USER MANUAL X1 Tiiwee
- Disclaimer
- Introduction
- System overview
- Installing your Tiiwee alarm system in four simple steps
-
Daily use of your alarm system
-
Expanding your system
Connecting additional door sensors
Connecting PIR motion detectors
Connecting remote controls
Adding additional sirens to your system
- Deleting accessories or changing the zones
Clearing all sensors from a zone. Reconnecting a sensor to a zone.
Disconnecting remote controls
- Battery lifetime, and low battery voltage
- Replacing batteries
- Resetting the X1-siren to factory settings
- tiwee window sensor 03
- tiwtee PIR sensor 02
- Customer service
- Warranty and liability
- FCC regulation
1. Disclaimer
Testing
It is recommended that the alarm is tested immediately after installation and at regular intervals not exceeding one month. Note: a cloth can be used to cover the siren and reduce the sound output of the alarm during testing.
Warning
Risk of personal injury: prolonged exposure to the alarm siren may cause permanent hearing loss. For indoor use only. Do not use in wet locations.
Limitations of alarm products
Test product regularly to ensure it functions in accordance with these instructions. Tiiwee B.V. is not providing insurance or any guarantee that the risk of burglary or robbery will be reduced or prevented even if this product is used properly. Tiiwee B.V. recommends that users obtain proper insurance coverage for these risks. Tiiwee B.V. does not represent or warrant that this product may not be compromised or circumvented, that it will provide proper or adequate warning, or that the
use of this product will prevent injury, property damage or other losses. Note that this product may be bypassed, compromised, fail or fail to warn like any alarm, including due to improper installation, positioning, or maintenance, tampering; dead, faulty, or improperly installed batteries; sensing limitations and component failures.
Audible alarm signals may be outside of hearing range, muted by doors, walls and floors, unheard by deep sleepers or the hearing-impaired, or overwhelmed by other sounds.
Battery Warning
Caution: Batteries may leak harmful liquids or ignitable materials or explode causing injury and product damage.
- Do not mix old and new batteries or other battery types
- Replace all batteries at the same time
- Replace fully discharged batteries immediately
2. Introduction
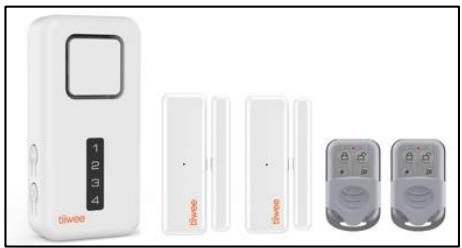
Congratulations with your new X1 Tiiwee Alarm Kit. The Tiiwee Alarm Kit is a versatile alarm system that detects if people or animals are entering your home or shop. It allows you to use several sensors with one or more alarms in up to four different zones. These sensors (PIR Motion Sensors,
Window/Door sensors) connect wirelessly to an alarm unit ("X1-siren"). This alarm unit produces a doorbell-sound or a very loud siren. The alarm unit can be placed on a fixed position or taken with you as you move around the house or if you go to sleep.
A maximum of 10 sensors can be connected to each zone. Also, up to 10 remote controls can be paired with each alarm unit. A sensor or remote control can be paired to several Alarm units if required.
Intended use
The Tiiwee Home Alarm System is primarily designed to deter burglars when they enter your home. The heart of the system is the X1-siren. Place the siren in your home where burglars are most likely to enter. If you have a larger home, please consider placing additional Tiiwee X1 or A3 (outdoors-) sirens.
The system is ready for use. Your system is pre-configured, and the sensors and remote controls are connected to the X1-siren. Window sensors are connected to zone 1. If a PIR motion sensor is included, it is connected to zone 2. We advise reading this user manual carefully and to familiarize yourself with its operating principle and ways to fine-tune it to your exact needs.
3. System overview
tiwee remote control 03
Technical Specifications
Trade name: tiwee remote control 03
Model Number: TWRC03
FCC ID: 2BAP8TWRC03
FCC compliance statement
This device complies with Part 15 of the FCC Rules. Operation is subject to the following two conditions: (1) this device may not cause harmful interference, and (2) this device must accept any interference received, including interference that may cause undesired operation.
Warning: changes or modifications not expressly approved by the party responsible for compliance could void the user's authority to operate the equipment.
This equipment has been tested and found to comply with the limits for a Class B digital device, pursuant to Part 15 of the FCC Rules. These limits are designed to provide reasonable protection against harmful interference in a residential installation. This equipment generates, uses and can radiate radio frequency energy and, if not installed and used in accordance with the instructions, may cause harmful interference to radio communications. However, there is no guarantee that interference will not occur in a particular installation.
If this equipment does cause harmful interference to radio or television reception, which can be determined by turning the equipment off and on, the user is encouraged to try to correct the interference by one or more of the following measures:
Reorient or relocate the receiving antenna.
- Increase the separation between the equipment and receiver.
- Connect the equipment into an outlet on a circuit different from that to which the receiver is connected.
- Consult the dealer or an experienced radio/TV technician for help.
FCC Radiation Exposure statement
This equipment complies with FCC radiation exposure limits set forth for an uncontrolled environment. This transmitter must not be co-located or operating in conjunction with any other antenna or transmitter.
4. Installing Your Tiiwee alarm system in four simple steps
- Unpack: Unpack all kit components and lay them in front of you on the table.
2. Remove battery protection:
X1-siren: Slide the back panel from the X1-siren and remove the battery protection strip. You hear one beep, and the X1-siren switches on automatically.
Door sensors: Remove the battery protection strip at the back of the sensor by pulling it.
Motion detector (if included): Open the battery compartment, and remove the battery protection strip
3. Familiarize Yourself with Your System:
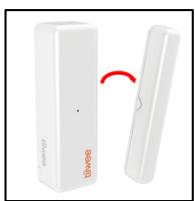
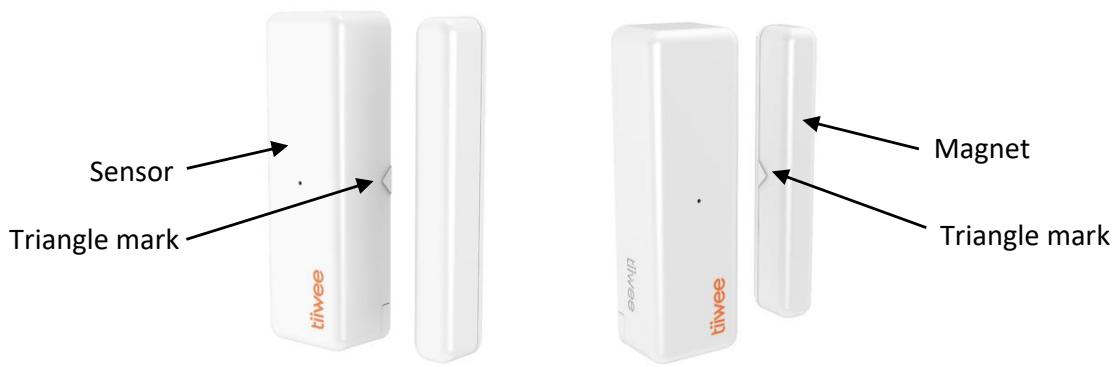
a. Arrange the door sensors such that the magnet is on the right-hand side of each sensor. The triangles on the middle of the sides of the sensor and the magnet cannot be more than 5 mm apart. IMPORTANT: Position them so that the triangles are facing each other.
Position the motion detector with the detection window facing downwards to avoid that it detects anything for the moment.
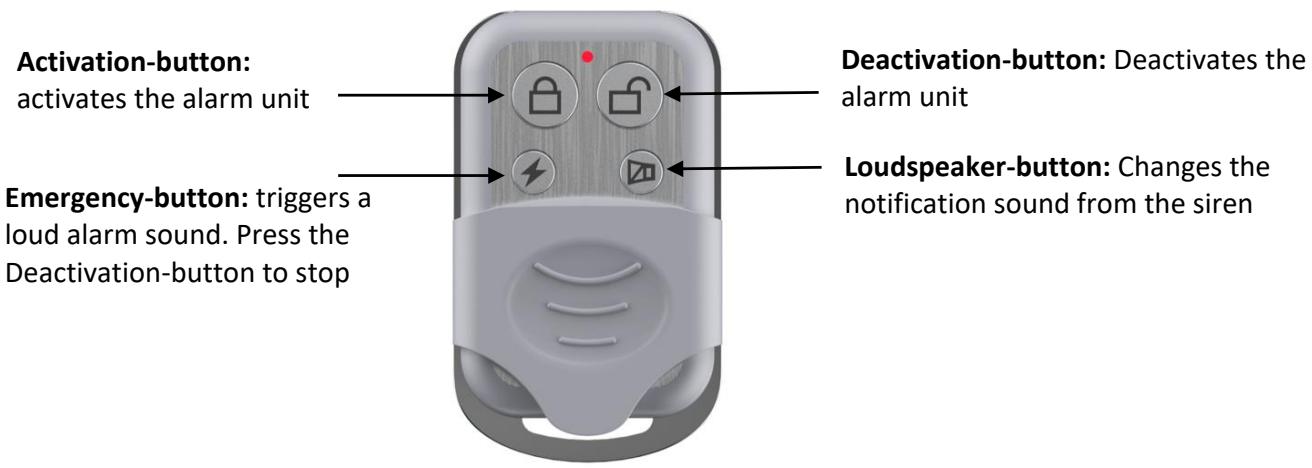
Use the Loudspeaker-button on the remote control to switch from the doorbell-sound (2 different volumes) to siren sound. Cover the siren to avoid damaging your hearing. Press the Loudspeaker-button of the remote control until you hear the doorbell-sound ("Ding-Dong").
b. Press the Activation-button ( ) on the remote control to arm the X1-siren. You hear a short beep accompanied by one brief flash of the LEDs.
c. Now move the magnet away from the first sensor. You hear the doorbell-sound ("Ding-Dong"), and the red light on the sensor lights up. Repeat this procedure for all other door sensors.
Motion detector (PIR kits only): Slowly, in front of the motion detector, wave your hand at a distance of approximately 50-70 centimetres. You hear a doorbell-sound, and the detection window of the sensor lights up.
4. Installing your system
Deactivate the X1-siren using the Deactivation-button on the remote control ( ). Now, mount the X1-siren and door sensors following the instructions in the manual.
How to mount the X1-siren
First, attach the back panel to the wall using the self-adhesive pads or screws (included). Place the X1-siren on the back panel and attach it to the back panel with the smallest screw at the bottom.
Once all components are mounted, activate the system: Select the Loudspeaker-button on the remote control to choose the loud siren sound. Now, to activate your system, press the Activation-button.
5. Daily use of your alarm system
Switch On/Off
Press the On/Off-button on the X1-siren for 5 seconds to switch the unit on or off. When switching on, you hear one short beep and the LEDs light-up from top to bottom. When switching the X1-siren off, you hear one long beep sound, and the LEDs dim from the bottom to the top. When the X1-siren is switched on, it will be in the same state (active or deactivated) as it was when it was switched off.
Activating the system
On the X1-siren: short press the CONNECT-button. On the remote control: press the Activation-button.
You hear one beep as a confirmation that the system is activated.
Deactivating the system
X1-siren: short press the CONNECT-button.
Remote control: press the Deactivation-button.
Deactivating the system will be confirmed by two beeps.
Indicator light: Activated status
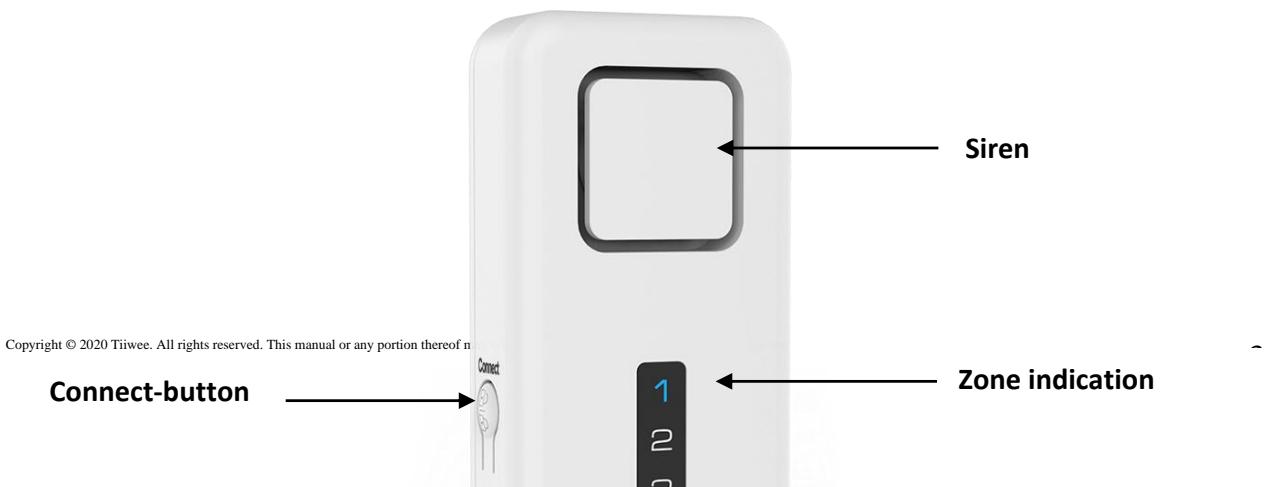
The X1-siren features an indicator light that shows if the system is active or not. When the system is activated, the LED of zone 4 flashes every 5 seconds. To switch off the indicator light, while in activated mode, press the CONNECT-button for 5 seconds. You hear one beep, and the indicator light switches off. To switch on the indicator light again, repeat the above-described procedure.
Choosing doorbell-sound or siren sound
In deactivated mode, short press the On/Off-button on the X1-siren or the Loudspeaker-button on the remote control to switch between doorbell-sounds and siren sound. The order of the sounds is
- loud doorbell
- mild doorbell
- very loud siren (120dB)
You hear a short fragment of the selected notification sound or alarm sound each time you press the button.
IMPORTANT: Changes to the X1-siren settings can only be performed when the X1-siren is in deactivated mode. If you try to make changes to the X1-siren while the system is in the activated mode, you hear three beeps.
As a general rule, three beeps always means that the X1-siren is not able to process the input. Consult the instructions for use in such case.
When the siren alarm sounds
When a sensor triggers an alarm in siren mode, the alarm sounds for 2 minutes. Then, the siren stops and the X1-siren returns into activated mode again automatically. The siren can also be stopped at any time with the remote control. During an alarm, the LED of the respective zone lights up until the alarm is switched off.
Stopping an alarm
There are two ways to stop the alarm when the siren sounds. Stop the siren by pressing the Deactivation-button on the remote control.
Alternatively, you can also stop the alarm on the X1-siren by the following-button combination: Press 3 times quickly the On/Off-button followed immediately by a quick press of the CONNECT-button.
6. Expanding your system
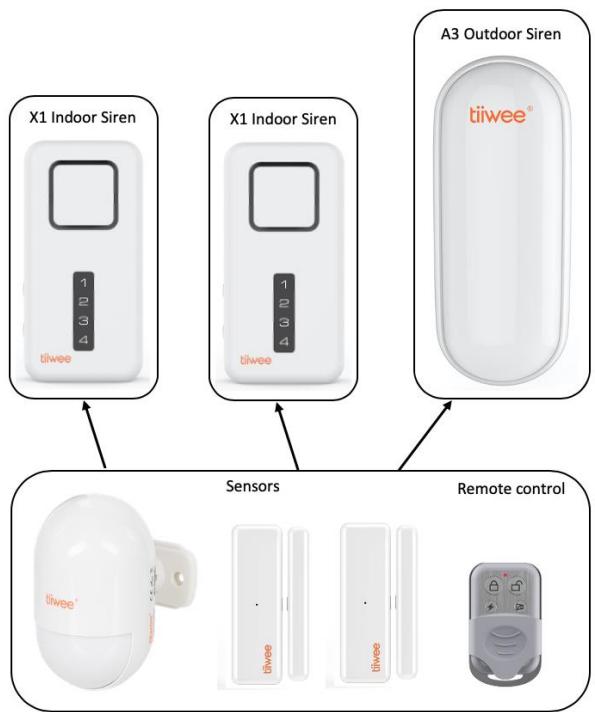
Expand the X1 system with Tiiwee door sensors and motion detectors from the Tiiwee Home Alarm System. It is possible to add up to 10 Sensors per zone. Up to 10 remote controls can be connected. Furthermore, additional X1-siren units, as well as A3 outdoor sirens, can be connected by combining the existing sensors to the new sirens.
IMPORTANT: Warranty
Please only use accessories from the Tiiwee Home Alarm System to ensure a proper function of the system.
Connecting additional door sensors
This is an example of connecting a door sensor to zone 2:
- De-activate the X1-siren by pressing the CONNECT-button on the X1-siren or the Deactivation-button on the remote control.
- On the X1-siren, press the CONNECT-button for 5 seconds. You hear a beep and all four LEDs light up.
- On the X1-siren, press the CONNECT-button short two times to select zone 2. The LED of zone 2 lights up.
- Activate the door sensor by moving the magnet away from the sensor. You hear two beeps, and the LED of zone 2 blinks twice.
- Save the setting by pressing the On/Off-button on the X1-siren briefly.
The door sensor is now connected to zone 2.
Connecting PIR motion detectors
Proceed as described with the door sensors in the previous chapter. Trigger the device by moving your hand in front of the motion detector at a distance of 50 - 70cm . When performing the pairing procedure, make sure the motion detector is facing downwards from you to avoid unwanted signals from the device while pairing it to the X1-siren.
Connecting remote controls
Up to 10 remote controls can be connected to the X1-siren.
Pairing remote controls
- Press the CONNECT-button for 5 seconds. You will hear a beep and all four LEDs light up
- Press one (any)-button on the remote control(s) which you wish to connect. You will hear two beeps for confirmation of correct pairing.
- Press the On/Off-button shortly to store the settings
The remote control is now connected to the X1-siren.
Adding additional sirens to your system
The system can be expanded with more X1-sirens and A3-outdoor sirens. Just connect your sensors and remote controls to the new X1 or A3 siren. A new siren operates independently of existing sirens.
Please refer to the below image which outlines the principle.
7. Deleting accessories or changing the zones
Clearing all sensors from a zone. Reconnecting sensor to a zone.
Sensors can be deleted from a zone by deleting all connection information for a zone. Any sensors that you would like to keep in that zone will need to be reconnected to that zone again.
In the following example procedure, all sensors from a zone are deleted and reconnected to the new zone(s).
Below is an example for deleting the door sensor from zone 3 and connecting this door sensor to zone 1:
○ Deactivate the X1-siren by pressing the CONNECT-button on the X1-siren or the Deactivation-button on the remote control.
Deleting all sensors from zone 3:
- On the X1-siren, press the CONNECT-button for 5 seconds. You hear a beep and all four LEDs light up
- On the X1-siren, press the CONNECT-button short three times to select zone 3. The LED of zone 3 lights up.
- On the X1-siren, press the CONNECT-button for 5 seconds. This will delete all sensors from zone 3. You hear four beeps to confirm, and the LED blinks four times.
Now, connect the door sensor to zone 1:
- On the X1-siren, press the CONNECT-button for 5 seconds. You hear a beep and all four LEDs light up
- On the X1-siren, press the CONNECT-button short 1 once to select zone 1. The LED of zone 1 lights up.
- Activate the door sensor by removing the magnet away from the sensor. You hear two beeps, and the LED of zone 1 blinks twice.
- On the X1-siren, save the setting by pressing the On/Off-button briefly.
The door sensor has now been removed from zone 3 and reconnected to zone 1.
Disconnecting remote controls
IMPORTANT: With this procedure, you disconnect all remote controls. Please reconnect the remote controls if you wish to operate the X1-siren through one or more remote controls.
○ Deactivate the X1-siren by pressing the CONNECT-button on the X1-siren or the Deactivation-button on the remote control.
- On the X1-siren, press the CONNECT-button for 5 seconds. You hear a beep and all four LEDs light up
- On the X1-siren, press the CONNECT-button again for 5 seconds. You will hear four beeps and all the LEDs quickly blink four times.
- On the X1-siren, short press the On/Off-button to save the new settings.
All remote controls are now disconnected from the X1-siren. To reconnect a remote control, please consult the chapter "Expanding your system - connecting remote controls".
8. Battery lifetime, and low battery voltage
The expected battery lifetime of all system components is 10-12 months under normal conditions. We recommend to check the batteries regularly and to replace them at least once a year. Please always use alkaline batteries.
Replace batteries when you notice the following:
X1-siren: You hear 3 beeps every 20 seconds.
Door sensors: The red LED light of the sensor is blinking or is continuous lit.
PIR motion sensors: The indicator light in the front lights up continuously.
PIR motion sensors: When the indicator light has been switched off manually, the low battery indication will not active. In this case, check the correct operation of the motion sensor at regular intervals.
9. Replacing batteries
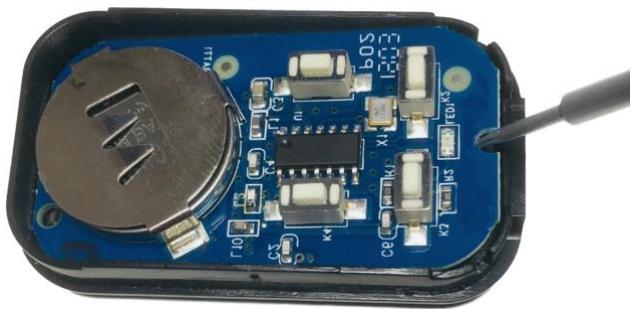
Remote control: Remove the 3 screws on the back of the remote control. Open the remote control. Now, using a pin, nail or small screwdriver, lift the electronic board at the notch. This will give you access to the battery. Gently remove the battery from its compartment by pushing it sideways. The battery type is CR2032 (3V, Lithium battery). Please also refer to the image below:
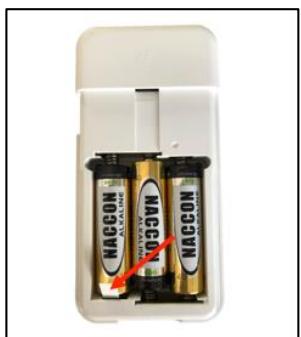
X1-siren: Remove the screw at the bottom of the back panel. Now, slide off the back panel and replace the batteries with 3x AA size 1.5V alkaline batteries.
Door sensors:
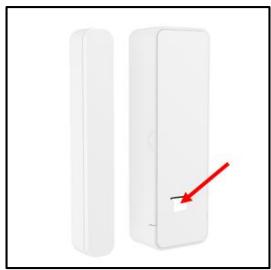
- Remove the screw at the bottom of the sensor. Now slide the sensor upwards and remove it from the back panel.
- Take out the old battery and replace it with a fresh AAA alkaline battery - please note the correct polarity.
- Slide the sensor on the back panel and secure it with the screw at the bottom of the sensor.
PIR Motion detectors: Slide off the back panel and replace the batteries with 2 x AAA or 3x AAA batteries depending on the model.
IMPORTANT: DO NOT USE RECHARGEABLE BATTERIES UNDER ANY CIRCUMSTANCES
10. Resetting the X1-siren to factory settings
This procedure erases all information which is related to sensors and remote controls.
Take out one battery from the X1-siren.
- While keeping the CONNECT-button pressed, re-insert the battery.
After a few seconds, you hear 10 beeps with longer intervals followed by another 10 beeps with shorter intervals.
Now, release the CONNECT-button.
Now, the X1-siren restarts automatically.
Your X1-siren now has been reset to factory settings. You can reconnect your remote controls and sensors.
11. tiwee window sensor 03
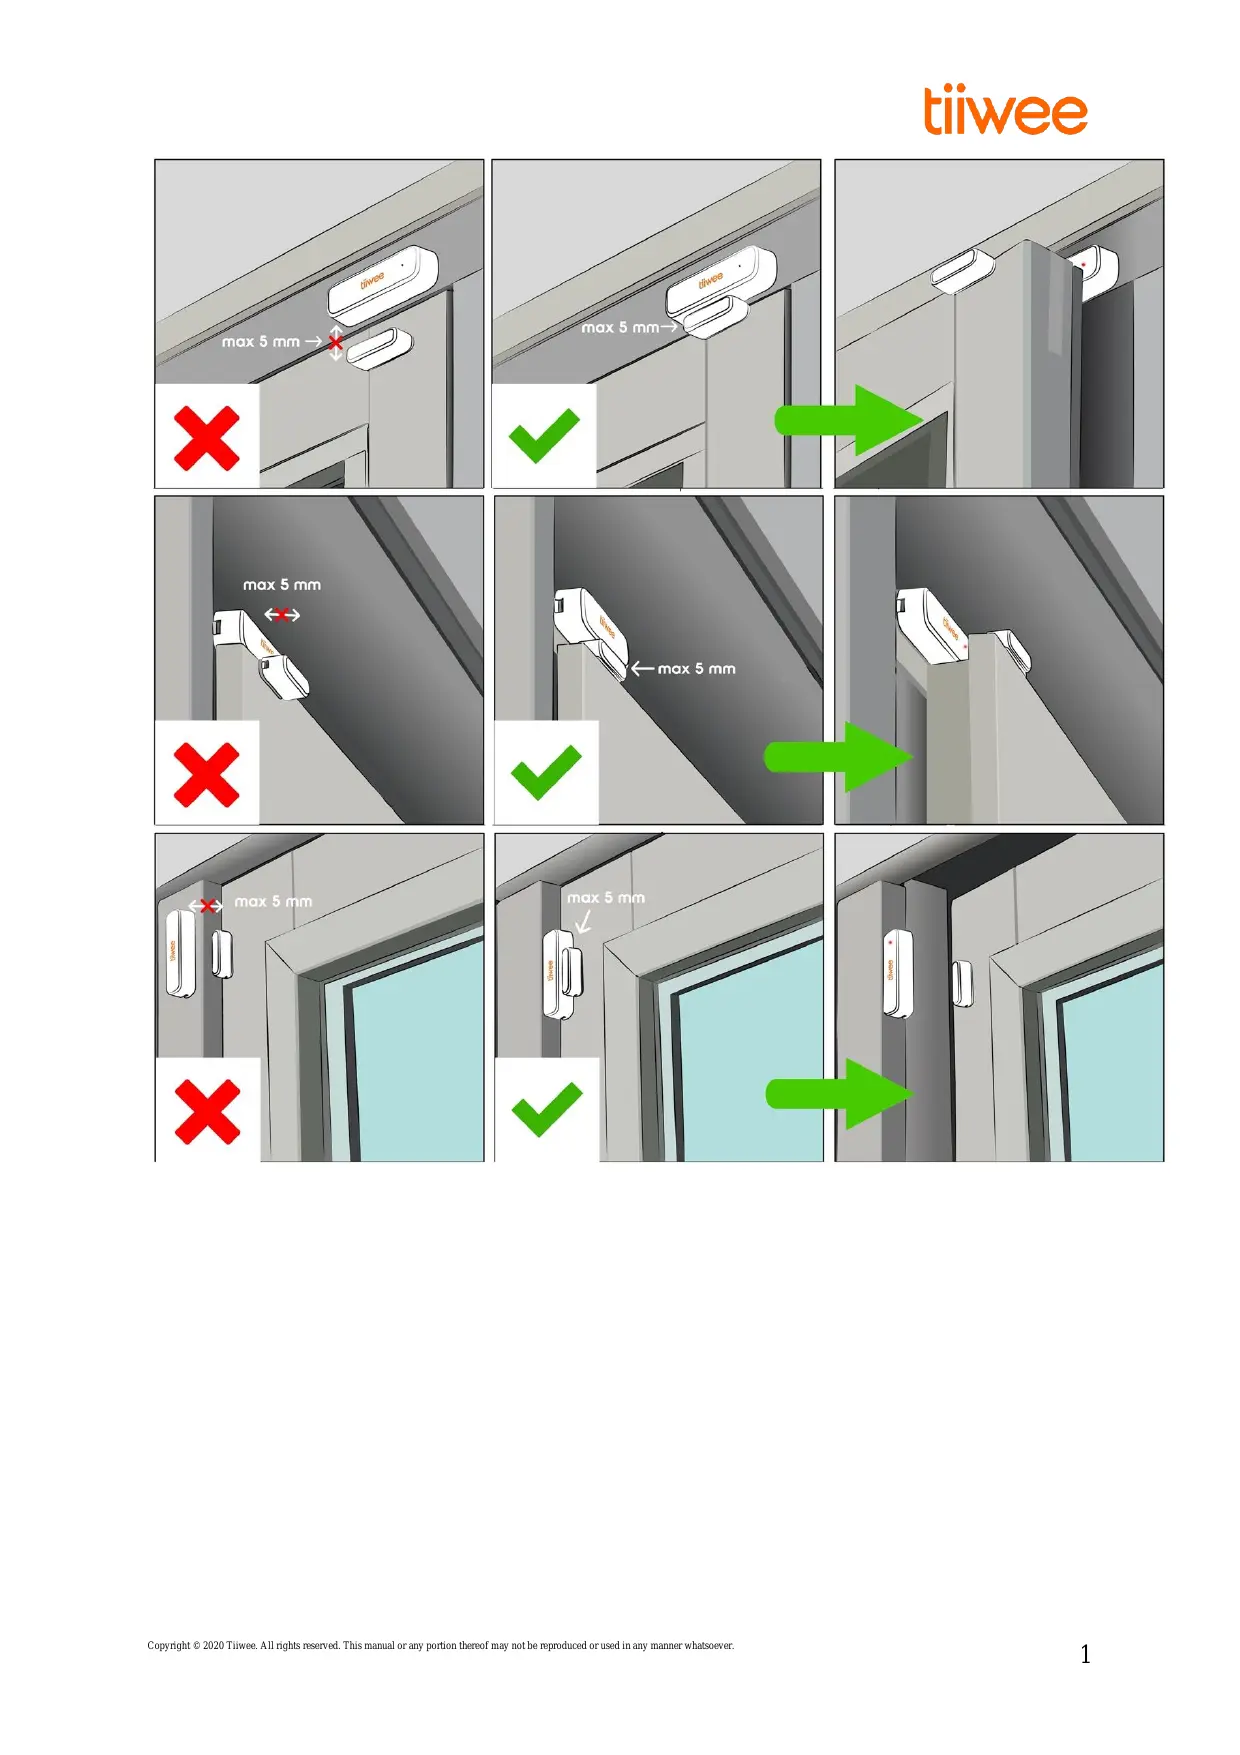
IMPORTANT: Please assure that the distance between magnet and sensor does not exceed 5mm . The triangles on the door sensor and the magnet are alignment aids. They must face each other at a distance of a maximum of 5mm for the door sensor to work optimally.
Product Overview and Operation
The door sensor consists of a magnet and a sensor which contains a detector for changes in magnetic fields ('flux'). When the magnet is moved away from the sensor, the sensor will detect that motion and will send a wireless signal to the Tiiwee Alarm unit. The Tiiwee Alarm unit will now emit a powerful alarm sound or a doorbell-sound ("Ding-Dong") depending on the settings of the Alarm unit.
The instructions for pairing additional door sensors with the Tiiwee alarm system are included in this manual, or can be found on our website www.tiiwee.com or one of our Youtube channels.
Installation of Door sensors
General guidelines:
- Do not install the sensor near magnets or magnetic devices - this may cause the alarm to be activated accidentally.
- Clean all surfaces carefully before installation.
- The magnet and sensor should be placed on the door and door frame respectively. The principle of the system is that an alarm is triggered when the sensor and magnet are separated because the window or door is opened.
- If possible, mount the sensor on the door frame and not on the door or window itself. This position reduces the wear and tear that occurs when windows and doors are closed (shocks). It increases the service life of your sensors.
Installation examples
Various installation examples are shown on the first page of this manual. Make sure that both the installation surfaces are clean and free from grease and dust. It is essential to respect the maximum distance of 5mm between sensor and magnet. Also, please assure that the triangle marks are aligned.
How to mount a door sensor (please see the inside of the front page)
Image 1: Door and doorpost are at the same level. Position the sensor and magnet next to each other and position the triangle markers on the sides of the magnet and sensor as such that they are close to one another.
Image 2: The door is protruding relative to the doorpost. Mount the magnet sideways on the top of the door and position the sensor with a few millimetres distance on the doorpost and position the triangle markers on the sides of the magnet and sensor as such that they are close to one another.
Image 3: The doorpost is protruding relative to the door. Mount the sensor sideways on the doorpost and then position the magnet on the door with a few millimetres distance and position the triangle markers on the sides of the magnet and sensor as such that they are close to one another.
IMPORTANT - PLEASE NOTE:
- It is essential that the sensor and magnet are aligned correctly and are at the same level using the triangle marks.
- The distance between the sensor and the magnet should not exceed 5mm.
Magnet:
- Installation with screws: remove the back panel from the magnet by sliding it off. Then, position the back panel at the desired position. Now, after the magnet back panel has been mounted, put the magnet on the back panel and slide it downwards until it is in its final position.
- Installation with double-sided tape: peel off the protective foil from one side and stick the tape onto the magnet. Then, peel off the other part of the protective foil and stick the magnet onto the door or doorpost.
Sensor:
Before installing the sensor, please assure that both the magnet and sensor will be aligned as described in the chapter "How to mount a door sensor".
- Sideways installation and installation with double-sided tape: Peel off the protective foil from one side of the tape and stick the tape onto the sensor. Then, peel off the other part of the protective foil and stick the sensor onto the door or doorpost.
- Installation with screws: Remove the screw at the bottom of the sensor. Now slide the sensor upwards and remove it from the back panel. Then, position the back panel at the desired position. Now, place the sensor on the back panel and slide it downwards. Secure the sensor with the screw at the bottom of the sensor.
Test your door sensor
- After the installation, open the window or door.
- The red indicator light on the front of the sensor will flash once.
- The sensor is now correctly setup.
Technical Specifications
Trade name: tiwee window sensor 03
Model Number: TWWS03
FCC ID: 2BAP8TWWS03
Transmission Distance: 100m (Open Area)
Transmission Frequency: 433MHz
Operating Voltage: 1,5V
Sensor Size: 78 × 24 × 18 ~mm
Magnet Size: 75 × 10 × 12 ~mm
FCC compliance statement
This device complies with Part 15 of the FCC Rules. Operation is subject to the following two conditions: (1) this device may not cause harmful interference, and (2) this device must accept any interference received, including interference that may cause undesired operation.
Warning: changes or modifications not expressly approved by the party responsible for compliance could void the user's authority to operate the equipment.
This equipment has been tested and found to comply with the limits for a Class B digital device, pursuant to Part 15 of the FCC Rules. These limits are designed to provide reasonable protection against harmful interference in a residential installation. This equipment generates, uses and can radiate radio frequency energy and, if not installed and used in accordance with the instructions, may cause harmful interference to radio communications. However, there is no guarantee that interference will not occur in a particular installation.
If this equipment does cause harmful interference to radio or television reception, which can be determined by turning the equipment off and on, the user is encouraged to try to correct the interference by one or more of the following measures:
Reorient or relocate the receiving antenna.
- Increase the separation between the equipment and receiver.
- Connect the equipment into an outlet on a circuit different from that to which the receiver is connected.
- Consult the dealer or an experienced radio/TV technician for help.
FCC Radiation Exposure statement
This equipment complies with FCC radiation exposure limits set forth for an uncontrolled environment. This equipment should be installed and operated with minimum distance 20cm between the radiator and your
body. This transmitter must not be co-located or operating in conjunction with any other antenna or transmitter.
12. tiwee PIR sensor 02
Product Overview and activation
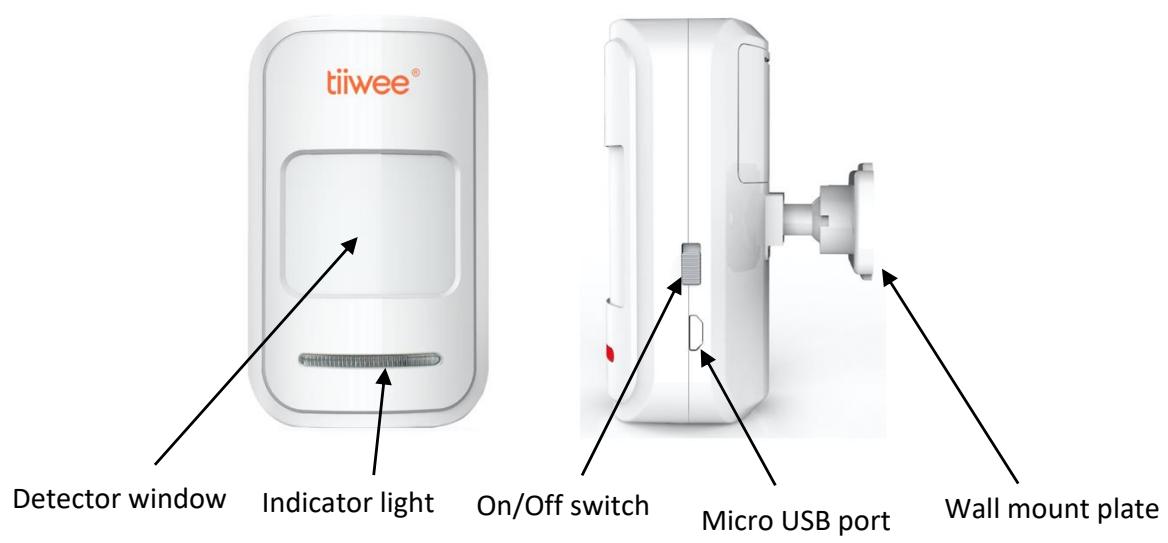
Open the back panel to insert the batteries. Please note the correct polarity. Now, close the back panel again. Slide the ball joint in place until it locks. Do not yet position the wall mount. Please first carefully read the sections "General installation guidelines" and "How to mount a PIR motion sensor" before you install the motion detector.
General installation guidelines
Avoid positions close to a window, air conditioners, fluorescent lights, heaters, refrigerators, stoves, and direct sunlight and other places where the temperature would change rapidly, and where airflow is high. If there are two detectors in the same detecting range, please adjust the position to avoid interference and false alarms.
IMPORTANT: The Infrared detector is sensitive to a human's horizontal movement. The detector is less susceptible to vertical movements. Therefore, it is advised to aim the device at a 90 degrees' angle to a person's walking direction.
How to mount a PIR motion sensor
Unlike magnetic door and window sensors, PIR motion sensors recognize heat differences. Sometimes heat differences are unnoticeable. Our PIR motion sensors feature advanced algorithms that help to detect the difference between a human being and environmental heat changes. However, it is essential to carefully select the right position of PIR motion sensors for it to function correctly.
Therefore, we recommend installing the motion detector in a corner that is void from any of those factors mentioned above, and where the sensor is directed at the room you want to guard.
Final installation: Taking the above in consideration, use the adhesive tape or the screws to attach the wall mount to the wall. Now, attach the detector to the wall mount, and change the detecting angle and distance by adjusting the installation height and the bracket. It is advised to install the device at a height of approximately 2 meters.
Test
- After the installation, turn the switch to ON. Now, walk or move in front of the PIR sensor at a distance between 3 and 6 meters.
- The Indicator light should light up once. Note the 5 seconds delay between 2 signals. The delay is normal and intentional to save battery power.
- If needed, adjust the detector angle to get the desired detection range.
When the detector indicator flashes
- LED flashes once: A signal is detected, and the detector sends a signal to the alarm unit.
LED continuously on: Low-voltage indication, please change the battery as soon as possible.
Advanced features
The Tiiwee PIR sensor is equipped with some additional features to allow you to adjust the device to your specific needs. To access these functions, remove the screw at the top of the sensor. Then separate the two parts (front and back piece) by using an appropriate tool (screwdriver, i.e.). Now you see the circuit board with the two switches.
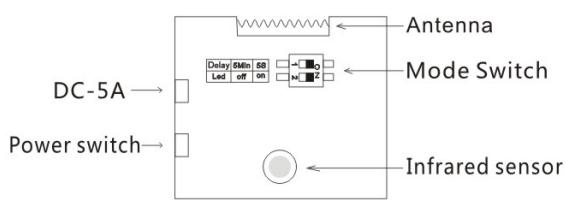
Picture 1
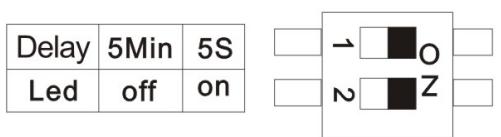
- The Indicator light can be switched off to save battery power ("Led off" position). In this mode, an alarm signal will still be sent to the X1-siren. IMPORTANT: Please note that the low battery indication is switched off in this setting.
- A waiting time of 5 minutes between detections can be set to save battery power ("5 Min" or "5s" switch). Use the 5-minute waiting period when your PIR sensor is set to result in a loud siren alarm. We do not advise to use this mode in combination with the doorbell-sound setting on your Alarm unit.
Changing Factory Settings
The factory settings are "5s" and "Led On". The sensor will respect a 5-seconds waiting time between 2 signals and that the LED indicator light will always flash if a movement is detected. These are the most commonly used settings.
- If both switches are set to the ON position, as shown in picture 1, the LED will flash each time a movement is detected. After each signal, a waiting time of 5 seconds allows a person to pass the detector without triggering a signal continuously.
- If the top switch is set to "Off", the detector will respect a 5-minute delay before it will become active again. This is a power saving mode. A doorbell-sound sound setting on the Alarm unit is not advised with this delay.
- If the lower switch is set to "Off", the Led light will not flash when a signal is detected. This setting
saves battery power. This setting can be used if you want to avoid that a burglar is able to locate the motion detector in the dark.
- If both switches are in the "Off" position, as shown in Figure 2, the PIR sensor will respect a 5-minute interval between 2 different signals, nor will the LED window flash.
Low-voltage Reminder: The indicator light will be continuously on when the voltage of the PIR is lower than 2.4V unless its light has been switched off by setting the internal switches.
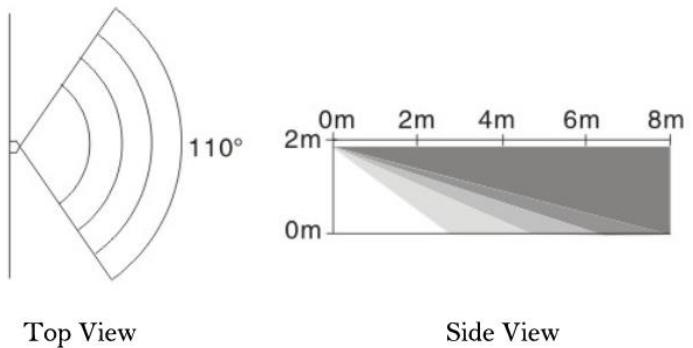
Detection Range Characteristics
Technical Features
Power: The PIR sensor is powered through 3 x AAA 1.5V alkaline batteries or by an external 5V/1A DC power supply connected through the micro-USB port. The batteries can stay inside the sensor while the external power supply is connected and in use. They will work as a power backup in case of 220V power failure. The power adaptor is not included with the product.
Specifications
Trade name: tiwee PIR sensor 02
FCC ID: 2BAP8TWPIRO2
Standby Current: < 50uA
Working Current: < 20mA
Detecting Range: 4-8 m/110 degrees angle
Wireless Distance: 100m ( Open Area )
Wireless Frequency: 433MHz
Housing Material: ABS
Working Humidity: <80%
Detector Size: 106x67x45mm
FCC compliance statement
This device complies with Part 15 of the FCC Rules. Operation is subject to the following two conditions: (1) this device may not cause harmful interference, and (2) this device must accept any interference received, including interference that may cause undesired operation.
Warning: changes or modifications not expressly approved by the party responsible for compliance could void the user's authority to operate the equipment.
This equipment has been tested and found to comply with the limits for a Class B digital device, pursuant to Part 15 of the FCC Rules. These limits are designed to provide reasonable protection against harmful interference in a residential installation. This equipment generates, uses and can
radiate radio frequency energy and, if not installed and used in accordance with the instructions, may cause harmful interference to radio communications. However, there is no guarantee that interference will not occur in a particular installation.
If this equipment does cause harmful interference to radio or television reception, which can be determined by turning the equipment off and on, the user is encouraged to try to correct the interference by one or more of the following measures:
Reorient or relocate the receiving antenna.
- Increase the separation between the equipment and receiver.
- Connect the equipment into an outlet on a circuit different from that to which the receiver is connected.
- Consult the dealer or an experienced radio/TV technician for help.
FCC Radiation Exposure statement
This equipment complies with FCC radiation exposure limits set forth for an uncontrolled environment. This equipment should be installed and operated with minimum distance 20cm between the radiator and your body. This transmitter must not be co-located or operating in conjunction with any other antenna or transmitter.
13. Customer service
If additional support is required, please visit www.tiwee.com. Here you can find additional support material as well as our support videos in your own language.
You can also contact us under info@tiiwee.com. We respond within 24 hours to all questions, but mostly still on the same day.
14. Warranty and liability
90 Day Limited Warranty
Tiiwee B.V. warrants this product to be free from manufacturing defects for a period of 90 days from the original date of consumer purchase. This warranty is limited to the repair or replacement of this product only and does not extend to consequential or incidental damage to other products that may be used with this unit. This warranty does not cover products which have been abused, altered or damaged. This warranty is in lieu of all other warranties expressed or implied. TO THE EXTENT PERMITTED BY LAW, Tiiwee B.V. DISCLAIMS ALL OTHER IMPLIED OR EXPRESS WARRANTYES, INCLUDING THE WARRANTY OF MERCHANTABILITY AND/OR FITNESS FOR A PARTICULAR PURPOSE.
Limitations of Liability
This limited warranty is your sole remedy and Tiiwee B.V. shall not be liable for any damages, whether direct, indirect, incidental, special, consequential, exemplary or otherwise, including lost revenue and lost profits, arising out of any theory of recover, including statutory, contract or tort. In no event will Tiiwee B.V.'s entire liability exceed the purchase price of this product. Some States and provinces do not allow the exclusion or limitations on how long an implied warranty lasts or permit the exclusion or limitations of incidental or consequential damages, so the above limitations or exclusions may not apply to you. This limited warranty gives you specific legal rights, and you may also have other rights which vary from state to state and province to province.
If the product should prove defective within the period of warranty, please contact us under info@tiiwee.com.
15. FCC Regulation
This device complies with Part 15 of the FCC Rules. Operation is subject to the following two conditions: (1) This device may not cause harmful interference, and (2) This device must accept any interference received, including interference that may cause undesired operation.
Warning: Changes or modifications to this product not expressly approved by the party responsible for compliance could void the user's authority to operate the equipment.
Note: This equipment has been tested and found to comply with the limits for a Class B digital device pursuant to Part 15 of the FCC Rules. These limits are designed to provide reasonable protection against harmful interference in residential installation.
This equipment generates, uses and can radiate radio frequency energy and, if not installed and used in accordance with the instructions, may cause harmful interference to radio communications. However, there is no guarantee that interference will not occur in a particular installation. If this equipment does cause harmful interference to radio or television reception, which can be determined by turning the equipment off and on, the user is encouraged to try to correct the interference by one or more of the following measures:
Reorient or relocate the receiving antenna.
- Increase the separation between the equipment and the receiver.
- Consult the dealer or an experienced radio/TV technician for help.
FCC Radiation Exposure statement
This equipment complies with FCC radiation exposure limits set forth for an uncontrolled environment. This equipment should be installed and operated with minimum distance 20cm between the radiator and your body. This transmitter must not be co-located or operating in conjunction with any other antenna or transmitter.
FCC certification
| Product Name | Product Model | FCC ID |
| tiwee window sensor 03 | TWWS03 | 2BAP8TWWS03 |
| tiwee PIR sensor 02 | TWPIR02 | 2BAP8TWPIR02 |
| tiwee remote control 03 | TWRC03 | 2BAP8TWRC03 |
GERMANY - DEUTSCH