PIR sensor 02 - Motion detector Tiiwee - Free user manual and instructions
Find the device manual for free PIR sensor 02 Tiiwee in PDF.
| Product Type | Wireless PIR Motion Detector |
| Brand | Tiiwee |
| Model | PIR sensor 02 (TWPIRO2) |
| Dimensions | 106 x 67 x 45 mm |
| Housing Material | ABS |
| Power Supply | 3 AAA alkaline batteries 1.5 V (included) or 5 V/1 A DC power adapter (not included) via micro-USB port |
| Standby Current | < 50 µA |
| Operating Current | < 20 mA |
| Detection Range | 4 to 8 meters, 110° angle |
| Wireless Range | 100 m (open area) |
| Wireless Frequency | 433 MHz |
| Operating Humidity | < 80 % |
| Usage | Indoor only |
| Compatible with | Tiiwee home alarm system (433 MHz units) |
| Main Features | Passive infrared motion detection, dual-core fuzzy logic, intelligent anti-false alarm analysis, delay settings (5 s or 5 min) and LED off |
| LED Indicators | Flashes once on detection; steady on for low battery (unless LED disabled) |
| Signal Delay | 5 seconds by default (factory set) |
| Internal Settings | DIP switches to select delay 5 s/5 min and LED on/off |
| Recommended Installation Height | Approximately 2 meters |
| Function Test | Walk in front of the sensor at 3-6 m; LED should flash |
| Maintenance and Cleaning | Clean with a soft dry cloth; avoid moisture and abrasive products |
| Safety | For indoor use; do not expose to extreme temperatures or direct sunlight; observe battery polarity |
| Spare Parts and Repairability | Replaceable batteries (AAA); access to internal switches; no specific spare parts provided |
| Box Contents | 1 sensor, 3 AAA batteries, 1 ball joint mount, 2 screws, 1 user manual |
Frequently Asked Questions - PIR sensor 02 Tiiwee
User questions about PIR sensor 02 Tiiwee
0 question about this device. Answer the ones you know or ask your own.
Ask a new question about this device
Download the instructions for your Motion detector in PDF format for free! Find your manual PIR sensor 02 - Tiiwee and take your electronic device back in hand. On this page are published all the documents necessary for the use of your device. PIR sensor 02 by Tiiwee.
USER MANUAL PIR sensor 02 Tiiwee
(For indoor use only)
For Tiiwee Home Alarm System
Introduction
Congratulations with your Tiiwee passive infrared detector (PIR). It is compatible with the components of the Tiiwee Home Alarm System and can be wirelessly connected to all Tiiwee 433 MHz Alarm Units (available separately).
This sensor applies digital dual-core fuzzy logic control processing technology and intelligent analysis algorithms to prevent false alarms. It also features various settings to adjust the PIR sensor to your personal situation.
Important: This sensor has been programmed to respect a 5 second delay between 2 signals. This is intentional and will save battery power.
contents
1 x tiwee PIR sensor 02
3 x batteries, 1.5V AAA-type, alkaline
1 x ball-joint mount
2 x screws
1 x instructions for use
Product Overview and activation
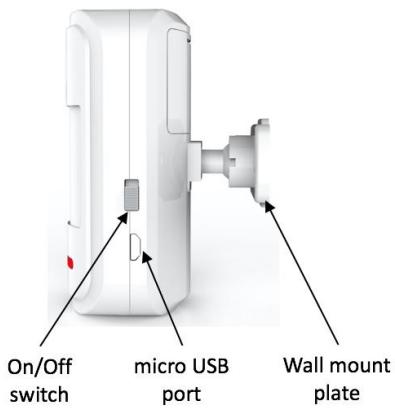
Open the back panel to insert the batteries. Please respect the correct polarity. Now, close the back panel again. Slide the ball joint in place until it locks in place and attach the wall mount on the ball joint. Your PIR sensor is now ready to be installed on the mount.
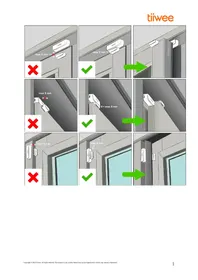
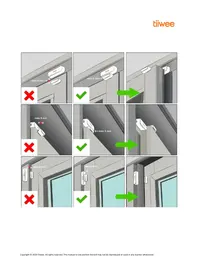
General installation guidelines
Avoid positions that are close to a window, air conditioners, fluorescent lights, heaters, refrigerators, stoves, and direct sunlight and other places where temperature would change rapidly and air flow is high. If there are two detectors in the same detecting range, please adjust the position to avoid interference and false alarms.
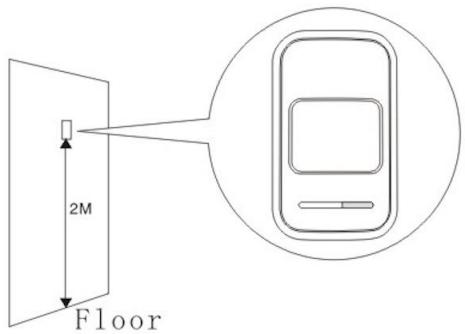
Attach the detector to the bracket, and change the detecting angle and distance by adjusting the installation height and the bracket. It is advised to install the device at a height of approximately 2 meters.
IMPORTANT: The Infrared detector is sensitive to a human's vertical movement. It is less sensitive to horizontal movements. Therefore, it is advised to aim the device at a 90 degrees' angle to a person's walking direction.
Test
-
After the installation, turn the switch to ON. Now, walk or move in front of the PIR sensor at a distance between 3 and 6 meters.
-
The Indicator light should light up once. Note the 5 second delay between 2 signals. This is normal and intentional to save battery power.
- If needed, adjust the detector angle to get the desired detection range.
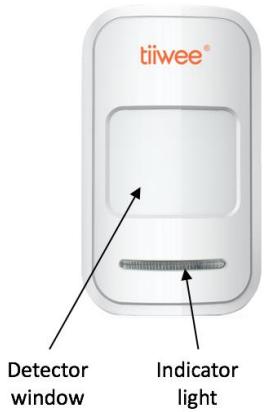
When the detector indicator flashes
- LED flashes once: A signal is detected and the detector sends a signal to the Alarm unit.
- LED continuously on: Low-voltage indication, please change the battery as soon as possible.
Connecting the PIR Sensors to an Alarm Siren
This PIR sensor is compatible with the Tiiwee Home Alarm System. Connect it wirelessly with one of the 433 MHz Alarm Units.
IMPORTANT: The instructions for pairing the PIR sensor with the Tiiwee Home Alarm System are included with the Alarm units or can be consulted on our website www.tiiwee.com or one of our Youtube channels.
Advanced features
The Tiiwee PIR sensor is equipped with some additional features to allow you to adjust the device to your specific needs. In order to access these functions, remove the screw at the top of the sensor. Then separate the 2 parts (front and back part) by using an appropriate device (screw driver i.e.). Now you can see the circuit board with the 2 switches.

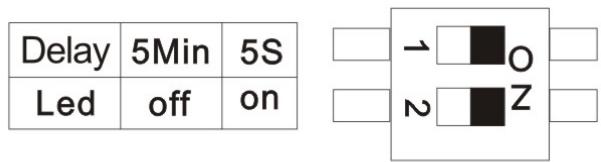
Picture 1
- The Indicator light can be switched off to save battery power ("LED OFF position). Off course, in this mode an alarm signal will still be sent to the Alarm Unit or the PIR Motion Sensor Alarm. However, please note that the low battery indication is switched off in this setting.
- A waiting time of 5 minutes between detections can be set saving battery power ("5 Min" vs "5s" switch). The 5-minute waiting period can be used when your PIR sensor is meant to result in a strong Siren alarm. This mode however is not advised when you selected a Chime sound setting on your Alarm unit.
Mode Setting
The factory settings are "5s" and "Led On". This means that the sensor will respect a 5-seconds waiting time between 2 signals and that the LED
indicator light will always flash if movement is detected. These are the most commonly used settings.
- If both switches are set to the ON position as shown in picture 1, the LED will flash each time a movement is detected. After each signal, a 5 second waiting time is set as a standard to allow a person to pass without triggering a signal continuously.
- If the top switch is set to Off the detector will respect a 5-minute delay before it will become active again. This is a power saving mode. This setting can perfectly be used with a loud alarm (which will sound continuously and loud). A Chime setting on the Alarm unit is not advised with this delay.
- If the lower switch is set to Off, the Led light will not flash each time a signal is detected. This can be convenient for saving battery power.
- If both switches are in the Off position as shown in Figure 2, the PIR sensor will respect a 5-minute interval between 2 different signals nor will the LED window flash.
Low-voltage Reminder Function: The indicator light will be continuously on when the voltage of the PIR is lower than 2.4V unless its light has been switched off by setting the internal switches.
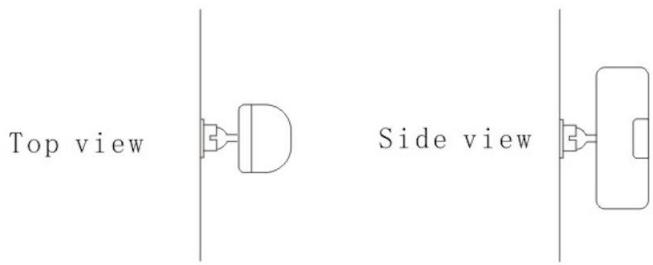
Detection Range Characteristics
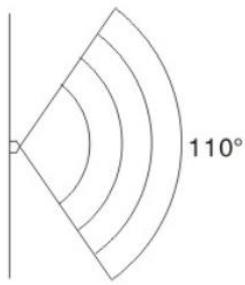
Top View
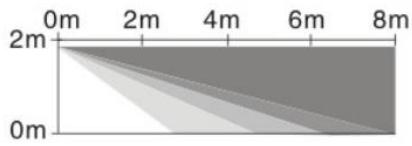
Side View
Technical Features
Power: The PIR sensor is powered through 3 x AAA 1.5V alkaline batteries or by an external 5V/1A DC power supply connected through the micro-USB port. The batteries can stay inside the sensor whilst the external power supply is connected and in use. They will work as a power backup in case of 220V power failure. The power adaptor is not included in the product.
Specifications
Trade name: tiwee PIR sensor 02
FCC ID: 2BAP8TWPIRO2
Standby Current: < 50uA
Working Current: < 20mA
Detecting Range: 4-8 m/110 degrees angle
Wireless Distance: 100m ( Open Area )
Wireless Frequency: 433MHz
Housing Material: ABS
Working Humidity: <80%
Detector Size: 106x67x45mm
Copyright © 2019 Tiwee. All rights reserved. This manual or any portion thereof may not be reproduced or used in any manner whatsoever.
FCC compliance statement
This device complies with Part 15 of the FCC Rules. Operation is subject to the following two conditions: (1) this device may not cause harmful interference, and (2) this device must accept any interference received, including interference that may cause undesired operation.
Warning: changes or modifications not expressly approved by the party responsible for compliance could void the user's authority to operate the equipment.
This equipment has been tested and found to comply with the limits for a Class B digital device, pursuant to Part 15 of the FCC Rules. These limits are designed to provide reasonable protection against harmful interference in a residential installation. This equipment generates, uses and can radiate radio frequency energy and, if not installed and used in accordance with the instructions, may cause harmful interference to radio communications. However, there is no guarantee that interference will not occur in a particular installation.
If this equipment does cause harmful interference to radio or television reception, which can be determined by turning the equipment off and on, the user is encouraged to try to correct the interference by one or more of the following measures:
Reorient or relocate the receiving antenna.
- Increase the separation between the equipment and receiver.
- Connect the equipment into an outlet on a circuit different from that to which the receiver is connected.
- Consult the dealer or an experienced radio/TV technician for help.
FCC Radiation Exposure statement
This equipment complies with FCC radiation exposure limits set forth for an uncontrolled environment. This equipment should be installed and operated with minimum distance 20cm between the radiator and your body. This transmitter must not be co-located or operating in conjunction with any other antenna or transmitter.
GERMANY - DEUTSCH
Copyright © 2019 Tiwee. All rights reserved. This manual or any portion thereof may not be reproduced or used in any manner whatsoever.
Frequenza Wireless: 433MHz
Copyright © 2019 Tiwee. All rights reserved. This manual or any portion thereof may not be reproduced or used in any manner whatsoever.