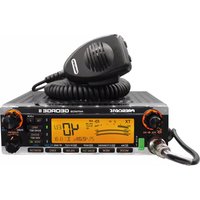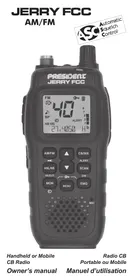
JERRY FCC - CB radio PRESIDENT - Free user manual and instructions
Find the device manual for free JERRY FCC PRESIDENT in PDF.


User questions about JERRY FCC PRESIDENT
0 question about this device. Answer the ones you know or ask your own.
Ask a new question about this device
Download the instructions for your CB radio in PDF format for free! Find your manual JERRY FCC - PRESIDENT and take your electronic device back in hand. On this page are published all the documents necessary for the use of your device. JERRY FCC by PRESIDENT.
USER MANUAL JERRY FCC PRESIDENT
1 On/Off - Volume
2 Display
3 UP ▲ / DOWN ▼ Keys
4 CB/WX key - ALERT key
5 SCAN key - DW (Dual Watch) key
6 EMG (Emergency) key
7 MENU key
8 MON (Monitor) key - Noise filter key
9 ANL/NB key - HI-CUT key
10 AM/FM key - key
11 SQ-(Squelch-)key
12 SQ+ (Squelch +) key
13 HI/LO (High/LOW) transmitting power key
14 PTT (Push To Talk) switch
15 FLASHLIGHT
16 LED Rx and TX
SUMMARY
GENERAL WARRANTY CONDITIONS 8
FREQUENCY TABLES 15
SOMMAIRE
Before using, be careful never to transmit without first having connected the flexible antenna (C2), or, with a CB antenna*, without having set the SWR (Standing Wave Ratio)! Failure to do so may result in destruction of the power amplifier, which is not covered by the warranty.
*When the flexible antenna (C2) has been removed and replaced by a CB antenna using the Mobile Charger Module (C3).
The warranty of this transceiver is valid only in the country of purchase.

Never use two antennas together, otherwise the device may be damaged.

Welcome to the world of the new generation of CB radios. The new PRESIDENT range gives you access to top performance CB equipment. With the use of up-to-date technology, which guarantees unprecedented quality, your PRESIDENT JERRY FCC is a new step in personal communication and is the surest choice for the most demanding of professional CB radio users. To ensure that you make the most of all its capacities, we advise you to read carefully this manual before installing and using your PRESIDENT JERRY FCC.
- Remove the flexible antenna (C2) from the device.
- Connect the CB antenna to the antenna adapter (C3).
a) Choosing your antenna
- For CB radios, the longer the antenna, the better its results. Your dealer will be able to help you with your choice of antenna.
b) Mobile antenna
- Must be fixed to the vehicle where there is a maximum of metallic surface (ground plane), away from windscreen mountings.
- If you already have a radio-telephone antenna installed, the CB antenna should be higher than this.
- There are two types of antenna: pre-regulated which should be used on a good ground plane (e.g. car roof or lid of the boot), and adjustable which offer a much larger range and can be used on a smaller ground plane (see § 3, ADJUSTMENT OF SWR).
- For an antenna which must be fixed by drilling, you will need a good contact between the antenna and the ground plane. To obtain this, you should lightly scratch the surface where the screw and tightening star are to be placed.
- Be careful not to pinch or flatten the coaxial cable (as this runs the risk of break down and/or short-circuiting).
- Connect the antenna to the adapter (C3).
c) Fixed antenna
- A fixed antenna should be installed in a clear space as possible. If it is fixed to a mast, it will perhaps be necessary to stay it, according to the laws in force (you should seek professional advice). All PRESIDENT antennas and accessories are designed to give maximum efficiency to each CB radio within the range.
2) BASIC OPERATIONS TO BE CARRIED OUT BEFORE USING YOUR SET FOR THE FIRST TIME (without transmitting and without using the "push-to-talk" switch)
- Check the antenna connections.
- Turn the set on by turning the Power knob (1) clockwise.
- Set the Squelch OFF. See page 6.
Adjust the volume to a comfortable level. - Go to channel 20 by using the channel selectors or key (3).
3) ADJUSTMENT OF SWR (Standing wave ratio)
WARNING: This must be carried out when you use your CB radio for the first time (and whenever you re-position your antenna). The adjustment must be carried out in an obstacle-free area.
*Adjustment with external SWR-meter (e.g. TOS-1 PRESIDENT)
a) To connect the SWR meter :
- Connect the SWR meter between the CB radio and the antenna as close as possible to the CB (use a maximum of 15.75 inches (40 cm), type President CA-2C).
b) To adjust the SWR meter:
Set the CB on channel 20.
Put the switch on the SWR-meter to position FWD (calibration).
- Press the "push-to-talk" switch on the microphone to transmit.
- Bring the index needle to by using the calibration key.
- Change the switch to position REF (reading of the SWR level). The reading on the Meter should be as near as possible to 1. If this is not the case, re-adjust your antenna to obtain a reading as close as possible to 1. (An SWR reading between 1 and 1.8 is acceptable).
- It will be necessary to re-calibrate the SWR meter after each adjustment of the antenna.
WARNING: In order to avoid any losses and attenuations in cables used for connection between the radio and its accessories, PRESIDENT recommends to use a cable with a length less than 118.11 inches (3 m).
Your CB is now ready for use.
B) HANDHELD CONFIGURATION
INSTALLATION
- Screw the flexible antenna (C2) on the device.
Check that the battery is fully charged.
Your CB is now ready for use.
C) FUNCTION DESCRIPTION
1) ON/OFF ~ VOLUME
Volume button : Rotary knob to turn radio ON/OFF and adjust reception volume
2) DISPLAY
Orange liquid crystal display (LCD)
3) CHANNEL SELECTOR: / keys
Press to change channel in up or down direction
4) CB/WX ALERT
- Short press key to alternate between CB or WX (weather) mode
- Press and hold key for 1 second to activate/deactivate WX ALERT function
5) SCAN DW (Dual Watch)
- Short press key to activate the SCAN function (can be used in CB and WX mode)
- Long press key to activate the DW function. CB alternates between the active channel and a second customizable channel
6) EMG (Emergency)
First short press to switch to Channel 9, second short press to switch to Channel 19, third short press to go back to the current channel
7) MENU
Short press to enter Menu to access following function settings: Roger Beep (6 tones/OFF settings), Key Beep (ON/OFF settings), Dual Watch (customizable second channel for DW), Eco Mode (3 settings), Reset
After entering the MENU function use Channel UP/DOWN keys to select function to edit
- Short press MENU key to validate function selection. The selected function name blinks
- Press Channel UP/DOWN keys to view the available settings for selected function
- Short press MENU key to validate and stay in MENU or long press to validate and exit MENU
8) MON (Monitor) ~ Noise filter
- Short press key to open up Squelch fully on current channel (it will bypass the ASC or the current manual Squelch level of the manual Squelch)
- Long press key to activate/deactivate the switchable reception mode filter
9)ANL/NB HI-CUT
- Short press key to activate/deactivate the filters in this order: ANL-NB-ANL+NB-Off
- Long press key to activate/deactivate the high frequency interference filter
10) AM/FM ~
- Short press key to switch between AM and FM mode
- Long press key to switch on the flashlight. The status blinks on the display. Within 3 seconds press the UP/DOWN key to select between FIXED-FAST-FLASH-SOS
11) SQ-(Squelch-)
Short press key to decrease level of the manual Squelch
12) SQ+ (Squelch +)
Short press key to increase level of the manual Squelch
11 + 12 ) ASC (Automatic Squelch Control)
Press SQ- (11) and SQ + (12) keys simultaneously to activate/deactivate ASC (worldwide President patent)
13) HI/LO (High/LOW)
Short press to switch between high and low transmitting power
14) PTT (Push To Talk) SWITCH
Press to transmit
15) FLASHLIGHT
See
16) LED Rx and TX
LED is red in transmit mode and green in reception mode
6 + 8) KEY LOCK (EMG + MON keys)
Simultaneously long press EMG and MON keys to activate/deactivate KEY LOCK
- Channels
- Modulation modes
- Frequency ranges
- Weather channels
- Antenna impedance
-
Power supply
-
Dimensions
- Weight without antenna with battery pack
- Accessories supplied
2) EMISSION
Frequency allowance
- Carrier power
- Transmission interference
- Audio response
- Emitted power in the adjacent channel
- Microphone sensitivity
-Drain
- Modulated signal distortion
3) RECEPTION
Max. sensitivity at 20 dB sinad
- Frequency response
- Adjacent channel selectivity
Max. audio power
Squelch sensitivity
Frequency image rejection rate
- Intermediate frequency rejection rate
- Internal speaker
:40
:AM/FM
: 26.965 MHz to 27.405 MHz
: 162,400 MHz to 162,550 MHz
: 50 ohms
: 13.8 V (Mobile configuration)
7.4 V (Handheld configuration)
: 5.98 (H) x 2.62 (W) x 1.46 (D) inches
: ±200 Hz
:4W
: < 4 nW (-54 dBm)
: 300 Hz to 3 KHz
: < 20 μW
: 6 mV
: 1,8 A (with modulation power Hi)
:2%
0.5 V - 113 dBm (AM)
0.3 V - 116 dBm (FM)
0.3 μV - 116 dBm (WX)
: 300 Hz to 3 kHz
:60dB
:1W
min. 0.2 V -120 dBm
max. 1 mV -47 dBm
:60dB
:70dB
: 16 ohms, 1 W
E) TROUBLE SHOOTING
1) YOUR CB RADIO WILL NOT TRANSMIT OR YOUR TRANSMISSION IS OF POOR QUALITY
- Check that the antenna is correctly connected.
- Check that the SWR is properly adjusted (Mobile Configuration only).
You are using the same modulation as your correspondent.
2) YOUR CB RADIO WILL NOT RECEIVE OR RECEPTION IS POOR
- Check that the Squelch level is properly adjusted.
- Check that the volume is set to a comfortable listening level.
- Check that the antenna is correctly connected.
- Check that the SWR is properly adjusted (Mobile Configuration only).
You are using the same modulation as your correspondent.
3) YOUR CB WILL NOT LIGHT UP
- Check the battery or power supply.
- Check the fuse (Mobile Configuration only).
F) HOW TO TRANSMIT OR RECEIVE AMESSAGE
Now that you have read the manual, make sure that your CB Radio is ready for use (i.e. check that your antenna is connected).
Choose your channel (19, 27).
Press the "push-to-talk" switch (14) and announce your message "Attention stations, transmission testing" which will allow you to check the clearness and the power of your signal. Release the switch and wait for a reply. You should receive a reply like, "Strong and clear".
If you use a calling channel (19, 27) and you have established communication with someone, it is common practice to choose another available channel so as not to block the calling channel.
GENERAL WARRANTY CONDITIONS
This device is guaranteed 2 years parts and labor in its country of purchase against any manufacturing defects validated by our technical department. PRESIDENT After Sales Service department reserves the right not to apply the warranty in the event a breakdown is caused by an antenna other than those distributed by PRESIDENT. An extension of 3 years warranty is proposed systematically for the simultaneous purchase of a device and an external mobile PRESIDENT antenna (this does not include the flexible antenna S-20 (C2) for the JERRY FCC unit), bringing the total duration of the warranty to 5 years. In order to be valid, the warranty registration must be completed and submitted within a period of 30 days after the purchase date to PRESIDENT ELECTRONICS online at www.president-electronics.us/warranty-registration. You can also access this warranty registration page by using your smartphone to read (application must be available) the QR code. You will receive a confirmation email if the registration is successfully completed. Please keep a copy of this email for your records.
Any repair under warranty will be without charge and the return delivery costs will be covered by PRESIDENT. A proof of purchase sales receipt must be included with the device to be repaired. The dates listed on the warranty registration and proof of purchase must match. In case the device is not under warranty, the repair and return of the device will be the purchaser's responsibility.
No spare parts will be sent nor exchanged by PRESIDENT under warranty. Do not proceed with the installation of the device without reading the user manual.
The warranty is only valid in the country of purchase.
Exclusions (not covered by Warranty):
- Damages caused by accident, shock or inadequate packaging.
- Batteries, power transistors, microphones, lights, fuses and the disrespect of the installation and use of specifications (including but not limited to antenna used with too high power, final output power transistors (SWR), inversion of polarities, bad connections, over voltage...).
- The warranty cannot be extended due to the non-availability of the device while it is being serviced at PRESIDENT After Sales Service department, nor by a change of one or more components or spare parts.
- Transceivers which have been modified. The warranty application is excluded in case of modification or poor maintenance done by a third party not approved by PRESIDENT ELECTRONICS.
If you note a malfunction:
- Check the power supply of your device and the quality of the fuse.
- Check that the antenna is correctly connected.
- Check that the squelch level is properly adjusted.
- In the event of a real malfunction, please contact your dealer first. He will decide what action should be taken.
In case of an intervention not covered by warranty, an estimate will be established before any repair.
Thank you for your confidence in the PRESIDENT quality and experience. We recommend that you read this manual carefully so that you are completely satisfied with your purchase.


Technical Manager and Quality Manager

Warranty Registration
ATTENTION!
8) MON (Monitor) ~ Noise filter
14) PTT (Push To Talk)
| Channel N° du canal | Frequency Fréquences | Channel N° du canal | Frequency Fréquences |
| 1 | 26,965 MHz | 21 | 27,215 MHz |
| 2 | 26,975 MHz | 22 | 27,225 MHz |
| 3 | 26,985 MHz | 23 | 27,255 MHz |
| 4 | 27,005 MHz | 24 | 27,235 MHz |
| 5 | 27,015 MHz | 25 | 27,245 MHz |
| 6 | 27,025 MHz | 26 | 27,265 MHz |
| 7 | 27,035 MHz | 27 | 27,275 MHz |
| 8 | 27,055 MHz | 28 | 27,285 MHz |
| 9 | 27,065 MHz | 29 | 27,295 MHz |
| 10 | 27,075 MHz | 30 | 27,305 MHz |
| 11 | 27,085 MHz | 31 | 27,315 MHz |
| 12 | 27,105 MHz | 32 | 27,325 MHz |
| 13 | 27,115 MHz | 33 | 27,335 MHz |
| 14 | 27,125 MHz | 34 | 27,345 MHz |
| 15 | 27,135 MHz | 35 | 27,355 MHz |
| 16 | 27,155 MHz | 36 | 27,365 MHz |
| 17 | 27,165 MHz | 37 | 27,375 MHz |
| 18 | 27,175 MHz | 38 | 27,385 MHz |
| 19 | 27,185 MHz | 39 | 27,395 MHz |
| 20 | 27,205 MHz | 40 | 27,405 MHz |
WEATHER FREQUENCY TABLE TABLEAU DES FREQUENCES MÉTÉO
| Channel N° du canal | Frequency Fréquences |
| 1 | 162,550 MHz |
| 2 | 162,400 MHz |
| 3 | 162,475 MHz |
| 4 | 162,425 MHz |
| 5 | 162,450 MHz |
| 6 | 162,500 MHz |
| 7 | 162,525 MHz |
IC RSS-GEN, Sec 7.1.2 Warning Statement - (Required for Transmitters)
ENGLISH:
Under Industry Canada regulations, this radio transmitter may only operate using an antenna of a type and maximum (or lesser) gain approved for the transmitter by Industry Canada. To reduce potential radio interference to other users, the antenna type and its gain should be so chosen that the equivalent isotropically radiated power (e.i.r.p.) is not more than that necessary for successful communication.
FRANÇAIS :
This radio transmitter has been approved by Industry Canada to operate with the antenna types listed below with the maximum permissible gain and required antenna impedance for each antenna type indicated. Antenna types not included in this list, having a gain greater than the maximum gain indicated for that type, are strictly prohibited for use with this device.
FRANÇAIS :
Usage and RF Exposure Warning Statements
ENGLISH:
This radio transmitter may be used in a mobile/fixed application or as a portable handheld application. For mobile/fixed applications, an external antenna as previously specified should be used. For portable handheld applications, the flexible antenna supplied with the device, P/N S-20, should be used. When used in a mobile/fixed application, the antenna used for this radio must be properly installed and maintained and must provide a separation distance of at least 53~cm (21 Inches) from all persons and must not be collocated or operated in conjunction with any other antenna or transmitter. Never transmit if any person is closer than the specified distance to the antenna.
Note that PRESIDENT does not specify or supply any CB antenna with this transceiver. While a 0 dBi gain antenna is normal for a typical installation, the above limit applies to any antenna with up to 3 dBi gain.
FRANÇAIS :
This device complies with Industry Canada's license-exempt RSSs. Operation is subject to the following two conditions: (1) This device may not cause interference; and (2) This device must accept any interference, including interference that may cause undesired operation of the device.
FRANÇAIS :
Note: This equipment has been tested and found to comply with the limits for a Class B digital device, pursuant to part 15 of the FCC Rules. These limits are designed to provide reasonable protection against harmful interference in a residential installation. This equipment generates, uses and can radiate radio frequency energy and, if not installed and used in accordance with the instructions, may cause harmful interference to radio communications. However, there is no guarantee that interference will not occur in a particular installation. If this equipment does cause harmful interference to radio or television reception, which can be determined by turning the equipment off and on, the user is encouraged to try to correct the interference by one or more of the following measures:
- Reorient or relocate the receiving antenna.
- Increase the separation between the equipment and receiver.
- Connect the equipment into an outlet on a circuit different from that to which the receiver is connected.
- Consult the dealer or an experienced radio/TV technician for help.
FRANÇAIS :
Changes or modifications not expressly approved by President Electronics USA could void your authority to operate the equipment.
FRANÇAIS :
This device complies with part 15 of the FCC Rules. Operation is subject to the following two conditions: (1) This device may not cause harmful interference, and (2) this device must accept any interference received, including interference that may cause undesired operation.
FRANÇAIS :
FCC RF Exposure Statement
ENGLISH:
This radio transmitter has been approved to meet the RF Exposure Requirements of the FCC and Industry Canada based on the following:
- 50% Push-To-Talk (PTT) duty cycle. When operating this device using the PTT pushbutton, do not operate (transmit) the device more than 50% of the time during the course of a conversation.
- 75% Voice Activated Transmission (VOX): When using this device in VOX mode, ambient noise can inadvertently cause the device to transmit. When in VOX mode, do not operate the device in a noisy environment to avoid transmitting over 75% of the time during the course of a conversation.
This radio transmitter has been approved to meet the RF Exposure Requirements of the FCC and Industry Canada for portable use based on the following: - When ONLY used with the Body-Worn and Audio Accessories provided with the radio and/or only approved by President Electronics USA.
- When ONLY used with the antenna provided with the radio and/or only approved by President Electronics USA.