TLK 110 - Portable radio MOTOROLA - Free user manual and instructions
Find the device manual for free TLK 110 MOTOROLA in PDF.
| Product Type | Portable Radio |
| Brand | Motorola |
| Model | TLK 110 |
| Dimensions (approx.) | 130 x 60 x 35 mm |
| Weight (with battery) | 260 g |
| Power Supply | Rechargeable Li-Ion battery |
| Estimated Battery Life | Up to 18 hours |
| Frequency Band | UHF 400-470 MHz |
| Number of Channels | 16 |
| RF Power | 1-2 Watts |
| Main Functions | Two-way communication, 16 channels, VOX, scanning, keypad lock, low battery indicator |
| Maintenance and Cleaning | Clean with a soft, slightly damp cloth. Avoid solvents and abrasive products. |
| Safety | Use only Motorola approved accessories. Do not expose to moisture or extreme temperatures. |
| Spare Parts and Repairability | Battery, charger, antenna, and belt clip available. Repairs by Motorola authorized service center. |
| General Information | Complies with FCC Part 15 and Industry Canada. Indoor use for certain bands. |
Frequently Asked Questions - TLK 110 MOTOROLA
User questions about TLK 110 MOTOROLA
0 question about this device. Answer the ones you know or ask your own.
Ask a new question about this device
Download the instructions for your Portable radio in PDF format for free! Find your manual TLK 110 - MOTOROLA and take your electronic device back in hand. On this page are published all the documents necessary for the use of your device. TLK 110 by MOTOROLA.
USER MANUAL TLK 110 MOTOROLA
TLK 110 Portable Radio User Guide
Contents
Legal and Support. 6
Intellectual Property and Regulatory Notices. 6
Legal and Compliance Statements. 7
Supplier's Declaration of Conformity 7
Industry Canada WLAN Statement 8
Important Safety Information. 8
Notice to Users (FCC and Industry Canada) 9
Warranty and Service Support. 9
Batteries and Chargers Warranty. 9
The Workmanship Warranty. 9
The Capacity Warranty. 9
Limited Warranty. 9
MOTOROLA SOLUTIONS COMMUNICATION PRODUCTS 9
I. WHAT THIS WARRANTY COVERS AND FOR HOW LONG: 9
II. GENERAL PROVISIONS 10
III. STATE LAW RIGHTS: 10
IV. HOW TO GET WARRANTY SERVICE 10
V. WHAT THIS WARRANTY DOES NOT COVER 10
VI. PATENT AND SOFTWARE PROVISIONS 11
VII. GOVERNING LAW 11
Chapter 1: Read Me First. 12
1.1 Software Version 13
Chapter 2: Radio Care. 14
Chapter 3: Radio Overview 15
3.1 Programmable Buttons 16
3.1.1 Assignable Radio Functions 16
Chapter 4: Getting Started. 18
4.1 Inserting a SIM Card 18
4.2 Attaching the Battery 18
4.3 Charging the Battery 18
4.4 Attaching or Detaching the Antenna 19
Attaching the Antenna 19
Detaching the Antenna 19
4.5Turning the Radio On or Off. 19
4.6 Adjusting the Volume 19
4.7 Activating the Preconfigured Wi-Fi Access Point (PWAP) 20
4.8 Selecting Talkgroups and Area Talkgroups 20
Chapter 5: Home Screen Overview 22
5.1 Status Indicators 22
5.1.1 Status Icons 22
5.1.2 Battery Capacity 24
5.1.3 LED Indicators 25
Chapter 6: Types of Radio Calls. 27
6.1 Making Calls on the Radio 28
6.2 Receiving and Responding to Calls 28
Chapter 7: Instant Personal Alert. 30
7.1 Sending IPA 30
7.2 Receiving and Viewing IPA 30
7.3 Clearing IPA Status List 31
Chapter 8: Voice Operating Transmission 32
8.1 Setting the Voice Operating Transmission 32
Chapter 9: Emergency Operations 33
9.1 Declaring Emergency 33
9.2 Canceling Emergency 33
9.3 Receiving and Responding to Emergency Alerts 34
9.4 Receiving and Responding to Emergency Calls 34
9.5 Clearing Emergency Alert List. 35
Chapter 10: Man Down (Fall Alert) 36
Chapter 11: Lone Worker. 37
Chapter 12: Location 38
12.1 Turning Location On or Off 38
Turning Location On 38
Turning Location Off 38
Chapter 13: Noise Reduction. 39
13.1 Turning Noise Reduction On or Off 39
Turning Noise Reduction On 39
Turning Noise Reduction Off 39
Chapter 14: Fast Scroll Talkgroup List. 40
14.1 Accessing Fast Scroll Talkgroup List. 40
Chapter 15: Contact List. 41
15.1 Accessing Contact List 41
Chapter 16: Supervisory Override 42
Chapter 17: Menu 43
17.1 Accessing Menu 44
Chapter 18: Turning the Cellular On or Off. 45
Turning the Cellular On. 45
Turning the Cellular Off. 45
Chapter 19: Turning the Wi-Fi On or Off. 46
Turning the Wi-Fi On 46
Turning the Wi-Fi Off 46
Chapter 20: Turning DND On or Off. 47
Turning DND On 47
Turning DND Off. 47
Chapter 21: Turning Voice Announcement On or Off. 48
Turning Voice Announcement On. 48
Turning Voice Announcement Off. 48
Chapter 22: Turning Alert Tones On or Off. 49
Turning Alert Tones On 49
Turning Alert Tones Off. 49
Chapter 23: Adjusting Display Brightness 50
Chapter 24: Bluetooth 51
24.1 Turning the Bluetooth On or Off 51
Turning the Bluetooth On 51
Turning the Bluetooth Off 51
24.2 Searching and Connecting to Bluetooth Devices 51
24.3 Clearing Bluetooth Pairing 52
Chapter 25: Scan 53
25.1Turning Scan On or Off. 53
Turning Scan On 53
Turning Scan Off 53
Chapter 26: Radio Stun. 54
Chapter 27: Radio Kill 55
Chapter 28:User Disabled or Suspended. 56
Chapter 29: Ambient Listening. 57
Chapter 30: Keylock. 58
30.1 Enabling and Disabling Keylock 58
EnablingKeylock. 58
Disabling Keylock. 58
Chapter 31: Turning the Mute Mode On or Off. 59
Turning the Mute Mode On. 59
Turning the Mute Mode Off. 59
Chapter 32: Authorized Accessories List. 60
Legal and Support
Intellectual Property and Regulatory Notices
Copyrights
The Motorola Solutions products described in this document may include copyrighted Motorola Solutions computer programs. Laws in the United States and other countries preserve for Motorola Solutions certain exclusive rights for copyrighted computer programs. Accordingly, any copyrighted Motorola Solutions computer programs contained in the Motorola Solutions products described in this document may not be copied or reproduced in any manner without the express written permission of Motorola Solutions.
No part of this document may be reproduced, transmitted, stored in a retrieval system, or translated into any language or computer language, in any form or by any means, without the prior written permission of Motorola Solutions, Inc.
Trademarks
MOTOROLA, MOTO, MOTOROLA SOLUTIONS, and the Stylized M Logo are trademarks or registered trademarks of Motorola Trademark Holdings, LLC and are used under license. All other trademarks are the property of their respective owners.
License Rights
The purchase of Motorola Solutions products shall not be deemed to grant either directly or by implication, estoppel or otherwise, any license under the copyrights, patents or patent applications of Motorola Solutions, except for the normal non-exclusive, royalty-free license to use that arises by operation of law in the sale of a product.
Open Source Content
This product may contain Open Source software used under license. Refer to the product installation media for full Open Source Legal Notices and Attribution content.
European Union (EU) and United Kingdom (UK) Waste of Electrical and Electronic Equipment (WEEE) Directive

The European Union's WEEE directive and the UK's WEEE regulation require that products sold into EU countries and the UK must have the crossed-out wheelie bin label on the product (or the package in some cases). As defined by the WEEE directive, this crossed-out wheelie bin label means that customers and end-users in EU and UK countries should not dispose of electronic and electrical equipment or accessories in household waste.
Customers or end-users in EU and UK countries should contact their local equipment supplier representative or service centre for information about the waste collection system in their country.
Disclaimer
Please note that certain features, facilities, and capabilities described in this document may not be applicable to or licensed for use on a specific system, or may be dependent upon the characteristics of a specific mobile subscriber unit or configuration of certain parameters. Please refer to your Motorola Solutions contact for further information.
Legal and Compliance Statements
Supplier's Declaration of Conformity
Supplier's Declaration of Conformity
Per FCC CFR 47 Part 2 Section 2.1077(a)

Responsible Party
Name: Motorola Solutions, Inc.
Address: 2000 Progress Pkwy, Schaumburg, IL. 60196
Phone Number: 1-800-927-2744
Hereby declares that the product:
Model Name: TLK 110
conforms to the following regulations:
FCC Part 15, subpart B, section 15.107(a), 15.107(d), and section 15.109(a)
Class B Digital Device
As a personal computer peripheral, this device complies with Part 15 of the FCC Rules. Operation is subject to the following two conditions:
1 This device may not cause harmful interference, and
2 This device must accept any interference received, including interference that may cause undesired operation.

NOTE:
This equipment has been tested and found to comply with the limits for a Class B digital device, pursuant to part 15 of the FCC Rules. These limits are designed to provide reasonable protection against harmful interference in a residential installation. This equipment generates, uses and can radiate radio frequency energy and, if not installed and used in accordance with the instructions, may cause harmful interference to radio communications. However, there is no guarantee that interference will not occur in a particular installation.
If this equipment does cause harmful interference to radio or television reception, which can be determined by turning the equipment off and on, the user is encouraged to try to correct the interference by one or more of the following measures:
Reorient or relocate the receiving antenna.
- Increase the separation between the equipment and receiver.
- Connect the equipment into an outlet on a circuit different from that to which the receiver is connected.
- Consult the dealer or an experienced radio or TV technician for help.
For country code selection usage (WLAN devices)

NOTE: The country code selection is for non-US model only and is not available to all US models. Per FCC regulation, all Wi-Fi products marketed in the US must be fixed to US operation channels only.
Industry Canada WLAN Statement

CAUTION:
1 The device for operation in the band 5150-5250 MHz is only for indoor use to reduce the potential for harmful interference to co-channel mobile satellite systems.
2 The maximum antenna gain permitted for devices in the bands 5250-5350 MHz and 5470-5725 MHz shall be such that the equipment still complies with the e.i.r.p. limit.
3 The maximum antenna gain permitted for devices in the band 5752-5850 MHz shall be such that the equipment still complies with e.i.r.p. limits specified for point-to-point and non-point-to-point operation as appropriate.
4 The worst case tilt angle(s) necessary to remain compliant with the e.i.r.p. elevation mask requirement set forth in Section 6.2.2 (3) shall be clearly indicated.
5 User should also be advised that high-power radars are allocated as primary users (i.e. priority users) of the bands 5250-5350 MHz and 5650-5850 MHz and that these radars could cause interference and/or damage to LE-LAN devices.
Important Safety Information

CAUTION:
This radio is designed to meet General Population usage. Before using the radio, read the RF Energy Exposure and Product Safety Guide that comes with the radio. This guide contains operating instructions for safe usage, RF energy awareness, and control for compliance with applicable standards and regulations.
Any modification to this device, not expressly authorized by Motorola Solutions, may void the user's authority to operate this device.
For Japan, the device is restricted to indoor use only when operating in the 5150 to 5350 MHz frequency range, except for transmission with 5.2 GHz High Power Data Communication System base Station or Relay Station.
Under Industry Canada regulations, this radio transmitter may only operate using an antenna of a type and maximum (or lesser) gain approved for the transmitter by Industry Canada. To reduce potential radio interference to other users, the antenna type and its gain should be so chosen that the equivalent isotropically radiated power (e.i.r.p.) is not more than that necessary for successful communication.
This radio transmitter has been approved by Industry Canada to operate with Motorola Solutions-approved antenna with the maximum permissible gain and required antenna impedance for each antenna type indicated. Antenna types not included in this list, having a gain greater than the maximum gain indicated for that type, are strictly prohibited for use with this device.
This radio transmitter 109U-89FT7166 has been approved by Innovation, Science and Economic Development Canada to operate with the antenna types listed in Authorized Accessories List on page 60, with the maximum permissible gain indicated. Antenna types not included in the list that have a gain greater than the maximum gain indicated for any type listed are strictly prohibited for use with this device.
Notice to Users (FCC and Industry Canada)
This device complies with Part 15 of the FCC rules and Industry Canada's license-exempt RSS's per the following conditions:
- This device may not cause harmful interference.
This device must accept any interference received, including interference that may cause undesired operation. - Changes or modifications made to this device, not expressly approved by Motorola Solutions, could void the authority of the user to operate this equipment.
Warranty and Service Support
Batteries and Chargers Warranty
The Workmanship Warranty
The workmanship warranty guarantees against defects in workmanship under normal use and service.
| TLK 110 Batteries | 12 Months |
The Capacity Warranty
The capacity warranty guarantees 80% of the rated capacity for the warranty duration.
| Lithium-Ion (Li-Ion) Batteries | 12 Months |
Limited Warranty
MOTOROLA SOLUTIONS COMMUNICATION PRODUCTS
I. WHAT THIS WARRANTY COVERS AND FOR HOW LONG:
Motorola Solutions, Inc. ("Motorola Solutions") warrants the Motorola Solutions manufactured Communication Products listed below ("Product") against defects in material and workmanship under normal use and service for a period of time from the date of purchase as scheduled below:
| Portable Radio | 1 Year |
| Product Accessories | 1 Year |
Motorola Solutions, at its option, will at no charge either repair the Product (with new or reconditioned parts), replace it (with a new or reconditioned Product), or refund the purchase price of the Product during the warranty period provided it is returned in accordance with the terms of this warranty. Replaced parts or boards are warranted for the balance of the original applicable warranty period. All replaced parts of Product shall become the property of Motorola Solutions.
This express limited warranty is extended by Motorola Solutions to the original end user purchaser only and is not assignable or transferable to any other party. This is the complete warranty for the Product manufactured by Motorola Solutions. Motorola Solutions assumes no obligations or liability for additions or modifications to this warranty unless made in writing and signed by an officer of Motorola Solutions.
Unless made in a separate agreement between Motorola Solutions and the original end user purchaser, Motorola Solutions does not warrant the installation, maintenance or service of the Product.
Motorola Solutions cannot be responsible in any way for any ancillary equipment not furnished by Motorola Solutions which is attached to or used in connection with the Product, or for operation of the Product with any ancillary equipment, and all such equipment is expressly excluded from this warranty. Because each system which may use the Product is unique, Motorola Solutions disclaims liability for range, coverage, or operation of the system as a whole under this warranty.
II. GENERAL PROVISIONS
This warranty sets forth the full extent of Motorola Solutions responsibilities regarding the Product. Repair, replacement or refund of the purchase price, at Motorola Solutions option, is the exclusive remedy. THIS WARRANTY IS GIVEN IN LIEU OF ALL OTHER EXPRESS WARRANTYES. IMPLIED WARRANTYES, INCLUDING WITHOUT LIMITATION, IMPLIED WARRANTYES OF MERCHANTABILITY AND FITNESS FOR A PARTICULAR PURPOSE, ARE LIMITED TO THE DURATION OF THIS LIMITED WARRANTY. IN NO EVENT SHALL MOTOROLA SOLUTIONS BE LIABLE FOR DAMAGES IN EXCESS OF THE PURCHASE PRICE OF THE PRODUCT, FOR ANY LOSS OF USE, LOSS OF TIME, INCONVENIENCE, COMMERCIAL LOSS, LOST PROFITS OR SAVINGS OR OTHER INCIDENTAL, SPECIAL OR CONSEQUENTIAL DAMAGES ARISING OUT OF THE USE OR INABILITY TO USE SUCH PRODUCT, TO THE FULL EXTENT SUCH MAY BE DISCLAIMED BY LAW.
III. STATE LAW RIGHTS:
SOME STATES DO NOT ALLOW THE EXCLUSION OR LIMITATION OF INCIDENTAL OR CONSEQUENTIAL DAMAGES OR LIMITATION ON HOW LONG AN IMPLIED WARRANTY LASTS, SO THE ABOVE LIMITATION OR EXCLUSIONS MAY NOT APPLY.
This warranty gives specific legal rights, and there may be other rights which may vary from state to state.
IV. HOW TO GET WARRANTY SERVICE
You must provide proof of purchase (bearing the date of purchase and Product item serial number) in order to receive warranty service and, also, deliver or send the Product item, transportation and insurance prepaid, to an authorized warranty service location. Warranty service will be provided by Motorola Solutions through one of its authorized warranty service locations. If you first contact the company which sold you the Product (for example, dealer or communication service provider), it can facilitate your obtaining warranty service. You can also call Motorola Solutions at 1-800-927-2744.
V. WHAT THIS WARRANTY DOES NOT COVER
1 Defects or damage resulting from use of the Product in other than its normal and customary manner.
2 Defects or damage from misuse, accident, water, or neglect.
3 Defects or damage from improper testing, operation, maintenance, installation, alteration, modification, or adjustment.
4 Breakage or damage to antennas unless caused directly by defects in material workmanship.
5 A Product subjected to unauthorized Product modifications, disassembles or repairs (including, without limitation, the addition to the Product of non-Motorola Solutions supplied equipment) which adversely affect performance of the Product or interfere with Motorola Solutions normal warranty inspection and testing of the Product to verify any warranty claim.
6 Product which has had the serial number removed or made illegible.
7 Rechargeable batteries if:
- any of the seals on the battery enclosure of cells are broken or show evidence of tampering.
- the damage or defect is caused by charging or using the battery in equipment or service other than the Product for which it is specified.
8 Freight costs to the repair depot.
9 A Product which, due to illegal or unauthorized alteration of the software/firmware in the Product, does not function in accordance with Motorola Solutions published specifications or the FCC certification labeling in effect for the Product at the time the Product was initially distributed from Motorola Solutions.
10 Scratches or other cosmetic damage to Product surfaces that does not affect the operation of the Product.
11 Normal and customary wear and tear.
VI. PATENT AND SOFTWARE PROVISIONS
Motorola Solutions will defend, at its own expense, any suit brought against the end user purchaser to the extent that it is based on a claim that the Product or parts infringe a United States patent, and Motorola Solutions will pay those costs and damages finally awarded against the end user purchaser in any such suit which are attributable to any such claim, but such defense and payments are conditioned on the following:
1 Motorola Solutions will be notified promptly in writing by such purchaser of any notice of such claim,
2 Motorola Solutions will have sole control of the defense of such suit and all negotiations for its settlement or compromise, and
3 Should the Product or parts become, or in Motorola Solutions opinion be likely to become, the subject of a claim of infringement of a United States patent, that such purchaser will permit Motorola Solutions, at its option and expense, either to procure for such purchaser the right to continue using the Product or parts or to replace or modify the same so that it becomes non-infringing or to grant such purchaser a credit for the Product or parts as depreciated and accept its return. The depreciation will be an equal amount per year over the lifetime of the Product or parts as established by Motorola Solutions.
Motorola Solutions will have no liability with respect to any claim of patent infringement which is based upon the combination of the Product or parts furnished hereunder with software, apparatus or devices not furnished by Motorola Solutions, nor will Motorola Solutions have any liability for the use of ancillary equipment or software not furnished by Motorola Solutions which is attached to or used in connection with the Product. The foregoing states the entire liability of Motorola Solutions with respect to infringement of patents by the Product or any parts thereof.
Laws in the United States and other countries preserve for Motorola Solutions certain exclusive rights for copyrighted Motorola Solutions software such as the exclusive rights to reproduce in copies and distribute copies of such Motorola Solutions software. Motorola Solutions software may be used in only the Product in which the software was originally embodied and such software in such Product may not be replaced, copied, distributed, modified in any way, or used to produce any derivative thereof. No other use including, without limitation, alteration, modification, reproduction, distribution, or reverse engineering of such Motorola Solutions software or exercise of rights in such Motorola Solutions software is permitted. No license is granted by implication, estoppel or otherwise under Motorola Solutions patent rights or copyrights.
VII. GOVERNING LAW
This Warranty is governed by the laws of the State of Illinois, U.S.A.
Chapter 1
Read Me First
This user guide covers the basic operations of the radio models offered in your region.
Notations Used in This Manual
Throughout the text in this publication, you notice the use of Warning, Caution, and Notice. These notations are used to emphasize that safety hazards exist, and the care that must be taken or observed.

WARNING: An operational procedure, practice, or condition, and so on, which may result in injury or death if not carefully observed.

CAUTION: An operational procedure, practice, or condition, and so on, which may result in damage to the equipment if not carefully observed.

NOTE: An operational procedure, practice, or condition, and so on, which is essential to emphasize.
Special Notations
The following special notations are used throughout the text to highlight certain information or items:
Table 1: Special Notations
| Example | Description |
| Menu key or PTT button | Bold words indicate a name of a key, button, or soft menu item. |
| Your radio shows Bluetooth On. | Typewriter words indicate the MMI strings or messages displayed on your radio. |
| <required ID> | The courier, bold, italic, and angle brackets indicate user input. |
| Setup→Tone→All Tones | Bold words with the arrow in between indicate the navigation structure in the menu items. |
Feature and Service Availability
Your dealer or administrator may have customized your radio for your specific needs.

NOTE: Not all features in the manual are available in your radio. Contact your dealer or administrator for more information.
You can consult your dealer or system administrator about the following:
What are the functions of each button?
- Which optional accessories may suit your needs?
What are the best radio usage practices for effective communication?
- What maintenance procedures promote longer radio life?
1.1
Software Version
All the features described in the following sections are supported by the software version R01.00.00 or later.
Contact your dealer or administrator for more information.
Chapter 2
Radio Care
This section describes the basic handling precaution of the radio.
Table 2: IP Specification
| IP Specification | Description |
| IP67 | Allows your radio to withstand adverse field conditions such as being submersed in water between 15 cm and 1 m for 30 minutes or dust tight for 2–8 hours. |
- If your radio has been submersed in water, shake your radio well to remove any water that may be trapped inside the speaker grille and microphone port. Trapped water could cause decreased audio performance.
- If your radio's battery contact area has been exposed to water, clean and dry battery contacts on both your radio and the battery before attaching the battery to radio. The residual water could short-circuit the radio.
- If your radio has been submersed in a corrosive substance (for example, saltwater), rinse radio and battery in fresh water then dry radio and battery.
- To clean the exterior surfaces of your radio, use a diluted solution of mild dishwashing detergent and fresh water (for example, one teaspoon of detergent to one gallon of water).
- Never poke the vent (hole) located on the radio chassis below the battery contact. This vent allows for pressure equalization in the radio. Doing so may create a leak path into radio and your radio's submersibility may be lost.
- Never obstruct or cover the vent, even with a label.
- Ensure that no oily substances come in contact with the vent.
- Your radio with antenna attached properly is designed to be submersible to a maximum depth of 1 m (3.28 ft) and a maximum submersion time of 30 minutes. Exceeding either maximum limit or use without antenna may result in damage to your radio.
- When cleaning your radio, do not use a high-pressure jet spray on radio as this will exceed the 1 m depth pressure and may cause water to leak into your radio.
Chapter 3
Radio Overview
This chapter explains the buttons and default functions of your radio.
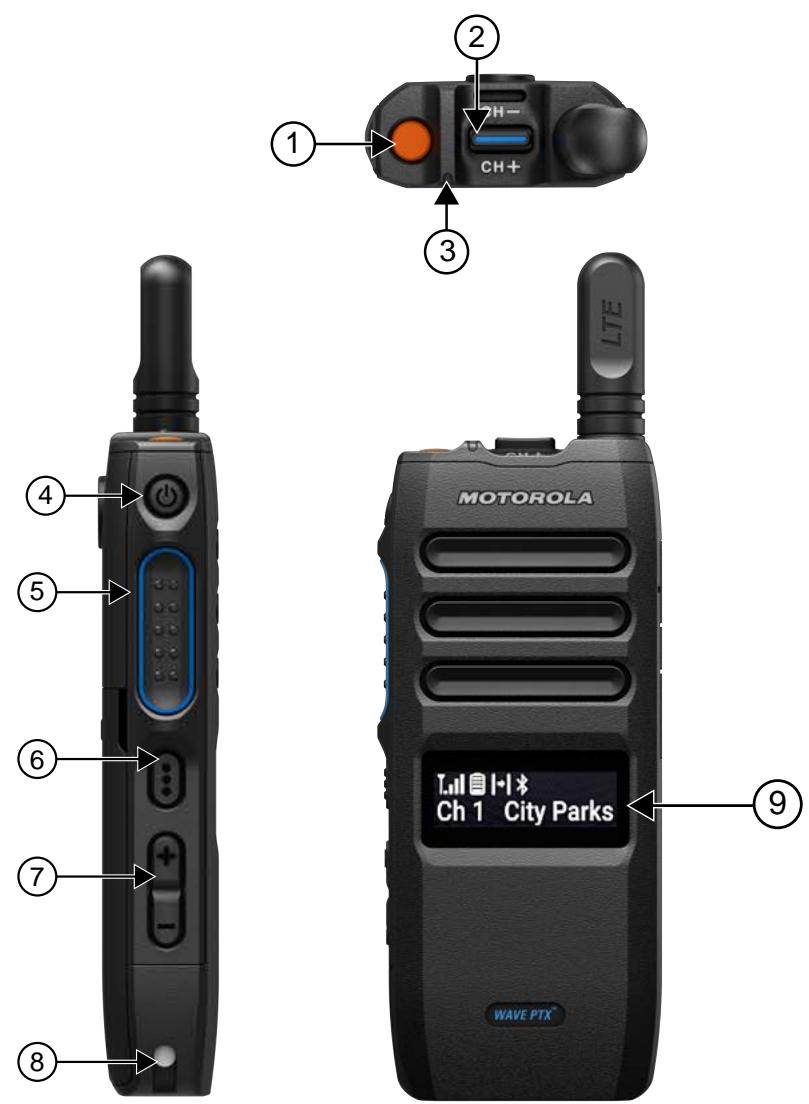
Table 3: Radio Overview
| Label | Name | Description |
| 1 | Emergency Button | To turn the Emergency Operations on and off. |
| 2 | Talkgroup Scroll Rocker | Press: Scroll to next talkgroup in the list. Press and hold: If there are more than 16 talk-groups, fast scroll is enabled. |
| 3 | LED Status Indicator | Red, green, and amber light-emitting diodes indicate operating status. |
| 4 | Power button | Turn the radio on and off. |
| 5 | Push-to-Talk (PTT) button | Press or press and hold to execute voice operations. |
| 6 | Menu/Programmable button | Press: Access Menu mode. Press and hold: Access Programmable Function. |
| 7 | Volume Up and Volume Down buttons | Increase and decrease the volume level. |
| 8 | Charging Contacts | For charging purposes. |
| 9 | Liquid Crystal Display (LCD) | 132 x 36 display resolutions provides visual information about many radio features |
3.1
Programmable Buttons
You can program the programmable buttons as shortcuts to specific radio functions through WAVE portal.
Depending on the duration of a button press, the programmable buttons function differently.
3.1.1
Assignable Radio Functions
The following radio functions can be assigned to the programmable buttons by your dealer.

NOTE: Not all programmable buttons are listed in the following list. Refer to the portal for more information.
Alert Tones
Allows you to toggle the Alert Tones on and off.
Bluetooth
Allows you to toggle the Bluetooth on and off.
Cellular
Allows you to toggle the Cellular on and off.
Contact List
Allows you to directly access the Contact List.
Do Not Disturb (DND)
Allows you to toggle between on and off.
Keypad Lock
Allows you to toggle the keypad to lock or unlock.
Location
Allows you to toggle the Location on and off.
Mute/Unmute
Allows you to turn Mute Mode on or off.
Menu
Allows you to access the menu features.
Noise Reduction
Allows you to toggle the Noise Reduction to on or off.
Scan
Allows you to toggle the Scan on and off.
Voice Announcements
Allows you to toggle Voice Announcements on and off.
Wi-Fi
Allows you to toggle the Wi-Fi on and off.
Chapter 4
Getting Started
This chapter provides instructions on how to prepare your radio for use.
4.1
Inserting a SIM Card
Prerequisites: Turn off your radio.
Procedure:
1 Remove the battery.
2 Lift the SIM card slot cover.
3 With the contacts facing down, align the card notched end first and slide the SIM card into the slot.

NOTE:
Depending on your radio model, if your radio has the SIM card slot, you can insert the SIM card as instructed. At any time, peeling off the radio label voids the warranty.
4.2
Attaching the Battery
Procedure:
1 Align the battery contacts with the contacts inside the battery compartment.
a Insert the contact side of the battery first.
b Gently push the battery into place.
2 Attach the battery cover by aligning it in place and slide the battery latch until it snaps into place.
3 Slide the battery latch into lock position.
4.3
Charging the Battery
Your radio is powered by a Lithium-Ion (Li-Ion) battery.
Prerequisites: Turn off your radio when charging.
Procedure:
- To comply with warranty terms and avoid damages, charge the battery using a Motorola Solutions charger exactly as described in the charger user guide.
- Charge a new battery 4 to 5 hours before initial use for best performance.
Batteries charge best at room temperature.

NOTE: All Motorola Solutions chargers can charge only Motorola Solutions authorized batteries.
4.4
Attaching or Detaching the Antenna
Attaching the Antenna
Procedure:
1 Set the antenna in the receptacle.
2 Turn the antenna clockwise.

CAUTION: To prevent damages, only use the authorized antenna for TLK 110 antennas.
Detaching the Antenna
Procedure:
1 Turn the antenna counterclockwise.
2 Remove the antenna from the receptacle.
4.5
Turning the Radio On or Off
Procedure:
Press and hold the Power button.
If your radio turns on, your radio shows the following indications:
The green LED illuminates.
The home screen lights up.
If your radio turns off, your radio shows the following indications:
A tone sounds.
The display shows Powering off
4.6
Adjusting the Volume
Procedure:
1 Perform one of the following actions:
To increase the volume level, press the Volume Up button.
To decrease the volume level, press the Volume Down button.

NOTE:
- The maximum volume level through the internal speaker or a wired accessory is 10. The maximum volume is increased to 15 if a Bluetooth accessory is attached.
- For PMLN8191, 1-Wire Enhanced Clear Tube Earpiece, the display shows a safety warning message if you attempt to increase the volume from 9 to 10.
4.7
Activating the Preconfigured Wi-Fi Access Point (PWAP)
This feature provides a temporary Wi-Fi connection for the radio to download the configurations from the portal. Instead of the manual configuration through the Maintenance Mode Web Server, you can use the preconfigured Wi-Fi access point for initial Wi-Fi connection.
Prerequisites:
Ensure your radio is in the User Mode and has no internet connection.

NOTE: The following are the preconfigured Wi-Fi Access Point settings supported by the radio.
| SSID | Password |
| WaveRadio | RadioManagement |
Procedure:
To connect to the PWAP, press the Menu/Programmable button and Volume Up button simultaneously.
If the radio successfully connects to the PWAP, your radio shows the following indications:
A positive tone sounds.
The display shows PwAP for 2 seconds.
Radio downloads the provisioned Wi-Fi Settings from the server and overwrites the preconfigured Wi-Fi setting.

NOTE: The preconfigured Wi-Fi setting is cleared when the radio is rebooted or when the Wi-Fi is disabled.
4.8
Selecting Talkgroups and Area Talkgroups
Procedure:
1 From the Home screen, perform one of the following actions:
| Option | Actions |
| Selecting the previous or next talkgroup | Press Talkgroup Scroll Rocker. |
| Fast scrolling the talkgroup list | Press and hold Talkgroup Scroll Rocker until you reach the required talkgroup. |
| Selecting the required area talk-group | a By using the Talkgroup Scroll Rocker, scroll past the talkgroup list or beginning of the talkgroup list. |
| b At the area talkgroup list, select the required area talkgroup. NOTE: If you scroll past the talkgroup list, the area talkgroup list is arranged alphabetically. If you scroll past the beginning of the talkgroup list, the area talkgroup is arranged in a reverse alphabetical order. |
If you have reached the end of the talkgroup and area talkgroup list, and enter the beginning of the list again, your radio shows the following indications:
A tone sounds.
- The display shows the first talkgroup.
If selecting a talkgroup or an area talkgroup is unsuccessful, your radio shows the following indications:
- A negative indicator tone sounds.
The display shows the previous talkgroup.
The voice announcement sounds.
Chapter 5
Home Screen Overview

Table 4: Home Screen Overview
| Label | Name | Description |
| 1 | Status Bar | Status icons appear in the status bar to provide your radio status and feature notifications. |
| 2 | Alphanumeric Dis-play1 | Displays Talkgroup errors, trunking statuses, and call states. Supports the following screen patterns: • Static • Scroll In • Alternate |
5.1
Status Indicators
Status Indicators explain the Icons, battery capacity information, and LED indicators used in your radio.
5.1.1
Status Icons
These icons appear at the status bar to provide radio-specific information or status.
| Icon | Name | Description |
| to | Cellular Network Strength | Your radio is connected to a cellular network. The number of bars represents the signal strength of the cellular network. |
| Cellular Network Not Connected | Your radio is not connected to a cellular network. | |
| X | Cellular Network Unavailable | Cellular Network is not available. |
| to Wi-Fi Network Strength | Your radio is connected to a Wi-Fi network. The number of bars represents the signal strength of the Wi-Fi network. | |
| Wi-Fi Network Not Connected | Your radio is not connected to a Wi-Fi network. | |
| Wi-Fi Network Unavailable | Wi-Fi Network is not available. | |
| SIM Status | SIM card is not inserted or detected. | |
| Emergency | Your radio is in Emergency mode. | |
| Instant Personal Alert (IPA) | Your radio is receiving Instant Personal Alert (IPA). | |
| Do Not Disturb (DND) | Your radio is in Do Not Disturb (DND) status. | |
| Area Based Talkgroup | Area Based Talkgroup feature is enabled. | |
| Scan | Scan feature is enabled. | |
| Mute | Mute is enabled and speaker is muted. | |
| Bluetooth | The Bluetooth feature is enabled. A dot appears next to Bluetooth icon when a remote Bluetooth device is connected. | |
| Location | Location is enabled and its signal is available. | |
| Software Status | Software is available when the display shows a check mark icon. Your radio is downloading software when the display shows a downward arrow icon. | |
| Diagnostics Log Status | Logs are available when the display shows a check mark icon. Your radio is currently uploading logs when the display shows an upward arrow. | |
| Voice Operating Transmission (VOX) | Voice Operating Transmission (VOX) feature is enabled. | |
| Man Down/Lone Worker | Man Down/Lone Worker feature is enabled. | |
| Battery Status | The number of bars shown indicates the charge remaining in the battery. | |
| Battery Charge | Battery is charging when lightning icon displayed. | |
| Language Change | Your radio is switching the language. | |
5.1.2
Battery Capacity
The following table provides the battery capacity information of your radio. Icons and LED Indication appear when you press Power/Info button.
Table 5: Battery Capacity
| Icon | LED Indication | Voice Announcement | Description |
| Charging LED is shown | — | Battery charging | |
| ● Solid green | Battery high | 80%–100% capacity | |
| ● Solid red | Battery medium | 60%–80% capacity | |
| ● Solid red | Battery medium | 25%–60% capacity | |
| ● Solid red | Battery low | 5%–25% capacity | |
| Blinking red | Battery very low | Less than 5% capacity |
5.1.3
LED Indicators
The LED Indicators show the operational status of your radio.
Table 6: LED Indications
| Indication | Status |
| Solid Red | • Indicates the following radio battery levels: - High - Medium - Low |
| Blinking Red | • The radio has moved out of range and receives no network connection. • The radio is in Man Down mode. • The radio is in Lone Worker respond duration. • The user account is disabled or suspended. • Indicates radio battery level when battery is critically low. |
| Solid Yellow | The radio declares an Emergency Alert. |
| Blinking Yellow | • The radio is scanning for activity. • The radio is receiving a Call Alert. • The radio is receiving a declared or canceled Emergency alert. • The radio has not cleared all Emergency or Instant Personal Alerts received from the list. |
| Slow Blinking Yellow | The radio is receiving an Instant Personal Alert. |
| Solid Green | • The radio is powering up. • The radio is transmitting. • Indicates full battery capacity when the radio is charging. • The radio is in an Emergency Group/Private call. • The radio is Ambient Listening. |
| Blinking Green | • The radio is receiving a call. • The radio enters a call-hang time. • The radio is sending an Instant Personal Alert. • The radio enters Area Based Talkgroup. • The radio is receiving an Emergency Group/Private call. |
| Blinking Green and Yellow | Radio is in Do Not Disturb (DND) mode. |
Chapter 6
Types of Radio Calls
There are several ways that you can make a call with your radio depending on the types of calls and system available on your radio.
Table 7: Types of Radio Calls
| Call Type | Description |
| Group Call | A Group Call is a point-to-multipoint call operation. Your radio must be configured as a member of the group for you to communicate with each other. |
| Private Call | A Private Call is a call from an individual radio to another individual radio. You can set up a Private Call after performing a radio presence check or call immediately. |
| Broadcast Call | A Broadcast Call is a one-way voice call from any user to an entire talkgroup. The Broadcast Call feature allows only the call initiating user to transmit to the talkgroup, while the recipients of the call cannot respond. |
| Area Based Talkgroup Call | When you enter a geographic area, you are able to view, and hear the notifications for the talkgroup area in that geofence. The Area Based Talkgroup is added to the Area Based Talkgroup List in alphabetical order. Once you are added to the Area Based Talkgroup List, your radio receives calls from both Area Based Talkgroup and the Talkgroup I before you enter into the Area Based Talkgroup zone. You can navigate through the Talkgroup Channel List and into the Area Based Talkgroup List. The Talkgroup Number is not displayed when you are in the Area Based Talkgroup. When you are in the Area Based Talkgroup, your radio shows the following indications. • The green LED blinks. • The display shows the talkgroup alias. • The voice announcement sounds. When you are exiting the Area Based Talkgroup, your radio shows the following indications. • The display shows the talkgroup alias. • The voice announcement sounds. If you are in a call when you are exiting the Area Talkgroup, the call continues without dropping. When the call is finally ended, your radio then exit the Area Based Talkgroup. |
6.1
Making Calls on the Radio
Procedure:
1 Perform one of the following actions:
- To make a group call, an area based talkgroup call, or a broadcast call, select the
using the Talkgroup Scroll Rocker. - To make a private call, from the menu, select Contacts List
.
2 To call, press and hold the PTT button.
For broadcast call, the display shows a countdown from 3, 2, and 1.
If the PTT button is released before the countdown completes, the call is not initiated.
3 Wait for the Talk Permit Tone to end, and speak into the microphone.

NOTE: If the recipient is busy or the server is synchronizing, the Talk Prohibit Tone sounds until the PTT button is released.
4 To listen, release the PTT button.

NOTE: This step is not applicable for broadcast call.
For group call or area based talkgroup call, your radio shows the following indications when entering hang time.
- The green LED blinks.
- The display shows the talkgroup name.
For private call, your radio shows the following indications when entering hang time.
- The green LED blinks.
The display shows Private Call.
5 To end a private call, perform one of the following actions.
- Wait for the private call hang time to expire.
- Press and hold the Menu/Programmable button.
6.2
Receiving and Responding to Calls
When you receive calls, your radio shows the following indications:
A tone sounds.
- The green LED blinks.
- Your radio unmute and the incoming call sound through the speaker.
- For group call, the display shows Talkgroup number followed by the caller alias.
- For private call, broadcast call, and area based talkgroup call, the display shows the caller alias.

NOTE: For Broadcast Call, you are not allowed to Talkback. If you attempt to talkback, the Talkback Prohibit tone sounds when the PTT button is pressed.
Procedure:
Perform one of the following actions:
| Option | Actions |
| Responding to calls | a Press and hold the PTT button. b Wait for the Talk Permit Tone to end, and speak into the microphone. c To listen, release the PTT button. |
| Rejecting a private call | Press and hold the Menu/Programmable button. |
Chapter 7
Instant Personal Alert
Instant Personal Alert (IPA) is a notification that you can send to a contact that is busy or unable to reply to a group or private call.
When you received an IPA, your radio sounds a tone and displays an icon and the sender alias.
The IPA received is stored in the IPA Status List and allows you to view and reply at any time. When multiple IPAs are received, the latest IPA will appear at the top of the list. The IPA Status List can store up to nine alerts.
An IPA can be received from contacts outside your Contact List.
If you have a private call with the sender of the IPA, then the IPA is automatically cleared.
7.1
Sending IPA
Procedure:
1 From the menu, select Contact List
2 To send IPA, press and hold the Menu/Programmable.
If your IPA is sent, your radio shows the following indications:
A tone sounds.
- Your screen displays Alert Sent.
If your IPA is not sent, your radio shows the following indications:
A tone sounds.
- Your screen displays Alert Failed.
7.2
Receiving and Viewing IPA
When you receive an IPA during idle mode, your radio shows the following indications:
- The IPA is added to the IPA Status List.
A tone sounds. - The amber LED blinks until IPA is cleared.
- The display shows the IPA icon and alias.
When you receive an IPA during a call, your radio shows the following indications:
- The IPA is added to the IPA Status List.
A tone sounds. - The amber LED blinks until IPA is cleared.
- The display shows the IPA icon and alias.
- There are no visible/audible indicators while the call is in progress.
After the call, the LED indicator flashes if the IPA has the highest priority at the time.

NOTE:
If you receive multiple IPAs from the same contact, there will only be one entry in the IPA list with the latest IPA at the top.
If you receive an IPA from someone not in your Contacts List, ? is displayed before their alias.
Procedure:
1 To view the IPA list, from the menu, select Instant Personal Alert List.
2 Scroll through the IPA list using Talkgroup Scroll Rocker or Volume Up and Volume Down.

NOTE: The IPA list consists up to nine IPA entries.
When the list is reaching the end or the beginning, a tone sounds.
7.3
Clearing IPA Status List
Procedure:
Perform one of the following actions:
- From the Contact list or IPA list, select the contact that you want to clear and press and hold the PTT button to make a call.
- In the IPA Status List, press and hold the Menu/Programmable button on the contact that you want to clear.
- Power cycle your radio to clear all the IPAs.
When all IPAs are cleared, your radio shows the following indications:
- The LED indicator stops blinking.
- The IPA list will no longer be displayed.
Chapter 8
Voice Operating Transmission
Voice Operating Transmission (VOX) allows you to initiate hands-free voice-activated calls on a programmed Talkgroup. When your VOX-capable accessory detects voice, your radio automatically transmits for a programmed period.
VOX is unable to initiate hands-free voice-activated calls if your radio is connected to any Bluetooth accessories.

NOTE: VOX does not support internal microphone, Bluetooth accessories, or wired radio speaker microphone. VOX is only supported on VOX capable wired earpiece accessories.
8.1
Setting the Voice Operating Transmission
Procedure:
1 From the menu, select VOX.
2 Perform one of the following actions:
To enable VOX, select On.
To disable VOX, select Off.
Chapter 9
Emergency Operations
Emergency Alert are used to indicate critical situations. You can initiate an Emergency Alert at any time even when there is activity on the current Talkgroup.
During the Emergency mode, any call launched is declared as Emergency Call.
9.1
Declaring Emergency
Procedure:
To declare emergency locally, press and hold the Emergency button.
The display shows a countdown from 3, 2, 1, and Declaring... with increasing tone. You can release the Emergency button during the countdown to stop the process.

NOTE: You can also declare an Emergency remotely by an authorized user through WAVE APP or a dispatcher but there is no countdown on display if done remotely.
If Emergency is declared successfully, your radio shows the following indications:
The Emergency tone sounds.
- The amber LED illuminates.
The display shows Emergency.

NOTE: When the display flashes the Emergency icon, you are only allowed to view the info screen, volume control, make an emergency call and exit the emergency mode.
If Emergency fails to declare, your radio returns to the previous screen.
9.2
Canceling Emergency
Procedure:
To cancel emergency locally, press and hold the Emergency button.
The display shows a countdown from 3, 2, 1, and Cancelling... with increasing tone. You can release the Emergency button during the countdown to stop the process.

NOTE:
- You can also cancel an Emergency remotely by an authorized user through WAVE APP or a dispatcher but there is no countdown on display if done remotely.
- Your radio can be configured that only an authorized user can exit emergency mode.
If Emergency is canceled successfully, your radio shows the following indications:
The Emergency tone sounds.
- Returns to the previously selected Talkgroup.
Voice Announcement sounds.
If Emergency cancellation fails, your radio shows the following indications:
The Emergency tone sounds.
- The amber LED illuminates.
The display shows Emergency
9.3
Receiving and Responding to Emergency Alerts
When you receive a Declared-Emergency Alert, your radio shows the following indications:
The Emergency tone sounds.
- The amber LED blinks for 2 seconds.
- The display shows the Declared-Emergency Alert icon and the initiator's alias.

NOTE: The alert has a higher priority compare to making or receiving call.
When you receive a Cancelled-Emergency Alert, your radio shows the following indications:
The Emergency tone sounds.
- The amber LED blinks until all Emergency Alerts are cleared from the Emergency Alert List.
- The display shows the Cancelled-Emergency Alert icon and the initiator's alias.

NOTE: The alert has a higher priority compare to making or receiving call.
Procedure:
1 From the menu, select Emergency Alert List.
2 To select the required Emergency Alert alias, press the Volume Up or Volume Down button.
3 Press PTT button to initiate a call.
9.4
Receiving and Responding to Emergency Calls
When you receive a Emergency Call, your radio shows the following indications:
The Emergency tone sounds.
- The green LED illuminates
- For Group Call, the display shows the Group Name, Emergency Call icon in front of the caller alias for 2 seconds, and then scroll to Caller Alias.
- For Private Call, the display shows the Emergency Call icon and the initiator's alias.
- For Private Call, the display shows the display call type, Emergency Call icon in front of the caller alias for 2 seconds, and then scroll to Caller Alias.

NOTE: The Emergency Call has a higher priority compared to Talkgroup Call and Private Call.
Procedure:
1 To respond to the Emergency Call, press and hold the PTT button.
2 Wait for the Talk Permit Tone to end, and speak into the microphone.
3 To listen, release the PTT button.
9.5
Clearing Emergency Alert List
An Emergency Alert in the Emergency Alert List is cleared automatically when a corresponding Cancelled-Emergency Alert is received and if you power cycle your radio.
Procedure:
Press and hold the Menu/Programmable button on the Emergency Alert Alias.
A tone sounds.
Voice Announcement sounds.
When all Emergency Alerts clears, your radio shows the following indications:
- The amber LED extinguishes.
- Emergency Alert List icon disappears from the status bar.
Chapter 10
Man Down (Fall Alert)
The Man Down feature (henceforth known as Fall Alert) enables your radio to alert others when you are in danger.
If your radio tilts at a specified angle, is stationary for a time, or tilts and is stationary, it prompts an Alert Tone. If you do not respond to the prompt before the predefined reminder timer expires, your radio automatically sends an Emergency Alarm or Emergency Call, skipping the 3 seconds countdown.
To prevent your radio from sending an Emergency Alarm or Emergency Call, you can take the following measures:
- For Tilt Alarm, you must restore the radio to the vertical position. You may configure the threshold for the tilt angle detection of the radio to 30^ , 45^ , or 60^ , with the default angle setting as 45^ .
- For No Movement Alarm, you must move your radio. You may configure the threshold to high, medium, or low sensitivity, with the default setting set to medium sensitivity.
- For Tilt and No Movement Alarm, you must restore the radio to the vertical position or move it. Both threshold settings for Tilt and No Movement will take effect for the Tilt and No Movement Alarm. Either thresholds may trigger the man down event.
If any of the configured thresholds are exceeded consistently for the default pre-alarm timer duration of 100 seconds, you radio shows the following indications.
A tone sounds.
- The red LED blinks for the default alarm timer duration of 10 seconds.

NOTE: Both the pre-alarm timer and the alarm timer are configurable by using the Wave OnCloud (WoC) portal from 1 to 3600 seconds.
Chapter 11
Lone Worker
This feature prompts an emergency if there is no user activity (button press or Talkgroup selector activation) for a predefined time.
When there is no user activity for a predefined time, your radio pre-warns you using an audio and LED indicator once the inactivity timer expires.
You can press any button and the timer for lone worker resets.
If there is no acknowledgment from you before the predefined reminder timer expires, your radio initiates an emergency condition, skipping the 3 seconds countdown.
Chapter 12
Location
The Global Navigation Satellite System (GNSS) integrates information from the Global Positioning System (GPS), Global Navigation Satellite System (GLONASS), BeiDou Navigation Satellite System, and Galileo to determine the approximate geographical location of your radio.
12.1
Turning Location On or Off
Turning Location On
Procedure:
1 From the menu, select Location.
2 To turn on Location, press the Volume Up button.
If Location successfully turns on, your radio shows the following indications:
The voice announcement sounds.
- The display shows a positive mini notice.
Turning Location Off
Procedure:
1 From the menu, select Location.
2 To turn off Location, press the Volume Down button.
If Location successfully turns off, your radio shows the following indications:
The voice announcement sounds.
- The display shows a negative mini notice.
Chapter 13
Noise Reduction
Noise Reduction feature reduces the effect of surrounding noise that affects the clarity of the intended audio for transmission.
13.1
Turning Noise Reduction On or Off
Turning Noise Reduction On
Procedure:
1 From the menu, select Audio NR.
2 To turn on Noise Reduction, press the Volume Up button.
If Noise Reduction successfully turns on, your radio shows the following indications:
The Voice Announcement sounds.
- The display shows a positive mini notice.
Turning Noise Reduction Off
Procedure:
1 From the menu, select Audio NR.
2 To turn off Noise Reduction, press the Volume Down button.
If Noise Reduction successfully turns off, your radio shows the following indications:
The Voice Announcement sounds.
The display shows a negative mini notice.
Chapter 14
Fast Scroll Talkgroup List
A talkgroup list has a maximum of 96 channels.
The order of the channels are in numerical order. You can press and hold on the Talkgroup Scroll Rocker to perform the fast scroll. After the second channel, you can fast scroll the channels with an increment of 10.
Example: For example, if your radio has 93 channels, the increment channel change is CH 80 CH 90 CH 93 CH 1 CH 10 Ch 20.
14.1
Accessing Fast Scroll Talkgroup List
Procedure:
Press and hold the Talkgroup Scroll Rocker.
Chapter 15
Contact List
A contact name is no more than 30 alphanumeric characters and the displayed in an alphabetical order.
The contact list only supports user that are available and set to Do Not Disturb (DND). If the contact is offline, it will be hidden from the list.

NOTE: Contact your dealer for more information on the configuration.
15.1
Accessing Contact List
Procedure:
1 Press and hold the Menu/Programmable button.
2 For fast scroll, perform one of the following actions:
- Press and hold the Talkgroup Scroll Rocker.
- Press and hold the Volume Up or Volume Down button.
Chapter 16
Supervisory Override
Supervisory Override allows a supervisor to interrupt during an ongoing call except for Private Call and immediately start a supervisory call.
If the user is receiving or transmitting a call and the current ongoing call is interrupted by a supervisory call, your radio unmutes to the supervisory call and display the alias of the supervisor.

NOTE: Contact your dealer or administrator for more information on the configuration.
Chapter 17
Menu
You are able to access the menu through the Menu/Programmable button.
The following are the available features in the Menu.
Table 8: List of Features
| Feature | Description |
| Emergency Alert List | Allows you to view and delete received emergency alerts. |
| Instant Personal Alert List | Allows you to view and delete received instant personal alerts. |
| Time | Allows you to view the local time. |
| Contact List | Allows you to access the contact list. |
| All Alert Tones | Allows you to enable and disable All Alert Tones. |
| Display Brightness | Allows you to adjust the display brightness on your radio. |
| Voice Announcements | Allows you to enable and disable the Voice Announcements. |
| Do Not Disturb (DND) | Allows you to change the mode of your radio from available to "do not disturb". NOTE: When DND is enabled, you will not be able to receive any group call, quick group call, or private call. |
| Scan | Allows you to enable and disable the Scan feature. |
| Location | Allows you to enable and disable the Global Positioning System (GPS) feature. |
| Bluetooth | Allows you to enable and disable the Bluetooth. |
| Bluetooth Pairing | Allows you to enable and disable the Bluetooth. |
| Wi-Fi | Allows you to enable and disable the Wi-Fi modems. |
| Cellular | Allows you to enable and disable the Cellular modems. |
| Mute | Allows you to mute and unmute your radio. |
| Keylock | Allows you to lock the Talkgroup Scroll Rocker and limit the functions of the Power button and Menu/Programmable button. |
| VOX | Allows you to enable and disable the VOX feature. |
| Mandum | Allows you to enable and disable the Mandum feature. |
| Lone Worker | Allows you to enable and disable the Lone Worker feature. |
| Noise Reduction | Allows you to enable and disable the Noise Reduction feature. |
| Radio Name | Allows you to view your radio name. |
| Serial Number | Allows you to view the serial number. |
17.1
Accessing Menu
Procedure:
1 Press the Menu/Programmable button.
2 To navigate through the menu, press the Menu/Programmable button.
Chapter 18
Turning the Cellular On or Off
Turning the Cellular On
Procedure:
From the menu, select Cellular.
If Wi-Fi turns on, your radio shows the following indications:
- The display shows a positive mini notice.
The voice announcement sounds.
Turning the Cellular Off
Procedure:
From the menu, select Cellular.
If Wi-Fi turns on, your radio shows the following indications:
- The display shows a negative mini notice.
The voice announcement sounds.
Chapter 19
Turning the Wi-Fi On or Off
Turning the Wi-Fi On
Procedure:
From the menu, select Wi-Fi.
If Wi-Fi turns on, your radio shows the following indications:
- The display shows a positive mini notice.
The voice announcement sounds.
Turning the Wi-Fi Off
Procedure:
From the menu, select Wi-Fi.
If Wi-Fi turns off, your radio shows the following indications:
- The display shows a negative mini notice.
The voice announcement sounds.
Chapter 20
Turning DND On or Off
Turning DND On
Procedure:
1 From the menu, select Do Not Disturb (DND).
2 To turn on DND, press the Volume Up button.
If DND turns on, your radio shows the following indications:
- The red and amber LED blinks.
- The display shows a positive mini notice.
The voice announcement sounds.
Turning DND Off
Procedure:
1 From the menu, select Do Not Disturb (DND).
2 To turn off DND, press the Volume Down button.
If DND turns off, your radio shows the following indications:
- The display shows a negative mini notice.
The voice announcement sounds.
Chapter 21
Turning Voice Announcement On or Off
Turning Voice Announcement On
Procedure:
1 From the menu, select Announcement.
2 To turn on Voice Announcement, press the Volume Up button.
If Voice Announcement successfully turns on, your radio shows the following indications:
- The display shows a positive mini notice.
The Voice Announcement sounds.
Turning Voice Announcement Off
Procedure:
1 From the menu, select Announcement.
2 To turn off Voice Announcement, press the Volume Down button.
If Voice Announcement successfully turns off, your radio shows the following indications:
- The display shows a negative mini notice.
The Voice Announcement sounds.
Chapter 22
Turning Alert Tones On or Off
Turning Alert Tones On
Procedure:
1 From the menu, select Alert Tones.
2 To turn on Alert Tones, press the Volume Up button.
If Alert Tones successfully turns on, your radio shows the following indications:
- The display shows a positive mini notice.
The Voice Announcement sounds.
Turning Alert Tones Off
Procedure:
1 From the menu, select Alert Tones.
2 To turn off Alert Tones, press the Volume Down button.
If Alert Tones successfully turns off, your radio shows the following indications:
- The display shows a negative mini notice.
The Voice Announcement sounds.
Chapter 23
Adjusting Display Brightness
Procedure:
1 From the menu, select Brightness.
2 Select the preferred brightness level ranging from 0 to 8.
If brightness level is selected, your radio shows the following indications:
The display shows brightness level.
The Voice Announcement sounds.

NOTE:
The radio backlight turns off in idle mode. You can press the Power button or any other buttons to turn on the backlight.
Chapter 24
Bluetooth
This feature allows you to use your radio with a Bluetooth-enabled accessory through a Bluetooth connection. Your radio supports both Motorola Solutions and Commercially available Off-The-Shelf (COTS) Bluetooth-enabled accessory.
Bluetooth operates within a range of 10 m (32 ft) line of sight. This is an unobstructed path between your radio and your Bluetooth-enabled accessory. For high degree of reliability, Motorola Solutions recommends to not separate the radio and the accessory.
At the fringe areas of reception, both voice and tone quality start to sound "garbled" or "broken". To correct this problem, position your radio and Bluetooth-enabled accessory closer to each other (within the 10m defined range) to re-establish clear audio reception. The Bluetooth function of your radio has maximum power of 2.5mW (4 dBm) at the 10m range.
Your radio can support up to three simultaneous Bluetooth connections with Bluetooth-enabled accessory of unique types. For example, a headset, a scanner, a sensor device, and a PTT-Only Device (POD). Multiple connections with Bluetooth-enabled accessory of the same type are not supported.
Refer to the user manual of your respective Bluetooth-enabled accessories for more details on the full capabilities of your Bluetooth-enabled accessory.
24.1
Turning the Bluetooth On or Off
Turning the Bluetooth On
Procedure:
From the menu, select Bluetooth.
If the Bluetooth is enabled, your radio shows the following indications:
- The display shows a positive mini notice.
The voice announcement sounds.
Turning the Bluetooth Off
Procedure:
From the menu, select Bluetooth.
If the Bluetooth is disabled, your radio shows the following indications:
- The display shows a negative mini notice.
The voice announcement sounds.
24.2
Searching and Connecting to Bluetooth Devices
Prerequisites:
- Ensure the Bluetooth mode is on.
- If required, update the Bluetooth accessory list in Wave OnCloud (WoC) portal.
Procedure:
From the menu, select Bluetooth Pairing Status.
Your radio shows the following indications:
- The display shows Bluetooth Searching.
The voice announcement sounds.
If the Bluetooth device is connected to the radio, your radio shows the following indications:
A positive tone sound.
- The display shows a positive mini notice.
The voice announcement sounds.

NOTE:
If the connected Bluetooth device is out of range or tuned off, your radio shows the following indications:
- A negative tone sounds.
- The display returns to Bluetooth Searching.
24.3
Clearing Bluetooth Pairing
Procedure:
1 From the menu, select Bluetooth Pairing Status.
2 Scroll through the Bluetooth list using Volume Up or Volume Down buttons.
3 On the selected device, press and hold the Menu/Programmable button to clear the pairing.
If the request is successful, a positive tone sounds.
If the request is unsuccessful, a negative tone sounds.
Chapter 25
Scan
Scan allows your radio to monitor multiple Talkgroups in the programmed scan list to look for an active Talkgroup.
When in the scan mode, the system preempts an ongoing low-priority talkgroup call. Your radio unmutes to the high-priority talkgroup call. You respond to the active talkgroup when you press the PTT button during the programmed period (hang time) of an ongoing call from your scan list.
Pressing the PTT button when the radio is not in a call causes the radio to start a call on the last selected talkgroup.

NOTE: If the DND mode is enabled during the scan mode, your radio prioritizes the DND mode.
25.1
Turning Scan On or Off
Turning Scan On
Procedure:
1 From the menu, select Scan
2 To turn Scan on, press the Volume Up button.
If Scan is on, your radio shows the following indications:
The amber LED blinks.
- The display shows a positive mini notice.
The voice announcement sounds.
Turning Scan Off
Procedure:
To turn Scan off, press the Volume Down button.
If Scan is off, your radio shows the following indications:
- The display shows a negative mini notice.
The voice announcement sounds.
Chapter 26
Radio Stun
Radio Stun indicates that your radio is disabled.
When your radio is in Radio Stun mode, all the buttons except for Power, Volume Up, and Volume Down buttons are disabled. All voice activity and LED indications are disabled as well.
When your radio is in Radio Stun mode, the following radio activities occur:
- Man Down feature is disabled.
- Lone Worker feature is disabled.
- Instant Personal Alert List is cleared.
Emergency Alert List is cleared.
In powered on state, your radio displays Radio Stun.
Chapter 27
Radio Kill
Radio Kill indicates that your radio is permanently disabled.
In a normal Operation mode, when your radio receive a kill command, your radio turns off.
While in Kill mode, User Interface (UI) is not available on your radio and you are not able to turn on your radio. Your radio can only be re-activated by Motorola Solutions.
Contact your dealer for more information.
Chapter 28
User Disabled or Suspended
User Disabled or Suspended indicates that your account is disabled or suspended. When your account is disabled or suspended, you are not able to log in to the PTT server.
Your account can be disabled through the WAVE OnCloud portal or the authorized user.
If your account is disabled or suspended, your radio shows the following indications.
A tone sounds.
The red LED blinks.
- The display shows User Disabled.
The Power, Menu/Programmable, and Volume Up and Down buttons still works normally.
If you press the PTT button, your radio tries to log in to the PTT server. If your radio is able to connect to the PTT server, it will bring you to the normal login screen, else it will bring you back to the User Disabled screen.
Chapter 29
Ambient Listening
Ambient listening allows you to listen to the ambient audio of your radio during idle mode.
When you start ambient listening, your radio shows the following indications:
A tone sounds.
- The solid green LED illuminates.
- The display shows Listening and the caller alias.
Ambient listening stops when call is initiated or received.
If the Voice Operating Transmission (VOX) feature is enabled when ambient listening is active, the VOX feature is temporarily disabled and is only re-enabled once the ambient listening ends.
Chapter 30
Keylock
Keylock allows you to lock the Talkgroup Scroll Rocker and limits the functions of the Power and Menu/Programmable button.
30.1
Enabling and Disabling Keylock
Enabling Keylock
Procedure:
From the menu, select Keylock.
When keylock is enabled, the following radio activities occur:
- The display shows a positive mini notice.
- The Talkgroup Scroll Rocker is locked.
- The Menu/Programmable button will only function if programmed to access Menu or Keylock.
- The Volume Up and Volume Down buttons function as usual.
- The PTT and Emergency buttons function as usual.
Disabling Keylock
Procedure:
To disable keylock, perform one of the following actions.
- Press the Menu/Programmable Button Volume Up.
- Press the Menu/Programmable Button Volume Down.
The display shows a negative mini notice.
Chapter 31
Turning the Mute Mode On or Off
Turning the Mute Mode On
Procedure:
From the menu, select Mute.
If the Mute mode is enabled, your radio shows the following indications:
- The display shows a positive mini notice.
The voice announcement sounds. - The radio stores the previous set volume.
Turning the Mute Mode Off
Procedure:
Perform one of the following actions:
From the menu, select Mute.
- Press the Volume Up or Volume Down buttons.
- Press and hold the Volume Up or Volume Down buttons.
If the Mute mode is disabled, your radio shows the following indications:
- The display shows a negative mini notice.
The voice announcement sounds.
The radio volume restores to the previously set volume.
Chapter 32
Authorized Accessories List
Motorola Solutions provides the following approved accessories to improve the productivity of your digital portable two-way radio.
Table 9: Antenna
| Part Number | Description |
| 32012144001 | Gray Antenna ID Band, Pack of 10 units |
| 32012144002 | Yellow Antenna ID Band, Pack of 10 units |
| 32012144003 | Green Antenna ID Band, Pack of 10 units |
| 32012144004 | Blue Antenna ID Band, Pack of 10 units |
| 32012144005 | Purple Antenna ID Band, Pack of 10 units |
| HKAN4005_ | Antenna (North America) |
| HKAN4006_ | Antenna (International) |
Table 10: Battery
| Part Number | Description |
| PMNN4578_ | Li-Ion 2500 mAh Battery |
Table 11: Carry Devices
| Part Number | Description |
| PMLN6074_ | Nylon Wrist Strap |
| PMLN7128_ | Heavy-Duty Swivel Belt Clip |
| PMLN8439_ | Swivel Carry Holster |
Table 12: Chargers
| Part Number | Description |
| PMKN4294_ | USB-C to USB-A Cable |
| PS000150A31 | USB-A, 1.5 A Power Supply Wall Charger, USA/Japan |
| PS000150A32 | USB-A, 1.5 A Power Supply Wall Charger, Europe |
| PS000150A33 | USB-A, 1.5 A Power Supply Wall Charger, United Kingdom/Hong Kong |
| PS000150A34 | USB-A, 1.5 A Power Supply Wall Charger, Australia/New Zealand |
| PS000150A35 | USB-A, 1.5 A Power Supply Wall Charger, Argentina |
| PS000150A37 | USB-A, 1.5 A Power Supply Wall Charger, Korea |
| PS000150A38 | USB-A, 1.5 A Power Supply Wall Charger, Brazil |
Table 13: Earbuds and Earpieces
| Part Number | Description |
| PMLN7156_ | Earbud with In-line Mic/Push-To-Talk (PTT), MagOne |
| PMLN7159_ | Adjustable D-Style with In-Line Mic and PTT |
| PMLN7189_ | Swivel Earpiece with In-line Microphone and PTT |
| PMLN7157_ | 2-Wire with Transparent Tube, Black |
| PMLN7158_ | 1-Wire Surveillance Earpiece, In-Line Mic, and PTT |
| PMLN8191_ | 1-Wire Enhanced Clear Tube Earpiece, 2.5 mm Single Pin, An-gled |
| PMMN4127_ | Operational Critical Wireless Remote Speaker Mic WM500 |
| PMLN7560_ | Receive Only Earpiece with Translucent Tube |
| PMLN8123_ | EP910W Operational Critical Wireless Earpiece PTT |
| PMLN8298_ | WP300 Wireless Bluetooth Control PTT Pod |
| PMLN8077_ | Over-the-Ear Earpiece, Single Pin |
| PMLN8125_ | Over-the-Ear Earpiece, Single Pin, Short Cord |
| PMLN8190_ | 1-Wire Enhanced Clear Tube Earpiece, 2.5 mm Single Pin, Straight |
| 5080384F72 | Replacement Foam Plug-ins |
| RLN6282_ | Replacement Ear Tips |
| RLN6242_ | Quick Disconnect Acoustic Tube |
Table 14: Remote Speaker Microphones
| Part Number | Description |
| PMMN4125_ | RM250 Remote Speaker Microphone |
Table 15: Miscellaneous Accessories
| Part Number | Description |
| HKLN4690_ | Battery Door |