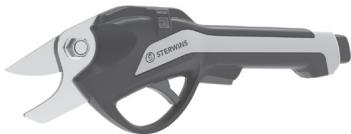
4VPS1-18.1 - Sécateurs électriques STERWINS - Free user manual and instructions

Find the device manual for free 4VPS1-18.1 STERWINS in PDF.

Page 492
Manual assistant
Powered by ChatGPT
Waiting for your message
Product information

Brand : STERWINS

Model : 4VPS1-18.1

Category : Sécateurs électriques

Download the instructions for your Sécateurs électriques in PDF format for free! Find your manual 4VPS1-18.1 - STERWINS and take your electronic device back in hand. On this page are published all the documents necessary for the use of your device. 4VPS1-18.1 by STERWINS.

USER MANUAL 4VPS1-18.1 STERWINS

44 Pruning Shears with Battery included

KOTOpoe coÉpaHO He NOHOCTHIO IIM

NPEAYNPEXAEHHE. NMepeg BKnIOUEHAEM YCTPOCTBA

| sais manu are beneceuranaus

E) He aoraryärecs 3 iHCTpyMeHToM

He akopucrosyire perani Ta npAnanAR, ski He pexoMeHpo ani aupoéHuKoM.

Thank you for choosing this product. Upon designing and manufacturing our products, we place all of our efforts into ensuring an excellent quality that meets the needs of the users.

IMPORTANT! IN ORDER TO OBTAIN THE UTMOST SATISFACTION FROM THIS PRODUCT UPON SETTING IT UP, USING IT, AND MAINTAINING IT, WE RECOMMEND THAT YOU CAREFULLY READ THIS USER MANUAL BEFORE USING THE PRODUCT. PLEASE PAY ATTENTION TO BASIC WARNINGS RELATING TO SAFETY WITHIN THIS MANUAL, AND KEEP THE MANUAL FOR LATER REFERENCE.

IMPORTANT, TO BE KEPT [eh FOR FUTURE REFERENCE: PLEASE READ CAREFULLY

INTENDED USE OF INTEGRATED BATTERY SHEARS This product is intended for outdoor use only, and must not be used inside a building under any circumstances, These shears are a handy gardening tool for cutting branches or plant stems. The maximum cutting capacity is 18 mm for softwood and 15 mm for hardwood, do not use this pruning shears for branches with a larger diameter. It is designed for domestic use and is not intended for commercial, craft or industrial use.

As this product is intended for Leisure use, it is not designed for intensive, repeated and continuous use over a Long period of time, as this could lead to overheating of the pruning shears and consequent damage to the product.

For safety reasons, it is essential that you read this manual in its entirety before using it for the first time and follow all instructions.

IT RO It should not be used for any purpose other than those described above

This product is designed for hand use. This product should never be installed on à workbench or any other support.

After unwrapping the packing, make sure that the product is complete with its accessories (if any). If the product is damaged or has any defect, please do not use it and bring back it to your dealer. If you give this tool to another people, please give him also this instruction manual.

Please note that our equipment has not been designed for use in commercial, trade or industrial applications. Our warranty will be voided if the machine is used in commercial, trade or industrial businesses or for equivalent purposes. This product has been designed to be used over a period of 5 years (Expected lifetime).

(2. SAFETYINSTRUCTIONS WARNING: Read all safety

warnings, instructions,

illustrations and specifications

provided with this power tool. Failure to follow al instructions listed below may result in electric shock, fire and/ or serious injury.

SAVE ALL WARNINGS AND INSTRUCTIONS FOR FUTURE REFERENCE The term «power toob in the warnings refers to your mains-operated (corded) power tool or battery-operated (cordless) power tool.

21 WORK AREA SAFETY A) Keep work area clean and well lit. Cluttered or dark areas invite accidents.

B) Do not operate power tools in explosive atmospheres, such as in the presence of flammable liquids, gases or dust. Power tools create sparks which may ignite the dust or fumes.

€) Keep children and bystanders away while operating a power tool, Distractions can cause you to lose control

2.2 ELECTRICAL SAFETY A) Power tool plugs must match the outlet. Never modify the plug in any way. Do

not use any adapter plugs with earthed (grounded) power tools. Unmodified plugs and matching outlets will reduce risk of electric shock.

B) Avoid body contact with earthed

or grounded surfaces, such as pipes, radiators, ranges and refrigerators. There is an increased risk of electric shock if your body is earthed or grounded.

C) Do not expose power tools to rain or wet conditions. Water entering a power tool will increase the risk of electric shock. D) Do not abuse the cord. Never use the cord for carrying, pulling or unplugging the power tool. Keep cord away from heat, oil, sharp edges or moving parts. Damaged or entangled cords increase the risk of electric shock.

E) When operating a power tool outdoors, use an extension cord suitable for outdoor use. Use of a cord suitable for outdoor use reduces the risk of electric shock

F) Ifoperating a power tool in a damp location is unavoidable, use a residual current device (RCD) protected supply. Use of an RCD reduces the risk of electric shock.

2.3 PERSONAL SAFETY A) Stay alert, watch what you are doing and use common sense when operating a power tool, Do not use a power tool while you are tired or under the influence of drugs, alcohol or medication. À moment ofinattention while operating power tools may result in serious personal injury,

B) Use personal protective equipment. Always wear eye protection while operating the machine. Protective equipment such as a dust mask, non-

skid safety shoes, hard hat or hearing protection used for appropriate conditions will reduce personal injuries.

C) Prevent unintentional starting. Ensure the switch is in the off-position before connecting to power source and/or battery pack, picking up or carryingthe tool. Carrying power tools with your finger on the switch or energising power tools that have the switch on invites accidents. D) Remove any adjusting key or wrench before turning the power tool on. À wrench or a key Left attached to a rotating part ofthe power tool may result in personal injury.

E) Do not overreach. Keep proper footing and balance at all times. This enables better control ofthe power tool in unexpected situations.

F) Dress properly. Do not wear Loose clothing or jewellery. Keep your hair and clothing away from moving parts. Loose clothes, jewellery or Long hair can be caught in moving parts.

G) If devices are provided for the connection of dust extraction and collection facilities, ensure these are

connected and properly used. Use of dust

collection can reduce dust-related hazards.

H) Do not Let familiarity gained from frequent use of tools allow you to become complacent and ignore tool safety principles. À careless action can cause severe injury within a fraction of a second.

1) LED should not be used face to the eyes of the operator.

2.4 POWER TOOL USE AND CARE A) Do not force the power tool. Use the correct power tool for your application. The correct power tool will do the job better and safer at the rate for which it was designed

B) Do notuse the power tool ifthe switch does not turn it on and off. Any power tool that cannot be controlled with the switch is dangerous and must be repaired.

C) Disconnect the plug from the power

source and/or remove the battery pack,

if detachable, from the power tool before

making any adjustments, changing

accessories, or storing power tools. Such 42

preventive safety measures reduce the risk of starting the power tool accidentally.

D) Store idle power tools out of the reach of children and do not allow persons unfamiliar with the power tool or these instructions to operate the power tool. Power tools are dangerous in the hands of untrained users.

E) Maintain power tools and accessories. Check for misalignment or binding of moving parts, breakage of parts and

any other condition that may affect the power tools operation. If damaged, have the power tool repaired before use. Many accidents are caused by poorly maintained power tools.

F) Keep cutting tools sharp and clean. Properly maintained cutting tools with sharp cutting edges are Less likely to bind and are easier to control

G) Use the power tool, accessories and tool bits etc. In accordance with these instructions, taking into account the working conditions and the work to be performed. Use of the power tool for

operations different from those intended could resutt in a hazardous situation.

H) Keep handles and grasping surfaces dry, clean and free from oil and grease. Slippery handles and grasping surfaces do not allow for safe handling and control of the tool in unexpected situations.

2.5 BATTERY TOOL USE AND CARE A) Recharge only with the charger specified by the manufacturer. À charger that is suitable for one type of battery pack may create a risk of fire when used with another battery pack.

B) Use power tools only with specifically designated battery packs. Use of any other battery packs may create a risk of injury and fire.

€) When battery pack is not in use, keep

it away from other metal objects, like paper clips, coins, keys, nails, screws or other small metal objects that can make a connection from one terminal to another. Shorting the battery terminals together may cause burns or a fire.

D) Under abusive conditions, liquid may be ejected from the battery; avoid contact. Icontact accidentally occurs, flush with water. f liquid contacts eyes, additionally seek medical help. Liquid ejected from the battery may cause irritation or burns.

E) Do not use a battery pack or tool

that is damaged or modified. Damaged

or modified batteries may exhibit unpredictable behaviour resulting in fire, explosion or risk of injury.

F) Do not expose a battery pack or tool to fire or excessive temperature. Exposure to fire or temperature above 130°C may cause explosion.

G) Follow all charging instructions and

do not charge the battery pack or tool outside the temperature range specified in the instructions. Charging improperly or at temperatures outside the specified range may damage the battery and increase the risk of fire.

2.6 SERVICE A) Have your power tool serviced by a qualified repair person using only identical replacement parts, This willensure that the safety of the power tool is maintained.

B) Never service damaged battery packs. Service of battery packs should only

be performed by the manufacturer or authorized service providers.

2.7 PRUNING SHEARS SAFETY A) Do not use the pruning shear in bad weather conditions, especially when there is a risk of lightning. This decreases the risk of being struck by Lightning.

B) Keep all power cords and cables away from cutting area. Power cords or cables may be hidden and can be accidentally cut by the blade.

C) Wear ear protection. Adequate protective equipment will reduce the risk of hearing loss.

D) Hold the pruning shear by insulated gripping surfaces only, because the

blade may contact hidden wiring. Blades contacting a “live” wire may make exposed metal parts ofthe pruning shear “live” and could give the operator an electric shock. E) Keep all parts ofthe body away from the blade. Do not remove cut material or hold material to be cut when blades are moving. A moment of inattention while operating the pruning shear may result in serious personal injury.

F) When clearing jammed material or servicing the pruning shear, make sure the power switch is off and the battery pack

is removed or disconnected. Unexpected actuation of the pruning shear while clearing jammed material or servicing may result in serious personal injury.

G) Carry the pruning shear by the handle with the blade stopped and taking care not to operate the power switch. Proper carrying ofthe pruning shear will decrease the risk of inadvertent starting and resultant personal injury from the blades.

H) When transporting or storing the pruning shear, always use the blade cover.

Proper handling ofthe pruning shear will decrease the risk of personal injury from the blades.

2.8 RESIDUAL RISKS Even if you are operating this product in accordance with all the safety requirements, potential risks of injury and damage remain. The following dangers can arise in connection with the structure and design of this product

— Health defects resulting from vibration emission ifthe product is being used over Long periods of time or not adequately managed and properly maintained.

+ Injuries and damage to property due to broken cutting attachments or the sudden impact of hidden objects during use + Danger of injury and property damage caused by flying objects. = Prolonged use of this product exposes the operator to vibrations and may produce ‘whitefinger’ disease. In order to reduce the risk, please wear gloves and keep your hands warm. If any of the ‘whitefinger”

symptoms appear, seek medical advice immediately. ‘Whitefinger’ symptoms include: numbness, loss of feeling, tingling, pricking, pain, loss of strength, changes in Skin colour or condition. These symptoms normally appear in the fingers, hands

or wrists. The risk increases at low temperatures.

2.9 SYMBOLS ON THE PRODUCT Complies with European standard: This Sat ea at planes CE | Snranr a ane Eropean directives, and a test of compliance with these directives has been performed.

market of the Member States of the Customs

E A [ Single mark of circulation of products on the Union:

Conform to the technical regulations of Ukraine

International protection code IPXO | (protection degree against dust and water intrusion)

Read and understand all instructions before operating the product, follow all warning and safety instructions.

Waste of electrical products must not be disposed of with household waste. Please recycle where facilities exist. Check with your local authorities or retailer for recycling advice.

Do not expose the product to rain or wet conditions.

Wear protective gloves.

Bewsare of sharp elements.

2:10 SYMBOLS IN THIS MANUAL EAN Type and source of the danger: Failure to observe this warning may result in physical injury or death.

Type and source of the danger: This symbol indicates that damage tothe appliance, the environment or other property may occur as à result of non-observance of this warning.

Note: This symbol indicates important information for better understanding of the product

Read the manual: This symbol indicates that you need to read the user manual careful\y

This product is recyclable. it cannot be used anymore, please take it to waste recycling centre.

Recycle this instruction manual

Recycling code of paper

Guaranteed sound power level {tested according to Directive 2000/14/EC as amended by 2005/88/EC)

Please refer tothe correspondingilustration at the end of the booklet

G. TECHNICAL DATA Model AvPS 181 Power (W) sow Voltage (V) AV max

Blade tightening torque (Nm) 23-28Nm Charger pack Model X20500-2000VUG Frequency Rated output Working ae-2u"c

Charger is NOT included in the sales unit.

Recharge only with the charger specified by the manufacturer If other chargers are used for charging this battery pack, it may cause a risk of fire.

Recommendation for the operator to wear hearing protection

- The declared vibration total value(s) and the declared noise emission value(s) have been measured in accordance with a standard test method and may be used for comparing one tool with another:

- The declared vibration total value(s) and the declared noise emission value(s) may also be used in a preliminary assessment of exposure.

Warning: - The vibration and noise emissions during actual use of the power tool can differ from the declared values depending on the ways in which the tool is used especially what kind of workpiece is processed:

- The emissions need to identify safety measures to protect the operator that are based on an estimation of exposure in the actual conditions of use (taking account of all parts of the operating cycle such as the times whenthe tool is switched off and when it is running idle in addition to the trigger time)

ES WARNING! The product must be fully assembled before operation! PT Do not use a product that is only

partly assembled or assembled h damaged parts! Follow the assembly instructions step-by-step and use the pictures provided as a visual guide to easily assemble the product!

2. Power on/off button

3. Battery pack release lever

4 Safety lever 5. Main trigger 6: Blade guard 7. Counter blade

8. USB C charging port (Sv max 23)

10. Battery indicator button and led Light

Unboxing instructions: + Wear gloves when unboxing.

+ Do not use cutter, knife, saw or any other similar tool for unboxing.

2 Carry the tool only by the handle (6) — Keep the box for further reuse (transport and storage)

+ Keep instruction manual in a dry area for further consultation.

completely assembled with the

© This cordless battery pruner comes pruner blade pre-installed.

4.3 PREPARATION Wear safety equipement. Before using the product, make sure to put on the following protective equipement.

4.4 FIRST USE WARNING: Read the «SAFETY INSTRUCTION» section atthe beginning of this manual including all text under subheading therein before using this product. 513

Pay particular attention using the machine for the first time: focus and dedicate all your attention to this first use. Make the first trial on a free space with no obstacle and no surrounding element.

4.5 OPERATION Charge andinsertthe battery illustration (&) To charge the battery, connect it with the charging wire {Type C adaptor) and select an USB type A power source that match to SV 2A or less.

Unplug the charger when charging is complete.

NOTE: The charge level indicator LED light will flash during normal use. The light will turn solid green when the battery is fully charged

CAUTION: This charger does not automatically turn off when the battery is fully charged. Please take care not to leave the battery pruner plugged into the charger.

The charging process starts as soon as the charger is plugged into the proper electrical outlet (230-240V) When no further use is planned for an extended period of time, disconnect the battery charger from the shears. Battery charging: The length of service between each charging varies depending on the type of work you are doing. The battery in this battery pruner has been designed to provide maximum trouble-free Life, However,

like all batteries, it will eventually wear out. To obtain the longest possible battery Life, we suggest the following

- Store and charge your battery pruner in à cool area. Temperatures above or below normal room temperature will shorten battery life.

- Never store the battery pruner with the battery in à discharged condition. Recharge the unit immediately after itis discharged

: Al batteries gradually lose their charge. The higher the temperature is, the faster they lose their charge. If you store your battery pruner for long periods of time without using it, recharge the battery every 6 months. This will extend battery life.

NOTE: À charge level indicator LED light will always be iluminated when the charger is plugged in and the mains power is turned on. The charge indicator indicates the charge status of the battery pruner as shown below

Condition Color of LED's battery

Charging Flash green

Full charged Fix green

Battery under 20% of Fixred

Hardware overcurrent Redblinkingonce

GT Color of LED's pruning shears

Battery under 30% of Fixred

NOTE: It is possible that for a short time the battery and the pruning shears do not have LEDS of the same color. It may take a little longer for the battery LED to turn red. Information on pruning shears predominates.

WARNING: Do no use the battery for charging any other product than the integrated battery shears &v.

Insert the battery into the device and make sure the battery is inserted in the right orientation: power button

on up side. To remove the battery, press the battery pack release lever and then remove the battery.

ustration @) û WARNING: Ensure the blade does

not touch any objects before turning on the product.

First, press the pouver button, the green light wilL turn on.

After that, you can hold the pruner firmly, depress and hold

the safety lever with middle finger and ring finger, then

active the main trigger with index finger.

If the safety lever or trigger are not activated for 5s, the pruning shears will automatically switch off. To keep the pruning shears switched on, you can keep the safety lever engaged between cuts (in this case, be careful

not to press the trigger inadvertently)

To switch OFF, release the main trigger and press the power button. The green Light will turn Of.

NOTE: For safety, this pruner could switch off by the blade closed

- Depress and hold the safety lever with middle finger and ring finger, then active the main trigger with index finger. Hold in the position until the blade is totally closed.

- Press the power button when the blade is closed with your other hand, the green Light will turn off.

Operation safety wamings : Check the product and charger as well as accessories for damage before each use. Do not use the product fit is damaged or shows wear.

— Double check that the accessories and attachments are property fixed.

— Always hold the product on its handle. Keep the handie dry to ensure safe support

— Ensure that the air vents are always unobstructed and clear Clean them if necessary with a soft brush. Blocked air vents may lead to overheating and damage the product.

— Switch the product off immediately if you are disturbed while working by other people entering the working area. Always let the product come to complete stop before putting it down.

Do not overwork yourself Take regular breaks to ensure you can concentrate on the wark and have full control over the produet

— Before switching the product on, check whether it has been assembled correctiy and alLthe moving parts are running smooth.

— We recommend slightly dampening surfaces in dusty conditions or using a mister attachment.

— operate the product only at reasonable hours - not eariy in the morning or Late at night when people might be disturbed

avoid using the product in bad weather conditions, especially when there is a risk of ightning. Do not perate the product in poor Lighting. The operator

requires a clear view of the work area to identify potential hazards.

— operating similar tools nearby increases both the risk of hearing injury and the potential for other persons to enter your work area

— Keep firm footing and balance.

Do not overreach. Overreaching can result in loss of balance. Always be sure of the footing on slopes.

2 Walk, never run. Keep all parts of your body away from any moving part.

Never run the product without the proper equipment attached.

— Do not modify the product in any way or use parts and accessories that are not recommended by the manufacturer. If the product is dropped, suffers heavy impact or begins to vibrate abnormally, immediately stop the product and inspect for damage or identify the cause ofthe vibration. Any damage should be property repaired or replace by an authorized service center.

— To reduce the risk of injury associated with contacting rotating parts, always stop the machine and make sure all moving parts have stopped

- before cleaning or clearing a blockage

- when leaving the product unattended

- before installing or removing attachments

- before checking, maintaining or working on the product

= ifthe machine starts to vibrate abnormally (inspect immediately)

4.6 PRUNINGTIPS ustration @D to @)

Pruning can be done all year round. It is advisable to prune lightiy when the shrub/plant is in full bloom or in its peak. Prune more heavily when the plant is less active and dormant.

Regular tip pruning of new growth should be carried out wéhen plants or shrubs are at a young age ideally seedtings or rooted cutting stage.

For higher results tip pruning is best after flowering and during the season. If you prune too Late in the season this affects and reduces your bloom

Tip pruning increases your flowers and creates bushier plants.

Sereens & Hedges Light pruning is recommended for all screens and hedge plants. Pruning on 2 regular basis promotes and maintains dense growth

Pruning to Encourage Flowering After flowers have had their full bloom it is then recommended to prune to promote more flowers next season. All dead flowers should be removed as they drain the plant. This then prevents the plant possibly going to seed

Pruning to Decrease Rapid Growth

To minimize new growth on shrubs and plants cut flush with the stem of the shrub/tree. This also assists if you want to create a topiary Look and train your plant or shrub,

Pruning to Repair Damage If severe weather conditions have damaged your plants or

Shrub, itis in the plants best interests to be pruned to help reinstate its condition.

If any insects have infected your plants/shrubs, prune back the affected areas to assist with new growth

4.7 AFTER USE Switch the product off and Let it cool down. Check, clean and store the product as described below. After each use it is recommended you disinfect the blades by using methylated spirits. This helps prevent the spread of disease to other plants and shrubs the next time you are pruning.

(5._ TRANSPORTATION )

Transporting the machine may require that you meet certain requirements specific to your country. Please make sure to respect them by contacting the authoriies of your

country, in order to respect them alL Let the machine cool for 2 hours outside before transport it. Ensure temperature during transportation will never be outoftemperature range given on chapter storage. Protect the product from any heavy impact or strong vibrations which may occur during transportation in vehicles. Secure the product to prevent it from slipping or falling over.

CG. WINTERING& STORAGE

6.1 STORE THE MACHINE Let the machine cool for 2 hours outside before storing it Be sure to secure the unit while transporting Examine the unit thoroughly for worn, loose or damaged parts. Clean the product before storing.

Onty store the machine in a clean, dry, ventilated place with a temperature range of 10°C to 30°C. Cover i in order to provide added protection. Do not expose the product to sunlight. Make sure the product is always protected from cold and humidity. We recommend using the original package for storage or covering the product with a suitable cloth or enclosure to protect it against dust

Appiy the maintenance advice before storing the product.

Keep the product in a dry place and never let it be immersed in liquids, always store the product with its blade guard

Keep the product out ofthe reach of children Remove the battery for storage

Store the battery separately in a dry place after charging itto more than 80%.

For à prolonged period of non usage, recharge the battery every 6 months.

71 CLEANING DANGER! Risk of injury due to electric shock. Shutdown the power tool before adjusting, inspecting, cleaning or storing the product.

WARNING! Do not handle cutting parts without gloves as they are sharp and can become hot after use, potentially causing personal injury.

Cleaningthe product: illustration G) 2) Letthe machine cool for 2 hours outside before cleaningit.

Keep all safety devices, air vents, and motor housing free of debris and dirt. Wipe down the equipment with a cloth Itis highly suggested that you clean the device after every use. Do not use cleaning agents to clean the plastic parts, as these can attack the plastic and weaken the structural integrity ofthe product.

It is important to clean the blades after each cutting session, before storing your pruning shears. This will ensure that the cutting efficiency is maintained so that the blade and counter blade can slide easily. In addition, à clean and healthy blade will prevent the spread of disease to your plants during pruning. Furthermore, cleaning after

PT IT EL PL RU KZ UA RO

ne cutting session will be easier than after 2 prolonged period

Before working on the pruning shears, it is essential to disconnect the battery.

Wear gloves to protect yourself from a possible cut, then soak a wadded cloth with 90° alcohol, turpentine or a suitable cleaning spray, then rub the blade and the counter-blade until ali traces of sap and dirt disappear.

As the product is not completely waterproof, it is important not to pour any liquid directly onto the pruning shears (including the blades)

A dull blade can damage your pruning shears, as the motor will have to work harder to prune.

‘The thicker and narrower counter-blade does not need to be sharpened, only the thin blade. The blade can only be sharpened on one side: the side opposite the counterblade. A sharpening stone is suffcient. But if the blade has nicks, it should be replaced.

WARNING! DO NOT USE THE LED ON FACE OF THE USER.

7.2 MAINTENANCE SCHEDULE Part BLADE WHEN IT'S NECESSARV/ CHANGE REFER TO TROUBLE SHOOTING

7.3 REPLACEMENT When servicing, use only identical replacement parts. Use of any other parts may create a hazard or cause product damage. f you shall replace the cutting blade, make sure that the following characteristics are the same: same shape, same Length, same thickness, same weight, same material

‘The new blade is only available through sale service.

Change the blades:ilustation €) @D

1. To remove the cutting blade, untighten the screwr and remove it completely (make sure to not lose the washer)

2. Carefully pull the cutting blade away from the pruning shears.

3.Insert the new eutting blade into position.

4. Place back the screwr and washer and tighten it. There is no need to apply too much force ta tighten the screw as it would exerce excessive friction resistance between the blades.

Pos | vescmpnon | | Pos | escriPrion 1 [so 19 | Ptanetcarrier 2 | Mognet 20 | Planetgear 3 [washer 21 | ptanet carrier [cer 22 | ptanetgear 5 [ein 23 | spacer 6 [actitybade | [2 [rositionpiate 7 [Shea 25 [screw Fredblade 26 | Motor pinion 5 Ju 27 | screw T0 [sen 28 [motor nm [cer Motor Control 29 | and Circuit 12 [screw Board Assembly 13 | searing so [ru 2 Shaft EL Clasp 15 [screw 32 | satterypack 16 | Gearbox 33 [screw 17 | Ringgear a [rentpinen 18 Planet carrier pate 35 [rigntshet

7.5 TROUBLESHOOTING DANGER! Risk of injury due to electric shock. Before any trouble shooting, switch off the product.

Problems Solutions | Qualification causes Chargine, the battery - The battery Satteryis_ | lightshoutd | customer not charged Product 8 en does not When the nc battery button is pressed Thebattery | chintne isnot batter) Customer correctly ee inserted completely

Probable Problems causes Solutions | Qualification Contact Thebattery | your is defective service Customer center Contact Thedevice | your Product is defective service Customer does not center work Press the power Thedevice | button - isnot | TheLED | Customer switchedon | aboveit should light up green % Sharpen e Customer product | The blade is Sharpen or replacethe | _ replace does wo ee | notant After Sale or properiy/ Customer tops in The blade is | cieanthe mid-eut | Trend genthe | customer

Problems | Prébéble | solutions | qualification Thecut branch is Larger Th manthe. | Decrease e | capacityof product | SP2Y 9 | ihecutting | customer does | (emmigr | diameter notcut | hardwood, property” | émm for stopsin | _softwood) mid-cut andeounter | Check the tightnessof | Customer blade are no | iEntness tonger tight Contact Thebattery | your The |isdefective | service | Customer autonomy ee SW Miebiades | cieantn ebladeis | Cleanthe dirty blade | Customer

‘The machine smokes during operation

immediately stop the machine, then speak to service center

Electrical products should not be discarded with household products. Used electrical products must be collected separately and disposed of at collection points provided for this purpose. Talk with your local authorities or dealer for advice on recycling

911 STERWINS WARRANTY STERWINS products are designed according to the highest quality standards for products intended for the consumer market. This sale warranty covers a period of 5 years as of the date of purchase of the product. This warranty covers all defects in materials and workmanship: missing parts and elements, and damage occurring under normal

use circumstances. Repair and replacement of parts do not lead to an extension of the initial warranty period. You must be able to provide proof of the purchase for this product and the date of purchase. Warranty coverage is limited to the value of this product.

The battery warranty covers a period of 2 years as ofthe date of purchase of the product:

9.2 WARRANTY EXCLUSIONS This warranty does not cover problems nor incidents resulting from incorrect use of the product. The following items are not covered by warranty:

=> The tool have been used incorrectiy

— Damage occurring upon transporting or setting up this product

— Repairs and/or change of parts carried out by a third party

— Damage caused by external factors or foreign objects such as sand or stones

— Damage resulting from non-compliance with the safety andusage instructions

> The tool have been disassembled or opened

— The tool have been in a wet environment (dewv, rain, submerged in water.)

— The tool has been used for professional purpose

— The too has been exposed to a temperature out of the range specified in chapter “storage”

The product must be used under normal usage circumstances, and for non-professional purposes.

Therefore, excluded from this warranty are products used by gardening companies, local authorities, as well as companies offering paid rentals or free loaning of equipment.

Inthe event of a problem or defect, you should first always consult your Sterwins dealer. In most cases, the Sterwins dealer will be able to solve the problem or correct the defect. Keep your invoice or your receipt:these documents will be requested upon processing any claims.

annees Qi product recyelabe cannot