WDH 229 PTC - Air-conditioner QLIMA - Free user manual and instructions
Find the device manual for free WDH 229 PTC QLIMA in PDF.
| Product type | Wall-mounted monoblock air conditioner |
| Brand | QLIMA |
| Model | WDH 229 PTC |
| Power supply | 230 V ~ 50 Hz |
| PTC heating power | 800 W |
| Refrigerant | R290 / R32 |
| Operating modes | Cooling, Heating, Dehumidification, Ventilation |
| Fan speed | 3 speeds (Low, Medium, High) |
| Timer | 24-hour programmable (delayed start and stop) |
| Remote control | Yes, with AAA batteries |
| Connectivity | WiFi 2.4 GHz via Smart Life app |
| PTC function | Additional electric heating activatable in heating mode |
| Auto swing | Yes, vertical (via remote control) |
| Air filter | Washable, regular cleaning recommended |
| Installation | Wall-mounted, requires 2 ventilation holes of 180 mm and 1 drainage hole |
| Maintenance | Unplug before cleaning, use a soft damp cloth |
| Safety | Compressor protection (3 min delay), automatic shutdown on overheating |
| Error codes | Complete list (F1 to FL) in the manual |
| Warranty | 24 months |
Frequently Asked Questions - WDH 229 PTC QLIMA
User questions about WDH 229 PTC QLIMA
0 question about this device. Answer the ones you know or ask your own.
Ask a new question about this device
Download the instructions for your Air-conditioner in PDF format for free! Find your manual WDH 229 PTC - QLIMA and take your electronic device back in hand. On this page are published all the documents necessary for the use of your device. WDH 229 PTC by QLIMA.
USER MANUAL WDH 229 PTC QLIMA
natural_image
White rectangular electronic device with a horizontal screen and a digital display showing '88' (no visible text or symbols on the device body)
| D | GEBRAUCHSANWEISUNG | 2 |
| E | INSTRUCCIONES DE USO | 34 |
| F | MANUEL D’UTILISATION | 64 |
| GB | OPERATING MANUAL | 94 |
| I | ISTRUZIONI D’USO | 126 |
| NL | GEBRUIKSAANWIJZING | 158 |
| P | MANUAL DE INSTRUÇÕES | 190 |
| SLO | PRIROČNIK ZA UPORABO | 222 |
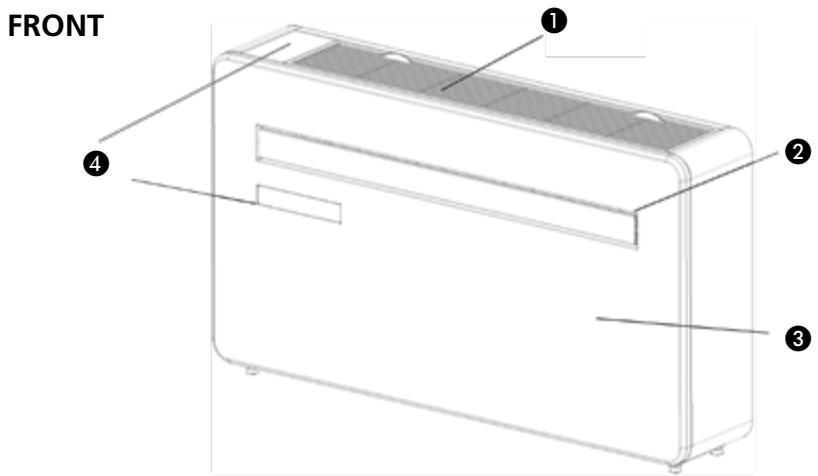
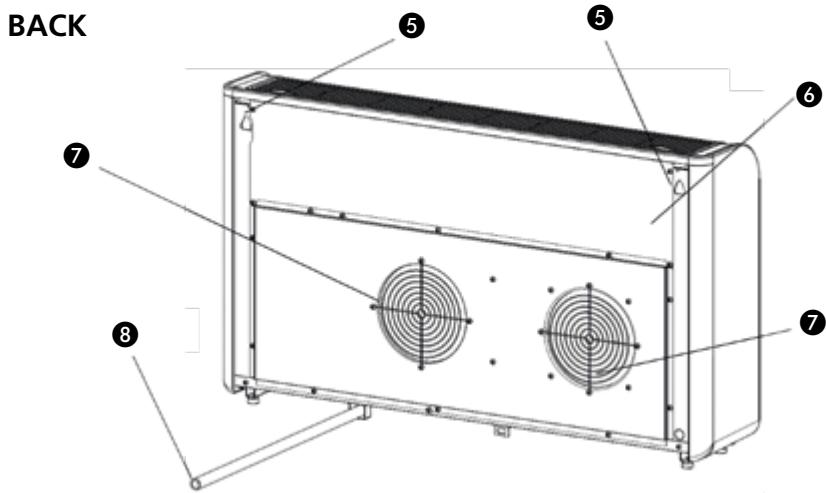
WICHTIGE TEILE
natural_image
Line drawing of a rectangular electronic device casing with ventilation slots and a handle (no text or symbols)1

natural_image
Pure geometric diagram with dots and circles, no text or symbols present2

natural_image
Two overlapping rectangular shapes with no text or symbols3

4

6
7
natural_image
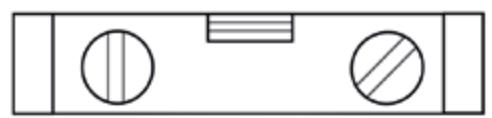
Simple diagram with three circles and a horizontal bar inside a rectangle (no text or symbols)1

natural_image
Simple line drawing of a handheld electric tool (no text or symbols)2

natural_image
Simple geometric diagram with a circle and two overlapping squares, no text or symbols present.3
natural_image
Simple line drawing of a rectangular object with three diagonal lines and a protruding rod (no text or symbols)4
natural_image
Two identical mechanical drill bit designs shown side by side, no text or symbols present.7

natural_image
Simple line drawing of a rectangular shape with a triangular tip and a small circle inside (no text or symbols)6

8
BENÖTIGTES WERKZEUG
Verification code has been sent to: Resend(57s)


STANDORT EINRICHTEN
RAUM HINZUFÜGEN
pie
Connecting Now | Category | Value (%) | |---|---| | Describing for Device | 8 | | Registering Device to the Cloud | 0 | | Instalizing your Device | 0 |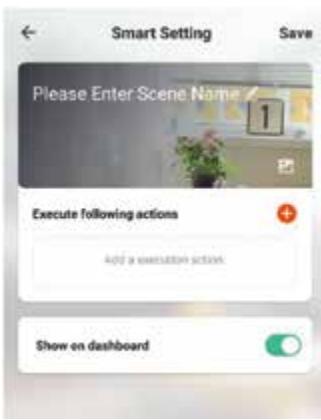

natural_image
Simple line drawing of a trash bin with no text or symbolsnatural_image
Line drawing of a rectangular electronic device casing with ventilation slots and a handle (no text or symbols)1

natural_image
Pure geometric diagram with dots and circles, no text or symbols present2

natural_image
Two overlapping rectangular shapes with no text or symbols3
4

6

7
natural_image
Simple diagram with three circles and a horizontal bar inside a rectangle (no text or symbols)1

natural_image
Simple line drawing of a handheld electric tool (no text or symbols)2
natural_image
Simple geometric diagram with a circle and two overlapping squares, no text or symbols present.3

natural_image
Simple line drawing of a rectangular object with three diagonal lines and a protruding rod (no text or symbols)4

natural_image
Two identical mechanical drill bit designs shown side by side, no text or symbols present.7

natural_image
Simple line drawing of a rectangular shape with a triangular tip and a small circle inside (no text or symbols)6

8
Verification code has been sent to iResend(57s)

pie
Connecting Now | Category | Value (%) | |---|---| | Deshilling for Device | 8 | | Registering Device to the Cloud | 0 | | Instalizing your Devices | 0 |

PESTAÑA PROFILE (PERFIL)
natural_image
Symbolic illustration of a trash bin with crossed lines indicating no waste or plastic (no text or labels)
natural_image
Line drawing of a rectangular electronic device casing with ventilation slots and a handle (no text or symbols)1

natural_image
Simple diagram with dots and circles, no text or symbols present2

natural_image
Two overlapping rectangular shapes with no text or symbols3
4

6

7
9
10

5
natural_image
Simple diagram with three circles and a horizontal bar inside a rectangle (no text or symbols)1

natural_image
Simple line drawing of a handheld electric tool (no text or symbols)2

natural_image
Simple geometric diagram with a circle and two overlapping squares, no text or symbols present.3

natural_image
Simple line drawing of a rectangular object with three diagonal lines and a protruding rod (no text or symbols)4

natural_image
Two identical mechanical drill bit designs shown side by side, labeled with number 5 (no text or symbols on the drill bit itself)7

natural_image
Simple line drawing of a rectangular shape with a triangular tip and a small circle inside (no text or symbols)6

8
OUTILS REQUIS
MÉTHODES DE CONNEXION DISPONIBLES POUR LA CONFIGURATION
Verification code has been sent to: Resend(57s)

Password must contain 8-20 letters and numbers


CONFIGURATION DE VOTRE MAISON DANS L'APPLICATION
CONFIGURATION DE VOTRE EMPLACEMENT
AJOUTER UNE AUTRE PIÈCE
pie
Connecting Now | Category | Percentage (%) | |---|---| | Searching for Devices | 8 | | Registering Device to the Cloud | 0 | | Installating your Devices | 0 | Make sure your phone and device are as close to your router as possible.CONNEXION EN MODE AP (AUTRE MÉTHODE)


ONGLET PROFIL
G CONDITIONS DE GARANTIE
natural_image
Pure electrical circuit lines without any symbols① Air inlet
② Louvre
3 Front panel
4 Control panel (depending on model)
⑤ Wall hanging mounts
6 Back panel
⑦ Vent
8 Drainage pipe
WHAT'S INCLUDED
① Air conditioner
② Wall template
③ Plastic ducting sheet (x2)
4 Wall plugs
⑤ Vent cover (x2) (chain, indoor ring and outdoor cover)
6 Remote control
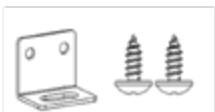
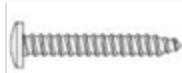
7 Screws
8 Wall bracket
9 Fixed Plate
10 4x10 topping screw
natural_image
Line drawing of a rectangular electronic device casing with ventilation slots and a handle (no text or symbols)1

natural_image
Pure geometric diagram with dots and circles, no text or symbols present2
natural_image
Two overlapping rectangular shapes with no text or symbols3

4

6

7

9
10
Diagrams for illustrative purposes only
- READ THE DIRECTIONS FOR USE FIRST.
- IN CASE OF ANY DOUBT, CONTACT YOUR DEALER.
natural_image
Simple diagram with three circles and a horizontal bar inside a rectangle (no text or symbols)1

natural_image
Simple line drawing of a handheld electric tool (no text or symbols)2

natural_image
Simple geometric diagram with a circle and two overlapping squares, no text or symbols present.3

natural_image
Simple line drawing of a rectangular object with three diagonal lines and a protruding rod (no text or symbols)4

natural_image
Two identical mechanical drill bit designs shown side by side, no text or symbols present.7

natural_image
Simple line drawing of a rectangular shape with a triangular tip and a small circle inside (no text or symbols)6

8
TOOLS REQUIRED
① Spirit level
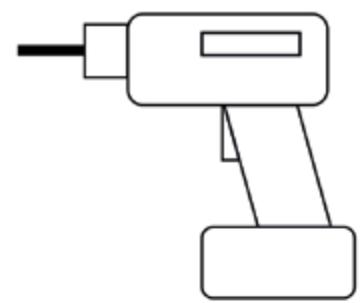
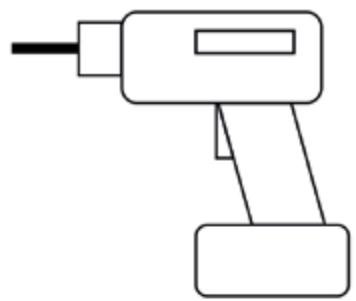
2 Drill
③ Tape measure
4 180 mm Core drill
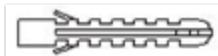
⑤ 8 mm Masondry drill bit
6 Sharp knife
⑦ 20 mm Masondry rll bitt
8 Pencil
Dear Sir, Madam,
Congratulations on the purchase of your air conditioner. You have acquired a high quality product that will provide you with many years of pleasure, on condition that you use it responsibly. Reading these instructions for use before operating your air conditioner will optimise its life span. We wish you comfort with your air conditioner.
Yours sincerely,
PVG Holding B.V.
Customer service department
A SAFETY INSTRUCTIONS
Read this user manual carefully before using the appliance and keep it for future reference. Install this device only when it complies with local/national legislation, ordinances and standards. This product is intended to be used as an air conditioner in residential houses and is only suitable for use in dry locations, in normal household conditions, indoors in living room, kitchen and garage.

IMPORTANT
- Never use the device with a damaged power cord, plug, cabinet or control panel. Never trap the power cord or allow it to come into contact with sharp edges.
- The installation must be completely in accordance with local regulations, ordinances and standards.
- The device is suitable exclusively for use in dry places, indoors.
- Check the mains voltage. This device is suitable exclusively for earthed sockets – connection voltage 220-240 Volt/ 50 Hz.
- The device MUST always have an earthed connection. You may absolutely not connect the device if the power supply is not earthed.
- The plug must always be easily accessible when the device is connected.
- Read these instructions carefully and follow the directions.
Before connecting the device, check that:
- The connection voltage corresponds to that on the type plate.
- The socket and power supply are suitable for the device.
- The plug on the cable fits the socket.
- The device is on a stable and flat surface.
Have the electrical installation checked by a recognised expert if you are not sure that everything is in order.
- The airconditioner is a safe device, manufactured in accordance with CE safety standards. Nevertheless, as with every electrical device, exercise caution when using it.
- Never cover the air inlets and outlets.
- Empty the water reservoir through the water drain before moving it.
- Never allow the device to come into contact with chemicals.
- Do not insert objects into the openings of the device.
- Never allow the device to come into contact with water. Do not spray the device with water or submerge it as this may cause a short circuit.
- Always take the plug out of the socket before cleaning or replacing the device or a part of the device.
- NEVER connect the device with the aid of an extension cable. If a suitable, earthed socket is not available, have one fitted by a recognised electrician.
- Always consider the safety of children in the vicinity of this device, as with every electrical device.
- Always have any repairs – beyond regular maintenance – carried out by a recognised service engineer. Failure to do so may lead to invalidation of the guarantee.
- Always take the plug out of the socket when the device is not in use.
- If the power cable is damaged it must be replaced by the manufacturer, its customer service department or persons with comparable qualifications in order to prevent danger.
- This appliance is not intended for use by persons (including children) with reduced physical, sensory or mental capabilities, or lack of experience and knowledge, unless they have been given supervision or instruction concerning use of the appliance by a person responsible for their safety.
- Children should be supervised to ensure that they do not play with the appliance.
- This appliance can be used by children aged from 8 years and above and persons with reduced physical, sensory or mental capabilities or lack of experience and knowledge if they have been given supervision or instruction concerning use of the appliance in a safe way and understand the hazards involved.
• Children shall not play with the appliance.
- Cleaning and user maintenance shall not be made by children without supervision.

ATTENTION!
- Never seal the room - where this device will be used - completely airtight. This will prevent under pressure in this room. Under pressure can disrupt the safe operation of geysers, ventilation systems, ovens, etc.
- Failing to follow the instructions may lead to nullification of the guarantee on this device.
Specific information regarding appliances with R290 / R32 refrigerant gas.
• Thoroughly read all of the warnings.
- When defrosting and cleaning the appliance, do not use any tools other than those recommended by the manufacturing company.
- The appliance must be placed in an area without any continuously sources of ignition (for example: open flames, gas or electrical appliances in operation).
- Do not puncture and do not burn.
- This appliance contains Y g (see rating label back of unit) of R290 / R32 refrigerant gas.
- R290 / R32 is a refrigerant gas that complies with the European directives on the environment. Do not puncture any part of the refrigerant circuit. Be aware the refrigerants may not contain an odour.
- If the appliance is installed, operated or stored in a nonventilated area, the room must be designed to prevent to the accumulation of refrigerant leaks resulting in a risk of fire or explosion due to ignition of
the refrigerant caused by electric heaters, stoves, or other sources of ignition.
- The appliance must be stored in such a way as to prevent mechanical failure.
- Individuals who operate or work on the refrigerant circuit must have the appropriate certification issued by an accredited organization that ensures competence in handling refrigerants according to a specific evaluation recognized by associations in the industry.
- Repairs must be performed based on the recommendation from the manufacturing company.
Maintenance and repairs that require the assistance of other qualified personnel must be performed under the supervision of an individual specified in the use of flammable refrigerants.
Appliances shall be installed, operated and stored in a room with a floor area larger than 15 m^2 . The appliance shall be stored in a well-ventilated area where the room size corresponds to the room area as specified for operation.
INSTRUCTIONS FOR REPAIRING APPLIANCES CONTAINING R290 / R32
1 GENERAL INSTRUCTIONS
This instruction manual is intended for use by individuals possessing adequate backgrounds of electrical, electronic, refrigerant and mechanical experience.
1.1 Checks to the area
Prior to beginning work on systems containing flammable refrigerants, safety checks are necessary to ensure that the risk of ignition is minimised. For repair to the refrigerating system, the following precautions shall be complied with prior to conducting work on the system.
1.2 Work procedure
Work shall be undertaken under a controlled procedure so as to minimise the risk of a flammable gas or vapour being present while the work is being performed.
1.3 General work area
All maintenance staff and others working in the local area shall be instructed on the nature of work being carried out. Work in confined spaces shall be avoided. The area around the workspace shall be sectioned off. Ensure that the conditions within the area have been made safe by control of flammable material.
1.4 Checking for presence of refrigerant
The area shall be checked with an appropriate refrigerant detector prior to and during work, to ensure the technician is aware of potentially flammable atmospheres. Ensure that the leak detection equipment being used is suitable for use with flammable refrigerants, i.e. nonsparking, adequately sealed or intrinsically safe.
1.5 Presence of fire extinguisher
If any hotwork is to be conducted on the refrigeration equipment or any associated parts, appropriate fire extinguishing equipment shall be available to hand. Have a dry powder or CO_2 fire extinguisher adjacent to the charging area.
1.6 No ignition sources
No person carrying out work in relation to a refrigeration system which involves exposing any pipe work that contains or has contained flammable refrigerant shall use any sources of ignition in such a manner that it may lead to the risk of fire or explosion. All possible ignition sources, including cigarette smoking, should be kept sufficiently far away from the site of installation, repairing, removing and disposal, during which flammable refrigerant can possibly be released to the surrounding space. Prior to worktaking place, the area around the equipment is to be surveyed to make sure that there are no flammable hazards or ignition risks. “No Smoking” signs shall be displayed.
1.7 Ventilated area
Ensure that the area is in the open or that it is adequately ventilated before breaking into the system or conducting any hot work. A degree of ventilation shall continue during the period that the work is carried out. The ventilation should safely disperse any released refrigerant and preferably expel it externally into the atmosphere.
1.8 Checks to the refrigeration equipment
Where electrical components are being changed, they shall be fit for the purpose and to the correct specification. At all times the manufacturer's maintenance and service guidelines shall be followed. If in doubt consult the manufacturer's technical department for assistance. The following checks shall be applied to installations using flammable refrigerants: - the charge size is in accordance with the room size within which the refrigerant containing parts are installed;
- the ventilation machinery and outlets are operating adequately and are not obstructed;
- if an indirect refrigerating circuit is being used, the secondary circuit shall be checked for the presence of refrigerant;
- marking to the equipment continues to be visible and legible. Markings and signs that are illegible shall be corrected;
- refrigeration pipe or components are installed in a position where they are unlikely to be exposed to any substance which may corrode refrigerant containing components, unless the components are constructed of materials which are inherently resistant to being corroded or are suitably protected against being so corroded.
1. 9 Checks to electrical devices
Repair and maintenance to electrical components shall include initial safety checks and component inspection procedures. If a fault exists that could compromise safety, then no electrical supply shall be connected to the circuit until it is satisfactorily dealt with. If the fault cannot be corrected immediately but it is necessary to continue operation, an adequate temporary solution shall be used. This shall be reported to the owner of the equipment so all parties are advised. Initial safety checks shall include:
- that capacitors are discharged: this shall be done in a safe manner to avoid possibility of sparking;
- that there no live electrical components and wiring are exposed while charging, recovering or purging the system;
• that there is continuity of earth bonding.
2 REPAIRS TO SEALED COMPONENTS
2.1 During repairs to sealed components, all electrical supplies shall be disconnected from the equipment being worked upon prior to any removal of sealed covers, etc. If it is absolutely necessary to have an electrical supply to equipment during servicing, then a permanently operating form of leak detection shall be located at the most critical point to warn of a potentially hazardous situation.
2.2 Particular attention shall be paid to the following to ensure that by working on electrical components, the casing is not altered in such a way that the level of protection is affected. This shall include damage to cables, excessive number of connections, terminals not made to original specification, damage to seals, incorrect fitting of glands, etc.
Ensure that apparatus is mounted securely.
Ensure that seals or sealing materials have not degraded such that they no longer serve the purpose of preventing the ingress of flammable atmospheres. Replacement parts shall be in accordance with the manufacturer's specifications.
NOTE The use of silicon sealant may inhibit the effectiveness of some types of leak detection equipment. Intrinsically safe components do not have to be isolated prior to working on them.
3 REPAIR TO INTRINSICALLY SAFE COMPONENTS
Do not apply any permanent inductive or capacitance loads to the circuit without ensuring that this will not exceed the permissible voltage and current permitted for the equipment in use.
Intrinsically safe components are the only types that can be worked on while live in the presence of a flammable atmosphere. The test apparatus shall be at the correct rating.
Replace components only with parts specified by the manufacturer. Other parts may result in the ignition of refrigerant in the atmosphere from a leak.
4 CABLING
Check that cabling will not be subject to wear, corrosion, excessive pressure, vibration, sharp edges or any other adverse environmental effects. The check shall also take into account the effects of aging or continua! vibration from sources such as compressors or fans.
5 DETECTION OF FLAMMABLE REFRIGERANTS
Under no circumstances shall potential sources of ignition be used in the searching for or detection of refrigerant leaks. A halide torch (or any other detector using a naked flame) shall not be used.
6 LEAK DETECTION METHODS
The following leak detection methods are deemed acceptable for systems containing flammable refrigerants. Electronic leak detectors shall be used to detect flammable refrigerants, but the sensitivity may not be adequate, or may need recalibration. (Detection equipment shall be calibrated in a refrigerant-free area.)
Ensure that the detector is not a potential source of ignition and is suitable for the refrigerant used. Leak detection equipment shall be set at a percentage of the LFL of the refrigerant and shall be calibrated to the refrigerant employed and the appropriate percentage of gas (25 % maximum) is confirmed.
Leak detection fluids are suitable for use with most refrigerants but the use of detergents containing chlorine shall be avoided as the chlorine may react with the refrigerant and corrode the copper pipework.
If a leak is suspected, all open flames shall be removed/extinguished.
If a leakage of refrigerant is found which requires brazing, all of the refrigerant shall be recovered from the system, or isolated (by means of shut off valves) in a part of the system remote from the leak. Oxygen free nitrogen (OFN) shall then be purged through the system both before and during the brazing process.
7 REMOVAL AND EVACUATION
When breaking into the refrigerant circuit to make repairs - or for any other purpose - conventional procedures shall be used. However, it is important that best practice is followed since flammability is a consideration. The following procedure shall be adhered to: remove refrigerant; purge the circuit with inert gas; evacuate; purge again with inert gas; open the circuit by cutting or brazing.
The refrigerant charge shall be recovered into the correct recovery cylinders. The system shall be “flushed” with OFN to render the unit safe. This process may need to be repeated several times. Compressed air or oxygen shall not be used for this task. Flushing shall be achieved by breaking the vacuum in the system with OFN and continuing to fill until the working pressure is achieved, then venting to atmosphere, and finally pulling down to a vacuum. This process shall be repeated until no refrigerant is within the system.
When the final OFN charge is used, the system shall be vented down to atmospheric pressure to enable work to take place. This operation is absolutely vital if brazing operations on the pipework are to take place. Ensure that the outlet for the vacuum pump is not close to any ignition sources and !here is ventilation available.
8 CHARGING PROCEDURES
In addition to conventional charging procedures, the following requirements shall be followed. Ensure that contamination of different refrigerants does not occur when using charging equipment. Hoses or lines shall be as short as possible to minimise the amount of refrigerant contained in them. Cylinders shall be kept upright. Ensure that the refrigeration system is earthed prior to charging the system with refrigerant. Label the system when charging is complete (if not already). Extreme care shall be taken not to overfill the refrigeration system. Prior to recharging the system it shall be pressure tested with OFN. The system shall be leak tested on completion of charging but prior to commissioning. A follow up leak test shall be carried out prior to leaving the site.
9 DECOMMISSIONING
Before carrying out this procedure, it is essential that the technician is completely familiar with the equipment and all its detail. It is recommended good practice that all refrigerants are recovered safely. Prior to the task being carried out, an oil and refrigerant sample shall be taken in case analysis is required prior to re-use of reclaimed refrigerant. It is essential that 4 GB electrical power is available before the task is commenced.
a) Become familiar with the equipment and its operation.
b) Isolate system electrically.
c) Before attempting the procedure ensure that: mechanical handling equipment is available, if required, for handling refrigerant cylinders;
d) All personal protective equipment is available and being used correctly; the recovery process is supervised at all times by a competent person;
e) recovery equipment and cylinders conform to the appropriate standards.
f) Pump down refrigerant system, if possible. g) If a vacuum is not possible, make a manifold so that refrigerant can be removed from various parts of the system. h) Make sure that cylinder is situated on the scales before recovery takes place.
i) Start the recovery machine and operate in accordance with manufacturer's instructions.
j) Do not overfill cylinders. (No more than 80 % volume liquid charge).
k) Do not exceed the maximum working pressure of the cylinder, even temporarily.
I) When the cylinders have been filled correctly and the process completed,
make sure that the cylinders and the equipment are removed from site promptly and all isolation valves on the equipment are closed off. m) Recovered refrigerant shall not be charged into another refrigeration system unless it has been cleaned and checked.
10 LABELLING
Equipment shall be labelled stating that it has been de-commissioned and emptied of refrigerant. The label shall be dated and signed. Ensure that there are labels on the equipment stating the equipment contains flammable refrigerant.
11 RECOVERY
When removing refrigerant from a system, either for servicing or decommissioning, it is recommended good practice that all refrigerants are removed safely. When transferring refrigerant into cylinders, ensure that only appropriate refrigerant recovery cylinders are employed. Ensure that the correct number of cylinders for holding the total system charge are available. All cylinders to be used are designated for the recovered refrigerant and labelled for that refrigerant (i.e. special cylinders for the recovery of refrigerant). Cylinders shall be complete with pressure relief valve and associated shut-off valves in good working order. Empty recovery cylinders are evacuated and, if possible, cooled before recovery occurs.
The recovery equipment shall be in good working order with a set of instructions concerning the equipment that is at hand and shall be suitable for the recovery of flammable refrigerants. In addition, a set of calibrated weighing scales shall be available and in good working order. Hoses shall be complete with leak-free disconnect couplings and in good condition. Before using the recovery machine, check that il is in satisfactory working order, has been properly maintained and that any associated electrical components are sealed to prevent ignition in the event of a refrigerant release. Consult manufacturer if in doubt.
The recovered refrigerant shall be returned to the refrigerant supplier in the correct recovery cylinder, and the relevant Waste Transfer Note arranged. Do not mix refrigerants in recovery units and especially not in cylinders.
If compressors or compressor oils are to be removed, ensure that they have been evacuated to an acceptable level to make certain that flammable refrigerant does not remain within the lubricant. The evacuation process shall be carried out prior to returning the compressor to the suppliers. Only electric healing to the compressor body shall be employed to accelerate this process. When oil is drained from a system, il shall be carried out safely.
B INSTALLATION
Corresponding images can be found on pages 252 - 253.
- This unit must be installed on an external wall, as it vents directly out of its rear. ①
- Only install the unit on a flat, solid and reliable wall. Ensure that there are no cables, pipes, steel bars or other obstructions behind the wall.
- Leave at least 10 cm of space to the left, right and base of the machine. At least 20cm of space must be left above the unit to help air flow smoothly.
- Paste the supplied installation template paper in position on the wall, ensuring that the reference line is level using a spirit level. ②
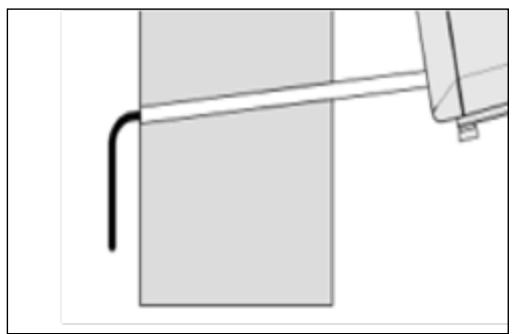
- The hole for the drainage pipe must be drilled using a 20mm Drill bit. Ensure the hole is at a downward angle (min 5 degrees) so that the water will drain correctly. ③
-
Use a 180mm core drill to drill the two holes for the units ventilation, ensuring that both the holes are aligned with the template. ④
-
Use the template to mark the position of the screws for the hanging rail, using a spirit level to ensure it is straight and level.
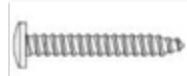
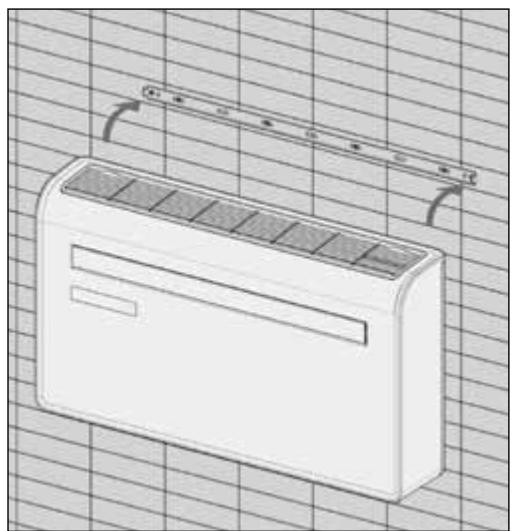
- Drill the marked holes using a suitable 8mm drill bit and insert wall plugs. Line the hanging rail with the holes, and fix the rail into position using the supplied screws.
- Ensure that the hanging rail is securely fastened onto the wall, and that there is no risk of the unit tipping or falling.
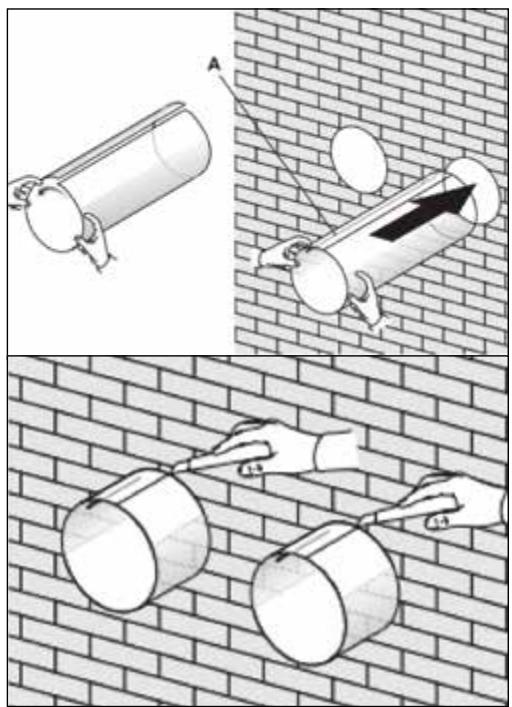
- Roll the plastic vent sheets into a tube and feed them from the inside into the holes previously made. Ensure the tubes sit flush to the interior wall. ⑤
-
Go outside and trim off the excess vent tube using a sharp knife, keeping the edge as neat as possible.
-
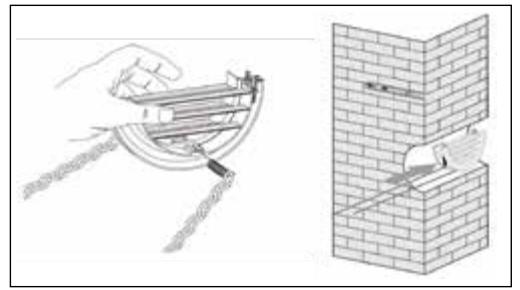
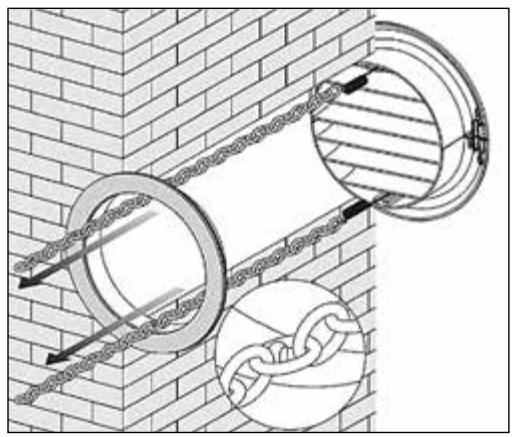
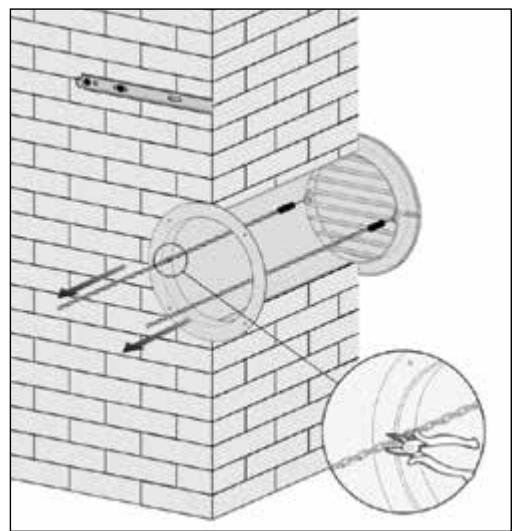
Insert the indoor fixing ring from the vent cover onto the indoor side of the air vent. Then fold the external vent cover in half. Attach the chains to each side of the vent cover, before sliding the cover outside through the vent hole. ⑥
- Expand the external cover, before tightly fixing the chains by hooking onto the indoor fixing ring. This will hold the external cover firmly in position. Repeat for the second vent. ⑦
- Once the chains are fitted and secure, any excess chain should be removed by cutting the chain. ⑧
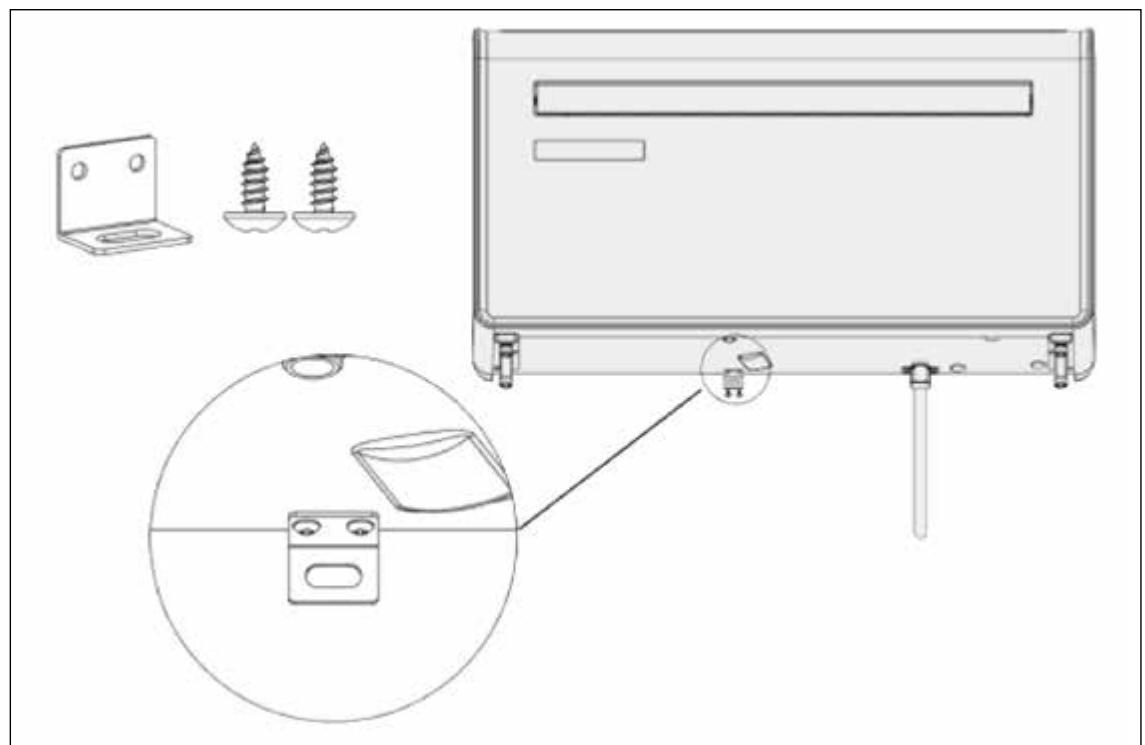
- Lift the unit onto the wall, align the hanging holes with the hooks on the hanging rail and gently rest the unit into place. At the same time, slide the drain pipe through the drainage hole. If the wireless controller (Available separately) has been purchased, it should then be installed, and connected. ⑨
NOTE: The end of the external water pipe must be placed in an open space or drain. Avoid damage or constriction to the drainage pipe to ensure the unit drains.
C OPERATION
CONTROL PANEL
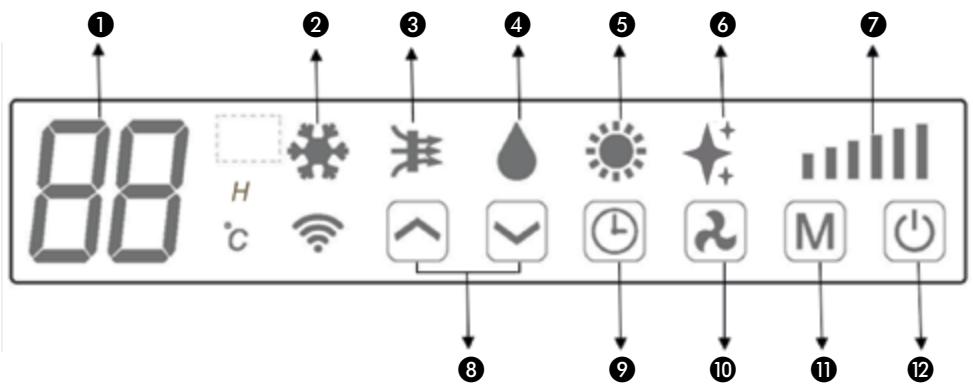
- Digital display 7. Speed
- Cooling 8. Increase/Decrease
- Air supply 9. Timer
- Dry 10. Speed
- Heating 11. Mode
- PTC 12. Power
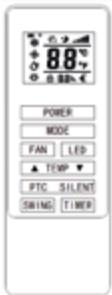
REMOTE CONTROL
The air conditioner can be controlled with the remote control. Two AAA-batteries are required.
NOTE: Further details of the functions can be found on the following page.
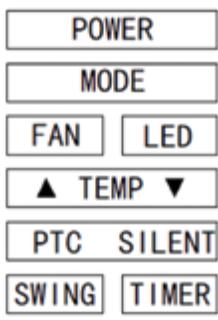
| POWER | Press the POWER button to turn the machine on or off. |
| MODE | Press the MODE button to switch between cooling, heating, fan and dry modes. |
| FAN | Press the FAN button to change between high, medium and low fan speeds |
| LED | Press the LED button to open or close the LED light on unit, it can be a choice for sleep condition. |
| ▲ | Press the UP button to increase the desired temperature or timer duration |
| ▼ | Press the DOWN button to decrease the desired temperature or timer duration |
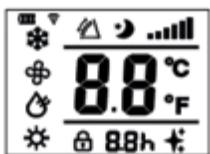
| PTC | Press it to turn PTC on or off. When PTC turned on, the display indicates *, lights up on remote control at the same time; when PTC turned off, goes out on display and remote control at the same time. (only activated in heating mode) |
| SILENT | Press it for silent mode. When silent mode turned on, the display indicates “SL” and the lights doesn’t dim out. When silent mode turned off, the lights goes out. In Silent mode, noise will be SILENT lower, fan works in low speed, frequency is low. |
| SWING | Press to turn the swing function on and off (Can only be activated from the remote) |
| TIMER | Press the TIMER button to set the timer. |
FUNCTIONS
 POWER POWER | Press “POWER” to turn the unit On or Off | |
 MODE MODE | Press to change between the 4 different modes. The display will show the symbol for the mode currently selected. | |
 COOLING COOLING | Cooling mode defaults to 22°C and will cool the air while sending warm air outside. The desired temperature can be adjusted using the increase and decrease button between 16°C and 30°C. The fan speed can also be adjusted using the speed button. | |
 DRY DRY | Dry mode will extract moisture from the air, which will be drained outside using the installed drain pipe. The fan speed cannot be adjusted in dry mode. | |
 FAN FAN | In fan mode the appliance will recirculate the air within the room, and will not cool, heat or dehumidify. The fan speed can be adjusted using the Speed button. | |
| [ZSHW]HEATING | Heating mode defaults to 24°C and will heat the air while sending cool air outside. The desired temperature can be adjusted using the increase and decrease button between 16°C and 30°C. The fan speed can also be adjusted using the speed button. | |
 |  SILENT SILENT | Silent mode can be activated from APP or the remote control, It can also be activated by pressing “☐”+“☐” on unit control panel at the same time. It will only operate in cooling modes, the fan speed will change to low and noise will be lower. |
 FAN SPEED FAN SPEED |  | Press to change the fan speed between Low, Medium and High. The fan speed cannot be adjusted in Dry or Silent modes. |
| [2SAH]TIMER | The air conditioner contains a 24 hour timer, which can be used to either set a delayed start, or a set period of operation. The timers cannot be combined, although the app can be used to program periods of operation. | |
| SHUTDOWN TIMER: While the unit is running press the timer button, the display will flash “0” 5 times. After the 5thflash, use the up and down buttons to adjust the duration in 1 hout increments between 1 to 24 hours. When the timer has elapsed, the unit will shutdown automatically. | ||
| DELAYED START TIMER: With the unit in standby, press the timer button, the display will flash “0” 5 times. After the 5thflash, use the up and down buttons to adjust the duration in 1 hout increments between 1 and 24 hours. After the timer has elapsed, the unit will start up in the same mode with the same settings as when it was turned off. | ||
 INCREASE AND DECREASE INCREASE AND DECREASE | Used within cooling and heating modes to adjust the desired room temperature. Also used while setting the timer to adjust the duration. | |
| SWING MODE | After machine turns on, press the “SWING” button, louver will swing continuously up and down; by pressing the button again the movement will stop and the louver remain in that position. Swing mode can only be adjusted from the remote, and will initially be turned on by default. | |
| COMPRESSOR PROTECTION | There is a 3 minutes delay on power on. In order to protect the life of the compressor and electronic components please do not switch on the unit for at least 5 minutes after you turned the unit off. | |
PTC ELECTRIC HEATING FUNCTION
The unit has an additional PTC electric heating element. When the weather conditions outside are bad, you can press the PTC button on the remote control to turn on the electric heating function to increase the heat. The heat power of the PTC is equal to 800W.
PTC TURN ON
- Only in the heating mode, press the PTC button on the remote control to send the turn-on command to the unit.
At this time, the remote control and the unit display ✦ lights up at the same time.
- After the unit receives the remote control command, the system will carry out self-testing, PTC will work when the following points are satisfied at the same time:
a. Unit is in heating mode.
b. Tw<25°C (outdoor temperature keeps lower than 25°C for 10 seconds).
c. Ts-Tr≥5°C (The Set temperature is more than 5 degrees higher than the Room temperature).
d. Room temperature Tr ≤ 18^ .
e. Coil Temperature of evaporator Te ≤48°C.
f. Compressor is keep working for 3 minutes.
- PTC will stop working when the system self-testing detects one of the following points:
a. Outdoor temperature keeps higher than 28^ C for 10 seconds
b. The room temperature is greater than the setpoint;
c. Room temperature Tr ≥23°C.
d. Compressor stop working.
e. The ventilation stops or the fan is faulty.
f. 4-way valve get disconnected.
g. Coil Temperature of evaporator Te ≥54°C or sensor error.
h. Unit didn't work in heating mode.
i. Unit is in defrost function.
PTC TURN OFF
Presses the PTC button again or change to other mode to turn off PTC function, the lights on remote control and the unit display will be off at the same time.
NOTE:
- The unit will work without PTC function as a default until the "PTC" button on remote control is pressed.
- If unit is turn off, the PTC setting will be cleared, it need to be set again.
WIFI SETUP AND SMART FEATURES
WIFI SETUP
BEFORE YOU START
- Ensure your router provides a standard 2.4ghz connection.
- If your router is dual band ensure that both networks have different network names (SSID). The provider of your router / Internet service provider will be able to provide advice specific to your router.
- Place the air conditioner as close as possible to the router during setup.
- Once the app has been installed on your phone, turn off the data connection, and ensure your phone is connected to your router via wifi.
DOWNLOAD THE APP TO YOUR PHONE
- Download the "SMART LIFE" app, from your chosen app store, using the QR codes below, or by searching for the app in your chosen store.

CONNECTION METHODS AVAILABLE FOR SETUP
- The air conditioner has 2 different setup modes: Bluetooth Connection and Wifi connection (Quick Connection and AP (Access Point)). The Bluetooth and Quick Connection is a quick and simple way to set the unit up. The AP connection uses a direct local wifi connection between your phone and the air conditioner to upload the network details.
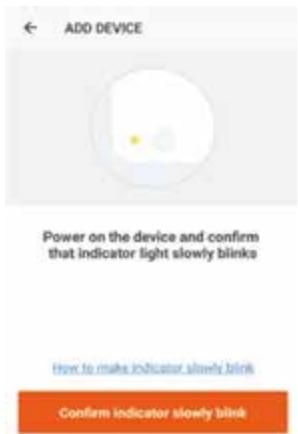
- Before starting the setup, with the air conditioner plugged in, but turned off, press and hold the Speed button for 3 seconds (until you hear a bleep) to enter the wifi connection mode.
- Please ensure your device is in the correct wifi connection mode for the connection type you are attempting, the flashing of the wifi light on your air conditioner will indicate this.
| Connection Type Frequency of Flashes | Frequency of Flashes |
| Bluetooth connection | |
| Quick Connection | Flashes twice per second |
| AP (Access Point) | Flashes once per three seconds |
CHANGING BETWEEN CONNECTION TYPES
To change the unit between the two wifi connection modes, hold the Speed button for 3 seconds.
- Press on the register button at the bottom of the screen.

- Read the Privacy policy and press the Agree Button.
![User Agreement and Privacy Policy We understand the importance of privacy. In order to more fully present our collection and use of your personal information, we have revised our privacy policy and user agreement in detail in accordance with the latest laws and regulations. When you click [Agree], you have fully read, understood and accepted all of the updated Privacy Policy and User Agreement. Please take some time to become familiar with our privacy policy, and if you have any questions, please feel free to contact us. Privacy Policy and User Agreements Disagree Agree](/content/2025/01/332209/images/6b3ec214f51c7e686db7fdd1604a1fb5b3c7ffaa4ab1a8bb34d6f494a8dae183.jpg)
- Enter your email address or phone number and press continue to register.

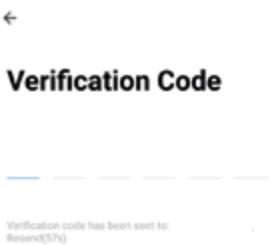
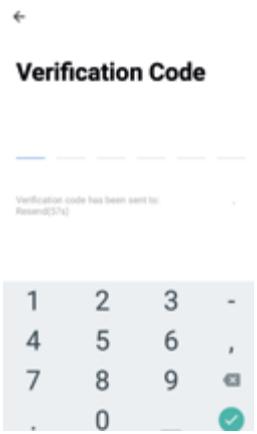
- A verification code will be sent by the method selected in step 3. Enter the code into the app.
- Type in the password you would like to create. This needs to be 6-20 characters, with letters and numbers.

- The app is now registered. It will automatically log you in following registration.


SETTING UP YOUR HOME WITHIN THE APP
SMART LIFE is designed so it can work with a large number of compatible smart devices within your home. It can also be set up to work with multiple devices within different houses As such during the setup process, the app requires that differen t areas are created and named to allow easy management of all your devices. When new devices are added, they are assigned to one of the rooms you have created.
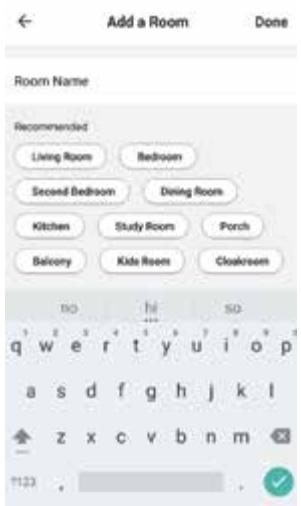
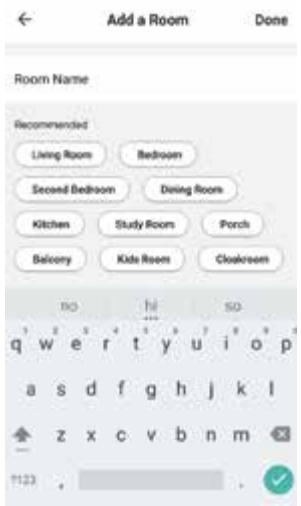
CREATING ROOMS
- Press on the ADD HOME button.

- Type in a name for your home,
- Press on the location button to select the location of your home. (See SETTING YOUR LOCATION below)
- New rooms can be added by pressing the ADD ANOTHER ROOM option at the bottom. (See ADD ANOTHER ROOM below)
- Untick any rooms that are not required on the app.
- Press DONE in the top right corner.

Use your finger to move the orange HOME symbol. When the symbol is in the approximate location of your home, press the confirm button in the top right corner.
ADD ANOTHER ROOM
Type in the name of the room, and press Done in the top right corner
CONNECTING USING QUICK CONNECTION
Before initiating the connection, make sure the unit is in standby mode, with the WIFI light flashing twice per second. If not follow the instructions for changing the connection mode. Also ensure your phone is connected to the wifi network. (We advise turning mobile data off during setup)
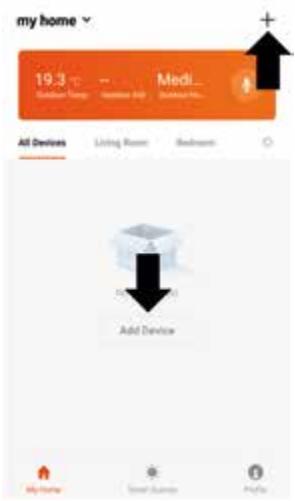
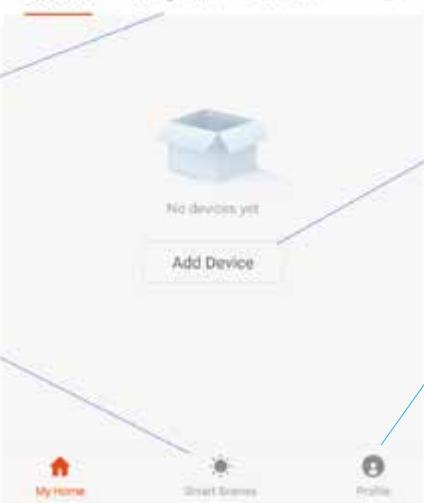
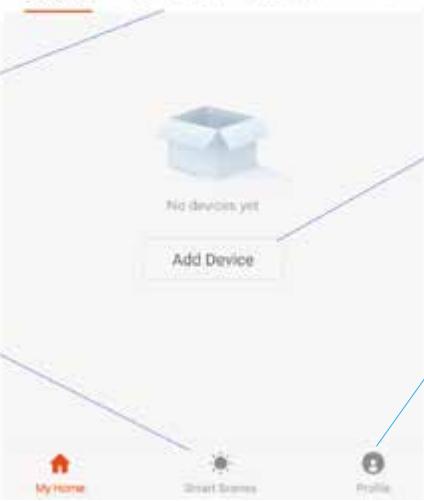
- Open app and press "+" to add device, or use the add device button
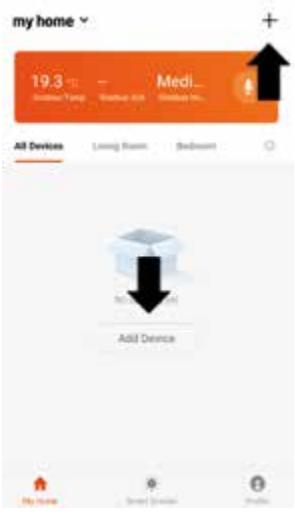
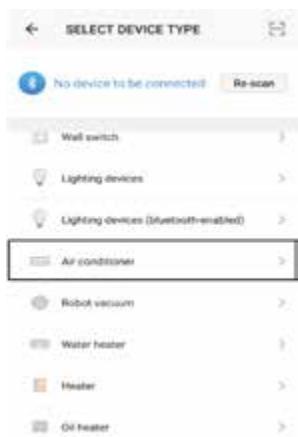
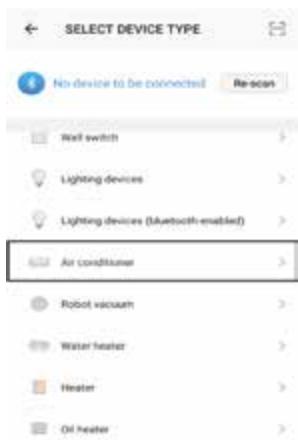
- Select the type of device as "Air Conditioner"
- Ensure the wifi light on the airconditioner is flashing twice per second, then press on the orange button at the bottom of the screen to confirm.
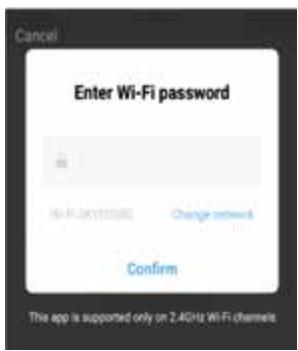
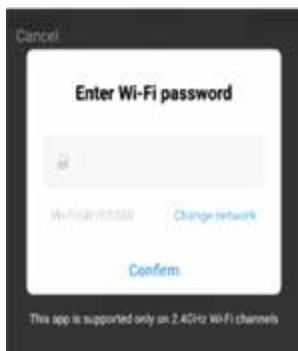
- Enter your wifi password and press confirm.
- This will then transfer the settings to the air conditioner. Wait for this to complete. If this fails, retry. If still unsuccessful please review the troubleshooting section for further help.
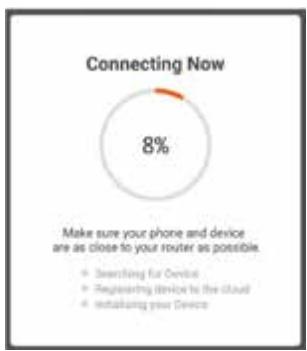
pie
Connecting Now | Category | Value (%) | |---|---| | Deshilling for Device | 8 | | Registering Device to the Cloud | 0 | | Instalizing your Devices | 0 |CONNECTING USING AP MODE (ALTERNATIVE METHOD)
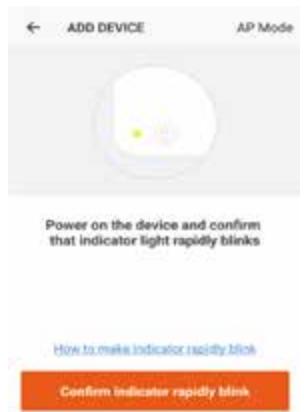
Before initiating the connection, make sure the unit is in standby mode, with the wifi light flashing once per second. If not follow the instructions for changing the wifi connection mode. Also ensure your phone is connected to the wifi network. (We advise turning mobile data off during setup)
- Open app and press "+" to add device, or use the add device button
- Select the type of device as "Air Conditioner".
- Press on the AP mode button in the top right of the screen.
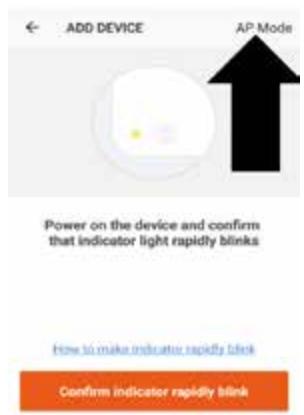
- Ensure the wifi light on the air conditioner is slowly-flashing (once per three seconds), then press on the orange button at the bottom of the screen to confirm
- Enter your wifi password and press confirm.
- Go to network settings in your phone and connect to the "SmartLife xxx" connection. There is no password to enter. Then return back to the app to complete setup.

This will then transfer the settings to the air conditioner. Once the connection process has completed, go back to the network settings on your phone to ensure your phone has reconnected to your wifi router.
CONTROLLING YOUR DEVICE THROUGH THE APP
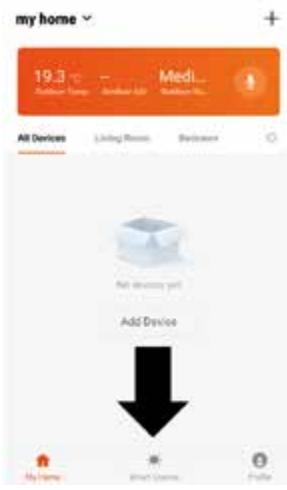
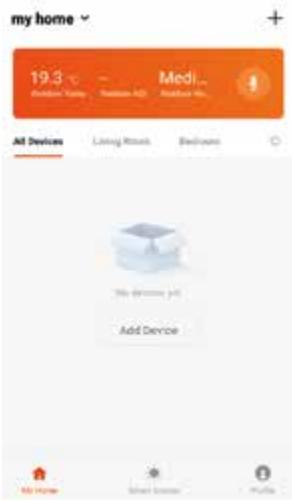
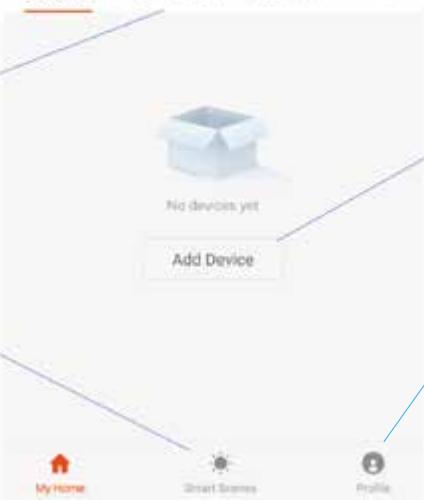
THE HOME SCREEN
Change Home: If you have a number of units at different houses, you can change between them
Environmental information: Provides outdoor temperature and humidity based on the location details entered
Rooms: Use to view the units set up within each room
Smart Scene: Allows you to program intelligent behaviour based on the internal and external environment
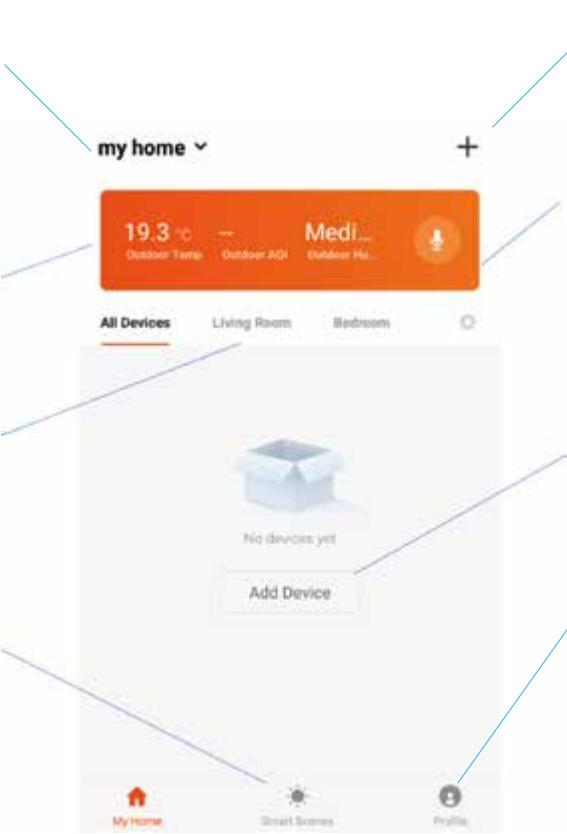
Add Device: Add a device to the app, and go through the setup process.
Room Management: Allows rooms to be added, removed or renamed.
Add Device: Add a device to the app, and go through the setup process.
Profile: Provides the option for changing settings, and adding devices using a QR code provided by a friend.
Each device has its own entry on the home screen to allow the user to either quickly turn the unit on or off, or to enter the device screen to make other changes.
DEVICE SCREEN
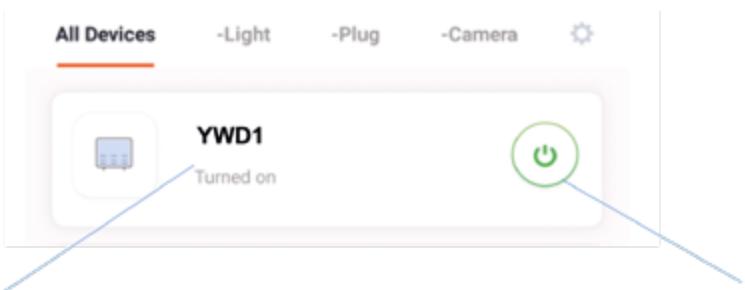
Name of Air Conditioner: Press to enter the Device Screen
ON / OFF Button: Use to quickly turn the unit on or off.
DEVICE SCREEN
The device screen is the main control screen for the air conditioner, providing access to the controls to amend the functions and settings
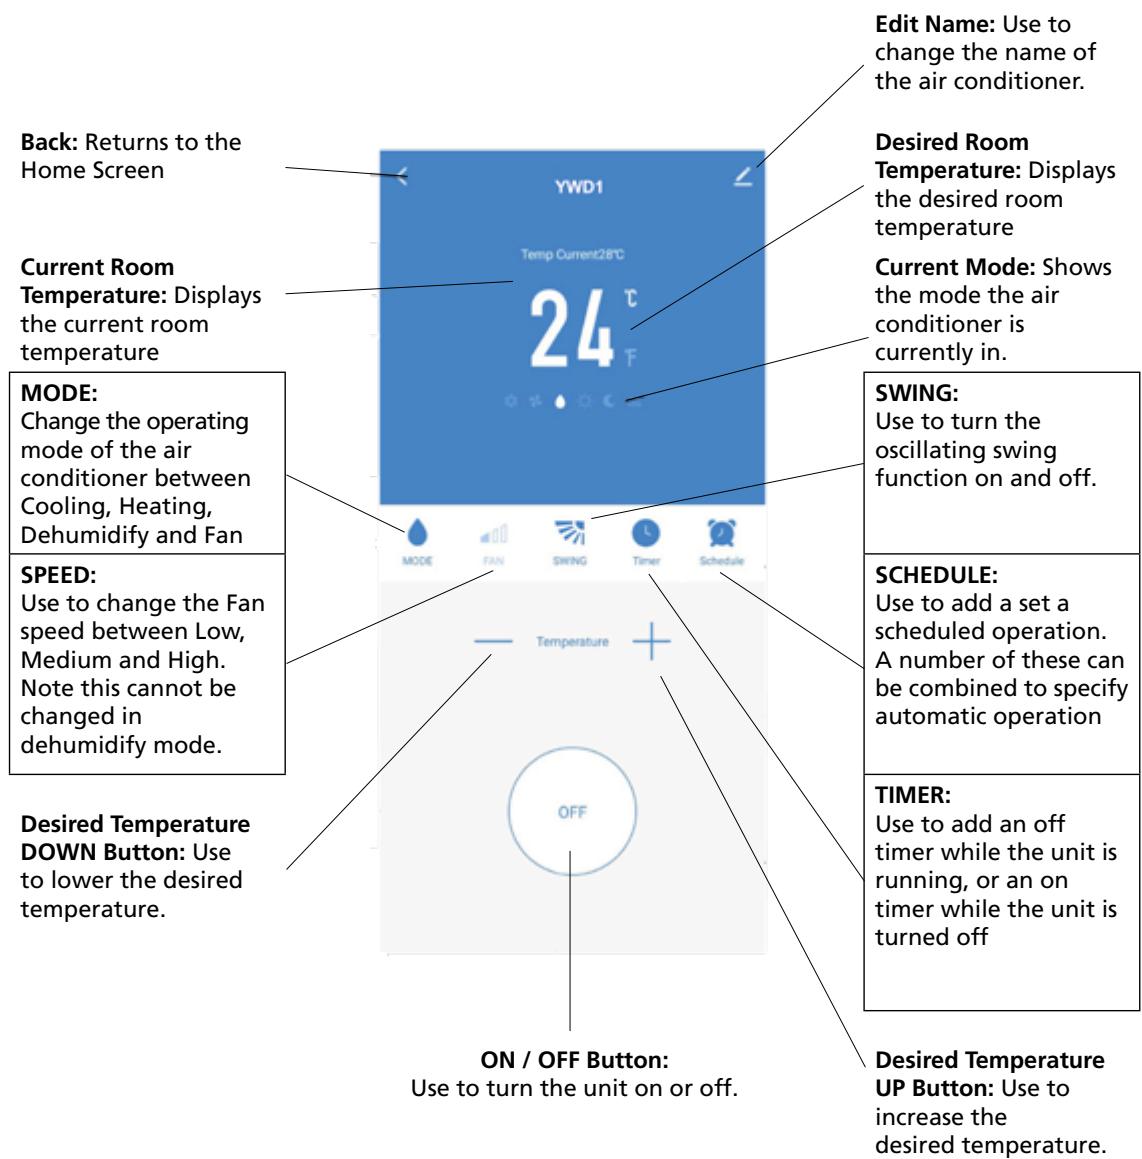
* Due to continuous development of the app, the layout and available features may be subject to change.
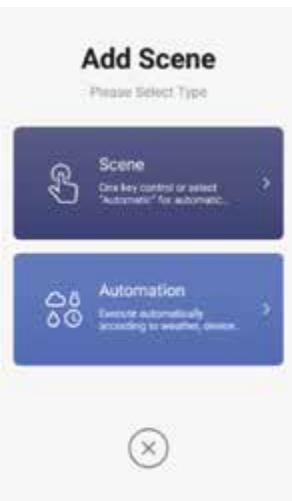
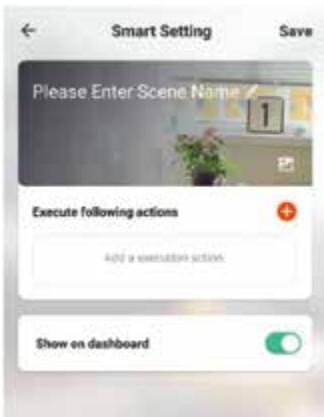
SMART SCENES
Smart Scenes is a powerful tool providing the option to customise the operation of the air conditioner based both on conditions within the room and outside influences. This gives the user the option of specifying much more intelligent actions. These are split into two categories Scene and Automation.
SCENE
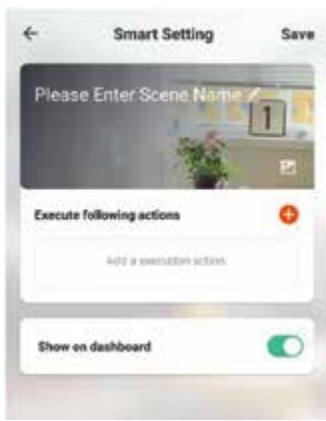
Scene allows for a one touch button to be added to the Home screen. The button can be used to change a number of settings in one go, and can change all the settings within the unit. A number of scenes can easily be setup, allowing the user to easily change between a number of preset configurations.
Below is an example of how to set up a scene:
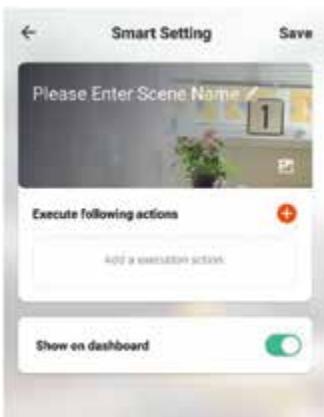
- Press on the Smart Scene tab at the bottom of the Home screen
- Press on the Plus in the topright corner to add a smartscene.

- Select Scene to create a new Scene

- Press the Pen next to "Please Enter Scene Name" to input the name for your Scene
Show on Dashboard: Leave this on if you require the scene to be displayed as a button on the Home Screen
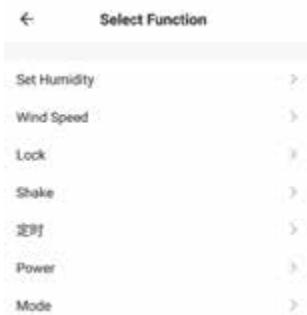
Press the Red Plus to add the action required. Then select the air conditioner from the list of devices.
- Chose the function, set the value for the function, and then press the back button in the top right corner, to return to the previous screen.
- Once all the functions required have been added, press the Save button in the top right corner to finalise and save your new Scene
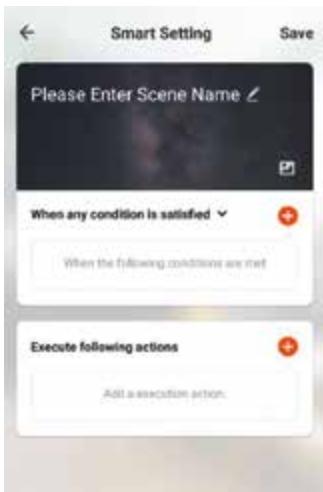
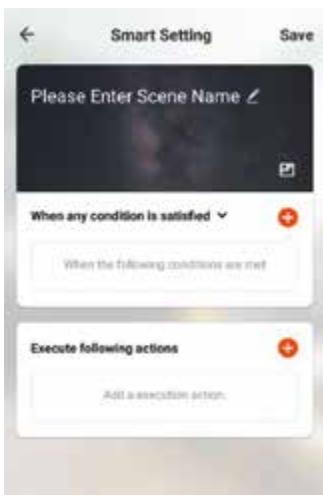
AUTOMATION
Automation allows an automatic action to be set up for the device. This can be triggered by the Time, indoor temperature, humidity of the room, weather conditions, and a range of other influences.
- Press on the Smart Scene tab at the bottom of the Home screen
- Press on the Plus in the top right corner to add a smart scene.

- Select Automation to create a new Automation Scene

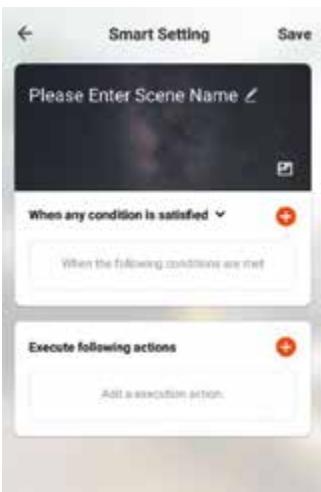
- Setup is very similar to the scene setup on the previous page, and includes an extra section for specifying a trigger for the scene to start.
Press the Pen next to "Please Enter Scene Name" to input the name for your Scene
Press the Red Plus next to "When any condition is satisfied" to add the trigger
Press the Red Plus next to "Execute following actions" to add the action required. Then select the air conditioner from the list of devices.
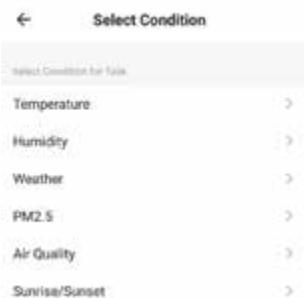
- Select the condition when the automation should start. A number of triggers can be combined.
- Chose the function, set the value for the function, and then press the back button in the top right corner, to return to the previous screen.

- Once all the functions required have been added, press the Save button in the top rightcorner to finalise and save your new scene.
The automation is now set up, it can be turned on and off using the toggle on the image shown on step 2.

PROFILE TAB
The profile tab gives you the option to edit both your detail, and use the added features of the unit.
CHANGING THE NAME OF YOUR DEVICE
When in any of the device screens further settings for the device can be accessed, by pressing on the three dots in the top right hand corner. The top option within this allows you to change the name of the device to something relevant to the use of the product, such as "Living Room Air Conditioner". Within the menu, you also have the option of setting up a pattern lock or change your password.
DEVICE SHARING
This allows you to share access to the controls of your air conditioner with friends and family.
INTEGRATION
This allows the unit to be integrated with your favourite home automation hardware such as Google Home and the Amazon Echo.
D MAINTENANCE

WARNING!
Switch off the unit and remove the electrical plug from the mains before cleaning the appliance or filter, or before replacing the filters.
Clean the housing with a soft, damp cloth. Never use aggressive chemicals, petrol, detergents or other cleansing solutions.
E TROUBLE SHOOTING
Do not repair or disassemble the air conditioning. Unqualified repair will invalidate the warranty and may lead to failure, causing injuries and property damage. Only use it as directed in this user manual and only perform operations advised here.
| Problem | Reasons | Solution |
| The air conditioner does not work. | There is no electricity. | Check the unit is plugged in, and the socket is working normally. |
| The ambient temperature is too low or too high. | Only use to use the machine with a room temperature between 7 and 35°C. | |
| In cooling mode, the room temperature is lower than the desired temperature; in heating mode, the room temperature is higher than the desired temperature. | Adjust the desired room temperature. | |
| In dehumidification (dry) mode, the ambient temperature is low. | Ensure that the room temperature is above 17°C for dry mode. | |
| Doors or windows are open; there are a lot of people; or in cooling mode, there are other sources of heat (e.g. fridges). | Close doors and windows; increase air conditioning power. | |
| The cooling or heating effect is poor. | Doors or windows are open; there are a lot of people; or in cooling mode, there are other sources of heat (e.g. fridges). | Close doors and windows; increase air conditioning power. |
| The filters screen is dirty. | Clean or replace the filter screen. | |
| The air inlet or outlet is blocked. | Clear obstructions; make sure the unit is installed as per the instructions. | |
| The air conditioner is leaking. | The unit is not straight. | Use a spirit level to check the unit is horizontal, if not remove from the wall and straighen. |
| The drain pipe is blocked. | Check the drain pipe to ensure it is not blocked or constricted. | |
| Compressor does not work. | Overheat protection operational. | Wait for 3 minutes until the temperature is lowered, and then restart the machine. |
| The remote control does not work. | The distance between the machine and the remote control is too far. | Let the remote control get close to the air conditioner, and make sure that the remote control directly faces to the direction of the remote-control receiver. |
| The remote control is not aligned with the direction of the remote-control receiver. | ||
| Batteries are dead. | Replace batteries. |
If problems not listed in the table occur or recommended solutions do not work, please contact the service centre.
F ERROR CODES
| Fault Code | Fault Description | Fault Code | Fault Description |
| F1 | Compressor IPM error | FE | EE error(outdoor) |
| F2 | PFC/IPM error | PA | Return air sensor temperature abnormal protection |
| F3 | Compressor start error | P1 | Over-heat protection on top of compressor |
| F4 | Compressor running out of step | PE | Abnormal refrigerant circulation |
| F5 | Location detection loop failure | PH | Exhaust temperature protection |
| FA | Phase current overcurrent protection | PC | Coil tube overload protection (outdoor) |
| P2 | Dc bus voltage Undervoltage protection | E3 | DC fan Feedback failure (indoor) |
| E4 | Communication error (indoor and outdoor) | P6 | Coil tube overload protection (indoor) |
| F6 | PCB communication error | P7 | Defrost protection on coil tube (indoor) |
| P3 | AC Input voltage protection | E2 | Sensor error on indoor coil tube |
| P4 | AC over-current protection | E1 | Temperature sensor error (indoor) |
| P5 | AC undervoltage protection | P8 | Zero-crossing fault detection (indoor) |
| F7 | Coil sensor error (outdoor) | EE | EE error (indoor) |
| F8 | Sensor on suction pipe error | E5 | Water-splash motor error |
| E0 | Sensor on discharge pipe error | E8 | Fan feedback fault |
| E6 | Temperature sensor error (outdoor) | FL | Water-full protection |
| E7 | Fan motor error (outdoor) |
G GUARANTEE CONDITIONS
The air conditioner is supplied with a 24-month guarantee, commencing on the date of purchase. All material and manufacturing defects will be repaired or replaced free of charge within this period. The following rules apply:
- We expressly refuse all further damage claims, including claims for collateral damage.
- Repairs to or replacement of components within the guarantee period will not result in an extension of the guarantee.
- The guarantee is invalidated if any modifications have been made, non-genuine parts are fitted or repairs are carried out by third parties.
- Components subject to normal wear, such as the filter, are not covered by the guarantee.
- The guarantee is valid only when you present the original, dated purchase invoice and if no modifications have been made to the product nor to the purchase invoice.
- The guarantee is invalid for damage caused by neglect or by actions that deviate from those in this instruction booklet.
- Transportation costs and the risks involved during the transportation of the air conditioner or air conditioner components shall always be for the account of the purchaser.
- Damage caused by not using suitable filters is not covered by the guarantee.
To prevent unnecessary expense, we recommend that you always first carefully consult the instructions for use. Take the air conditioner to your dealer for repairs if these instructions do not provide a solution.

natural_image
Pure electrical circuit lines without any symbolsDo not dispose of electrical appliances as unsorted municipal waste, use separate collection facilities. Contact your local government for information regarding the collection systems available. If electrical appliances are disposed of in landfills or dumps, hazardous substances can leak into the groundwater and get into the food chain, damaging your health and well-being. When replacing old appliances with new once, the retailer is legally obligated to take back your old appliance for disposal at least for free of charge. Do not throw batteries into the fire, where they can explode or release dangerous liquids. If you replace or destroy the remote control, remove the batteries and throw them away in accordance with the applicable regulations because they are harmful to the environment.
Environmental information: This equipment contains fluorinated greenhouse gases covered by the Kyoto Protocol. It should only be serviced or dismantled by professional trained personnel.
This equipment contains R290 / R32 refrigerant in the amount as stated in the table above. Do not vent R290 / R32 into atmosphere: R290 / R32, is a fluorinated greenhouse gas with a Global Warming Potential (GWP) = 3.
COMPONENTI PRINCIPALI
natural_image
Line drawing of a rectangular electronic device casing with ventilation slots and a handle (no text or symbols)1
natural_image
Pure geometric diagram with dots and circles, no text or symbols present2

natural_image
Two overlapping rectangular shapes with no text or symbols3

4
6

7

9
10

5

8
Schemi Solo A Fini Illustrativi
- LEGGERE DAPPRIMA LE ISTRUZIONI D'USO.
- IN CASO DI DUBBIO, RIVOLGERSI AL RIVENDITORE.

natural_image
Simple diagram with three circles and a horizontal bar inside a rectangle (no text or symbols)1

natural_image
Simple line drawing of a handheld electric tool (no text or symbols)2

natural_image
Simple geometric diagram with a circle and two overlapping squares, no text or symbols present.3

natural_image
Simple line drawing of a rectangular object with three diagonal lines and a protruding rod (no text or symbols)4

natural_image
Two identical mechanical drill bit designs shown side by side, no text or symbols present.7

natural_image
Simple line drawing of a rectangular shape with a triangular tip and a small circle inside (no text or symbols)6

8
STRUMENTI RICHIESTI
① Bolla Ad Alcool
② Trapano
③ Metro A Nastro
4 Carotatrice 180 mm
⑤ Punta Per Muratura
8 mm
6 Taglierino
⑦ Punta Per Muratura 20 mm
8 Matita
Verification code has been sent to: Resend(57s)

AGGIUNTA DI UN'ALTRA STANZA
pie
Connecting Now | Category | Value (%) | |---|---| | Deshilling for Device | 8 | | Registering Device to the Cloud | 0 | | Instalizing your Devices | 0 |CONNESSIONE USANDO LA MODALITÀ AP (METODO ALTERNATIVO)
All Devices
Living Room
Bedrooms


SCHEDA PROFILO
natural_image
Simple line drawing of a trash bin with no text or symbolsnatural_image
Line drawing of a rectangular electronic device casing with ventilation slots and a handle (no text or symbols)1

natural_image
Pure geometric diagram with dots and circles, no text or symbols present2

natural_image
Two overlapping rectangular shapes with no text or symbols3
4
5

6

7

8
natural_image
Simple diagram with three circles and a horizontal bar inside a rectangle (no text or symbols)1
natural_image
Line drawing of a handheld electric tool (no text or symbols)2

natural_image
Simple geometric diagram with a circle and two overlapping squares, no text or symbols present.3
natural_image
Simple line drawing of a rectangular object with three diagonal lines and a protruding rod (no text or symbols)4

natural_image
Two identical mechanical drill bit designs shown side by side, no text or symbols present7
natural_image
Simple geometric shape with a triangle and a rectangle, no text or symbols present6
VEREIST
GEREEDSCHAP
1 Waterpas
② Boormachine
③ Lintmeter
4 180 mm boor
5 8 mm betonboorbit
6 Scherp mes
7 20 mm betonboorbit
8 Potlood
BESCHIKBARE VERBINDINGSMETHODEN
Verification code has been sent to: Resend(57s)

Password must contain 8-20 letters and numbers
单位:元

natural_image
Illustration of a person using a laptop with a potted plant nearby (no text or symbols)Enjoy your smart life

Ling Nult
UW HUIS INSTELLEN BINNEN DE APP
UW LOCATIE INSTELLEN
pie
Connecting Now | Category | Value (%) | |---|---| | Deshilling for Device | 8 | | Registering Device to the Cloud | 0 | | Instalizing your Devices | 0 |VERBINDING VIA AP-MODUS (ALTERNATIEVE METHODE)
All Devices
Living Room
Bedrooms


PROFILE TAB
natural_image
Pure electrical circuit lines without any symbolsnatural_image
Line drawing of a rectangular electronic device casing with ventilation slots and a handle (no text or symbols)1

natural_image
Pure geometric diagram with dots and circles, no text or symbols present2

natural_image
Two overlapping rectangular shapes with no text or symbols3

4

6
7

9
10

5
natural_image
Simple diagram with three circles and a horizontal bar inside a rectangle (no text or symbols)1

natural_image
Simple line drawing of a handheld electric tool (no text or symbols)2

natural_image
Simple geometric diagram with a circle and two overlapping squares, no text or symbols present.3

natural_image
Simple line drawing of a rectangular object with three diagonal lines and a protruding rod (no text or symbols)4

natural_image
Two identical mechanical drill bit designs shown side by side, no text or symbols present7
natural_image
Simple line drawing of a rectangular shape with a triangular tip and a small circle inside (no text or symbols)6

8
FERRAMENTAS NECESSÁRIAS
① Nível De Bolha
② Berbequim
③ Fita Métrica
4 Sonda Perfuradora De 180 mm
⑤ Broca Para Alvenaria
De 8 mm
6 Faca Afiada
⑦ Broca Para Alvenaria
De 20 mm
8 Lápis
Caro utilizador,
Verification code has been sent to: Resend(57s)

Password must contain 8-20 letters and numbers
单位:元

natural_image
Illustration of a person using a laptop with a plant and abstract cloud-like shapes in the background (no text or symbols)Enjoy your smart life

Ling Nuff
pie
Connecting Now | Category | Value (%) | |---|---| | Connecting for Device | 8 | | Registering Device to the Cloud | | | Instalizing your Device | |All Devices
Living Room
Bedrooms


SEPARADOR PERFIL
natural_image
Pure electrical circuit lines without any symbolsnatural_image
Line drawing of a rectangular electronic device casing with ventilation slots and a handle (no text or symbols)1

natural_image
Pure geometric diagram with dots and circles, no text or symbols present2
natural_image
Two overlapping rectangular shapes with no text or symbols3
4

5

6
7

8
natural_image
Simple diagram with three circles and a horizontal bar inside a rectangle (no text or symbols)1
natural_image
Simple line drawing of a handheld electric tool (no text or symbols)2

natural_image
Simple geometric diagram with a circle and two overlapping squares, no text or symbols present.3

natural_image
Simple line drawing of a rectangular object with three diagonal lines and a protruding rod (no text or symbols)4

natural_image
Two identical mechanical drill bit designs shown side by side, no text or symbols present.7

natural_image
Simple line drawing of a rectangular shape with a triangular tip and a small circle inside (no text or symbols)6

8
POTREBNA ORODJA
FUNKCIJE
METODE POVEZAVE, KI SO NA VOLJO ZA NASTAVITEV
- Klimatska naprava ima 2 različna načina nastavitve: Povezava prek Bluetooth in Povezava Wi-Fi (Quick Connection in AP (Access Point)). Bluetooth in Quick Connection sta hitra in enostavna načina za nastavitev enote. Povezava AP uporablja neposredno lokalno povezavo WiFi med vašim telefonom in klimatsko napravo za prenos podatkov omrežja.
- Pred začetkom nastavljanja mora biti klimatska naprava priklopljena v vtičnico, vendar izklopljena. Za vstop v način WiFi povezovanja pritisnite in pridržite gumb za hitrost za 3 sekunde (dokler ne slišite piska).
- Poskrbite, da bo naprava v primernem načinu povezave WiFi za vrsto povezave, ki jo poskušate vzpostaviti, kar bo pokazala lučka WiFi na vaši klimatski napravi.
- Preberite pravilnik o za-sebnosti in pritisnite gumb Agree (Strinjam se).
![User Agreement and Privacy Policy We understand the importance of privacy. In order to more fully present our collection and use of your personal information, we have revised our privacy policy and user agreement in detail in accordance with the latest laws and regulations. When you click [Agree], you have fully read, understood and accepted all of the updated Privacy Policy and User Agreement. Please take some time to become familiar with our privacy policy, and if you have any questions, please feel free to contact us. Privacy Policy and User Agreements Disagree Agree](/content/2025/01/332209/images/ca339e9c09af83c8d9ce253d9e7d5d841078a5032194cb1b19ed11e342f69f59.jpg)
Verification code has been sent to: Resend(57s)

- Vtipkajte želeno geslo. Geslo mora biti dolgo od 6 do 20 znakov s črkami in številkami.
Set Password
Password must contain 8-20 letters and numbers
单位

NASTAVLJANJE DOMA V APLIKACIJI
NASTAVLJANJE LOKACIJE
DODAJ ŠE EN PROSTOR
Vnesite ime prostora in pritisnite gumb Done (Končano) v zgornjem desnem kotu
POVEZOVANJE Z UPORABO HITRE POVEZAVE
- Za vrsto naprave izberite »Air Conditioner« (Klimatska naprava).

pie
Connecting Now | Category | Value (%) | |---|---| | Deshilling for Device | 8 | | Registering Device to the Cloud | 0 | | Instalizing your Devices | 0 |POVEZAVA Z UPORABO NAČINA AP (ALTERNATIVNA METODA)
All Devices
Living Room
Bedrooms

Dodajanje naprave: V aplikacijo dodajte na-pravo in pojdite skozi postopek nastavljanja
ZAVIHEK PROFILA
SKUPNA UPORABA NAPRAVE
natural_image
Pure electrical circuit lines without any symbolsnatural_image
Isometric diagram of a wall-mounted air conditioner placed on a checkered floor, with no text or symbols present.2
natural_image
Pure mechanical diagram showing a curved pipe or rod inserted into a rectangular block, without any text, labels, or symbols.3

natural_image
Diagram showing a brick wall with two white oval shapes and a ruler placed on it, no text or symbols present.4
natural_image
Diagram showing two methods of installing a cylindrical object on a brick wall, with no text or symbols present.5
natural_image
Illustration showing a hand using a tool to lift a pipe into a brick wall, with no text or symbols present.6
natural_image
Diagram of two circular pipe fittings with chains inside a brick wall, no text or symbols present7
natural_image
Diagram of a pipe installation inside a brick wall, showing internal flow and a magnified inset of the cable (no text or symbols)8
natural_image
Illustration of a white air conditioner unit with ventilation grilles and a diagonal panel, placed on a grid background (no text or symbols)9
natural_image
Technical line drawing of a device with mounting bracket, screw base, and close-up inset showing internal components (no text or symbols)
Distributed in Europe by PVG Holding B.V.
Benötigen Sie weitere Informationen oder treten Probleme auf, besuchen Sie bitte unsere Website www.qlima.com, oder setzen Sie sich mit unserem Kundendienst in Verbindung (Telefonnummer auf www.qlima.com).
For alle yderligere oplysninger eller ved eventuelle problemer med apparatet henvises til www.qlima.com eller det lokale Kundecenter (telefonnumre findes i www.qlima.com).
ES Si necesita información o si tiene algún problema, visite nuestra página Web www.qlima.com, o póngase en contacto con el servicio cliente (hallará el número de teléfono en www.qlima.com).
F Si vous souhaitez obtenir des informations supplémentaires ou si vous rencontrez un problème, rendez-vous sur notre site Web (www.qlima.com) ou contactez notre service client (vous trouverez l'adresse et numéro de téléphone sur www.qlima.com).
FIN Jos haluat huoltoapua, lisätietoja tai laitteen kanssa tulee ongelmia, tutustu verkkosivustoon osoitteessa www.qlima.com tai kysy neuvoa PVG kuluttajapalvelukeskuksesta (www.qlima.com).
GB If you need information or if you have a problem, please visit the our website (www.qlima.com) or contact our sales support (you find its phone number on www.qlima.com)
Per informazioni e in caso di problemi, visitate il sito Web www.qlima.com oppure contattate il Centro Assistenza Clienti (per conoscere il numero di telefono, consultate www.qlima.com).
Hvis du trenger informasjon, eller hvis du har et problem med produktet, kan du gå til nettsidene www.qlima.com. Alternativt kan du kontakte med PVG' forbrukertjeneste (telefonnummeret i www.qlima.com).
NL Als u informatie nodig hebt of als u een probleem hebt, bezoek dan de onze website (www.qlima.com) of neem contact op met de afdeling sales support (adres en telefoon op www.qlima.com).
Se necessitar de informações ou se tiver problemas, visite o Web site www.qlima.com ou contacte o Centro de Assistência (número de telefone o www.qlima.com)
PL W przypadku problemów i w celu uzyskania szczegółowych informacji odwiedź stronę internetową Qlima dostępną pod adresem www.qlima.com lub skontaktuj się z Centrum kontaktów Qlima (www.qlima.com)
Om du behöver service eller information eller har problem med apparaten kan du besöka www.qlima.com eller kontakta Qlima kundtjänst (du hittar telefonnumret på www.qlima.com).
SLO Če želite dodatne informacije, obiščite spletno mesto podjetja na naslovu www.qlima.com ali pokličite na telefonsko (www.qlima.com).
TR Daha fazla bilgiye ihtiyaç duyarsanız veya bir sorunla karşılaşırsanız, www.qlima.com adresindeki Qlima Internet sitesini ziyaret edin veya ülkenizde bulunan Qlima müşteri merkeziyle iletişim kurun (telefon numarasını: www.qlima.com).