FONT, FP-3, FP-3 FR - Electric fireplace EQUATION - Free user manual and instructions
Find the device manual for free FONT, FP-3, FP-3 FR EQUATION in PDF.

| Product type | Electric fireplace |
| Brand | EQUATION |
| Model | FONT, FP-3, FP-3 FR |
| Supply voltage | 220-240 V~, 50 Hz |
| Nominal heating power | 1800 W (1.8 kW) |
| Maximum power | 2000 W (2 kW) |
| Electrical protection class | I |
| Flame effect type | Adjustable (F1, F2, F3, F4) |
| Thermostat | Adjustable from 17°C to 28°C |
| Timer | From 1 to 9 hours (automatic shutdown) |
| Weekly programming | Yes, 7 customizable programs |
| Open window detection | Yes (automatic shutdown if temperature drops) |
| Thermal safety | Yes (automatic cut-off in case of overheating) |
| Remote control | Yes, with AAA batteries |
| Button lock | Yes (remote control) |
| Adjustable sound effect | Yes (low, medium, high, off) |
| Installation | Wall-mounted, permanent fixing |
| Minimum installation height | Bottom of the device at 30 cm from floor |
| Recommended distance from floor | 60 cm from floor (bottom of device) |
| Maintenance | Soft dry cloth, soapy water for stains |
| Remote control batteries | 2 AAA batteries (1.5 V) |
| Repairability | Lighting system not replaceable |
| Warranty | Manufacturer's warranty (conditions in manual) |
Frequently Asked Questions - FONT, FP-3, FP-3 FR EQUATION
User questions about FONT, FP-3, FP-3 FR EQUATION
0 question about this device. Answer the ones you know or ask your own.
Ask a new question about this device
Download the instructions for your Electric fireplace in PDF format for free! Find your manual FONT, FP-3, FP-3 FR - EQUATION and take your electronic device back in hand. On this page are published all the documents necessary for the use of your device. FONT, FP-3, FP-3 FR by EQUATION.
USER MANUAL FONT, FP-3, FP-3 FR EQUATION
| Modèle/Modelo/Modello/Movtéλo/Model | EAN | |||
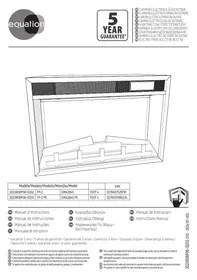
| 2023R08P06-0203 | FP-3 | GMA2118 | FONT 5 | 3276007529876 |
| 2023R08P06-0251 | FP-3 FR | GMA2118 FR | FONT 5 | 3276007686241 |

FR Manuel d'Instructions
ES Manual de Instrucciones
PT Manual de Instruções
Manuale di Istruzioni
CAUTION 116
Installation 118
Use 122
Care. 126
Troubleshooting 126
Characteristics. 127
warranty. 128
Notes 130

x5
x5


AVERTISSEMENT
1-Deselpaneldecontrol
1-Deselpaneldecontrol
12 Cologne as pedras.

13 Obepejxho BCTaBte CKNo Ha MlCue.
14 3aTfHiTb 2 FbHNTN, IIO TpIMaHTb CKNo, Rki p03TaIbObaHI 3 KOKHOrO 60ky npuIaNy.
BVKOPNUCTAHH
YbIMKHeHHa/PeXmOoikyBaHHa
HaTnCHiTB KHOJIKy Ha naHeli KepyBaHHa 60 npIbTi nIcTaHciHOro KepyBaHH, IIOb yBIMKHyTu nPiNcTpri a60 nepeBecTe NOrO B pexm OUYKaBHn.
HanaTsyBaHHe eKtynym'
- HataHcHtB KhoNky Kijbka pa3iB, 106 Bn6paTn Tnnp eekTy

HanaTsyBaHHa TempepaTyprn 06irpiBy:
- HATNCiTb KHONky , ⅡO6 yBIMKHyTN ΦyHKcIIO 6oirpiBy, BiO6pa3ntbc 3aJaHa TEmpepaTpa
1-Ha naheIkepyeAnnHa
LIO6 nepeitB pexkHn HanaStyBaHHaYtpmUyTe KHOKy , NOKu TempepaTpy He NoOHe 6JIMaTu
·HaTnCHiTB KHOIky kInbKa pa3iB, 106 Bn6paTn 3aAnHy TeMnepaTypy (Heo6xHny TeMnepaTypy) 17c 18c 19c 20c 21c 22c 23c 24c 25c 26c 27c 28c
2-Ha nylbmi ducmaunuiHozKepyeAHn
BCTaHOBiT 3aHaHy Tempeatypy 3aIOnOMOrIO KHOIOK +i —

3HauenHra 口 ^ 口 C ^ 口 )cmaHoBnOe MaKcMaIbHy nomxHicMb obizpiy be3 ypaxyaHnHa memnepamyp enpu HnpumiuenceHHi.
-Писяд ekількох секунд 6e3dяльноcti obirpiibav bnxOДТБ i3 pekIMy HanaaTbVAHЯ.
- Hatachitb KhoNky Ⅱe pa3, Ⅲo6 BumKHyTu ΦyHKuio 06irpiBy, BeHTnIaTOp 3ynHHTbcra Yepe315 cekyHd.
BVKOPINCTaHH TaMepa
1-Ha naheiKepyeannn
HanaStTyBaHHNoToHOrO yacy
Ha nylbTi nctaHIO KepyBaHHn, POKn rOINHa He noHne 6JIMMaTn
BcTaHOBiTb roDInHy 3a DonOMoIOU KHOJOK + Ta — Ha npIbTi iNCTaHciHOrO KepyBaHHra
- Hatnchitb OK, i06 niTbeprntu, xBnlnnH 6nMaTmUyTb
BCTaHOBiTB XBNINH 3a DOnOMoHO KHOIOK + Ta —
- Hatachitb OK, zuo6 niTBePdHTN, DeHb TUNKHa 6JIMaTIme
BCTaHOBiTb DeHb TnXnH 3a DOnOMoTOK KHOOK + Ta - SU MO TU WE TH FR SA HeiJa noHeiJIOK BIBTOPOK cepeda cheTbep n'ATnIcya cy6ota
HaTnCHiTB OK, 06 niTBePdntn. RaO BoBpOdo8x 15 cekyHn He 6ynde BnKoHaHO JoDHO i, nTBePdXeHHN BnKOHyETbCABTOMaTHUHO.
TnxKHeBnIporpaMyBaHHa
- Pexim nporpaMByaHnJa e MoKJIbICt b Bu3HaunTu OAnu h a6o KIbKa nepioiB o6irp iy BnpOIOBx nH. 7 nporpaBCTaHOBLeHi 3a 3amOByBaHnAm i MoKytb 6Ty 3mHeNi KopNCyBaUeM. KoJHa nporpaMa IOUYHaETbC3 yBIMKHeHnI 3akIHcyETbcpeKIMOM OUYBaHn, BOHa Bu3Haue CbiyaIbnHneFekT i 3aDaHy TEMpePaTpy Ta moKe 6Ty nAKTNBOBaHa B OOnH a6o KJIbKa dHIB TINKHe.
Onc nporpam 3a 3amOByBaHHaM
TapaHTia Bnpo6Hka Adeo Services He noUmpuOeTbCra Ha HabeJeHi NnJyue BnpaKn:
- HopmaIbHn 3HOC npOdyKtTa/a60 Ioro KOMIOHeHTiB.
Bnpanokoe noIskoJKeHHn(noB'3aHe 3 npHnM npOyKTu, ynapom a6o He npabInbHm ycTaHOJIeHHM)
-Пошкджehньслддьнб63doTpmaHnBka3iBokу noci6Hky KOpntybaa Ta/a60Ha ypaKobu (HapnPKnaI, HehaJexHnHa npyra JxNblenH).
Пошкдженив Всалдд Кн endotprmaння ekomendauiz i3 texhiHOro 06cIyObyaHnny npodkykty.
IoiKoJxHHeN, cPiuHHeHc 0BHiHIMn oakTopaMn, Hapuknaq Upe3 TpaHcnopTyBaHH, HerOy, BiKluOeHneEneKtpoeHepri a6o nepenadn Happyn.
KocmetnHi noIshKOJdKeHH, 3OKpeMa, OKpim iHsOro, NIOpRnHH, NIOtePToCTi abo NIOLOMKn PnactIKOBHX DeTaeJe. - HecnpabHocti, cnpuHneHi fopc-MaxkopHMn o6cbTuHAMn (noiieo, kHa ne 3aIeKtB bID Adeo Services, 6yna HepepeD6ayBaHOu Ha MomeHT npOdaKy npOkyTу n HacniikBЯKOi HEmOxKnBO yHnKHyTn, BxNbUu BIDNOBIDHNX 3axoIB (HaNPKNlaD, CTnxiHmN liXamn).
- HecnpabHocti, cnpuHHHeI TaKIMN 06CTaBnHaM:
HeopepejHe, HnpaBnIbHe nHoeBaChHe BnKOpncTahnn IpoDyKTu a6o HeHaJIeXHe NpOBoJxHeHH 3 Hm;
BVKOPNCaHnH63 DoTpImaHn H pOceDyp, BKNlaJeHnx y noci6Hky KopncTyBaHa npOdyKty;
BVKOpncTaHHN pOpykTu DnIzIeN, BiDmHnX BiD 3BnuaHOro NObyTOBOro BVKnOPncTaHHB KpaHi npDi6aHHa;
BVKOpNCtAHnJeTeTaeN,KeI He 3i6paHO a6o He BCTaHOBNeHO BiINOBiINO Do iHcTpkyKciA Adeo Services MoHTaKy;
BIVOKOpIcTaHnH IpnCtpoH Ta DeTanei, BiDminHnx BiD opinHaJIbHnx KOMNoHeHTiB, 10o HaJaAe Adeo Services;
HecppaBHe BkOHaHH BCTaHOJIeHH a60 36paHH;
pemont a60 moiΦikaui, 3diIcHHeI CTopoHaMn, He BnOBHOBaKeHmMn Adeo Services abo II BnOBHOBaKeHmMn aReHTaMn.
- TapaantjraTakOJ He Diincha, JaKzio BvDalaHc o6o 3iNcoBaHO cepiHn Homep uN pAcnpTHy TaBnUcy npOkyTyr (aKzio ii nepeD6aueHo).
B Oha TakoK He iE, kIIO Adeo Services OTPMBy BID KOMPeTeHTHnx DepeXabHNx OpraHIB IHOpMaio Ipo Te, IIO npOdyKT yKpaedeHO.
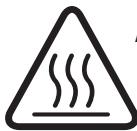
Some parts of this product can become very hot and cause burns. Particular attention has to be given where children and vulnerable people are present.


PLEASE READ CAREFULLY THIS MANUAL BEFORE USING THE APPLIANCE

WARNING In order to avoid overheating, do not cover the heater.
Children of less than 3 years should be kept away unless continuously supervised.
- Children aged from 3 years and less than 8 years shall only switch on/off the appliance provided that it has been placed or installed in its intended normal operating position and they have been given supervision or instruction concerning use of the appliance in a safe way and understand the hazards involved. Children aged from 3 years and less than 8 years shall not plug in, regulate and clean the appliance or perform user maintenance
- This appliance can be used by children aged from 8 years and above and persons with reduced physical, sensory or mental capabilities or lack of experience and knowledge if they have been given supervision or instruction concerning use of the appliance in a safe way and understand the hazards involved. Children shall not play with the appliance. Cleaning and user maintenance shall not be made by children without supervision.
- If the supply cord is damaged, it must be replaced by the manufacturer, its service agent or similarly qualified persons in order to avoid a hazard.
- The heater must not be located immediately below a socket outlet
- Do not use this device if it has been dropped
- Do not use if there are visible signs of damage to the device
- Use this device on a horizontal and stable surface, or fix it to the wall, as applicable.
- WARNING: Do not use this device in small rooms when they are occupied by persons not capable of leaving the room on their own, unless constant supervision is provided.
- WARNING: To reduce the risk of fire, keep textiles, curtains, or any other flammable material a minimum distance of 1m from the device
- When heating for the first time, a slight odor may appear corresponding to the removal of any traces associated with the manufacture of the appliance.
- Do not use this device near a bathtub, shower, or swimming pool.
- Means for disconnection must be incorporated in the fixed wiring in accordance with the wiring rules
- This appliance must be installed in such a way that the switches and other controls cannot be touched by a person in the bath or shower.
- In order to avoid a hazard due to inadvertent resetting of the thermal cutout, this appliance must not be supplied through an external switching device, such as a timer, or connected to a circuit that is regularly switched on and off by the utility.
Important!
- Batteries are to be inserted with the correct polarity;
- The supply terminals are not to be short-circuited;
- Different types of batteries are not to be mixed;
- The batteries must be removed from the appliance before it is scrapped.
- New and used batteries are not to be mixed;
- Non-rechargeable batteries are not to be recharged;
- Exhausted or leaking batteries are to be removed from the appliance and safely disposed of;
- Do not ingest batteries
- Do not let children play with batteries
- If the appliance is to be stored unused for a long period, the batteries should be removed;
Disposing of the packaging
- The packaging must be totally recycled, as stated by the recycling symbol printed on it. The various components of the packaging must not be thrown out in nature, but disposed of probably in compliance with local regulations.
Processing waste of electronic and electric devices at life-cycle end.
This image indicates that this product must not be disposed of with unsorted home trash. A system for disposal and special processing of used electric and electronic devices, mandatory to follow, has been implemented including the right to have vendors retrieve free-of-charge used appliances upon purchase of new appliances, as well as special collection of such waste by approved organisations.
For more information on this, you can contact your store or your town hall. Proper
disposal of used electric and electronic appliances ensures their adequate processing and recycling in order to avoid damage to the environment and public health as well as to preserve natural resources.
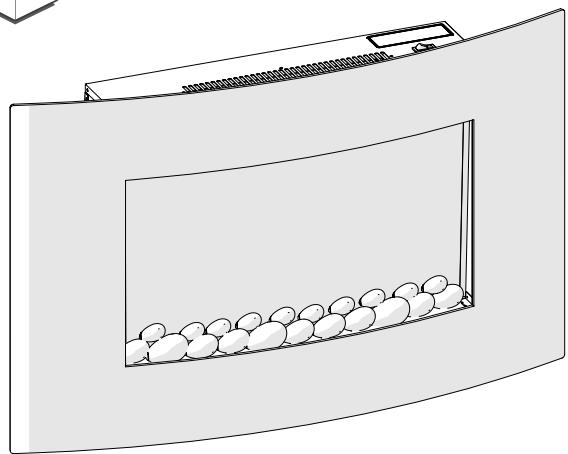
INSTALLATION
- The fireplace should not be plugged in and used until it is securely attached to the wall.
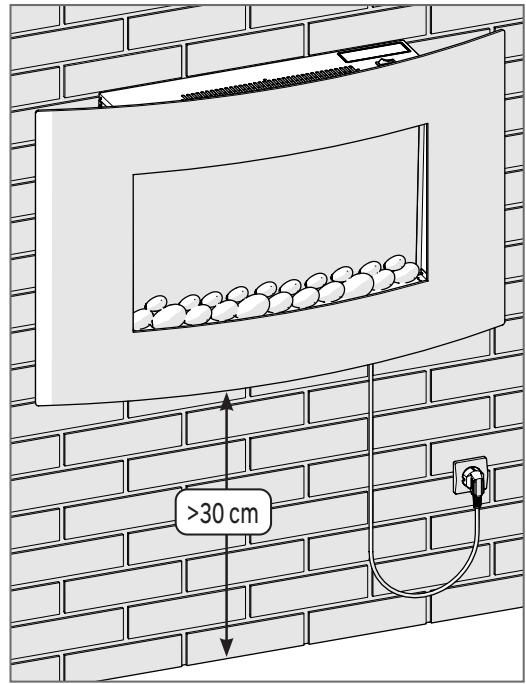
- This appliance is designed to be permanently fixed to a wall at a minimum height of 30~cm .
- A distance of 60cm between the bottom of the heater and the floor is recommended for optimum viewing of the fireplace.
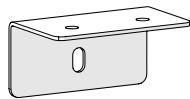
- The wall bracket should be installed horizontally and the cable routed down to the right of the heater.
- Connect the plug to a 220-240V~ 50 Hz wall socket when fixing has been completed.
- Unplug the device when not in use
Fixation
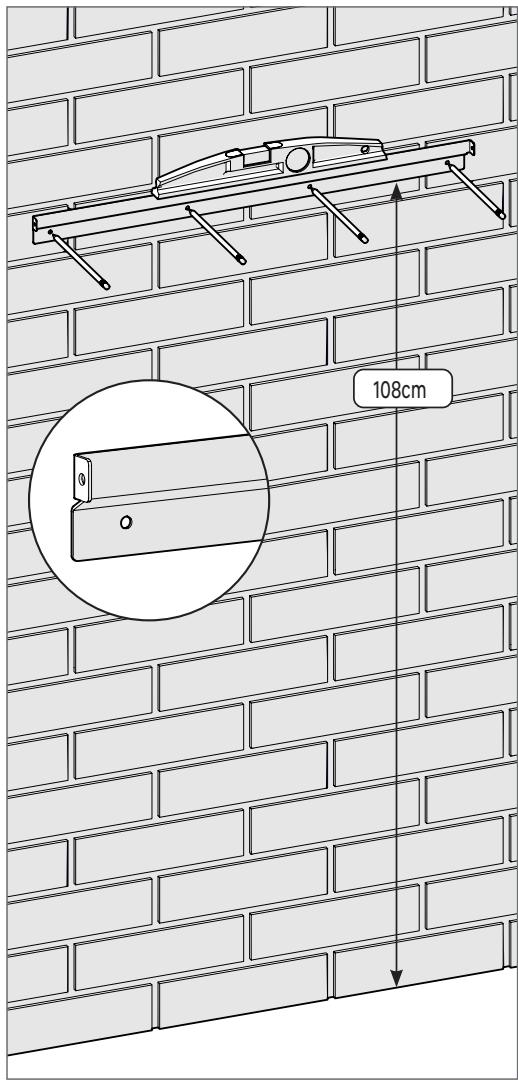
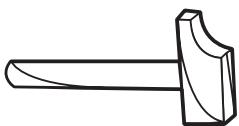
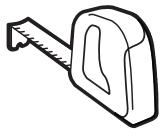
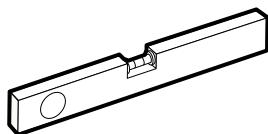
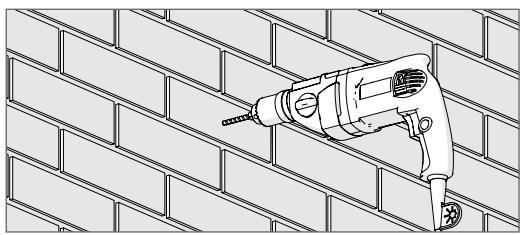
1 Place the fixing rail 108 cm from the ground, check the level, and locate the 4 fixing holes.
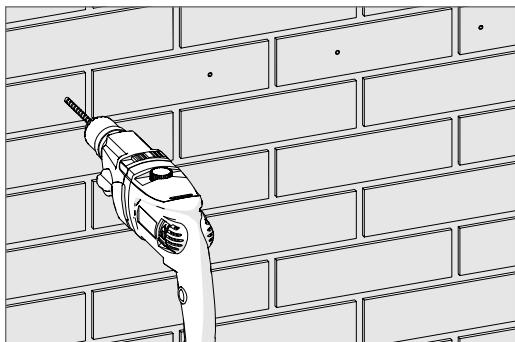
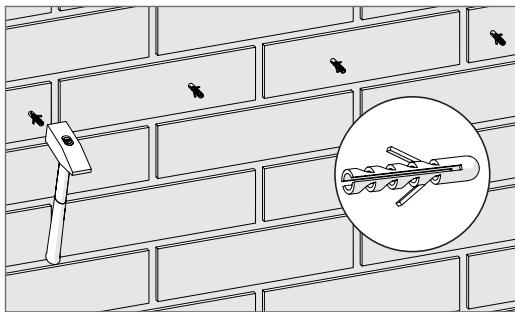
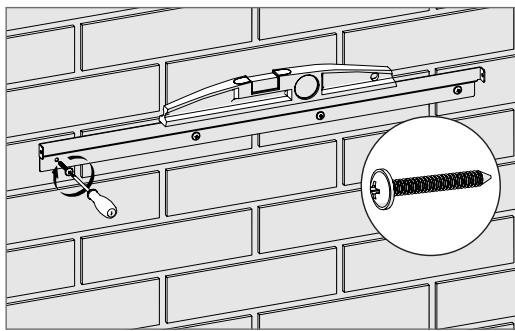
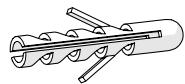
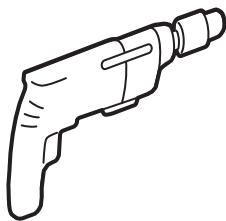
2 Drill the 4 holes, insert the dowels, and fix the rail while controlling the level.
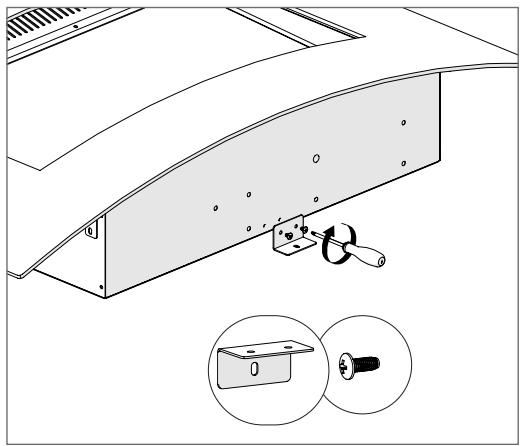
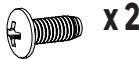
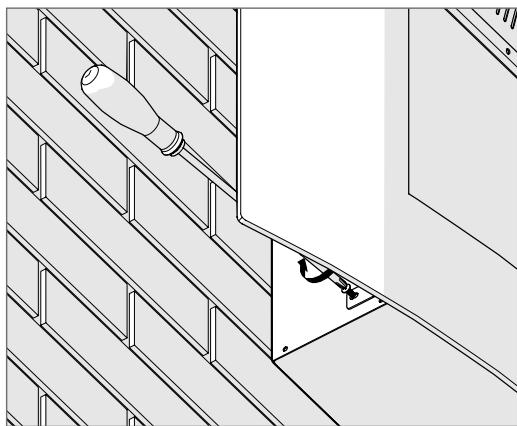
Fix the bracket below the device using the 2 small screws provided.
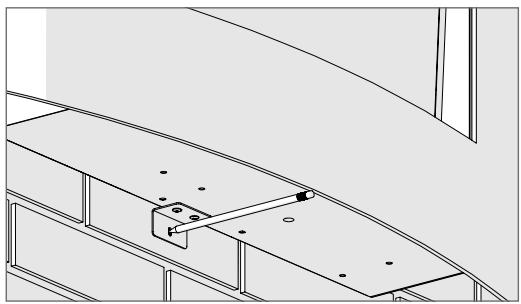
5 Mark the hole of the bracket.
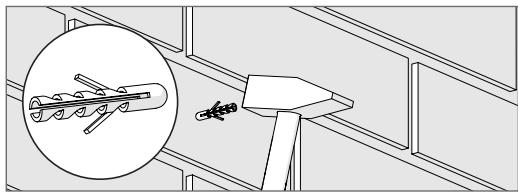
7 Drill the hole and insert the dowel.
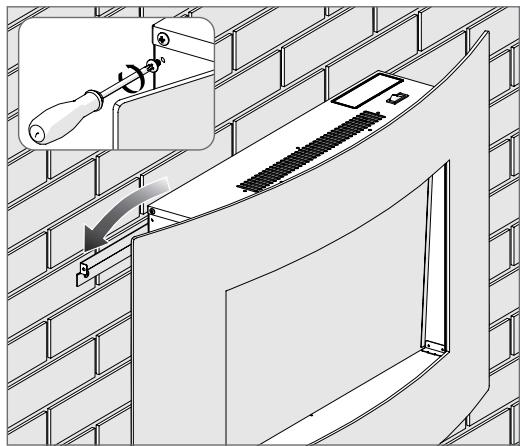
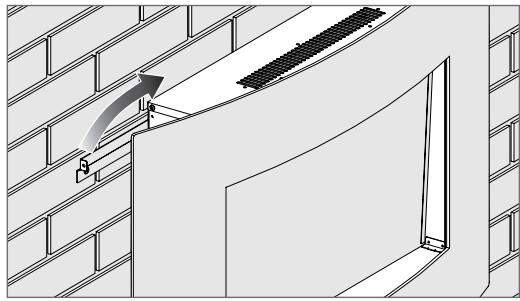
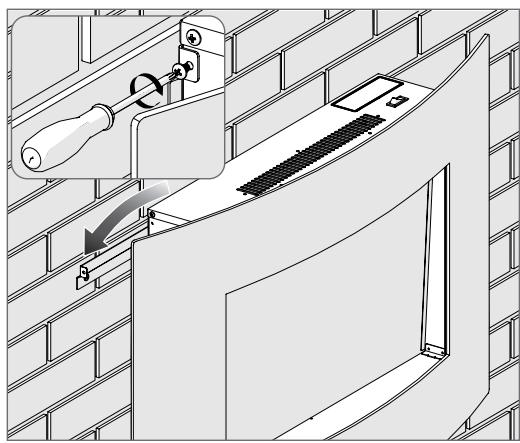
4 Remove the fixing screws on each side of the device and position it on the rail, making sure that it is properly engaged.
6 Remove device.
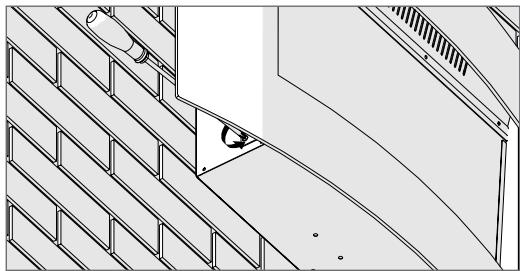
8 Position the device again on the rail, ensuring that it is properly engaged and secure it using the 2 screws.
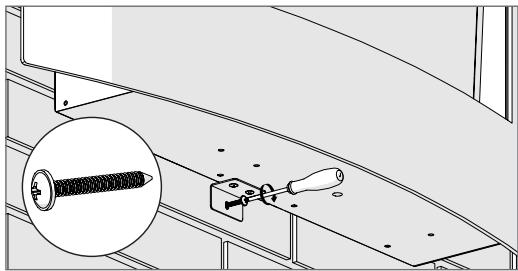
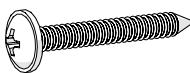
Fix the bracket using a large screw provided.
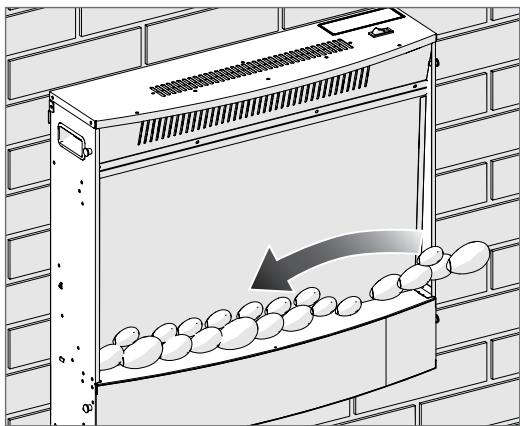
10 Remove the 2 screws located on each side of the device.

11Gently remove the window.
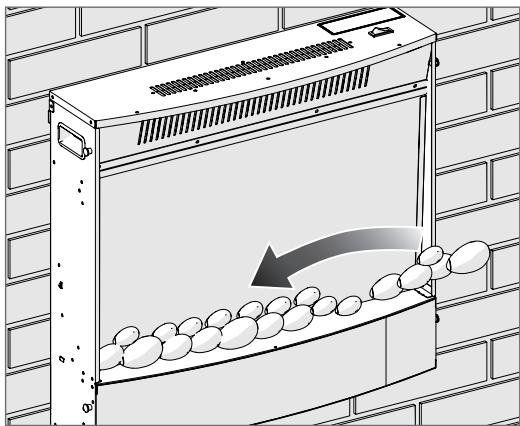
12 Place the stones.

13 Replace the window gently.

14 Tighten the 2 screws located on each side of the device.
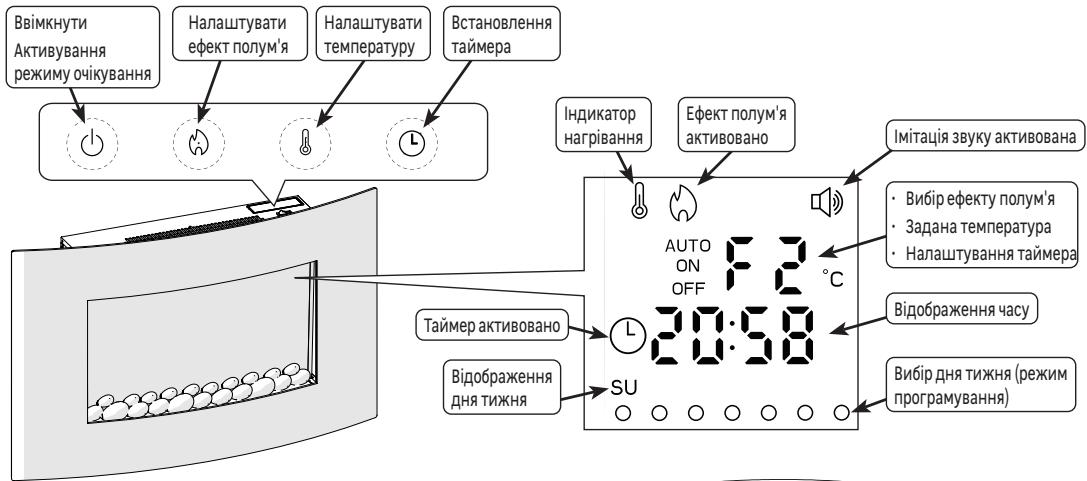
USE
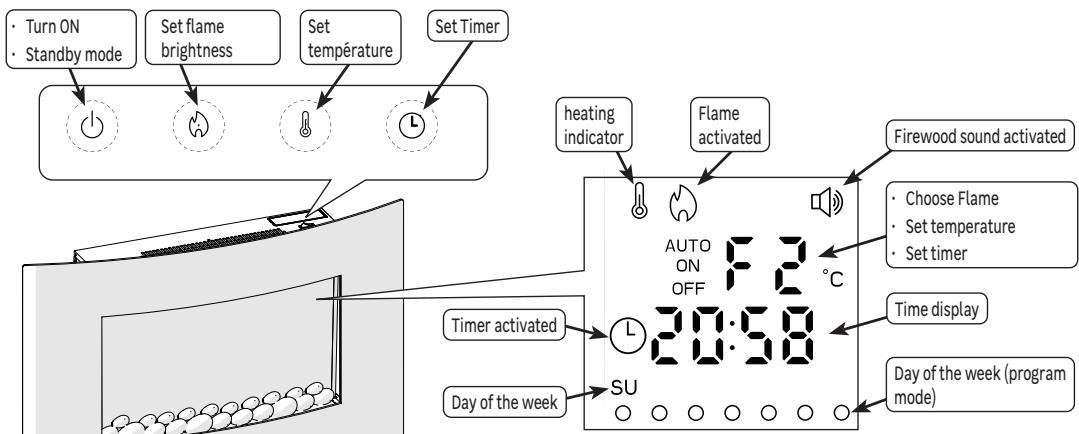
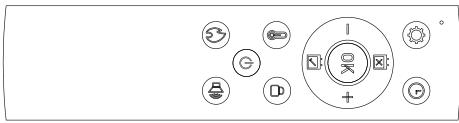
On/Standby
- Press () on the control panel or the remote control to start or standby the device.
Flame effect adjustment
- Press [n]n several times to choose a type of effect

Heating temperature adjustment:
- Press to activate the heating, the set temperature is displayed
1- From the control panel
- Maintain until the temperature flashes to enter the adjustment mode
- Press several times to choose the set temperature (desired temperature)

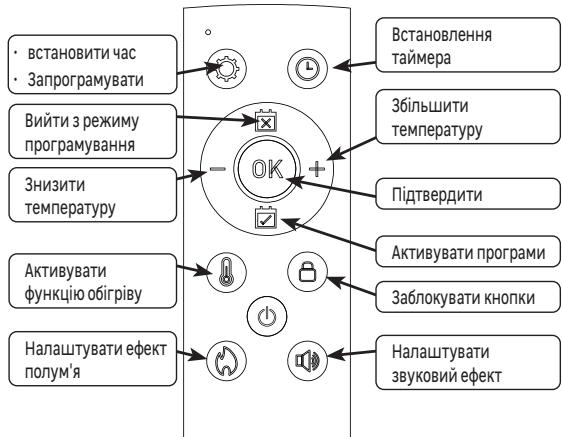
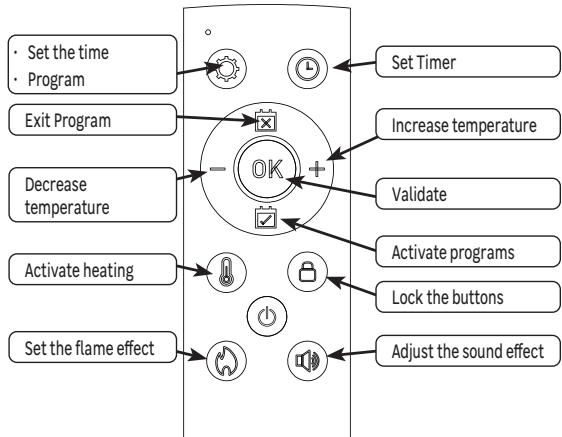
2-From the remote control
- Set the temperature using the + and — buttons

The value "0°C" sets heating on its maximum power without taking into account the room temperature.
- After several seconds without action, the device comes out of the adjustment mode.
- Press again to deactivate the heating, the blower stops after 15 seconds.
Using the timer
- The Timer function allows the heater to be put into standby mode after a user-defined time.
1- From the control panel
- When the device is running, press ( c 一 一 ) several times to choose the number of hours before standby

2-From the remote control
- Press to display the timer
- Set the number of hours before standby using the + and — buttons

During the timer adjustment, if there is no action within 10 seconds, the device leaves the adjustment cycle and retains the last selected value.
Commands lock
- Press and keep to the beep the button on the remote control to lock all the buttons (except the button).
- Press and keep to the beep the button on the remote control to unlock all the buttons..
Sound effect adjustment
- Press the button on the remote control several times to choose the sound level of the effect.

Current time adjustment
- Press and keep the button on the remote control until the hours flash
- Set the hours using the + and — buttons of the remote control
- Press OK to validate, the minutes flash
- Set the minutes using the + and — buttons
- Press OK to validate, the day of the week flashes
- Set the day using the + and — buttons

- Press OK to validate. If no action is carried out within 15 seconds, validation is made automatically.
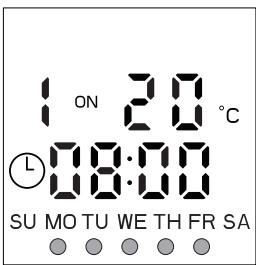
Weekly programming
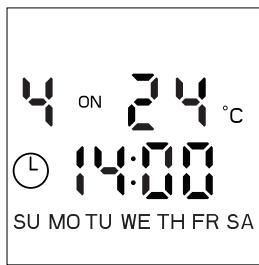
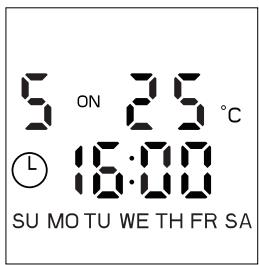
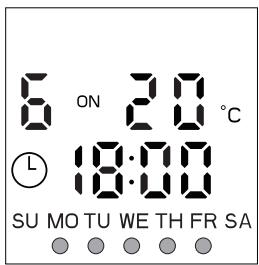
- The programming mode allows you to define one or more heating periods over the day. 7 programs have been defined by default and can be modified by the user. Each program begins with a start -up and ends with a standby, it defines a visual effect and a set temperature, and can be activated on one or more days of the week.
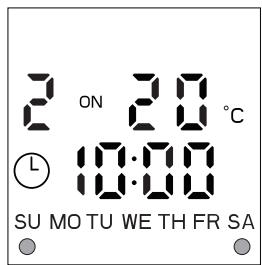
Description of default programs
| Prog 1 | Prog 2 | Prog 3 | Prog 4 | Prog 5 | Prog 6 | Prog 7 | |
| Start-up time | 08:00 | 10:00 | 12:00 | 14:00 | 16:00 | 18:00 | 20:00 |
| Standby time | 09:00 | 11:00 | 13:00 | 15:00 | 17:00 | 19:00 | 21:00 |
| Visual effect | F1 | F2 | F4 | F3 | F2 | F1 | F1 |
| Temperature | 21℃ | 22℃ | 23℃ | 24℃ | 25℃ | 26℃ | 27℃ |
| Active day | Monday | Monday | Monday | Monday | Monday | Monday | Monday |
Customizing programs
- Press the button on the remote control, program 1 is displayed, the day flashes
- Use the + and — buttons to move the cursor to the desired day
- Press to activate or deactivate this day
- Reproduce this operation for each of the days to activate/deactivate
- Press OK to validate, the time flashes
- Use the + and — buttons to set up start time
- Press OK to validate, the minutes flash
- Use the + and — buttons to adjust the minutes
- Press OK to validate, the temperature flashes
- Use the + and — buttons to adjust the set temperature
- Press OK to validate, the type of visual effect flashes
- Press ( 0 ) several times to choose a type of effect
- Press OK to validate, the time flashes
- Use the + and — buttons to set up standby time
- Press OK to validate, the minutes flash
- Use the + and — buttons to adjust the minutes
- Press OK to validate, program 2 is displayed, the day flashes
- Reproduce these steps for each programs
- Press [×] to get out of the adjustment cycle.
Activation of a program
- Press to enter the activation mode
- Use the + and — buttons to choose the program to activate
- Press OK to validate
Activation of all programss
- Press ✔ to enter the activation mode
- Use the + and — buttons to choose the A (Auto) program
- Press OK to validate

If the value "R" has been chosen, all programs are active, it is therefore important to deactivate the programs that are not used every day.

AUTO mode will only work if there is no overlapping ON/OFF time in 7 programs within one day
Example: I want to have a temperature of 20^
From Monday to Friday from 8 a.m. to 9 a.m., from 12 p.m. to 1 p.m., and from 6 p.m. to 10 p.m.
Saturday and Sunday from 10 a.m. to 10 p.m.
| Monday to Friday | P1 | 9h | P3 | 12h | 13h | 18h | 22h |
| Saturday Sunday | P2 | ||
| 8h | 10h | 22h | |
Program 1 Active from Monday to Friday
Program 2 Active on Saturday and Sunday

Program 3 Active from Monday to Friday
Program 4 Active on no day
Program 5 Active on no day
Program 6 Active from Monday to Friday

Program 7 Active on no day
Open window detection
This function is used to stop heating after detecting a rapid drop in room temperature (5°C in 10 minutes) and the impossibility of reaching the set temperature again for 30 minutes, which generally corresponds to opening a window or door.
In this case, the display indicates "OP" and the heating function stops. Press for 3 seconds or turn off the device to delete the error message.
Thermal cutoff
A thermal security automatically cuts the device in the event of overheating (the display indicates "88"). In this case, unplug the device, eliminate the cause of overheating, and let cool for 15 minutes before using again.
CARE
- Use a soft, dry cloth.
- For persistent stains, use a cloth dampened with soapy water and wipe immediately with a dry cloth.
TROUBLESHOOTING
Malfunctions are often due to minor causes; please read the table below before contacting the after-sales service. This can save you time and avoid unnecessary expenses.
| Problem | Causes, Solutions |
| The device does not turn on. | Check that the device is electrically powered. |
| The unit does not heat. | Check the temperature of the room: if it is too high compare to the setpoint temperature, the unit does not heat. |
| The remote control does not work | Check the batteries. Orient the remote control towards the device at a distance less than 1.2 m. |
| The display indicates "EE" and beeps for 5S | A short circuit has been detected, consult the after-sales service |
| The display indicates "88". | Thermal security has been triggered. Disconnect the device, eliminate the cause of overheating, and let cool for 15 minutes before using again. |
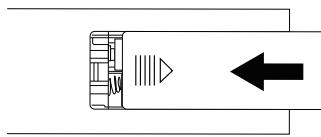
Replacement of the remote control batteries.
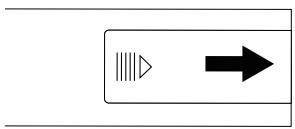
1 - Press gently on the cover of the battery compartment and push it in the direction of the arrow in order to remove it.
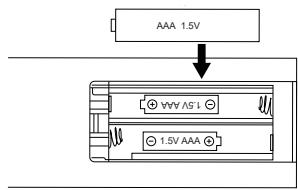
2 - Insert 2 AAA (R03) 1.5 V batteries into the compartment.
3 - Make sure you observe the right polarity (^+ + ^+ and " - "
The lightboard is not replaceable
CHARACTERISTICS
| Model Identifier | GMA2118 | Rated voltage | 220-240 V~ | |
| Power rating | 1680-2000W | Rated frequency | 50 Hz | |
| Electrical protection class | I | |||
| Item | Symbol | Value | Unit | |
| Heat output | ||||
| Rated heat output | P nom | 1.8 | kW | |
| Minimum heat output | P min | N/A | kW | |
| Maximum continuous heat output | P max,c | 1.8 | kW | |
| Auxiliary Electricity Consumption | ||||
| At nominal heat output | el max | 0.0 | kW | |
| At minimum heat output | el min | 0.0 | kW | |
| In standby mode | el sb | 0,00043 | kW | |
| Item | Unit | |||
| Type of heat input, for electric storage local space heaters only | ||||
| Manual thermal control of the load with integrated thermostat | No | |||
| Manual thermal control of the load with reception of information on the temperature of the room and/or outside | No | |||
| Electronic thermal control of the load with information on room and/or outside temperature | No | |||
| Thermal power can be regulated by fan | No | |||
| Type of heat output/room temperature control | ||||
| Single stage heat output and no room temperature control | No | |||
| Two or more manual steps, no room temperature control | No | |||
| Room temperature control with mechanical thermostat | No | |||
| Electronic room temperature control | No | |||
| Electronic room temperature control and daily timer | No | |||
| Electronic room temperature control and weekly timer | Yes | |||
| Other control options | ||||
| Room temperature control with presence detection | No | |||
| Room temperature control with open window detection | Yes | |||
| Remote control option | No | |||
| Adaptive activation control | No | |||
| Activation duration restriction | Yes | |||
| Black globe sensor | No | |||
| Contact Details | ADEO Services - 135 Rue Sadi Carnot - 59790 - RONCHIN - FRANCE | |||
WARRANTY
Terms and conditions of the ADEO SERVICES manufacturer warranty
Adeo Services offers a manufacturer warranty on its products.
The scope of the Adeo Services manufacturer warranty:
Adeo Services products are designed and built to provide quality performance for normal use. If a product proves to be defective during the warranty period under normal use, it is Adeo Services' responsibility to repair or replace it. The Adeo Services warranty covers the repair or replacement (at the discretion of Adeo Services) of your device marketed by Adeo Services if it proves to be defective due to a material or manufacturing defect during the warranty period. In case of unavailability of a part required for proper functioning of the product, Adeo Services commits to replacing it with a part of equivalent characteristics and performance levels The implementation of this warranty does not affect the exercise of your rights under the legal warranties provided by the civil code and the consumer code.
Cases excluded from the coverage of the Adeo Services manufacturer warranty:
The Adeo Services manufacturer warranty is not intended to apply in the cases listed below:
- Normal wear and tear of the product and/or its components.
- Accidental damage (due to dropping the product, impact or improper installation of the product)
- Damage resulting from use that does not comply with the information in the user manual and/or packaging (e.g. incorrect power supply voltage)
- Damage caused by failure to comply with the product maintenance recommendations.
- Damage caused by external sources such as transportation, weather, power failure or power surges.
- Cosmetic damage, including, but not limited to, scratches, scuffs, or broken plastic components,
- Failures caused by Acts of God (events beyond the control of Adeo Services, unforeseeable at the time of sale of the product and the effects of which could not be avoided by appropriate measures (e.g. natural disasters).
-
Failures caused by:
-
Negligent use, misuse, mishandling or careless use of the product.
Use not in accordance with the product user manual.
Use of the product for purposes other than normal domestic use in the country where it was purchased.
Use of parts that are not assembled or installed in accordance with Adeo Services installation instructions.
Use of parts and accessories that are not genuine Adeo Services components. -
Faulty installation or assembly.
□ Repairs or modifications performed by parties other than those authorized by Adeo Services or its authorized agents. -
The warranty will also not be valid if the serial number or the nameplate of the product (if the product has a nameplate) is removed or defaced.
If Adeo Services receives information from competent public authorities that the product has been stolen.
What are the terms and conditions for implementing the warranty?
The terms and conditions for implementing the Adeo Services warranty are as follows
- The warranty takes effect on the date of purchase (or on the date of delivery if later).
- A proof of delivery/purchase is required prior to performing any operation on your device under warranty. Please note that without this proof, any work to be done will be subject to an estimate, which must be accepted by the customer before any work can be done. Please keep your purchase receipt or delivery note.
- All work will be performed by Adeo Services or its authorized service providers.
- Any replaced part becomes the property of Adeo Services
- The repair or replacement of your device under warranty does not extend the warranty period.
- The warranty does not affect the exercise of your rights under the legal warranties provided by the civil code and the consumer code.
To make use of this warranty, you must contact the brand company from which you purchased your product.
Date of entry into force of the warranty:
The Adeo Services warranty takes effect on the date of purchase or the date of delivery of your product, whichever is later.
Geographic scope of Adeo Services warranty:
The warranty is valid in the country of purchase of the product.
If you use your device in a country other than the one in which you purchased it, the warranty may be invalidated. In this case, please contact the brand company in the country of origin where you purchased the product who will study the warranty claim on a case by case basis.
Fate of Adeo Services warranty in case of resale of the product:
In case of resale of the product during its warranty period, the warranty remains valid for the benefit of the buyer and can be implemented by the latter provided however:
That the proof of original purchase of the product is brought along,
That the proof of proof of proper functioning of the product at the time of the resale is brought along,
That the terms and conditions of implementation of the warranty as detailed within the present document are met. It is specified that the resale of the product has no effect on the warranty period remaining at the date of resale. Thus, the buyer of the resold product can claim the benefit of the Adeo Services warranty within the limit of the remaining validity time of the warranty at the date of the resale.
NOTES
NOTES
FR Traduction de la version originale du mode d'emploi
Traducción de las Instrucciones originales
PT Traducao das Instruções originais
Traduzione delle istruzioni originali