USER MANUAL JBKOOL-21 VALBERG
CONDITION DE GARANTIE
EN This product is guaranteed against faults caused by defects in manufacturing or the materials used for a period of two years, starting from the date of purchase.* This warranty does not cover defects or damage caused by failure to install the device correctly, incorrect use of the product, or excessive wear and tear.
*proof of purchase required
GARANTIEVOORWAARDEN
Thank you for choosing this VALBERG product. VALBERG products are chosen, tested, and recommended by ELECTRO DEPOT, so you can be sure you are getting a top-quality, easy-to-use product that won't let you down.
We're confident your new device will be a pleasure to use every day!
Welcome to ELECTRO DEPOT.
Table of Contents

Parts
Product overview
Intended use
Specifications

Before first use
Assembly
Use

Cleaning and maintenance
Storage
A Product overview
PLEASE TAKE TIME TO READ THIS USER MANUAL AND THE SEPARATE REGULATORY BOOKLET CAREFULLY BEFORE USING THE UNIT. KEEP BOTH BOOKLETS FOR FUTURE REFERENCE.
Parts
A Main unit
B Handle
Air inlets
D Power cable and plug
Cable storage hooks
F Control panel
① Timer button
(2) Fan mode button
③ Oscillation button
- button (speed/timer)
5 Power button (ON/STANDBY)
6 +button (speed/timer)
Display screen with remote control signal receiver
① Speed/timer setting
② Timer indicator
A Product overview
③ Normal ventilation indicator
Night-time ventilation indicator
Natural ventilation indicator
⑥ Oscillation indicator
Air outlets
I Base
Remote control
① + button [speed/timer]
- button (speed/timer)
3 Fan mode button
4 Power button (ON/STANDBY)
⑤ Timer button
Oscillation button
Product overview
- Unpack the unit. Remove all the labels from the product. Check that it is complete and in a good condition. If the unit is damaged or faulty, do not use it and take it to your retailer or after-sales service centre.
- Keep all packaging out of the reach of children. There is a risk of accidents if children play with packaging materials.
Intended use
- This unit is intended for household use only. Only use the unit indoors, in a dry and well-ventilated location. It has not been designed for industrial or professional use.
- This unit has been designed to circulate air in the surrounding space and generate an air flow. Do not use the unit for any other purpose.
Any other use may damage the unit or cause injury.
Specifications
| Model: | 968200 |
| Tower fan |
| Operating voltage: | 220-240 V ~, 50 Hz |
| Power: | 45 W |
| Protection class: | I |
| Timer (auto-on/auto-off): | 0.5 - 12 hours
(The 0.5 - 10-hour duration can be adjusted in 30-minute intervals, and the 11 - 12-hour duration can be adjusted in 1-hour intervals) |
| Remote control |
| Battery: | 1x 3 V CR2032 lithium button battery (included) |
| Operating range: | Up to 5 metres |
| Description | Symbol | Value | Unit |
| Maximum fan air flow: | F | 6.0 | m3/min |
| Fan power input: | P | 37.5 | W |
| Service value: | Sv | 0.2 | (m3/min)/W |
| Power consumption in standby mode: | PSB | 0.3 | W |
| Power consumption when stopped: | Poff | - | W |
| Sound power level: | LWA | 57.5 | dB (A) |
| Maximum air speed: | c | 2.8 | metre(s) |
| Seasonal power consumption: | Q | 12.3 | kWh/year |
| Service value measurement standard | EN 60704-2-7:1998EN 60704-1: 2010+A11:2012EN 50564:2011EN ISO 5801:2008 |
| Contact details for further information | ELECTRO DEPOT,1 route de Vendeille59155 FACHES THUMESNIL - France |
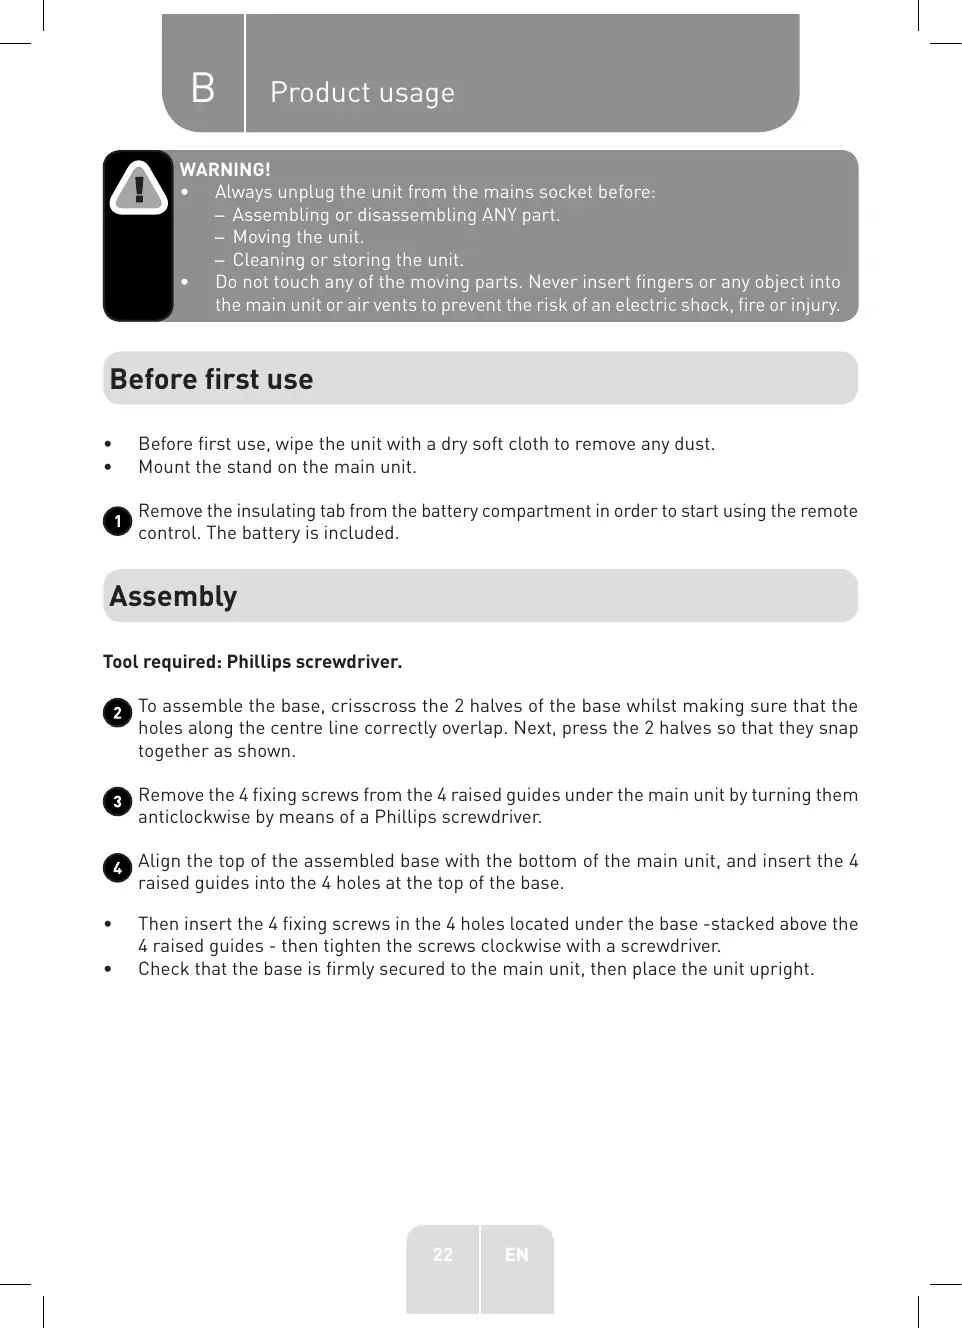
B Product usage

WARNING!
Always unplug the unit from the mains socket before: - Assembling or disassembling ANY part. - Moving the unit. - Cleaning or storing the unit.
- Do not touch any of the moving parts. Never insert fingers or any object into the main unit or air vents to prevent the risk of an electric shock, fire or injury.
Before first use
Before first use, wipe the unit with a dry soft cloth to remove any dust.
Mount the stand on the main unit.
1 Remove the insulating tab from the battery compartment in order to start using the remote control. The battery is included.
Assembly
To assemble the base, crisscross the 2 halves of the base whilst making sure that the holes along the centre line correctly overlap. Next, press the 2 halves so that they snap together as shown.
3 Remove the 4 fixing screws from the 4 raised guides under the main unit by turning them anticlockwise by means of a Phillips screwdriver.
Align the top of the assembled base with the bottom of the main unit, and insert the 4 raised guides into the 4 holes at the top of the base.
- Then insert the 4 fixing screws in the 4 holes located under the base -stacked above the 4 raised guides - then tighten the screws clockwise with a screwdriver.
- Check that the base is firmly secured to the main unit, then place the unit upright.
Use
Control panel and remote control description

NOTE: When using the remote control, point the top of the remote towards the tower fan's display to correctly transmit the signal.
- A beep will sound to confirm your selection whenever a button is pressed on the tower fan or remote control, and the display will be updated accordingly.
| Button | Function |
| Control panel | Remote control |
| POWER | | Press to turn on the unit. The indicators corresponding to the current speed, fan mode and oscillation (if enabled) will be illuminated on the main display screen.
Press again to put the unit in Standby (off) mode. The screen will go off. |
| +/- Speed or program | +/- | Press to increase or decrease the fan speed (Normal ventilation) or to select a predefined ventilation programme (Night-time ventilation/Natural ventilation). |
| Fan mode | M | Press this button to toggle between the 3 fan modes. The indicator of the selected fan mode will light up on the screen.
Then press +/- to select a predefined fan speed or ventilation programme.
- Normal ventilation: The fan speed can be set from level 1 to 6.
-Night-time ventilation: This mode simulates a light night breeze which is ideal for a good sleep. The fan speed decreases by one level every 30 minutes to then remain at the lowest speed. Two ventilation programmes are available.
-Programme 1: Speed 2 (30 min) → Speed 1 (remains at speed 1).
-Programme 2: Speed 3 (30 min) → Speed 2 (30 min) → Speed 1 (remains at speed 1).
-Natural ventilation: This mode simulates an outdoor breeze. The fan speed varies and the cycle is repeated in a loop. Three ventilation programmes are available.
-Programme 1: Speed 3 (6 s) → Speed 2 (6 s), repeated in a loop.
-Programme 2: Speed 5 (6 s) → Speed 4 (6 s), repeated in a loop.
-Programme 3: Speed 6 (6 s) → Speed 5 (6 s) → Speed 4 (6 s) → Speed 5 (6 s) → repeated in a loop.
PLEASE NOTE: In Night-time ventilation and Natural ventilation mode, the speeds are preset in the programmes and cannot be adjusted. |
| Oscillation | M | Press to activate or deactivate the automatic left-right oscillation. The indicator lights up on the screen whenever the function is activated. |
| Timer | | Press to enter the auto-on/auto-off timer setting mode. The time can be set in 30-minute intervals from 0.5 to 9.5 hours, then in 1-hour intervals from 10 to 12 hours. |
| Auto-on: This function allows you to delay the time upon which the unit switches on. Press the按钮 when the unit is in Standby mode to set the auto-on timer. The indicator light will turn on and the duration "0.0" will flash for a few seconds on the settings screen. Press +/- to set the desired auto-on time (0.5 - 12 hours). The settings screen will then display the main parameters, indicating the last used settings as far as speed, fan mode and oscillation (if enabled) are concerned; these will flash for a few seconds. These settings can be adjusted if desired. When you have finished with the settings, the main display screen will reappear: the set time , in addition to the fan mode and oscillation indicators (if enabled) will light up for approximately 1 minute. |
| Auto-off: This function allows you to delay the time upon which the unit goes into Standby mode (switches off). Press the button when the unit is on to set the auto-off timer. The indicator light will turn on and the duration "0.0" will flash for a few seconds on the settings screen. Press +/- to set the desired auto-off time (0.5 - 12 hours). When you have finished with the settings, the main display screen will reappear: the indicator will be lit, in addition to the fan mode and oscillation indicators (if enabled) to indicate that they are in use. |
| To cancel a programmed auto-on or auto-off: Press the button or press the button, followed by +/- until the time returns to "0.0". |
Product usage

WARNING!
Make sure that the room is well ventilated when using the unit.
- Place the unit upright on a flat, dry surface in a safe area to prevent it from tipping over.
- Arrange the cable in such a way that it is not near any doorways or thoroughfares, where people could step on or trip over it.
- Do not place the unit near a window where it could be exposed to rain.
- Fully unwind the power cable and securely plug it into a suitable mains socket. Once powered, the unit will beep twice and enter Standby mode.
- Press the button to turn on the unit.
- Press the button to toggle between the 3 fan modes (Normal/ Night-time/Natural ventilation).
- Press the +- button to increase or decrease the fan speed (Normal ventilation) or to select a predefined ventilation programme (Night-time ventilation/Natural ventilation).
- Press the button to start or stop the automatic left-right air flow oscillation.
- See the "Control panel and remote control description" section above for more information.

NOTE: After approx. 1 minute of inactivity (no buttons being pressed), the display will turn off to save power whilst the fan continues to operate (speed, fan mode, oscillation and timer). Press any button (except ) to turn the display back on again.
- When you have finished using the unit, press the button to make the unit enter Standby (off) mode and unplug the power cable from the mains socket.

Important: Always unplug the unit from the mains socket whenever it is no longer in use to fully disconnect it from the power source.
5 Replacing the remote control battery
If the remote control battery is dead, only replace it with the same or an equivalent type.
- Hold the remote control with the back facing upwards.
- Place your thumb (or a flat screwdriver) on the bottom of the remote to push and hold the small locking clip towards the opposite side, as shown. Then pull the groove of the battery compartment to slide it out.
Install a new battery (1x 3 V CR2032 button battery) with its + side facing upwards, and close the compartment.
Cleaning and maintenance

WARNING!
- Do not attempt to disassemble the unit for cleaning purposes.
- Always unplug the unit from the mains socket before cleaning it.
- Never immerse the unit, power cable or plug in water or any other liquid, to avoid any electrical hazard. Never spray them with liquids or rinse them under running water. The interior of the unit and all of its electrical components must be kept dry.

NOTE: Never use solvents, chemical or abrasive cleaning products, wire brushes, sharp objects or scouring pads to clean the unit. Do not use turpentine, benzene, thinner or alcohol to clean the unit.
- Clean the unit on a regular basis.
- Wipe the unit's surfaces, air inlets and air outlets with a soft cloth/sponge lightly dampened with water or a small amount of soapy water. Thoroughly dry the unit with a soft dry cloth after cleaning it.
- To ensure the air circulates well in the motor unit, make sure that the unit's air inlets do not get dusty.
6 Power cable storage
When putting the unit away, wind the power cable around the 2 storage hooks located at the back of the unit. Press the inner ends of the 2 concealed hooks to pop them out, then wind the cable.
Storage
- Always unplug the unit before storing it.
- Store the unit in a fresh, dry and dust-free place, out of the reach of children and pets.
- Please retain the packaging and use it to store your unit when it is not in use for an extended period of time.

Bedankt!