LIGHT70 - Pack BOOST - Free user manual and instructions
Find the device manual for free LIGHT70 BOOST in PDF.

User questions about LIGHT70 BOOST
0 question about this device. Answer the ones you know or ask your own.
Ask a new question about this device
Download the instructions for your Pack in PDF format for free! Find your manual LIGHT70 - BOOST and take your electronic device back in hand. On this page are published all the documents necessary for the use of your device. LIGHT70 by BOOST.
USER MANUAL LIGHT70 BOOST
SET OF 4 LIGHT EFFECTS ON A STAND
4x 12x1W RGBW PAR PROJECTORS
PACK DE 4 EFFETS DE LUMIERE SUR UN SUPPORT
4 PROJECTEURS PAR 12X1W RVBB
The triangle containing a lightning symbol is used to indicate whenever your health is at risk (due to electrocution, for example).
An exclamation mark in a triangle indicates particular risks in handling or operating the appliance.
UK The unit complies with UK standards
For indoor use only
Minimum distance between the appliance and other objects
Protection class I. Requires an earth connection
Don't stare into the light beam
CAUTION DO NOT OPEN THE HOUSING SHOCK HAZARD
SAFETY INSTRUCTIONS
- Please read these instructions carefully, they include important information about the installation, usage and maintenance of this product.
- Please keep this User Guide for future reference. If you sell the unit to another user, be sure that he also receives this instruction booklet.
- Always make sure that you are connecting to the proper voltage, and that the line voltage you are connecting to is not higher than that stated on the decal or rear panel of the fixture.
- This product is intended for indoor use only!
- It is essential that the device is earthed. A qualified person must carry out the electric connection.
- To prevent risk of fire or shock, do not expose fixture to rain or moisture. Make sure there are no flammable materials close to the unit while operating.
- The unit must be installed in a location with adequate ventilation, at least 1m from adjacent surfaces. Be sure that no ventilation slots are blocked.
- Always disconnect from power source before servicing or replacing fuse and be sure to replace with same fuse size and type.
- Secure fixture to fastening device using a safety chain. Never carry the fixture solely by its head. Use its carrying handles.
- Maximum ambient temperature (Ta) is 104^ F ( 40^ C ). Do not operate the fixture at temperatures higher than this.
- In the event of a serious operating problem, stop using the unit immediately. Never try to repair the unit by yourself. Repairs carried out by unskilled people can lead to damage or malfunction. Please contact the nearest authorized technical assistance center. Always use the same type of spare parts.
- Don't connect the device to a dimmer pack.
- Make sure the power cord is never crimped or damaged.
- Never disconnect the power cord by pulling or tugging on the cord.
- Avoid direct eye exposure to the light source while it is on.
The product is for decorative purposes only and not suitable as a household room illumination. - The light source of this device is not replaceable. If it is defective, the entire unit must be discarded.
- CONNECT DEVICE: Where the MAINS plug or an appliance coupler is used as the disconnect device, the disconnect device shall remain readily operable.
INSTALLATION OF THE UNITS
Before positioning the light, ensure the stability of the installation site. Drive the screw into the screw hole on the stand. Make sure that the units can't fall from the stand. The manufacturer cannot be held responsible for damages due to bad installation of the units.
WARNING: Carry the lights only by the handle.
POWER SUPPLY
Plug the supplied mains lead into the IEC socket (1) on the rear side of the cross bar. Make sure the unit is connected to the appropriate power supply.
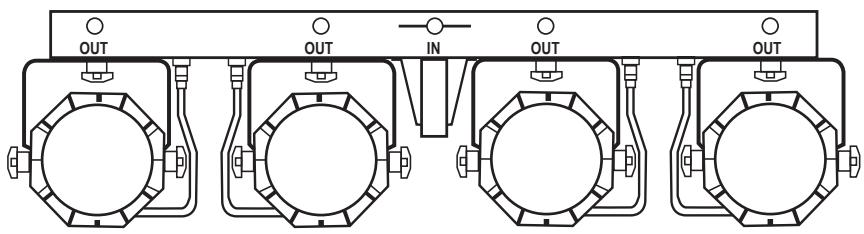
CONNECTION OF THE SIGNAL CABLE
Connect the lead of every unit to the corresponding connector on the light bar, as shown below:

FEATURES & FUNCTIONS
| Number | Feature | Function |
| 1 | Power supply input | Attach the IEC mains lead here. Built-in fuse |
| 2 | DMX input | 3-pin XLR connector for DMX512 input communication |
| 3 | DMX output | 3-pin XLR connector for DMX512 output communication |
| 4 | LED display | LED function display and menu buttons to control the operating mode of the unit |
| 5 | MENU buttons | MENU function buttons (see below for operation) |
| 6 | Mic | Built-in microphone for sound-controlled operation |
| 7 | PAR mounts | Attach the PAR projectors to the controller bar at the 4 points shown |
| 8 | PAR connections | Connect the PAR projectors to the controller bar at the 4 points shown |
| 9 | Light stand socket | Tighten screw to secure the controller bar to the light stand |
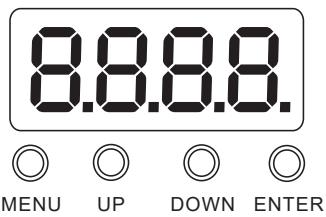
HOW TO CONTROL THE UNIT
Access control panel functions using the four panel buttons located directly underneath the LCD Display.
| Button | Function |
| MENU | Used to access the menu or to return to a previous menu option |
| UP | Scrolls through menu options in ascending order |
| DOWN | Scrolls through menu options in descending order |
| ENTER | Used to select and store the current menu or option within a menu |
OPERATION
1) When power is on, the digital LED display works with red dots. When a DMX signal is present, the dot will be shiny.
2) DMX address code setting: Press "MENU" button. When the digital LED displays d001-d512, press "UP" or "Down" to set the address code. The code ranges from 001-512.
3) IP code setting: Press "MENU". When IP.01-IP.64 is displayed, press "UP" or "DOWN" to set the address code. The code ranges from 001-512.
4) Internal program running: There are 5 built-in programs. Press "MENU" to choose one of the built-in programs from A1-A5: A1 is static color mode, A2 LED jump function, A3 LED rainbow function, A4 LED sound active function, and A5 LED strobe function.
BUTTON SPECIFICATIONS:
| A1 | Solid Mode | ←UP/DOWN→ 1-19 |
| A2. | Jump Mode | ←UP/DOWN→ 1-19 |
| A3. | Rainbow mode | ←UP/DOWN→ 1-19 |
| A4. | Sound active mode | ←UP/DOWN→ 1-19 |
| A5. | Strobe Mode | ←UP/DOWN→ 1-19 |
| R. | Solid Red Color intensity | ←UP/DOWN→ 0-255 |
| G. | Solid Green Color intensity | ←UP/DOWN→ 0-255 |
| B. | Solid Blue Color intensity | ←UP/DOWN→ 0-255 |
| U. | Red+White Color Wash | ←UP/DOWN→ 0-255 |
| D. | DMX Mode | d.512 |
| IP. | IP Mode | IP.64 |
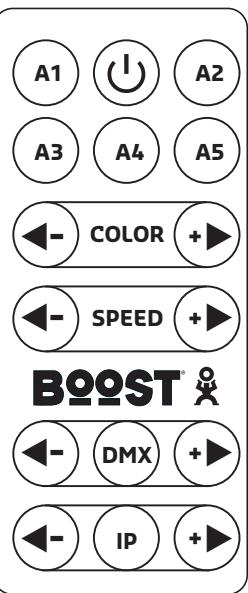
IR REMOTE CONTROLLER
Please operate the remote control within a distance of 4 - 5m and 30^ between the remote and the appliance. Aim the remote at the sensor. Remove all obstacles between the remote and the sensor.
The remote control might not work properly if the sensor is exposed to strong sunshine.
If the remote control doesn't work properly, please check the batteries.
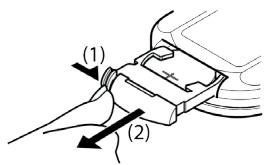
INSTALLING THE BATTERIES IN THE REMOTE CONTROL
- Place the remote face down on a flat surface.
- Push the compartment cover into the direction of the arrow.
- Slide the battery compartment open.
- Remove the old battery and install the new one (CR2025) with the plus (+) symbol facing up.
Gently slide the battery compartment closed. It locks automatically.
RECOMMENDATIONS FOR BATTERIES

This symbol indicates that used batteries should not be disposed of with household waste but deposed correctly in accordance with your local regulations. Batteries shall not be exposed to excessive heat such as sunshine, fire or the like.
When the internal batteries are not to be used, remove them to avoid damage caused by battery leakage or corrosion.
ATTENTION: Danger of explosion if battery is incorrectly placed. Only replace by the same or equivalent type.
WARNING :Do not swallow the battery. Danger of chemical burns. Keep new and old batteries out of the reach of children.
If the battery compartment doesn't close properly, stop using the product and keep it out of the reach of children. If you are in doubt whether the batteries have been swallowed or introduced into any other part of the body, contact immediately a doctor.
REMOTE CONTROL
A1: Effect 1 All bright
A2: Effect 2 Jump change
A3: Effect 3 Gradual change
A4: Sound activated
A5: Strobe
Color: Color adjustment
Speed: Speed adjustment
DMX: Selection of DMX channel
IP: Running effect
8 DMX CHANNELS:
| Channel | Value | Description |
| CH 1 | 0-10 | No function |
| 11-50 | Macro A1 | |
| 51-100 | Macro A2 | |
| 101-150 | Macro A3 | |
| 151-200 | Macro A4 | |
| 201-255 | Macro A5 | |
| 210-255 | Red+Green+Blue | |
| CH2 | 0-255 | Macro color |
| CH3 | 0-255 | Speed adjustable |
| CH4 | 0-255 | Master dimming |
| CH5 | 0-255 | Red dimming |
| CH6 | 0-255 | Green dimming |
| CH7 | 0-255 | Blue dimming |
| CH8 | 0-255 | White dimming |
FIXTURE CLEANING
The cleaning of internal and external optical lenses and/or mirrors must be carried out periodically to optimize light output. Cleaning frequency depends on the environment in which the fixture operates: damp, smoky or particularly dirty surrounding can cause greater accumulation of dirt on the unit's optics.
- Clean with soft cloth using normal glass cleaning fluid.
Always dry the parts carefully. - Clean the external optics at least every 20 days. Clean the internal optics at least every 30/60 days.
TROUBLE-SHOOTING
| Problem | Solution |
| No display when power is on | 1. Check if the power is correctly connected. |
| 2. Check the outlet is powered | |
| Light is out of control | 1. Check if the DMX address code is correctly set. |
| 2. Check if the DMX cable is correctly connected. | |
| The light is off after working for a while | 1. Check if the sensor is soldered on the LED PCB |
| 2. Check if the temperature is too high or not. | |
| 3. Check if Power supply is damaged. | |
| The beam is dark | 1. Check if the temperature is too high and cause a fast fade. |
| 2. Check if there are too much dust on the surface of light. |
SPECIFICATIONS
Voltage. 220-240V\~ 50/60Hz
Consumption 48W
PAR projector 12 x 1W (RGBW) x 4
DMX channels 8
Control modes.. Auto, music-controlled, DMX, Remote
Packing Size 38 x 15.5 x 92cm

This marking indicates that this product should not be disposed with other household wastes throughout the EU. To prevent possible harm to the environment or human health from uncontrolled waste disposal, recycle it responsibly to promote the sustainable reuse of material resources. To return your used device, please use the return and collection systems or contact the retailer where the product was purchased. They can take this product for environmental safe recycling.
MANUEL D'UTILISATION
EXPLICATION DES SYMBOLES
LED lamp: 12 x 1W (RGBW) x 4
DMXkanalen. 8
Controle modi ....Auto, Master/Slave, DMX, afstandsbediening
Voedingskabel 4m
Afmetingen (verpakking) 38 x 15.5 x 92cm

Imported from China by LOTRONIC S.A.
Avenue Zénobe Gramme 9
B-1480 Saintes