
VRS82736VF - Stick vacuum BEKO - Free user manual and instructions
Find the device manual for free VRS82736VF BEKO in PDF.
| Product type | Cordless stick vacuum |
| Brand | BEKO |
| Model | VRS82736VF |
| Rated voltage | 36 V |
| Adapter power supply | 100-240 V~, 50-60 Hz, output 42.2 V / 350 mA |
| Maximum runtime | 75 min (ECO level) |
| Charging time | Up to 8 hours |
| Power levels | ECO, CARPET, TURBO |
| Suction type | Cyclonic |
| Filters | Washable HEPA, foam filter |
| Included accessories | Crevice tool, upholstery brush, dusting brush, shoulder strap |
| Weight | Approximately 2.8 kg |
| Dimensions (H x W x D) | Approximately 110 x 25 x 20 cm |
| Protection class | II |
| Usage | Household use only |
| Safety | Do not use on liquids; do not vacuum hot ashes; unplug before cleaning |
| Maintenance | Clean dustbin, cyclone and filters regularly; wash HEPA and foam filter, dry for 24 h |
| Spare parts | Filters, brushes, battery (available) |
Frequently Asked Questions - VRS82736VF BEKO
User questions about VRS82736VF BEKO
0 question about this device. Answer the ones you know or ask your own.
Ask a new question about this device
Download the instructions for your Stick vacuum in PDF format for free! Find your manual VRS82736VF - BEKO and take your electronic device back in hand. On this page are published all the documents necessary for the use of your device. VRS82736VF by BEKO.
USER MANUAL VRS82736VF BEKO
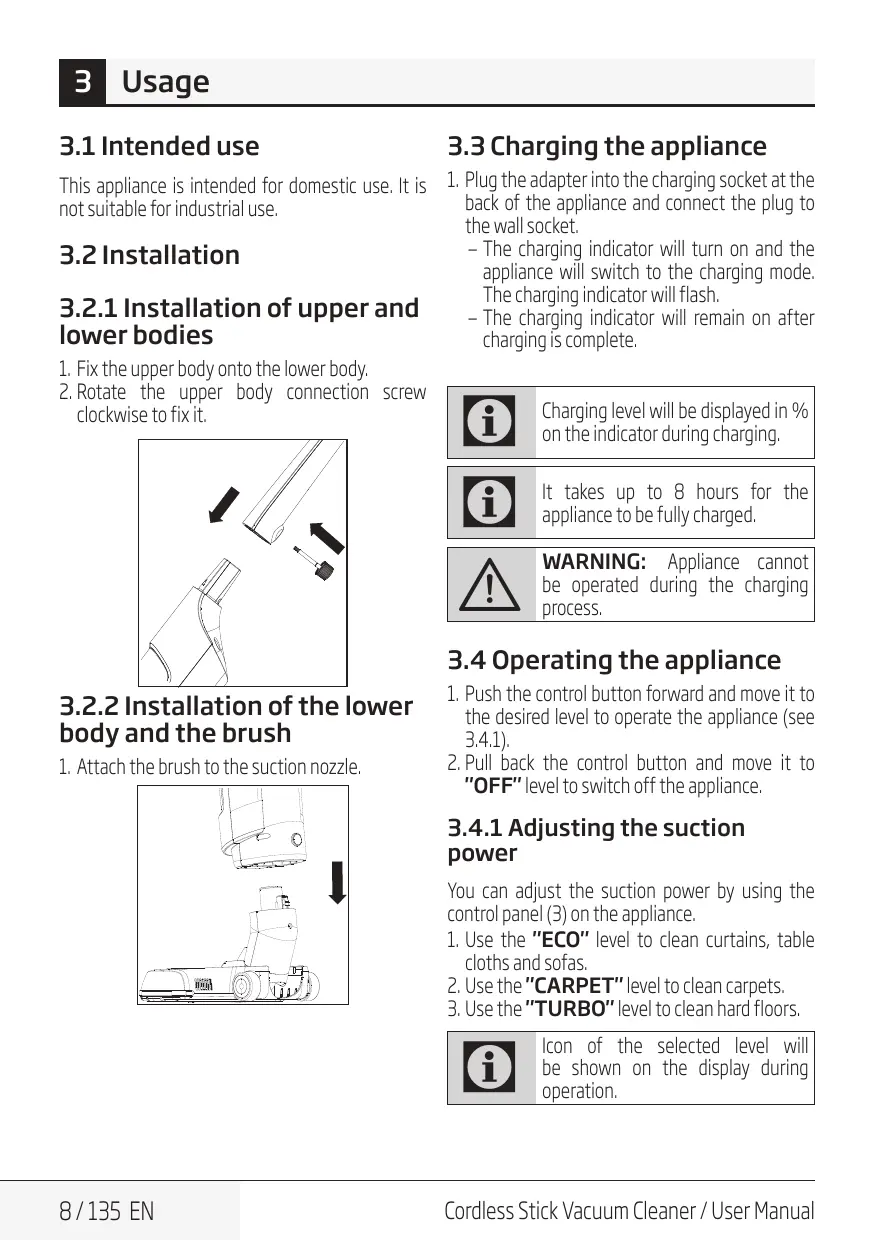
Cordless Stick Vacuum Cleaner
User Manual
VRS 82736 VF
EN DE FR IT RO ES
SL | CS | PL | BG | HU
01M-8839593200-2117-01
beko
Please read this user manual first!
Dear Valued Customer,
Thank you for preferring this Beko appliance. We hope that you get the best results from your appliance which has been manufactured with high quality and state-of-the-art technology. Therefore, please read this entire user manual and all other accompanying documents carefully before using the appliance and keep it as a reference for future use. If you handover the appliance to someone else, give the user manual as well. Follow the instructions by paying attention to all the information and warnings in the user manual.
Remember that this user manual may also apply to other models. Differences between models are explicitly described in the manual.
Meanings of the Symbols
Following symbols are used in various sections of this manual:

Important information and useful hints about usage.

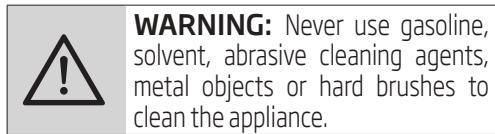
WARNING: Warnings against dangerous situations concerning the security of life and property.

Protection class for electric shock.

This appliance has been manufactured in environmental friendly modern plants without giving any harm to the nature.
1 Important safety and environmental instructions 4-5
1.1 General safety 4
1.2 Compliance with WEEE Directive and Disposing of the Waste Product 5
1.3 Compliance with RoHS Directive 5
1.4 Information on Waste Batteries 5
1.5 Package information.. 5
2 Your cordless stick vacuum cleaner 6-7
2.1 Overview 6
2.2 Technical data. 7
3 Usage 8-9
3.1 Intended use 8
3.2 Installation 8
3.2.1 Installation of upper and lower bodies ... 8
3.2.2 Installation of the lower body and the brush 8
3.3 Charging the appliance 8
3.4 Operating the appliance. 8
3.4.1 Adjusting the suction power 8
3.5 Accessories 9
4 Cleaning and care 11-12
4.1 Cleaning the dust container 11
4.2 Cleaning the cyclone 11
4.2 Cleaning the HEPA filter. 11
4.3 Cleaning the foam filter 12
4.4 Cleaning the turbo brush 12
4.5 Storage. 12
4.6 Moving and transportation 12
1 Important safety and environmental instructions
This section contains safety instructions that will help protect from risk of personal injury or material damage.
Failure to follow these instructions voids any granted warranty.
1.1 General safety
- This appliance complies with international safety standards.
- This appliance may be used by children who are at the age of 8 or over and the people whose physical, perceptive or mental skills are impaired or who are inexperienced or not knowledgeable about the appliance as long as they are supervised or informed and made understood the safe use of the appliance and the encountered dangers. Children should not play with the appliance. Cleaning and care works should not be performed by children unless they are supervised by an adult.
- If the power cable or the appliance itself is damaged, do not use it. Contact an authorised service.
-
Your mains power supply should comply with the information supplied on the rating plate of the appliance.
-
The mains supply on which you will use the appliance must be secured with a 16 A fuse minimum.
- Do not use the appliance with an extension cable.
- Prevent damage to the power cable by not squeezing, bending, or rubbing it on sharp edges.
- Do not touch the appliance or its plug when it is plugged if your hands are damp or wet.
- Do not pull the power cable when unplugging the appliance.
- Do not vacuum flammable materials and when vacuuming cigarette ash, make sure that it has cooled down.
- Do not vacuum water or other liquids.
- Protect the appliance from rain, humidity and heat sources.
- Never use the appliance in or near places where combustible or inflammable ambience or places are present.
- Unplug the appliance before cleaning and maintenance.
- Do not immerse the appliance or its power cable in water for cleaning.
- Do not attempt to dismantle the appliance.
1 Important safety and environmental instructions
- Use the original parts or parts recommended by the manufacturer only.
- Do not clean the particles such as cement, plaster and compressed paper in order to prevent the filter from being clogged and the motor being damaged.
- Use the appliance only with the adapter supplied with.
- Do not use the appliance without filters; otherwise it can get damaged.
- If you keep the packaging materials, store them out of the reach of children.
1.2 Compliance with WEEE Directive and Disposing of the Waste Product

This product complies with EU WEEE Directive (2012/19/EU). This product bears a classification symbol for waste electrical and electronic equipment
(WEEE).This product has been manufactured with high quality parts and materials which can be reused and are suitable for recycling. Do not dispose of the waste product with normal domestic and other wastes at the end of its service life. Take it to the collection center for the recycling of electrical and electronic equipment. Please consult your local authorities to learn about these collection centers.
1.3 Compliance with RoHS Directive
The product you have purchased complies with EU RoHS Directive (2011/65/EU). It does not contain harmful and prohibited materials specified in the Directive.
1.4 Information on Waste Batteries
This symbol on rechargeable batteries/batteries or on the packaging indicates that the rechargeable battery/battery may not be disposed of with regular household rubbish. For certain
rechargeable batteries/batteries, this symbol may be supplemented by a chemical symbol. Symbols for mercury (Hg) or lead (Pb) are provided if the rechargeable batteries/batteries contain more than 0,0005% mercury or more than 0,004% lead.
Rechargeable batteries/batteries, including those which do not contain heavy metal, may not be disposed of with household waste. Always dispose of used batteries in accordance with local environmental regulations. Make enquiries about the applicable disposal regulations where you live.
1.5 Package information

Packaging materials of the product aremanufactured from recyclable materialsin accordance with our National
Environment Regulations. Do not dispose of the packaging materials together with the domestic or other wastes. Take them to the packaging material collection points designated by the local authorities.
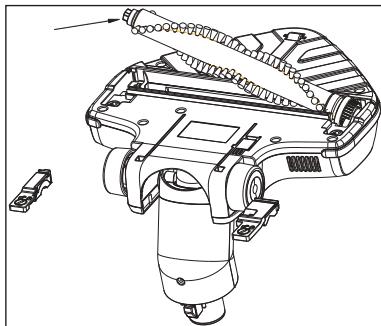
2 Your cordless stick vacuum cleaner
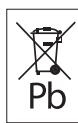
2.1 Overview
2 Your cordless stick vacuum cleaner
- Handle
- Control button
- Control panel
- Upper body
- Lower body
- Charging indicator
- Dust container handle
- Dust container
- Suction nozzle
- Brush
- Brush removal button
- Dust container removal button
- Upper body connection screw
2.2 Technical data
Rated voltage : 36 V
Adaptor input :
100-240V\~50-60Hz
Adapter output : 42.2 V 350 mA
Protection class : Ⅱ
3.1 Intended use
This appliance is intended for domestic use. It is not suitable for industrial use.
3.2 Installation
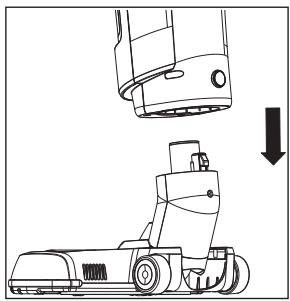
3.2.1 Installation of upper and lower bodies
- Fix the upper body onto the lower body.
- Rotate the upper body connection screw clockwise to fix it.
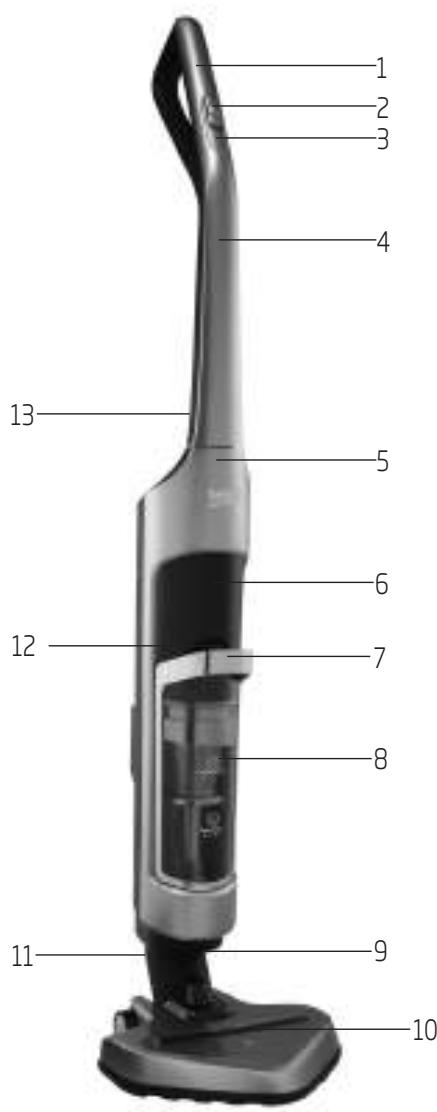
3.2.2 Installation of the lower body and the brush
- Attach the brush to the suction nozzle.
3.3 Charging the appliance
-
Plug the adapter into the charging socket at the back of the appliance and connect the plug to the wall socket.
-
The charging indicator will turn on and the appliance will switch to the charging mode. The charging indicator will flash.
- The charging indicator will remain on after charging is complete.

Charging level will be displayed in % on the indicator during charging.

It takes up to 8 hours for the appliance to be fully charged.

WARNING: Appliance cannot be operated during the charging process.
3.4 Operating the appliance
- Push the control button forward and move it to the desired level to operate the appliance (see 3.4.1).
- Pull back the control button and move it to "OFF" level to switch off the appliance.
3.4.1 Adjusting the suction power
You can adjust the suction power by using the control panel (3) on the appliance.
- Use the "ECO" level to clean curtains, table cloths and sofas.
- Use the "CARPET" level to clean carpets.
- Use the "TURBO" level to clean hard floors.

Icon of the selected level will be shown on the display during operation.

It can be used up to 75 minutes with 100% charge at the minimum level.

The charging indicator will be shown in % during operation. Percent of the indicator will decrease as the charging level goes down.
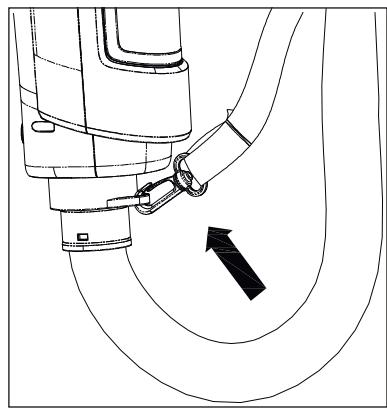
3.5 Accessories
- Remove the brush by pressing the brush removal button on the lower body to use accessories.
- Fit the lug on the hose to the slot in the suction nozzle (you will hear a click).
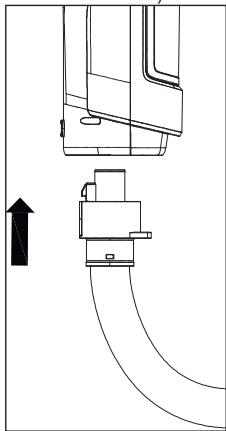
- Attach the desired accessory to the hose cap to use it.
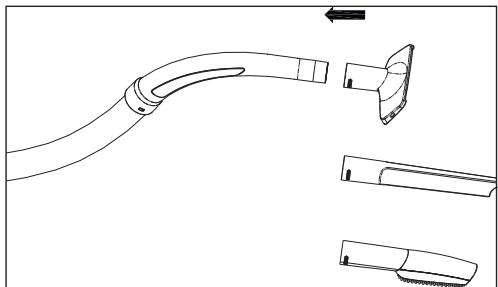
- To remove the accessories, pull them from the hose cap.
- Remove the hose from the suction nozzle by pressing the accessory removal button.
Crevice tool
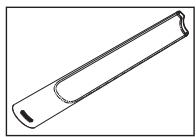
Suitable for the cleaning of the surfaces which are difficult to clean, such as the areas remaining under sofas and furniture.
Upholstery tool
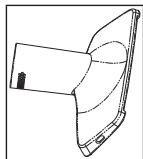
Suitable for cleaning the floorings, stair steps, inside of the cars, sofas, armchairs etc.
Dust brush
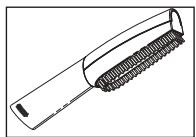
Suitable for cleaning the curtains, and sensitive and fragile objects.
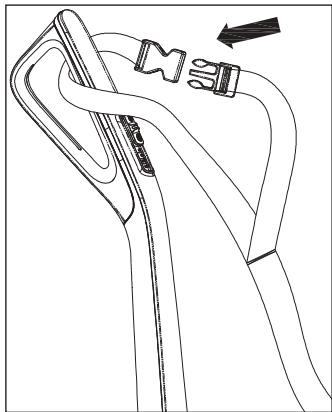
Shoulder hanger
Shoulder hanger allows you to move easily during cleaning.
Attach the hose cap to use the shoulder hanger (see 3.5).
- Fit the hook of the shoulder hanger to the slot on the hose cap.
3 Usage
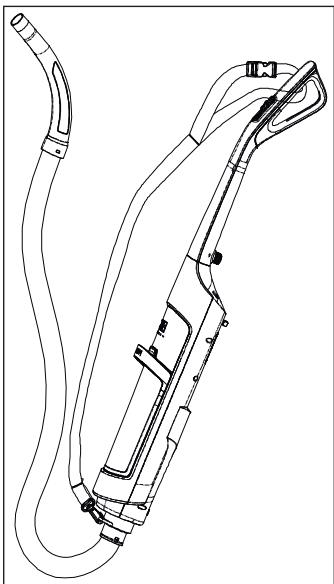
- Attach the other end of the shoulder hanger to the handle.
- You can hang the appliance on your shoulder using the hanger to start cleaning.
4 Cleaning and care
Switch off and unplug the appliance before cleaning it.
4.1 Cleaning the dust container
Empty the dust container (8) when the dust container full LED "under the charging indicator (6) turns red with the appliance switched on.

- Press the dust container removal button and pull the handle of the dust container to remove it.
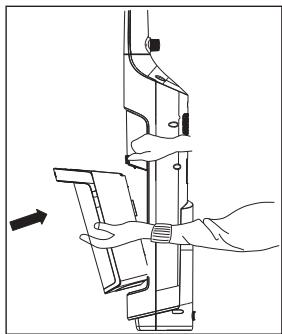
- Grab and pull the cyclone from its handles and take it out from the dust container (8).
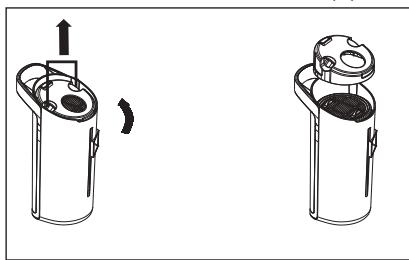
-
Empty the dust container.
-
Place the cyclone to its housing according to the arrow mark on it.
- Place the dust container into the body of the appliance.
4.2 Cleaning the cyclone
- Press the dust container removal button and pull the handle of the dust container to remove it.
- Grab and pull the cyclone from its handles and take it out from the dust container (8).
- Rotate the cyclone cap counterclockwise to remove it.
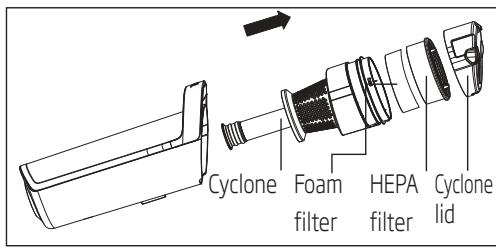
- Remove the HEPA filter on the cyclone.
- Clean the cyclone by washing it under running water.
- Follow the steps above in reverse order to assemble the parts together again.
4.2 Cleaning the HEPA filter
- Press the dust container removal button and pull the handle of the dust container to remove it.
- Grab and pull the cyclone from its handles and take it out from the dust container (8).
- Rotate the cyclone cap counterclockwise to remove it.
- Remove the HEPA filter on the cyclone.
- You can wash the filter under running water after shaking it off.
- If you wash the HEPA filter, dry it at room temperature (for 24 hours minimum). Do not use them before ensuring that they are completely dry.
4 Cleaning and care
- Install the HEPA filter to the cyclone housing and fit the cyclone into the dust container (8).
- Attach the dust container to the body again.
4.3 Cleaning the foam filter
- Press the dust container removal button and pull the handle of the dust container to remove it.
- Grab and pull the cyclone from its handles and take it out from the dust container (8).
- Rotate the cyclone cap counterclockwise to remove it.
- Remove the HEPA filter on the cyclone.
- Remove the foam filter under the HEPA filter.
- You can wash the filter under running water after shaking it off.
- If you wash the HEPA filter, dry it at room temperature (for 24 hours minimum). Do not use them before ensuring that they are completely dry.
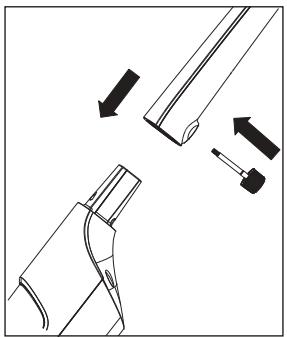
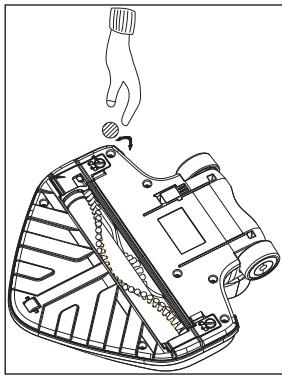
4.4 Cleaning the turbo brush
- Twist the removal button of the turbo brush cylinder lid with the help of a screwdriver or a coin and unlock the lid of the brush cylinder.
- Open the lid of the brush cylinder, remove and clean the brush.
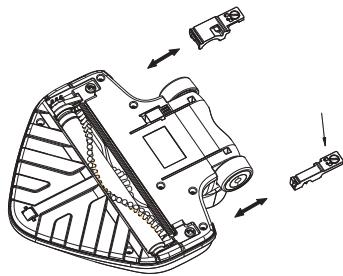
- Clean the brush roller with a damp cloth, attach it to its place and lock the tab.
4.5 Storage
- If you do not intend to use the appliance for a long time, please store it carefully.
- Please make sure that the appliance is unplugged, cooled and totally dry.
- Store the appliance in a cool and dry place.
- Keep the appliance out of the reach of children.
4.6 Moving and transportation
- During handling and transportation, carry the appliance in its original packaging. The packaging of the appliance protects it against physical damages.
- Do not place heavy loads on the appliance or on the packaging. The appliance may get damaged.
- Dropping the appliance may render it non-operational or cause permanent damage.
Chere cliente, cher client,
to place a space above
Tension de sortie
lesire adaptor :42,2V350mA
HeCnA3BaHcTo Ha INHCTpyKcNITe BOiIO OTMaHa Ha IpeOCTaBeHaTa rapaHcIy.
1.1 06ua 6e3oNaChocT
To3n ypei CbOTBETCTBa Ha MexdyHapOndHnte CtaHdaptN 3a 6e30NaCHOCT.
- Upei bT MoKe Da 6bIe n3nOJI3BaH OT DeuHa 8 rOdInn IIN NOrOJIeMn, N OT JIuCa C cH3NueCKn, CETNBn INn MeHTaJIHn YBpeJdaHnra, KOnTO He Ca pa6oTnIIN Docera C ypeDa H He rO P03HaBAt Do6pe, CTnA Te Da Ce Ha6JIouDaBt IIN Da ca pa36paJn KaK Da rO n3nOI3Ba Be3OpacHo, IN KaKBn Ca ONaCHOCTnte, CBbp3aHn C ypeDa. DeuTa H Tp8Ba Da INgPaTc CypeDa. PoUncTBaHeTo IN pOndbPckKaTa He Tpr6Ba Da ce IN3BbPbWBat OT Deu, OCBEN aKO He Ca KOHTPOJInpaHn OT Bb3paCTHn.
- HnKora He n3noJ3BaIte ypeDa, aKO 3axpaHbAunrT Ka6eJ nn camnT ypeE NOBpeDen. CBypXeTe ce c otOpn3npaH cepBn3.
- Пюверete далданнite 3a MeCTHOTO eNEKTPo3axpaHbaHe OTROBaprT Ha INΦOpMaцЯТа Bbpxy Ta6eJkata C daHn.
3axpaHbAHeTo Ha ypeDa Tp8Ba Da 6bJe o6e3OpacEno C npedna3nteI OT MmHmym 16 A.
He n3noJ3BaIte ypea c ydJIxIteJ Ka6eJ.
3a Da N36eHHeTe PnCKa OT NOBpeHa Ha 3axpaHbAunia Ka6eI, BHIMaBaIte Da He rO npITnCKaTe, ORbBaTe IIN TbpKaTe B OCTpN pb6OBe. - HnKora He nIpaIte ypeDa nIi NIeIcEla, KOraTo ca BkJIuOeHn, C MOKpN IIN BnAJHn pIe.
He n3KJIIOUBAIte OT KOHTaKTa DbPnaIKn Ka6eNa Ha ypeDa.
He nouuctbaute C npaxocmykackaata 3anaIIMMaTePnAINIKORATO NOUCTBaTeOCTaTbCNIOTzIrapN,yBepTe ce, ye ca n3rachann.
He BCMyKBaITe BOa IJI IN DpyrN TeuHOCTN.
3aunTeyepea otIbXn I n3TOUHnHa HbnaI TOJInHa. - HnKora He n3noJ3BaIte ypeDa B nIiB 6IIN3OCT Do n36yXnIBN, Bb3IpaMeHmM MeCTa mATEpnaJI.
-Изключete ypeda ot eJIeKtpnueckkata Мржа пpeДи NOuchTBAHe И NOДрьЖka.
He notanayte ypea nnn kaeba BbB BOda KOraTO rN NOUNCTBate.
He npabete onntn da pa3rno6baveypea.
- I3PON3BaIte cAmO opnHnHaJIHn YactN nJIn TaKnBa, npenOpbUaHn OT pON3BOIDTeJI.
3aДа npedOTbpaTnte 3anyuBaHe HaФнтьрИ NOBpeJdaHe Ha DBnIaTeJI, He NOuchTbaIte CypeDA napYeHcMaTePnaJI, KaTO ZIMeHT, TnncOKapToH, KOMnpecnpaHa XapTna.
- Използваite урEDA само с доставеня заедно с HeroадаNTep.
He n3noJ3BaIte ypea 6e3 cnItpn; B npOTnbEN cnyaM MoKe Da ce NobpeiN.
Ako peuHte Da 3ana3nte ONaKOBbUHnTe MaTePnaJI, CbXpaHBAIte rN daJeU OT Deca.
1.2 CbBmecTnMoCT c WEEE DnpeKtNbBa 3a HxBpIaHe Ha OTnaDbuHn IpOdykTn
IpojdykTbT OTROBapr Ha N3NCKBaHnraTa Ha DnpeKtNBata Ha EC 3a NxBbpnHe Ha OTnaDbuHn npOjyKn (2012/19/EU).To3n IpojdyK T Hocn KnaCnФнkaCnoHc CmBOn 3a OTnAbuHo eJekTpuecko n eJektpoHNo o6OpyDbaHe (WEEE).
IpoodykTBt e npOn3BVeDeH OT BnCOKoKaueCTBeHn Yactn MATEpnaN, KOITOMORAT Da CE n3PON3Bat NOBTOPHO caNoDxOJaUa 3a peuKnnpaHe. He n3XbBypIyte ypeDa 3aedHo C obnk
HOBeHIne 6nTOBn INpyrN OTNaIbCIN B KpaHa OnepatNBnry My XnBOT.3aHeceTe ro B cb6nPaTeHNn YcHTbp 3a peuKnnpaHe Ha eNEkTPOHNO n ENEkTpuecko O6OpyDbaHe. O6bPheTe ce KbM MeCTHIne BJIactn 3a NOBee NeIpO6HoCTN OTHOcHO Te3n C6bnpateJIHn CEHTPOBE.
1.3 CbBmecTnMoCTc ДиректNBaTa 3a OgrpaHnUaBaHe Ha yNtpe6aTa Ha OnpeJeHn ОпаСн ВБЕСТВa
3akyenrT O BAC npOyKT OTROBap Ra Hn3KcKBAHrTa Ha DInpeKTNBATA 3a ORpaHnUaBaHe Ha yNtpe6ata Ha ONpeIeHn OnaChn BeIeCTBa Ha EC (2011/65/EU). ToH He CbIbPxa HnKoI OT BpeHNTe 3a6paHEn MaTePnaJI, OINcaHn B DInpeKTNBATA.
1.4 N3xBbPJIHe Ha 6aTePNTe
YBepete ce, ye nIOCKnTE 6atepnn Ca n3XbBpJIeHN B cBOTBcTCTBne C MeCTHnTe 3aKOHn HapeD6n. CmBONbT Bbpxy 6atepna T ONAKOBkata NOKa3BaT, Ye 6atepnaT, DoCTaBeHa C npOdykTa, He
Tp6Ba Da ce CnTa 3a 6ntoB OTnAbk. Ha HkON MeCTa, To3n CmBOJ MOKe Da e N3PON3BaH B KOM6nHaZrC XmMnueckn CmBOJ. Ako BaTeepnIte CbIbpxkat NOBee OTo 0,0005% JxVBak IIN NOBee ot 0,004% ONOBo, TOraba CmBOJbT Hg 3a JxVBak IN CmBOJbT Pb 3a ONOBo ca NoCTabEHn NOXmNueckn CmBOJ. YBepraBaNKe Ce, ye BatePnITe ca n3XBpIeHN IO NOxDxOJaIu NaUH, BVE DOpriHacrTe 3a npEDoTbPaTBAHeTO Ha NOTeHnAaHn BpeDN 3a OKoHnTa CpeDa UOBeWskOTO 3dpaBe, KOtTO bNxMa MOrJI NaB3NHKnHat, aKO BatePnITe He Ce n3XBpIyT npaBnHO.
HOMHaJaBbONTaJx :36V
BxoJeH aanTep :100-240V~ 50-60Hz