USER MANUAL Jogger - KINOMAP CARE FITNESS
9. connection bluetooth & application
https://cloud.carefitness.com/index.php/s/E2WD22KMNBQzERL
https://www.carefitness.com/sav
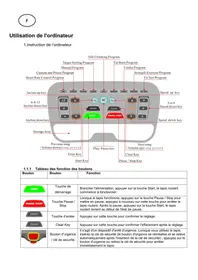
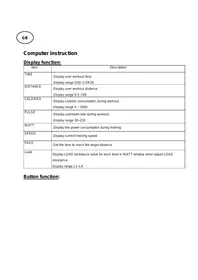
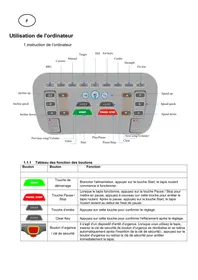
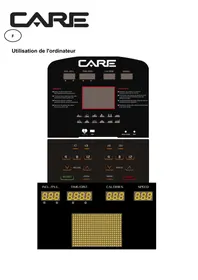
Computer instruction
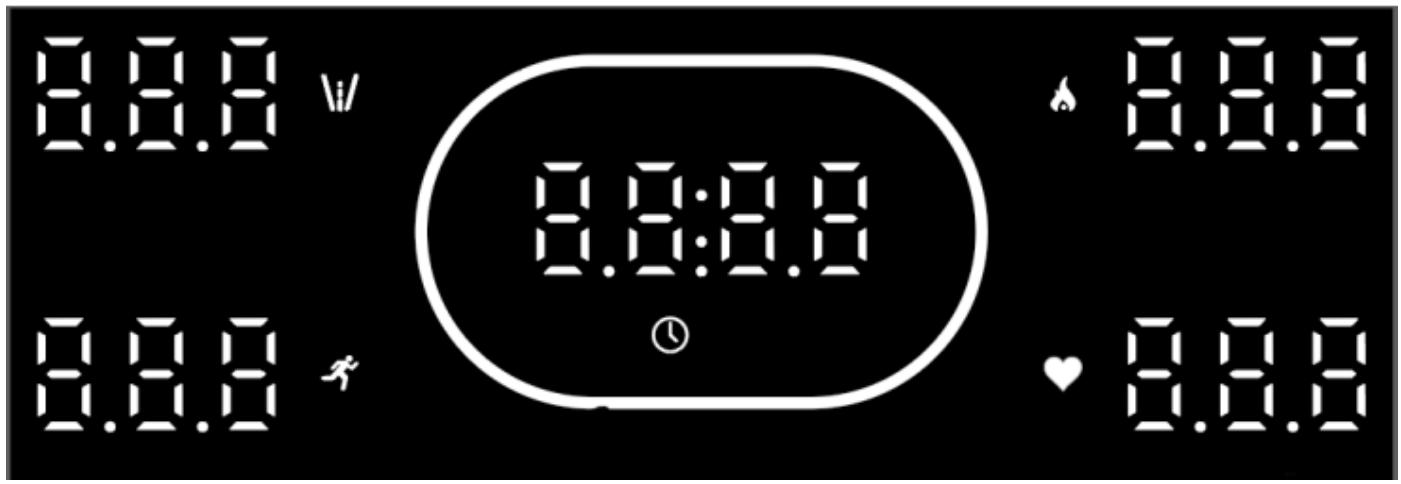
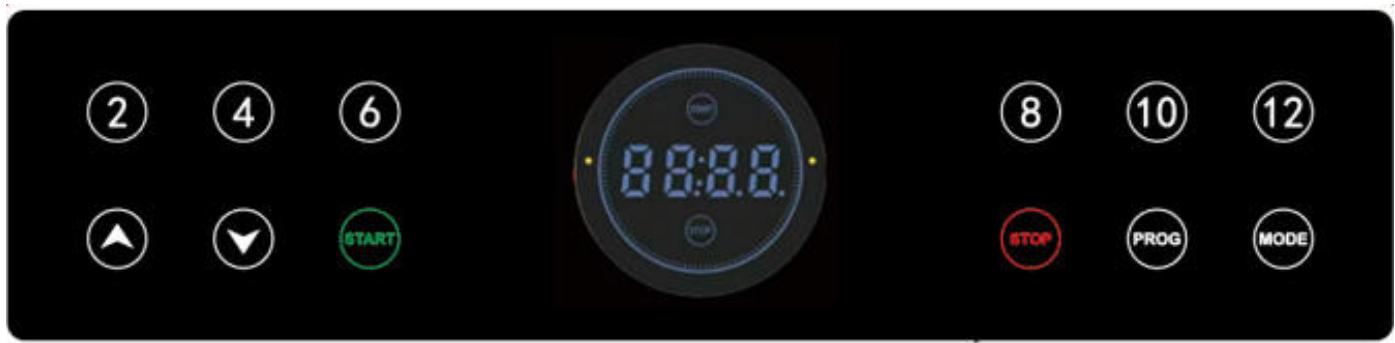
2. Window function
2.1 "SPEED": Display current speed, speed range: 1.0-16.0 kmh.
When start pre-set programs, it will display "P01-P02-...-P24-U01-U02-U03-HP1-HP3"-FAT.
2.2 "TIME": Display exercise time, and the range is 0:00-99:59.
2.3 "DISTANCE": Display running distance, and the range is 0.00-99.9.
2.4 "CAL": Display calories you burned and the range is 0-999.
2.5 "PULSE": Display hand pulse at the moment and the range is 50-200.
3. Key function
3.1 "START": Start the machine; "STOP": Stop the machine.
3.2 "SPEED+/-": At the using time, press it will increase/decrease 0.1 ~km/h in one time; press it more than 5 seconds, it will increase/decrease constantly.
3.3MODE: At the using time, press it to select countdown time/distance/calories circularly.
3.4 BLUETOOTH SPEAKER: Connect your phone and the machine by bluetooth.
3.5 QUICK SPEED:2KM/H, 4KM/H,6KM/H,8KM/H,10KM/H,12KM/H
3.6 PROG: Press it to select programs you want.
3.7 Rotary:Turn right to increase speed, turn left to decrease speed.
P01-P24: Pre-set programs.
FAT: Body fat test.
4. Quick Start (manual mode):
4.1 Turn on the power switch, and put on the safety key.
4.2 Press "START" button and the machine will start within 5 seconds.
4.3 Press "SPEED +/-" to adjust the speed; press "INC +/-" to adjust the incline.
5.Pre-set programs
| P01 | P02 | P03 | P04 | P05 | P06 |
| NO. | SPEED | SPEED | SPEED | SPEED | SPEED | SPEED |
| 1 | 1 | 2 | 2 | 2 | 3 | 3 |
| 2 | 3 | 3 | 3 | 2 | 4 | 4 |
| 3 | 3 | 3 | 5 | 3 | 5 | 5 |
| 4 | 7 | 6 | 5 | 5 | 6 | 5 |
| 5 | 7 | 5 | 7 | 5 | 7 | 6 |
| 6 | 5 | 5 | 7 | 5 | 8 | 6 |
| 7 | 5 | 8 | 8 | 8 | 9 | 7 |
| 8 | 5 | 5 | 5 | 8 | 10 | 7 |
| 9 | 7 | 5 | 5 | 8 | 10 | 7 |
| 10 | 7 | 6 | 5 | 8 | 10 | 9 |
| 11 | 5 | 8 | 3 | 5 | 9 | 9 |
| 12 | 5 | 8 | 3 | 5 | 8 | 10 |
| 13 | 5 | 8 | 8 | 5 | 7 | 10 |
| 14 | 5 | 5 | 8 | 3 | 5 | 11 |
| 15 | 3 | 4 | 4 | 2 | 4 | 5 |
| 16 | 2 | 3 | 3 | 2 | 3 | 3 |
| P07 | P08 | P09 | P10 | P11 | P12 |
| NO. | SPEED | SPEED | SPEED | SPEED | SPEED | SPEED |
| 1 | 3 | 3 | 2 | 3 | 4 | 4 |
| 2 | 4 | 5 | 4 | 5 | 5 | 6 |
| 3 | 9 | 8 | 5 | 6 | 7 | 10 |
| 4 | 4 | 3 | 5 | 6 | 9 | 10 |
| 5 | 10 | 5 | 6 | 6 | 10 | 7 |
| 6 | 4 | 7 | 5 | 9 | 11 | 10 |
| 7 | 10 | 9 | 6 | 10 | 9 | 10 |
| 8 | 4 | 3 | 3 | 6 | 6 | 10 |
| 9 | 9 | 5 | 3 | 6 | 8 | 7 |
| 10 | 4 | 7 | 2 | 9 | 9 | 7 |
| 11 | 8 | 10 | 6 | 10 | 10 | 10 |
| 12 | 4 | 3 | 5 | 6 | 10 | 10 |
| 13 | 11 | 5 | 6 | 6 | 11 | 10 |
| 14 | 5 | 7 | 3 | 6 | 9 | 10 |
| 15 | 3 | 11 | 3 | 11 | 6 | 6 |
| 16 | 2 | 5 | 2 | 3 | 5 | 5 |
| P13 | P14 | P15 | P16 | P17 | P18 |
| NO. | SPEED | SPEED | SPEED | SPEED | SPEED | SPEED |
| 1 | 1 | 2 | 2 | 2 | 2 | 2 |
| 2 | 2 | 6 | 6 | 5 | 5 | 3 |
| 3 | 3 | 5 | 5 | 7 | 6 | 5 |
| 4 | 4 | 4 | 4 | 5 | 7 | 6 |
| 5 | 5 | 8 | 8 | 8 | 8 | 8 |
| 6 | 6 | 6 | 7 | 6 | 9 | 6 |
| 7 | 7 | 5 | 5 | 5 | 10 | 9 |
| 8 | 8 | 2 | 3 | 2 | 5 | 6 |
| 9 | 9 | 3 | 3 | 4 | 3 | 5 |
| 10 | 10 | 3 | 2 | 2 | 4 | 2 |
| 11 | 12 | 8 | 8 | 8 | 8 | 8 |
| 12 | 10 | 6 | 7 | 6 | 9 | 6 |
| 13 | 8 | 5 | 5 | 5 | 10 | 9 |
| 14 | 6 | 2 | 3 | 2 | 5 | 6 |
| 15 | 4 | 3 | 3 | 4 | 3 | 5 |
| 16 | 2 | 3 | 2 | 2 | 4 | 2 |
| P19 | P20 | P21 | P22 | P23 | P24 |
| NO. | SPEED | SPEED | SPEED | SPEED | SPEED | SPEED |
| 1 | 3 | 3 | 3 | 3 | 4 | 4 |
| 2 | 7 | 5 | 7 | 5 | 5 | 6 |
| 3 | 6 | 8 | 9 | 6 | 7 | 10 |
| 4 | 5 | 3 | 4 | 6 | 9 | 10 |
| 5 | 9 | 5 | 7 | 6 | 10 | 7 |
| 6 | 7 | 7 | 10 | 10 | 11 | 10 |
| 7 | 6 | 9 | 4 | 6 | 9 | 12 |
| 8 | 3 | 3 | 7 | 11 | 6 | 10 |
| 9 | 5 | 5 | 11 | 3 | 8 | 7 |
| 10 | 2 | 7 | 5 | 9 | 9 | 7 |
| 11 | 9 | 10 | 7 | 10 | 10 | 10 |
| 12 | 7 | 3 | 12 | 6 | 10 | 11 |
| 13 | 6 | 5 | 4 | 6 | 11 | 10 |
| 14 | 3 | 7 | 7 | 6 | 9 | 10 |
| 15 | 5 | 11 | 12 | 11 | 6 | 6 |
| 16 | 2 | 5 | 6 | 3 | 5 | 5 |
6. BODY FAT
6.1 In stopping state, press PROG button to select FAT.
6.2 Set the parameter: F-1 Sex, F-2 Age, F-3, Height, F-4, Weight, F-5, body fat.
6.3 Press MODE button to select F-1, press SPEED button to choose your sex.
01 means MAN, 02 means WOMAN.
6.4 Press MODE button to select F-2, press SPEED button to set your age between 10-99.
6.5 Press MODE button to select F-3, press SPEED button to set your height.
6.6 Press MODE button to select F-4, press SPEED button to set your weight.
6.7 Press MODE button to select F-5, and the window shows----, put your hands on the handle bar pulse Pins more than 10 seconds, it will show your body fat.
6.8 The body fat standard as below:
| F-1 | SEX | 1-MAN | 2-WOMAN |
| F-2 | AGE | 10-99 |
| F-3 | HEIGHT | 100-200 |
| F-4 | WEIGHT | 20-150 |
| F-5 | FAT | ≤19 | Too thin |
| =(20---24) | normal |
| =(25---29) | Too heavy |
| ≥30 | Much heavy |
7. Safety key function
At any situation, pull off the safety key, the treadmill stop immediately to protect the user.
8. Save energy mode.
If you did not use the machine at 10 minute, the machine will enter Save energy mode, and you can press any button to restart the machine.
9. Bluetooth & application connection
Copy the link here under to your brower (Edge, Firefox, Chrome, Safari etc)
https://cloud.carefitness.com/index.php/s/E2WD22KMNBQzERL
And Followw the detailed instruction
10. Bluetooth function.
Connect your phone and machine by bluetooth to play music.
| Code | Problem | Possible Reason | Solution |
| E01 | Display did not receive the signal | Cable connection | Check or replace the Cables |
| display default | replace the display |
| controller default | replace the controller |
| E02 | The problem between controller and motor | motor connect wires did not connect well | Check that the motor wires are connected correctly |
| No voltage output or abnormal voltage output of controller board | replace the controller |
| motor default | replace the motor |
| E03 | The speed is abnormal | The photoelectric sensor is not properly assembled on the motor | reassemble the sensor |
| Poor photoelectric sensor | replace the sensor |
| Failure of controller board | replace the controller |
| E04 | over voltage | Input voltage too high | adjust the voltage |
| motor default | replace the motor |
| Failure of controller board | replace the controller |
| E05 | over power current | power current too high | adjust the power current |
| Problems with the assembly structure of the treadmill and the motor cause motor resistance or blockage | check the structure if it is well |
| | controller default | replace the controller |
| E06 | over voltage | Input voltage too low | Please check whether the power supply line is normal |
| Failure of controller board | replace the controller |
| E07 | safety key did not put well | safety key fail off the treadmill | put the safety key well |
| the safety system default | replace the console |
Maintenance and Malfunction Treatment
1) The surface of the treadmill should be kept clean, remove the power cord before cleaning. You can clean the tread and surface of the treadmill with a soft, damp cloth.
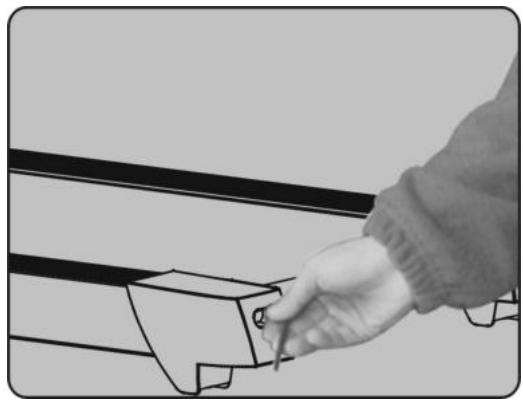
2) The treadmill is factory set, it may not work properly after transport or use. Stop the treadmill before adjusting, pull the treadmill to the centre and adjust the left and right rear roller bolts with a hex key (see figure). It is recommended to adjust one half turn at a time. Then turn the switch and check if the mat is 10 turns off when the speed is about 4 to 5km / h .
Warning: To prevent electrical shock, make sure the treadmill is turned off and unplugged before cleaning or performing routine maintenance.
LUBRICATING THE TREADMILL AND DECK
To extend the life of this treadmill, the treadmill requires regular lubrication, which is general maintenance for the machine. The routine maintenance procedure will prevent premature wear of the treadmill and motor system. The recommended lubrication schedule is as follows:
LUBRICATION USE
1- 6 km/h Every 6 months
6-12 km/h Every 3 months
12- 16 km/h Every 2 months
This schedule corresponds to the recommended application for an individual user, up to 20-30 minutes at a time, 3-4 times a week.
CLEANING
Perspiration should be wiped off the console and treadmill surface after your workout. You should wipe your treadmill once a week with a soft, damp cloth. Do not over-moisten the display panel as this may cause electrical and electronic problems.
STORAGE
Store your treadmill in a clean, dry place. Make sure it is turned off and the plug is unplugged.
MOVING
This treadmill has been designed and equipped with wheels for easy movement. Before moving it, make sure it is turned off and the plug is unplugged.
FOR HOME USE ONLY!
This treadmill is designed for home use only. Do not use in an institution or for commercial purposes.
It is important to take care of your treadmill (especially the running surface underneath the treadmill). Proper silicone lubrication will also improve the performance of your treadmill.
WARNING: Turn off the treadmill and remove the safety key before lubricating the running surface.
HOW TO APPLY SILICONE TO THE TREADMILL
A/ Find the bottle of silicone. It is located in the DIY kit included with this treadmill.
B/ Find a straw and place it on the silicone bottle as shown in the drawing.
C/ Apply the silicone evenly as shown in the drawing (CAUTION: the treadmill MUST BE STOPPED before applying the lubricant to avoid injury, otherwise the edge of the treadmill could cut you or your fingers could be crushed by the rollers).
Do not apply too much silicone to the mat. Too much lubricant can cause the mat to slip on the rollers.
To order spare parts
To guarantee an efficient service, make sure you have the following items before you contact our After Sales Service:
The name or reference of the product.
The manufacturing number shown on the main chassis and on the packing box.
The number of the missing or faulty part shown on the exploded view of the product described in this manual.
After Sales Service Email: service-uk@carefitness.com
https://cloud.carefitness.com/index.php/s/E2WD22KMNBQzERL
E mail : service-de@carefitness.com
E
https://cloud.carefitness.com/index.php/s/E2WD22KMNBQzERL
https://cloud-carefitness.com/index.php/s/E2WD22KMNBQzERL
E mail: service-it@carefitness.com
NL
enz.)https://cloud.carefitness.com/index.php/s/E2WD22KMNBQzERL
E-mail: service-nl@carefitness.com
CARE
FITNESS