25km/h - CARE - CLUB RUNNER écran TFT - Treadmills CARE FITNESS - Free user manual and instructions
Find the device manual for free 25km/h - CARE - CLUB RUNNER écran TFT CARE FITNESS in PDF.
| Product type | Treadmill |
| Brand | CARE FITNESS |
| Model | 25km/h - CARE - CLUB RUNNER TFT screen |
| Maximum speed | 25 km/h |
| Screen | 21.5-inch color touch screen |
| Incline adjustment | Yes, via buttons and screen |
| Training modes | Quick Start, Real Mode, Target Mode, Training Mode, HRC Mode |
| Preset programs | Relax, Cardio, Fat Burn, Endurance |
| Heart rate monitoring | Hand grip sensors + wireless chest strap (optional) |
| Bluetooth connectivity | Yes, for speakers and headphones |
| Ports | USB, 3.5mm audio input |
| Wireless charging | Yes, for compatible smartphone |
| Safety | Safety key and emergency stop button |
| Lubrication | Automatic reminder every 1000 km of use |
| Maintenance | Clean with soft cloth, adjust running belt |
| Error codes | Displayed on screen for diagnosis (E01H, E02H, etc.) |
Frequently Asked Questions - 25km/h - CARE - CLUB RUNNER écran TFT CARE FITNESS
User questions about 25km/h - CARE - CLUB RUNNER écran TFT CARE FITNESS
0 question about this device. Answer the ones you know or ask your own.
Ask a new question about this device
Download the instructions for your Treadmills in PDF format for free! Find your manual 25km/h - CARE - CLUB RUNNER écran TFT - CARE FITNESS and take your electronic device back in hand. On this page are published all the documents necessary for the use of your device. 25km/h - CARE - CLUB RUNNER écran TFT by CARE FITNESS.
USER MANUAL 25km/h - CARE - CLUB RUNNER écran TFT CARE FITNESS
text_image
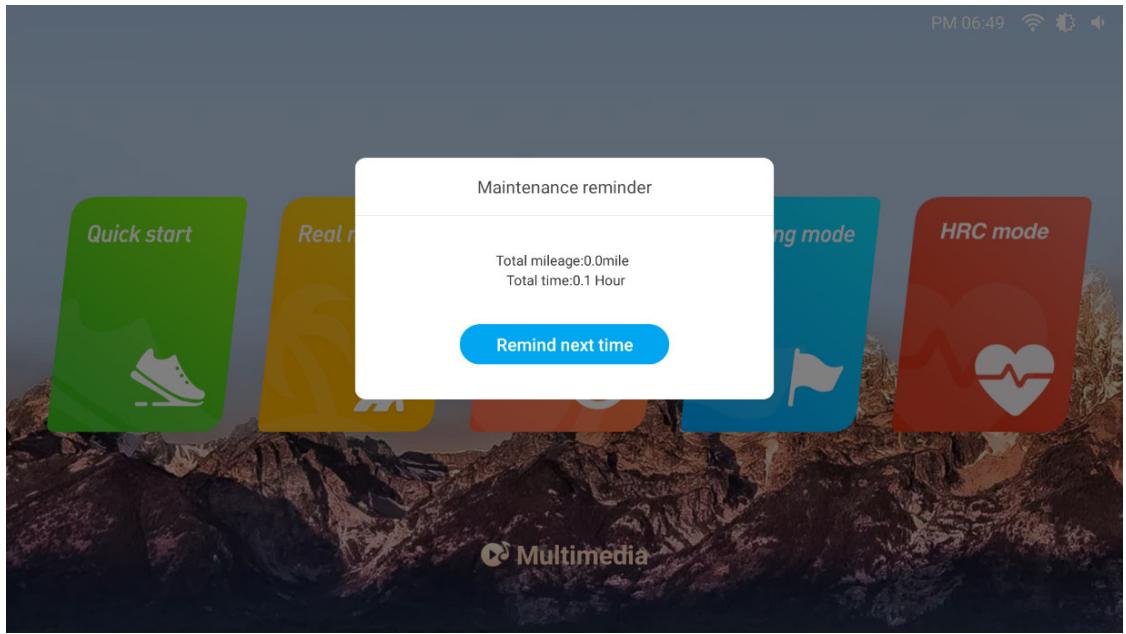
Maintenance reminder Total mileage:0.0mile Total time:0.1 Hour Remind next time Quick start Real running mode HRC mode Multimediatext_image
PM 07:02 Quick start Real mode Target mode Training mode HRC mode Multimediatext_image
TOORX and/or ending - Robusting 2 Primary: Alexander and off-###text_image
Code: M K H S D L 1 9 6 3 0 % TOORX a - Made Moving - Remapping 9.0 6.0 3.0 1.0 km/h Photo by David Marga on Ubiash 0 kcal 0 step/min 0.00 km RELAX STOP 00:00:00 h:m:s 0 bpmtext_image
Media Local Music Local Video Chrome Facebook Instagram Netflix Prime Video ScreenShare Spotify Twitter YouTube Code: M G H S D K HRC mode Quick start R Multimediatext_image
Code: MKHTDL 9.0 6.0 3.0 0 % - 1.0 km/h TOORX a move in hand - Running 2020 by David Hertz on uddash 0 kcal 0 step/min 0.00 km RELAX STOP 00:00:00 h:m:s 0 bpmtext_image
Code: M G H T D K Safety lock opened Quick start Real n ng mode HRC mode Multimediatext_image
PM 07:02 Quick start Real mode Target mode Training mode HRC mode Multimediatext_image
Quick start Real mode Target mode Training mode Bluetooth WLAN Settings Multimedia4.3 Mode réel
text_image
River road Rural road Beach Tree-lined road Corniche road Mountain road AM 09:48text_image
AM08:30 9 6 3 3% 3% 12 km/h 999 kcal 122 step/min 10.52 km RELAX STOP 00:00:15 h:m:s 68 bpmtext_image
Code: M K H S D 4 3 9 6 3 0 % TOORX a-hotel roading - Rotating Photo by David Mangs on uslteam 0.00km 6km 0 kcal 0 step/min 0.00 km RELAX STOP 00:00:00 0 bpm 1.0 km/hother
| Metric | Value | | --- | --- | | Distance | 15 | | Time(min) | 30 | | Calorie | 45 | | Duration | 60 | | Accuracy | 90 | | Performance | 120 | | Time (min) | 150 | | Calorie (g) | 150 |bar
Custom 1 | Time | Incline (%) | Speed (inch) | |---|---|---| | 00:40:00(0x100per segment) | 22 | 3 | | 05:00:00 | 22 | 4 |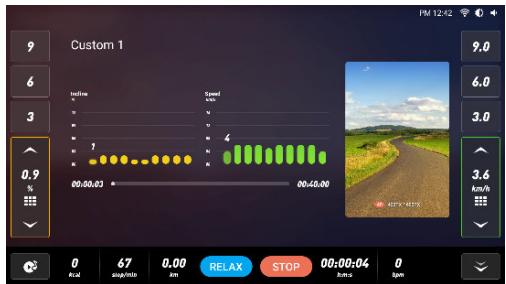
text_image
Custom 1 0.9 % 00:00:03 00:00:00 00:00:00 9 6 3 9.0 6.0 3.0 4 3.6 km/h RelAX STOP 00:00:04 0 67 0.00 0.00 RelAX STOP 00:00:04 0 67 0.00 0.00 RelAX STOP 00:00:04 0text_image
Heart rate is too low,now speed up 87 Hrc maximum:138,minimum:102,time:60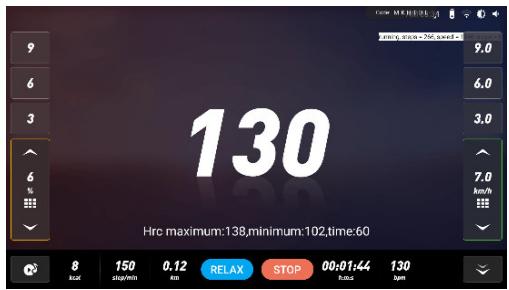
text_image
130 Hrc maximum:138,minimum:102,time:60text_image
Running Data Running Distance Running Time 1.01 mile 00:07:48 Avg Speed Avg Incline 7.8 mile/h 0.0 % Avg Pace Heat 04'47" 118 kcal TOORX Home Photo by Christopher Campbell in Uniqian5. multimédia
text_image
Media Local Music Local Video Chrome Facebook Quick start R Instagram Netflix Prime Video ScreenShare Spotify Twitter YouTube Multimedia Code: M G H S D K HRC mode4. connection application
natural_image
Technical diagram of a mechanical or fluidic component with circular flow indicators (no text or symbols)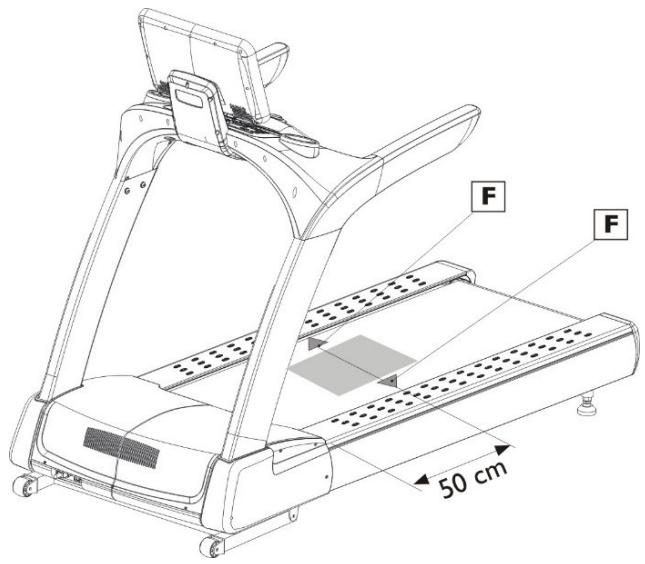
text_image
F F 50 cm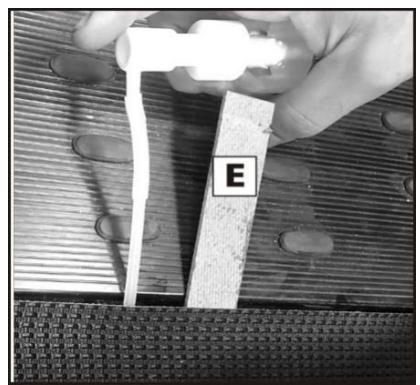
text_image
Etext_image
Read fabrication Read 30 (Standard ball) PM 06:59 Quick start Real mode Target mode Training mode HRC mode Multimedia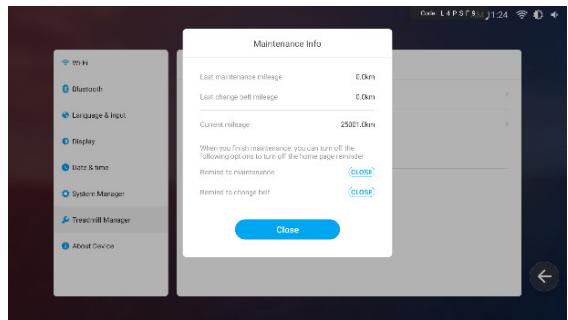
text_image
Maintenance Info Last maintenance mileage £0m Last change belt mileage £0m Current mileage 2502.0m When you finish maintenance you can turn off the all adoption to turn off the home page release Remind to maintenance close Remind to change belt close Closehttps://www.carefitness.com/sav
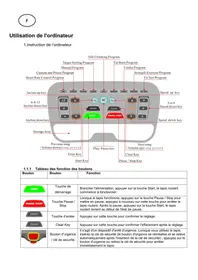
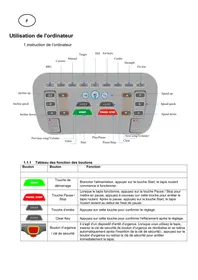
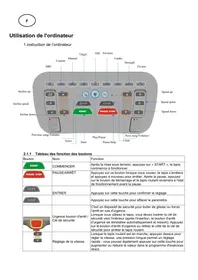
Console Instruction
Warning: To reduce the possibility of electric shock, keep the console dry. To prevent liquid from spilling onto the console, only sealed water bottles can be placed on the water bottle holder.
1. Quick start
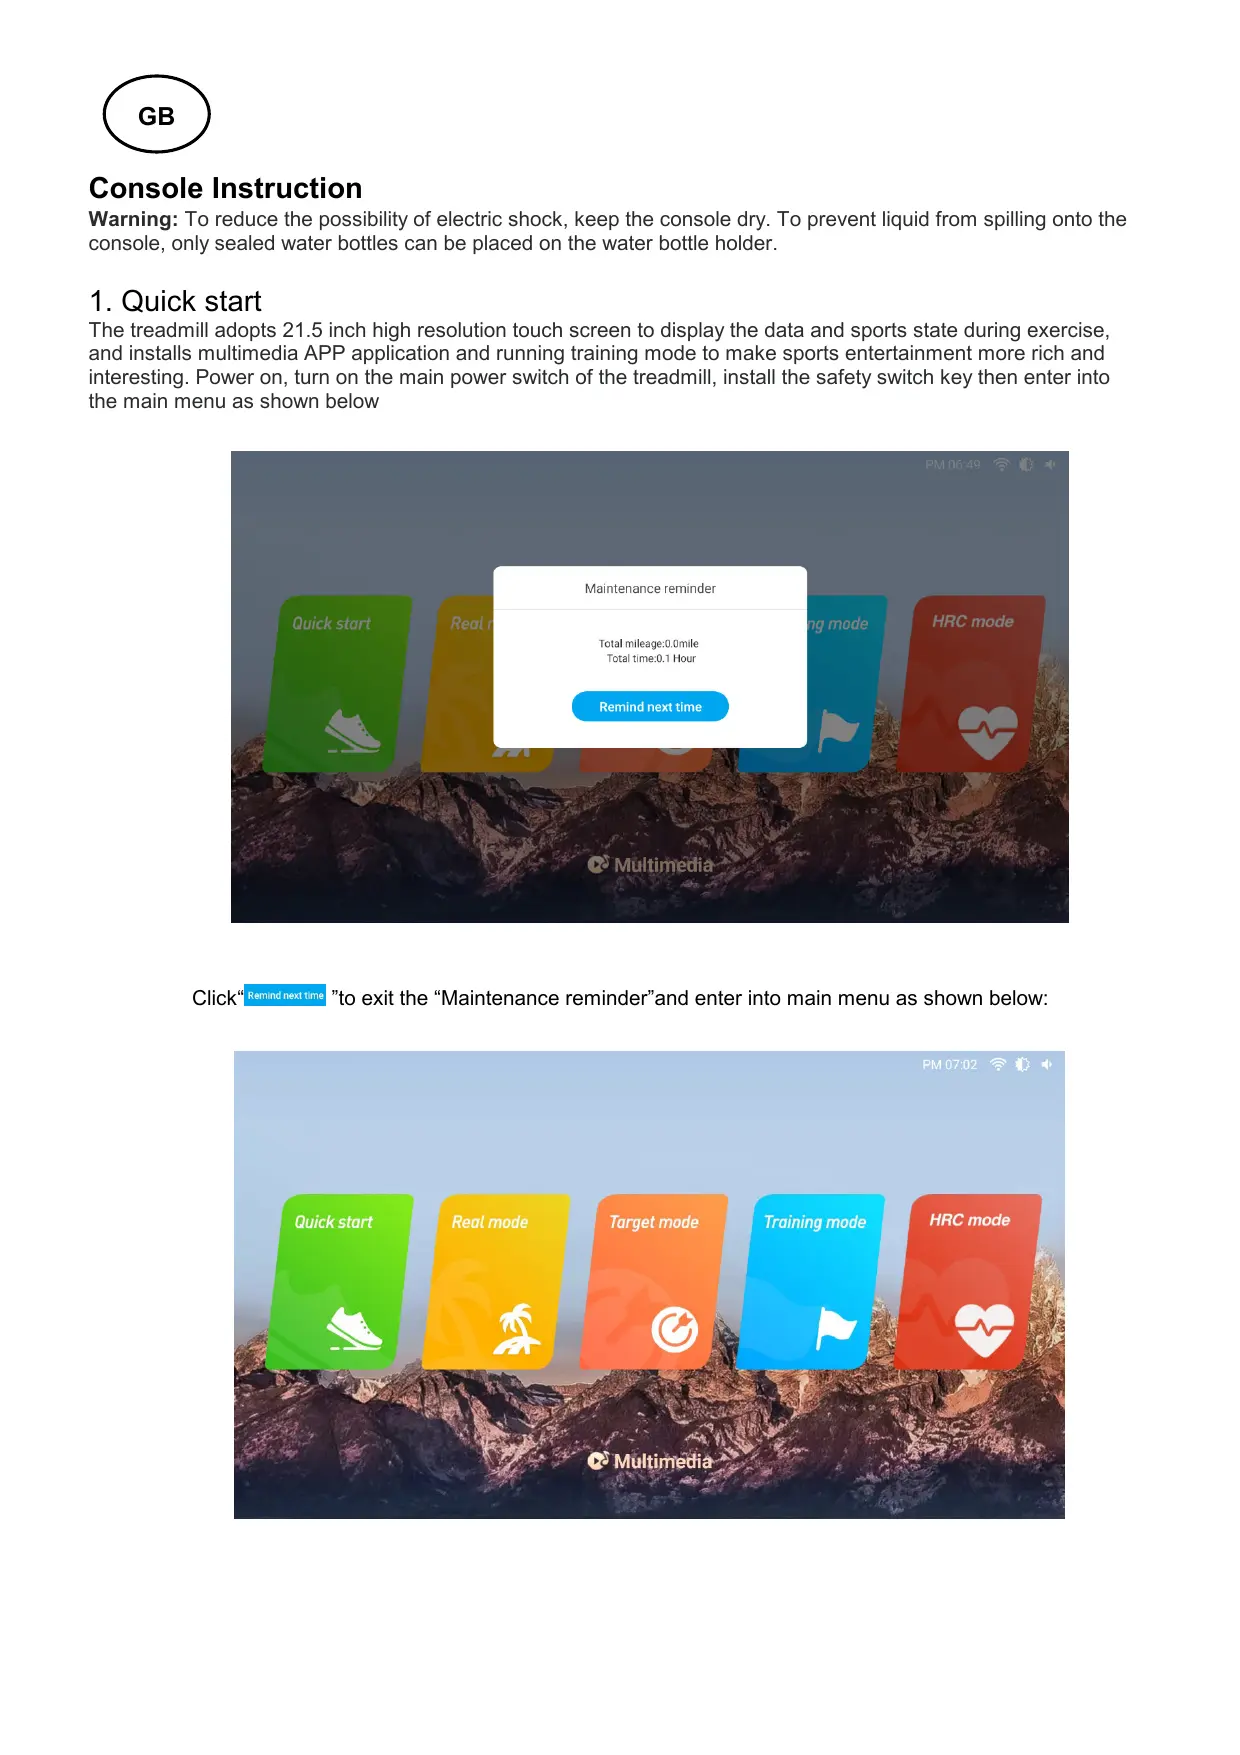
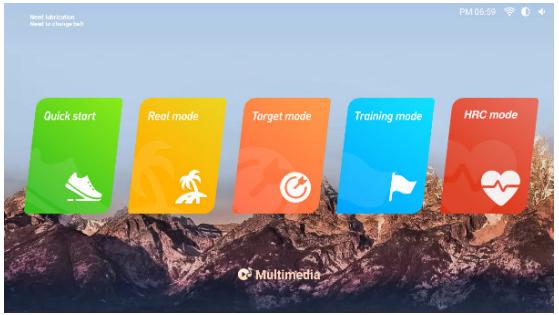
The treadmill adopts 21.5 inch high resolution touch screen to display the data and sports state during exercise, and installs multimedia APP application and running training mode to make sports entertainment more rich and interesting. Power on, turn on the main power switch of the treadmill, install the safety switch key then enter into the main menu as shown below
text_image
Maintenance reminder Total mileage:0.0mile Total time:0.1 Hour Remind next time Quick start Real mode HRC mode MultimediaClick“Remind next time” to exit the “Maintenance reminder” and enter into main menu as shown below:
text_image
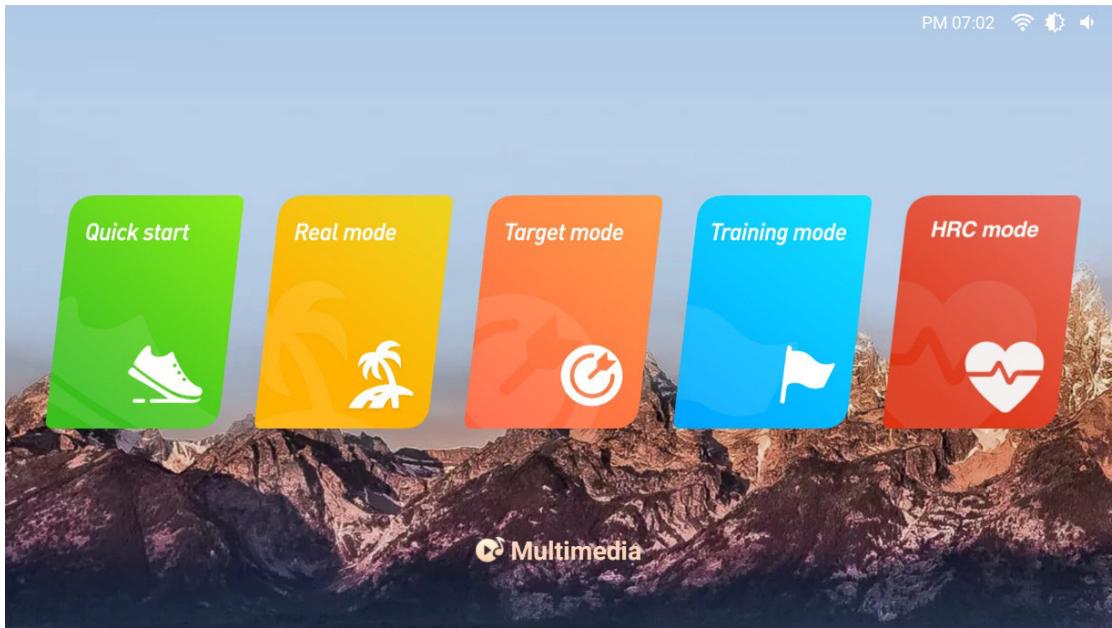
PM 07:02 Quick start Real mode Target mode Training mode HRC mode MultimediaClick"Quick Start" on the screen or the "START" button on the console to start quickly. The treadmill will directly start the countdown and enter running mode as shown below:
text_image
TOORX and/or ending - Robating 2Main interface in running state is shown as below:

text_image
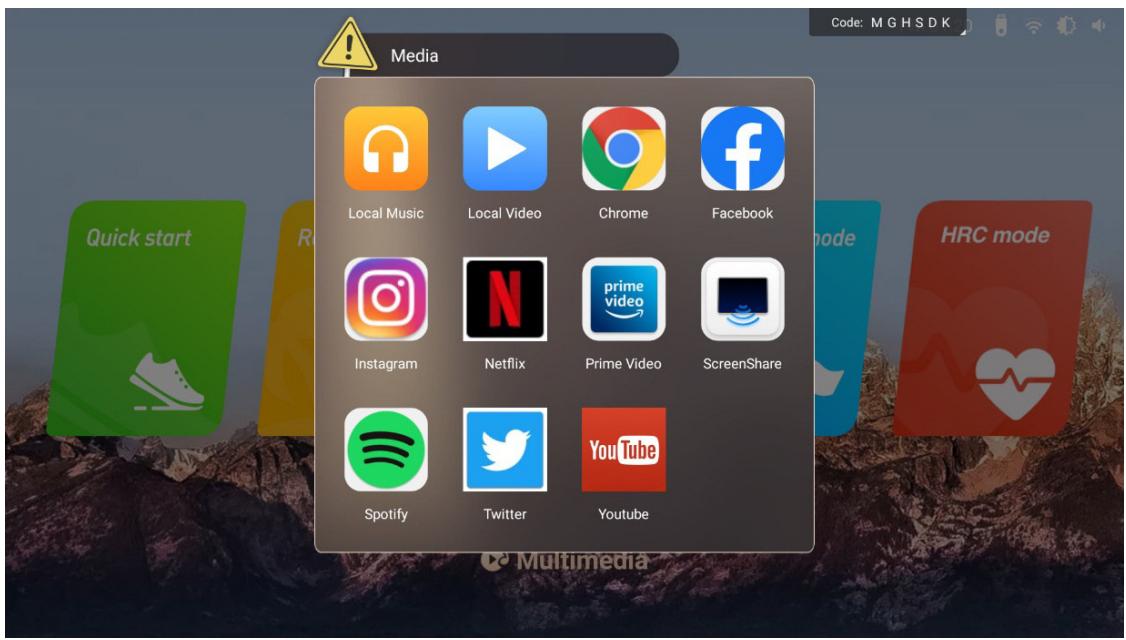
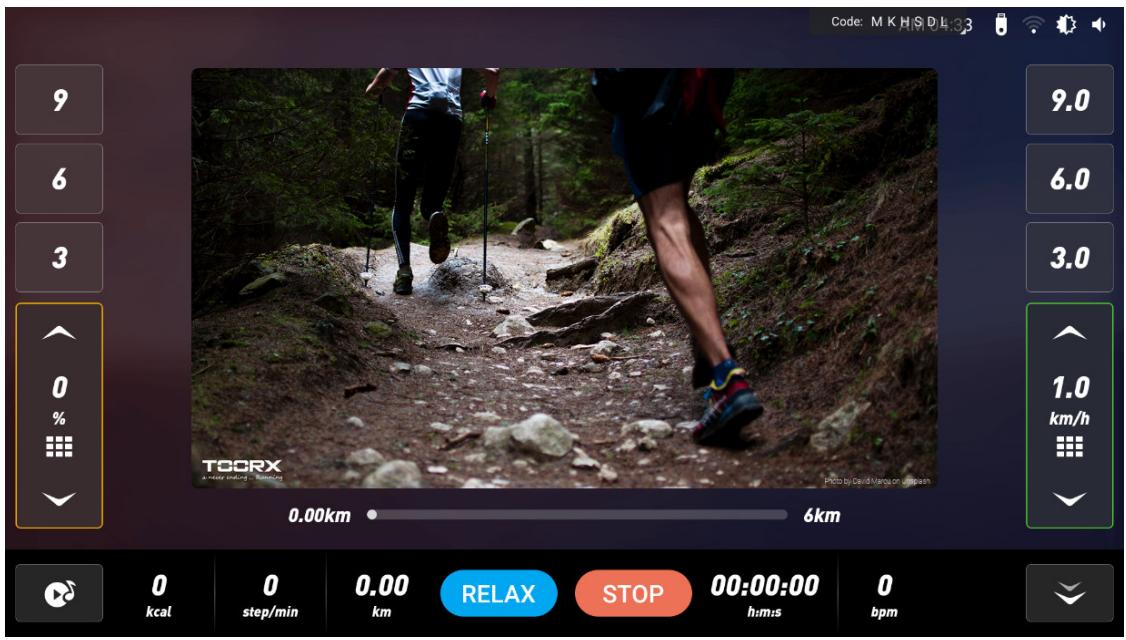
Code: M K H S D L 9 6 3 0 % TOORX a water hiking - Swimming 9.0 6.0 3.0 1.0 km/h Photo by David Maras on uptech 0 kcal 0 step/min 0.00 km RELAX STOP 00:00:00 0 bpm h:m:s bpmAfter starting the treadmill, press the speed adjustment button (+ -/ ) on the controlling panel or color screen to adjust your running speed. Press the incline adjustment key (+ -/ ) to adjust the comfortable running incline; Press the speed direct selection key (3-6-9) or fast selection key (1.0 km/h ) on the screen to quickly select the speed; Press incline direct selection button (3-6-9) or quick selection button (0 % ) on the screen to quickly select the incline. For your safety, try not to operate other functions on the screen when running. If you want to operate the media APP function, please do it when it is lower than 3KM/H or in the shutdown state. Click the "multimedia" icon on the interface to enter the APP interface, as shown in the picture below, you can browse Twitter, Facebook... and so on.
text_image
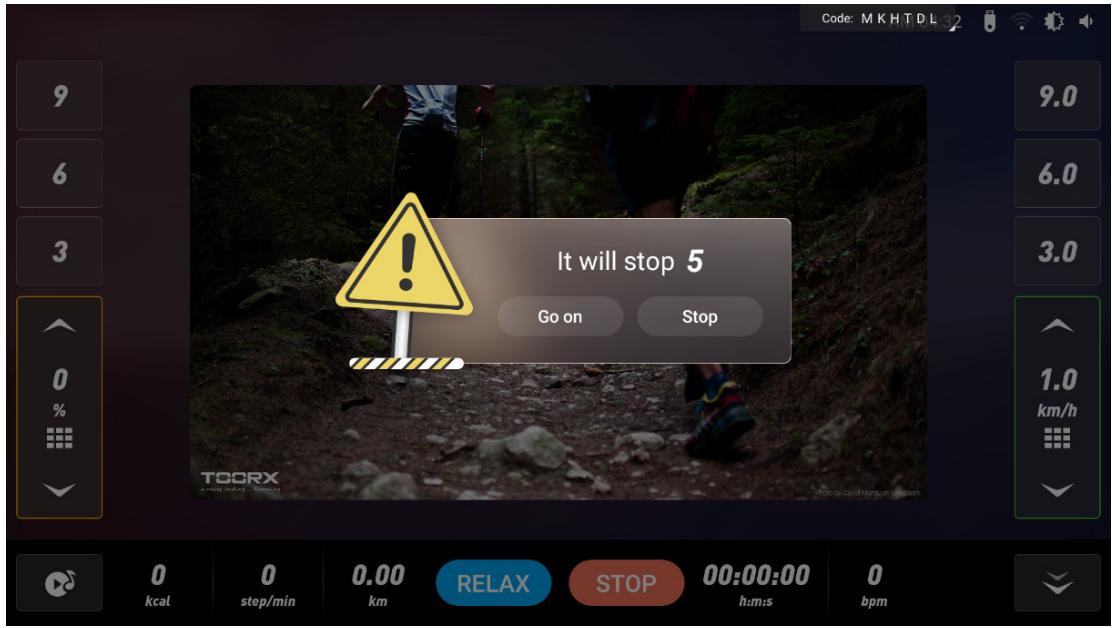
Media Local Music Local Video Chrome Facebook Instagram Netflix Prime Video ScreenShare Spotify Twitter YouTube Code: M G H S D K HRC mode Quick start R MultimediaWhen the speed is > 1KM/H, click the "RELAX", the speed will be reduced to a comfortable state and the incline to the initial state value. When you want to stop running, press the "STOP" on the home page or the "STOP" button on the controlling panel, and a window that is about to end running will pop up on the home page to provide "Go on" or "Stop", as shown below:
text_image
Code: MKHTDL 9 6 3 0 % It will stop 5 Go on Stop TOORX a - help driving - Running photo by david mgang on uqslam 0 kcal 0 step/min 0.00 km RELAX STOP 00:00:00 0 bpm h:m:s bpmIf you need to stop running in an emergency, please pull out the safety key or press the emergency stop button to stop the treadmill. Then it will be shown as below:
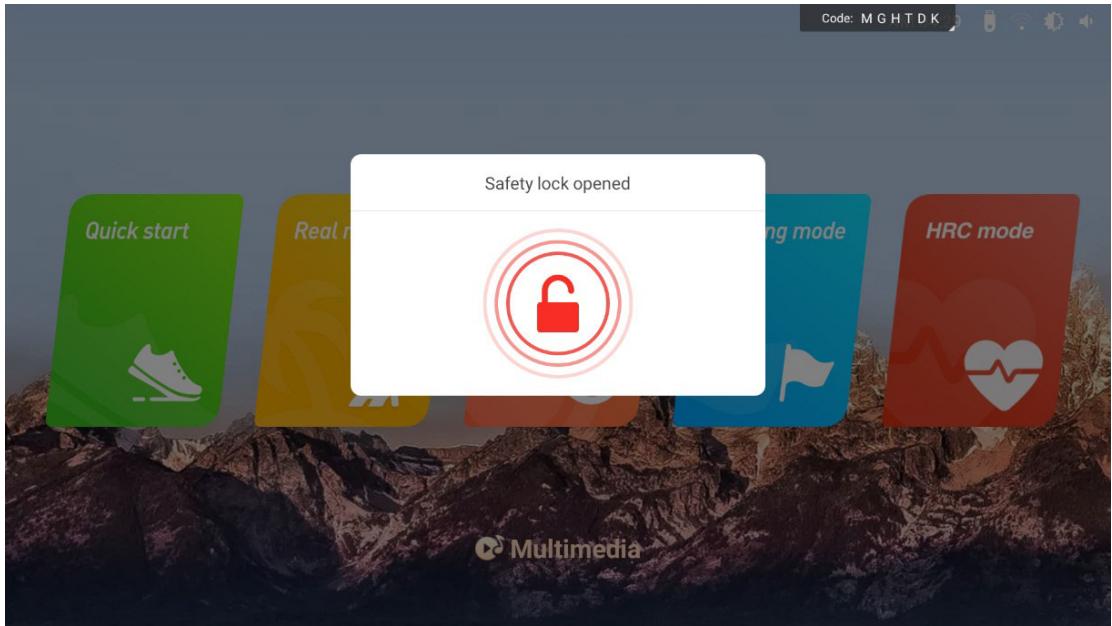
text_image
Code: M GHTDK Safety lock opened Quick start Real running mode HRC mode MultimediaAfter inserting the safety key, it will switch to the main menu page, as shown below:
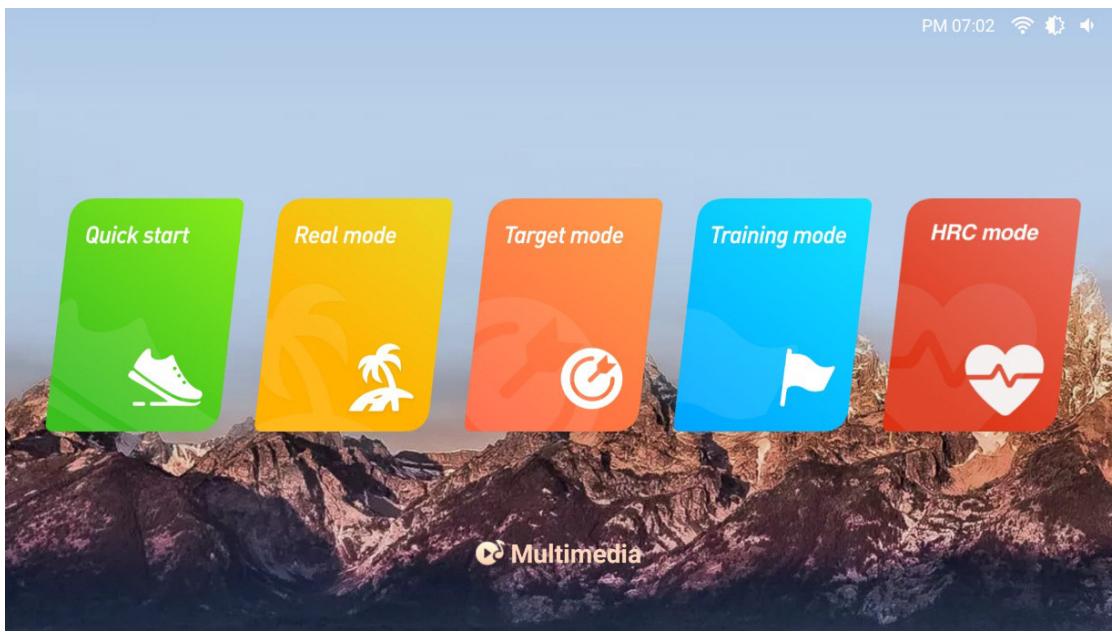
text_image
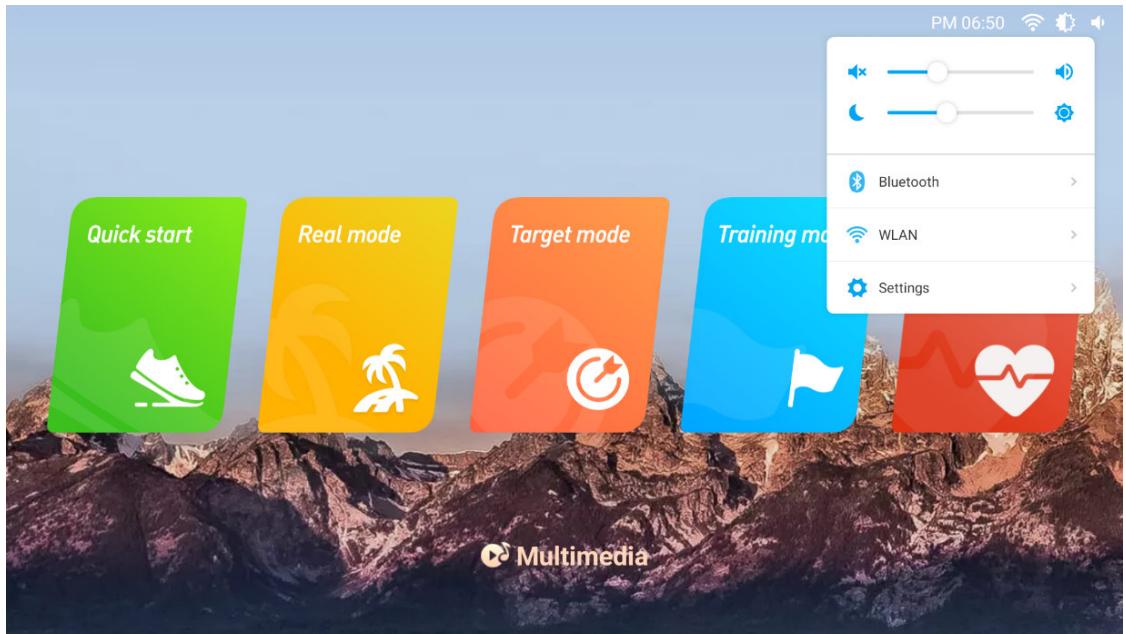
PM 07:02 Quick start Real mode Target mode Training mode HRC mode MultimediaIn the standby mode, you can choose the Quick start mode, Real mode, Target mode, Training mode and other sports programs to train, and you can also choose Multimedia for other operations.
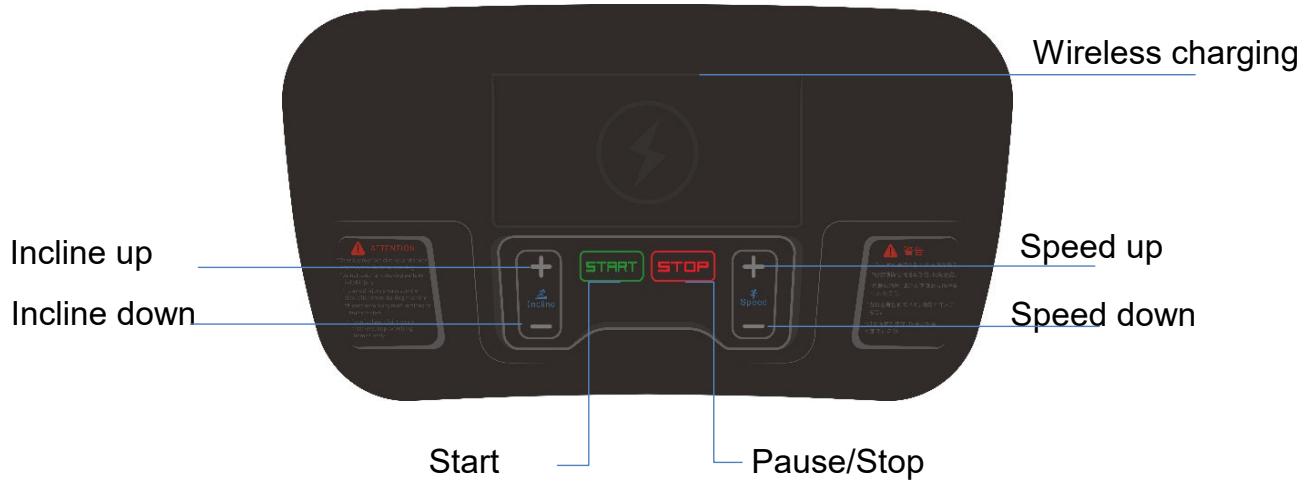
2. Controlling panel instruction
text_image
Wireless charging Incline up Incline down Start Stop Speed up Speed down ATTENTION + - + - + - + - + - + - + - + - + - + - + - + - + - + - + - + - + - + - + - + - + - + - + - + -2.1 Mechanical button operation

Start: after power on, press "START", the treadmill starts running.

Stop/pause : press this button when running, the treadmill will puase, and press again to stop
running. After the pause, press the start button and the treadmill will return to the running state before the pause.

eed adjustment : when the treadmill is running, press this key to adjust the speed, keep pressing willd to fast adjustment.

line adjustment: when the treadmill is running, press this key to adjust the incline, keep pressing will d to fast adjustment.
Emergency stop button/Safety key: it is a safety device to prevent slipping or forced shutdown in emergency. When using the treadmill, you need to insert the safety key inward (after inserting the
safety key, the emergency stop button will automatically reset and spring up), press the emergency stop button or pull out the safety key side of the treadmill to stop running.

Wireless charging: when the treadmill is powered on, if the mobile phone has wireless charging function, put the mobile phone in the charging slot, and the wireless charging can play.
2.2 Buttons in tounch screen
2.2.1 Quick start: when the treadmill is powered on, click this button then the treadmill starts to run.
2.2.2 Real mode: click this button to enter into the real scene selection interface.
2.2.3 ©Target mode:click this button to enter into the target selection interface.
2.2.4 Training mode: click this button to ente into the training selection interface.
2.2.5 HRC mode: click this button to enter into setting interface of HRC
2.2.6 Multimedie: click this button to view different applications.
2.2.7 ←: click this button to return to the previous menu.
2.2.8: click this button to switch to the full screen.
2.2.9: click this button to switch to the initial interface.
2.2.10 STOP Stop: clip this button to stop running the treadmill.
2.2.11 RELAX Cool down: Click this button to reduce the treadmill speed/incline to the initial state of comfortable exercise.
2.2.12 Speed/Incline up: click this button to increase running speed / incline.
2.2.13 Speed/Incline down: click this button to decrease running speed/incline.
2.2.14 Quick speed selection: click this button to enter quick speed selection.
2.2.15 Quick incline selection: click this button to enter quick incline selection.
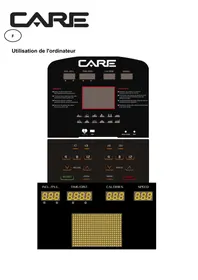
3. Display screen instruction
text_image
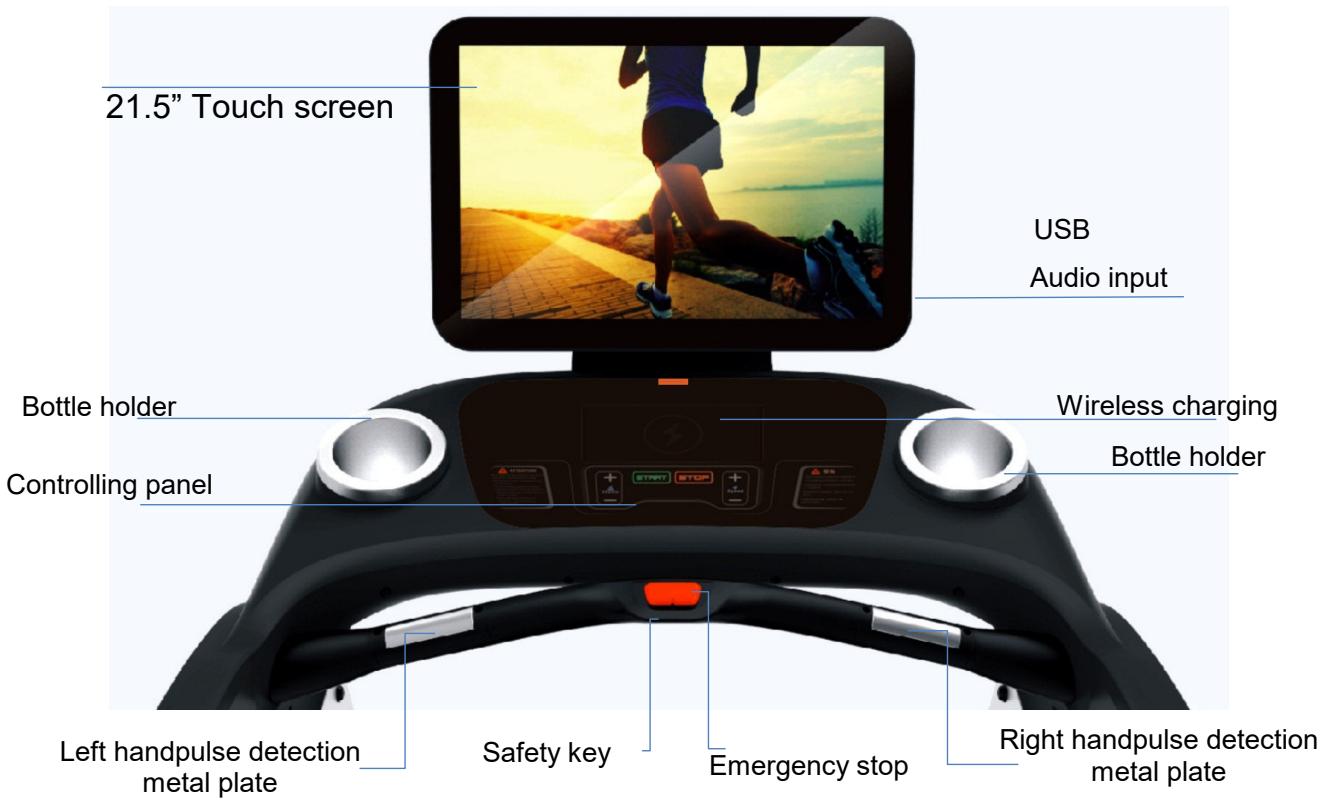
21.5" Touch screen USB Audio input Bottle holder Wireless charging Bottle holder Controlling panel Left handpulse detection metal plate Safety key Emergency stop Right handpulse detection metal plate4. Instruction of running programs and setting operation
4.1 Treadmill operation instruction
Switch on the power, the treadmill enters into the standby state, press "START", the treadmill starts to run, you can choose the speed or incline button to adjust, press "STOP" to stop running. In the standby state, if
there is no signal input for a long time, the treadmill enters the black screen of shutdown standby state. Press any physical mechanical button to light up the screen and return to the standby. Before starting the treadmill, you can choose system settings or training mode.
4.2 Status bar and shortcut Settings
Under the power-on state, you can set the system. Through the status bar and shortcut setting area in the upper right corner of the home page, you can open the shortcut setting menu, adjust the treadmill volume, screen brightness and set bluetooth. Advanced Settings are the management menu of treadmill, it is non-user menu, but only for equipment maintenance personnel. As shown below:
text_image
Quick start Real mode Target mode Training mode Bluetooth WLAN Settings Multimedia4.3 Real mode
Click "REAL MODE" on the screen, the treadmill enters the real scene selection interface with six built-in scenes, as shown below:

text_image
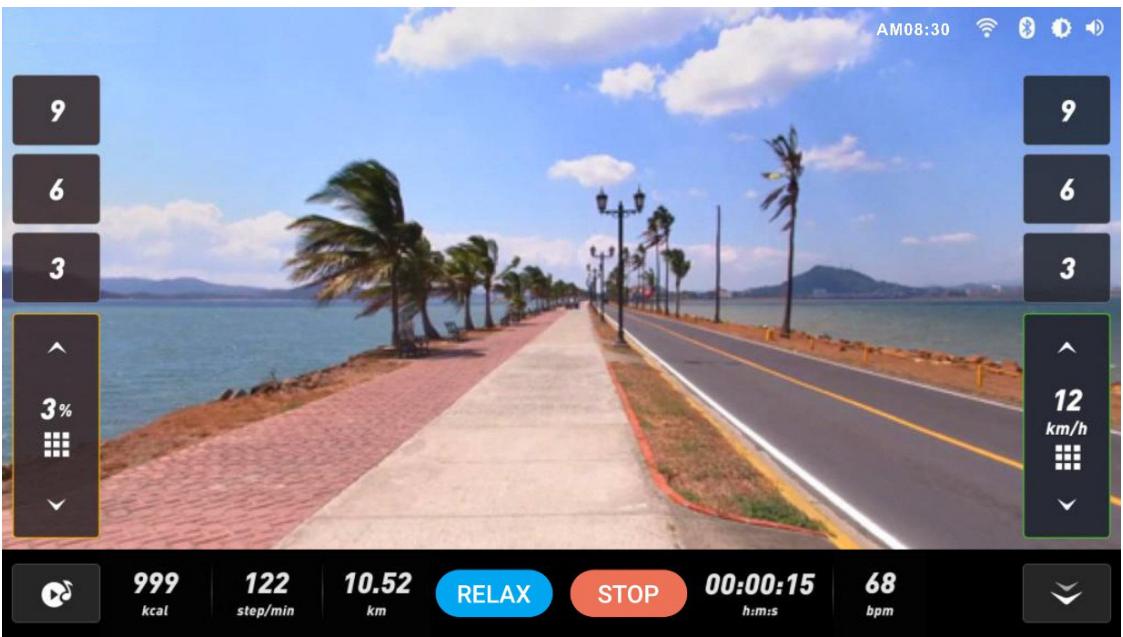
River road Rural road Beach Tree-lined road Corniche road Mountain road AM 09:48Users can choose their favorite real scene, click to enter the scene running. For example: the user chooses "Beach" real scene, beach scene running will be started. As shown below:
text_image
AM08:30 9 6 3 3% 3% 12 km/h 999 kcal 122 step/min 10.52 km RELAX STOP 00:00:15 h:m:s 68 bpmPress the speed adjustment button (+ -/ ) on the controlling panel or screen to adjust the speed of running. Press the speed direct selection key (3-6-9) or fast selection key (1.0 km/h) on the screen to quickly select
the speed. Note: In the real running mode, there is no need to adjust the incline. The system will automatically set it according to the terrain changes in the real scene.
4.4 Target mode
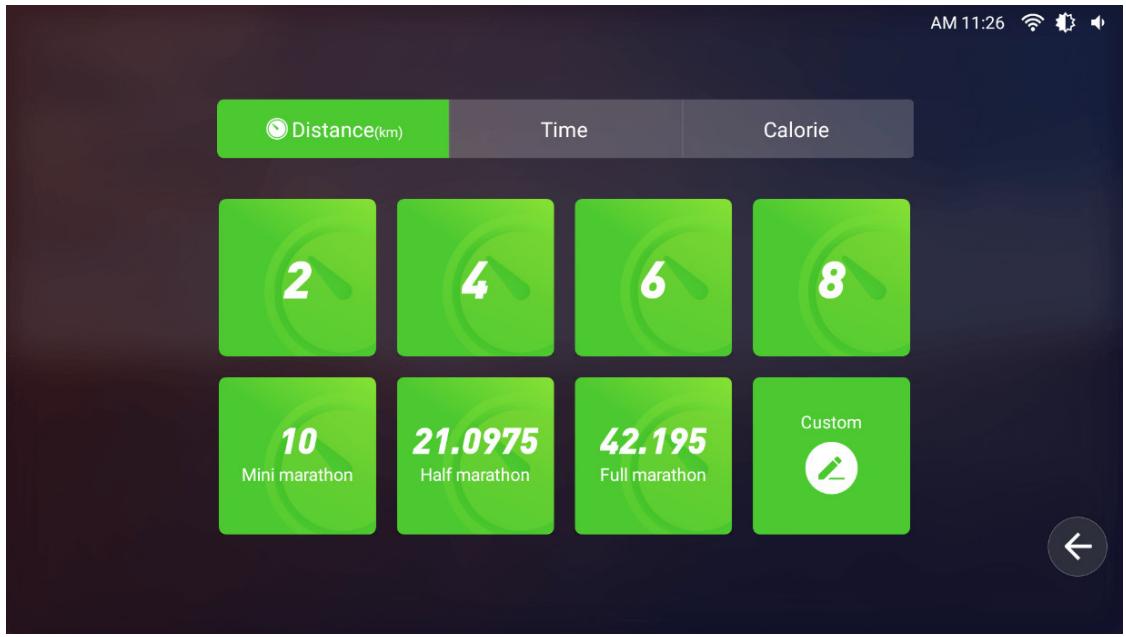
Click "TARGET MODE" to enter the target selection interface, which has threetypes, as shown below:
other
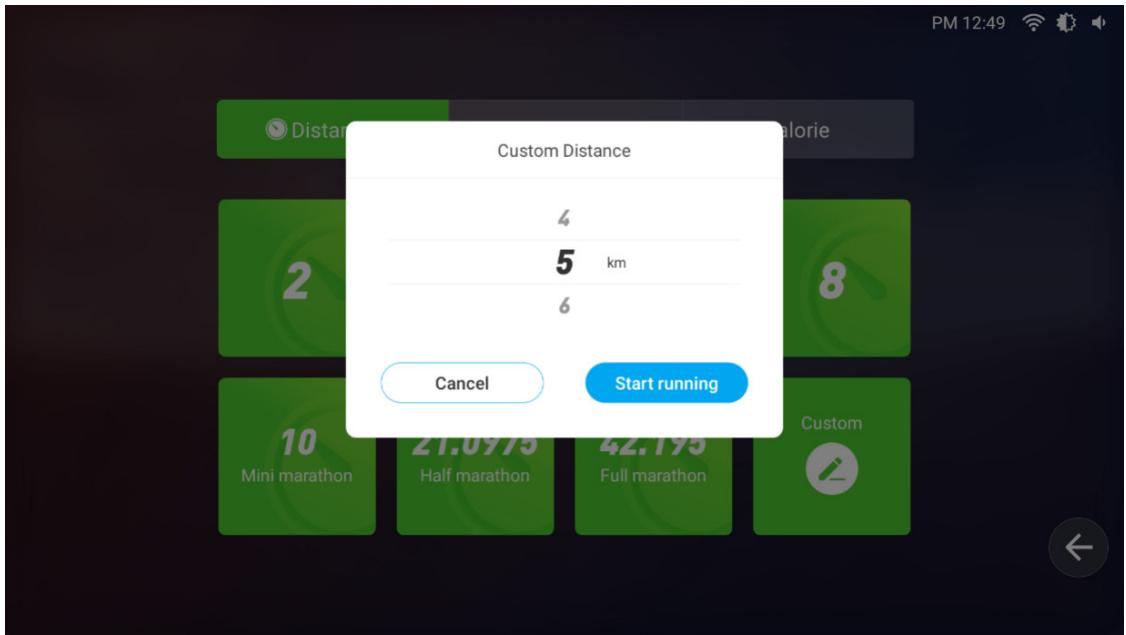
| Distance (km) | Time | Calorie | | ------------- | ---- | ------- | | 2 | 4 | 2 | | 4 | 6 | 4 | | 6 | 8 | 6 | | 8 | - | 8 | | 10 | - | 10 | | Mini marathon | - | 21.0975 | | Half marathon | - | 42.195 | | Full marathon | - | 42.195 | | Custom | - | 42.195 |4.4.1 Distance : Built-in 2/4/6/8/ Mini marathon/half marathon/full marathon/custom options. The distance will gradually decrease as you run, then come to end when it drop to 0.
Users can select their target distance and click to enter the running interface. For example, users can select a "4km" to start. As shown below:
text_image
Code: M K H S D 4 3 9 6 3 0 % TOORX a-hotel roading - Rotating Photo by David Mangs on uslteam 0.00km 6km 0 kcal 0 step/min 0.00 km RELAX STOP 00:00:00 0 bpm 1.0 km/hCutom mode : Press "Custom" to enter into the setting interface. After setting, click "Start running" to run. As shown below:
text_image
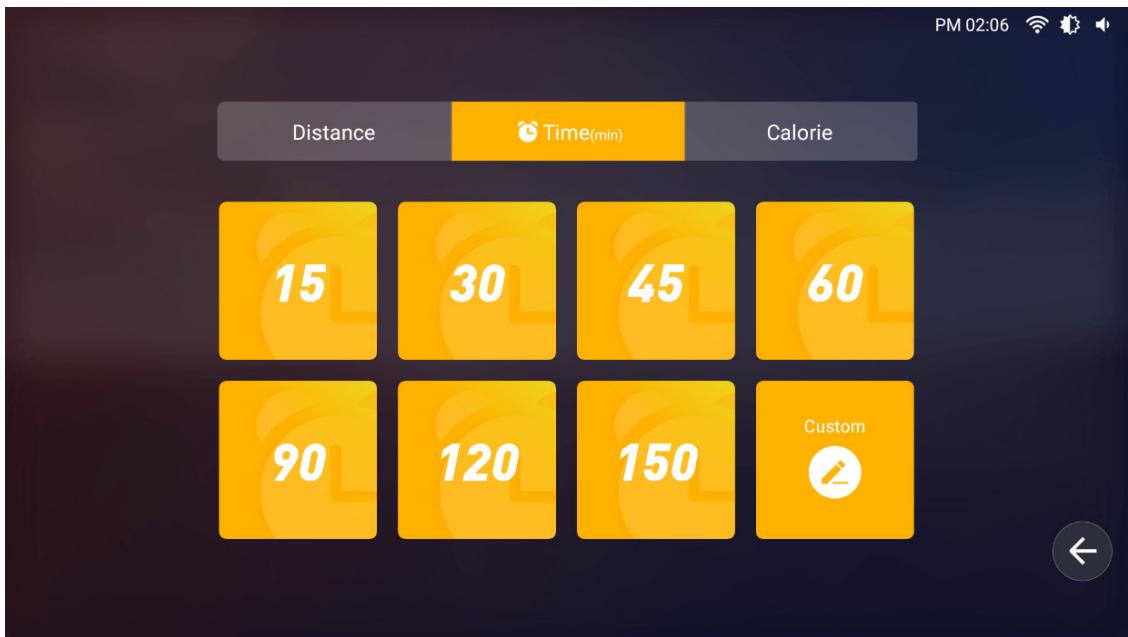
Custom Distance 4 5 km 6 Cancel Start running 2 8 10 Mini marathon Half marathon Full marathon Custom4.4.2 Time : Built-in 15/30/45/60/90/120/150/custom options. The settingtime will gradually decrease as you run, then come to end when it reaches 0.
Users can select their target time and click to enter the running interface. For example, the user selects the "15 minute" to start. As shown below:
other
| Category | Distance | Time(min) | Calorie | | -------- | -------- | --------- | ------- | | 1 | 15 | 30 | 45 | | 2 | 90 | 120 | 150 | | 3 | 150 | 30 | 45 | | 4 | 150 | 30 | 45 | | 5 | 150 | 30 | 45 | | 6 | 150 | 30 | 45 | | 7 | 150 | 30 | 45 | | 8 | 150 | 30 | 45 | | 9 | 150 | 30 | 45 | | 10 | 150 | 30 | 45 | | 11 | 150 | 30 | 45 | | 12 | 150 | 30 | 45 | | 13 | 150 | 30 | 45 | | 14 | 150 | 30 | 45 | | 15 | 150 | 30 | 45 | | 16 | 150 | 30 | 45 | | 17 | 150 | 30 | 45 | | 18 | 150 | 30 | 45 | | 19 | 150 | 30 | 45 | | 20 | 150 | 30 | 45 | | 21 | 150 | 30 | 45 | | 22 | 150 | 30 | 45 | | 23 | 150 | 30 | 45 | | 24 | 150 | 30 | 45 | | 25 | 150 | 30 | 45 | | 26 | 150 | 30 | 45 | | 27 | 150 | 30 | 45 | | 28 | 150 | 30 | 45 | | 29 | 150 | 30 | 45 | | 30 | 150 | 30 | 45 | | | | | | | | | | | | | | | | | | | | | | | | | | | | | | | | | | | | | | | | | | | | | | | | | | | | | | | | | | | | |Custom mode : Press "Custom" to enter the setting interface. After setting, click "Start running" to run. As shown below:
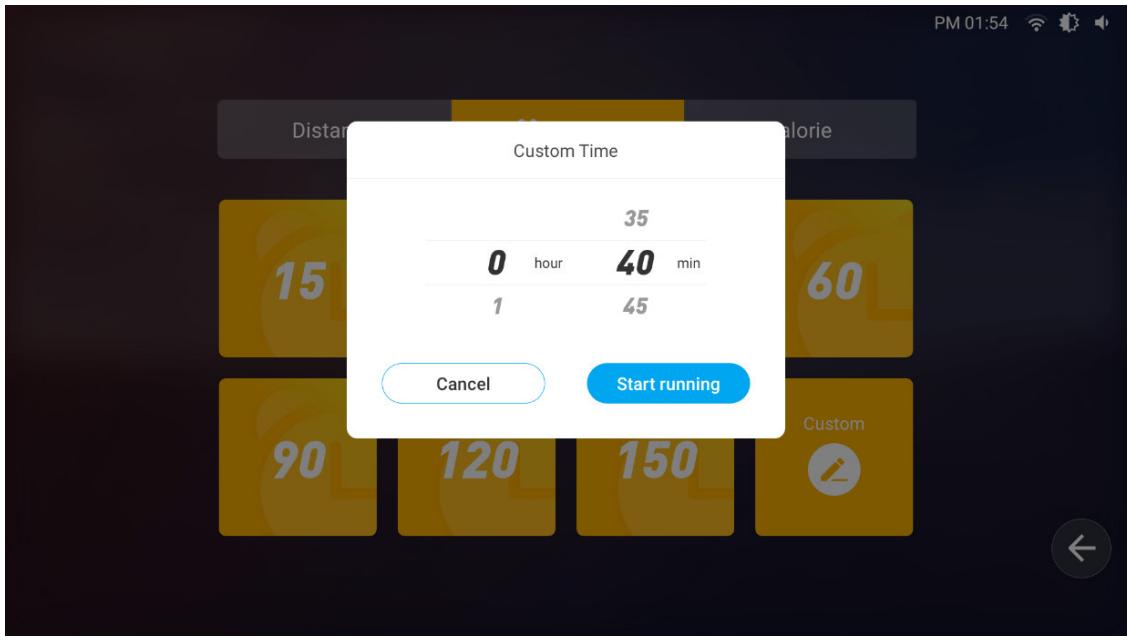
text_image
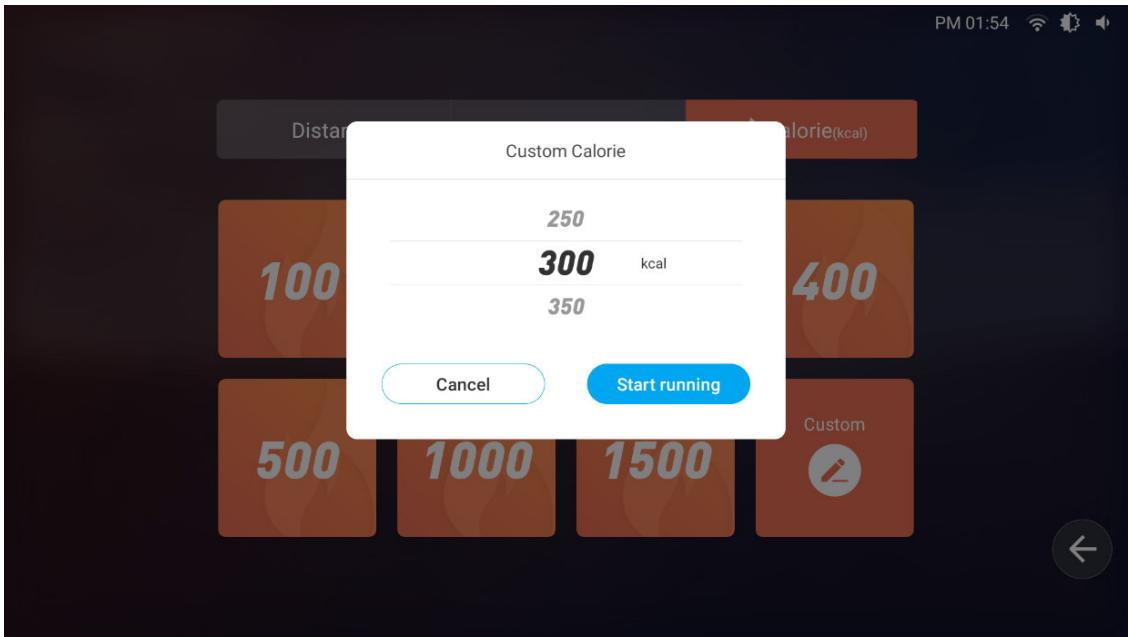
Custom Time 35 0 hour 40 min 1 45 Cancel Start running 15 60 90 120 150 Custom4.4.3 Calorie : Built-in 100/200/300/400/500/1000/1500 custom options. The setting calories will gradually decrease as you run, then come to end when it reaches 0.
Users can select their target calorie and click to enter the running interface. For example, the user selects the "100" to start. As shown below:
Custom mode : Press "Custom" to enter the setting interface. After setting, click "Start running" to run. As shown below:
bar
| Duration | Value | | :--- | :--- | | 250 | 300 kcal | | 350 | 300 kcal | | 400 | 300 kcal | | 500 | 300 kcal | | 1000 | 300 kcal | | 1500 | 300 kcal | | 2000 | 300 kcal | | 2500 | 300 kcal | | 3000 | 300 kcal | | 3500 | 300 kcal | | 4000 | 300 kcal | | 4500 | 300 kcal | | 5000 | 300 kcal | | 5500 | 300 kcal | | 6000 | 300 kcal | | 6500 | 300 kcal | | 7000 | 300 kcal | | 7500 | 300 kcal | | 8000 | 300 kcal | | 8500 | 300 kcal | | 9000 | 300 kcal | | 9500 | 300 kcal | | 10000 | 300 kcal | | 1500 | 300 kcal | | 2000 | 300 kcal | | 250 | 350 kcal | | 300 | 350 kcal | | 350 | 350 kcal | | 400 | 350 kcal | | 450 | 350 kcal | | 500 | 350 kcal | | 550 | 350 kcal | | 600 | 350 kcal | | 650 | 350 kcal | | 700 | 350 kcal | | 750 | 350 kcal | | 800 | 350 kcal | | 850 | 350 kcal | | 900 | 350 kcal | | 950 | 350 kcal | | 1000 | 350 kcal | | 1500 | Start running4.5 Training mode
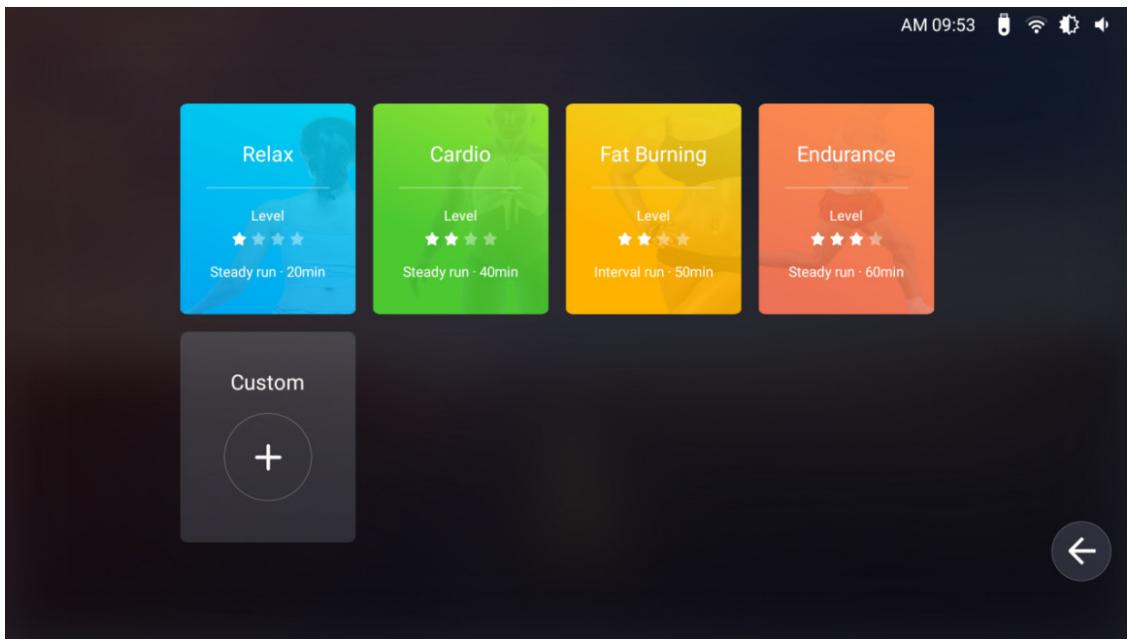
Click "Training mode" to enter the selection interface, as shown below:
text_image
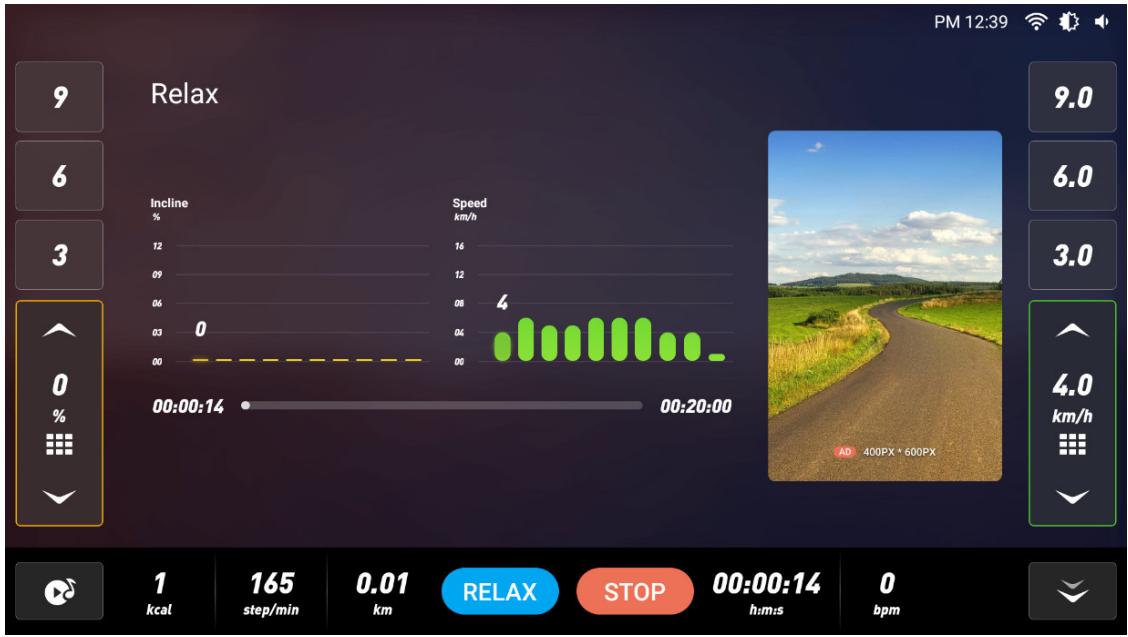
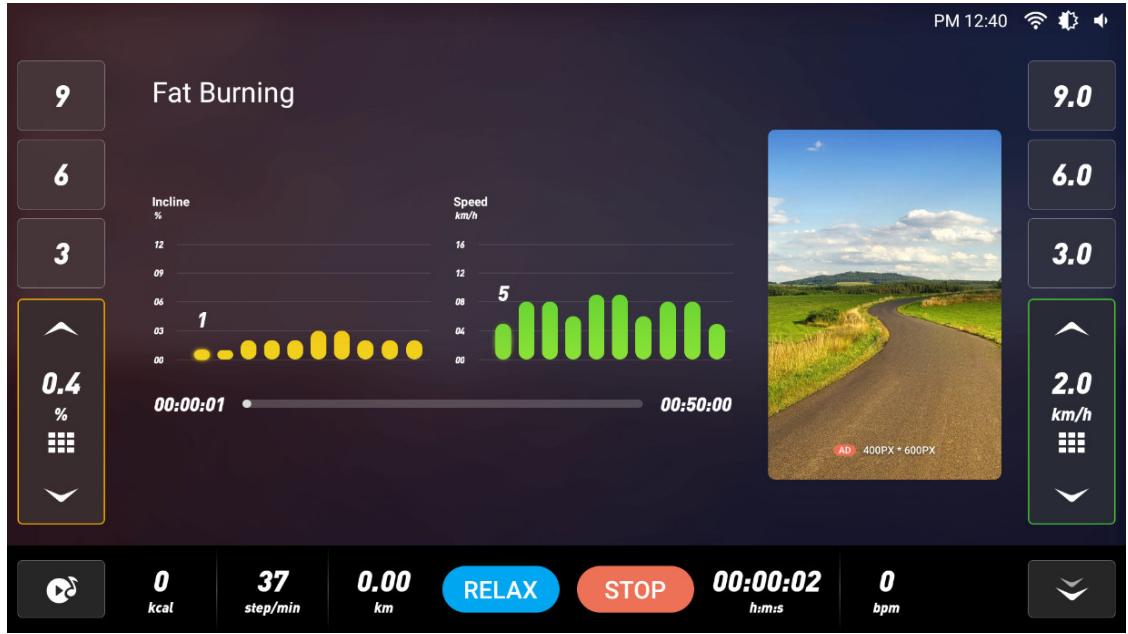
AM 09:53 Relax Level Steady run · 20min Cardio Level Steady run · 40min Fat Burning Level Interval run · 50min Endurance Level Steady run · 60min Custom4.5.1 In the training mode, the system provides a variety of preset training plans of Relax, Cardio, Fat burning and Endurance for different running styles to help train stretching. Different running modes have different incline andpaces, so users can concentrate on running without worrying about various Settings. 4.5.11 Users can select the training mode and click to enter the running interface. For example, when users select "Relex", they can start running in this mode. As shown below:
bar
| Time | Incline % | Speed km/h | | ---------- | --------- | ---------- | | 00:00:14 | 0 | 4 | | 00:20:00 | 0 | 4 |4.5.2 Cardio mode, as shown below

bar
| Time | Incline % | Speed km/h | | ---------- | --------- | ---------- | | 00:00:27 | 0 | 4 | | 00:40:00 | 0 | 4 |4.5.3 Fat burning mode, as shown below:
bar
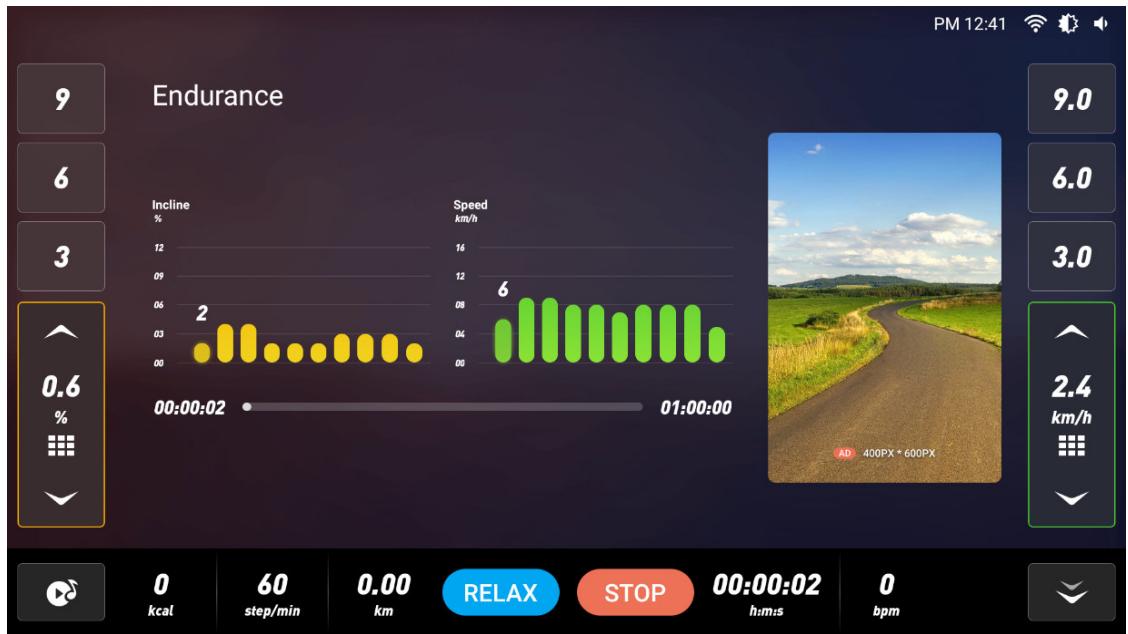
| Time | Incline (%) | Speed km/h | | ---------- | ----------- | ---------- | | 00:00:01 | 1 | 0 | | 00:00:37 | | 5 | | 00:00:50 | | 5 |4.5.4 Endurance mode, as shown below
4.5.5
bar
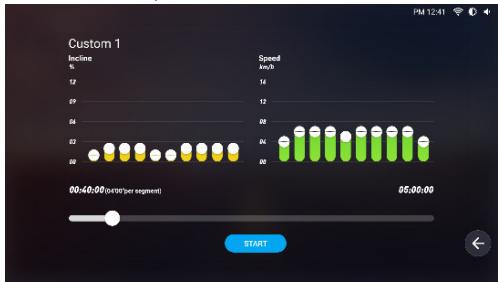
| Time | Incline % | Speed km/h | | ---------- | --------- | ---------- | | 00:00:02 | 2 | 400 | | 01:00:00 | 6 | 600 |Custom mode: If the preset training mode cannot meet users' requirements, they can customize the training mode, including: running time, incline and speed of each running stage. You can press and drag any rectangular bar to set different incline changes and different pace parameters in different time periods. After setting, click "START" to run, as shown below:
bar_line
Custom 1 | Time | Incline (%) | Speed (km/h) | |---|---|---| | 00:40:00 (per 100 per segment) | 62 | 8 | | 05:00:00 | 63 | 7 |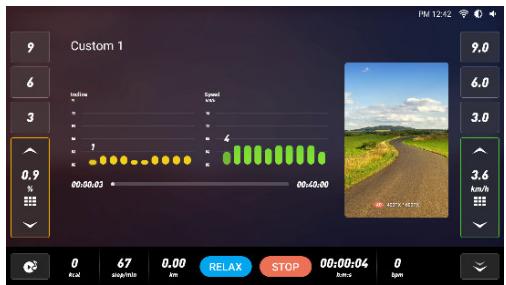
text_image
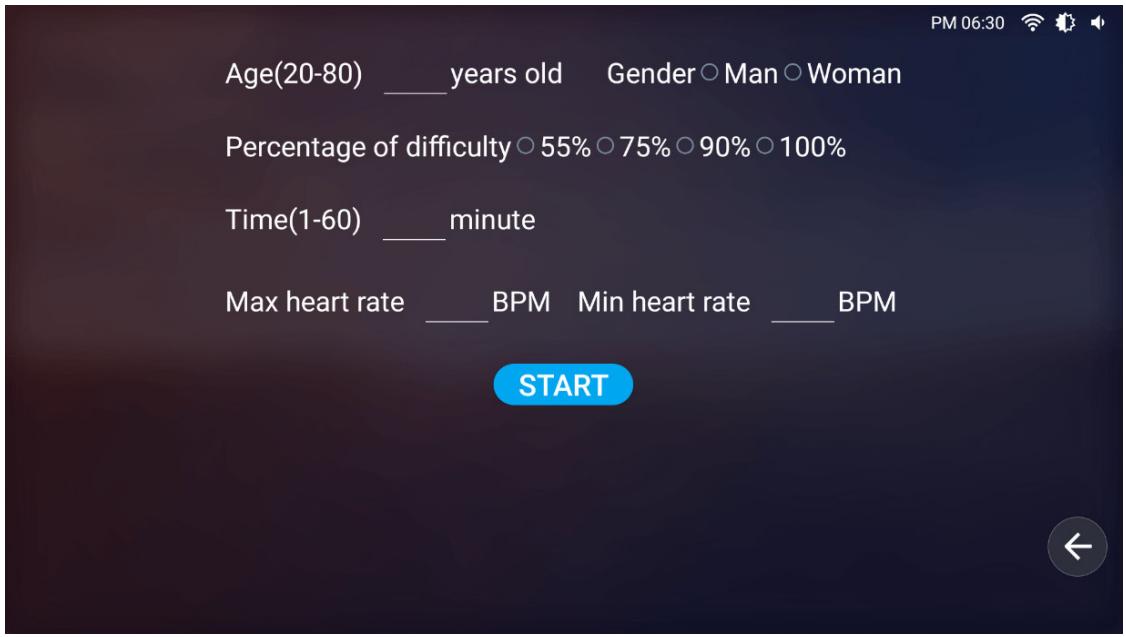
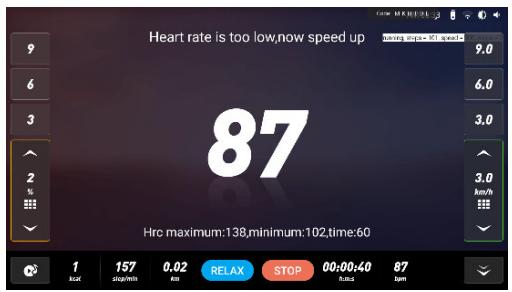
Custom 1 9.0 6.0 3.0 0.9 % - 00:00:03 00:00:00 00:00:00 Relax STOP 00:00:04 00:00:00 PM 12:42 3.6 km/h 87 245/155 0.00 4.0 4.0 Relax Stop 00:00:04 00:00:004.6 Heart rate control mode: click "HRC Mode" to enter into heart rate control setting page, such as "Age"- "Gender"- "Percentage of difficulty"- "Time" - "Max heart rate"- "Min. Heart rate" are default value, then click START" to start running under heart rate control mode, as shown below:
text_image
Age(20-80) ____ years old Gender ○ Man ○ Woman Percentage of difficulty ○ 55% ○ 75% ○ 90% ○ 100% Time(1-60) ____ minute Max heart rate ____ BPM Min heart rate ____ BPM STARTWhen running in heart rate control mode, please put your left and right hand on the heart rate detector or wear a wireless heart rate band, as shown below:
text_image
Heart rate is too low,now speed up 87 Hrc maximum:138,minimum:102,time:60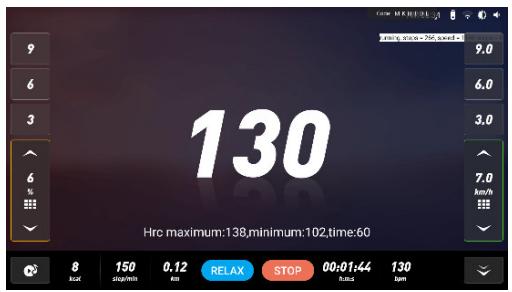
text_image
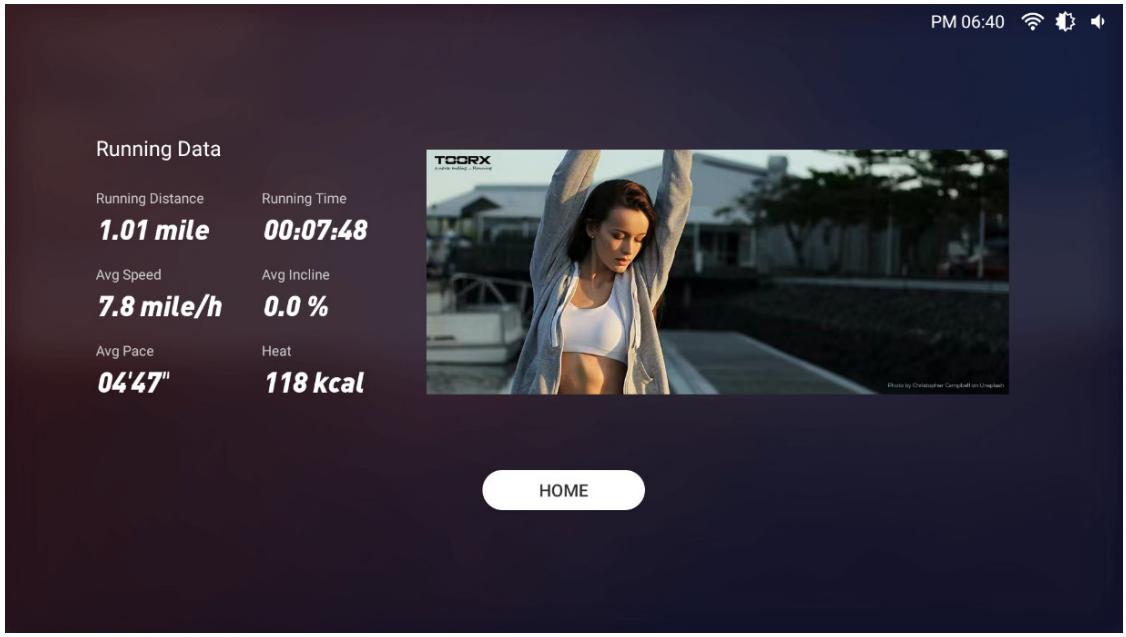
130 Hrc maximum:138,minimum:102,time:60- Exercise summary: when the distance is ≥ 0.1 km, the system will automatically record the relevant exercise data (the data will be automatically cleared after exiting the interface), as shown below
text_image
PM 06:40 Running Data Running Distance Running Time 1.01 mile 00:07:48 Avg Speed Avg Incline 7.8 mile/h 0.0 % Avg Pace Heat 04'47" 118 kcal TOORX Home Photo by Christopher Campbell on Unleash5. Multimedia
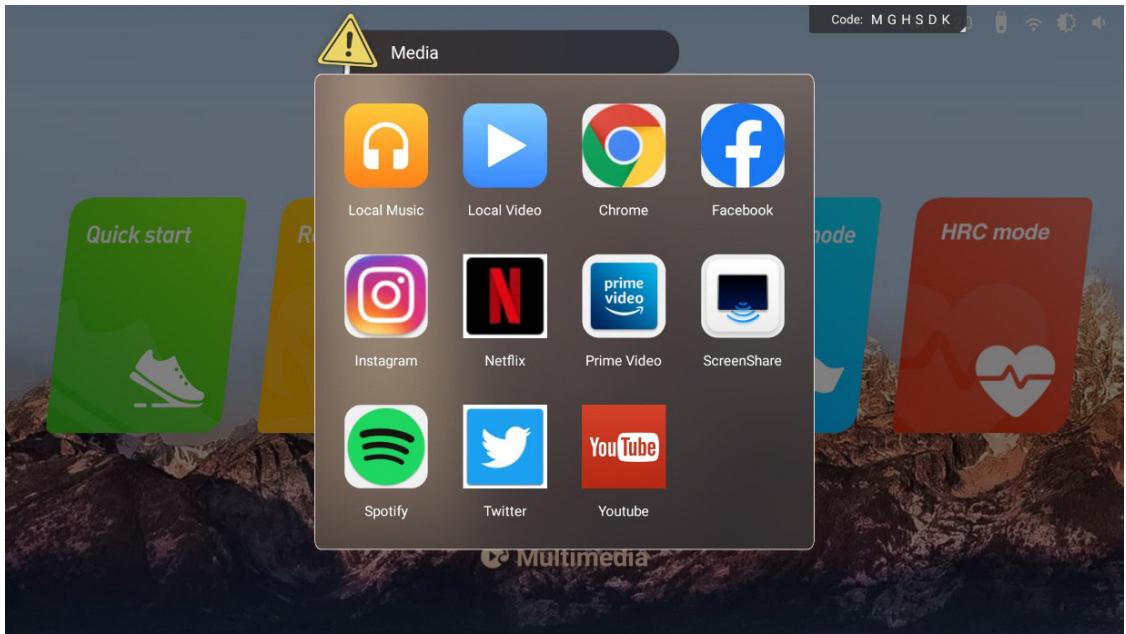
Click "Multimedia" to enter application selection interface, as shown below:
text_image
Media Local Music Local Video Chrome Facebook Instagram Netflix Prime Video ScreenShare Spotify Twitter YouTube Code: M G H S D K HRC mode Multimedia*Remark: Because thesoftware is constantly updated and iterated, if the actual interface is inconsistent with that in this instruction, the actual interface prevails, this document is for reference only.
◆ Heat rate test
The test can detect static and dynamic heart rate before and after exercise, and recovery after exercise. The user holds the metal plate of heart rate detection on the left and right horizon handlebar with both hands, then the heart rate value will be displayed on the screen. (Warm reminder: the maximum heart rate of the exerciser should not exceed (220-age). When the heart rate exceeds the maximum, it is recommended to rest for about 30 minutes or slow down and reduce the incline. The detected heart rate is only for the reference of sports and fitness.
Tips: When using wireless heart rate, please do not use in MP3 mode, to prevent the interference of two signals, and a special wireless heart rate chest band is required.
Warning: Heart rate monitoring system may be inaccurate. Excessive exercise can result in serious injury or death. Stop exercising immediately if you feel faint.
◆Interface instruction
1. Audioport
When walking, you can wear headphones and plug the earphone into the audio port to listen to the voice on the headphones.
2. USB input
Insert the USB flash drive into the port on the right of the display, and click the multimedia to play songs and videos on the USB in Local Music and Video.
3. Bluetooth
The bluetooth of this treadmill is set as the main device, which can recognize and connect bluetooth speakers, earphones and other bluetooth peripheral.
4. Application connection
Copy the link here under to your brower (Edge, Firefox, Chrome, Safari etc) https://cloud.carefitness.com/index.php/s/E2WD22KMNBQzERL
And Follow the detailed instruction
Maintenance and malfunction treatment
-
Clean: The surface of the treadmill should be kept clean, pull out the power cord before cleaning. You can clean the running belt and the surface of the treadmill with a soft and wet cloth, be sure not to use strong solvents.
-
Adjustment of belt deviation: The running belt has been adjusted when manufactured; it may runs defectively after transportation and use. Turn off the treadmill before adjusting, (see figure)adjust theleft and right bolts in rear roller with wrenchIf the belt deviates to the left, clockwise rotate the left bolt. If the belt deviates to the right, counterclockwise rotate the right bolt. It is better to adjust 1/2 circle at a time. After adjustment, turn on the power and start the treadmill to check if the belt back to certer at speed of 4-5km/h, repeat the procedure if not.
-
Adjustment of belt slip: After a certain time of using, the belt might turn to be longer or couldn't free roll.. Your should adjust the left and right bolts in rear roller clockwise at same position till it runs smoothly and freely, it is better to adjust 1/2 circle at a time .But to avoid shortening belt using lifetime, do not adjust it too tight.
-
Lubricate
When the lubricant between the running board and the running belt is used up, please lubricate the running board and adjust the running belt well.
4.1 Power off, loose the belt by using the method of belt deviation adjustment, then brush lubricant to the running board evenly.
4.2 Please do not lubricate excessively, lubricant is not the more the better, reasonable lubrication can improve the service life of the treadmill.
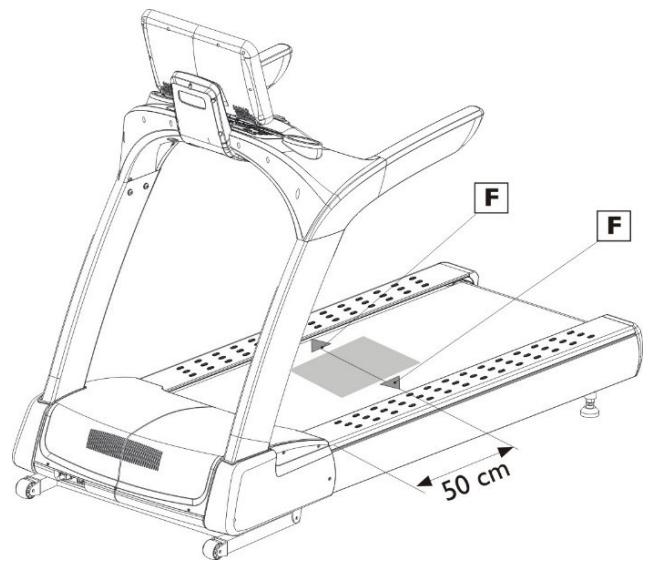
text_image
F F 50 cm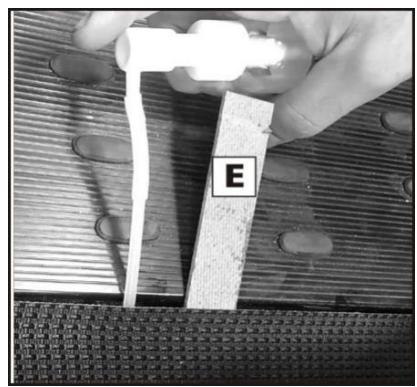
natural_image
Close-up of a hand holding a white tool over a textured surface, with a labeled block 'E' on the side (no other text or symbols visible)Maintenance reminding function
The treadmill has been lubricated before leaving the factory, it is not necessary to add lubricant oil when the treadmill runs first time. In order to keep the transmission parts of the treadmill in the best condition, the treadmill is equipped with reminding function of belt lubricating and replacing.
natural_image
Technical diagram of a mechanical or structural component with two vertical supports and circular holes, no text or symbols present.When the treadmill runs to 9000km, "Need lubrication" will be displayed on left upper corner of thescreen, it means need to add oil to the treadmill; After the first time oiling, the next reminding will be displayed every 1000km.
Click "Status bar& Shortcut setting area" to enter into "Advanced setting", then clip "Treadmill Manager", and clip "Close" to exit the reminding.
When the treadmill runs to 2500km, “Need to change belt” will be displayed on left upper corner of the screen, it means need to add oild to the treadmill.
Click "Status bar& Shortcut setting area" to enter into "Advanced setting", then clip "Treadmill Manager", and clip "Close" to exit the reminding.
text_image
Next Education Read to Hangzhou Quick start Real mode Target mode Training mode HRC mode Multimedia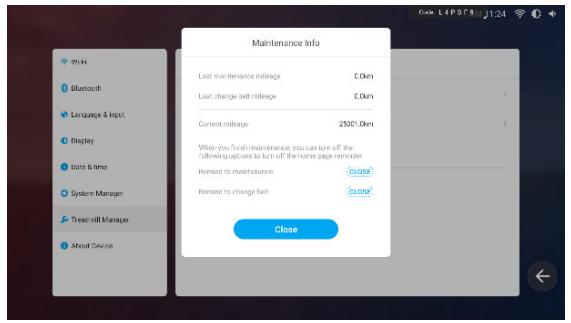
text_image
Maintenance Info Last maintenance mileage C.0km Last change left mileage C.0km Current mileage 25001.0km When you finish maintenance, you can turn off the following options to turn off the home page reminder Remind to maintenance close Remind to change left close CloseMalfunction treatment
| Error code | Description | Treatment countermeasures |
| E01H | Under voltage during operation | 1. Power off for 1 minute then on, and start2. Check whether the power plug, socket, or switch is loose3. Check whether the power supply voltage is too low4. If not, please contact customer service |
| E02H | Temperature sensorsAbnormal | 1. Power off for 1 minute then on, and start2. Check whether the NTC plug on the converter is loose3. If not, please contact customer service |
| E04H | Over current | 1. Power off for 5 minute then on, and start2. Check whether the load is overweight3. Check whether the running belt needs lubricant, or the belt is seriously worn, or the transmission mechanism (eg.roller) is abnormal4. If not, please contact customer service |
| E06H | Converter overvoltage | 1. Check whether the power supply is normal2. Power off for 1 minute then on, and start3. If not, please contact customer service |
| E08H | Grounding fault | 1. Power off for 1 minute then on, and start2. Check whether the motor and motor wires are well insulated3. Make sure the load is within the design range, check whether the running belt needs lubricant, or the belt is seriously worn, or the transmission mechanism (eg.roller) is abnormal4. If not, please contact customer service |
| E09H | Converter overheating | Improve environmental ventilation and clean the heat sink of converter2. Return to the factory to replace the converter cooling fan (The fan starts when the converter reaches 50 degrees)3. If not, please contact customer service |
| E0AH | Motor overload | 1.Check whether the load is overweight2. Check whether the running belt needs lubricant, or the belt is seriously worn, or the transmission mechanism (eg.roller) is abnormal |
| E0BH | Converter overload | 1.Check whether the load is overweight2. Check whether the running belt needs lubricant, or the belt is seriously worn, or the transmission mechanism (eg.roller) is abnormal |
| E0CH | System overload | This function is disabled by default (F-040=0) |
| E0DH | Motor disconnection detection | 1.Check whether the connecting line and joint of motor and converter are loose2.The motor isn't connected |
| E0EH | Converter brake transistor overload | Power off for 2 minute then on, replace the converter if couldn't start |
| E21H | Flash program fault | Power off for 2 minute then on, if couldn't start, replace the converter |
| E22H | Lower controller EEPROM fault | Power off for 2 minute then on, if couldn't start, replace the converter |
| Error code | Description | Treatment countermeasures |
| E23H | Low voltage | 1.Check if input voltage of the converter is normal2.Check whether the power plug, socket, or connection is loose |
| E25H | Emergency stop | 1.Check whether the emergency stop is loose or disconnected2.The cable connecting the console with the converter is loose |
| E26H | Driver setting error | Power off then on, and start to reset |
| E27H | Input low voltage | Check whether the converter input voltage is normal |
| E28H | Input high voltage | Check whether the converter input voltage is normal |
| E29H | Hihg temperature | This function is disabled by default (F-070=0) |
| E5 | Incline adjustment fault | 1. Check if the incline cable is well conneted2.Make sure the cable is well connected then re-adjust3.Touch the incline motor gently, if it is too hot, try not to adjust the incline or power off for about 5 minutes, and then power on again when the temperature of incline motor returns to normal |
| Calibration failure | Incline calibration failure | 1. Check if the incline cable is well conneted2. Make sure the cable is well connected then re-adjust |
| E22 | Communication error | 1. Check whether the console cable is loose or detached from the console2. Check whether the cable between console and converter is loose or fall off3.Check whether the upper and down cables are well connected4.Check whether the converter is damaged5.Check whether the console is damaged6.Power off for 2 minutes, then on |
| Emergency stop | Abnormal safety key | 1.Check whether the safety key is smooth and can move freely2.Check whether the connector of the safety key is loose or detached3.Check whether the safety key board is damaged4.Check whether the console is damaged |
| Light board communication error | 1. Check whether the console cable is loose or detached from the console2.Check whether the cable between console and converter is loose or fall off3.Check whether the upper and down cables are well connected4.Check whether the converter is damaged5.Check whether the console is damaged | |
| Incline system failure | 1.Check whether the power cord between incline motor and converter is loose or detached off2.Check whether the signal cable between incline motor and converter is loose or detached off3.Check whether the upper and down cables are well connected4.Check whether the incline motor is damaged5.Check whether the converter is damaged |
To order spare parts
To guarantee an efficient service, make sure you have the following items before you contact our After Sales Service:
The name or reference of the product.
The manufacturing number shown on the main chassis and on the packing box.
The number of the missing or faulty part shown on the exploded view of the product described in this manual.
After Sales Service
Email: service-uk@carefitness.com