USER MANUAL AQUA CONNECT X550 EZICLEAN
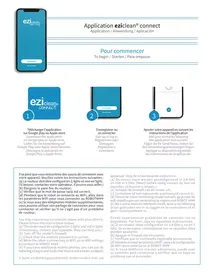
Application eziclean connect
You may experience connection issues with your device. Please follow the instructions below:
a) The router must be configured in 2.4GHz and not in 5GHz. (If necessary, contact your operator, they can help you.)
[b] Turn off the router's firewall;
[c] Check that the entered password is correct;
[d] While the robot is connecting to WIFI, go to WIFI settings to connect to ROBOT ###
e) If you have additional mobile phones, you can use its tethering to log in and verify that there is not a router problem;
Rechner (application "EZIcone" Connect)
Search for the application "EZClean Connect" /
Suchen Sie nach der Anwendung «EZClean Connect»/
Busque la aplicacion «EZClean Connect»
6

Entrez les identifiants de votre application «EZiclean® Connect»
Enter the identifiers of your "EZClean Connect" app / Geben Sie die Kennungen Ihr's App «EZclean» Connect/ Introduzca los identificadores de su Aplicacion «EZclean» Connect
Fonctionnalités
Features / Funktionen / Characteristicas

Control the level of humidification of the mop(1)
Cleaning along the walls (2)
Intensive cleaninga defined area
Define areas not to be cleaned (4)
Define specific areas to clean (3)
Return to charging base
Ask the robot to go to a specific point (3)
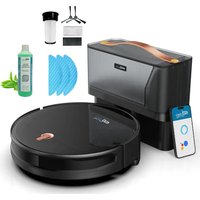
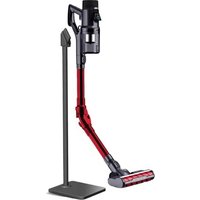
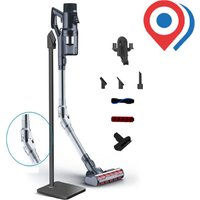
connect x500 et aqua connect x550


eziclean connect x500:
Dimensions (mm): 330 × 76
Poids (kg):2,800
Surface Max.: 120m^2
Welcome to EZI® - Make it easy
Thank you for the trust you place in our EZIclean® range. We hope you are satisfied with this product and now let you take note of the following instructions for use.
Precautions for use
can obstruct it.
- Do not expose the robot to flammable substances such as petrol, toner and toner for printers or photocopiers.
- Do not expose the robot to burning articles, such as cigarettes, matches, ashes and other articles which may cause a fire.
- Do not place items near the suction nozzles.
- Do not use the product when the suction nozzle is blocked.
- Clean dust, cotton, hair, etc. which are in the suction nozzle to ensure good air circulation.
- Use the power cable carefully to avoid damage.
- Do not use the power cord to slide or pull the robot and the charging station.
- Do not trap the power cable in the doors.
- Do not pull on the power cable.
- Keep the power cable away from heat sources.
- Do not use the charging station if it is damaged.
- Even if the product has been severely damaged, combustion of this product is prohibited, this may cause the product battery to explode.
Please read the following information carefully before using your robot vacuum cleaner or its accessories. Do not disassemble the device and do not try to repair it yourself. In the event of a malfunction, please contact your dealer for professional advice. Stairs: The device uses sensors to avoid falling on steps, on stairs or over an edge. In some situations, the sensors may malfunction. This device cannot detect steps that are less than 8cm high. Steps less than 8cm high can cause the robot to fall. Highly reflective or very dark surfaces on certain steps or stairs, such as glass or polished ceramic can cause the device to fall. If available, use the virtual wall or place a carpet on the bottom step to prevent your robot from falling. Avoid using your robotic vacuum cleaner on mezzanines, landings or elevated, undefined surfaces.

C E
The symbol on this appliance indicates that it cannot be disposed of with household waste. You must deposit it in an electrical and electronic waste recycling center. Disposal must be carried out in accordance with local waste regulations. For further information on the treatment, recovery and recycling of this appliance, please contact your municipality, the local household waste disposal service or the retailer of the appliance.

Your device


Installing your device
To install your device, follow these instructions :

1. Assemble the dust bin cover by pressing firmly

2. Close the lid dust bin
3. Insert the dust container in the robot
4. Remove all protections of the robot

5. Place the charging base at 50~cm from any obstacle and connect it

6. Install the side brushes according to the L & R instructions

7. Set the switch to «I» To switch off the robot, set the switch to «O»

8. Place the robot to be charged by placing it on the charging base
Note:
-
It is also possible to recharge the robot by directly connecting the power cable to the robot.
-
Make sure that the switch is on «I» before recharging the robot. If the switch is on «O», the robot cannot be recharged.
-
During cleaning, the robot may feel that its battery is insufficient and automatically return to its charging base.
- You can also ask it to return to its charging base by pressing the robot button or from your application.
Pay attention to the charge:
- The charging base should not be placed in highly reflective environments such as direct sunlight or near mirrors. This could distort the robot's navigation and it could get lost.
- In order to ensure the proper functioning of the robot, it is advisable to recharge it for 6 hours the first time.
Start cleaning
The different cleaning modes:

The robot performs the planned cleaning by automatically adapting to its environment.
- Turn on the main switch, when the light is on, it means that the robot is on.
- Then briefly press the robot button, the button on the remote control or from the application.

Adapted to the soil where the garbage is concentrated, the robot cleans the soil "spirally" and intensively.
- Then briefly press the robot button, the button on the remote control or from the application.

Control the robot by hand by selecting the directional arrows.
- Press the directional arrows on the remote control or the application.
Suction power control

Adjust the suction power according to the different types of soil.
- Press the buttons on the remote control or from the application.
Please note: The suction power can only be adjusted in auto mode.
Stop cleaning
Standby
While the appliance is running, press the «Start / pause» button on the robot or the pause button on the remote control or the application to stop cleaning.
Start-up
The robot goes into standby mode after 10 minutes of inactivity and all the lights go out.
Use any button on the robot or application to restart the robot.
Switch off
Once the device has stopped working, press the «start» button for a few seconds and all the indicators will go out.
If you no longer wish to use your robot for an extended period of time, set the switch to «O».
If you want to use it regularly, leave the switch on «I» so it can charge properly.
Caring for your device
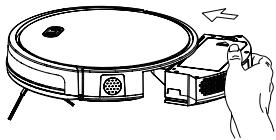
To clean the dust container, follow the instructions below :

1. Press the dust bin button to remove it from the robot.

2. Open the dust container.


3. Remove the dirt.
4. Open the cover of the HEPA filter

5. Remove the pre-filter and the robot's HEPA filter.

6. Gently clean the HEPA filter and the pre-filter with water.


7. Clean the dust container with a cloth or brush. Do not put it in the water.

8. Let the various elements dry before reinserting them.


- Replace the pre-filter and the HEPA filter in the dust container
Notes:
-
Before installing the filters, make sure that the HEPA filter and the pre-filter are completely dry.
-
Do not expose the filters to the sun.
-
Close the dust bin cover and install the dust bin in the robot.
Please note: the dust container and the HEPA filter must not be washed with water.
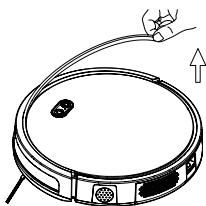
To clean the main brush, follow the instructions below :

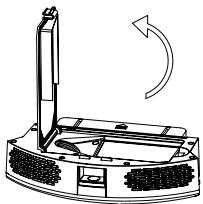
1. Open the passenger compartment the main brush

2. Remove the main brush

)
3. Use the cleaning brush to remove dirt.
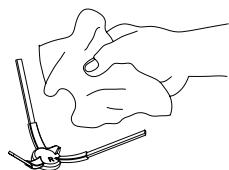
To clean the side brushes, run them under water or clean them with a cloth
To clean the sensors, follow the instructions below:
The charging base, robot and bumper sensors contain sensitive electronic components. Use a dry cloth to clean them and be careful not to moisten them as this may cause damage.

1. Clean the sensors loading

2. Clean the robot sensors

3. Clean the central wheel
- If you do not use the product for a long time, charge it fully before storing it.
- Turn off the device and continue to charge it every 3 months to prevent the battery from fully discharging.
- If the battery is too discharged or not used for a long time, the product may not be able to be recharged. Contact our company for after-sales service. Do not disassemble the product yourself.
Technical characteristics
eziclean connect x500:
Dimensions (mm): 330 × 76
Weight (kg): 2,800
Max area: 120m^2
Navigation technology: NAVIG+TM - Mapped
Max decibels : 55dB
Battery: Lithium-ion - 2000 mAh
Autonomy: 120 min
Charging time: 4 hours
Automatic return to base: Yes
Technology Corner Detection: CORNER™
Capacity: 600~mL
Anti-Allergen: HEPA filter
Remote control: Yes
Connected via app: Yes
Water tank: No
ezclean 品 aquacennectx550:
Dimensions (mm): 330 × 76
Weight (kg): 2,800
Max area: 120m^2
Navigation technology: NAVIG+TM - Mapped
Max decibels : 55dB
Battery: Lithium-ion - 2000 mAh
Autonomy: 120 min
Charging time: 4 hours
Automatic return to base: Yes
Technology Corner Detection: CORNER™
Capacity: 600~mL
Anti-Allergen: HEPA filter
Remote control: Yes
Connected via app: Yes
Water tank: Yes
To download this manual in multilingual, go to our website.
46/48, rue Gay Lussac
94430 Chennevières-sur-Marne
www.e-zicom.com
Do not use on rugs and carpets.
After cleaning the floor, properly clean the water tank. Remove the mop, clean it and dry it flat.
Depending on the type of soil you will clean, you can manage the water flow of your water tank from the e2clearer connect application.