
LM871D - Blender MOULINEX - Free user manual and instructions
Find the device manual for free LM871D MOULINEX in PDF.



| Brand | Moulinex |
| Model | LM871D |
| Product type | Blender |
| Bowl capacity (thick mixtures) | 1.5 L |
| Bowl capacity (liquid preparations) | 1.25 L |
| Bowl material | Graduated glass |
| Number of speeds | Progressive adjustment from min to max |
| Pulse function | Yes |
| Smoothie function | Yes, pre-programmed |
| Ice crush function | Yes, pre-programmed |
| Auto clean function | Yes, with hot water (<80°C) |
| Included accessories (depending on model) | Spatula, herb chopper, spice grinder, accessory bowl |
| Bowl cleaning | Dishwasher (top rack, except titanium-coated blades) |
| Motor unit cleaning | Damp cloth, do not immerse |
| Automatic overload stop | Yes |
| Maximum liquid temperature | 80°C / 176°F |
| Number of instruction manual pages | 50 pages |
| Available languages | FR, DE, EL, EN, ES, FA, IT, KK, NL, PT, RU, UK |
Frequently Asked Questions - LM871D MOULINEX
User questions about LM871D MOULINEX
0 question about this device. Answer the ones you know or ask your own.
Ask a new question about this device
Download the instructions for your Blender in PDF format for free! Find your manual LM871D - MOULINEX and take your electronic device back in hand. On this page are published all the documents necessary for the use of your device. LM871D by MOULINEX.
USER MANUAL LM871D MOULINEX
CAUTION: the safety precautions are part of the appliance. Read them carefully before using your new appliance for the first time. Keep them in a place where you can find and refer to them later on.
DESCRIPTION
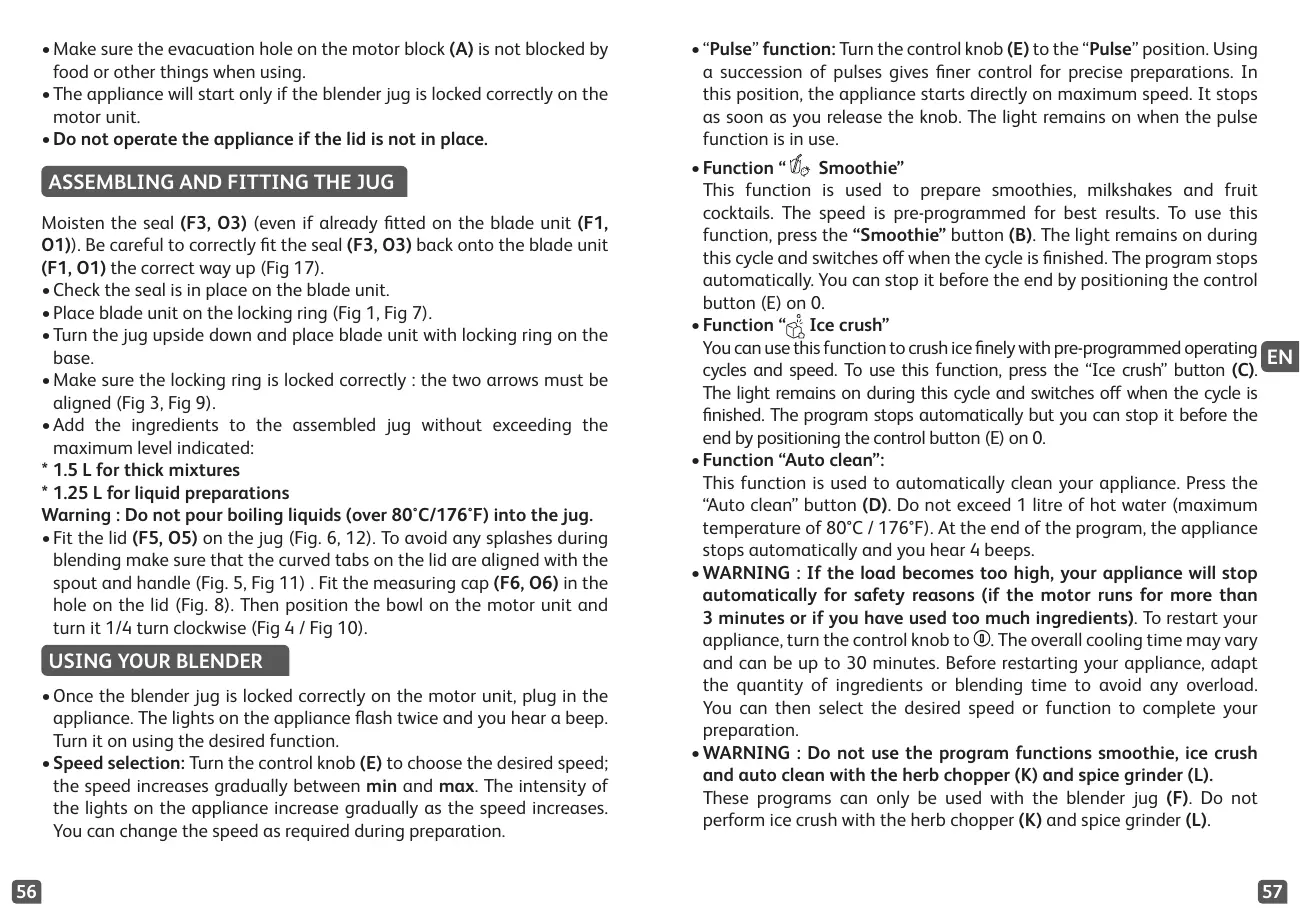
A Motor unit B "Smoothie" button C "Ice crush" button D "Auto clean" button E Control knob F/O Blender jug assembly
F1 / O1 Blade unit F2 / O2 Locking ring F3 / O3 Seal F4 / O4 Graduated blender jug F5 / O5 Lid F6 / O6 Lid cap
G Min speed H Max speed I Pulse button
J Spatula* (accessory depending on model) K Herb chopper* (accessory depending on model)
K1 Seal K2 Herb chopper blade unit
L Spice grinder* (accessory depending on model)
L1 Seal L2 Spice grinder blade unit
M Herb chopper and Spice grinder bowl* (accessory depending on model)
BEFORE THE FIRST USE
- Clean all the parts (F, J, K, L, M, O) with warm water and washing up liquid except for the motor unit (A) which must never be immersed in water or placed under running water (see section Cleaning).
CAUTION: The blades are extremely sharp; handle them with caution when using or cleaning the appliance.
- Handle the glass jar (F4) with caution when using and cleaning, do not drop.
- Make sure all the packaging has been removed before operating the appliance.
- Important note: Turn the control knob (E) to ① before placing the blender jug (F/O) on the motor unit (A).
- Make sure the evacuation hole on the motor block (A) is not blocked by food or other things when using.
- The appliance will start only if the blender jug is locked correctly on the motor unit.
- Do not operate the appliance if the lid is not in place.
ASSEMBLING AND FITTING THE JUG
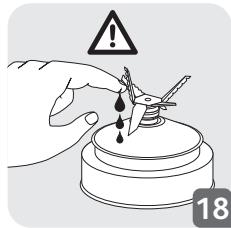
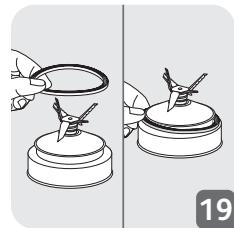
Moisten the seal (F3, O3) (even if already fitted on the blade unit (F1, O1)). Be careful to correctly fit the seal (F3, O3) back onto the blade unit (F1, O1) the correct way up (Fig 17).
- Check the seal is in place on the blade unit.
- Place blade unit on the locking ring (Fig 1, Fig 7).
- Turn the jug upside down and place blade unit with locking ring on the base.
- Make sure the locking ring is locked correctly: the two arrows must be aligned (Fig 3, Fig 9).
- Add the ingredients to the assembled jug without exceeding the maximum level indicated:
- 1.5 L for thick mixtures
- 1.25 L for liquid preparations
Warning: Do not pour boiling liquids (over 80°C / 176°F) into the jug.
- Fit the lid (F5, O5) on the jug (Fig. 6, 12). To avoid any splashes during blending, make sure that the curved tabs on the lid are aligned with the spout and handle (Fig. 5, Fig 11). Fit the measuring cap (F6, O6) in the hole on the lid (Fig. 8). Then position the bowl on the motor unit and turn it 1/4 turn clockwise (Fig 4 / Fig 10).
USING YOUR BLENDER
- Once the blender jug is locked correctly on the motor unit, plug in the appliance. The lights on the appliance flash twice and you hear a beep. Turn it on using the desired function.
- Speed selection: Turn the control knob (E) to choose the desired speed; the speed increases gradually between min and max. The intensity of the lights on the appliance increases gradually as the speed increases. You can change the speed as required during preparation.
- "Pulse" function: Turn the control knob (E) to the "Pulse" position. Using a succession of pulses gives finer control for precise preparations. In this position, the appliance starts directly on maximum speed. It stops as soon as you release the knob. The light remains on when the pulse function is in use.
- Function "Smoothie"
This function is used to prepare smoothies, milkshakes and fruit cocktails. The speed is pre-programmed for best results. To use this function, press the "Smoothie" button (B). The light remains on during this cycle and switches off when the cycle is finished. The program stops automatically. You can stop it before the end by positioning the control button (E) on 0.
- Function "Ice crush": You can use this function to crush ice finely with pre-programmed operating cycles and speed. To use this function, press the "Ice crush" button (C). The light remains on during this cycle and switches off when the cycle is finished. The program stops automatically but you can stop it before the end by positioning the control button (E) on 0.
- Function "Auto clean": This function is used to automatically clean your appliance. Press the "Auto clean" button (D). Do not exceed 1 litre of hot water (maximum temperature of 80°C / 176°F). At the end of the program, the appliance stops automatically and you hear 4 beeps.
- WARNING: If the load becomes too high, your appliance will stop automatically for safety reasons (if the motor runs for more than 3 minutes or if you have used too many ingredients). To restart your appliance, turn the control knob to position 0. The overall cooling time may vary and can be up to 30 minutes. Before restarting your appliance, adapt the quantity of ingredients or blending time to avoid any overload. You can then select the desired speed or function to complete your preparation.
- WARNING: Do not use the program functions smoothie, ice crush, and auto clean with the herb chopper (K) and spice grinder (L). These programs can only be used with the blender jug (F). Do not perform ice crush with the herb chopper (K) and spice grinder (L).
USING THE HERB CHOPPER (K) AND SPICE GRINDER (L) (DEPENDING ON MODEL)
- With the herb chopper (K) you can chop ingredients like onions, garlic, or raw meat (pre-cut into small pieces) in a few seconds. Do not use the herb chopper for liquid preparations (fruit juices, etc.).
- With the spice grinder (L) you can grind spices in a few seconds: coriander seeds, peppercorns, etc.
- These accessories are equipped with a bowl (M) that prevents access to the blades during use.
- Turn the bowl (M) upside down and add the ingredients.
- Position the seal (K1 or L1) in its recess on the blade unit (K2 or L2) (Fig. 13). Position the blade unit on the bowl. Lock the accessory by rotating the blade unit until fully assembled (Fig. 14). Caution: leaks can occur if the accessory is not locked correctly.
- Rotate the assembled accessory (K or L) and position it on the motor unit (Fig. 15).
- Then turn the assembled accessory (K or L) through a quarter turn clockwise (Fig. 15).
- Plug in the appliance and turn the control knob (E) to the desired position or apply a few pulses. To stop the appliance, turn the control knob (E) to position zero.
- Unlock the accessory by turning it through a quarter turn in the anticlockwise direction. Remove the assembled accessory (K+M or L+M) from the motor unit. Turn it over before opening to avoid any spillage of your preparation. Then you can unlock the blade unit (K1 or L1). The blades are very sharp: handle them with caution to avoid injury. You can then remove the preparation in the bowl.
Warning: Do not use the accessories for chopping or grinding liquid or grains too hard (ex: hard black beans, sugar ...). You can pour liquid ingredients in the blender jug (F) only.
ADVICE
- Depending on the nature of the ingredients, you can use the blender jug to prepare up to
- 1.5 L for thick mixtures.
- 1.25 L for liquid preparations.
Warning: Do not pour boiling liquids (over 80°C / 176°F) in the jug.
- You can prepare finely blended soups, cream soups, stewed fruit, light batter (pancakes, fritters, Yorkshire pudding batter, etc.), milkshakes, smoothies, cocktails, etc.
- If ingredients stick to the sides of the jug when blending, stop the appliance. Remove the blender jug from the motor unit, and push the food down onto the blades using a spatula and put your blender jug back to continue your preparation.
- Always pour the liquid ingredients into the blender jug first, before adding the solid ingredients, without exceeding the maximum level.
- To add ingredients while blending, remove the lid cap (F6, O6) from the lid (F5, O5) and add the ingredients through the feeder hole.
- For finely crushed ice, use a maximum of 6 small ice cubes (25x25x25 mm maximum) using "Ice crush" function. There is no need to add water.
- Always operate the blender with lid or guard in position as indicated in the instructions. Never put a hand in the jar when it is placed on the base unit, if food needs to be pushed down use a suitable tool e.g. spatula
RECIPE
Cold carrot soup:
600g carrots + 900g water: Put the water in the blender jug and add the carrot pieces. Mix on max speed for 3 minutes.
CLEANING
Do not immerse the appliance in water. Never put the motor unit (A) under running water.
- Clean the jug immediately after use.
- Fill the jug with 1 litre of hot water along with 2 or 3 drops of washing-up liquid. Only use the recommended amount of water and washing-up liquid. An excess of washing-up liquid creates more foam and consequently can lead to overflowing.
- Use the automatic auto-clean program to carry out a prewash of the jug.
- Once the program has stopped, unplug the appliance.
- Remove the blender jug (F4, O4).
- Place the jug on a flat surface.
- Unlock the lid and remove it with care. Pour out the water.
- Remove the Blade Unit + Locking Ring + Seal (F1 + F2 + F3 / 01 + 02 + 03) and clean them under running water. The blades are very sharp, handle them with caution to avoid injury (Fig. 10).
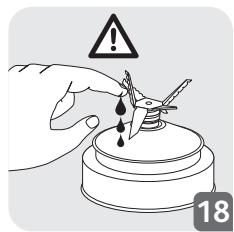
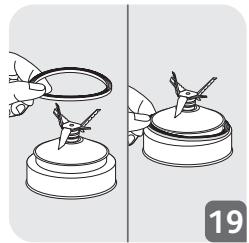
- After cleaning, remember to correctly fit the seal (F3, O3) back onto the blade unit (F1, O1) (Fig. 17). Please be careful to avoid any damage to the seal by touching the blades.
Note: Incorrectly fitting the seal can result in ingredients leaking from the base of the blender jug.
- Rinse the inside of the jug and the lid under running water.
- Take care when cleaning the blades in the blender jug and when you empty the jug as they are sharp.
- Use a damp cloth to clean the motor unit (A). Dry it carefully.
- The detachable parts (lid, blade unit, locking ring) can be cleaned with a sponge and hot soapy water.
- The jug (F4, O4), blade unit without titanium coating (F1), locking ring (F2, O2) can be cleaned in the dishwasher on the upper rack - use the 'ECO' or 'LOW SALT' program.
- Caution: The jug (F4, O4), blade unit without titanium coating (F1) and locking ring (F2, O2) must be disassembled and placed separately in the dishwasher. Please do not put the blades with titanium coating (O1) in the dishwasher.
WHAT TO DO IF YOUR APPLIANCE DOES NOT WORK
| PROBLEMS | CAUSES | SOLUTIONS |
| Appliance does not work | The plug is not connected | Connect the appliance to a socket with the same voltage as that on the rating plate of the appliance. |
| The blender jug is not positioned correctly on the motor unit | Check that the blender jug is positioned properly on the motor unit as explained in the instructions. | |
| The appliance stopped while in use | Overload | Follow the instructions in section USING YOUR BLENDER. The cooling time is variable and can last up to 30 minutes |
| Excessive vibrations | The product is not placed on a flat, stable surface | Place the appliance on a flat surface. |
| Volume of ingredients is too high | Reduce the quantity of ingredients processed. | |
| Leak from the lid | Volume of ingredients is too high | Reduce the quantity of ingredients processed. |
| The lid is not correctly positioned | Place the lid correctly on the blender jug. | |
| Leak at the bottom of the blender jug | The blender seal (F3 / O3) is not positioned correctly or is absent | Reposition the seal with the correct side uppermost (Fig. 1) and lock the assembled blade unit (F1+F2+F3 / 01 + O2 +O3) onto the blender jug correctly (Fig. 2, Fig. 3 & Fig. 4 / Fig. 9, Fig. 10 & Fig. 11) |
| The blade does not turn easily | Pieces of food are too large or too hard. Liquid has been blended that was too hot and has distorted the seal | Replace the seal with a new one. Reduce the size or quantity of ingredients processed. Add liquid. |
YOUR APPLIANCE STILL DOES NOT WORK?
Contact an approved service centre (see list in service booklet).
- 2
| العربية | الإستعمال | الترجمة |
| العربية الحرفية و صحيى ملاوي بعبيعة الحرفية الحرفية الحرفية | العربية الحرفية الحرفية الحرفية | الإستعمال |
| العربية الحرفية و صحيى ملاوي بعبيعة الحرفية الحرفية الحرفية | العربية الحرفية الحرفية الحرفية | الإستعمال |
| "العربية الحرفية الحرفية الحرفية الحرفية | العربية الحرفية | الإستعمال |
| "العربية الحرفية الحرفية الحرفية | العربية | الإستعمال |
| "العربية الحرفية الحرفية | "العربية | "الإستعمال |
| "العربية الحرفية | "العربية | "الإستعمال |
| "العربية | "العربية | "الإستعمال |
| "العربية | "العربية | "الإستعمال |
| "العربية | "العربية | "الإستعمال |
| "العربية | "العربية | "الإستعمال |
| "العربية | "العربية | "الإستعمال |
| "العربية | "العربية | "الإستعمال |
| "łامزه الحرفية | "łامزه | "łامزه |
| "العربية الحرفية | "łامزه | "łامزه |
| "العربية | "łامزه | "łامزه |
| "العربية | "łامزه | "łامزه |
| "łامزه | "łامزه | "łامزه |
| "łامزه | "łامزه | "łامزه |
| "łامزه | "łامزه | "łامزه |
| "łامزه | "łامزه | "łامزه |
| "łامزه | "łامزه | "łامزه |
| "łامزhole | "łامزhole | "łامزhole |
| "łامزhole | "łامزhole | "łامزhole |
| "łامزhole | "łامزhole | "łامزhole |
| "łامزhole | "łامزhole | "łامزhole |
| "łامزhole | "łامزhole | "łامزhole |
| "łامزhole | "łامزhole | "łامز Hole |
| "łامزhole | "łامزhole | "łامزhole |
| "łامزhole | "łامزhole | "łامزhole |
| "łامزhole | "łامزhole | "łامزhole |
| "łامزhole | "łامزhole | "łامزhole |
| "łامزhole | "łامزhole | "łامز hole |
| "łامزhole | "łامزhole | "łامزhole |
| "łامزhole | "łامزhole | "łامزhole |
| "łامزhole | "łامزhole | "łامزhole |
| "łامزhole | "łامزhole | "łامزhole |
| "łامزhole | "łامزhole | "łامز holes |
| "łامزhole | "łامزhole | "łامزhole |
| "łامزhole | "łامزhole | "łامزhole |
| "łامزhole | "łامزhole | "łامزhole |
| "łامزhole | "łامزhole | "łامزhole |
| "łامزhole | "łامزhole | "łامزholes |
| "łامزhole | "łامزhole | "łامزhole |
| "łامزhole | "łامزhole | "łامزhole |
| "łامزhole | "łامزhole | "łامزhole |
| "łامزhole | "łامزhole | "łامزhole |
| "łامزhole | "łامزhole | "łامزole |
| "łامزhole | "łامزhole | "łامزhole |
| "łامزhole | "łامزhole | "łامزhole |
| "łامزhole | "łامزhole | "łامزhole |
| "łامزhole | "łامزhole | "łامزhole |
| "łامزhole | "łامزhole | "łامزbole |
| "łامزhole | "łامزhole | "łامزbole |
| "łامزhole | "łامزhole | "łامزbole |
| "łامزhole | "łامزhole | "łامزbole |
| "łامزhole | "łامزhole | "łامزbole |
| "łامزhole | "łامزhole | "łامزhole |
| "łامزhole | "łامزhole | "łامزhole |
| "łامزhole | "łامزhole | "łامزhole |
| "łامزhole | "łامزhole | "łامزhole |
| "łامزhole | "łامزhole | "łامزisle |
| "łامزhole | "łامزhole | "łامزbole |
| "łامزhole | "łامزhole | "łامزbole |
| "łامزhole | "łامزhole | "łامزbole |
| "łامزhole | "łامزhole | "łامزbole |
| "łامزhole | "łامزhole | "łامزisle |
| "łامزhole | "łامزhole | "łامزbole |
| "łامزhole | "łامزhole | "łامزbole |
| "łامزhole | "łامزhole | "łامزbole |
| "łامزhole | "łامزhole | "łامزisle |
| "łامزhole | "łامزhole | "łامزisle |
| "łامزhole | "łامزhole | "łامزbole |
| "łامزhole | "łامزhole | "łامزbole |
| "łامزhole | "łامزhole | "łامزbole |
| "łامزhole | "łامزhole | "łامزole |
| "łامزhole | "łامزhole | "łامزbole |
| "łامزhole | "łامزhole | "łامزbole |
| "łامزhole | "łامزhole | "łامزbole |
| "łامزhole | "łامزhole | "łامزbole |
| "łامزhole | "łامزhole | "łامزole |
| "łامزhole | "łامزhole | "łامزole |
| "łامزhole | "łامزhole | "łامزbole |
| "łامزhole | "łامزhole | "łامزbole |
| "łامزhole | "łامزhole | "łامزbole |
| "łامزhole | "łامزhole | "łامزole |
| "łامزhole | "łامزhole | "łامزisle |
| "łامزhole | "łامزhole | "łامزbole |
| "łامزhole | "łامزhole | "łامزbole |
| "łامزhole | "łامزhole | "łامزbole |
| "łامزhole | "łامزhole | "łامزILE |
Therefore, triangle ACD is congruent to triangle BDE, so DE = CE = 1.
.15
.1JgUJnJ 1.25*
y 176/80 jn jy y
a a a a a a a a a a a a a a a a a a a a a a a a a a a a
...山,山S;jwagaw,.山。...山,山
.((F1,O1) (uJzduoJg JzduoJzduoJzduoJzduoJzduoJzduoJzduoJzduoJzduoJzduoJzduoJzduoJzduoJzduoJzduoJzduoJzduoJzduoJzduoJzduoJzduoJzduoJzduoJzduoJzduoJzduo
uJaaal 100g de cuaall qiaic ooo gdo aol Jy zai
.7Jswl.lJswl) Jaal ala de jaial a o
.aaal llaaall aao gdoaal oogg qae lajblal j5
(9JS3,3JS) boll jdi dc jlogwll gjki jy:ssu Jsdua Jiaiyai 1j S
: aJl Jd j 100000000000000000000000000000
a.5u 1.5*
aJlJ 1.25
y 176/80 80 j5
Jg.150 150 150 150 150 150 150 150 (F5,O5)
__SUPPIMER__
Therefore, cos θ = 4/5
((1/2) + 1/3)^2 = -1/8
δω K1
Therefore, the area of triangle OBC is 1/2 * OB * BC = 1/2 * CD * 5.
O1/F1
02/F2
90 90 O3/F3
Jbgloo 04/F4
ωw O5/F5
SOSO6/F6
G
oJzaljgljds
JgA (A) goo ofo 000 j 1 4 uS 2 6 8 9 9 9 9 9 9 9 9 9 9 9 9 9 9 9 9 9 9 9 9 9 9 9 9 9 9 9 9 9 9 9
(1) | x - 2| = 5/2 , | y - 3| = 7/2
. 100000000000000000000000000000000000000
aai jao d uu bga g bsblal (F4) gladz yj oosg oolalui jusp
.100 400 400 400 400 400 400 400 400 400 400 400 400 400 400 400 400 400 400 400 400 400 400 400
05s s y (F,O) 58 loga 2y dy d j l Jd u b 1j E) Jus aS: pao cdoo
A. jj3 (A) jjgo
__SUPPIMER__
INSTRUCTIONS AND SAFETY
WARNING: Instructions and safety in the complete kit of the device. Please read them carefully before first use. Keep them in a safe place for future reference.
DESCRIPTION
A Motor block
B "Stop" button
C "Pulse" button
D "Automatic off" button
PRECAUTIONS FOR USE
- Immerse all parts (F, J, K, L, M, O) in hot water and with a cleaning agent, except the motor block (A), which must not be immersed in water or placed under running water (see section "Cleaning").
WARNING: The blade is very sharp! When using or cleaning the device, handle it with great care.
- Carefully handle the removable bowl (F4) during its installation, use, and cleaning, and do not drop it on a hard surface. - Before using the device, make sure that all
nakyBaIbHi MaTepiAIn.
BaxnBa npimitka: NobepHItb nepemKau KepyBaHHa (E) y noJoxHeHH ① nepeTtM,ЯкВCTaHOBHTN yaIy 6JIeHdepa (F,O)Ha MToPnHn 6JIOK (A). -ПepekonaItecra,ио BnynckHn OTBiP Ha MToTOpHMy 6Iooi nId yac BnKOpNCTaHHA (A) He 3a6nBcra npOdyKTamn XapUyBaHHa 6o IHsIMn npEmdetamn. - Пплад працю тільки 3 правиьно чашю 6леньдау, со правиьно зafikcobа на мотор氡блочi. - He BnKOpncTObyIe npnla,ЯKIo KoPnIka He BcTaHOBJeHa Ha Micue.
35MPAHNRA BCTAHOBJIEHH YASSI
3MoUitb yuilbHOBauch (F3,O3) (BCTaHOBJeHn y 6NoK 3 nezamn (F1,O1)).
- PepeKoHaIteCra, 10 y uizlbHIOBaV BCTaHOBHeHn y 6Jok 3 ne3amn.
- YctahOBiB 6Iok 3 Ie3aMn Ha cTOnOpHe KInbue (306p. 1 i 7). -ПepeBepHitb YAshy Dooropn IHom i BCTaHObitb Ha YAshy 6IOK 3Je3Amn Ha CTOnOpHOMy KInbci. -ПepekonaIteCb,ио StOnOpHe KInbue 3aФiKCoBaHe npaBnIbHo:ДВi CTpiJkn MaIOb CnIBnadaTn (306.3,306.9).
- POKlaɪdɪt b npOdykTn B yəw. He nepeBnuIyTe MaKcImaJIbHn pɪBeHb: * 1,5 n ᶅŋ rγctux cμiweɪ
- 1,25 π ἀνλ πίαιν
PonepeJxHHe HauBaIe B uayrpaui ( < 80°C)
BCTaHOBITb KpIuKy (F5,05) Ha yauy. UO6 yHnKHyTu nO36pn3KByHnn iNd uac npiroTOyBaHH, nepekoHaTeCya. 3bIaOTbc3 HocIKom i pyuKOIO (3o6.6,3o6.12). BCTaHOBITb KObnaOK (F6,O6) B Ioro Micue Ha KpUu (3o6.5,3o6.11). Iotim BCTaHOBITb yauy Ha MOTOPHNI 6JLOK i NOBepHITb II Ha 1/4 o6eTp 3a rOunHHNKOBIO CTpiKIO (3o6.4/3o6.10).
IPEPIE BVKOPNCTAHN IPIPINAy
- Ak tINbKN Bn npaBnIbHO 3aΦiKcYBaHn qaHy 6NeHepa Ha MOTOpHOMy 6NoCi, NiIKNIOHTb npuJaD oPo3ETKn. IHdNKaTOp npuJaD 6JIIMHe 2 pa3n i BN NOUYeTe 3ByKOBn CnHaJ. YBIMKHITb npuaD, BnKOpNCTOBYOuN nOTpi6Hy fynKciio.
Bn6ip wbnkocti: NobepHt b nepemKau wbnkocTe (E), 106 Bn6paTn notpi6Hy wbnkicTB. Wbnkictb 36Ib7yETcR noCTynoBO biD pIBH min do pIBH max. lHTeHCNBHCTb CBITIOBOr iHNkaTopa 36Ib7yETcR nO mipi 36Ib7eHHwbnkocTi. Bn MoKeTe Bn6paTn notpi6Hy wbnkicTB 6e3nocepEnhbo nID yac 3miuBaHH. -Функця imnybcHoro pexmy:Поверніть пемикay керувань (E)В пооженна"Pulse".Використань послідовості IMnybcivdo3bOJIЯКраше керуbatи поцесom 3mіш汞вань.Вц Bomу pexkimi рпаладочипрацobatи Ha мakсимальhiшвдкOSTi. BiH 3упнHTбс,ДоJOHO Bn BiDnycstnte pepeMuKau.КOLIN BИКOPINCTOBYETbCIMpylbchnipexkM, iHdkaTop cBITNbCra. ΦyHKzij"CMy3i"
Lz yHKzIy BnKOpNCTOByeTcI Jn npriToYBaHH OndHopiDHNX MoOnuHnx i 0pkykTOBHX KOKTeiNIB. UbnkicTb nonepedHbo 3aIporpaMOBaHa IJn DOcRHeHH HaIKpaunx pe3yIbTaIb. IJIa BnKOpNCtAHH ZieI cyHKU II HATNCiTB KONKY Smoothie" (B). IHINkaTOP CbitNTbcr IpOTAROM BCbOro npouecy npriToYBaHH Ta BmNKAETCB, KOIn npriToYBaHH 3akIHueHo. Iporpama 3ynHHetcbA bTOMatNoHO. BN MoKeTe 3ynHHITn nporpamy Do II 3abepWeHH, 7JlXOM YCTAHOBLeHH KONKn KepyBaHH (E) y noLoKeHH «0».
Функця"Подрибеннаьody"
You can use the functions according to the program for preparation and speed. To use these functions, press the "Ice crush" button (C). The indicator lights up during the entire preparation process and turns off when preparation is complete. The program stops automatically, but you can stop it before completion by turning the control knob (E) to the "0" position.
- Function "Auto clean":
You can use the automatic cleaning function. Press the "Auto clean" button (D). Do not pour more than 1 liter of water at a maximum temperature of 80 °C. After the program starts, the device stops automatically and emits a sound signal 4 times. - WARNING: If the load is too heavy, the device will stop automatically for safety reasons (if the motor runs continuously for more than 3 minutes, or if you process too many products). To restart the device, turn the liquid switch to position ①. The cooling time of the device may be up to 30 minutes. Before restarting the device, check the quantity of products in the bowl or cup to avoid repeated overloading.
After that, you can choose the desired speed or function to finish the blending process.
- WARNING: Do not use the functions "Ice crush", "Chopping" and "Auto clean" with accessories. These programs use only the main bowl. Do not use any additional accessories.
- Using the chopper (K) and the mill (L) (depending on the model)
- With the chopper (K) you can chop in a few seconds such products as onions, garlic or meat (previously cut into small pieces). Do not use the chopper for blending liquids (fruit juices, etc.). - With the mill (L) you can grind in a few seconds spices: cinnamon, pepper, etc. - The accessories have a lid (M) that prevents access during use.
- Turn the lid (M) counterclockwise and add the ingredients.
- Insert the blade block (K1 or L1) into the bowl with blades (K2 or L2) (see fig. 13). Insert the blade block into the bowl. Lock the accessory by turning the blade block clockwise until it clicks into place (see fig. 14). Warning: If the accessory is not fixed correctly, liquids may leak.
- Place the assembled accessory (K or L) on the motor block and turn it.
- Then check that the accessory (K or L) is fixed by turning it counterclockwise (see fig. 15).
- Plug in the device and turn the speed switch (E) to the desired position or make a few pulses. To stop the device, turn the speed switch (E) to the "0" position.
- Disassemble the accessory by turning it counterclockwise. Remove the assembled accessory (K+M or L+M) from the motor block. Before opening it, turn it over so that the prepared mixture does not fall on the floor. Then you can disassemble the blade block (K1 or L1). The blades are sharp: handle them carefully to avoid injury. Then you can remove the prepared mixture from the bowl.
Before using the accessories for chopping or mixing solid ingredients (for example, solid fruits, vegetables, sugar), you can select the desired speed only after switching on.
RECOMMENDATIONS
Depending on the type of ingredients, you can use the blender bowl for preparing 1.5 liters of pureed soups, 1.25 liters of liquid mixtures.
Precaution: Do not pour liquids hotter than 80°C into the bowl.
- You can prepare one-pot soups, cream soups, compotes, light dough (for pancakes, fritters, muffins, etc.), milkshakes and fruit cocktails, smoothies, etc. If products stick to the walls of the bowl during blending, stop the appliance. Remove the blender bowl from the motor unit and scrape off the products with a spatula. Place the blender bowl back on the motor unit and continue blending. To achieve the best result, add liquid ingredients first, then solid products, without exceeding the maximum permissible level.
- To remove products from the blades, remove the lid (F6, O6) from the jug (F5, O5) and remove the products before pouring. For chopping any ingredients, cut them into small pieces (approx. 25x25x25 mm) and use the "Chopping" function. Do not need to add water. Always use the blender with the lid and the cap closed. Never insert hands into the bowl while it is installed on the base. If you need to move it down, use the appropriate tool, for example a spatula.
RECIPES
Cold Carrot Soup
600 g carrots + 900 g water: Pour water into the blender bowl and add carrot pieces; blend at maximum speed for 3 minutes.
CLEANING
Do not immerse the appliance in water. Never place the motor unit (A) under running water.
After use, always clean the bowl. - Pour 1 liter of warm water into the bowl along with 2-3 drops of dishwashing liquid. Use only the recommended amount of water and dishwashing liquid. Excess dishwashing liquid creates more foam and may cause overflow. Use the automatic cleaning program for preliminary cleaning of the bowl. - When the program finishes, turn off the appliance and unplug it. Remove the blender bowl (F4, O4). - Place the bowl on a flat surface. - Remove the lid and carefully take it off. - Remove the blade unit, the sealing ring (F1 + F2 + F3 / O1 + O2 + O3) and rinse them under running water (Fig. 10).


UK
- Remember, 10 minutes after cleaning, correctly reinstall the sealing ring (F3, O3) back into the blade unit (F1, O1) (Fig. 17). Install it carefully to avoid contact of the sealing ring with the blades.
- The bowl (F4, O4), the blade unit without the sealing ring (F1) and the sealing ring (F2, O2) can be washed on the top rack of the dishwasher in the ECO or LOW SALT program.
- Disassemble the blades (F4, O4), the blade block with titanium coating (F1), and the support rings (F2, O2) before washing in the dishwasher. Do not place blades with titanium coating (O1) in the dishwasher.
- Wipe the motor unit with a damp cloth.
- Be careful when handling the blades in the blender bowl and when emptying the bowl, as they are very sharp.
- Clean the motor block (A) with a damp cloth. Dry thoroughly. Removable parts (lid, blade block, support rings) can be cleaned with a sponge and mild detergent.
Blender and chopper attachments (depending on model)
- Wash all parts (F, J, K, L, M, O) in warm water with detergent, except the motor block (A), which must never be immersed in water or placed under running water (see section "Cleaning").
WARNING! Blades are very sharp. Handle with care during use and cleaning of the appliance.
- When installing, removing, and cleaning the container (F4), handle it with care. Do not drop it.
- Before using the appliance, read the instructions.
- Materials removed.
- Important: Turn the adjustment knob (E) to position ① before placing the blender jug (F, O) onto the motor block (A). Make sure that during use, the opening on the attachment (A) on the motor block does not become clogged with food or other substances.
- The appliance will only operate if the jug is correctly placed on the motor block.
- Do not use the device if the lid is not installed in place.
ASSEMBLY AND INSTALLATION OF THE JUG
Install the seal (F3, O3) (inserted into the blade block (F1, O1)).
- Make sure the seal is correctly positioned in the blade block. -Place the blade block on the side ring (Fig.1, Fig.7). -Turn the jug over and place the blade block with the retaining ring on the base.
- Make sure the retaining ring is correctly locked: the two arrows must coincide (Fig. 3, Fig. 9). -Place the ingredients inside the assembled jug, not exceeding the indicated maximum level:
- 1.5 cups for thick mixtures
- 1.25 L for liquid mixtures
Warning. Do not pour boiling liquid (temperature above 80°C) into the jug.
Close the jug with the lid (F5, O5). To avoid splashing during preparation, make sure the lid spout is aligned with the spout and handle (Fig.6, Fig.12). Place the measuring cup (F6, O6) in the recess provided for it in the lid (Fig.5, Fig.11). Install the jug on the motor block and turn it a quarter turn clockwise (Fig.4 and 10).
FIRST USE OF THE DEVICE
-After the jug is correctly locked on the motor block, connect the device to the mains. The indicator will flash twice and a beep will be heard. Turn on the device by selecting the desired function. - Speed selection. Turn the control knob (E) to select the desired operating speed. The speed increases gradually from min (minimum) to max (maximum). The higher the speed, the brighter the indicator. If necessary, the speed can be changed during preparation. - Pulse function. Turn the control knob (E) to the Pulse position. Using successive pulses allows more precise control of the preparation process. In this mode, the device starts working at maximum speed immediately. The device stops as soon as the knob is released. The pulse function has a light indicator. - Smoothie function.
This function is used for preparing milk mixtures and fruit cocktails. In this mode, the operating speed of the device is pre-programmed for optimal results. To activate this function, press the Smoothie button (B). The indicator lights up throughout the entire operating cycle and goes out after completion. After the program finishes, the device stops automatically. To stop the program before it ends, set the control knob (E) to position 0.
The chopping function can be used for fine chopping with preset operating cycles and speeds. To activate this function, press the Chop button (C). The indicator lights up during the entire operating cycle and goes out after completion. To stop the program before it finishes, set the control knob (E) to position 0. - Automatic cleaning function. This function is used for automatic cleaning of the appliance. Press the Automatic Cleaning button (D). The amount of hot water should not exceed 1 liter, and its temperature should not exceed 80 °C. After the program finishes, the appliance stops automatically and emits 4 audible signals. - OVERLOAD PROTECTION. If the load becomes too high, the appliance automatically switches off
for safety reasons (if the motor runs for more than 3 minutes or too many ingredients are used). To reset the appliance, turn the speed control knob to position ①. The cooling time of the appliance can be up to 30 minutes. Before resetting the appliance, adjust the amount of ingredients and the mixing time to avoid overload. Then you can select the desired operating speed or function to complete the preparation.
WARNING. Do not use the Puree, Chop, and Automatic Cleaning functions with any additional accessories. Only glass jugs can be used for these programs. Do not chop ice using any additional accessories.
- Using the herb chopper (K) and the spice grinder (L) (depending on the model)
- - The herb chopper (K) allows you to finely chop ingredients such as onions, garlic, or meat (pre-cut into small pieces) in a few seconds. Do not use the herb chopper for liquids (fruit juices, etc.). - The spice grinder (L) allows you to grind spices such as cumin, coriander, pepper, etc. in a few seconds. - These accessories are equipped with a lid (M) that prevents access to the blades during operation.
1. Turn the lid (M) upside down and add the ingredients. 2. Install the seal (K1 or L1) in the recess on the blade unit (K2 or L2) (Fig. 13). Place the blade unit on the base. Turn the blade unit until it locks securely in place (Fig. 14). Caution! Incorrect locking may cause leaks. 3. Place the assembled unit (K or L) on the motor base. 4. Then turn the assembled unit (K or L) a quarter turn clockwise (Fig. 15). 5. Plug in the appliance and turn the speed control knob (E) to the lowest position. Use the pulse function several times if needed. To stop the appliance, turn the speed control knob (E) to the zero position. 6. Unlock the unit by turning it a quarter turn counterclockwise. Remove the assembled unit (K+M or L+M) from the motor base. Before opening the unit, turn it over to avoid spilling the prepared product. After that
You can now unplug the blender jar (K1 or L1). The blades are sharp; to avoid injury, handle with care. You can now remove the prepared product from the jar.
Warning. Do not use this accessory for processing liquids or overly hard substances (e.g., hard cheese, sugar, etc.). Liquid ingredients can only be poured into glass jugs.
Tips
Depending on the composition of the ingredients, you can use the blender jar for preparation: *up to 1.5 L for thick mixtures; *up to 1.25 L for liquid mixtures.
Warning. Do not pour boiling liquid (with temperature above 80°C) into the jug.
- You can prepare light creamy soups, pureed soups, compotes, light dough (for pancakes, fritters, Yorkshire pudding, etc.), milk mixtures, mousses, cocktails, etc.
- If during mixing the ingredients stick to the walls of the jug, stop the appliance. Remove the blender jug from the motor unit, scrape off the ingredients with a spatula, then place the jug back and continue mixing. Always pour liquid ingredients into the blender jug first, then add solid ones, without exceeding the maximum level.
- To add ingredients during mixing, remove the cap (F6, O6) from the lid (F5, O5) and add ingredients through the opening. For crushing, place no more than a few small cubes (25x25x25 mm maximum) and use the "Crush" function. Do not add water. Always use the blender with the lid on to prevent splashing, as indicated in the instructions. Never put your hand into the bowl while it is on the base of the appliance. If you need to push the ingredients down, use a suitable accessory, such as a spatula.
Recipes
Cold carrot soup:
600 g carrots + 900 ml water: Pour water into the blender jar and place the chopped carrots. Blend at maximum speed for 3 minutes.
Cleaning
Do not immerse the appliance in water. Never immerse the motor unit (A) in running water.
- Rinse the jug immediately after use.
- Pour 1 liter of warm water into the jug and add 2-3 drops of dishwashing liquid. Use only the recommended amount of water and dishwashing liquid. Excessive dishwashing liquid creates a lot of foam and may cause overflow. For a thorough cleaning of the bowl, use the automatic cleaning program.
- After completing the work, disconnect the device from the power supply.
- Remove the blender jug (F4, O4). Place the jug on a flat surface.
- Disassemble the lid and carefully remove it.
- Remove the blade block with the locking ring and seal (F1 + F2 + F3 / O1 + O2 + O3) and rinse under running water (Fig. 10).
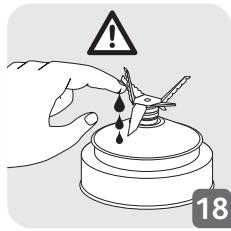
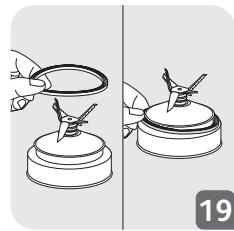
- After this, do not forget to correctly install the seal (F3, O3) on the blade block (F1, O1) (Fig. 17). To avoid damage to the seal, make sure that it does not touch the blades. The jug (F4, O4), the blade block without the protective cover (F1), and the locking ring (F2, O2) can be washed on the top rack of the dishwasher — use the “ECO” or “LOW SALT CONTENT” program.
Attention! The jug (F4, O4), the blade block without the protective cover (F1), and the locking ring (F2, O2) must be disassembled and placed in the dishwasher completely. Do not place the blade block with the protective cover (O1) in the dishwasher. - Wash the jug and lid under running water. - The blades are sharp, so be careful when cleaning them in the blender jug and when emptying the jug. For cleaning the motor block (A), use a damp cloth. Then carefully wipe it dry. Removable parts (lid, blade block, locking ring) can be washed with a sponge and hot soapy water.
WHAT TO DO IF THE DEVICE DOES NOT WORK
DEVICE DOES NOT WORK?
Contact an authorized service center (see the address in the service booklet).
TROUBLESHOOTING GUIDE
Troubleshooting: If the device does not work, check the following points. If the problem persists, contact an authorized service center.
DISPOSAL
A Motor block B “Pulse” button C “Mixing” button D “Auto-clean” button E Control panel F/O Blade unit
F1/O1 Blade block F2/O2 Locking ring F3/O3 Seal F4/O4 Blender jug
F5 / O5 Lid
G E h a3 XbIДamDblK EHKENXbINdAmdbIK I Nmnybc TyMecci J Kanak*ynlire baimaHbictbl 6oNaTbIH KocanKbI Kypan)
K Wen Tpyaftiw* (yrrire
baIaHbICTbI bONaTbIH
KocanKbI KypaJ)
K1TbIfb3dafbliW
K2 Wen TpyaftbIHTbIH Kx3dep 6norbl
L Dəmdeyiustep ykkiwi* (yIrrire 6aIIaHbICTbl 60laTbIH KocalkbI kypan)
L1TbIfbl3afoblu
L2ДamdeyiItep ykkiiinH kyy3dep 6Jorbl
M Wen TpyaftbIHTbIH XaHE
dEmdeiyiTep ykkiiInH
Ta6afti*ynrire 6auihbcTbl
60JIaTbIH KocajIkbi KypaJI)
BIPIHUI PETIADAIAHY AIDbIHDA
- Remove the 6 filter elements (F, J, K, L, M, O) that have been used. To do this, open the drain plug and drain the oil into a suitable container. Then install the new filter elements (A) and tighten them (see "Draining" section).
CAUTION: The engine may be hot; be careful when removing the drain plug or draining to avoid burns.
- When draining, remove the drain plug (F4) and let the oil drain completely. Do not reinstall the plug until the oil has fully drained.
Before removing the drain plug, place a suitable container underneath. - To drain: Remove the oil filler cap (F, O) from the engine (A) and turn the drain valve (E) counterclockwise. - During draining, check the engine oil for metal particles or other contaminants. If the oil contains metal particles, do not reuse it. If it is contaminated, do not reuse it.
REPLACING THE OIL FILTER
Remove the oil filter (F3, O3) using an oil filter wrench (F1, O1) (if equipped).
Clean the oil filter mounting surface. - Apply a thin coat of clean oil to the gasket of the new filter (1-3, 7-9). Screw on the new filter by hand until the gasket contacts the mounting surface, then tighten it an additional 3/4 to 1 turn (3-9, 9-9). Do not overtighten. Add the recommended amount of oil: * 1.5 L for standard viscosity * 1.25 L for low viscosity
Note: The oil capacity is approximately 80°C/176°F when hot.
- Install the oil filler cap (F5, O5) and tighten it. During operation, check for oil leaks around the cap and gasket (6-12, 12-12). Check the oil level (F6, O6) with the dipstick (5-11, 11-11). After adding oil, run the engine for a few minutes, then check the oil level again (4-10, 10-10).
REPLACING THE AIR FILTER
After the engine has cooled, remove the air filter cover. The air filter should be replaced every 2 years or 20,000 km, whichever comes first. Install the new filter and secure the cover.
- Checking the air filter: Remove the air filter element (E) and inspect it. If it is dirty or clogged, replace it. If it is only slightly dusty, clean it with compressed air. Do not wash it. The "Impulse" function: Press the "Impulse" button (E) to activate the cleaning cycle. The impulse cycle will run for a few seconds. If the filter is heavily clogged, repeat the cycle. The indicator light will illuminate when the filter needs cleaning.
This function is designed for defrosting frozen food. It can be used as an initial stage before cooking. To activate this function, press the "Defrost" button (B). During this program, the device will beep when it is time to add food. The program stops automatically. You can stop it manually at any time by pressing the control button (E).
• "Defrost" function: This function is used for the initial defrosting of frozen food. To activate it, press the "Defrost" button (C). During this program, the device will beep when it is time to add food. The program stops automatically, but you can stop it manually at any time by pressing the control button (E). • "Auto Cook" function: This function is used for automatic cooking. Press the "Auto Cook" button (D). Do not exceed the maximum temperature of 80°C / 176°F. At the end of the program, the device will stop automatically and beep 4 times. - CAUTION: If the food is too hot, the device will stop automatically for safety reasons.
(If the motor runs for more than 3 minutes without food or if the ingredients are missing). To add ingredients, press the control button ①. You can change the water level at any time, and it is possible to do so within 30 minutes. To avoid excess heat when adding ingredients, change the water level or the ingredients' preparation time. After that, you can continue with the preparation.
CAUTION: The Defrost, Defrost, and Auto Cook functions cannot be used together with the accessories. - These programs are only for the main oven. Do not use the defrost function with the accessories. - The steam tube (K) and the water tank (L) are used for the steam function.
- The steam tube (K) can be used to cut solid ingredients (such as vegetables, meat, or fish) into pieces for a few seconds. Do not use the steam tube for liquids (such as soups, etc.). - The water tank (L) can be used to add water for a few seconds: for spices, herbs, etc. - During the use of these accessories, be careful not to touch the hot surfaces (M).
- Remove the tray (M) and add the ingredients.
- If the eyes (K1 or L1) are blocked, clean them (K2 or L2) (Fig. 13). Clean the tray with a damp cloth. If the tray is heavily soiled, clean it with a soft brush (Fig. 14). Note: If the accessory is not clean, it may cause unpleasant odors.
- Insert the supplied brush into the motor block (K or L) and clean it.
- Insert the supplied brush into the motor block (K or L) and clean it thoroughly (15-fig.).
- Insert the plug into the socket, turn the control knob (E) to the desired position or press the pulse button. To switch off, turn the control knob (E) to the off position.
- To clean the filter thoroughly, remove the filter. Insert the supplied brush (K+M or L+M) into the motor block. To remove stubborn dirt, run the appliance briefly. Then you can remove the filter (K1 or L1) and clean it. The filters are washable: for thorough cleaning, they can be washed under running water. Then you can remove the stubborn dirt from the tobacco.
Caution: The filters must not be placed in the dishwasher or cleaned with aggressive cleaning agents (e.g., solvents, abrasive cleaners). Only use the brush for cleaning.
RECIPES
- To prepare the ingredients, use the blender cup as follows:
- 1.5 liters of thick mixtures.
- 1.25 liters of liquid mixtures.
Caution: Do not pour hot liquids (above 80°C/176°F) into the cup.
To prepare solid ingredients, liquid ingredients, compotes, sour cream (kumis, kefir, etc.), yogurt, mousse, cocktails, etc. - During operation, do not add ingredients with a spoon. If the blender motor is blocked, turn it off immediately to prevent damage and prepare for cleaning. When adding ingredients, add liquid ingredients through the opening in the lid at the highest speed. - To add ingredients during operation, remove the lid (F6, O6) and add ingredients through the opening. - If you need to add ice, use the "ice crush" function: add ice cubes no larger than 25x25x25 mm. Add water if necessary.
- Binder... - Kerset... - Unlesimli Kralim T... - Herizlbokturfanda OFAN KOLBI...
RECENT
Your blender:
600 g of cottage cheese and 900 ml of water: Add water to the blender, add the cottage cheese pieces. Blend at the highest speed for 3 minutes.
CLEANING
Do not immerse the housing in water. Do not place the motor block (A) under running water.
Clean the blender immediately after use. Fill the blender with 1 liter of warm water and add 2-3 drops of dishwashing liquid. Run the blender. Then rinse with clean water. Excess dishwashing liquid may damage the seals. - For automatic cleaning, use the "Auto Clean" program. - After the program stops, unplug the blender. - Remove the blender from the base (F4, O4) and rinse under running water. Remove the lid and gasket. - Clean the blades (F1 + F2 + F3 / O1 + O2 + O3) under running water (Fig. 10).
Do not use abrasive sponges (F3, O3) to clean the filter (F1, O1). Do not close the filter drain hole. The drain (F4, O4), the filter (F1), and the salt container (F2, O2) must be cleaned when the high-pressure washing machine displays the indicator "ECO (YHEMdl)" or "LOW SALT (T¥3 A3)". - Maintenance: The drain (F4, O4), the filter (F1), and the salt container (F2, O2) must be checked and cleaned when the high-pressure washing machine requires it. Do not put filters with a drain hole (O1) into the high-pressure washing machine. Do not pour water into the drain hole. - When cleaning the filters and the drain, be careful not to damage them. - To clean the motor block (A), use a dry cloth. Do not use water. - The removable parts (lid, filters, salt container) can be cleaned with warm water and mild detergent.
The drain hose must be connected or disconnected as required.
| MÖCENELEP | CEBENTEP | ÜEWIMDEP |
| Курьлфы куmbic ICTeMeiDi | Asha Косылмаган | Курьлфынсы Керneyi Курьлфынсы 3ayытсы Таңийшасыдд Керсетілгенmen Бир ded розткага Ксьынсы. |
| Бlendeр Кульпасы MOTOP Блогында дурьс орнахтулмаган | Бlendeр Кульпасы napakшада Тусіндіріндан MOTOP Блогында дурьс орнахтулмаган Tekceperiіз. |


- DESCRIPTION
- BEFORE THE FIRST USE
- ASSEMBLING AND FITTING THE JUG
- USING YOUR BLENDER
- USING THE HERB CHOPPER (K) AND SPICE GRINDER (L) (DEPENDING ON MODEL)
- ADVICE
- RECIPE
- COLD CARROT SOUP
- CLEANING
- YOUR APPLIANCE STILL DOES NOT WORK
- THEREFORE, THE AREA OF TRIANGLE OBC IS 1/2 * OB * BC = 1/2 * CD
- OJZALJGLJDS
- INSTRUCTIONS AND SAFETY
- PRECAUTIONS FOR USE
- WARNING: THE BLADE IS VERY SHARP! WHEN USING OR CLEANING THE DEVICE, HANDLE IT WITH GREAT CARE
- MPAHNRA BCTAHOBJIEHH YASSI
- IPEPIE BVKOPNCTAHN IPIPINAY
- RECOMMENDATIONS
- PRECAUTION: DO NOT POUR LIQUIDS HOTTER THAN 80°C INTO THE BOWL
- RECIPES
- ASSEMBLY AND INSTALLATION OF THE JUG
- FIRST USE OF THE DEVICE
- TIPS
- DEVICE DOES NOT WORK
- TROUBLESHOOTING GUIDE
- DISPOSAL
- BIPIHUI PETIADAIAHY AIDBIHDA
- CAUTION: THE ENGINE MAY BE HOT; BE CAREFUL WHEN REMOVING THE DRAIN PLUG OR DRAINING TO AVOID BURNS
- REPLACING THE OIL FILTER
- REPLACING THE AIR FILTER
- RECENT
- YOUR BLENDER
Brand : MOULINEX
Model : LM871D
Category : Blender