BRANDTFOURBFH3412X - Oven MAE DARRY - Free user manual and instructions
Find the device manual for free BRANDTFOURBFH3412X MAE DARRY in PDF.
User questions about BRANDTFOURBFH3412X MAE DARRY
0 question about this device. Answer the ones you know or ask your own.
Ask a new question about this device
Download the instructions for your Oven in PDF format for free! Find your manual BRANDTFOURBFH3412X - MAE DARRY and take your electronic device back in hand. On this page are published all the documents necessary for the use of your device. BRANDTFOURBFH3412X by MAE DARRY.
USER MANUAL BRANDTFOURBFH3412X MAE DARRY
Chere Cients, Cher Client
- Plat multi usages 45mm
- Plat multi usages 20mm
RELATIONS CONSOMMATEURS
Thank you for purchasing and placing your trust in a BRANDT product. We have designed and made this product with you, your lifestyle and your requirements in mind so that it meets your expectations. It comes packed with more than 60 years of expertise, innovative spirit and passion.
In a continuous effort to better satisfy your needs, our customer service department is available to listen and answer all your questions and receive any suggestions you may have.
Visit our website at www.brandt.com where you will find our latest innovations, as well as useful and complementary information.
BRANDT is pleased to be on hand to offer daily support and to help you make the most of your purchase.

BvCer.6011825
The "Origine France Garantie" label guarantees consumers the product traceability by providing them with a clear and objective indication of origin. BRANDT is proud to affix this label to the products made in our French plants based in Orléans and Vendôme.
https://brandt.com/

IMPORTANT:

Before switching your appliance on, please read this user guide carefully to familiarise yourself quickly with its operation.
Safety Instructions 4
installing your device 6
Choice of location and installation 6
Electrical connection 7
ENVIRONMENT 8
Environment 8
Description of your device 9
Presentation of the oven 9
Display and control keys 9
Accessories 10
Using your device 11
Settings 11
Settings menu 11
Cooking methods 13
Starting a cooking 14
The Culinary Guide function 16
The Steam Guide function 17
Caring for your device 18
Interior - exterior cleaning 20
Anomalies and solutions 22
After-sales service 23
COOKING AID 24
Cooking tables 24
Function tests 26
IMPORTANT - READ CAREFULLY AND RETAIN FOR FUTURE USE. This user guide is available for download on the brand's website.
When you receive the appliance, unpack it or have it unpacked immediately. Check its general appearance. Make a note of any reservations on the delivery slip and keep a copy.

IMPORTANT:
This appliance may be used by children aged 8 years and older, and by persons with impaired physical sensorial or mental capacities, or without experience or knowledge, if they are supervised or have received prior instructions on how to use the appliance safely and have understood the risks involved. Children must not be allowed to play with the appliance. Cleaning and maintenance operations must not be carried out by children without supervision.
- Children must be supervised to prevent them from playing with the appliance.

WARNING:
The appliance and its acces
sible parts become hot during use. Be careful not to touch the heating elements inside the oven. Children under 8 years old must not be allowed near it unless they are supervised at all times.
- This appliance is designed to cook with the door closed.
Before pyrolytic cleaning of your oven, remove all accessories and any thick deposits.
During cleaning, the surfaces may become warmer than under normal conditions of use. It is advisable to keep children away from the appliance.
— Do not use a steam cleaner. - Do not use abrasive cleaning products or hard metal scrapers for cleaning the oven's glass door, as they could scratch the surface and cause the glass to shatter.

WARNING :
Make sure the appliance is disconnected from the power before replacing the lamp in order to avoid the risk of electric shock. Change the lamp only when the appliance
has cooled down. To unscrew the view port and the light, use a rubber glove, which will make disassembly easier.

The electrical plug must re-accessible after installation.
- It must be possible to disconnect the appliance from the power supply, either using a plug or by fitting a switch on the fixed wiring system in accordance with installation rules.
If the power cable is damaged, it should be replaced by the manufacturer, its after-sales service department or by a similarly qualified person in order to avoid danger.
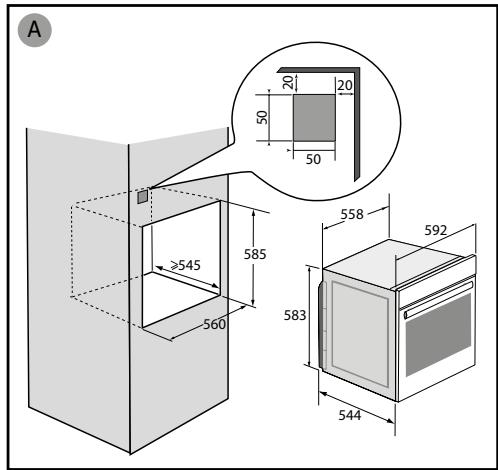
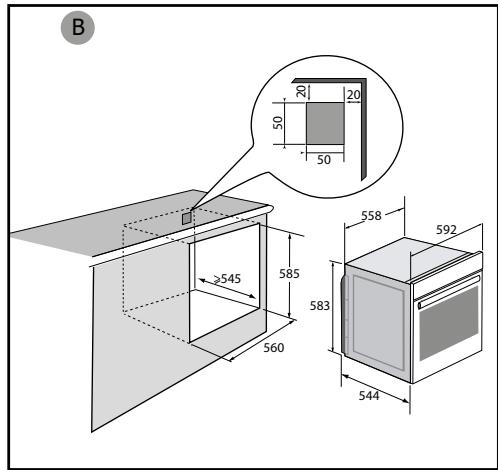
This appliance may be installed either under a worktop or in a cabinet column, as indicated on the installation diagram.
Centre the oven in the unit so as to ensure a minimum distance of 10mm between the appliance and the surrounding unit. The material of the unit supporting the appliance must be heat-resistant (or covered with a heat-resistant material). For greater stability, attach the oven to the unit with 2 screws through the holes provided on the side panels.
In order to avoid overheating,
the appliance must not be installed behind a decorative door..
This appliance is designed to be used for domestic and similar applications such as:
Kitchen areas for the staff of shops, offices and other professional premises; Farms; Use by clients of hotels, motels and other residential type establishments; guest house type environments.
The oven must be turned off when cleaning inside the oven.
Do not modify the characteristics of this appliance; doing so could be dangerous.
Do not use your oven as a larder or to store any items after use.
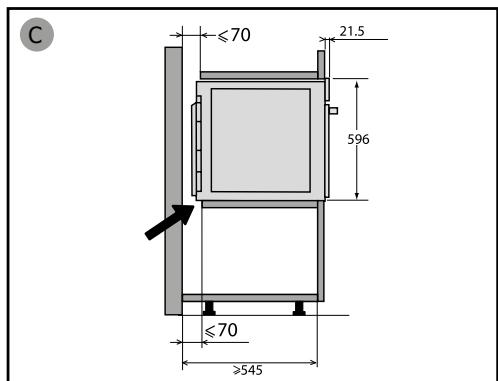
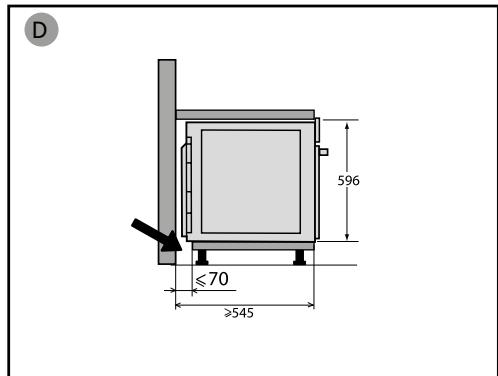
CHOICE OF LOCATION AND FITTING
The diagrams show the dimensions of a cabinet that will be able to hold your oven.
This appliance may be installed either under a worktop (A) or in a column (B). If the cabinet is open, its opening at the back must be 70 mm maximum.
Install the oven in the furniture. To do this, remove the rubber stops and pre-drill a 2-mm diameter hole in the wall of the furniture to avoid splitting the wood. Attach the oven with the two screws. Re-position the rubber stops.

Tip
To be certain that you have properly installed your appliance, do not hesitate to call on a household appliance specialist.

WARNING :
If the electrical installation in your residence requires any changes in order to hook up your appliance, contact a professional electrician. If the oven malfunctions in any way, unplug the appliance or remove the fuse corresponding to the sector where the oven is hooked up.
ELECTRICAL CONNECTION
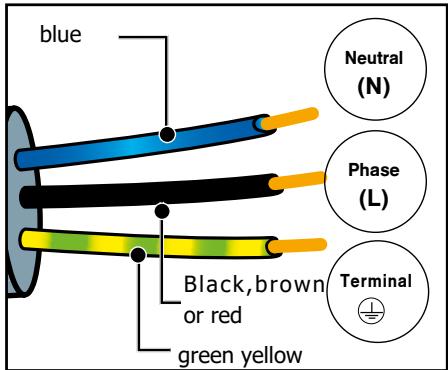
Your oven must be connected with a (standard) power cable with 3 conductors of 1.5mm2 (1 live + 1 neutral + earth) which must be connected to a 220 - 240V single-phase grid by means of a 1 live + 1 neutral + earth CEI 60083 standard power socket or via an all-poles cut-off device in compliance with the installation rules.
WARNING
The safety wire (green-yellow) is connected to the appliance's terminal and must be connected to the earth terminal of the electrical set-up.
The fuse in your set-up must be 16 amperes.
We cannot be held responsible for any accident resulting from inexistent, defective or incorrect earthing.
Prior to first use
Before using your oven for the first time, heat it with the door closed for about 15 minutes on the highest temperature. to break in the appliance. The mineral wool surrounding the oven cavity may initially give off a particular odour due to its composition. You may also notice smoke development. This is normal.
CARE FOR THE ENVIRONMENT
- This appliance's packing materials are recyclable. Please recycle them and help protect the environment by depositing them in municipal containers provided for this purpose.
- Your appliance also contains many recyclable materials. It is therefore marked with this logo to indicate that used appliances must not be mixed with other waste.

The appliance recycling organised by your manufacturer will therefore be conducted in optimum conditions, in accordance with European directive on electrical and electronic equipment waste.
Consult your local authority or your retailer to locate your nearest used appliance drop-off points.
- We thank you for your help in protecting the environment.
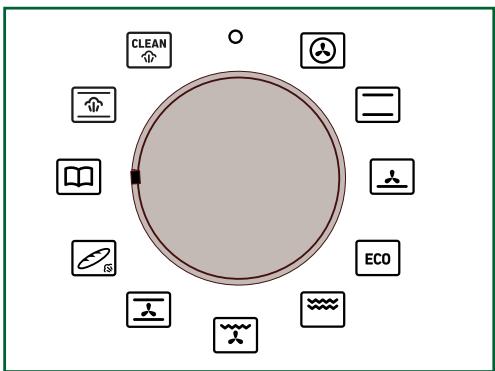
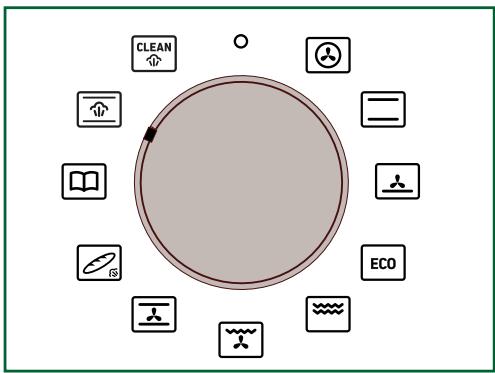
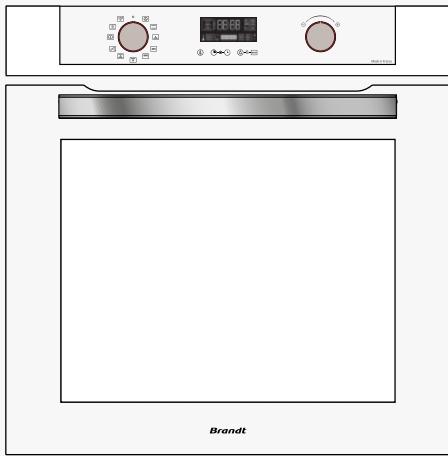
DESCRIPTION OF THE OVEN
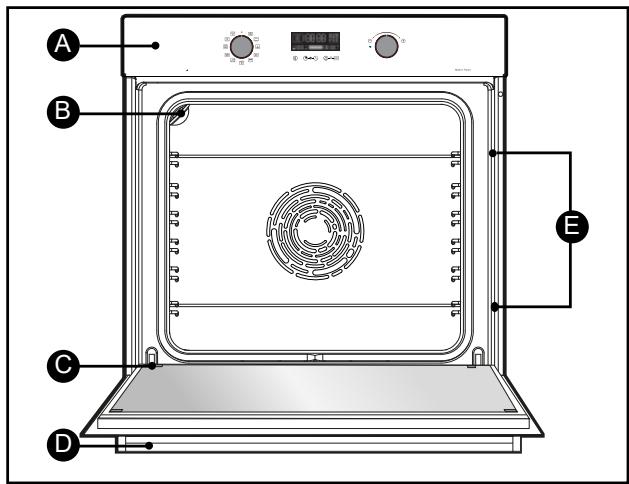
A Control panel
Light
Door
D Handle
E Shelf runners This oven has 6 positions for the accessories.
DISPLAY AND CONTROL BUTTONS
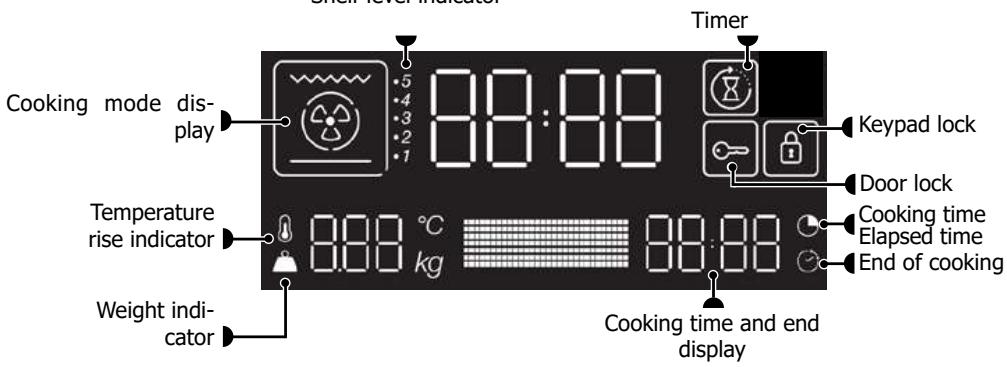
- Display
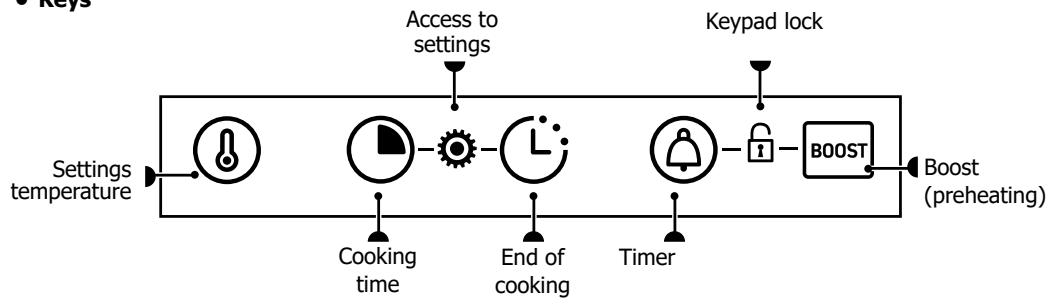
- Keys
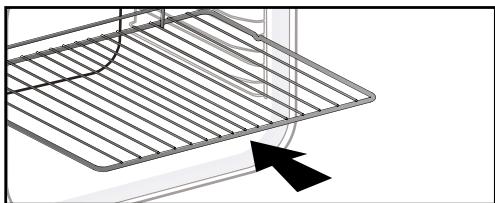
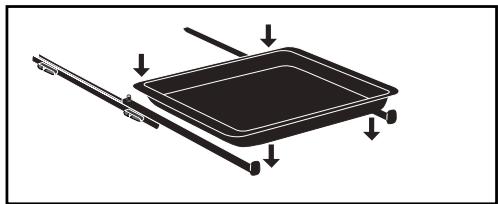
ACCESSORIES (depending on the model)
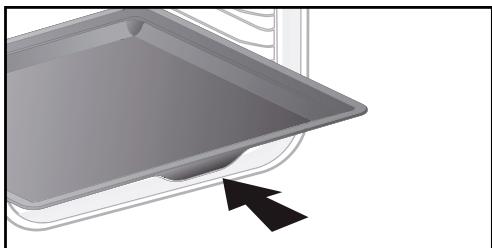
- Anti-tip safety rack
The rack can be used to support all dishes and moulds containing food for cooking or browning. It can be used for barbecues (to be placed directly on the grill).
Insert the anti-tip safety grill towards the back of the oven.
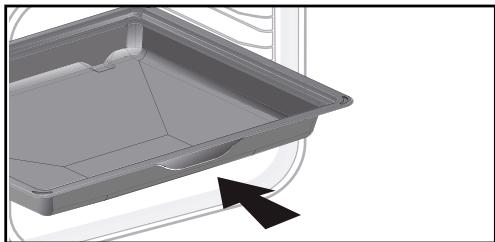
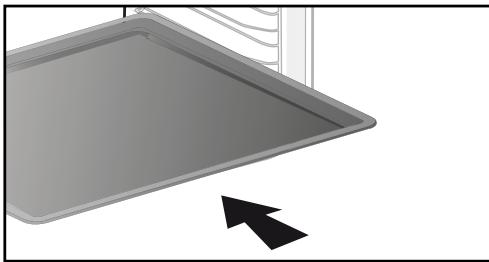
- 45 mm multi-purpose drip tray
To be inserted into the runners below the wire rack. It collects juice and fat from grilling, and can be used half-filled with water as a double-boiler.
20mm multi-purpose drip tray
Insert in the shelf runners with handle. it is ideal for baking cookies, shortbread and cupcakes. Its tilted surface makes it practical and easy to use. Can also be inserted into the runners under the rack to collect juice and fat from grilling.
- 8mm pastry dish
Insert in the shelf runners. Ideal for baking cookies, shortbread and cupcakes.
The tilted surface makes it easier for you to place your preparations on a dish. Can also be inserted into the runners under the rack to collect juice and fat from grilling.

Tip:
To avoid fumes when cooking fatty meats, we recommend you add a small amount of water or oil to the bottom of the 45mm multi-purpose drip tray.
ACCESSORIES (depending on the model)
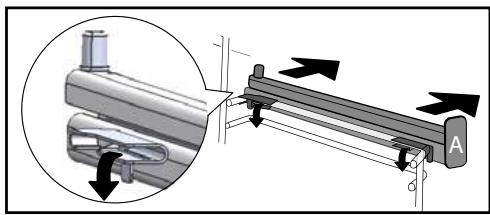
- Sliding rail system
The new sliding rail system makes food more practical and easier to handle as the trays can be effortlessly pulled for simpler handling. The trays can be completely removed, providing full access. Their stability ensures that food can be handled safely, reducing the risk of burns. This means that you can take food out of the oven far more easily.
INSTALLING AND REMOVING
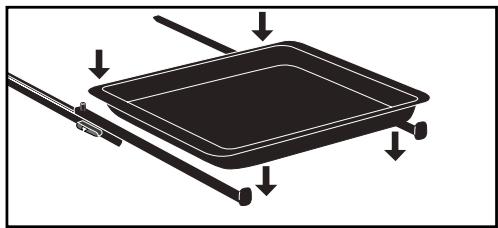
THE SLIDING RAILS (Depending on the model) After removing the 2 shelf runners, choose the height (2 to 5) at which you want to fit your rails. Snap the left rail against the left shelf runner by applying enough pressure to the front and back of the rail so that the 2 tabs on the side of the rail slot into the shelf runner. Do the same for the right-handrail.
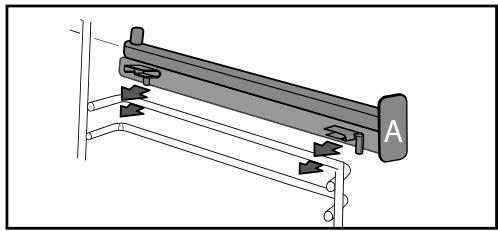
NOTE: the telescopic sliding part of the rail must unfold towards the front of the oven, with the buffer A opposite you.
Insert your 2 shelf runners and then put your tray on the 2 rails. The system is now ready to use.
To remove the rails, remove the shelf runners again. Slightly pris apart the bottom of the tabss fixed on each rail to release
SETTINGS
- Setting the clock

When switching on, the display flashes at 12:00.
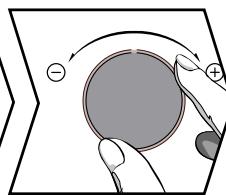
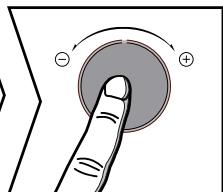
Set the clock with the + and - knob. Confirm by pressing the knob.
If there is a power cut, the clock flashes. Reset it as above.
- Changing the time
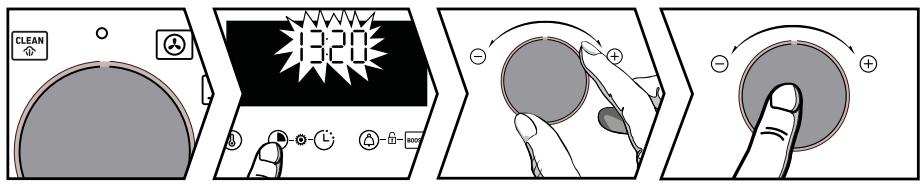
The function selector must always be in position 0.
Hold the key pressed until the time flashes.
Set the time with the + and - knob. Confirm by pressing the knob.
- Timer
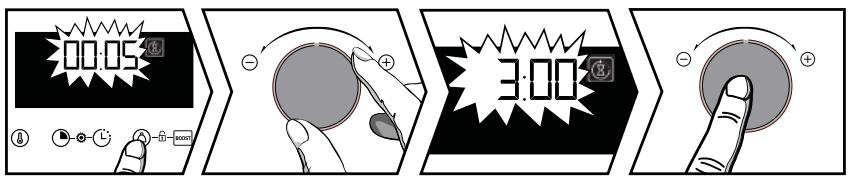
Press , the symbol appears. The timer flashes.
Set the timer with the + and - knob. Confirm by pressing the knob. The time displays once again and the timer starts to count down. Press the button to display the countdown. Once the time has lapsed, there is a sound signal. To stop it, press the knob.
Note: You can modify or cancel the minute minder at any time. To cancel or change the timer, press twice on the ⑧ key to go back to the timer menu and reset it, to cancel, set it to 00:00.
- Keypad lock (child safety device).
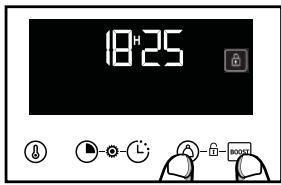
Press ④ and ① at the same time until the symbol 出 appears on the screen. To unlock, press ⑥ and ⑦ at the same time until the 出 symbol disappears off the screen.

SETTINGSMENU
Press 念 and 念 at the same time until "MENU" appears on the screen. Scroll through the different menus by using the + / - knob (see table). Validate your selection by pressing the + / - knob. Use the + and - knob to select OFF or ON, then confirm your choice by pressing the + / - knob.
To exit the "MENU", press any key.
| 1-Lamp | AUTO: In cooking mode, the light inside the oven automatically turns itself off after 90 seconds. ON: In cooking mode, the light stays on all the time, except in ECO mode. |
| 2-Sound | ON: Activate OFF: Deactivate the beeping sound of the buttons |
| 3-Demo | Activate/de-activate demonstration mode |
| 4-Languages | Language selection: FR, GB, SP, PL, CZ Internationales Languages |
| 5-Code | Information After Sales |
COOKING MODES
Manual functions:

CHALEUR TOURNANTE
Température mini 35^ maxi 250^
Recommended for meat, fish and vegetables, preferably placed in an earthenware dish.

CONVENTIONAL
Min. temperature 35^ max. 275^
Recommendation: 200^ C
This cooking method is not compatible with cooking in a bain-marie.
Recommended for slow, gentle cooking: rich game, etc. For retaining the juices in red meat roasts. For simmering in a covered casserole, dishes that were started on the hob (coq au vin, stew).

PULSED BOTTOM
Min. temperature 75^ , max. 250^
Recommendation: 180^ C
Recommended for moist dishes (quiches, tarts with juicy fruits, etc.). The pastry will be thoroughly cooked on the bottom. Recommended for recipes which rise (cake, brioche, kugelhopf, etc.) and for soufflés which will not be stopped by a crust on the top.
ECO
ECO*
Min. temperature 35^ max. 275^
Recommendation: 200^ C
This cooking method is not compatible with cooking in a bain-marie.
This setting saves energy while maintaining the quality of the cooking.
All types of cooking are done without preheating.

FULL GRILL
Positions 1 to 4
Recommendation: Position 4
Recommended for toast, gratin dishes, browning crème brûlée, etc.

PULSED GRILL
Min. temperature 100^ , max. 250^
Recommendation: 200^ C
Roasts and poultry are juicy and crisp all over.
Slide the 45 mm multi-purpose drip tray in the bottom shelf runners.
Recommended for all spit-roasted poultry or meat, for sealing and thoroughly cooking a leg or a rib of
To keep fish steaks moist. BREAD
Min. temperature 35^ max. 220^
Recommendation: 205^
Recommended cooking sequence for
bread. Remember to place a
ramekin with water on the bottom of the oven to obtain
a crisp, golden crust.

THE "COOKING GUIDE" FUNCTION
The "Cooking guide" function selects the appropriate cooking parameters according to the food to be prepared, its weight and the type of dish.

THE "STEAM GUIDE" FUNCTION
Select the "Steam Guide" function
The oven then suggests different food categories:
Chicken, large fish and roasts (veal, pork).
STARTING A COOKING PROGRAMME
- Starting a cooking programme immediately

The programmer must only display the time. It should not be flashing.
Turn the function selector to any position. Cooking starts.
For manual functions:
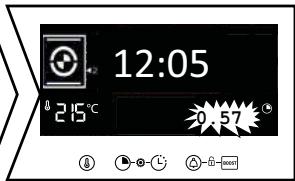
The temperature starts to increase at once. Your oven suggests a temperature, which can be modified. The oven heats up and the temperature indicator flashes. A series of beeps sounds when the oven has reached the programmed temperature. You can place your dish in the oven.
- Changing the temperature

Press the ⑧ button, the temperature flashes. Set the temperature with the + and - knob. Confirm by pressing the knob.
- Using the Boost mode (preheating)
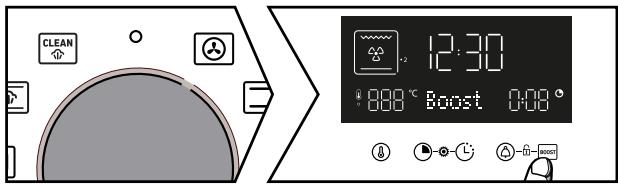
Press the Boost key for quick temperature rise. The temperature indicator flashes, and a series of beeps sound when the oven has reached the set temperature.
- Changing the cooking time

Press. Your oven suggests a cooking time, which can be modified. Set the cooking time with the + and - knob. Confirm by pressing the knob.

"Smart Assist" system
Your oven has the "Smart Assist" function which, when programming a cooking time, will suggest a cooking time which can be modified depending on the selected cooking mode (see table).
If you change the time, confirm by pressing the control knob. The time starts to count down immediately.
| COOKING FUNCTIONS | COOKING TIME |
| 30 min | |
| 30 min | |
| 30 min | |
| ECO | 30 min |
| 7 min | |
| 7 min | |
| 15 min | |
| 30 min |
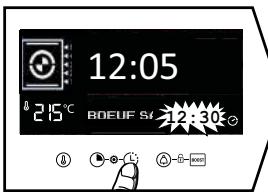
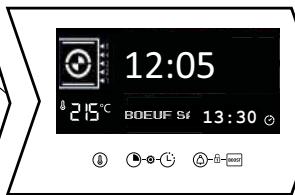
- Changing the cooking end time
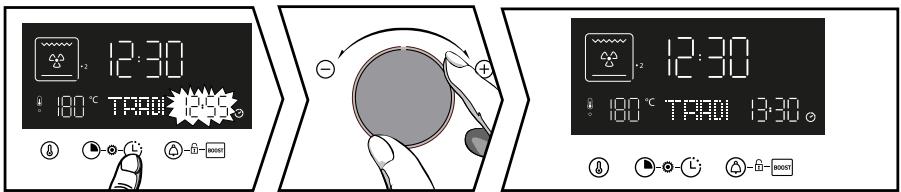
After setting the cooking time, press the key, the cooking end time flashes.
Set the new cooking end time with the + and - knob. Confirm by pressing the knob. The cooking end time display stops flashing.
Your oven will start cooking later on to finish cooking at the chosen time.
Note: This function is not available with the Grill setting.

THE "COOKING GUIDE" FUNCTION
The "Cooking guide" function selects the appropriate cooking parameters according to the food to be prepared, its weight and the type of dish.
r1: Beef medium
r2: Beef well done
r3: Beef rare
r4: Potato gratin
r5: Jacket potatoes
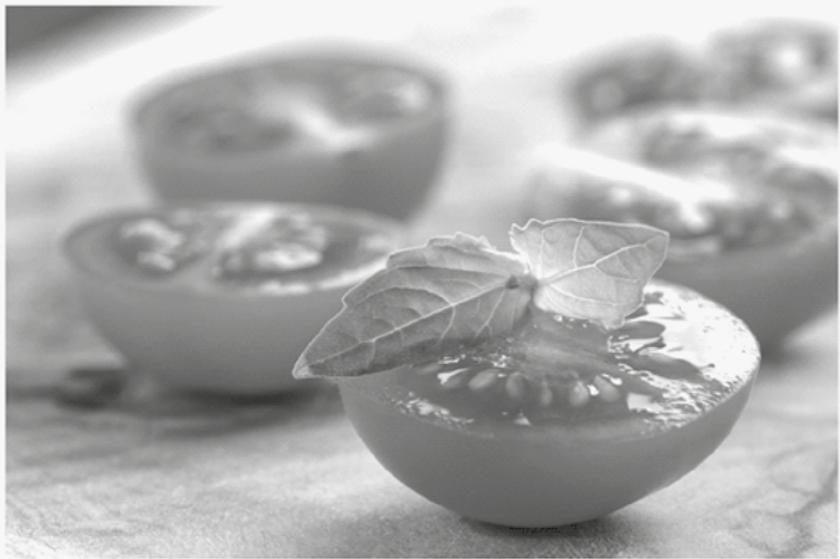
r6: Stuffed tomatoes
r7: Vegetable flans
r8: Pizza
r9: Quiche
r10: Lasagne
r11: Fruit tart
r12: Cookies*
*for these dishes, the oven must be preheated. Place your dish in the over after the preheat beep.
Turn the function selector to "Cooking Guide". You must select a pre-programmed recipe with the + and - knob. Confirm by pressing the + and - knob.
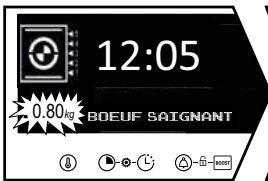
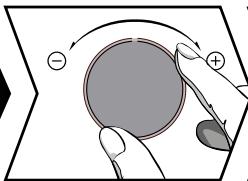
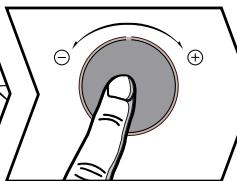
Depending on your dish, a suggested weight flashes. Enter the actual weight of the dish with the + and - knob, then confirm by pressing the knob. The ideal cooking time is displayed, it is calculated automatically. The oven recommends the height of the shelf on which you should place the dish. Place your dish in the oven on the recommended shelf level (from 1 at the bottom to 6 at the top). The oven starts.
- Changing the cooking end time
- Press the key to set the desired cooking end time.
Set the new cooking end time with the + and - knob. Confirm by pressing the knob. The cooking end time display stops flashing. The set cooking programme displays, your cooking will end at the selected time.

IMPORTANT
The delayed start function cannot be used for recipes which require pre-heating.

THE "STEAM GUIDE" FUNCTION
Select the "Steam Guide" function
The oven then suggests different food categories: Chicken, Large Fish and Roasts (veal, pork).
| COMBINED FUNCTIONS TABLE AUTOMATIC WITH ADDED STEAM | ||
| Dishes | Food | Quantity of water to add |
| A Poultry | A1 Chicken | 500 ml warm water in the 45 mm multi-purpose drip tray |
| A2 Guinea fowl | ||
| A3 Duck | ||
| A4 Turkey | ||
| B Fish | B1 Large fish | |
| B2 Poisson's plats | ||
| B3 Smoil Fish | ||
| B4 Filets | ||
| C Roasts | C1 Veal | |
| C2 Pork | ||

Select your food category using the + and - knob, and confirm by pressing the knob. Then select your food using the + and - knob, and confirm by pressing the knob.
A weight flashes; enter the actual weight of the dish with the + and - knob, then confirm by pressing the knob
Place the 45 mm multi-purpose drip tray (with warm water) on the bottom shelf (level 1), and your dish on the level 3 shelf.
There is nothing else for you to set, the temperature and cooking time will be automatically calculated. If needed, set your cooking end time and confirm. Your cooking will start immediately.
- Changing the cooking end time

- Press the button to set the desired cooking end time.
Set the new cooking end time with the + and - knob. Confirm by pressing the knob. The cooking end time display stops flashing. The set cooking programme displays, your cooking will end at the selected time.

THE "STEAM GUIDE" FUNCTION
When steam cooking, condensation forms on the inside of the glass.
It is possible for water resulting from this condensation to be retained by the chute (^) . In this case, this water must be soaked up with a sponge after cooking to avoid building up. (^) The chute is underneath the door seal, at the bottom of the oven's frame.

Caring for and cleaning your appliance
CLEANING THE INNER AND OUTER SURFACES
- Steam cleaning of the cavity
Thanks to this function you will spend less time cleaning your oven, with an eco-responsible action. To do this, spray your cavity with 300ml of water and start the steam cleaning function by positioning the lever in the position n for a period of 35 min.
- Cleaning the outer surfaces
Use a window washing product applied to a soft cloth. Do not use abrasive creams or scouring sponges.
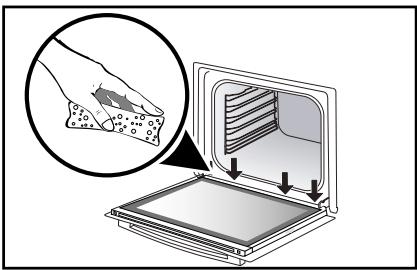
- Cleaning the oven door glass

IMPORTANT:
Do not use scouring products, abrasive sponges or metal scrapers to clean the glass oven door as this could scratch the surface and cause the glass to shatter.
Before doing this, remove any excess grease from the inside of the window with a soft cloth and washing up liquid. To clean the different inside glass panels, disassemble them as follows :
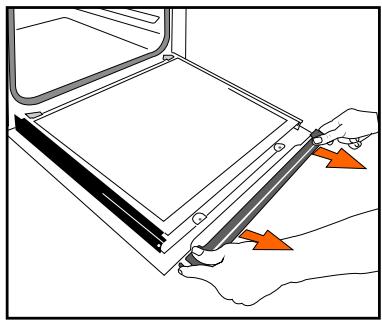
- Cleaning the oven door glass
Open the door fully and block it with the plastic wedge provided with your appliance.
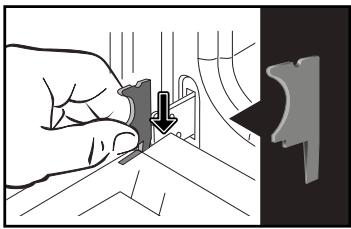
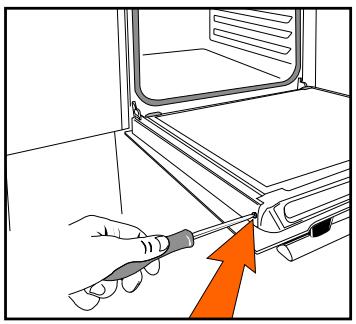
Unscrew the two screws on either side of the door mounts using a torx screwdriver (T20), then pull the rail out towards you.
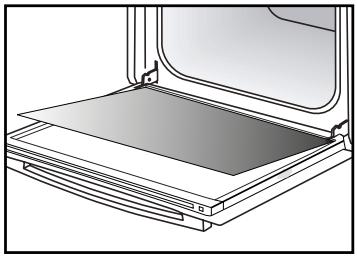
CLEANING THE INNER AND OUTER SURFACES
Remove the first glass panel.
Do not soak the glass panels in water. Rinse with clean water and dry off with a lint-free cloth.
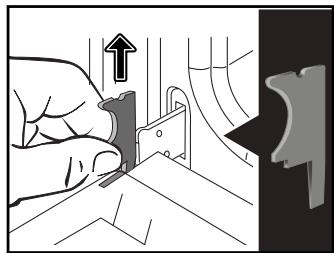
- Reassembling the oven door glass
After cleaning, reposition the glass panels. Insert the last glass panel into the stops, reposition the rail and screw it back in. Remove the plastic wedge before closing the door. Your appliance is now ready to use again.
- Replacing the light bulb

IMPORTANT:
Make sure the appliance is disconnected from the power before replacing the bulb in order to avoid the risk of electric shock. Change the lamp only when the appliance has cooled down.

Bulb details:
25 W, 220-240 V\~, 300^, G9 cap.
You can replace the bulb yourself. Unscrew the view port and remove the bulb (use a rubber glove, which will make it easier to remove). Insert the new bulb and replace the view port. This product contains a light source with energy rating G.
ANOMALIES AND SOLUTIONS
The oven is not heating.
Check that the oven is correctly connected and that your installation's fuse is not out of service. Increase the selected temperature.
The oven light is not working.
Replace the bulb or the fuse. Check that the oven is correctly connected.
The cooling fan continues to operate after the oven stops.
This is normal; the fan may continue running until a maximum of 1 hour after cooking to lower the temperature inside and outside the oven. If the fan runs for over an hour, contact the After Sales Department.
The symbol flashes in the display.
Door locking fault; contact the Customer Services Department.
Cooking in a bain-marie.
Please use ventilated cooking methods when cooking in a bain-marie.
Vibration noise.
Make sure the power cord is not in contact with the rear surface of the oven.
This will not have any impact on your appliance's operation, however it may cause a vibration noise when the fan is running. Remove your appliance and move the cord away. Reposition your oven.
SERVICE CALLS
Any repairs made to your appliance must be carried out by a qualified professional authorised to work on the brand. When calling, please provide the complete references of your appliance (commercial reference, service reference, serial number), so that we can handle your call better. This information appears on the manufacturer's nameplate attached to your equipment.
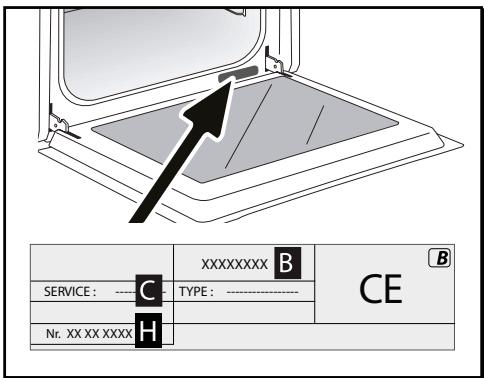
B: Commercial reference
C: Service reference
H: Serial number
GENUINE REPLACEMENT PARTS
During maintenance work, request that only certified genuine replacement parts are used.

All the T°C and cooking times are given for preheated ovens
Note: Before putting them in the oven, all meats must be kept at room temperature for at least one hour.
| EQUIVALENT: GAS MARKS T °C | |||||||||||||||||
| °C | 30 | 60 | 90 | 120 | 150 | 180 | 210 | 240 | 275 | ||||||||
| Gas marks | 1 | 2 | 3 | 4 | 5 | 6 | 7 | 8 | 9 and max | ||||||||
| TYPE OF FOOD | * | * | * | * | * | * | * | * | L | ||||||||
| min | |||||||||||||||||
| Meat | |||||||||||||||||
| Roast pork (1kg) | 200 | 2 | 180 | 2 | 60 | ||||||||||||
| Roast veal (1 kg) | 200 | 2 | 180 | 2 | 60-70 | ||||||||||||
| Roast beef rare (1kg) | 240 | 2 | 30-40 | ||||||||||||||
| Lamb (leg, shoulder 2.5 kg) | 220 | 1 | 220 | 200 | 2 | 60 | |||||||||||
| Poultry (1kg) | 200 | 2 | 220 | 180 | 2 | 210 | 3 | 60 | |||||||||
| Large pieces of poultry | 180 | 1 | 60-90 | ||||||||||||||
| Chicken thighs | 220 | 3 | 210 | 3 | 20-30 | ||||||||||||
| Pork chops | 210 | 3 | 30-40 | ||||||||||||||
| Veal ribs | 210 | 3 | 20-30 | ||||||||||||||
| Beef ribs rare (1kg) | 210 | 3 | 210 | 3 | 20-30 | ||||||||||||
| Mutton ribs | 210 | 3 | 20-30 | ||||||||||||||
| Fish | |||||||||||||||||
| Small fish | 275 | 4 | 15-20 | ||||||||||||||
| Medium fish (1kg to 1.5kg) | 200 | 3 | 180 | 3 | 30-35 | ||||||||||||
| Fish fillets | 220 | 3 | 200 | 3 | 15-20 | ||||||||||||
| Légumes | |||||||||||||||||
| Gratins (precooked ingredients) | 275 | 2 | 15 | ||||||||||||||
| Potato gratin | 200 | 2 | 180 | 2 | 45 | ||||||||||||
| Lasagne | 200 | 3 | 180 | 3 | 45 | ||||||||||||
| Stuffed tomatoes | 170 | 3 | 160 | 2 | 30 | ||||||||||||
| Pâtisseries | |||||||||||||||||
| Sponge cake | 150 | 3 | 180 | 2 | 35 | ||||||||||||
| Swiss roll | 220 | 3 | 180 | 2 | 25-35 | ||||||||||||
| Brioche | 170 | 1 | 210 | 180 | 2 | 35-45 | |||||||||||
| Brownies | 180 | 2 | 175 | 3 | 20-25 | ||||||||||||
| Cake - Pound cake | 180 | 1 | 180 | 1 | 180 | 2 | 45-50 | ||||||||||
| Clafoutis | 200 | 2 | 180 | 3 | 30-35 | ||||||||||||
| Creams | 165 | 2 | 150 | 2 | 30-40 | ||||||||||||
- Depending on model
| FUNCTION PERFORMANCE TESTS CEI STANDARD 60350 | ||||||
| FOOD | *Cooking mode | LEVEL | Accessories | °C | DURATION min. | PREHEAT-ING |
| Short-bread (8.4.1) | 5 | 45 mm pan | 150 | 30-40 | yes | |
| Short-bread (8.4.1) | 5 | 45 mm pan | 150 | 25-35 | yes | |
| Short-bread (8.4.1) | 2+ 5 | 45 mm pan + wire rack | 150 | 25-45 | yes | |
| Short-bread (8.4.1) | 3 | 45 mm pan | 175 | 25-35 | yes | |
| Short-bread (8.4.1) | 2+ 5 | 45 mm pan + wire rack | 160 | 30-40 | yes | |
| Small cakes | 5 | 45 mm pan | 170 | 25-35 | yes | |
| Small cakes | 5 | 45 mm pan | 170 | 25-35 | yes | |
| Small cakes | 2+ 5 | 45 mm pan + wire rack | 170 | 20-40 | yes | |
| Small cakes | 3 | 45 mm pan | 170 | 25-35 | yes | |
| Small cakes | 2+ 5 | 45 mm pan + wire rack | 170 | 25-35 | yes | |
| Fat-free sponge cakes (8.5.1) | 4 | wire rack | 150 | 30-40 | yes | |
| Fat-free sponge cakes (8.5.1) | 4 | wire rack | 150 | 30-40 | yes | |
| Fat-free sponge cakes (8.5.1) | 2+ 5 | 45 mm pan + wire rack | 150 | 30-40 | yes | |
| Fat-free sponge cakes (8.5.1) | 3 | 150 | 30-40 | yes | ||
| Fat-free sponge cakes (8.5.1) | 2+ 5 | 45 mm pan + wire rack | 150 | 30-40 | yes | |
| Apple pie (8.5.2) | 1 | wire rack | 170 | 90-120 | yes | |
| Apple pie (8.5.2) | 1 | wire rack | 170 | 90-120 | yes | |
| Apple pie (8.5.2) | 3 | wire rack | 180 | 90-120 | yes | |
| Browned surface (9.2.2) | 5 | wire rack | 275 | 3-6 | yes | |
- Depending on model
NOTE: When cooking on 2 levels, dishes can be removed at different times.
Brandt
MANUAL DE USUARIO ES
HORNO

We cannot be held responsible for any accident resulting from inexistent, defective or incorrect earthing.
"Smart Assist" system
Information for domestic ovens (UE n° 66/2014)


| Symbol | Value | Unit | EN: Energy Efficiency Index per cycle of operation under the current operation. The efficiency index is a measure of the efficiency of operation under operation in each cycle. The efficiency index is a measure of the efficiency of operation under operation in each cycle. The efficiency index is a measure of the efficiency of operation under operation in each cycle. The efficiency index is a measure of the efficiency of operation under operation in each cycle. The efficiency index is a measure of the efficiency of operation under operation in each cycle. The efficiency index is a measure of the efficiency of operation under operation in each cycle. The efficiency index is a measure of the efficiency of operation under operation. The efficiency index is a measure of the efficiency of operation under operation. The efficiency index is a measure of the efficiency of operation under operation. The efficiency index is a measure of the efficiency of operation under operation. The efficiency index is a measure of the efficiency of operation under operation. The efficiency index is a measure of the efficiency of operation under operation. The efficiency index is a measure of the efficiency of operation under operation. The efficiency index is a measure of the efficiency of operation under operation. | EN: Energy Efficiency Index per cycle of operation under operation. The efficiency index is a measure of the efficiency of operation under operation. The efficiency index is a measure of the efficiency of operation under operation. The efficiency index is a measure of the efficiency of operation under operation. The efficiency index is a measure of the efficiency of operation under operation. The efficiency index is a measure of the efficiency of operation under operation. The efficiency index is a measure of the efficiency of operation under operation. The efficiency index is a measure of the efficiency ofoperation under operation. The efficiency index is a measure of the efficiency of operation under operation. The efficiency index is a measure of the efficiency of operation under operation. The efficiency index is a measure of the efficiency of operation under operation. The efficiency index is a measure of the efficiency of operation under operation. The efficiency index is a measure of the efficiency of operation under operation. The efficiency index is a measure of the efficiency of operation under operation. The efficiency index is a measure of the efficiency of operation underoperation. The efficiency index is a measure of the efficiency of operation under operation. The efficiency index is a measure of the efficiency of operation under operation. The efficiency index is a measure of the efficiency of operation under operation. The efficiency index is a measure of the efficiency of operation under operation. The efficiency index is a measure of the efficiency of operation under operation. The efficiency index is a measure of the efficiency of operation under operation. The efficiency index is a measure of the efficiency of operation under operation. | |||||