
TQ703R07 - Grinder DARTY - Free user manual and instructions
Find the device manual for free TQ703R07 DARTY in PDF.



| Product Type | Automatic coffee machine with integrated grinder |
| Brand | Darty |
| Model | TQ703R07 |
| Dimensions (W x D x H) | 30 x 46.7 x 38 cm |
| Net Weight | 9 kg |
| Power Supply | 220-240 V ~, 50 Hz, 1500 W |
| Water Tank Capacity | 2.6 L |
| Bean Hopper Capacity | 350 g |
| Maximum Pump Pressure | 20 bar |
| Grinder Type | Ceramic |
| Grind Fineness Adjustable | Yes, via rotary selector |
| DoubleShot and TripleShot | Yes |
| Two Cups Simultaneously | Yes (except with doubleShot/tripleShot) |
| Integrated Milk System | Yes, with milk container and frother |
| Cup Warmer | Yes, adjustable |
| Connectivity | Wi-Fi (Home Connect) |
| Maintenance Programs | Cleaning, descaling, calc'nClean, frost protection |
| Child Safety | Yes, appliance lock |
| Automatic Shut-off | Yes, adjustable |
| Water Filter | Yes, INTENZA (replacement recommended every 2 months) |
| Included Accessories | Milk container, milk hose, adapter, descaling and cleaning tablets, water filter, hardness test strip, microfiber cloth |
| Automatic Cleaning | Automatic rinse on start/stop, steam cleaning of milk system |
| Power Cord Length | 100 cm |
Frequently Asked Questions - TQ703R07 DARTY
User questions about TQ703R07 DARTY
0 question about this device. Answer the ones you know or ask your own.
Ask a new question about this device
Download the instructions for your Grinder in PDF format for free! Find your manual TQ703R07 - DARTY and take your electronic device back in hand. On this page are published all the documents necessary for the use of your device. TQ703R07 by DARTY.
USER MANUAL TQ703R07 DARTY
Fully automatic espresso machine
EQ.700 integral
TQ7....
en User manual
fr Manuel d'utilisation
nl Gebruikershandleiding
pl Instrukcja obslugi
cs Návod k obsslze
ru Рожовдъюпьбоватуя
uk KepiВицъв З ecрлуацii
de Gebrauchsanleitung

Register your product on My Siemens and discover exclusive services and offers. siemens-home.bsh-group.com/welcome
The future moving in.

3

5
7
9
4

6
8
10
11
13
15
17
12

14
16
18
19
21
23
25
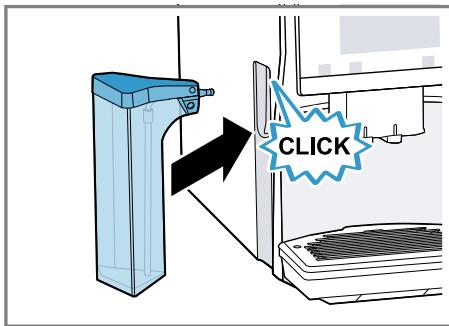
20
22
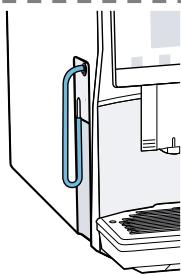
24
26
For further information, please refer to the Digital User Guide.

Table of contents
1 Safety 8
1.1 General information 8
1.2 Intended use 8
1.3 Restriction on user group..... 8
1.4 Safety information 8
2 Environmental protection and saving energy 12
2.1 Disposing of packaging 12
2.2 Tips for saving energy 12
3 Installation and connection..... 12
3.1 Scope of delivery 12
3.2 Installing and connecting the appliance 12
4 Familiarising yourself with your appliance. 13
4.1 Appliance 13
4.2 Controls 13
5 Accessories. 14
6 Before using for the first time... 14
6.1 Preparing and cleaning the appliance 14
6.2 Checking the water hardness 14
6.3 Performing initial start-up 15
6.4 General information 15
7 Basic operation 16
7.1 Switching the appliance on or off 16
7.2 Dispensing beverages 16
7.3 doubleShot and tripleShot.....16
7.4 Dispensing a coffee beverage with milk 16
7.5 Dispensing two cups at once... 17
8Grinder 17
8.1 Adjusting the grinding level..... 17
9 Water filter 18
9.1 Inserting the water filter 18
9.2 Changing or removing the water filter 18
10 Childproof lock. 18
10.1 Activating the child-proof lock 18
10.2 Deactivating the childproof lock............ 19
11 Cup heater1 19
11.1 Activating and deactivating the cup heater1 19
12 Favourites. 19
12.1 Saving beverages from the beverage selection 19
12.2 Saving the beverage in the menu 19
12.3 Changing beverage settings 19
12.4 Deleting favourites 20
12.5 Sorting favourites 20
13 Home Connect 20
13.1 Home Connect settings..... 20
13.2 Data protection 21
14 Basic settings. 21
14.1 Changing the basic settings 21
14.2 Overview of the basic settings 21
15 Cleaning and servicing 23
15.1 Dishwasher-safe components 23
15.2 Cleaning agent 23
15.3 Cleaning the appliance 24
15.4 Cleaning the drip tray and coffee dregs container 24
15.5 Cleaning the milk container ... 24
15.6 Service programmes 24
16 Troubleshooting 27
17 Transportation, storage and disposal 32
17.1 Activating frost protection ...... 32
17.2 Disposing of old appliance .... 32
18 Customer Service 32
18.1 Product number (E-Nr.), production number (FD) and consecutive numbering (Z-Nr.) 33
18.2 Warranty conditions 33
19 Technical specifications 33
19.1 Information regarding Free and Open Source Software.... 33
20 Declaration of Conformity 34

1 Safety
Observe the following safety instructions.
1.1 General information
- Read this instruction manual carefully.
- Keep the instruction manual and the product information safe for future reference or for the next owner.
- Do not connect the appliance if it has been damaged in transit.
1.2 Intended use
Only use this appliance:
for preparing hot drinks.
- In private households and in enclosed spaces in a domestic environment.
Up to an altitude of max. 2000 m above sea level.
1.3 Restriction on user group
This appliance may be used by children aged 8 or over and by people who have reduced physical, sensory or mental abilities or inadequate experience and/or knowledge, provided that they are supervised or have been instructed on how to use the appliance safely and have understood the resulting dangers.
Children must not play with the appliance.
Children must not perform cleaning or user maintenance unless they are at least 8 years old and are being supervised.
Keep children under the age of 8 years away from the appliance and power cable.
1.4 Safety information
WARNING - Risk of suffocation!
Children may put packaging material over their heads or wrap themselves up in it and suffocate.
- Keep packaging material away from children.
- Do not let children play with packaging material.
Children may breathe in or swallow small parts, causing them to suffocate.
- Keep small parts away from children.
- Do not let children play with small parts.
WARNING - Risk of electric shock!
Incorrect installation is dangerous.
- Connect and operate the appliance only in accordance with the specifications on the rating plate.
- Connect the appliance to a power supply with alternating current only via a properly installed socket with earthing.
- The protective conductor system of the domestic electrical installation must be properly installed.
If the appliance or the power cord is damaged, this is dangerous.
- Never operate a damaged appliance.
- Never operate an appliance with a cracked or fractured surface.
- Never pull on the power cord to unplug the appliance. Always unplug the appliance at the mains.
- If the appliance or the power cord is damaged, immediately unplug the power cord or switch off the fuse in the fuse box.
▶ Call customer services. → Page 32
Incorrect repairs are dangerous.
- Repairs to the appliance should only be carried out by trained specialist staff.
- Only use genuine spare parts when repairing the appliance.
- If the power cord of this appliance is damaged, it must be replaced by the manufacturer, the manufacturer's Customer Service or a similarly qualified person in order to prevent any risk.
An ingress of moisture can cause an electric shock.
- Never immerse the appliance or the power cord in water.
Liquids must not be spilled on the appliance plug connection. - Only use the appliance in enclosed spaces.
- Never expose the appliance to intense heat or humidity.
- Do not use steam- or high-pressure cleaners to clean the appliance.
WARNING - Risk of fire!
The appliance will become hot.
- Ventilate the appliance adequately.
Never operate the appliance in a cupboard.
It is dangerous to use an extended power cord and non-approved adapters.
- Do not use extension cables or multiple socket strips.
If the power cord is too short, contact Customer Service.
Only use adapters approved by the manufacturer.
WARNING - Risk of burns!
Some parts of the appliance become very hot.
- Never touch hot appliance parts.
- Allow hot appliance parts to cool down before touching.
WARNING - Risk of scalding!
Freshly prepared drinks are very hot.
Leave drinks to cool down if necessary.
- Do not let escaping liquids or steam come into contact with your skin.
A remote start via the Home Connect app while the appliance is unattended may cause scalding to third parties.
- Do not reach under the coffee outlet during the dispensing of drinks.
- Keep other persons, in particular children, away from the appliance.
WARNING - Risk of injury!
Improper use of the appliance may endanger the user.
- To avoid injuries, only use the appliance for its intended purpose.
Trapped fingers when closing the appliance door. - Be careful of your fingers when closing the appliance door. The grinder rotates.
Never reach into the grinder.
WARNING - Danger: Magnetism!
The appliance contains permanent magnets. These may affect electronic implants, e.g. pacemakers or insulin pumps.
People with electronic implants must stand at least 10 cm away from the appliance.
This minimum distance of 10 cm must also be observed for the water tank when removed.
WARNING - Risk of harm to health!
Soiling on the appliance may be harmful to health.
To ensure hygiene, follow the cleaning instructions for the appliance.
2 Environmental protection and saving energy
2.1 Disposing of packaging
The packaging materials are environmentally compatible and can be recycled.
- Sort the individual components by type and dispose of them separately.
2.2 Tips for saving energy
If you follow these instructions, your appliance will use less power.
Set the interval for automatic switchoff to the smallest value.
ν If the appliance is not being used, it will switch itself off earlier. → "Basic settings", Page 21
Do not interrupt the dispensing process prematurely.
- The amount of water or milk that is heated is used optimally.
Descale the appliance regularly.
Limescale deposits increase the appliance's energy consumption.
3 Installation and connection
3.1 Scope of delivery
After unpacking all parts, check for any damage in transit and completeness of the delivery.
Note: Different accessories are enclosed depending on the appliance model. This accessory is shown in a frame with a dashed line.
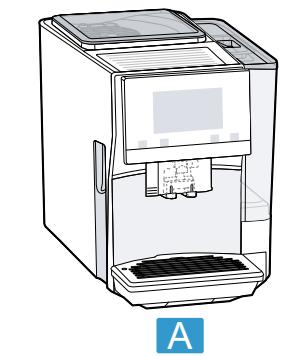
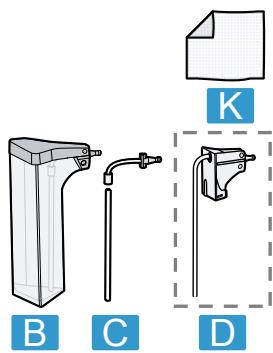
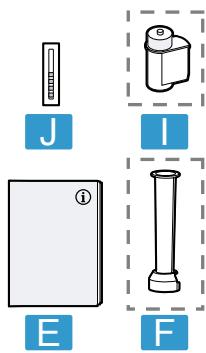
→ Fig. 1
| A | Fully automatic coffee machine |
| B | Milk container |
| C | Milk tube and suction pipe |
| D | Adapter for milk containers1 |
| E | User manual |
| F | Insertion aid for water filter |
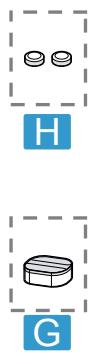
| G | Descaling tablet1 |
| H | Cleaning tablet1 |
| I | Water filter1 |
| J | Water hardness testing strip |
| K | Microfibre cloth |
1 Depending on the appliance specifications
3.2 Installing and connecting the appliance
ATTENTION!
Risk of damage to the appliance. If the appliance is not started up correctly, it may be damaged.
- Use the appliance in frost-free rooms only.
If the appliance has been transported or stored below 0°C , wait 3 hours at room temperature before starting it up.
After plugging in, always wait approx. 5 seconds. -
Place the appliance on a level, water-resistant surface that is capable of bearing its weight.
-
Using the mains plug, connect the appliance to an earthed socket that has been correctly installed.
4 Familiarising yourself with your appliance
4.1 Appliance
You can find an overview of the parts of your appliance here.
Note: Individual details and colours may differ, depending on the appliance model.
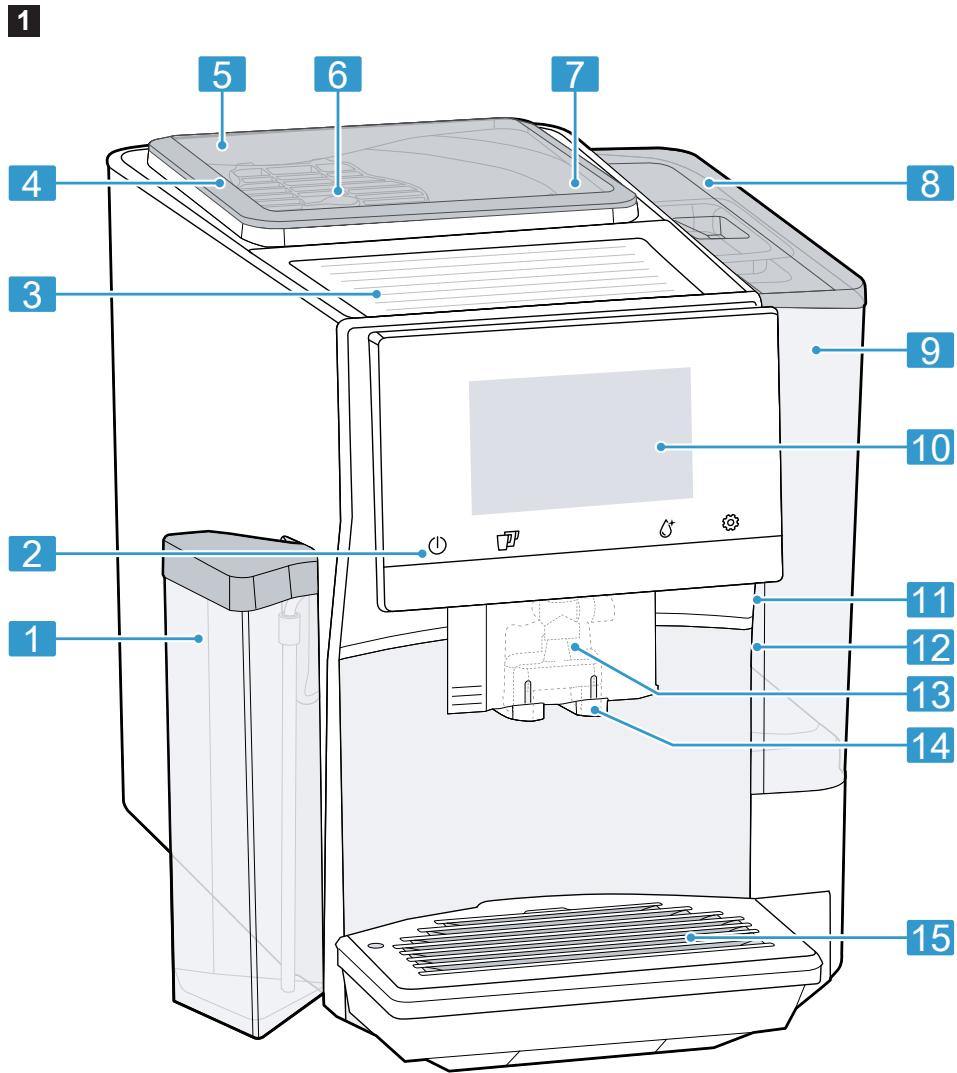
→ Fig. 2
| 1 | Milk container |
| 2 | Touch fields |
| 3 | Cup heater1 |
| 4 | Aroma lid |
| 5 | Bean container |
| 6 | Rotary selector for grinder setting |
| 7 | Tablet compartment |
| 8 | Cover for water tank |
| 9 | Water tank |
| 10 | Touch display |
| 11 | Brewing chamber door |
| 12 | Rating plate |
| 13 | Milk system |
| 14 | Beverage outlet cover |
| 15 | Drip tray |
1 Depending on the appliance specifications
4.2 Controls
You can find an overview of the controls for your appliance here.
Touch fields
Here you can find an overview of the symbols that are always visible.
| ① | Switch the appliance on or off. |
| ② | Dispense two cups. |
| ③ | Open or close the service programmes. |
| ④ | Open or close the settings. |
Touch display
The touch display functions both as a display and a control.
| Favour- ites | Select saved beverages with personal settings. → Page 19 |
| Clas- sics | Select standard bev- ages. |
| coffee- World | Select basic beverages which can be extended in conjunction with Home Connect. |
| ∑∑∑ | Cup warmer is switched on. |
| ∑ | Appliance is connected to Home Connect. |
Note: When the appliance is switched on, you have additional operating options with relevant displays and messages, e.g. beverage settings.
| ① | Set strength. |
| ② | Set per-cup quantity. |
| ③ | Set milk ratio. |
| ④ | Set aroma. |
| ⑤ | Set temperature. |
5 Accessories
Use original accessories. These have been made especially for your appliance.
| Accessories | Retail | Customer service |
| Cleaning tablets | TZ80001A | 00312097 |
| TZ80001B | 00312098 | |
| Descaling tablets | TZ80002A | 00312094 |
| TZ80002B | 00312095 | |
| Water filter | TZ70003 | 00575491 |
| Water filter pack of 3 | TZ70033A | - |
| Microfibre cloth | - | 00460770 |
| Care set | TZ80004A | 00312105 |
| TZ80004B | 00312106 | |
| Adapter for milk containers | TZ70001 | 17006005 |
6 Before using for the first time
Prepare the appliance for use.
6.1 Preparing and cleaning the appliance
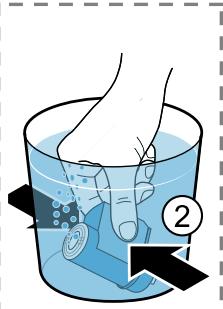
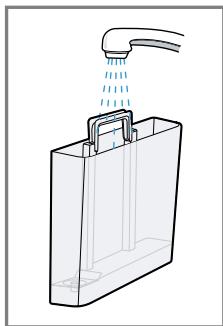
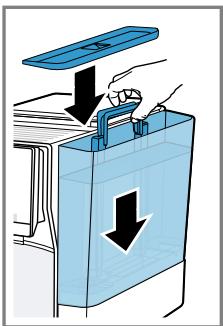
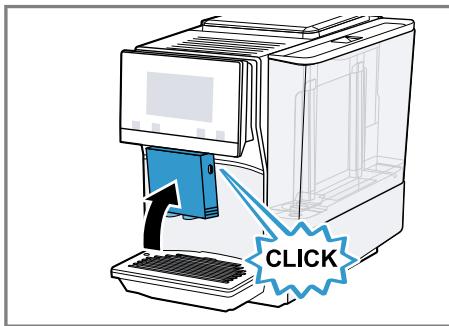
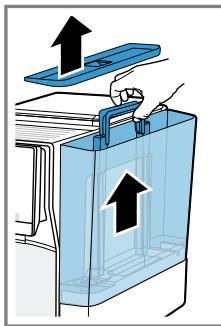
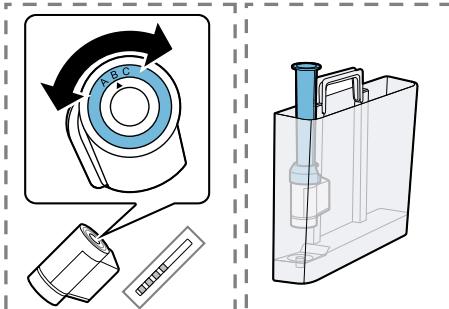
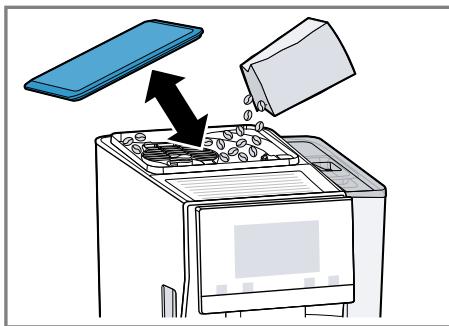
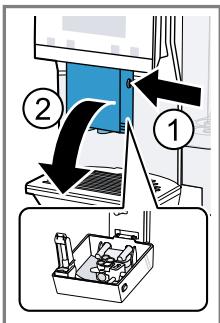
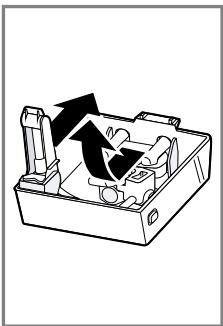
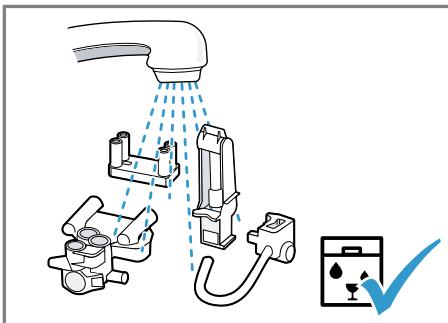
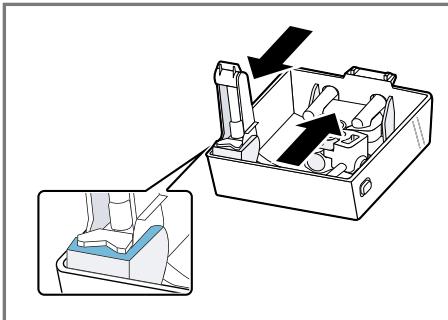
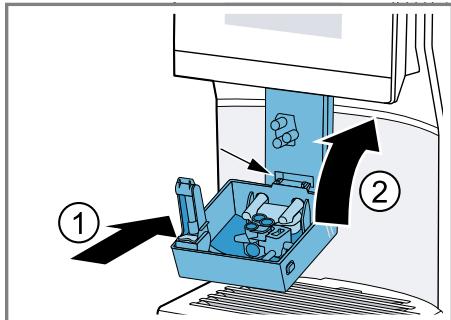
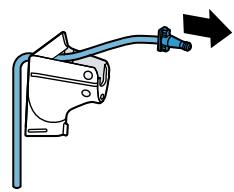
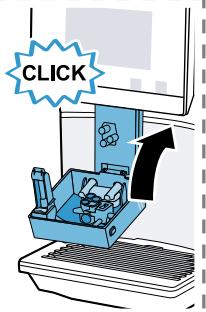
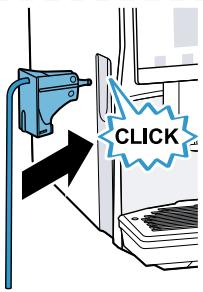
Remove the protective foils and clean the appliance and individual parts. Follow the illustrated instructions at the beginning of this manual.
ATTENTION!
Unsuitable beans can block up the grinder.
- Only use pure, roasted bean mixes that are suitable for use in fully automatic coffee or espresso machines.
Do not use glazed coffee beans. - Do not use caramelised coffee beans.
- Do not use coffee beans that have been treated with additives containing sugar.
Do not add ground coffee.
→ Fig. 3 - 24
Note: Fill the water tank each day with fresh, cold, non-carbonated water.
Tip: To keep the coffee beans at their best, store them in a sealed container in a cool place.
You can keep the coffee beans in the bean container for several days without them losing their aroma.
6.2 Checking the water hardness
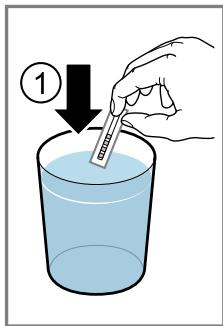
It is important to set the water hardness correctly so that your appliance indicates in good time that it needs descending. You can use the enclosed test strip to check the water hardness or ask your local water company.
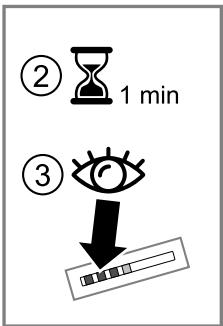
- Briefly dip the test strip in fresh tap water.
- Allow the water to drain off the test strip.
- Read the water hardness off the test strip after 1 minute.
The table shows allocation of the levels to the different degrees of water hardness:
| Level | German degrees in °dH | Total hardness in mmol/ l |
| 1 | 1-7 | < 1.3 |
| 2 | 8-14 | 1.3-2.5 |
| 3 | 15-21 | 2.5-3.8 |
| 4¹ | 22-30 | > 3.8 |
Factory setting
Note: If a water softening system is installed in your house, you can select "Softening device".
Tip: You can change the settings at any time.
→ "Basic settings", Page 21
6.3 Performing initial start-up
After connecting the appliance to the power supply, configure the settings for initial start-up. Initial start-up only appears when switching on for the first time.
- Press ① to switch the appliance on.
- Follow the instructions on the display.
- The display will guide you through the programme.
Notes
- To set up Home Connect, refer to the documents on Home Connect supplied with the appliance.
If "Demo mode" is selected, only the display screens will work. You can not dispense a beverage or run a programme.
6.4 General information
Please bear this information in mind so that you can get the best out of your appliance.
Notes
The appliance has been programmed at the factory with standard settings for optimum operation.
- The grinder has been factory-set for optimum operation. If coffee is only dispensed drop by drop or is too thin and with too little crema, you can adjust the grinding level when the grinder is running.
→ "Adjusting the grinding level", Page 17
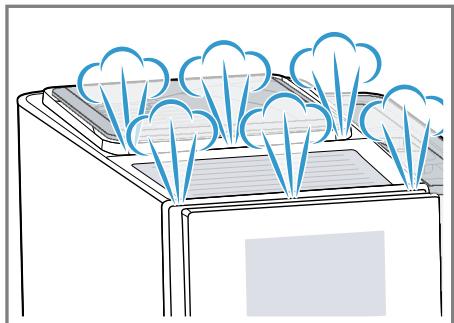
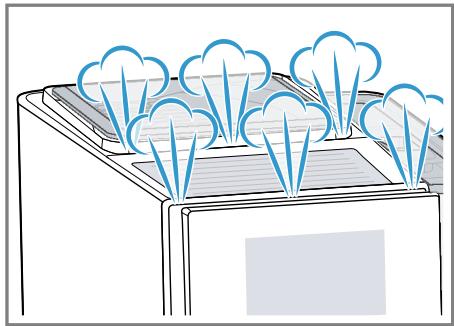
During operation water droplets may form at the ventilation slits and on the lid of the tablet compartment.
If you do not perform any actions on the appliance for a certain period, it will switch off automatically. You can change the duration in the basic settings. → Page 21
- For technical reasons steam can escape from the appliance.
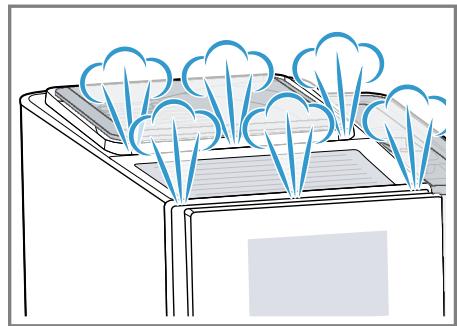
The first beverage will not yet have its full aroma if:
- You are using the appliance for the first time.
- You have run a service programme.
- You have not used the appliance for a long time.
Do not drink the beverage.
Tip: You will get a stable, fine-pored crema after you have started up your appliance and dispensed a few cups.
7 Basic operation
7.1 Switching the appliance on or off
Press ①.
When the appliance switches on, the display shows the Siemens logo. When the appliance is switched on or off, it will rinse itself automatically. When switched off, the appliance will emit steam into the drip tray for cleaning. The appliance does not rinse itself if the appliance is still warm when switched on or if no beverage was dispensed before it was switched off.
7.2 Dispensing beverages
Find out how to prepare a drink of your choice.

WARNING
Risk of scalding!
Freshly prepared drinks are very hot.
- Leave drinks to cool down if necessary.
- Do not let escaping liquids or steam come into contact with your skin.
Notes
- With a number of settings your coffee is prepared in several steps. Wait until the process is fully completed.
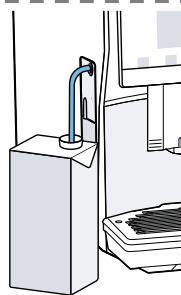
If you are dispensing a beverage with milk, always connect the milk container filled with milk or the milk adapter to a milk carton. -
You can only connect the milk container or milk adapter if the milk system is fitted with the adapter and the hose in the beverage outlet cover.
-
The milk container is specially designed for this appliance. Only use the milk container for storing milk in the refrigerator and in the house.
If the milk system has not been cleaned, small amounts of milk may escape when hot water is dispensed.
Tips
- You can also use plant-based alternatives to milk, e.g. soya milk.
The quality of the milk foam depends on the type of milk or the plant-based alternative used.
7.3 doubleShot and tripleShot
Your appliance grinds the coffee two or three times.
To ensure that only pleasant-tasting and easily digestible aromatic substances are released, coffee beans are freshly ground and brewed again by the appliance.
The longer coffee brews, the more bitter substances and undesirable aromas are released. These bitter substances and undesirable aromas affect the taste and digestibility of coffee.
Note: The functions "doubleShot" and "tripleShot" depend on the beverage strength and beverage size selected.
7.4 Dispensing a coffee beverage with milk
An example explains how to make a latte macchiato.
WARNING Risk of burns!
The milk system can become extremely hot.
-
Never touch the milk system when it is hot.
-
Allow the hot milk system to cool down before touching it.
Requirements
- The milk container or milk adapter is connected.
- The milk container is filled with milk or the milk adapter hose is immersed in milk.
- Place a glass underneath the beverage outlet.
- Press "Classics".
-
Select and press the beverage symbol for latte macchiato.
-
To change the strength, press ①.
- To change the per-cup quantity, press .
-
To change the milk ratio, press E.
-
Press "Start" and wait until the process is complete.
-
To completely stop dispensing the beverage, press "Stop".
- To only stop the current dispensing step, press "Skip".
After preparing the beverage, the milk system will automatically clean itself with a short jet of steam.
Notes
If you do not change any settings for approx. 30 seconds, the appliance will exit settings mode.
The appliance saves the settings automatically.
Tip: You can also pre-heat cups before dispensing using hot water or the cup heater.
7.5 Dispensing two cups at once
Depending on your beverage, you can make 2 cups at the same time.
Note: If the "doubleShot" or
"tripleShot" function is active, the function for dispensing two cups at once is not possible.
- Press the symbol for your desired drink.
- Press .
ν The setting is shown on the display.
3. Place two cups on the left and right underneath the beverage outlet.
4. Press "Start".
The beverage is prepared in 2 steps. The beans are ground in 2 grinding operations.
- The beverage is brewed and then runs into the cups.
- Wait until the process is complete.
8Grinder
Your appliance has an adjustable grinder, which you can use to customise the grinding level of your coffee beans.
8.1 Adjusting the grinding level
Set the desired grinding level while the coffee beans are being ground.

WARNING
Risk of injury!
The grinder rotates.
- Never reach into the grinder.
ATTENTION!
Risk of damage to the grinder. The grinder may be damaged if the grinding level is not set properly.
- Only set the grinding level when the grinder is running.
- Select the grinding level using the rotary selector step by step.
Grinding level Setting
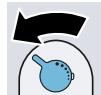
Fine grinding level for dark-roasted beans.
Turn rotary selector anticlockwise.
Coarse grinding level for light-roasted beans.
Turn rotary selector clockwise.
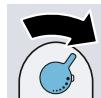
The grinding level setting only has an effect after the second cup of coffee.
Tip: If the coffee is only dispensed drop by drop, set a coarser grinding level.
If the coffee is too thin with too little crema, set a finer grinding level.
9 Water filter
You can use a water filter to minimise limescale deposits and reduce impurities in the water.
9.1 Inserting the water filter
ATTENTION!
Possible damage to the appliance due to limescale build-up.
Change the water filter in good time.
Change the water filter after 2 months at the latest.
Observe the display messages.
- Press .
- Press "INTENZA filter" and follow the instructions on the display.
9.2 Changing or removing the water filter
You can also operate your appliance without a water filter.
- Press .
- Press "INTENZA filter".
- Press "Replace" or "Remove" and follow the instructions on the display.
Tips
- You should also change your water filter for reasons of hygiene.
- With a water filter you need to descale your appliance less frequently.
If you use a water filter, your coffee will be more flavoursome.
If your appliance has not been used for a long time, for example if you were on holiday, you should rinse the water filter before use by dispensing a cup of hot water.
The water filter can be purchased from retailers or customer service. → "Accessories", Page 14
10 Childproof lock
You can lock the appliance, to protect children against scalding and burns.
10.1 Activating the childproof lock
Requirement: The appliance is switched on.
Press and hold for at least 3 seconds.
ν The childproof lock is activated.
10.2 Deactivating the childproof lock
Press and hold for at least 3 seconds.
ν The childproof lock is deactivated.
11 Cup heater
You can use the cup heater to preheat your cups.
11.1 Activating and deactivat ing the cup heater
WARNING Risk of burns!
The cup heater1 can become very hot.
- Never touch the cup heater1 while hot.
- Allow the hot cup heater1 to cool down before touching it.
Tip: Place the cups with their base on the cup heater to heat them to optimum effect.
You can activate or deactivate the cup heater in the basic settings. → "Overview of the basic settings", Page 21
12 Favourites
Save beverages with your personal settings as a favourite.
You can mark your favourites with a colour. A favourite is a beverage with personal settings. You can change the settings at any time.
Note: To exit the settings, press ← .
12.1 Saving beverages from the beverage selection
- Select a beverage from "Classics" or "coffeeWorld".
- Select the personal beverage settings.
- Press "Favourite".
- Select the required colour for the beverage.
- Press "Save".
12.2 Saving the beverage in the menu
- Press "Favourites".
-
Press
-
The display shows all available beverages.
- Select the required beverage.
- Select the personal beverage settings.
- Press "Next".
- Select the required colour for the beverage.
- Press "Save".
12.3 Changing beverage settings
- Press "Favourites".
- Select the beverage and press briefly.
- Change the beverage settings.
- Press "Apply".
ν The new settings are saved.
12.4 Deleting favourites
- Press "Favourites".
- Select the beverage.
- Press the beverage for at least 3 seconds.
- Confirm "Delete".
12.5 Sorting favourites
- Press "Settings".
- Press "Personalisation".
- Press "Sort favourites".
- Sort favourites, e.g. by name or colour.
13 Home Connect
This appliance is network-capable. Connecting your appliance to a mobile device lets you control its functions via the Home Connect app, adjust its basic settings and monitor its operating status. The Home Connect services are not available in every country. The availability of the Home Connect function depends on the availability of Home Connect services in your country. You can find information about this at: www.home-connect.com.
The Home Connect app guides you through the entire login process. Follow the instructions in the Home Connect app to configure the settings.
Tips
Please consult the documents supplied by Home Connect.
- Please also follow the instructions in the Home Connect app.
Notes
Please note the safety precautions in this instruction manual and make sure that they are also observed when operating the appliance via the Home Connect app. → "Safety", Page 8
- Operating the appliance on the appliance itself always takes priority. During this time it is not possible to operate the appliance using the Home Connect app.
13.1 Home Connect settings
Adapt Home Connect to your needs. You can find the Home Connect settings in the basic settings for your appliance. Which settings the display shows will depend on whether Home Connect has been set up and whether the appliance is connected to your home network.
Overview of the Home Connect settings
Here you can find an overview of the "Home Connect" settings and network settings.
| Basic setting | Selection | Description |
| WiFi connection | On | Switch off the wireless module with prolonged absence or to save energy. |
| Off | ||
| Note: In networked standby mode your appliance requires max. 2 W. | ||
| Remote start | OnOff | Switch remote start on the appliance on and off. Note: With the "Home Connect" app only switch-off is possible. |
| Add mobile device | - | Connect the appliance to the "Home Connect" app or additional accounts. |
| Network information | - | Display network information and appliance information. |
| Delete network settings | - | Note: You cannot operate your appliance via the "Home Connect" app without a network connection. |
| Software update | - | Note: This setting is only available with a software update. |
13.2 Data protection
Please see the information on data protection.
The first time your appliance is registered on a home network connected to the Internet, your appliance will transmit the following types of data to the Home Connect server (initial registration):
- Unique appliance identification (consisting of appliance codes as well as the MAC address of the Wi-Fi communication module installed).
Security certificate of the Wi-Fi communication module (to ensure a secure data connection).
The current software and hardware version of your appliance.
Status of any previous reset to factory settings.
This initial registration prepares the Home Connect functions for use and is only required when you want to use the Home Connect functions for the first time.
Note: Please note that the Home Connect functions can only be utilised with the Home Connect app. Information on data protection can be retrieved in the Home Connect app.
14 Basic settings
You can configure your appliance to meet your needs and call up additional functions.
14.1 Changing the basic settings
- Press
- The display shows the list of basic settings.
- Change the required basic setting.
- The appliance saves the basic setting automatically.
- To exit the basic settings, press ← .
14.2 Overview of the basic settings
You can find an overview of the basic settings here.
| Beverage setting | Brewing temperature | Set the brewing temper- ature. |
| Milk sequence | Select the sequence for milk and coffee. | |
| Latte macchiato pause | Select the pause between milk and coffee. | |
| Resetting beverage para- meters | Reset the beverage set- tings. | |
| Appliance setting | Cup heater1 | Switch the cup heater1 on or off. |
| Automatic switch-off | Set the time after which the appliance switches off. | |
| Display brightness | Set the brightness in levels. | |
| Sounds | ■ Switch sounds on and off. ■ Set the volume. | |
| Water hardness | Set the water hardness. | |
| Language | Set the language. | |
| Factory settings | Reset the appliance to the factory settings. | |
| Personalisation | ||
| Operation after switch-on | Set the display screen for "Favourites", "Class- sics" or "coffeeWorld". | |
| Sort favourites | Set the sequence of fa- vourites. | |
| Home Connect | Information on Home Connect | To start, scan the QR code. → "Home Connect set- tings", Page 20 |
| Appliance information | Beverage counter | Display the number of beverages dispensed. |
| Cleaning information | Time until the water filter should next be changed or a service programme started. | |
| Version information | Display network informa- tion and appliance in- formation. | |
| 1 Depending on the appliance specifications | ||
| Licence information | Display FOSS licence text. | |
| Mode | Mode for demonstration purposes | Switch "Demo mode" on or off. |
| 1 Depending on the appliance specifications | ||
15 Cleaning and servicing
To keep your appliance working efficiently for a long time, it is important to clean and maintain it carefully.
15.1 Dishwasher-safe components
Here you can find an overview of the components you can clean in the dishwasher.
ATTENTION!
Some components are sensitive to heat and may be damaged if they are cleaned in a dishwasher.
-
Follow the operating instructions of the dishwasher.
-
Only put dishwasher-safe components in the dishwasher.
- Only use programmes that do not heat the water above 60°C .
Suitable:
Drip tray
- Drip plate
- Coffee dregs container
- Mechanical fill level indicator
Milk system with adapter
Milk container with lid
Not suitable:
Water tank
Water tank lid
Aroma lid
Brewing unit
- Beverage dispenser cover
15.2 Cleaning agent
Only use suitable cleaning agents.
ATTENTION!
Unsuitable cleaning products may damage the surfaces of the appliance.
- Do not use harsh or abrasive detergents.
- Do not use cleaning agents containing alcohol or spirits.
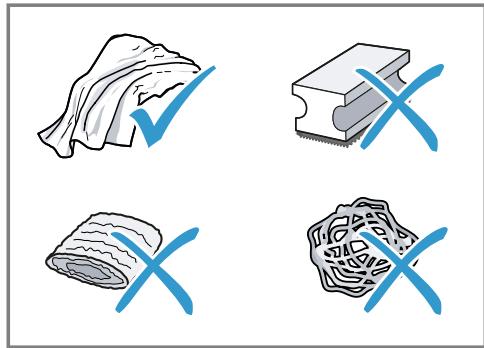
- Do not use hard scouring pads or cleaning sponges.
Unsuitable cleaning agents and descalers may damage the appliance.
- Do not use pure citric acid, vinegar or any vinegar-based agents to descale the appliance.
- Only use suitable tablets for cleaning and descaling.
- Do not use descaling agent with phosphoric acid.
Only use cleaning tablets and descaling tablets that have been specially developed for the appliance. → "Accessories", Page 14
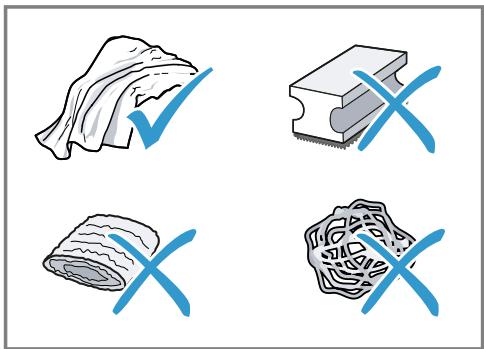
Tips
- Wash new sponge cloths thoroughly to remove any salt adhering to them. Salt can cause rust film to develop on stainless steel surfaces.
Always remove any residues of limescale, coffee, milk and cleaning/descaling solutions immediately to prevent corrosion.
15.3 Cleaning the appliance

WARNING
Risk of electric shock!
An ingress of moisture can cause an electric shock.
- Never immerse the appliance or the power cord in water.
- Liquids must not be spilled on the appliance plug connection.
- Do not use steam- or high-pressure cleaners to clean the appliance.

WARNING
Risk of burns!
Some parts of the appliance become very hot.
- Never touch hot appliance parts.
- Allow hot appliance parts to cool down before touching.
-
Clean the housing, the high-gloss surfaces and the control panel with the enclosed microfibre cloth.
-
Clean the outlet system with a soft, damp cloth after beverages have been dispensed.
- Rinse the water tank with fresh, clean water.
- If the appliance has not been used for a long time, e.g. after a holiday, clean the entire appliance, including moving parts such as the brewing unit or water tank.
Note: The appliance will rinse itself automatically if you switch it on when it is cold or switch it off after it has dispensed coffee. The system is therefore self-cleaning.
15.4 Cleaning the drip tray and coffee dregs container
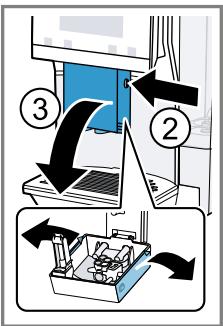
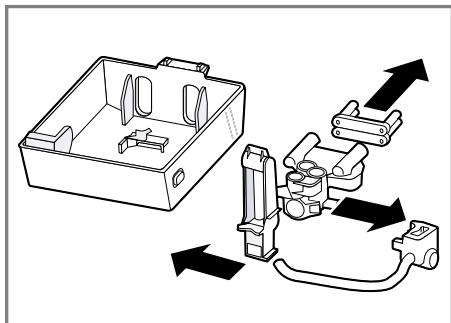
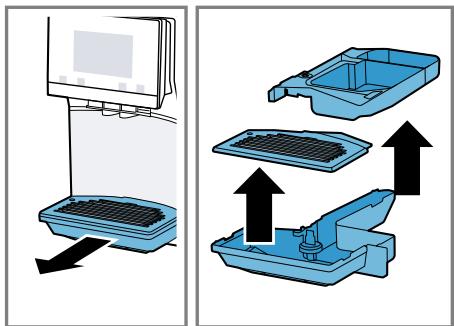
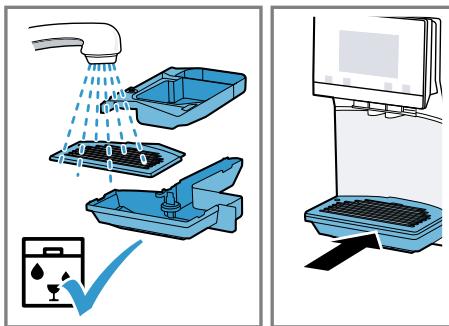
Clean and empty the drip tray and coffee dregs container every day to prevent deposits. Follow the illustrated instructions at the beginning of this manual.
→ Fig . 2 5 - 2 6
15.5 Cleaning the milk container
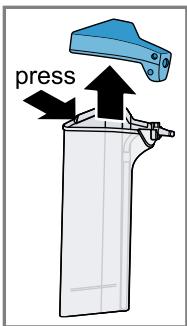
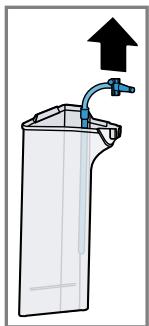
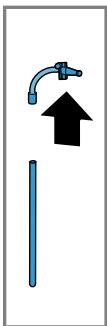
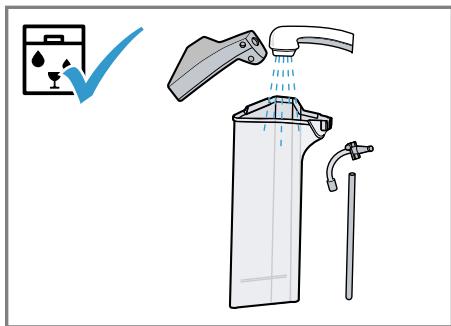
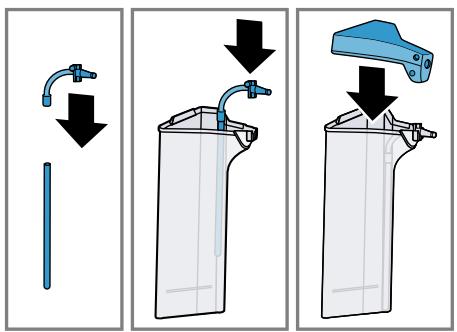
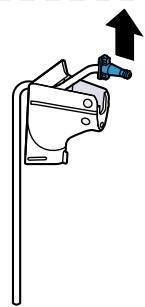
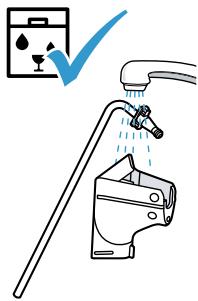
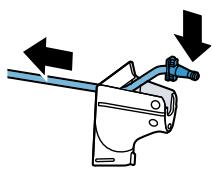
Clean the milk container regularly for hygiene reasons. You can clean the milk container in the dishwasher. Follow the illustrated instructions at the beginning of this manual.
→ Fig. 1 7 - 1 8
15.6 Service programmes
Use the service programmes if you insert or remove a water filter or in order to clean your appliance thoroughly. Your appliance will tell you when you need to perform a service programme, e.g. cleaning.
ATTENTION!
Improper cleaning and descending or a delay in doing so may damage the appliance.
- Immediately perform the descending process in accordance with the instructions.
- Only use cleaning tablets in the tablet compartment.
- Do not put descending tablets or other products in the tablet compartment.
Notes
The display indicates the progress of the descending or cleaning process.
If your appliance has been locked, you can only operate it again once the descending process has been carried out.
Using the service programmes
- Press .
- Press the symbol for the required programme.
- The display will guide you through the programme.
Overview of service programmes
You can find an overview of the service programmes here.
Note: The start image shows the remaining number of beverages that can be dispensed until running the programme and the duration.
| BRITA | INTENZA filter | Insert, replace or remove the water fil-ter. |
| Milk system cleaning | Rinse the milk system automatically. | |
| calc'nClean | Combine cleaning and descaling. Re-move residues of limescale and cof-fee from the pipes. | |
| Cleaning | Remove residues of coffee from the pipes. | |
| Descaling | Remove residues of limescale from the pipes. | |
| Brewing unit cleaning | The display shows optimum cleaning of the brewing unit step by step. | |
| Beverage outlet clean-ing | The display shows optimum cleaning of the outlet step by step. |
| Frost protection | Drain the pipes to protect the appli- ance during transport or storage. |
| Special rinsing | If a service programme is interrupted, e.g. due to a power failure, it will rinse itself automatically. The appliance is then ready for use again. |
Tips
If you are starting the "Dscaling" or "calc'nClean" programme, keep a container with a capacity of min. 1 I at the ready.
If you use a water filter, this will prolong the time until you have to run a service programme.
- You can combine "Dscaling" and "Cleaning" with the "calc'nClean" service programme.
16 Troubleshooting
You can rectify minor faults on your appliance yourself. Read the troubleshooting information before contacting after-sales service. This will avoid unnecessary costs.

WARNING
Risk of electric shock!
Incorrect repairs are dangerous.
- Repairs to the appliance should only be carried out by trained specialist staff.
- Only use genuine spare parts when repairing the appliance.
- If the power cord of this appliance is damaged, it must be replaced by the manufacturer, the manufacturer's Customer Service or a similarly qualified person in order to prevent any risk.
| Fault | Cause and troubleshooting |
| Appliance no longer responds. | Appliance has a fault. 1. Pull out the mains plug and wait 10 seconds. 2. Re-insert the mains plug. |
| HomeConnect is not working correctly. | Different causes are possible. ► Go to www.home-connect.com. |
| Appliance only dis-penses water, not cof-fee. | Empty bean container is not detected by the appli- ance. ► Pour in coffee beans. |
| Coffee shaft on brewing unit is blocked. ► Clean the brewing unit. | |
| Beans are too oily and are not falling into the grinder. ► Gently tap the bean container. ► Change the coffee variety. ► Do not use oily beans. ► Clean the empty bean container with a damp cloth. | |
| Brewing unit is not inserted properly. 1. Check whether the brewing unit is inserted correctly and is securely locked. 2. Push the red lever up to the left. 3. Insert the brewing unit cover. | |
| Appliance is not dis-pensing milk froth. | Milk system is soiled. ► Clean the milk system in the dishwasher. |
| Milk tube not immersed in milk. ► Use more milk. | |
| Appliance is not dis-pensing milk froth. | Check whether the milk tube is immersed in the milk. |
| Heavy build-up of limescale in the appliance. Descale the appliance. | |
| No milk intake by the milk system. | The milk system is assembled incorrectly. Assemble the milk system correctly. |
| Order for connecting the milk container and milk sys-tem is wrong. First insert the milk system into the outlet and then the milk container. | |
| Milk tube not immersed in milk. Use more milk. Check whether the milk tube is immersed in the milk. | |
| Milk froth is too cold. | Milk is too cold. Use lukewarm milk. |
| Appliance is not dis-pensing hot water. | Milk system is soiled. Clean the milk system in the dishwasher. |
| Milk system cannot be assembled or dis-as-sembled. | Order of assembly is wrong. First connect the milk system and then the milk container. When disassembling, you must first remove the milk container and then the milk system. |
| Appliance is not dis-pensing drinks. | Air is in the water filter. 1. Immerse the water filter in water with the opening facing upwards until no more air bubbles escape. 2. Reinsert the filter. Firmly press the water filter straight down into the tank connection. |
| Residues of limescale remover are blocking the water tank. 1. Remove the water tank. 2. Clean the water tank thoroughly. | |
| There is dripping wa-ter on the inner floor of the appliance. | Drip tray was removed too soon. Wait a few seconds after the last drink was dispensed before removing the drip tray. |
| Brewing unit cannot be removed. | Locking device cannot be released, brewing unit is jammed. Switch the appliance off and back on after 3 minutes. |
| Grinder won't start. | Appliance is too hot. 1. Disconnect the appliance from the mains. 2. Wait 1 hour so the appliance can cool down. |
| Grinder is not grinding any coffee beans despite full bean container. | Beans are too oily and are not falling into the grinder. ►Gently tap the bean container. ►Change the coffee variety. ►Do not use oily beans. ►Clean the empty bean container with a damp cloth. |
| Coffee or milk froth quality varies widely. | Build-up of limescale in the appliance. ►Descale the appliance. |
| Milk froth quality varies widely. | Milk froth quality depends on the type of milk or plant-based alternative used. ►Optimise the result through the selection of the milk or vegetable-based drink type. |
| Coffee is not dispensed or has slowed to a trickle. Set quantity is not reached. | Grinding level is set too fine. ►Set a coarser grinding level. →"Adjusting the grinding level", Page 17 Heavy build-up of limescale in the appliance. ►Descale the appliance. Air is in the water filter. 1. Immerse the water filter in water with the opening facing upwards until no more air bubbles escape. 2. Reinsert the filter. Appliance is soiled. ►Clean the brewing unit. ►Descale and clean the appliance. |
| Coffee has nocrema. | Type of coffee is not optimal. ►Use a coffee variety with a higher proportion of Robusta beans. ►Use beans with a darker roast. Beans are no longer fresh. ►Use fresh beans. Grinding level is not appropriate for coffee beans. ►Adjust the grinder to a finer setting. →"Adjusting the grinding level", Page 17 |
| Coffee is too acidic. | Grinding level is set too coarse. ►Adjust the grinder to a finer setting. →"Adjusting the grinding level", Page 17 Type of coffee is not optimal. |
| Coffee is too acidic. | Use a coffee variety with a higher proportion of Robusta beans. Use beans with a darker roast. |
| Coffee is too bitter. | Grinding level is set too fine. Set a coarser grinding level. → "Adjusting the grinding level", Page 17 |
| Type of coffee is not optimal. → Change the coffee variety. | |
| Coffee tastes burnt. | Grinding level is set too fine. Set a coarser grinding level. → "Adjusting the grinding level", Page 17 |
| Type of coffee is not optimal. → Change the coffee variety. | |
| Coffee temperature setting is too high. → Set the coffee temperature lower. | |
| Coffee grounds are not compact and are too wet. | The grinding level is not set optimally. Adjust the grinder to a coarser or finer setting. → "Adjusting the grinding level", Page 17 |
| Beans are too oily. → Use a different type of bean. | |
| Display shows "Please insert brewing unit." | Cover is wrongly inserted. 1. Check whether the brewing unit is inserted correctly and is securely locked. 2. Push the red lever up to the left. 3. Insert the brewing unit cover. |
| Display shows "Please fill water tank." despite the fact that the water tank is full. | Water tank is wrongly inserted. Insert the water tank correctly. |
| Carbonated water is in the water tank. Fill the water tank with fresh tap water. | |
| Float is stuck in the water tank. 1. Remove the water tank. 2. Clean the water tank thoroughly. | |
| New water filter was not rinsed as per instructions. 1. Rinse the water filter according to the instructions. 2. Place the water filter into operation. | |
| Air is in the water filter. 1. Immerse the water filter in water with the opening facing upwards until no more air bubbles escape. 2. Reinsert the filter. | |
| Display shows "Please fill water tank." despite the fact that the water tank is full. | Water filter is old. ►Insert a new water filter. |
| Limescale deposits in the water tank are blocking the system. 1. Clean the water tank thoroughly. 2. Start the descaling programme. | |
| Display shows "Please clean brewing unit." | Brewing unit is soiled. ►Clean the brewing unit. |
| Mechanism of brewing unit is stiff. ►Clean the brewing unit. | |
| Display shows "Over-voltage or under-voltage". | There are problems with the power supply. ►Only operate the appliance at 220 - 240 V. |
| Display shows "Error in water system. Please restart appliance.". | Appliance has a fault. 1. Pull out the mains plug and wait 10 seconds. 2. Re-insert the mains plug. |
| Display very frequently shows "Please run calc'nClean programme!". | Decalcified water still contains small amounts of lime. 1. Insert a new water filter. 2. Set the corresponding water hardness. |
| Incorrect or too little descaling agent used. ►When descaling, only use suitable tablets. | |
| Service programme has not been carried out in its entirety. ►Start the "Special rinsing" service programme. → "Service programmes", Page 24 |
17 Transportation, storage and disposal
You can find out here how to prepare your appliance for transportation and storage. You will also find out how to dispose of old appliances.
17.1 Activating frost protection
Protect your appliance from frost during transport and storage.
ATTENTION!
Residues of liquid in the appliance may damage it during transport or storage.
- Empty the pipe system before transport or storage.
- Run the "Frost protection" programme.
→ "Overview of service programmes", Page 25
2. Disconnect the appliance from the mains power supply.
17.2 Disposing of old appliance
Valuable raw materials can be reused by recycling.
- Unplug the appliance from the mains.
- Cut through the power cord.
- Dispose of the appliance in an environmentally friendly manner.
Information about current disposal methods are available from your specialist dealer or local authority.
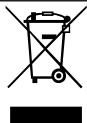
This appliance is labelled in accordance with European Directive 2012/19/EU concerning used electrical and elec
tronic appliances (waste electrical and electronic equipment - WEEE). The guideline determines the framework for the return and recycling of used appliances as applicable throughout the EU.
18 Customer Service
If you have any queries, are unable to rectify faults on the appliance yourself or if your appliance needs to be repaired, contact Customer Service. Function-relevant genuine spare parts according to the corresponding Ecodesign Order can be obtained from Customer Service for a period of at least 7 years from the date on which your appliance was placed on the market within the European Economic Area.
Note: Under the terms of the manufacturer's warranty the use of Customer Service is free of charge.
Detailed information on the warranty period and terms of warranty in your country is available from our after-sales service, your retailer or on our website.
If you contact Customer Service, you will require the product number (E-Nr.), the production number (FD) and the consecutive numbering (Z-Nr.) of your appliance.
The contact details for Customer Service can be found in the Customer Service directory at the end of the manual or on our website.
18.1 Product number (E-Nr.), production number (FD) and consecutive numbering (Z-Nr.)
You can find the product number (E-Nr.), the production number (FD) and the consecutive numbering (Z-Nr.) on the appliance's rating plate.
Make a note of your appliance's details and the Customer Service telephone number to find them again quickly.
18.2 Warranty conditions
You can make warranty claims for your appliance under the following conditions.
The guarantee conditions for this appliance are as defined by our representative in the country in which it is sold. Details regarding these conditions can be obtained from the dealer from whom the appliance was purchased. The bill of sale or receipt must be produced when making any claim under the terms of this guarantee.
19 Technical specifications
| Voltage | 220-240 V ~ |
| Frequency | 50 Hz |
| Connection rating | 1500 W |
| Maximum static pump pressure | 20 bar |
| Maximum capacity of water tank (without filter) | 2,6 l |
| Maximum capacity of bean container | 350 g |
| Length of the power cable | 100 cm |
| Appliance height | 38 cm |
| Appliance width | 30 cm |
| Appliance depth | 46,7 cm |
| Weight, empty | 9 kg |
| Type of grinder | Ceramic |
19.1 Information regarding Free and Open Source Software
This product includes software components that are licensed by the copyright holders as free or open source software.
The applicable licence information is stored on your home appliance. You can also access the applicable licence information via your Home Connect app: "Profile -> Legal information -> Licence Information".1 You can download the licence information on the brand product website.
(Pleasesearch on the product website for your appliance model and additional documents). Alternatively, you can request the relevant information from osssrequest@bshg.com or BSH Hausgerate GmbH, Carl-WeryStr.34,81739 Munich, Germany.
The source code will be made available to you on request.
Please send your request to ossrequest@bshg.com or BSH Hausgerate GmbH, Carl-Wery-Str.34, 81739 Munich, Germany.
Subject: "OSSREQUEST"
The cost of performing your request will be charged to you. This offer is valid for three years from the date of
purchase or at least as long as we offer support and spare parts for the respective appliance.
20 Declaration of Conformity
BSH Hausgeräte GmbH hereby declares that the appliance with Home Connect functionality conforms to the basic requirements and other relevant provisions of Directive 2014/53/EU.
A detailed RED Declaration of Conformity can be found online at www.siemens-home.bsh-group.com among the additional documents on the product page for your appliance.
CE
Hereby, BSH Hausgeräte GmbH declares that the appliance with Home Connect functionality is in compliance with relevant statutory requirements.
A detailed Declaration of Conformity can be found online at www.siemens-home.bsh-group.com/uk/ among the additional documents on the product page for your appliance.
UK CA
Only applies to Great Britain
2.4 GHz band (2400-2483.5 MHz): Max. 100 mW
5 GHz band (5150-5350 MHz + 5470-5725 MHz): Max. 100 mW
5 GHz WLAN (Wi-Fi): For indoor use only.
| BE | BG | CZ | DK | DE | EE | IE | EL | ES |
| FR | HR | IT | CY | LI | LV | LT | LU | HU |
| MT | NL | AT | PL | PT | RO | SI | SK | FI |
| SE | NO | CH | TR | IS | UK (NI) |
| AL | BA | MD | ME | MK | RS | UK | UA |
| 5 GHz WLAN (Wi-Fi): For indoor use only. | |||||||
WAARSCHUWING - Kans op verstikking!
WAARSCHUWING - Kans op brand!
WAARSCHUWING - Kans op letsel!
7.3 doubleShot i tripleShot
7.3 doubleShot a tripleShot
He donycka Te deTei MnaIe 8 let K npbOpu I ero ceTeBOMy npoBODy.
1.4 Yka3aHnI NO TexHnke 6e3oNaChOCTn
PPEyIpeJDEHNE-Onacnoctb yduyb!
IeTN MOryT 3aBepHyTbCBy B yPaKOBoHbI MaTePnaJI nII NaTeTbe erO ce6e Ha roIoBy n 3aDOxHyTbCra.
He noDnyscaIte deTei K ynaKoBOuHOMy MaTePnAly.
He nO3B0JIaIe Te DeTAM HrpaTb C yNaKOBouHbIM MaTePnaJIOM.
IeTN MOryT BdoXHyTb IIN IpOrlOTnTb MeJKe DeTaJI, B pe3yIbTaTe ueo 3aDOxHyTbcra.
He npdnyckaTe DeTeK MeJkM DeTaIaM.
He nO3BOLJIte DeTAM INrpaTb C MeJIKNIMn DeTaJIaMn.
I P E D U N P E X I D E H N E - O n a c h o c t b: M a r H e T h 3 M!
Прибор сODEржNT NOCTОгньie MaHHTbI. OHI MOryT BO3ДeJcTBOBaTbHa эЛ ekТpoHьie ИМпlaHTaTbI, HApPIMep, Ha KapДиOCTmUЯTOpbl ИлИнЖeKToPbI INCулнHa.
- Пицамсэл ektpoHbIMN HMnlaHTaHTaMn 3aPpeaetcnp6nJxatbcK np6bopy 6nke, yem Ha 10 cm.
Co6IIOaIte TaKHe MInHMaJIbHOe pacCTOaHne 10 cm Do BbHyToRo pe3epByapa dJa BObl.
IPEyPExEHE - Pnck HaHeceHnaBpeJa 3DopOBbIO!
3aŋp3HeHn np6opamoryntpeDCTaBnTbOnaCHOCtBdIa 3OpOBbI.
Co6IIOJaTe yKa3aHnI NO OunchTKe npnbopa IJN oBeCneHnI rHnEhbl.
2 3aunTa OkpykaOuSei cpebl N 3KOHOMN
2.1 Ytihn3aunypaKOBKn
YnakoBouHbIe MaTePnaJIbI 3KOJOrnueCkn 6e3OpaChbl N MOrTy INcNoJIb3OBAtbcra NOBTOpHo.
- YtIIN3npyTe OTdIbHbIe qacTn, npeI-BaPHTeBHO paccOpTnPoBaB INX.
2.2 3Heproc6epeKeHne
Pn co6JIIOJeHnn 3Tnx yKa3aHn np6Op 6yJeT pacXoJIOBaTb MeHbIe 3JIeKTpO-3Heprn.
YcTaHOBnTe INHTepBaJI DЯ aBTOMaTnueCKOrO OTKJIouChEnHa MInHmAlbHoe 3Ha-ueHne.
Ecni npnbop He nCnoJIb3yETc, OH otKIIIOUaETc paHbIe.
→ "Ba3OBbIe yCTaHOBKn", CtpaHnua 170
He npepbBaIte npexKeBpeMeHNo npiroTOBJIeHne HAnITka.
ν HarpeToe KOJInueCTBO BOIbI IIN MOIOKa IcNoIb3YeTcR ONITMaJIbHO.
Perylaepno ouuuaaTe npnbop ot haknn.
HaKnIb npBODNT K NOBbIeHHOMy 3Hepronotpe6JIeHIO.
3 YcTaHOBKa N NOkJIIOUeHne
3.1 Komnlektaця
Iocne pacnakOBKn npOBepbTe Bce DeTaHn OTCyTCTBHe TpaHCnOpTHbIX NOBpeKdEHN, a TaKKe KOMNJIeKTHOcTB NocTaBKn.
3aMetka: B 3aBnCmOCTn OT Tnna pnp60pa OH nocTaBJIeTcA pa3JIuHbIMn npHaJaJIeKHOCTMa. 3Tu npHaJaJIeKHOCTNo 063NaueHbI WTPNXOBaHHo paMKoI.
→Pnc.1
IoproToBbTe np6oK IcnoJIb3ObaHnIO.
3aMeKa: EcnnB Dome IMeETcY yCTaHOB Ka IJIy YMaRyuEHH BOJbl, MOXHO BbINOHnHTb HAcTpoKy "YMaRyuTeNb".
PekomeHdauny: Bbl MoKeTe N3MeHnTb yCTaHOBKn BJIIOoe BpeM.
→ "Ba30BbIe yCTaHOBKn", CtpaHnua 170
6.3 Первьн BBODВЭКСПУаТa-цИО
IoiKIIOuINB 3JIeKTPoINTuHne, BbIOnHInTe HacTPOINДЯ NEPBOr BO BBOa IprN6Opa B 3KcNlpyatauIO. INdNkaunepBOr BOBa D B 3KcNlpyatauIO NOBJIeTcR ToNbKO IIpi NEPBOM BKIOUChEN.
- BkHouHnte npH6op KhoNkoi ①.
- CneyuTe yKa3aHnIaM Ha DnCnIee.
ν Инданацина диспee Bedet no nyHK-Tam nporpaMMbl.
PpIMeuaHn
Длн�и Home Connect co6liOdaIte yka3aHnI n3 npilaraeMoN KHome Connect Dokymentaun.
EcnBbIbpaHo "IeMopeKm",ФyHKUOHNpyeTToJIbKO INHINKaunHaDnCnnnee.BbI He MoKeTe pNiroTOBHTb HAnITOK NIN BbIOnJHNTb npOrpaMMy.
6.4 Ośuigne yka3aHnHa
Co6IIOdaIte yka3aHnI dIJI ONTImaJIbHOrO IcNoJIb3OBAHnI pI6opa.
PpIMeuaHn
Ha 3aBoJe-3rTOBHTeIe 3anpOgrpaMMnpOBaHbI cTaHdApTHbIe HAcTPOIKnДЯ ONTImaJIbHO rpeKIMpaPobTl npN6opa.
Ha 3aBoJe yctaHOBlen ONTImaIbHbIy peKIM pa6oTbI KoΦeMOJKn. EcIn KoΦe BbIXOAnIT NIIb OTdJIbHbIMn KaPJIaMn ININ CNIuKOM JNdkN I NMeet CNIuKOM MaIO NeKH, MOXHO N3MeHNtB CTe- neHb NOMOna npi pa6oTaIOSeI KoΦeMOJKe.
→ "YCTaHOBKa CTeNeHn NOMOna", CtpaHnua 166
Bo Bpempa60bHa BeHTnlaCIOHHbIX OTBepCTnX Ha KpbIuKe OTEka DnT Ta6JeTOK MOryTo6pa3ObaTbcra KaeneBKn BObl.
EcnBbI He noJIb3yeTecb npI6Opom B TeueHHe ONpeDeJeHHoro BpeMeHN, OH aBTOMaTHUeCKN OTKJIIOHTcR.ДNTeHbHOCTb MOJHNO H3MeHnTB B 6a3OBbIX Ha- cTpoiKaX. → CtpaHnua 170
ItoTexHnuecknMpnuHaMa n3 npnbopa MoKeT BbIXoNDtB nap.
-
PerBbI HAnITOK eUe He o6JIaJaET OJIHbIM apOMaTOM, eCJI:
-
Bbl NcnoJIb3yeTe npI6op B nepBbI pa3;
BbI BbIIOJIHNI IN cepBnCHyO npoPamMy;
BbIДЛNTeJIbHoe BpeM He IcNoJIb3O-BaJI npI6Op.
He neTe 3OT HAnITOK.
PekomeHdaun: Cta6nIbHo MeIkoNOpnCTaKoHCnCTeHcIeNeHbIOCTnIraeTcnoCne BBOda np60paB aKcnnyatauio INpNiTOBOTHeHnHEckOJIbKINx qaWeK.
7 CtaHdapThoe ynpaBneHne
7.1 BkJIoueHne HnBbIKJIOueHne np6opa
HaKMITE ①.
PnB KluOeHn Ha dncnnee nOBnEetcI norottn Siemens. PnB BkIoUeHnn I BbIKIOUeHnn BblIOJIHHeTcA bTOMaTHueckan IpnMbIBKa np6opa. Pn BblKIOUeHnn np6op BblNyckaet nap BnoDoH c ceIbIO oUcNtKn. Ecn np6op npBbIKIOUeHnn eIe HaIpeT nn nepeD BblIOUeHneM KoPe He rotOBnCra, npMbIBKa np6opa He BblIOJIHHeTcA.
7.3 doubleShot n tripleShot
Pn6op IBa Hn Tpna Pa3a MeJet KoFe.
Tc6bI BcB6o0dbTb TOnbKO JERKoyCBOReMble n Pn7rTHbIe Ha BKyc apOMaTHueCKne BeueCTBa, Pn6op NOBtOpH NopeMaJIbBAETn 3aBapNBaET KoFeHbIe 3epHa.
Yem DoJIbWe 3aBapNBaETc Ra Koe, Tem
6OJIbWe rOpbKnx BeUeCTB N HeKeNaTeJIbHbIX apOMaTOB nonaTaET B HAnITOK. TOpB- Kne BeUeCTBa N HeKeNaTeJIbHbIe apOMaTBIOTPiuCaTeJIbHO BnIAHOT Ha BKyc N DeJaHT KOFe MeHee Pn7rTHbIM dIy yNtpe6NeHHra.
3aMeTka:Функци "doubleShot" n tripleShot" 3aBnCt OT BbIbpaHNo KpenoCTn HAnITka n erO obema.
KoΦeMonka Bpauaaetc.
He npikacaiTecb K BHyTpEHnM qaCTrM KOΦeMOJKN.
BHIMAHHE!
OnachocTb NOBpeJdeHn KaΦeMOJIKN.
Pn HnnpaBnIbHoYcTaHOBKe CTepeHn
NOMoJa BO3MOxHNo NOBpeJdeHne KoΦeMOLKn.
YcTaHaBnBaIte CTepeHb NOMOJa TOnbKO npu pa6oTaIOUeN KOfemONKe.
CTeneHb nOmona yCtHaBaNBnBaetc cTyneHauTo NOBOPOTbIM nepeKluvaTelem.
CTepeHb NOMO- HacTpoKaJa
Mekn nomonДяЗерн TemHoi obkapkn.
IopBepHnTe npeKJIIOuATeNb npOTNB YacOBO B CTpeKN.
CTepeHb nomo- HacTpoiKa Ja

Kpynhn noomI dna 3epen CBetIOI O6kapKn.
IopBepHnTe nepeKluOuTaTeJb no YacobN CTpeJIke.

YctaHObKa cTepeHn NOMOna DeIcTByET TOnbKO IocJe BToPoI YaUKN KoΦe.
PekomeHdaun: EcnKoFe BbIXOJNT IINb OTdJIbHbIMn KaJIaMn, yCTaHOBnte 60nee KpyNbI nomol.
EcnI KOFe cInuKOM KnDkn N CInuKOM MaIO neKN, yCTaHOBNTe 60Jee MeIKN IOMoI.
9 ΦильТр Дя BOДы
CootBeTCTBvUOaIaHΦOpMauncoepJXITcB I pIJIaRaEMoI DOKyMeHTaunnHome Connect.
Co6IIOaIte TaKke yKa3aHnI, pInBe-DeHHbIe B npInIoKeHnH Home Connect.
PpIMeuaHn
CobIoudaIte H3IOJKeHHbIe B DaHHoINHCTpyKcII INpaBnJIa TexHKn6e3Opac-HocTN, B TOM YncIe npN ynpaBHeHInpN6Opom uepe3 npINOJKeHneHome Connect.
→ "Bé3oNaChocTB", CtpaHua 156
- PnpOpnteTbIM ABnIeTc ynpaBHeHne HeNoocpeDCTBeHHo Ha cAmOM pnp6ope. B 3tOM cIyue OndHOBpeMeHHoe ynpaBHeHne Upe3 npIoJKeHne Home Connect HeBo3MoKHo.
13.1 Home Connect YctaHOBKN
BbinoHnTe HacTopyKy Home Connect B COOTBeTCTBnC BaUHMN IOpTe6HoCTaMn.
HacpoiHome Connect BbHaJeTeB MeHIO 6a3OBbIX yCTaHOBOK BaWero np6o- pa. IepueeHb HAcTPOeK, OTo6paKaembIX Ha DnCpIee, 3aBNCIT OT TORO, ycTaHOBNeHO li npINOJKeHne Home Connect n POnkNIO- ueHn pIn6Op K DomaunHe cTeH.
O63op HacTpoek Home Connect
3ndeBbI haIeTe o63op HacTpoek "Home Connect" n ceTeBbIX HacTpoek.
14 Ba3Obblc yCtAHOBKN
BbMOKeTe BbINOHHTb HAcTPOHy npH6Opa cornaCHO BaUIM NtPe6HOCTaM N Bbl3BaTb DOnOJIHNTeMbHbIe yHKun.
He nCnoB3yIte arpecnBhIe nn a6pa- 3NBHbIe YnCTaIne CpeIcTBA.
He nCnoIb3yIte yIcTnIe cpeIcTba, coedePkauIe aJIkoIorIb/cnIrt.
He nCnoIb3yIte JxecTkne MoaJkn nn ry6kn.
HenoJxIe nCTaIe cpeCTBa n CpeCTBa IydaJIeHnHaKInMmOryT NOBpeINb npNoOp.
Дя удаленя Накпи He Использу TeчсTuЮ ЛIMонHyю КИСлOTу, yKcyc ИПсpeДСТВа Ha OCHOBE yKcCyca.
Дя удалени haKINI N OUcTkn NC- noJIb3yIe TOnbKO NOxOJaIuIe Ta6JeTKn.
He nCnoB3yIte cpeDCTBO IaJydaJIeHnHaKInn,coedePkaUee focOfOpHyIO KNCLOTy.
- IcnoIb3yIte ToJIbKO cneuaIbHo pa3pa6oTaHHbIe IOJ KOHKpeTHbI npu6Op Ta6JIeTKn DJIaYdaJIeHn HaKINn OOHCtKN.
→ "AKececcyapbl", CtpaHua 162
Pekomehdaun
Ttataelbno npomoyte HObIe rhycbaTbe caJIΦeTKn, yTObIy ydaIHTb CoN, KOTOpBle MOryt HmEtbcRa Ha Hx. CoN MOryt npNBecTHK o6pa3oBaHIno HaJeTa pKaBUnHbI Ha NOBepXHOCTx I3 CTaIN.
OcTaKn HaKnPi, KoFe, MoNoka, MoIOuX cpeIcTB n cpeIcTB dJaYaIeHna HaKnPi BceIgDa ydaJIrTe HeMeJInHeHO, YTO6bl IpeIodTbpaITb o6pa3oBaHne Koppo3nn.
15.3 OuHcTka npHbopa
PNEyPExKDeHne
Onachoctb nopaxeHHN 3JIeKTPnueckHM TOKOM!
15.5 OuHcTka eMkoCTn IJIa MoJIOKa
Iro rHnHeHnueeCKm COO6paKeHHaM pery
JIAPHO OUYUaIte EMKocTb IJRA MOLOKa.
EMKocTb IJRA MOLOKa MOXHO MbITb B NOcYdOMoEuHo MaUNHe. CJeDyIte
IHCTpyKcNn B KApTINHKax, npNBeDeEHNo B
3Toi IHCTpyKcNn.
→Pc.17-18
15.6 CepBnchIe npoPamMbI
Pn yctaHOBKe/CHrTnΦNtBtpaIJI B0DbI HIN TtAteMbHO OuNCTKN pnp6oPA HCNoJb3yIte cepBnchIe nporpaMMbl. Pn HeoXoDMocTN BblONHITb cepBnchHyIO nporpaMMy (HaNPmEp, ouNcTK) np6Op yBeDOMnEe 06 3Tom.
BHIMAHNE!
HepaBnBHeO nn HeCBoeBpeMeHHoe BbIOnHeHne OunchKu ydaJeHna HAKIN MoKeT HaheCTn uiepe npibopy.
Pocne coo6eHnHaMeJeHbBbIOnHnTe npoecc ydaenHn HaKnH.
BOTCEK DnTa6NeTOK KlaNTe TOnbKO Uc7rUne Ta6NetkN.
He klaIte Ta6IeTKn dJa ydaJIeHna KaIIIN I npOue cpeIcTBa B OTeK dJa Ta6IeTOK.
PpIMeuaHn
IinCnnei noka3bBaet dInTeJIbHOCTb npocecca.
Ecn np6op 6loKnpoBaH,IM MoXHO 6ydt CHOba NOJb3OBAbCra TOnbKO nOcne BblONHeHHoro ydaJeHnHaKaHnI.
HcnoJb3OBaHne cepBnchbIX nporpaMM
-
HaxMMte ^+
-
Haxmte Ha cIMBOJ HxHNo nporpaM Mbl.
ν Инданашина диспец BeTeT no nyHK-Tam npoRpaMMbl.
O63op cepBnchbIX npoPpAMM
3ndecb npINBOIDITc8 063Op cepBnCbIX nporpaMM.
3aMeTka:Ha HaayalbHOM 3KpaHe OTo6paKaeTcK KOJIueCTBO HAnITKOB,OCTaBbIXxCr Do BblOpJIHeHnI pOgrpaMMbl, IN BpeM.
1.3 O6MeJKeHnKaKoJa KOpNcTyBaayiB
ДiTи BIKOM BiD 8 pOKiB, a TAKOJ OCO6n 3 O6mExeHIMN φi3nUHIMN, CEHCOPHIMN a6o PO3yMOBIMN 3Ii6HOCTaMn U3 6paKOM DOCbIy Ta/a60 3HaHb MOKyTb KOpNCtYBaTINcA ZIM nPpIaNOM TiIbKN iId HaIraIOM a6o NiCIA OTPImaHNN Bka3iBOK i3 6e3neuHOrO KOpNCTyBaHHr nPpIaNOM i NiCJIaTOR, JK BOHN yCBiIDOMnIn MOxJIbBi NOB'J3aHI 3 ZIM He6e3NeKn.
ДiTМ 3a6bOpHeNo rpaTnC3 npuJaOM.
YCTaHOBIb HaIMeHsU TpNBaIcTb 3aTPMKN aBTOMaTHO BUMKHeH H.
ν Koln npilaIom He 6yIyb KOpNCTyBaTnCra, BiH BIMNKaTUMeTbcr paHiie.
→ "OChOBHi npaMeTpN", CToP. 202
He nepeepuBaIte npiroTuBaHHa HanoiB nepeDuacHO.
ν HarpiTa KIbKICTb BOAn a6o MoJOKa 6yJe BnKOpNCTaHa ONTUMaJIbHO.
PergyIaRHO BuaJaIe 3 npilaNy HauKnI.
V BiДклади haKiny piДВиуIOTb eHeprocnoxINBaHHa.
3 YcTaHOBJIeHNeI niKJIIOUeHHa
3.1 KomnjeKT NOCTABKN
IicIpaO3naKaYBaHHnepeBipTe, uKOMnJIeKT NOBHN i uH He NIOuKOdINo RaKiCb YactHNI pI d uac TpaHCnpTyBaHHa.
3ayBaHexHH: 3aIeKHO BiM MoJeI npIaNy B KOMnIeKT BXoIaTb pi3Hi akcesCyapn. IodatKobi akcesCyapn no-3HaueHNIyHKTInpHOIO paMKOIO.
→ Man. 1
- YbIMKHiTb npuIaJ KHOJIKOIO ①.
- Bukohy Te Bka3iBKN, 10 3'YBJIaTnMyTbCn Ha nCnIeI.
HaДиспл ei 3'ЯВЛТИМУТьСЯИCTpyKUJI 3 BIVKOHAHH npOrpamN.
Bka3iBku
- ΜύοςΗλαψτυβατη Home Connect, Kεργινιδει ΣθαδαHOι έπερτρυκμείου οὐδό Home Connect.
YKIO Bn6paHO BapiaHT "IeMopeKIM", npaTOE TINbKN DnCnJIeHa IHNkaIi. FOTyBaTn HanoI YN BKNOHyBaTn PpOrpaMn HEmoXJInBO.
6.4 3araJIbHI Bkα3iBKN
LIO6 OINTMmaJIbHO KOpIcTByBaTINcR IpUlaIOM,3BaJaTe Ha BKa3iBKn.
Bka3iBkn
Ha 3aBoDi BCTaHOBHeO CTAHdapTHi npaMeTpNi DnI ONTImaJIbHOrOpexkMy po60t NiPnlaNy.
KabOMOJIky BiDpeRyIbOBAHO Ha 3aBODi IJN ONTIMaJIbHOI PO6OTn. JkIo KaBa Teue IJNSe KpApJIaMn a6o HauTo pIka N MaE 3aMaIOnPiHKn, MoKHa NiIkOpuRyBatn CTynIHb POMeNy NiI qac PO6OTn KaBOMOJIkn. → "BIn6ip CtynPeHr POMeLy", CToP.197
Пд уас Користувашина Вerteцліцинх плинхі кршци BiDciKу Дп ТаБлетOK можлamba пова Крапель BODи.
JaKIO He KopnCTyBaTnCnI npInaDOM ynpoIOBx NEBHO Yacy, BIn aBTOMaTnUHO BmKHeTbCn. TpNBAJIcTB cboTO nepioOy MOxHa 3MiHHTN B OCHOBHX HaIaWtYBaHnX. → CToP.202
3TexhiuHnx npuHn 3cepeiHn npilaIy MoKe BHXoINTn npa.
■ Perpши npuROTOBaHn HaniH He 6yde MaTn BIPAxHeHOr apOMaTy, kUO:
- Bn koprncTyecr npnilaIom ypepe.
- Bn ⅢoHOBVKOHaJIncepBicHy nporpaMy.
- Bn IOBRO He BMNKaJI npNJaI.
He nIte zboTo hanoIO.
Iopapa: Cta6iBHa Dpi6HOpnCTa KpemOba NiHKa DoCraeTbcr NiCJI npNOrTyBaHHK iNbKOx YauoK BiD NooatKy KopncTyBaHHn PpnilaDom.
7 Ochobhi BiIDomocTi npo KopnCTyBaHHa
7.1 YbIMKHeHHa6o BmKHeHHa npHaNy
- Hatnchitb ①.
Плд ус ac yBIMKHeHЯ Ha dinCnJIeI 3'YBNTbcr Iorotin Siemens.Плд ус ac yBIMKHeHЯ BIMKHeHЯ prnilad aBTOMaTUnHO npOMBaetbcr. BIMNKaIouncs, prnilad uNCTntbcr. BINyckaIoun napyВпДон.ЯКIo prnilaHa MOMeHT yBIMKHeHЯ ZeTepln a6o nepei BIMKHeHHaHanoI He rotYBaIn, prnilaD He npOMBaETbcr.
7.2 Пнготуваима наоов
Tyt Bn Di3HaεTeC8aK pniroTyBaTHBnOpaHn Hani.
YBATA!
He6e3neka oniky!
LioHOn npiroToBaHi hanoi dyxke ra-paui.
Y paizi noTpe6n daBaIte HanoM OXOLOHUTN.
YHnKaIte nOtpaIIaHHHa shkipy piINi napn, IIO BNXoJrTb i3 npInaNy.
Bka3iBkn
3a DeKnX npaMeTpIB Kaba roTyetbCBy KijbKa etanIB. 3aueKaIte, DOKN IpOcE npuRTOyBaHHa NOBHICTU 3aBepuHTbcra.
IIO6 npiroToyBaTu Hani3 MOJOKOM,do npilaNy NotpiHO npneiHaTn 3aONBHeHm MOJOKOM KOHTeHep a6o,3a DOnOMOrOHaanTepa,MOJOnHn PaKeT.
■Приедно Контейнел Дд молoka abo aanTep Дл пaketib MOKHa Tlbkn nicn npabunbHOrOBCTaHOBLeHHcNCTeMn IOaui MoIOKa 3 aanTepom i TpykoTo B KpnsuДdo3aTopa HanoivB.
KoHTeHepIJMAJMOJOKaP03pO6JIeHn CpeiaJIbHO nId CEi npUlaI. KoHTeHepIJMAJMOJOKa Ppu3HaueHn TIIbKn IJN TOI, 0o6 36epiraT MOnJOKOBIObYTOBHX yMOBaX i B XOJODINbHNky.
Якшо молоча систema Heпочида, нал'tа rapяча Вдаможе міctити He3нayні дOMiшки молoka.
IoparNi
3amictb MOLOKA MOXHa BVKOpnCTOByBaTn HaIoi poclinHHOrIOXoJxHeHHa,HaPnKJaC OeBeMOJOKO.
■AkiCTbMOIoUHOI NiHKn 3aJIeXHTb BiTtNy BnKOpNCTOByBaHOrO MoIOKa a6o pocInHHOrO HanoIO.
7.3 doubleShot i tripleShot
PpnilaMJIe KaBy DBiCi a6o TpruCi.
LIOb BnBilbHraIcN TIIbKn PpneMHi Ha CMAk i Do6pe 3acBOIOBaHI apomatuHi peOBoHH, PpnilaD 3aHOBO MeJe 3epHa N 3aBapIOE KaBy.
YIM DOBSe 3aBapIOeTbCkaba,TIM 6iJIbSe rIPKnxpeyOBnIH eBaXaHnx apomatIB BnBilbHReTbCn.FipKi peyOBnHn HeBaXaHi apomATn NoriPpUOTb CMAk i 3acBOIOBaHicTb KaBN.
3ayBaXeHHa:ФyHkuii "doubleShot" i "tripleShot" 3aIeKaatb BiD BnOpaHnx MiUHOCTI Ta o6'Emy HanoIO.
7.4 ПпнгOTуВаHHЯ KaBOBOrO HANOHO 3 MOJIOKOM
YcIbOMy npIKlaJI Mm PO3rJHEmo, JAK pIINrOITyBaTn IaTe-MaK'rTO.
YBATA!
He6e3neKa onikib!
Molouha cnCTema dYxE cnIbHO ha-rpiBaetbcra.
Hikon He TopkaTecra rapaoMolouHOI CnCTEMN.
- Persh Hix TopkaTnca MOJouHOi CnCTeMn, daTe iN OXJOHOHTN.
Bumorm
KoHTeHepIaMOJoka a60 MoJOnuHN aadantep npueHaHn.
KoHTeHepIaMOLOKa 3aIOBHeHm MOLOKOM, aOb IJIaHr MOLOUHO r aIaNTepa 3aHypeHn y MOLOKO.
- NocTaBTe cKJIaHKy NiД Do3aTop.
- HatnChiTb "KlaCnka".
-
Bn6epiTb i HATNCHITb CUMBOJ IaTeMaK'rTO.
-
Lio6 3miHHTn MiUHicTb, HATNCKaIte 0.
- Lio6 3miHHTn O6'em HanoIO, HATNCKaIte.
-
Lio6 3miHHTu chaTky MoIoka, HATNCKaIte B.
-
Hatncihitb "Po3nooyatn" i doue- kaHTecs 3aBepweHnI npoccy.
-
Lio6 noBHCtIO 3yINHHTN npnroTByBaHHHaNOIO, HATNCHTb "3yINHHTN".
-
Ⅲo6 3ynHHTn TijbKn NTOOHyn eTan npnroTyBaHHa,HaTNCiTb "PpOnyctntn".
Iicna npnrotyBaHHa MOLOuHa cnCTema aBTOMaTHUHO OUYuaetbCk KOPOTKmIMnYbCOM nap.
Bka3iBkn
JaKIO He 3MIHITN KOJHOrO npaMeTpa IpoTgROM pIu6JIIN3HO 30c, pIpuIaN BnIe 3peXIMy HanaaHTyBaHHra.
- Пилад зберіга\'е пapamETpn abToMaTnUH0.
Iopapa: Ipeep npriroTyBaHHa HanoiB yauKm MoXHa Niirpibatn Ra-paHO BOIOIO aOcneiaJbHm NiirpiBaem
7.5 Ondohouache npnroTyBaHnHaBQxu
Длг Деткнх HaNoB MOЖHa rToyBaTn BOHouac DiI yauKn.
3ayBaHexHH:KoIaKTHBHaФyHKcIi "doubleShot"abo "tripleShot", OndHouacHe npuROTuBaHHaBox Ya- WOK He NiIDTpMMyETcbr.
- Hatnchitb CmB0JI 6aKaHOro HanoIO.
- HATNCiTb
ν BnopaHn BapiaHT BiOobpaxaetbca Ha nucnPJI.
3. NocTaBTe DBi YaUkN PiI Do3aTOp, IiBOpyu i npaBOpyu.
4. HatncHtB "Poznoatu".
ПригOTуВаHHЯ HANOЮ CКладаETьсЯ 3 takоi KiIbKocTi etanib: 2. 3epHa MeJIOTbcr TaKy KiIbKicTb pa3iB: 2.
Hani 3aBapIOeTbcra, a NOTIM Teue B YauKn.
5. Дουема Teся за Воршени поцecу.
8 KaBOMOJIka
Lcien npinad o6laanHnpeyIbOBHO KABOMJKOIO, 0o Dae 3MOryIHINBIaJIbHO KOpNpyBaTn CTyniHbIOMeNy KaBOBHX 3epeH.
8.1 Bn6ip cTypeHЯ nOmeJy
14.1 3MiHa OCHOBnX HaJa- StTyBaHb
- Hatnchitb
DinCJIeI nOKa3ye cINcOK
OCHOBHnX npaMeTpB.
- 3MiHiTb Notpi6Hn OCHOBHN npaMeTp.
ν Пилад abTomatnUHO 36epiraocHOBnI npaMeTp. - Lio6 BnHTn 3 OCHOBnHnnapaMeTpib, HATNCiTb
14.2 OrlaO cHOBnX npaMeTpipB
Tyt HabeJeHn OrlaOCHOBnX npaMeTpib.
16 YcyuHnHa HecnpaBHOCTeI
He3NaHHi HeCnpaBHOCTI npnlaNy moKHa yCyBaTn BlnachOpyu. Nepu HiX 3BeptaTnca Do cepBicHOi Cnyk6n, CKOpNCtaTecr BiIOMOCTAmN IpO yCyHeHHr HeCnpaBHOCTe. TaK moKHa yHNKHyTN 3aIBNX BNtpaT.
YBAGA!
Hebe3neka ypaXeHH eJekTpHnM cTpymOM!
PemOHTHi pOBoTn, BnKoHaHl HeHaJIeXHHm YInHOM, MoKyTb CTaHOBHTn He6e3IeKy IIN KOpNCTyBaUa.
PemOHtByaTN npuJa dO3BOJeHO tIbKn faxiBzM.
-Для ремоHTу пиладу ДОЗВОЛЯЕТСВЕ ВИКОПИСТОВУВАТИ ЛИшЕ OРИГИАЛБHI 3ANUCACTUNH.
UIOy uHnKHyTN He6e3neK, y pa3i NooKoJKeHHaKeJIIO KINBLeHHa CbOro npuIaNy Ioro 3amIHy MaE BnKOHyBaTN BnPO6HnK, cepBicHn CEHTp a60 ocOba 3 BiIDNOBtIO KBAJIΦikaieIO.
| Hecnpabnictb | Причины та усунецнг Hecepabnocteи |
| Пробад перастов 畴уваши на Команд. | Ha полади Винникla HecepabnICTb. 1. Виимить Штесельни Винку 3 розтукий посякайе 10 c. 2. Вставе Штесельни Винку в розтук. |
| Home Connect па- цюс He=npвльно. | Можлбі різné Причип. ▷ Легдіть на сait www.home-connect.com. |
| Пробад видае тільки ВоDU, 6e3 кав. | Пробад не розпізăс порожни Контейнэр дія Кавових зер. ▷ 3араз taxікіе кавові зер. Засмічedo відсік дія меленій каві білока заварюв- нні. ▷ Oочіstыті осык 3аварювань. |
| Зерна нато масій не падають у кавомолку. ▷ 3легka постукайті пі контейнэр дія кавових 3e- рeh. ▷ 3mініть сорт каві. ▷ He Виковостовіті масій зерп. ▷ Лотріть порожни Контейнэр дія кавових зер. ВOLTOGO rANCHIPKOJO. | |
| Заварюваль的新СТАВLEНОН He=npвльно. 1. Пе配电онаітеся, за варюваль的新СТОК прав- льно Bставлени i міцно зафікован. 2. 3суніte в缩水иі червонь вaxіль наію. 3. Uстановіті крашky заварюваль新三СТОК. | |
| Hecnpabhnicb | Прична та усуньесправносту |
| Пробад не видае мо- лочу пину. | Молоча сисема бухда. → Помиite молочу сисему в посydомини маш- нi. |
| Гунчу Trубку He занурно В мол Okо. → 3бльшte кльбic'tь молoka. → Перевирte, чь занурно Гунчу Trубку В мол Okо. | |
| У роблadi вдklалося багато накуп. → Вдаліт b наку i3 праладу. | |
| Молоча сисема не Всмokтуе мол Okо. | Молочу сисему 3ibpaно Ненравиьно. → Правиьно 3беріт b молочу сисему. |
| Ненравиьна послідовсість пrie\'dнань Emhoctі дя молOkа в молочи Сисем. → Стоатky BCTавte молочу сисему в doЗатор, a ТODI BCTahOBiTb EmHic'tь дя молOka. | |
| Гунчу Trубку He занурно В мол Okо. → 3бльшte кльбic'tь молoka. → Перевирte, чь занурно Гунчу Trубку В мол Okо. | |
| Молоча пина нато холони. | Моложа нато xолоне. → Виkopustobуіte телпe мол Okо. |
| Пробад не видае га- рачу Bodу. | Молоча сисема бухда. → Помиite молочу сисему в посydомини маш- нi. |
| He вда\'ься Встановити заю знaitи мolyочу сисему. | Ненравиьна послідовсість могтожу. → Сторшу пrie\'dнaite молочу сисему, a ТODI - emHic'tь дя молOka. Пiod уас demontажу виимаіte с网络传播у emHic'tь дя молOka, a ТODI - MOLOCHY CUS- CTEMy. |
| Пробад не видае нани. | Фільт дя Bodи містпь Nobітг. 1. Потprimаіte Фільт оТВОРOM Догори у Bodi, ДOKи 3 НьOTO He перацHTь ВИХОДИТи БУьБашкі nobi- trp. 2. Вставе Фільт на місцe. → РIBNO I MIIHO BTINCHITь Фільт дя Bodи у ГИЗДО на pezeрвуAPI. |
| Залишки засову дя ВидаLEння на��иу засmічуOTь pezeрвуap дя Bodи. 1. Вииміт b pezeрвуap дя Bodи. 2. Ретельно оочістпe pezeрвуap дя Bodи. | |
| Hecnpabhictb | Прична та усунноюпeй. |
| Ha ди пиладу e крални вори. | Пддон Вийято зарано. Виимаite пддон ліше 3a кільka секунд піся OCTанього приготуваши наю. |
| He вдастбая Вийати 6лok заварювань. | Фikсаня He bідпugskaстся, заварювалыньий 6лok з actрг. Виимкіть пилад, зждіть 3хвіліни i 3нов у비-MKHіть. |
| Kabomolka He 3any-ckaftься. | Прилад занадо rapачи. 1. Bід'энайte пилад bід[elektromepexki. 2. Почекайte 1 rod., пооб Datи пиладу oxoloун'ti. |
| Kabomolka He мeled зерна,хоча Контейнера Дд зерен повни. | Зерна нало маси He падоть y kabOMOLKY. Зlerka постукайte по kohteyнepy дд Кавobих 3e-рен. Змініть сорт кави. He bікористовіte маси зерна. Постріть поожній Контейнера Дд Кавobих 3epen BOLOTOю raнчіркою. |
| Якіст KBИ aбо молочи пінки 3нauно КOLTBAeTbСя. | Прилад забухени Нakіпом. Видаліть накуи i3 пиладу. |
| Якіст молочи пінки КOLTBAeTbСя. | Якіст b молочи пінки залжіть bід сорту Викори-stobуваного мolyoka aбо наю рoclinного похоженя. Шоб onтимізвати peşув差别, вібэріь bідповідни сорт мolyoka aбо наю рoclinного похоженя. |
| Кава He bідстбая aбо bідстбая пі крални. He досягстбая устовленио ob'eм. | Установленио занадо дріниnomел. Установіть грубішіnomel. →"Вибір сту老人家", Стор. 197 |
| Y риладi bідкіалось barato Нakіпу. Видаліть накуи i3 пиладу. | |
| Фільті дді Bodи містпь Nobітpres. 1. Потримаite phільтг OTвором догору в Bodі, дOKи 3 NBOTO He nepectан'tь ВixODNTNБуьбашки nobі- trь. 2. Вставіе phільт р на місцe. | |
| Прилад б rudni. Очістіte bідікін 3аварювань. Видаліть накуи i очістіte пірід. | |
| Hecnpabhictb | Прична та усуненя-heс=npавноcteи |
| Кава 6e3 пики. | Heontimальни сорт кави. • ВикоростовуITE сорт кави 3 більшим вмістом зe-peн робUCTA. • ВикоростовуITE зерна, обсможени до temнишого кольору. |
| Зерна обсможени вже давно. • ВикоростовуITE сбіжі зерна. | |
| Ступінь пomелу не відnobідае кавOBим зерham. • Ustahовіть sixьш дriб Horo поем. → "Вибір стуменя пomerу", Стор. 197 | |
| Кава мae занадто ки-cлий писмak. | Установлени загрубий пomerл. • Ustahovibt sixьш дriб Horo поем. → "Вибір стуменя пomerу", Стор. 197 |
| Heontimальни сорт кави. • ВикоростовуITE сорт кави 3 sixьшим вмістом зe-peн рobUCTA. • ВикорostовуITE зерна, обсможени до temнишOTO кольору. | |
| Кава мae наито ri-pkni писмak. | Ustahовлени занадто дriбнii пomerл. • Ustahovibt sixьш пomer. → "Вибір стуменя пomerу", Стор. 197 |
| Heontimальни сорт кави. • 3mініть сорт кави. | |
| Кава мae писмak ropilinx зерн. | Ustahовлени занадто дriбнii пomerl. • Ustahovibt sixьш пomer. → "Вибір стуменя пomerу", Стор. 197 |
| Heontimальни сорт кави. • 3mініть сорт кави. | |
| Ustahовлени замису Temпегату рави. • Ustahovibt sixьш Tempepatу рави. | |
| Кавoba ryца неdo-statнbosцильna та занадто волога. | He bCTahovblengо ontmальни ступінь пomerу. • Ustahovibt sixьш abo sixьш дriбнii пomerl. → "Вибір стуменя пomerу", Стор. 197 |
| Зерна наито маси. • ВикоростовуITE зерна{iшого сорту. | |
| Hecnpabnictb | Прична та усунега Несправносту |
| Ha дисплий зявлес- ыся indидаця "Bставто заразю- валенький". | Кршka неревно вставло. 1. Пе配电онатся, по заразюваший бок прав- льно вставло и міцно зафікован. 2. 3сунtle ворхни чер党支部а вaxьл нал; 3. Yctановіт кршку заразюва hareо? 6лоча. |
| Ha дисплий зявлес- ыся вksaizibka "Заличесу Body",хоча peзерbvayap пон宪. | Peзерbvayap по Bodи встановлесно Несправно. ▷Правильно вставто peзерbvayap по Bodи. |
| Peзерbvayap по Bodи містить газовану Bodу. ▷Заловітpeзерbvayap по Bodи CBIXKO BOdo- п探测но Bodою. | |
| Поча baseь у peзерbvayapi по Bodи застг. 1. Вииміть peзерbvayap по Bodи. 2. Ретельно оочьte peзерbvayap по Bodи. | |
| Новий Фільту по Bodи не рpopито 3гідно 3ін- струкцию. 1. Ромиту по Bodи 3гідно 3інструкцию. 2. Рочіть коростуваший Фільтум по Bodи. | |
| Фільту по Bodи містить посту. 1. Потримайу Фільту OTВОРМ Догору у Bodi, дOKи 3 нього не пechостаунь ВинODИТУБДБАСКИ NOVI- ту. 2. Bставто Фільту на міц承受. | |
| Рescypс Фільту по Bodи Виерпано. ▷Вставто Новий Фільту по Bodи. | |
| Відіklади накиу в peзерbvayapi по Bodи за CMічуютб систем. 1. Ретельно оочьtupeзерbvayap по Bodи. 2. 3anyc'tь поportу видалени на ксуну. | |
| Ha дисплий зявлес- ыся indидаця "Почисту заразю- валенький". | Бл_OK заварювань на руdnи. ▷Очирьту Бл_OK заварювань. |
| Mexанізм SFLOKA заварювань заідіа. ▷Очирьту SFLOKA заварювань. | |
| Ha дисплий зявлес- ыся indидаця "Зав- сokedа accompanying" "Зав- сokedа accompanying" "Зав- сokedа accompanying" "Зав- сokedа accompanying" "Зав- сokedа accompanying" "Зав- сokedа accompanying" "Зав- сokedа accompanying" "Зав- сokedа accompanying" "Зав- сokedа accompanying" "Зав- сokedа accompanying" "Зав- сokedа accompanying" "Зав- сokedа accompanying" "Zakov- сokedа accompanying" "Zakov- сokedа accompanying" "Zakov- сokedа accompanying" "Zakov- сokedа accompanying" "Zakov- сokedа accompanying" "Zakov- сokedа accompanying" "Zakov- сokedа accompanying" "Zakov- сokedа accompanying" "Zakov- сokedа accompanying" "Zakov- сokedа accompanying" "Zakov- сokedа accompanying" "Zakov-- сokedа accompanying" "Zakov- сokedа accompanying" "Zakov- сokedа accompanying" "Zakov- сokedа accompanying" "Zakov- сokedа accompanying" "Zakov- сokedа accompanying" "Zakov- сokedа accompanying" "Zakov- сokedа accompanying" "Zakov- сokedа accompanying" "Zakov- сokedа accompanying" "Zakov- сokedа accompanying" "Zakov - сokedа accompanying" "Zakov- сokedа accompanying" "Zakov- сokedа accompanying" "Zakov- сokedа accompanying" "Zakov- сokedа accompanying" "Zakov- сokedа accompanying" "Zakov- сokedа accompanying" "Zakov- сokedа accompanying" "Zakov- сokedа accompanying" "Zakov- сokedа accompanying" "Zakov- сokedа accompanying" "Zakov- cokа accompanying" "Zakov- cokа accompanying" "Zakov- cokа accompanying" "Zakov- cokа accompanying" "Zakov- cokа accompanying" "Zakov- cokа accompanying" "Zakov- cokа accompanying" "Zakov- cokа accompanying" "Zakov- cokа accompanying" "Zakov- cokа accompanying" "Zakov- cokа accompanying" "Zakov- cokai accompanying" "Zakov- cokai accompanying" "Zakov- cokai accompanying" "Zakov- cokai accompanying" "Zakov- cokai accompanying" "Zakov- cokai accompanying" "Zakov- cokai accompanying" "Zakov- cokai accompanying" "Zakov- cokai accompanying" "Zakov- cokai accompanying" "Zakov- cokai accompanying" "Zakov- cokai accompany" "Zakov- cokai accompany" "Zakov- cokai accompany" "Zakov- cokai accompany" "Zakov- cokai accompany" "Zakov- cokai accompany" "Zakov- cokai accompany" "Zakov- cokai accompany" "Zakov- cokai accompany" "Zakov- cokai accompany" "Zakov- cokai accompany" "Zakov- cokai accompany' "Zakov- cokai accompany" "Zakov- cokai accompany" "Zakov- cokai accompany" "Zakov- cokai accompany" "Zakov- cokai accompany" "Zakov- cokai accompany" "Zakov- cokai accompany" "Zakov- cokai accompany" "Zakov- cokai accompany" "Zakov- cokai accompany" "Zakov- cokai accompany" “Zakov- cokai accompany" "Zakov- cokai accompany" "Zakov- cokai accompany" "Zakov- cokai accompany" "Zakov- cokai accompany" "Zakov- cokai accompany" "Zakov- cokai accompany" "Zakov- cokai accompany" "Zakov- cokai accompany" "Zakov- cokai accompany" "Zakov- cokai accompany" "Зakov- cokai accompany" "Зakov- cokai accompany" "Зakov- cokai accompany" "Зakov- cokai accompany" "Зakov- cokai accompany" "Зakov- cokai accompany" "Зakov- cokai accompany" "Зakov- cokai accompany" "Зakov- cokai accompany" "Зakov- cokai accompany" "Зakov- cokai accompany" "З Kov- cokai accompany" "Зakov- cokai accompany" "Зakov- cokai accompany" "Зakov- cokai accompany" "Зakov- cokai accompany" "Зakov- cokai accompany" "Зakov- cokai accompany" "Зakov- cokai accompany" "Зakov- cokai accompany" "Зakov- cokai accompany" "Зakov- cokai accompany" "Зakov-- cokai accompany" "Зakov- cokai accompany" "Зakov- cokai accompany" "Зakov- cokai accompany" "Зakov- cokai accompany" "Зakov- cokai accompany" "Зakov- cokai accompany" "Зakov- cokai accompany" "Зakov- cokai accompany" "Зakov- cokai accompany" "Зakov- cokai accompany" "Зakov - cokai accompany" "Зakov- cokai accompany" "Зakov- cokai accompany" "Зakov- cokai accompany" "Зakov- cokai accompany" "Зakov- cokai accompany" "Зakov- cokai accompany" "Зakov- cokai accompany" "Зakov- cokai accompany" "Зakov- cokai accompany" "Зakov- cokai accompany" "Зakov- сokai accompany" "Зakov- cokai accompany" "Зakov- cokai accompany" "Зakov- cokai accompany" "Зakov- cokai accompany" "Зakov- cokai accompany" "Зakov- cokai accompany" "Зakov- cokai accompany" "Зakov- cokai accompany" "Зakov- cokai accompany" "Зakov- cokai accompany" "Зakov- cikpo" "Завлесь "Завлесь "Завлесь "Завлесь "Завлесь "Завлесь "Завлесь "Завлесь "Завлесь "Завлесь "Завлесь "Завлесь "Завлесь "Завлесь "Завлесь "Zавлесь "Zавлесь "Zавлесь "Zавлесь "Zавлесь "Zавлесь "Zавлесь "Zавлесь "Zавлесь "Zавлесь "Zавлесь "Zавлесь "Zавлесь "Zавлесь "Zав於体 "Zав於体 "Zав於体 "Zав於体 "Zав於体 "Zав於体 "Zав於体 "Zав於体 "Zав於体 "Zав於体 "Zав於体 "Zав於体 "Zав於体 "Zав於体 "Zав於体 "Zав於体 "Zав於体 "Zav- sckay "Zav- sckay "Zav- sckay "Zav- sckay "Zav- sckay "Zav- sckay "Zav- sckay "Zav- sckay "Zav- sckay "Zav- sckay "Zav- sckay "Zav- sckay "Zav- sckay "Zaz- sckay "Zaz- sckay "Zaz- sckay "Zaz- sckay "Zaz- sckay "Zaz- sckay "Zaz- sckay "Zaz- sckay "Zaz- sckay "Zaz- sckay "Zaz- sckay "Zaz- sckay "Zaz- scky "Zaz- scky "Zaz- scky "Zaz- scky "Zaz- scky "Zaz- scky "Zaz- scky "Zaz- scky "Zaz- scky "Zaz- scky "Zaz- scky "Zaz- scky "Zaz- scky "Zak- scky "Zak- scky "Zak- scky "Zak- scky "Zak- scky "Zak- scky "Zak- scky "Zak- scky "Zak- scky "Zak- scky "Zak- scky "Zak- scky "Zak- sckу "Zak- sckу "Zak- sckу "Zak- sckу "Zak- sckу "Zak- sckу "Zak- sckу "Zak- sckу "Zak- sckу "Zak- sckу "Zak- sckу "Zak- sckу "Zak- sckу "Zaz- sckу "Zaz- sckу "Zaz- sckу "Zaz- sckу "Zaz- sckу "Zaz- sckу "Zaz- sckу "Zaz- sckу "Zaz- sckу "Zaz- sckу "Zaz- sckу "Zaz- sckу "Zaz- scky "Zaz- sckу "Zaz- sckу "Zaz- sckу "Zaz- sckу "Zaz- sckу "Zaz- sckу "Zaz- sckу "Zaz- sckу "Zaz- sckу "Zaz- sckу "Zaz- sckу "Zaz- sckу "Zak- sckу "Zak- sckу "Zak- sckу "Zak- sckу "Zak- sckу "Zak- sckу "Zak- sckу "Zak- sckу "Zak- sckу "Zak- sckу "Zak- sckу "Zak- scky "Zak- sckу "Zak- sckу "Zak- sckу "Zak- sckу "Zak- sckу "Zak- sckу "Zak- sckу "Zak- sckу "Zak- sckу "Zak- sckу "Zak- sckу "Zaz- sckу "Zak- sckу "Zaz- sckу "Zaz- sckу "Zaz- sckу "Zaz- sckу "Zaz- sckу "Zaz- sckу "Zaz- sckу "Zaz- sckу "Zaz- sckу "Zaz- sckу "Zaz- scky "Zaz- scky "Zaz- scky "Zaz- scky "Zaz- scky "Zaz- scky "Zaz- scky "Zaz- scky "Zaz- scky "Zaz- scky "Zaz- scky "Zaz- scky "Zac- sckу "Zac- sckу "Zac- sckу "Zac- sckу "Zac- sckу "Zac- sckу "Zac- sckу "Zac- sckу "Zac- sckу "Zac- sckу "Zac- sckу "Zac- sckу "Zac- sckу "Zaz- sckу "Zaz- sckу "Zaz- sckу "Zaz- sckу "Zaz- sckу "Zaz- sckу "Zaz- sckу "Zaz- sckу "Zaz- sckу "Zaz- sckу "Zaz- sckу "Zaz- sck: "Zaz- sck: "Zaz- sck: "Zaz- sck: "Zaz- sck: "Zaz- sck: "Zaz- sck: "Zaz- sck: "Zaz- sck: "Zaz- sck: "Zaz- sck: "Zaz- sck: "Zaz- sck: "Zaz- sck: "Zaz- sck: " Zaz- sck: "Zaz- sck: "Zaz- sck: "Zaz- sck: "Zaz- sck: "Zaz- sck: "Zaz- sck: "Zaz- sck: "Zaz- sck: "Zaz- sck: "Zaz- sck: "Zaz- sck: "Zaz- sck: "Zaz- sck: "Zaz - sck: "Zaz- sck: "Zaz- sck: "Zaz- sck: "Zaz- sck: "Zaz- sck: "Zaz- sck: "Zaz- sck: "Zaz- sck: "Zaz- sck: "Zaz- sck: "Zaz- sck: "Zaz- sck: "Zaz- sck: "Zaz- ssk: "Zaz- sck: "Zaz- sck: "Zaz- sck: "Zaz- sck: "Zaz- sck: "Zaz- sck: "Zaz- sck: "Zaz- sck: "Zaz- sck: "Zaz- sck: "Zaz- sck: "Zaz- sck: "Zaz- sck: "Zaz- sck: 'Zaz- sck: "Zaz- sck: "Zaz- sck: "Zaz- sck: "Zaz- sck: "Zaz- sck: "Zaz- sck: "Zaz- sck: "Zaz- sck: "Zaz- sck: "Zaz- sck: "Zaz- sck: "Zaz- sck: "Zaz- sck: "Zak- sck: "Zak- sck: "Zak- sck: "Zak- sck: "Zak- sck: "Zak- sck: "Zak- sck: "Zak- sck: "Zak- sck: "Zak- sck: "Zak- sck: "Zak- sck: "Zak- sck: "Zak- sck: "Zak- SCK "Zak- sck "Zak- sck "Zak- sck "Zak- sck "Zak- sck "Zak- sck "Zak- sck "Zak- sck "Zak- sck "Zak- sck "Zak- sck "Zak- sck "Zak- sck "Zak- sck "Zak- sck 'Zak- sck "Zak- sck "Zak- sck "Zak- sck "Zak- sck "Zak- sck "Zak- sck "Zak- sck "Zak- sck "Zak- sck "Zak- sck "Zak- sck "Zak- sck "Zak- sck "Zaz- sck "Zaz- sck "Zaz- sck "Zaz- sck "Zaz- sck "Zaz- sck "Zaz- sck "Zaz- sck "Zaz- sck "Zaz- sck "Zaz- sck "Zaz- sck "Zaz- sck "Zaz- sck "Zaz- SCK "Zaz- sck "Zaz- sck "Zaz- sck "Zaz- sck "Zaz- sck "Zaz- sck "Zaz- sck "Zaz- sck "Zaz- sck "Zaz- sck "Zaz- sck "Zaz- sck "Zaz- sck "Zaz- sck 'Zaz- sck "Zaz- sck "Zaz- sck "Zaz- sck "Zaz- sck "Zaz- sck "Zaz- sck "Zaz- sck "Zaz- sck "Zaz- sck "Zaz- sck "Zaz- sck "Zaz- sck "Zaz- sck "Zak- sck "Zak- sck "Zak- sck "Zak- sck "Zak- sck "Zak- sck "Zak- sck "Zak- sck "Zak- sck "Zak- sck "Zak- sck "Zak- sck "Zak- sck "Zak- SCK "Zak- sck "Zak- sck "Zak- sck "Zak- sck "Zak- sck "Zak- sck "Zak- sck "Zak- sck "Zak- sck "Zak- sck "Zak- sck "Zak- sck "Zak- sck " Zaz- sck "Zaz- sck "Zaz- sck "Zaz- sck "Zaz- sck "Zaz- sck "Zaz- sck "Zaz- sck "Zaz- sck "Zaz- sck "Zaz- sck "Zaz- sck "Zaz- sck "Zaz- sck "Zaz - sck "Zaz - sck "Zaz - sck "Zaz - sck "Zaz - sck "Zaz - sck "Zaz - sck "Zaz - sck "Zaz - sck "Zaz - sck "Zaz - sck "Zaz - sck "Zaz - sck "Zaz - sck "Zaz - sCK "Zaz - sCK "Zaz - sCK "Zaz - sCK "Zaz - sCK "Zaz - sCK "Zaz - sCK "Zaz - sCK "Zaz - sCK "Zaz - sCK "Zaz - sCK "Zaz - sCK "Zaz - sCK "Zaz - sCK "Zaz - sCK 'Zaz - sCK 'Zaz - sCK 'Zaz - sCK 'Zaz - sCK 'Zaz - sCK 'Zaz - sCK 'Zaz - sCK 'Zaz - sCK 'Zaz - sCK 'Zaz - sCK 'Zaz - sCK 'Zaz - sCK 'Zaz - sCK 'Zaz - sCK 'Zak- sck 'Zak- sck 'Zak- sck 'Zak- sck 'Zak- sck 'Zak- sck 'Zak- sck 'Zak- sck 'Zak- sck 'Zak- sck 'Zak- sck 'Zak- sck 'Zak- sck 'Zak- sck 'Zak- sck "Zaz- sck "Zaz- sck "Zaz- sck "Zaz- sck "Zaz- sck "Zaz- sck "Zaz- sck "Zaz- sck "Zaz- sck "Zaz- sck "Zaz- sck "Zaz- sck "Zaz- sck "Zak- SCK "Zak- SCK "Zak- SCK "Zak- SCK "Zak- SCK "Zak- SCK "Zak- SCK "Zak- SCK "Zak- SCK "Zak- SCK "Zak- SCK "Zak- SCK "Zak- SCK "Zak- SCK "Zak- SCK 'Zak- SCK 'Zak- SCK 'Zak- SCK 'Zak- SCK 'Zak- SCK 'Zak- SCK 'Zak- SCK 'Zak- SCK 'Zak- SCK 'Zak- SCK 'Zak- SCK 'Zak- SCK 'Zak- SCK 'Zak- SCK 'Zaz- SCK 'Zaz- SCK 'Zaz- SCK 'Zaz- SCK 'Zaz- SCK 'Zaz- SCK 'Zaz- SCK 'Zaz- SCK 'Zaz- SCK 'Zaz- SCK 'Zaz- SCK 'Zaz- SCK 'Zaz- SCK 'Zaz- SCK 'Zaz- sCK 'Zaz- SCK 'Zaz- SCK 'Zaz- SCK 'Zaz- SCK 'Zaz- SCK 'Zaz- SCK 'Zaz- SCK 'Zaz- SCK 'Zaz- SCK 'Zaz- SCK 'Zaz- SCK 'Zaz- SCK 'Zaz- SCK 'Zaz- SCK | |
| Hecnpabhictb | Прична та усунец нecрабхосте небяпелей 3'явлес- ыбя indиказ们 "Пом- лka y воряни си- стем. П配电запстов, прилад". |
| Ha диспелей дуже ч- сто 3'явлесь ся indи- кац们 "Запстов по- гаму calc'nClean!". | Пом'якшени вogaBSDОДно містов trpoхи мінера. 1. Вставе Новий等着дя вори. 2. Установы bідповідун жорсткістов вори. |
| Викоростано неідповідné засю дя ворален; наки роб замалу яого кільке. ▷ Дя вораленя наши рідь викоростовуbatи в- Клочи відповідни tabлітк. | |
| Сервicny поразу对我 викоано до кінц. ▷ 3аустов сөрвicну поразу "Сpeцiaльne поми- Вань". → "Сервichi поразу", Стор. 205 |
17 TpaHcNoptyBaHHn, 36epirAHnny uTnIizauia
Tyt Bn Di3HaeteC8a KPiIroTyBaTu npnilaI Do TpaHcnpOpyBaHHa 36epi- raHHa. KpIM TORo, Bn Di3HaTeC8a, Ka YtunlizyBatu CTapi npnilaIaN.
17.1 AKTINBaCiIaXnCTy BiMOPo3y
3axnctitb npnilaB BiD BnIINBy MOpO3y nIi yac TpaHcnpTyBaHHra Ta 36epiraHHA.
YBARA!
HaBhictb y npila zi 3aIiWkIB piDHH MoKe Ipn3BeCTn Do NIOJKOJKeHHN iIc Yac TpaHcnpTyBaHH a6o 36epi- rAHn.
Central Service Contacts
AM AM Armenia, Ruwuunnuu
ZIG ZAG LLC
Charenci str. 25
Yerevan 375025
Tel.: 010 55 60 10
newsletter:service@zigzag.am
www.zigzag.am
www.siemens-home.bsh-group.at
Gate 1, 1555 Centre Road
Clayton, Victoria 3168
Tel.: 1300 167 425
newsletter: aftersales.au@bshg.com
www.siemens-home.bsh-group.com/au
*Mon-Fri 24 hours
BE Belgique, Belgie, Belgium
BSH Home Appliances S.A.-N.V.
Rue Picard 7, box 400, Picardstraat 7, box 400
1000 Bruxelles - Brussels
Tel.: 024757002
mailto:bru-repairs@bshg.com
www.siemens-home.bsh-group.com/be
BY Belarus, Bénapycb
000"5CX BbITOBa TEXHnKa"
ten.: 4957372962
mailto:mok-kdhl@bshg.com
CH Schweiz, Suisse, Svizzera, Switzerland
BSH Hausgeräte AG
www.siemens-home.bsh-group.com/ch
CZ Ceska republika, Czech Republic
www.siemens-home.bsh-group.fr
GB Great Britain
BSH Home Appliances Ltd.
Grand Union House, Old Wolverton Road,
Wolverton
Milton Keynes MK12 5PT
To arrange an engineer visit, to order spare parts and accessories or for product advice please visit www.siemens-home.bsh-group.com/uk Or call Tel.: 0344 892 8999*
*Calls are charged at the basic rate,
please check with your telephone service
provider for exact charges.
IE Republic of Ireland
BSH Home Appliances Ltd.
M50 Business Park, Ballymount Road Upper, Walkinstown
Dublin 12
To arrange an engineer visit, to order
pare parts and accessories or for
product advice please call Tel.: 01450
2655
www.siemens-home.bsh-group.com/ie
*Calls are charged at the basic rate,
please check with your telephone service
provider for exact charges
IT Italia, Italy
www siemens-home.bsh-group.com/it
LU Luxembourg
www.siemens-home.bsh-group.com/lu
MT Malta
Aplan Limited The Atrium
The Atrium
Mriehel by Pass
BKR3000 Birkirkara
Tel.: 025 495 122
mailto:services@theatrium.com.mt
NL Nederland, Netherlands
www.siemens-home.bsh-group.nl
PL Polska, Poland
www.siemens-home.bsh-group.pl
RU Russia, Pocsn
OOO «BxCBБытовыприборы»
CepBnC O T pOn3BODnteJIa
Ten.: 8 (800) 200 29 62
mailto:hotlineru@bshg.com
www.siemens-home.bsh-group.ru
UA Ukraine, Ykpaia
TOB "5CX Побутва Тхиka"
Tel.: 0 800 300 153
mailto: BSH-serviceua@bshg.com
www.siemens-home.bsh-group.com/ua
Бекштогн Ифо-Линяп 3 9.00
do 18.00
ZA South Africa
BSH Home Appliances (Pty) Ltd.
96 Fifteenth Road, Randjespark
1685 Midrand - Johannesburg
Tel.: 086 002 6724
mailto:bsh@iopen.co.za
mailto:applianceserviceza@bshg.com
www.siemens-home.bsh-group.com/za
BSH group is a Trademark Licensee of Siemens AG. Manufacturer's Service for Siemens Home Appliances.
BSH Hausgeräte GmbH
Carl-Wery-StraBe 34
81739 München
GERMANY
www.siemens-home.bsh-group.com
Valid within Great Britain:
Imported to Great Britain by
BSH Home Appliances Ltd.
Grand Union House
Old Wolverton Road
Wolverton, Milton Keynes
MK12 5PT
United Kingdom
Manufactured by BSH Hausgeräte GmbH under the trademark licence of Siemens AG


- FULLY AUTOMATIC ESPRESSO MACHINE
- FOR FURTHER INFORMATION, PLEASE REFER TO THE DIGITAL USER GUIDE
- TABLE OF CONTENTS
- 1 SAFETY
- 1.1 GENERAL INFORMATION
- 1.2 INTENDED USE
- 1.3 RESTRICTION ON USER GROUP
- 1.4 SAFETY INFORMATION
- WARNING - RISK OF SUFFOCATION
- WARNING - RISK OF ELECTRIC SHOCK
- WARNING - RISK OF FIRE
- WARNING - RISK OF BURNS
- WARNING - RISK OF SCALDING
- WARNING - RISK OF INJURY
- WARNING - DANGER: MAGNETISM
- WARNING - RISK OF HARM TO HEALTH
- 2 ENVIRONMENTAL PROTECTION AND SAVING ENERGY
- 2.1 DISPOSING OF PACKAGING
- 2.2 TIPS FOR SAVING ENERGY
- 3 INSTALLATION AND CONNECTION
- 3.1 SCOPE OF DELIVERY
- 3.2 INSTALLING AND CONNECTING THE APPLIANCE
- ATTENTION
- 4 FAMILIARISING YOURSELF WITH YOUR APPLIANCE
- 4.1 APPLIANCE
- → FIG. 2
- 4.2 CONTROLS
- TOUCH FIELDS
- TOUCH DISPLAY
- 5 ACCESSORIES
- 6 BEFORE USING FOR THE FIRST TIME
- 6.1 PREPARING AND CLEANING THE APPLIANCE
- → FIG. 3 - 24
- 6.2 CHECKING THE WATER HARDNESS
- 6.3 PERFORMING INITIAL START-UP
- NOTES
- 6.4 GENERAL INFORMATION
- 7 BASIC OPERATION
- 7.1 SWITCHING THE APPLIANCE ON OR OFF
- 7.2 DISPENSING BEVERAGES
- WARNING
- RISK OF SCALDING
- TIPS
- 7.3 DOUBLESHOT AND TRIPLESHOT
- 7.4 DISPENSING A COFFEE BEVERAGE WITH MILK
- WARNING RISK OF BURNS
- REQUIREMENTS
- 7.5 DISPENSING TWO CUPS AT ONCE
- 8GRINDER
- 8.1 ADJUSTING THE GRINDING LEVEL
- GRINDING LEVEL SETTING
- 9 WATER FILTER
- 9.1 INSERTING THE WATER FILTER
- 9.2 CHANGING OR REMOVING THE WATER FILTER
- 10 CHILDPROOF LOCK
- 10.1 ACTIVATING THE CHILDPROOF LOCK
- 10.2 DEACTIVATING THE CHILDPROOF LOCK
- 11 CUP HEATER
- 11.1 ACTIVATING AND DEACTIVAT ING THE CUP HEATER
- 12 FAVOURITES
- 12.1 SAVING BEVERAGES FROM THE BEVERAGE SELECTION
- 12.2 SAVING THE BEVERAGE IN THE MENU
- 12.3 CHANGING BEVERAGE SETTINGS
- 12.4 DELETING FAVOURITES
- 12.5 SORTING FAVOURITES
- 13 HOME CONNECT
- 13.1 HOME CONNECT SETTINGS
- OVERVIEW OF THE HOME CONNECT SETTINGS
- 13.2 DATA PROTECTION
- 14 BASIC SETTINGS
- 14.1 CHANGING THE BASIC SETTINGS
- 14.2 OVERVIEW OF THE BASIC SETTINGS
- 15 CLEANING AND SERVICING
- 15.1 DISHWASHER-SAFE COMPONENTS
- SUITABLE
- NOT SUITABLE
- 15.2 CLEANING AGENT
- 15.3 CLEANING THE APPLIANCE
- RISK OF ELECTRIC SHOCK
- RISK OF BURNS
- 15.4 CLEANING THE DRIP TRAY AND COFFEE DREGS CONTAINER
- 15.5 CLEANING THE MILK CONTAINER
- 15.6 SERVICE PROGRAMMES
- USING THE SERVICE PROGRAMMES
- OVERVIEW OF SERVICE PROGRAMMES
- 16 TROUBLESHOOTING
- 17 TRANSPORTATION, STORAGE AND DISPOSAL
- 17.1 ACTIVATING FROST PROTECTION
- 17.2 DISPOSING OF OLD APPLIANCE
- 18 CUSTOMER SERVICE
- 18.1 PRODUCT NUMBER (E-NR.), PRODUCTION NUMBER (FD) AND CONSECUTIVE NUMBERING (Z-NR.)
- 18.2 WARRANTY CONDITIONS
- 19.1 INFORMATION REGARDING FREE AND OPEN SOURCE SOFTWARE
- 20 DECLARATION OF CONFORMITY
- CE
- UK CA
- WAARSCHUWING - KANS OP VERSTIKKING
- WAARSCHUWING - KANS OP BRAND
- WAARSCHUWING - KANS OP LETSEL
- 7.3 DOUBLESHOT I TRIPLESHOT
- 7.3 DOUBLESHOT A TRIPLESHOT
- 1.4 YKA3AHNI NO TEXHNKE 6E3ONACHOCTN
- PPEYIPEJDEHNE-ONACNOCTB YDUYB
- I P E D U N P E X I D E H N E - O N A C H O C T B: M A R H E T H 3 M
- IPEYPEXEHE - PNCK HAHECEHNABPEJA 3DOPOBBIO
- 2 3AUNTA OKPYKAOUSEI CPEBL N 3KOHOMN
- 2.1 YTIHN3AUNYPAKOBKN
- 2.2 3HEPROC6EPEKEHNE
- 3 YCTAHOBKA N NOKJIIOUEHNE
- 3.1 KOMNLEKTAЦЯ
- 6.3 ПЕРВЬН BBODВЭКСПУАТA-ЦИО
- PPIMEUAHN
- 6.4 OŚUIGNE YKA3AHNHA
- 7 CTAHDAPTHOE YNPABNEHNE
- 7.1 BKJIOUEHNE HNBBIKJIOUEHNE NP6OPA
- 7.3 DOUBLESHOT N TRIPLESHOT
- BHIMAHHE
- CTEPEHB NOMO- HACTPOKAJA
- CTEPEHB NOMO- HACTPOIKA JA
- 9 ΦИЛЬТР ДЯ BOДЫ
- 13.1 HOME CONNECT YCTAHOBKN
- O63OP HACTPOEK HOME CONNECT
- 14 BA3OBBLC YCTAHOBKN
- PEKOMEHDAUN
- 15.3 OUHCTKA NPHBOPA
- PNEYPEXKDEHNE
- 15.5 OUHCTKA EMKOCTN IJIA MOJIOKA
- 15.6 CEPBNCHIE NPOPAMMBI
- BHIMAHNE
- HCNOJB3OBAHNE CEPBNCHBIX NPORPAMM
- O63OP CEPBNCHBIX NPOPPAMM
- 1.3 O6MEJKEHNKAKOJA KOPNCTYBAAYIB
- 3 YCTAHOBJIEHNEI NIKJIIOUEHHA
- 3.1 KOMNJEKT NOCTABKN
- → MAN. 1
- BKA3IBKU
- 6.4 3ARAJIBHI BKΑ3IBKN
- BKA3IBKN
- 7 OCHOBHI BIIDOMOCTI NPO KOPNCTYBAHHA
- 7.1 YBIMKHEHHA6O BMKHEHHA NPHANY
- 7.2 ПНГОТУВАИМА НАООВ
- YBATA
- HE6E3NEKA ONIKY
- IOPARNI
- 7.4 ППНГOTУВАHHЯ KABOBORO HANOHO 3 MOJIOKOM
- HE6E3NEKA ONIKIB
- BUMORM
- 7.5 ONDOHOUACHE NPNROTYBAHNHABQXU
- 8 KABOMOJIKA
- 8.1 BN6IP CTYPEHЯ NOMEJY
- 14.1 3MIHA OCHOBNX HAJA- STTYBAHB
- 14.2 ORLAO CHOBNX NPAMETPIPB
- 16 YCYUHNHA HECNPABHOCTEI
- YBAGA
- HEBE3NEKA YPAXEHH EJEKTPHNM CTPYMOM
- 17 TPAHCNOPTYBAHHN, 36EPIRAHNNY UTNIIZAUIA
- 17.1 AKTINBACIIAXNCTY BIMOPO3Y
- YBARA
- CENTRAL SERVICE CONTACTS
Brand : DARTY
Model : TQ703R07
Category : Grinder