
CANOSCAN 4400F - To scan CANON - Free user manual and instructions
Find the device manual for free CANOSCAN 4400F CANON in PDF.
| Scanner type | Flatbed scanner |
| Scanning element | 6-line color CCD |
| Light source | Cold cathode fluorescent lamp |
| Optical resolution | 4800 x 9600 dpi |
| Maximum resolution (ScanGear) | 19200 dpi |
| Color scanning bits | Input 48 bits, output 24 bits |
| Grayscale scanning bits | Input 48 bits, output 16 or 8 bits |
| Interface | USB 2.0 Hi-Speed |
| Maximum document size | A4/Letter (216 x 297 mm) |
| Supported film types | 35 mm film (6 frames), 35 mm slide (4 frames) |
| Scanner keys | 7 keys: PDF (×4), COPY, PHOTO/FILM, E-MAIL |
| Power supply | AC adapter 100-240 V (depending on region) |
| Power consumption | 17 W max, 4 W standby |
| Dimensions (W × D × H) | 259 × 474 × 83 mm |
| Weight | 2.8 kg |
| Operating temperature | 10 to 35 °C |
| Operating humidity | 10 to 90% RH (20 to 80% RH for film without condensation) |
| Included software | ScanGear, CanoScan Toolbox, ArcSoft PhotoStudio, Presto! PageManager (Windows), ScanSoft OmniPage SE, Adobe RGB |
| Optional accessory | CSAK-4400F accessory kit |
| Transport lock | Locking button under the scanner |
| Main functions | Scanning, copying, email sending, PDF creation via dedicated keys |
| Maintenance | Use a blower brush for film; clean the glass with a soft, dry cloth |
| Safety | Use only provided accessories; do not block slots; unplug before cleaning; do not expose to moisture |
Frequently Asked Questions - CANOSCAN 4400F CANON
User questions about CANOSCAN 4400F CANON
0 question about this device. Answer the ones you know or ask your own.
Ask a new question about this device
Download the instructions for your To scan in PDF format for free! Find your manual CANOSCAN 4400F - CANON and take your electronic device back in hand. On this page are published all the documents necessary for the use of your device. CANOSCAN 4400F by CANON.
USER MANUAL CANOSCAN 4400F CANON
Please read this guide before operating this scanner. After you finish reading this guide, store it in a safe place for future reference.
Table of Contents
Package Contents 1
Using the Scanner Buttons. 5
Installing the Software 2
Scanning Film 6
Preparing the Scanner 3
Specifications 9
Try Scanning 4
Package Contents
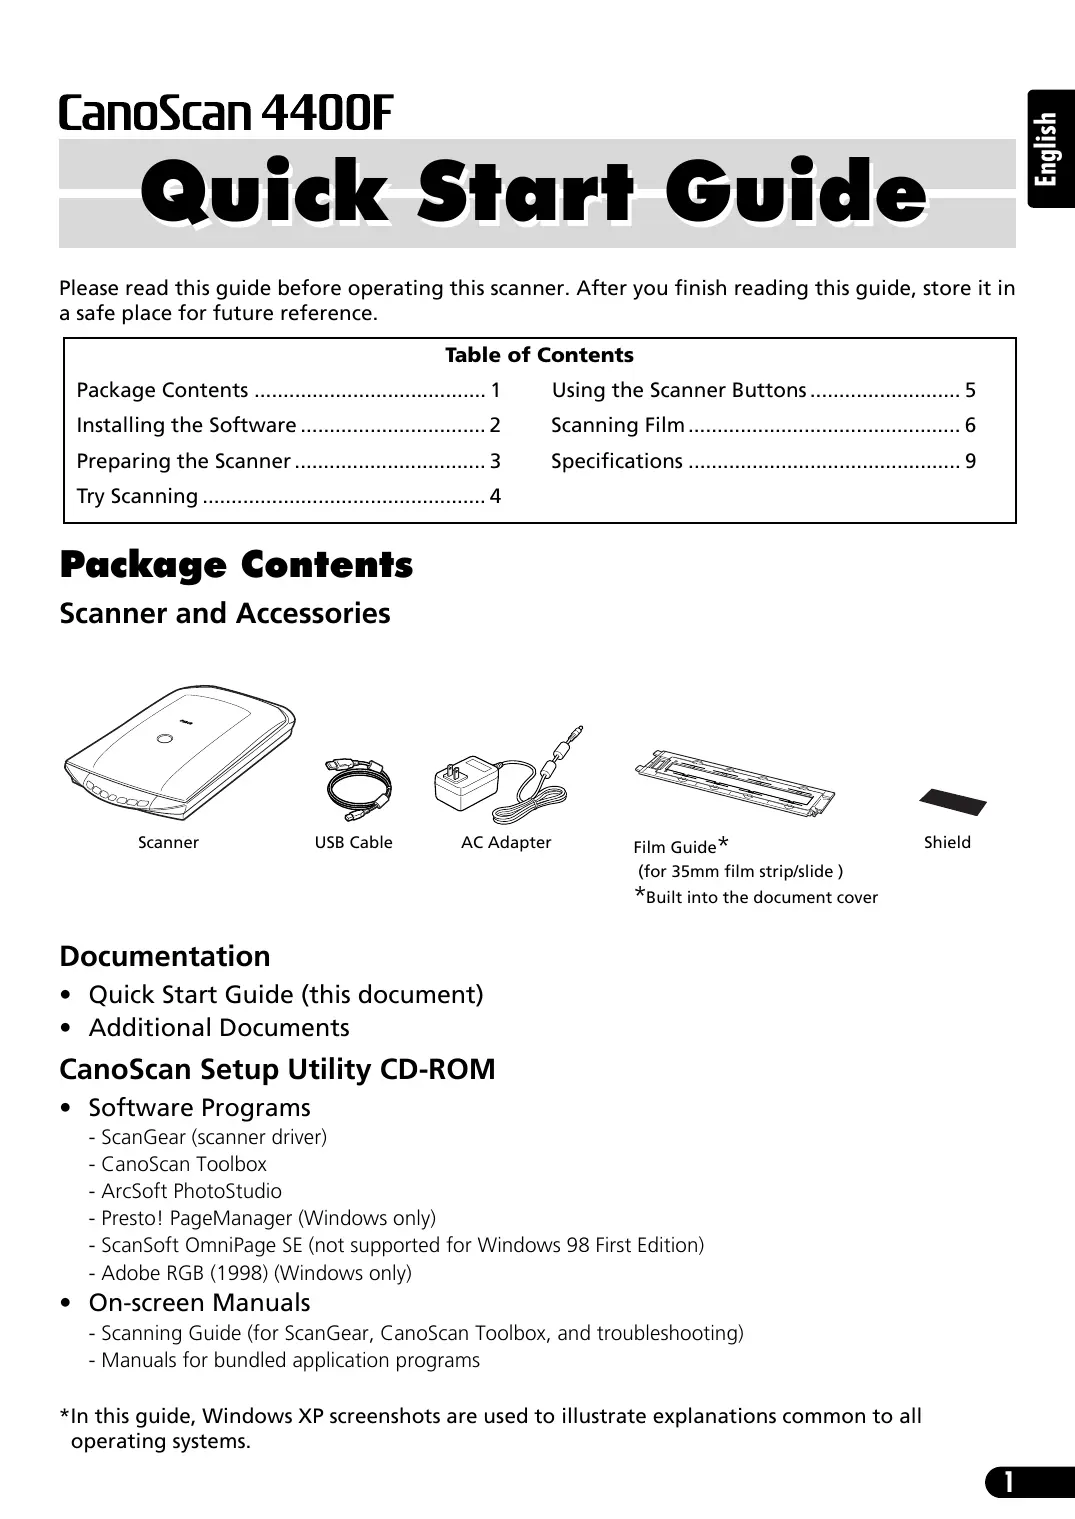
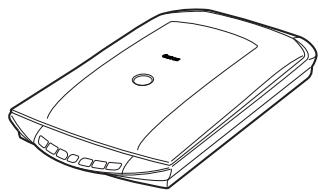
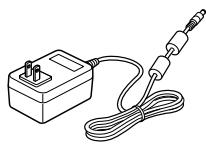
Scanner and Accessories
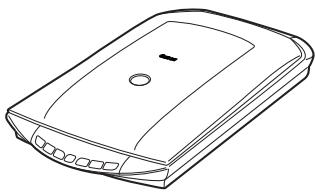
Scanner

USB Cable
AC Adapter
Film Guide*

Shield
(for 35mm film strip/slide)
*Built into the document cover
Documentation
- Quick Start Guide (this document)
Additional Documents
CanoScan Setup Utility CD-ROM
-
Software Programs
-
ScanGear (scatter driver)
- CanoScan Toolbox
- ArcSoft PhotoStudio
- Presto! PageManager (Windows only)
- ScanSoft OmniPage SE (not supported for Windows 98 First Edition)
-
Adobe RGB (1998) (Windows only)
-
On-screen Manuals
-
Scanning Guide (for ScanGear, CanoScan Toolbox, and troubleshooting)
- Manuals for bundled application programs
*In this guide, Windows XP screenshots are used to illustrate explanations common to all operating systems.
Installing the Software

- Do NOT connect the scanner to a computer before installing the software. If you connect the scanner and the Found New Hardware Wizard appears, click [Cancel].
- Quit all running applications before installation, including anti-virus software.
- For Windows 2000/XP, log in as an administrator to install the software.
1 Place the CanoScan Setup Utility CD-ROM in the drive.
If prompted, select your language and place of residence.
CanoScan Setup Utility program starts.
- For Macintosh: Double-click the [Setup] icon. Enter the administrator ID and password on the authentication dialog box.
2 Click [Easy Install] on the main menu.
3 Click [Install] to start installation.
Carefully read the License Agreement, and then click [Yes] to proceed. All the software programs and on-screen manuals will be installed on your computer.
4 For the bundled applications, follow the on-screen instructions to perform the installation.
5 When the installation is complete, click [Restart] to restart your computer.
- Make sure to remove the CD-ROM from the drive and store it in a safe place.
- If you encounter a problem during installation, see "Troubleshooting" in the Scanning Guide.
- If you later upgrade your OS to Windows XP, reinstall the software.
![CANON CANOSCAN 4400F - When the installation is complete, click [Restart] to restart your computer. - 1](/content/2019/12/31019/images/cb0191ae2a4cb58f9dd4cab0e998a3e4d841f3d696e063d2697a96f9518883b8.jpg)
![CANON CANOSCAN 4400F - When the installation is complete, click [Restart] to restart your computer. - 2](/content/2019/12/31019/images/421f8c6a1014cc75928c66f5ea1f0573fa7d036aef29ddae509e95c7d1190e3a.jpg)
![CANON CANOSCAN 4400F - When the installation is complete, click [Restart] to restart your computer. - 3](/content/2019/12/31019/images/10e67d7fd998ce408d0f5d6dd712900ec2cd42e637e097d8c5e6fa1893a3c62e.jpg)
![CANON CANOSCAN 4400F - When the installation is complete, click [Restart] to restart your computer. - 4](/content/2019/12/31019/images/3bd63f855086e4b058b2942ced832d4c59e60e3d2dd7388760c05f01c3fa1f69.jpg)
Preparing the Scanner
Unlocking the Scanner
1 Peel the seals off the scanner.
2 Slide the lock switch on the bottom of the scanner toward the unlock mark ( ).
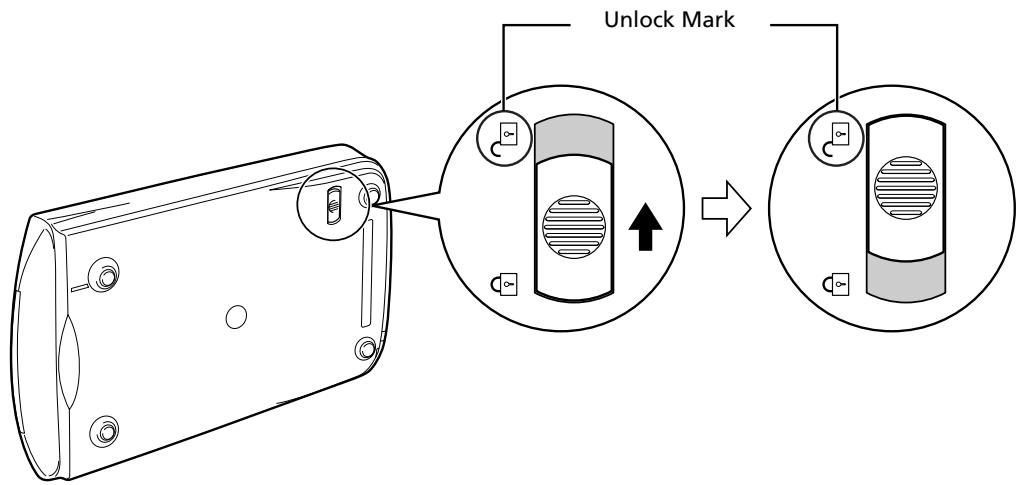

- Do not tilt the scanner more than 90 degrees from horizontal when releasing the lock.
- Handle the scanner with both hands. Be careful not to drop the scanner.
- Always lock the scanner when carrying or transporting it.
- When locking the scanner, do not lift up the back and tilt the front (scatterer button location) downward. You may be unable to set the lock.
Connecting the Scanner
1 Connect the scanner to your computer with the supplied USB cable.
2 Connect the supplied AC adapter to the scanner, and then plug in.


- Only use the USB cable and the AC adapter provided with the scanner. Use of other cables or adapters may lead to a malfunction.
- When the scanner is connected to the USB 1.1 port on Windows XP and "HI-SPEED USB Device Plugged into non-HI-SPEED USB Hub" message appears, ignore the message. The scanner operates in this condition without problems.
- The scanner does not have a power switch. The power is activated as soon as the AC adapter is plugged in.
Try Scanning
This section explains the basic scanning procedures using the image editing program, ArcSoft PhotoStudio, and the scanner driver, ScanGear.
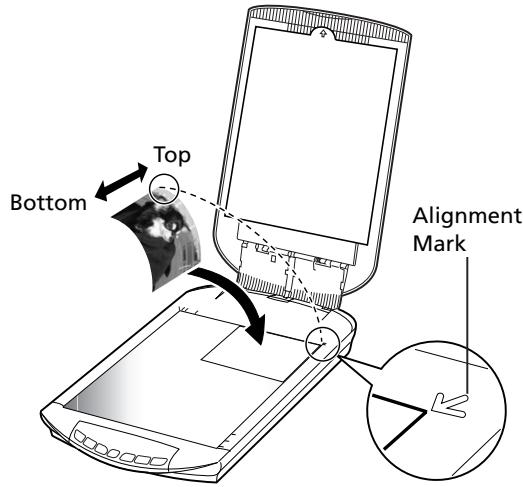
1 Place a document on the document glass and close the document cover.

When opening the document cover, support it with your hand until it stops.
2 Start ArcSoft PhotoStudio.
For Windows: Select [start] - [(All) Programs] - [ArcSoft PhotoStudio 5.5], then click [PhotoStudio 5.5]. For Macintosh: Open [Applications] - [PhotoStudio] folders, then double-click the [PhotoStudio] icon.
3 From the [File] menu, click [Select Source] and select the scanner model.
For Windows: Do not select the one that includes [WIA] in the model name.
4 Click the [Acquire] icon to start ScanGear.
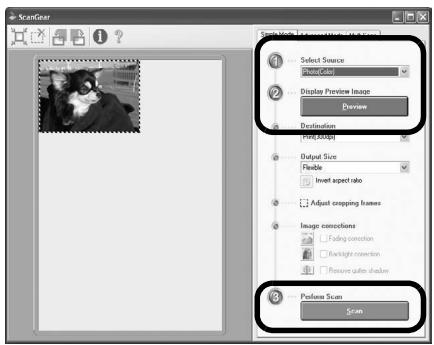
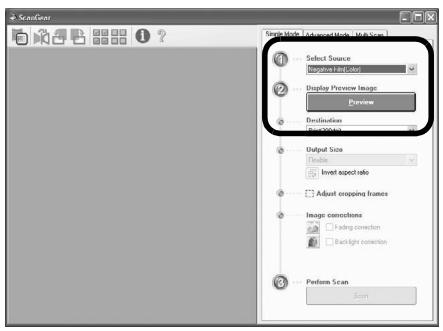
5 Select the type of document you are scanning in [Select Source] and click [Preview].
6 Set [Destination] and/or [Output Size] as needed.
7 Click [Scan] to start scanning.

Do not touch the scanner while it is operating.
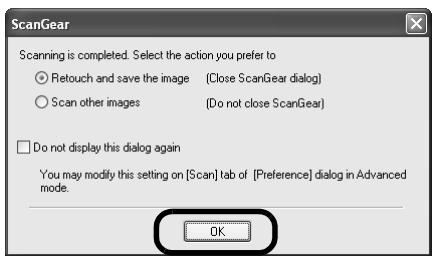
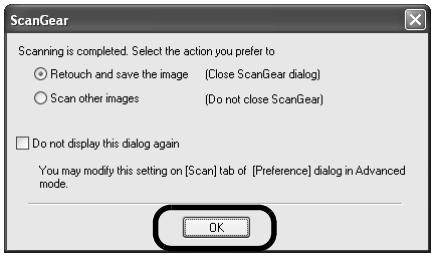
8 When prompted to close ScanGear, click [OK].
9 Save the scanned image in ArcSoft PhotoStudio and close the window.
- For more information on scanning using ScanGear, bundled applications, and troubleshooting, see the on-screen manual Scanning Guide. To open the Scanning Guide, double-click the Scanning Guide icon on the desktop, or click on in ScanGear or CanoScan Toolbox.
Using the Scanner Buttons
Scanner buttons allow you to copy, scan, e-mail, and save scanned images in PDF format with a press of a button. Simply place your document on the scanner, and then press the scanner button for the required function. For more information, see the Scanning Guide.
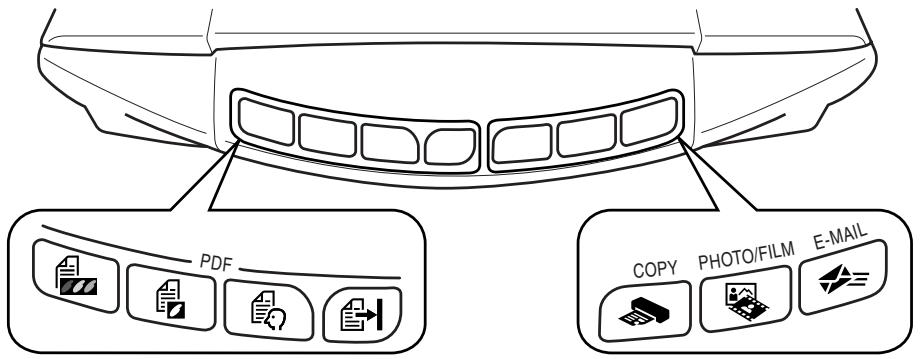
PDF Buttons
PDF buttons allow you to easily create PDF files according to your needs. Note that these buttons are not labeled on the scanner.

COLOR Button
Scans color images in A4 or Letter size* at 300 dpi.

BLACK & WHITE Button
Scans black & white images in A4 or Letter size* at 300 dpi.

CUSTOM Button
Scans images in user-specified settings.

FINISH Button
Ends the operation and saves the scanned image in a PDF file.
*The size may differ depending on your system environment.

COPY Button
Prints (copies) the scanned image with a printer.

PHOTO/FILM Button
Opens the scanned image in the bundled application program, ArcSoft PhotoStudio.

E-MAIL Button
Attaches the scanned image to a new e-mail message.
The first time you press this button, you will be prompted to select the e-mail program to use with this function.
- Before using scanner buttons, make sure that all the software programs are installed on your computer using the [Easy Install] option of the CanoScan Setup Utility program. See "Installing the Software" on page 2.
- For Mac OS X 10.3 and 10.2.8: Before using the scanner buttons, you need to set Image Capture (in [Applications] folder) to open CanoScan Toolbox automatically when a scanner button is pressed.
Start Image Capture, and then perform the following.
- Mac OS`X 10.3: Click [Options] and select CanoScan Toolbox in [When a scanner button is pressed, open]:
- Mac OS X 10.2.8: Select [Other] in [When a scanner button is pressed, open:]. Select CanoScan Toolbox and click [Open]. Click [OK] and quit Image Capture. For more information, see "Troubleshooting" in the Scanning Guide.
Scanning Film
This scanner can scan 35 mm film (film strip or slide). Follow the procedure below when scanning film.
1 Remove the protective sheet from the document cover.
When you finish scanning, put the protective sheet back by aligning it with the grooves in the document cover and sliding it downward into place.
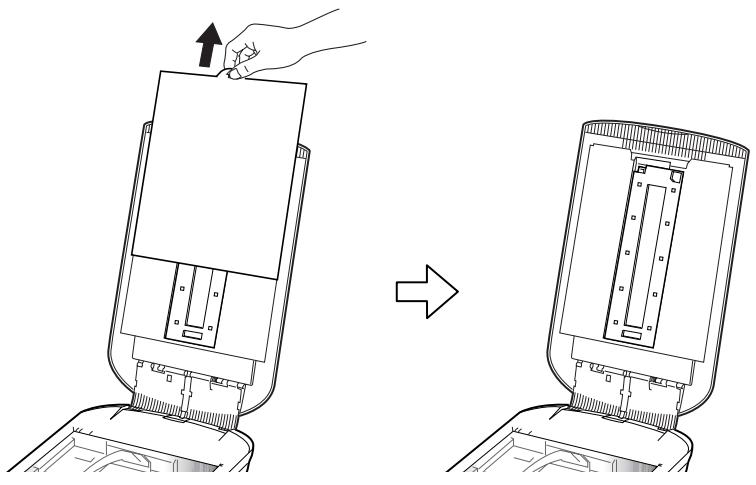

Always put the protective sheet back when you are not scanning film to protect the light source in the document cover.
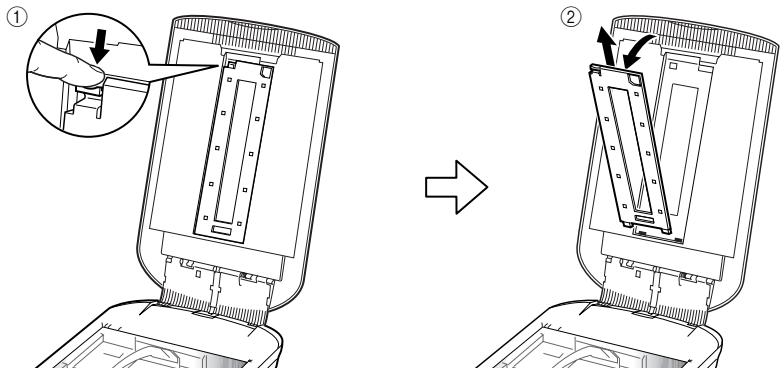
2 Remove the Film Guide from the document cover.
Hold the document cover so that it doesn't close, then ① press down and hold the tab at the Film Guide's top left and ② tilt the Film Guide outward to lift it up.
3 Open the Film Holder.
Pinch the both side of the Film Holder to open.
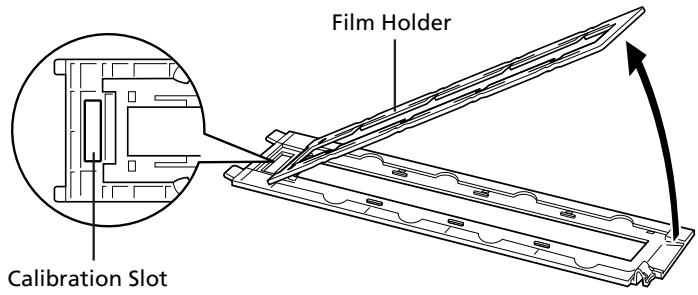
4 Insert the film into the Film Guide.
Place the film face down with the frames in reverse order.
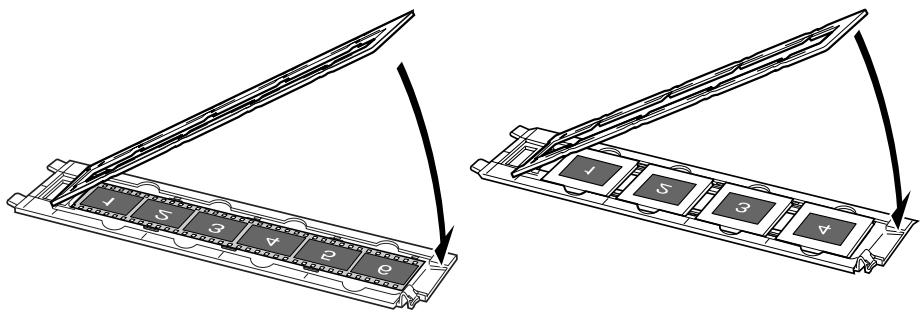

- Use a blower brush to remove any dust from the film, which will affect the image quality, and take care to hold the film by its edges to avoid transferring dirt or fingerprints to it.
- Do not block the calibration slot on the Film Guide when scanning film. Colors will not be scanned correctly if the calibration slot is obstructed.
- Close the Film Guide securely. Press lightly until it clicks into place.
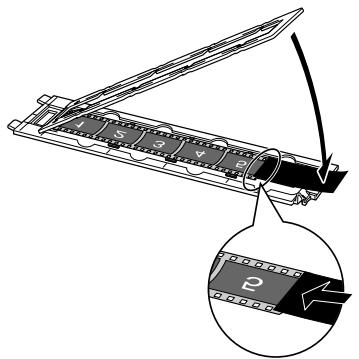
How to Use the Shield
When scanning short or curled film, extra light may enter through gaps and produce bands of color around the edges of the scanned image. If this occurs, use the supplied shield as shown in the figure.
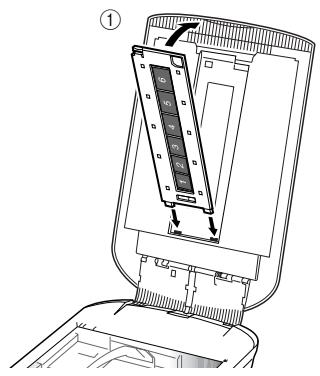
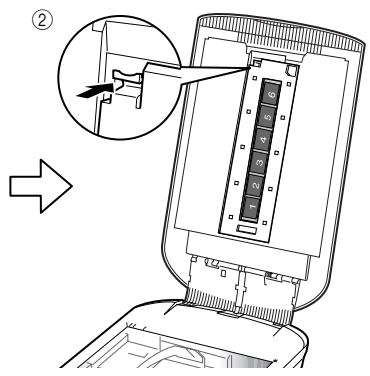
5 Set the Film Guide to the document cover, and close the document cover.
Hold the document cover and ① insert the bottom edge of the Film Guide into the bottom groove in the document cover, and then ② tilt the top of the Film Guide up into the document cover until it locks securely into place with a click.
6 Start ArcSoft PhotoStudio, then start ScanGear.
Follow the steps 2 to 4 in "Try Scanning" on page 4.
7 Select [Negative Film (Color)] or [Positive Film (Color)] in [Select Source] to match the type of film you are scanning, then click [Preview].
8 Place a check mark beside the number(s) of the frame(s) you want to scan. Perform image corrections as needed.
9 Click [Scan] to start scanning.

Do not touch the scanner while it is operating.

10 When prompted to close ScanGear, click [OK].
11 Save the scanned image in ArcSoft PhotoStudio and close the window.

- Do not leave the film strip in the film guide for an extended period of time as heat from the unit may damage the film.
- For more information on scanning film, see "Scanning Film" in the Scanning Guide.
Specifications
| Scanner Type | Flatbed | |
| Scanning Element | CCD 6-line color | |
| Light Source | Cold cathode fluorescent lamp | |
| Optical Resolution *1 | 4800 x 9600 dpi | |
| Selectable Resolution | 25-19200 dpi (ScanGear) | |
| Scanning Bit Depth | Color | 48 bit input (16 bit for each color) 48 bit or 24 bit output (16 bit or 8 bit for each color) |
| Grayscale | 48 bit input (16 bit for each color) 16 bit *2 or 8 bit output | |
| Scanning Speed *3 (Photo or Document) | Color | 7.7 msec./line (2400 dpi), 14.8 msec./line (4800 dpi) |
| Grayscale, B&W | 7.7 msec./line (2400 dpi), 14.8 msec./line (4800 dpi) | |
| Scanning Speed *3 (Film) | 7.4-74.0 msec./line | |
| Preview Speed *3*4 | Approximately 5 sec. | |
| Interface | USB 2.0 Hi-Speed | |
| Maximum Document Size | A4/Letter: 216 x 297 mm | |
| Film Type/Number of Frames | 35 mm strip (6 frames max)/35 mm slide (4 frames max) | |
| Scanner Buttons | 7 buttons (PDF x 4, COPY, PHOTO/FILM, E-MAIL) | |
| Operating Range | Temperature | 10°C to 35°C (50°F to 95°F) |
| Humidity | 10% to 90% RH, 20% to 80% RH for film scanning without condensation formation | |
| Power Requirements | AC adapter (100/120/230/240V)*5 | |
| Power Consumption | In operation: 17 watts maximum, Stand-by: 4 watts (Using supplied AC adapter) | |
| Maximum Exterior Dimensions | 259 x 474 x 83 mm | |
| Weight | Approximately 2.8 kg | |
| Optional Accessory Kit | Accessory Kit CSAK-4400F | |
- Optical Resolution represents the maximum sampling rate based on ISO 14473.
2 For film scanning only.
3 The fastest speed in USB 2.0 Hi-Speed mode on Windows PC. Transfer time is not included. Scanning speed varies according to the document types, scan settings, or specifications of the computer.
4 Calibration processing time is not included.
5 AC adapter type varies according to the region in which the scanner is purchased. Use only AC adapters listed in the user instructions.(Canon AC Adapter: K30279 is for United Kingdom and K30278 is for other EU countries). Do not use them for other products - Specifications are subject to change without notice.
Model Number: K10293 (CanoScan 4400F)
European Union (and EEA) only.

This symbol indicates that this product is not to be disposed of with your household waste, according to the WEEE Directive (2002/96/EC) and your national law. This product should be handed over to a designated collection point, e.g., on an authorized one-for-one basis when you buy a new similar product or to an authorized collection site for recycling waste electrical and electronic equipment (EEE). Improper handling of this type of waste could have a possible negative impact on the environment and human health due to potentially hazardous substances that are generally associated with EEE. At the same time, your cooperation in the correct disposal of this product will contribute to the effective usage of natural resources. For more information about where you can drop off your waste equipment for recycling, please contact your local city office, waste authority, approved WEEE scheme or your household waste disposal service. For more information regarding return and recycling of WEEE products, please visit www.canon-europe.com/environment.
(EEA: Norway, Iceland and Liechtenstein)
For Customers in Europe, Middle-East, Africa and Russia only
For Canon Customer Support contacts, please see the back cover of the European Warranty System (EWS) Booklet or visit www.canon-europe.com.
The socket-outlet shall be installed near the equipment and shall be easily accessible.
Warning
When you use this product, you should pay attention to the following legal issues:
-
Scanning of certain documents, such as bank notes (bank bills), government bonds and public certificates, may be prohibited by law and may result in criminal and/or civil liability.
-
You may be required under law to obtain authorization from a person possessing copyrights or other legal rights to the item being scanned.
If you are uncertain of the legality of scanning any particular item, you should consult your legal adviser in advance.
- Adobe® and Adobe® RGB (1998) are either registered trademarks or trademarks of Adobe Systems Incorporated in the United States and/or other countries.
- Microsoft® and Windows® are either registered trademarks or trademarks of Microsoft Corporation in the U.S. and/or other countries.
- Macintosh, Mac and the Mac logo are trademarks of Apple Computer, Inc., registered in the U.S. and other countries.
- ArcSoft, Inc. All rights reserved for PhotoStudio.
- Other names and products not mentioned above may be registered trademarks or trademarks of their respective companies.
CanoScan 4400F
Escanery accessories
Escaner

Cable USB

Adaptador de ca

Guía depelliculas*

Installation completed successfully.
Restart the system now (recommended)
De scanner opstellen
De scanner ontgrendelen
FCC Notice (U.S.A. Only)
For 120V, 60Hz model
Model Number : K10293
This device complies with Part 15 of the FCC Rules. Operation is subject to the following two conditions: (1)
This device may not cause harmful interference, and (2) this device must accept any interference received, including interference that may cause undesired operation.
Note: This equipment has been tested and found to comply with the limits for a Class B digital device, pursuant to Part 15 of the FCC Rules. These limits are designed to provide reasonable protection against harmful interference in a residential installation. This equipment generates, uses and can radiate radio frequency energy and, if not installed and used in accordance with the instructions, may cause harmful interference to radio communications.
However, there is no guarantee that interference will not occur in a particular installation. If this equipment does cause harmful interference to radio or television reception, which can be determined by turning the equipment off and on, the user is encouraged to try to correct the interference by one or more of the following measures:
- Reorient or relocate the receiving antenna.
- Increase the separation between the equipment and receiver.
- Connect the equipment into an outlet on a circuit different from that to which the receiver is connected.
- Consult the dealer or an experienced radio/TV technician for help.
Use of a shielded cable is required to comply with Class B limits in Subpart B of Part 15 of the FCC Rules.
Do not make any changes or modifications to the equipment unless otherwise specified in the manual. If such changes or modifications should be made, you could be required to stop operation of the equipment.
Canon U.S.A., Inc.
One Canon Plaza
Lake Success, NY 11042
1-516-328-5600