ASO - Fan STADLERFORM - Free user manual and instructions
Find the device manual for free ASO STADLERFORM in PDF.

| Product type | Pedestal fan |
| Brand | Stadlerform |
| Model | ASO (Peter) |
| Dimensions (housing) | 135 mm diameter, 1100 mm height |
| Power supply | 220-240 V ~ 50 Hz |
| Rated power | 36-60 W |
| Sound level | 33-52 dB(A) |
| Number of speeds | 3 |
| Natural breeze mode | Yes, natural breeze simulation |
| Timer | 1 to 7 hours |
| Oscillation | Yes, angle about 70° |
| Remote control | Infrared, CR2032 battery included |
| Air filter | Washable, removable (4 screws) |
| Maintenance | Damp cloth for exterior, washable filter |
| Usage | Indoor only |
| Warranty | 2 years |
| Weight | Approximately 4.1 kg |
Frequently Asked Questions - ASO STADLERFORM
User questions about ASO STADLERFORM
0 question about this device. Answer the ones you know or ask your own.
Ask a new question about this device
Download the instructions for your Fan in PDF format for free! Find your manual ASO - STADLERFORM and take your electronic device back in hand. On this page are published all the documents necessary for the use of your device. ASO by STADLERFORM.
USER MANUAL ASO STADLERFORM
Operating instructions
Gebrauchsanweisung
Mode d'emploi
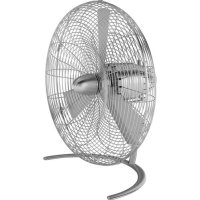
Congratulations! You have just purchased the exceptional PETER fan. He will give you great pleasure and improve the indoor air for you.
As with all domestic electrical appliances, particular care is needed with this model also, in order to avoid injury, fire damage or damage to the appliance. Please study these operating instructions carefully before using the appliance for the first time and follow the safety advice on the appliance itself.
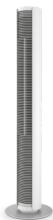
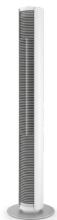
Description of the appliance
The appliance consists of the following main components:
- Foot
- Housing
- Mains cable for power supply
- On/off button
- Control panel
- Button for the selection of the speed level: 1-3
- Display of the selected speed level (disappears after 5s)
- Button for the selection of „Natural Breeze“ mode
-
Button for the selection of timer function: 1-7h
-
Button for swing mode
- Remote control
- Compartment for remote control
- Battery compartment remote control (type CR2032)
- Infrared receiver
- Air outlet
- Air inlet with washable air filter
- Carrying handle
Important safety instructions
Please read through the operating instructions carefully before you use the appliance for the first time and keep them safely for later reference; if necessary pass them on to the next owner.
- Stadler Form refuses all liability for loss or damage which arises as a result of failure to follow these operating instructions.
- The appliance is only to be used in the home for the purposes described in these instructions. Unauthorized use and technical modifications to the appliance can lead to danger to life and health.
- This appliance can be used by children aged from 8 years and above and persons with reduced physical, sensory or mental capabilities or lack of experience and knowledge if they have been given supervision or instruction concerning use of the appliance in a safe way and understand the hazards involved. Children shall not play with the appliance. Cleaning and user maintenance shall not be made by children without supervision.
- Never leave any parts of the packing within the reach of children.
- Assemble the appliance in accordance with the instructions for Assembly. Follow the instructions for assembly exactly and ensure that all screws are firmly tightened so as to avoid damage and hazards.
- Never insert objects into the grille of the fan. Do not cover the appliance during operation.
-
Always disconnect the power cord from the socket before removing the protection grille.
-
Only connect the cable to alternating current. Observe the voltage information given on the appliance.
- Do not use damaged extension cords.
- Do not run the power cord over sharp edges and make sure that it does not get trapped.
- Do not pull the plug from the socket with wet hands or by holding on to the power cord.
- Do not use the appliance in immediate vicinity of a bath tub, a shower or a swimming pool (observe a minimum distance of 3m ). Place the appliance such that a person in the bath tub cannot touch the appliance.
- Do not place the appliance near a heat source. Do not subject the power cord to direct heat (such as a heated hotplate, open flames, hot iron sole plates or heaters for example). Protect power cords from oil.
- See to it that the appliance is properly positioned to ensure a high stability during its operation and make sure that no one can trip over the power cord.
- The appliance is not splash-proof.
- For indoor use only.
- Do not store the appliance outdoors.
- Store the appliance in a dry place inaccessible to children (pack the appliance).
- If the supply cord is damaged, it must be replaced by the manufacturer, or its service agent, or a qualified person in order to avoid a hazard.
- Prior to any maintenance, cleaning and after each use, switch off the appliance and unplug the mains cable from the socket.
- Repairs to electrical appliances must only be carried out by a qualified electrical technician.
Assembly (see page 2 and 3)
Attach the foot (1) to the bottom of the housing (2) with the 4 screws provided. Make sure the screws are firmly tightened.
Setting up / operation
- Place Peter in the desired location on a flat surface. Connect the mains cable (3) to a suitable power outlet.
- Switch on the appliance by pressing the on/off button (4). The blue LEDs on the control panel (5) will then turn on. The appliance gives an audible signal when a setting is changed via the control panel (5) or the remote control (11).
- Press the button for the selection of the speed level (6) to change the fan speed (levels 1-3). Pressing once increases the speed by one level. If you would like to increase the speed by another level, press again. The number of the selected speed level (7) lights up on the front of the unit, and disappears after 5 seconds.
-
Press the button for the selection of "Natural Breeze" mode (8) for natural wind conditions. The blue LED beneath the button (8) will now light up. This mode provides an even more pleasant cooling effect, simulating a natural breeze. The fan speed of this breeze automatically varies depending on the selected speed level.
-
By pressing the button for the timer (9) you can set the operating time for between 1 and 7 hours (for example, 3h = 1 h and 2 h LEDs lit, 7h = 1h , 2 h and 4 h LEDs lit). The selected time is displayed below the timer button (9) with blue LEDs. Press once to set the operating time to 1 h, press the button again for 2 h, and so on. The remaining time is indicated by the illuminated LEDs below the timer button (9). The unit switches off automatically after the set operating time has elapsed. If no LEDs are lit below the timer button (9), the unit is set to continuous operation.
- Activate swing mode by pressing the swing mode button (10). The appliance now swings at an angle of approx. 70^ to ensure optimum distribution of cooling air throughout the room. Press the swing mode button (10) again if the appliance is to remain at a certain angle.
- Switch off the appliance by pressing the on/off button (4).
- The remote control (11) is in the compartment for remote control (12) on the back of the appliance. It operates via infrared – for this purpose, point the remote control at the infrared receiver (14) on the front of the unit. The battery compartment (13) is on the back of the remote control (11). This can be opened by pushing the cover downwards.
Cleaning
Prior to any maintenance, cleaning and after each use, switch off the appliance and unplug the mains cable (3) from the socket.
Attention: Never submerge the appliance in water (danger of short-circuit).
- For external cleaning, rub with a damp cloth and then dry thoroughly.
- Make sure that the air inlet (16) and air outlet (15) are cleaned regularly to prevent the build-up of dust. The air outlet (15) can be cleaned with a dry brush or a vacuum cleaner. The air inlet screen (16) is fitted with an air filter which can be removed and cleaned with a damp cloth. Remove the filter by removing the 4 screws on the air inlet screen (16). After cleaning, ensure that the air filter is completely dry and that the 4 screws are firmly tightened again.
Repairs
- Repairs to electrical appliances must only be carried out by a qualified electrical technician. If improper repairs are carried out, the warranty lapses and all liability is refused.
- Never operate the appliance if the adaptor or plug is damaged, after it has malfunctioned, if it has been dropped or has been damaged in any other way (cracks/breaks in the casing).
- Do not push any object into the appliance.
- If the appliance is beyond repair, make it unusable immediately by cutting through the cable and hand it in at the collection point provided for the purpose.
Disposal
The European directive 2012 / 19 / CE on Waste Electrical and Electronic Equipment (WEEE), requires that old household electrical appliances must not be disposed in the normal unsorted municipal waste stream. Old appliances must be collected separately in order to optimize the recovery and recycling of the materials they contain and reduce the impact on human
health and the environment. The crossed out "wheeled bin" symbol on the
product reminds you of your obligation, that when you dispose of the appliance it must be separately collected. Consumers should contact their local authority or retailer for information concerning the correct disposal of their old appliance.
Specifications
| Rated voltage | 220–240 V / 50 Hz |
| Rated power | 36–60 W |
| Dimensions | Housing: 135 x 1100 mm (diameter x height) Foot: 240 mm (diameter) |
| Weight | 6.0 kg |
| Sound level | 33–52 dB(A) |
| Complies with EU regulations | CE / WEEE / RoHS / EAC |
All rights for any technical modifications are reserved
Pied:240mm(diametre)
Poids 6.0 kg
BentnIaTOp Bo3dyxa He yBnIeTc8 6pb3roHepoHuaembIM
He3KcnnyatnpyuteBentnIaTOp Bo3dyxa Bne Nomeuhen.
- HexpaHnte BENTnIaTOp Ha yIuIe.
-ДляхареняункутпиборВКоробкУxханiteВСухOMnomeцEHIN,BMeCTax,HEDOCHTyINbIXДлЯDETeI.
B Cnyuayx NOBpexdeHn cTeBOrO shypa OH doJXeH 6bTb 3aMeHeH ABTOIN3IPoBAHHbIM cepBnCHbIM ceHTpOM IIO6 KBaJIuIqIpOBAHHbIM CNEUAnCTOM.
-
Пегд поведенем Тхнческо обсукваня, чstkn, a takжес пося кадою Истльзованя, bbikliuHTe npibopи OTOcoedHHTe erOOTcTn.
-
PemOH npIbopa moKet bItb BblIOJIHeH TOJIbKO aBTOpI3NpOBaHHbIM cepBnCHbIM cHTPOM INo KBaIIuINΦnpOBaHHbIM CneuaJInCTOM.
C60pka (ctp.2n3)
PnKpeHneNoctabky(1)KNxHneYacTNI KOpNyca(2)npn NOMOuN qeTbIpeX BnHTOB, BXoJauNX B KomJIeKT. NaExxo3aTaNHE BnHTbl.
3Kcnnyataun
- NocTaBte BeHTnJIaTOp Peter B HUxHOM MecTe Ha POBHOI NOBepXHOCTn. NIOKNIQUHTe CeTEBOI KaEBb (3) K COOTBetCTBYUOeI poOETke.
- BkIIOHTe np6Op, Haxab KhoNky nITaHnra (4). PpI 3tOM 3aIopTcA CnHne CBeToDIOHbIe INHdkaTOpbl Ha naHelen ynpabLeHnra (5).PpI n3MeHenHHn HAcTpoek C naHelen ynpabLeHnra (5) nIi C nyltTa nCtAnuONHOy npabLeHnra (11) np6Op npdaet 3BykoBoi cnHai.
3.ДиИЗМЕHENHЯСКОРOSTЯpoBtIBEHTINJIaTOpA(yPobHn1-3)нжмTe KhoNkY Bb6Opa COKOPCTN BO3dUshoro NOTOKa(6).OДно HaxKaTne NOBbIaHaTcKOPoCTb Ha OOnH yPoBeH.EcIn BAM Heo6xOJIMo NOBiCnTB cKOpOCTb eue Ha OOnH yPoBeH, HaxMITE KhoNky eue pa3.Haпердэн панелпрбopa 3aRopaetc O6O3haChenE Bb6pHnHOуPobHЯ cKOpOCTN(7),KOTOpoe rachet chee5 5cekyHd.
4.ДлЯ IMNTaци ecteTbeHoro notOKa BO3dyxa haKmITE KhoNky BbIb6pa pexnma «Natural Breeze» (8).ПиуТOM 3arOpinTc cnHn CBeToDIOhblu HndNKatop NO kHOnkOy (8).3TOt pexnM oEcecneuBaet OeyHb npraTHbOxnaJdaIoUzni 3Ффekt,IMNTpyIOUm ecteTbeHbH bPn3.PnIyTOM CKoPoCTb BO3dyuHoro notOKa N3MeHaTeCBA ToMaTHueeCKN B 3abNCIMoCTn OT BbIbpaHHO ypOBHr CKopoCTn. - Haxab KhoKyu TaMepa (9), Moxho 3aadaTb Bpempa60tB OTOHNO DO cEmu Yacob (Hapnpimep, npu yctahOBke BpeMeHN 34 zaropaOTc HndnKaTOpbl 1u 2u, npu yctahOBke BpeMeHN 74 zaropaOTc HndnKaTOpbl 1u, 2u 4u). 3aadHnoe Bpempa60kAETC npn nomou n CnHex CBToDnOHBIX INDnKaTOpOB NOK HonKO Taimepa (9). YTO6bl 3aadaTb Bpempa60tBl 1u, HaxmITE KhoKny OOnPi p3, 2u — Dba pa3a u Tak daJIee. OTabueec Bpempa60tBI OTO6pAAetC npn nomou n CBToDnOHBIX INDnKaTOpOB NOK HonKO TaIMepa (9). IIO OKOHauHHN 3aadaHoro BpeMeHN pa60bI np60 ABtOMatUneCKN OTKnIOUaeTcE. Ecln np60BbKlIoUeHNpepeBbHOM pexime, HNKAKNe INDnKaTOpbl IOd KhoNko TaIMepa (9) He roprt.
6.Дявкючehн рекima «swing»нхмite кноку bblбор рекima «swing》(10).Пиббр 6удET nobopaumbatcnoуглmpnnpimepno70°,обесс neuropвая ONTIMальhoe paacpepeelene Oxnaждашero notoka BO3duxa no BCemY nOmeuHIO.YTObI OCTaHOBITb np6bB NOLOxe-HIN IOJ KELaEMbIM yrglOM,нхмite KhONky bblбор рекima «swing》(10)еpepa3.
7.ДлЯ Вькlioуняпибора НжмITE Кноку петаня(4). - Пильт дисанционно управлени (11) размeeаetсь в отсke (12) на заденсторе ппбopa. Пильт паботаь Инфрахсом диапэоhe. Утоы bocnoьзоватя пьTom, habeinte erо на IK-nриемнк (14) на поденсторе ппбopa. capitalized onytsa dntstahunhofoуnpablenen (11) haxoindtc otsekn 对签6tpeek (13). Chtoы otkpbib ero, npnxmite кршky отсka и notanhtte ee BnH3.
06cIyKbAHneHnCTka
Пелег добукьанем ическов,а тасke пося NGNOLьваня,OTKлioчite сетевошур (3) bentnilayotopa ot nctouнka јл ektrponitаня.
BhMaHHe: BO n36eKaHHe nopaxeHnI 3JNeKTpOToKOM HnKOrJa He nOrgyKaJIte BENTNIATOp IN cTeBOI shHyp (17) B BODY.
- Пи Нeo6хоюмocntи BEHTINATOP можно поразеть Bлajхно calФETKо, a 3aTeM bbltepeTb hacyxo. He donyckaite nonadHna BlaRn Bdbu-rateIb nIIb 6JOK peYJInpOBKn CKOpOCTn
Bnyckhoe (16) n Bvinyckhoe (15) OTBepctna I na Bo3dyxa cneyet peryIaRHO OunuTa, He Donyckar hakonJIeHn B Hnx NbIIN. Bvinyckhoe OTBepCTne (15) moxho uchtb cyxoh utkOu nnblncocom. PeWetka BnyckHO r OTBepCTna I na Bo3dyxa (16) ochauena B03dyuHbIM fNtbpOM, KOTOpBIO MOxHO CHMaTb NpOtnpaTb BlaxHoCAnfETKO. YTo6bI ChrTb fNlTp, OTKpynte YteBipe BuHTa Ha peWetke BnyckHO OTBepCTna I na Bo3dyxa (16). Nocne OuncTKn fNlTp cneyET nonHOCTbBO BVicuNTb U yctahOBuTb 6paTHo, HAdexHO 3aTrHyB YteBipe BuHTa.
Pemont n yctpaheHne HncnpabHocte
B ueJx 6e30nacchOn pemont 3neKtpnpnbopa doJnxen ocuyectBlaTbC TOJIbKO KBaJIuΦuIcPObaHHbIMN CpeUaJIncTaMn ABTopu3oBaHHoro cepBnCHOrO ueHTpa.
- Tapaantna He pacnpoctpaHaeTcHa HeNCnPabHOCtN, OycNObJIeHHbIe HekBaJIuΦnUPOBaHbIM pEmoHTom, a TaKxHe HeppaBnJbHO 3KcJIpyTauee 3NeKTponpnpopa.
- Tapaantna He pacnpoctpaHaeTcHa HeNCnPpABHoCTn, OycNObIeHHbIe HekBaJIuΦmUPOBaHbIM peMOHTom, a TaKxHe HeppaBnIbHO 3KcPJIyaTauee 3NeKTponpnpopa.
3aPpeaetcNcnoJIb3ObaHnne HeNCnPabHOrO 3eKtpOnpnp6opa, a TaKKe npMexAHueCcknx ININHbIX NOBpExdHnax CamoRo 3eKtpOnpnp6opa, cTeBoro shHpya ININ erO BUNKn.
- HinkoIa He pa3bpaIte 3JekTpnpn6op camocToIeIbHo, He BCTabJIte HIKaKne NoctOpOHHe IpeImTeB OTBepCTnB KOpnyce 3JekTpnpn6opa.

Ytuluzua
I03a60bTecb 6 okkyoioe cpe! He bbl6pa5BaIte HecnpabHbe 3neKtpnpnbOpby Bmectc 6 bblTOBbIMn OTxOdaMn. O6paTntecb IJra 3TuX uei B Cneuunln3npobAHnhy nyHK T ytnlnaau 3neKtpnpnbOpOB. Adepca npYkTob npema 6blTObBx 3neKtpnpnbOpOB ha nepebaotky Bbl mojete noynuTb B myHunuaJIbHbIX cnyxbax BaWero ropoJa. HenpabInbHa ytnlna3aun 3neKtpnpnbOpOB hAnocn HenonpabMbn Bpeokpykaoue cpe. Ppi 3amHe nCnpabHoro 3neKtpnpnbOpBa Ha HObI IOpNDueckyIO TBETCTBEHHOCb 3a ytnlna3auHO dnJxhen Hectn npodabeu.
CneuΦkaua
Datu n3rTOBnEHHcNeDyET HtTaTb:
78901 1511 123456 - 2015 rOД, hОБрь
Garantie/Warranty/Garantie/Garanzia/Garantía Garantie/Garanti/Takuu/Garanti/Garanti
2 Years warranty
This warranty covers defects of construction, manufacturing and material. Excluded are all wearing parts and improper usage, or consequential damages due to lack of cleaning and/or descaling of the appliance.
2 Jahre Garantie

Design by Bernard / Burkhard
Thanks to Charly Liu for his engagement and organization, Bob Hong for the coordination, Alan Ai and Johnson Xia for the main engineering and CAD work, Mario Rothenbuhler for the photos, Fabian Bernhard and Thomas Burkard for the cool design, Matti Walker for the graphic work.
Martin Stadler, CEO Stadler Form Aktiengesellschaft