
ORIGINALS - Photo POLAROID - Free user manual and instructions
Find the device manual for free ORIGINALS POLAROID in PDF.
| Product Type | Instant Camera |
| Brand | Polaroid |
| Model | Originals OneStep+ |
| Dimensions | 150 mm (L) x 111 mm (W) x 97 mm (H) |
| Weight | 493 grams (without film cartridge) |
| Power | Rechargeable lithium-ion battery 1100 mAh, 3.7 V, charge via micro USB (cable included). Full charge: about 2 hours on mains adapter, up to 4 hours on computer USB port. |
| Key Features | Two interchangeable lenses (standard and close-up), built-in flash, 8-second self-timer, Bluetooth connectivity, LED photo counter (8 indicators), battery level indicator, exposure adjustment (+1/2 EV, -1/2 EV), roller cleaning mode. |
| Compatible Films | Polaroid Originals i-Type and type 600 (color and black & white, including special editions) |
| Box Contents | OneStep+ camera, USB charging cable, user manual, camera strap |
| Maintenance and Cleaning | Built-in roller cleaning mode: turn off the camera, open the film compartment, hold down the flash disable button and press the shutter, clean the rollers with a damp cloth or cotton swab, then press the shutter to advance the rollers. Do not immerse, avoid moisture and dust. |
| Safety | Do not open or disassemble the camera. Do not immerse in water. Keep out of reach of children. Do not cover the flash. Do not expose to high temperatures (>42°C) or excessive humidity. Do not attempt to remove the built-in battery. If battery liquid gets into eyes, rinse thoroughly and consult a doctor. |
| Spare Parts and Reparability | Built-in non-removable battery, replacement only by an authorized service center. No other spare parts available. The device must be recycled in accordance with regulations at end of life. |
| General Information | Polaroid Originals OneStep+ instant camera with dual lens and Bluetooth connectivity. Operating temperature: 4-42°C, 5-90% relative humidity. Outer materials: polycarbonate and ABS plastics. |
Frequently Asked Questions - ORIGINALS POLAROID
User questions about ORIGINALS POLAROID
0 question about this device. Answer the ones you know or ask your own.
Ask a new question about this device
Download the instructions for your Photo in PDF format for free! Find your manual ORIGINALS - POLAROID and take your electronic device back in hand. On this page are published all the documents necessary for the use of your device. ORIGINALS by POLAROID.
USER MANUAL ORIGINALS POLAROID
Inspired by the original OneStep camera from 1977 and an evolution of the OneStep 2, the Polaroid OneStep+ is an analog instant camera for the modern era. It takes a moment and turns it into something you can hold, something you can share, something real.
To get the best experience with your OneStep+, we recommend downloading the Polaroid Originals smartphone app on the Apple App Store or Google Play.

Film shield

Bouton plus
Botón Plus
Pulsante ^ 十
Plus-Taste

LED infrarouge
LED infrarrojo
LED infrarosso
Infrarot-LED

Flash
Flash
Flash
Blitz

Bouton éclairir/assombrir
Boton para
aclarar/oscurecer
Loquet du compartment film
14 Box Contents
14 How to Use the OneStep+
17 Further Guidance
20 Troubleshooting & FAQ
22 Tips for Making Great Photos
23 Customer Support
23 Technical Specifications
24 Safety Information
24 E2 Compliance
Manuale utente
Please be sure to read through this manual before using the OneStep+. Keep for future reference.
User Manual
Warranty
Find the Warranty for this camera
by following this link:
polaroidoriginals.com/warranty
Box contents
01 OneStep+ Camera
02 USB Charging Cable
03 User Manual
04 Camera Neck Strap

How to use the OneStep+
Charge the camera
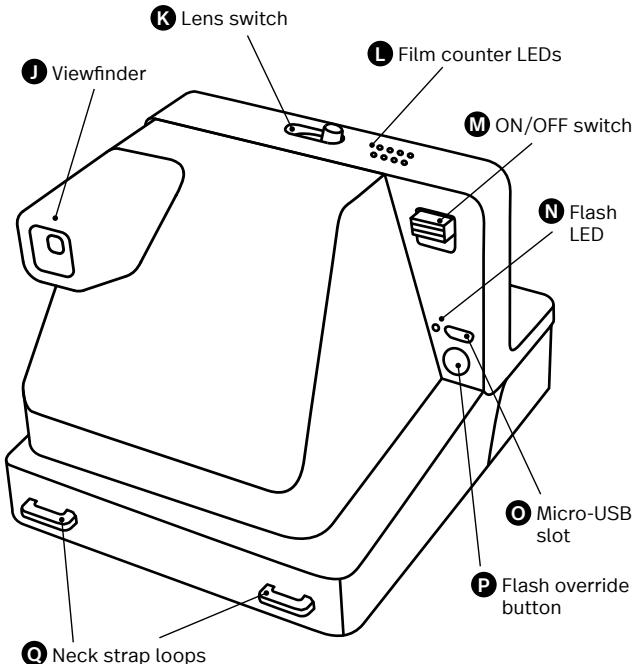
Important The OneStep+ will not be fully charged upon purchase - it should be fully charged before first use. To charge the camera, plug the USB charging cable into the Micro-USB slot on the camera's back panel, and the other end of the cable into a charger, such as a smartphone adapter or your computer's USB slot. The red flash charge LED will turn off when the battery is fully charged.
A full charge usually takes about 2 hours through a wall socket with a smartphone adapter, or up to 4 hours through a computer's USB slot. A fully-charged OneStep+ camera will have enough power to shoot 15-20 packs of film, depending on usage. Remember to turn your camera off after every use to conserve battery life.
1. Turn the camera on/off
To turn the camera on, slide the power switch into the ON position (down). The flash charging LED on the back panel will start blinking to charge the flash, and the remaining film counter on the top of the camera will light up to indicate that the camera is switched on, and show the amount of remaining film if a film cassette is loaded. To turn the camera off again, return the power switch to the OFF position.
2. Load the film
Slide the film door latch to the right to open the film door. Push the film cassette all the way in, with the film's darkslide facing up.
Note Please check individual film packaging for development time, handling and storage details.
3. Close film door
When you close the film door, the darkslide will eject from
the camera automatically, underneath the film shield. The plastic film shield is designed to protect images from light as they develop - it should not be removed. Take the darkslide out from under the film shield and let the film shield roll back up. If the darkslide has not ejected, remove the film pack and re-insert it, making sure it is pushed all the way to the back of the camera.
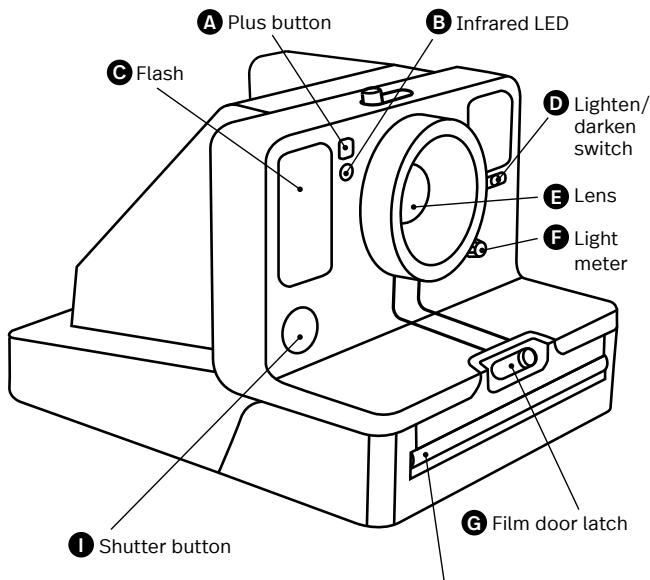
4. Set the Flash & Lighten/Darken
Flash The camera flash will trigger by default when you shoot with the OneStep+. To shoot without the flash, press and hold the flash override button on the back panel as you press the shutter button.
Warning Shooting without flash will reduce camera performance and picture quality in most lighting situations except brightly-lit, sunny environments. We recommend always shooting with flash.
Lighten/Darken Use the lighten/darken switch on the right side of the lens barrel to adjust the exposure of your shot. To get a brighter photo, move the lighten/darken switch right to the plus/lighten position. For a darker photo, move the lighten/darken switch left to the minus/darken position. These two settings correspond to different Exposure Values (EV). The camera's Exposure Values are +1/2 EV (when you move the switch to plus/lighten) and -1/2 EV (when you move the switch to minus/darken).
5. Using the viewfinder
The OneStep+ uses a traditional viewfinder located on the right side of the lens barrel. To use the viewfinder, simply align your eye with the viewfinder barrel and use the image you see to compose your shot.
Note Remember that the viewfinder sits slightly above and to the right of the camera's lens – above and to the left from your perspective when
shooting - so you will need to adjust your aim to compose your shot correctly when shooting at distances of 1.2 meters or less.
6. Compose your photo
The OneStep+ has two high-quality lenses; a standard lens, intended for photographs shot from 60 cm (2 feet) away and further; and a portrait lens, intended for photographs shot from as close as 30 cm (1 foot) away to 90 cm (3 feet) away. To select the desired lens, use the Lens Switch located above the Lens Barrel. To avoid a blurry photo, make sure you are at least 60 cm (2 feet) away from your subject when shooting with the standard lens, or 30 cm (1 foot) away when shooting with the portrait lens. For the best results, always try to shoot with your light source behind you.
7. Take the photo
Press the shutter button all the way in to take the photo.
The photo will be ejected from the slot at the front of the camera as soon as you let go of the shutter button. It will be shielded from the light by the film shield, and will be held in place until you are ready to remove it.
8. Remove and shield the photo
Remove the photo from beneath the film shield and let the film shield roll back into the camera. Place the photo face down to continue shielding it from light as it develops.
Further Guidance
Using the portrait lens
The OneStep+ has two high-quality lenses; a standard lens, intended for photographs shot from 60 cm (2 feet) away and further; and a portrait lens, intended for photographs shot from as close as 30 cm (1 foot) away to 90 cm (3 feet) away. To select the desired lens, use the Lens Switch located above the Lens Barrel.
Pairing with Bluetooth®
The OneStep+ features Bluetooth connectivity, allowing it to be connected to the Polaroid Originals smartphone app, unlocking a range of creative features. To pair your OneStep+ with your smartphone, press the Plus button (located to the left of the camera's lens barrel) once. The Plus button LED will flash blue, indicating that it is in pairing mode and waiting for a new connection. Ensure your phone's Bluetooth is switched on and open the Polaroid Originals app, choosing the OneStep+ option. The camera will connect automatically. Once your camera and smartphone are paired, the Plus button will change to solid blue, indicating that it is successfully paired.
To pair your OneStep+ with a new device, ensure that Bluetooth is switched off on the current paired device, then press and hold the Plus button for 3 seconds. The Plus button LED will flash blue, indicating it is now in pairing mode.
Using the self-timer
The OneStep+ has a self-timer function allowing you to place yourself in your photos or create perfectly-timed photographs. To use the self-timer, press the Plus button twice quickly. The button will light up to solid orange, indicating that the self-timer is activated. Once you have framed your photo, press the shutter button lightly. The self-timer uses an 8-second interval between pressing the shutter button and taking the photograph. Once triggered, the orange LED will blink to indicate the self-timer countdown. In bright or sunny environments, the camera flash will also countdown with short, low-power flashes.
Note When using the self-timer to shoot, the flash will trigger automatically. To make self-timed photos without flash, activate the self-timer, then press and hold the flash override button as you press the shutter button. To cancel a self timer shot after it
has been activated, just press the Plus button once again.
How much film is left in the pack
There are 8 orange LED lights on top of the camera. When the OneStep+ is switched on and not in sleep mode, the LEDs will constantly display the film count. The number of LEDs which light up corresponds to the number of shots left in the film pack. For example: If 6 LEDs light up, that means there are 6 shots left in the film pack. If you have used up all 8 shots in the film pack, or if there is no film pack inserted in the camera, then the LEDs will blink rapidly when you turn the camera on.
How much battery you have left
The camera has 3 battery states, indicated by the camera's flash charge LED light:
- Battery charged: Enough charge for at least 2 packs of film.
The flash LED will blink green
whilst charging between shots, and will be solid green when ready to shoot.
- Battery low:
Enough charge for about
1 pack of film.
The flash LED will blink orange whilst charging between shots, and will be solid orange when ready to shoot.
3. Battery empty:
No charge remaining.
The flash led will blink red, and the camera will cease to operate until it is recharged.
A fully-charged OneStep+ camera will have enough power to shoot 15-20 packs of film, depending on usage.
Checking your camera's charge
To check the camera's charge at any time, switch the camera off, then switch it back on whilst holding down the Plus button. The 8 film counter LEDs on top of the camera will light up, indicating how much battery remains.
For example: If 6 LEDs light up, that means the camera has 6/8 (75%) charge remaining.
Once you release the Plus button, the LEDs will return to displaying the number of shots remaining in your film pack.
Compatible Film
The OneStep+ works with all Polaroid Originals i-Type and 600 type film packs. We recommend using i-Type film as it is optimized for use with the OneStep+.
Power supply
Charge the OneStep+ before use to ensure it has enough power for the duration of your shoot (see Charge the Camera). The flash charge LED will be solid red whilst the camera is plugged in and charging, and will turn off once the camera is fully charged.
Attach the camera neck strap
See page 8 for guide to attaching your neck strap.
Using a Tripod
The OneStep+ has a tripod socket in its base, which works with most standard
tripods. Simply screw your tripod mount into the socket on the base of the OneStep+.
Note with some tripods, the tripod mount will need to be unscrewed before you can load or exchange film into the OneStep+.
Cleaning the rollers
Sometimes excess developer paste from photos may build up on the camera's rollers, affecting the camera's performance and causing photos to show unwanted imperfections. The OneStep+ has a built-in roller cleaning mode to help with this issue. Just follow these steps:
- Turn the camera off.
- Open the film door.
- Hold the flash override button and press the shutter button.
- The camera is now in roller cleaning mode.
- Using a damp cloth or cotton swab, gently clean the rollers.
-
Press shutter button to incrementally advance roller positions.
-
Once both rollers are clean on all sides, close the film door.
- Rollers will automatically return to their correct position.
Troubleshooting & FAQ
My OneStep+ won't eject my photo/darkslide
Make sure that your OneStep+ camera is charged: The camera's flash charge LED will blink red if it doesn't have enough charge to operate. If this is the case, you should recharge your camera before using the camera again.
Make sure you still have film in your camera: to check, slide the power switch off and on. The remaining film counter LEDs will indicate how many shots you have left in the film pack. If the LEDs flash rapidly when the camera turns on again, this means
that there are no shots left in the film pack, or that no film pack is inserted.
The flash doesn't fire when I take a photo
When taking photos make sure you aren't accidentally pressing the flash override button, located on the camera's back panel.
My photo turned out slightly too dark
We strongly recommend that you always shoot with flash when shooting indoors, as well as outside at night-time, at dusk and on cloudy days with low light conditions.
Make sure you are not shooting towards the sun; the OneStep+ meters the average light level it sees. When shooting toward sunlight, the excessive light may cause the camera to over-compensate when exposing the image, creating an image that is too dark to expose your subject properly.
Move the lighten/darken
switch on the right side of the lens barrel to the plus/lighten position for a brighter image.
My photo turned out blurry or fuzzy
Make sure you are using the correct lens, with the Lens Switch in the standard position, and be at least 60~cm (2 feet) away from your subject. In the portrait position, your subject should be at least 30~cm (1 foot) away, but not further than 90~cm (3 feet).
When shooting, make sure to hold the camera steady, especially in low light conditions, and make sure you have a strong light source to illuminate your shot.
We strongly recommend that you always shoot with flash when shooting indoors, as well as outside at night-time, at dusk and on cloudy days with low light conditions. You can also use a tripod to give your camera a stable base.
Make sure you are not too close to your subject when taking photos. In order to avoid
blur or out-of-focus photos, you should shoot from at least 60 cm (2 ft) away from your subject.
Tips for Making Great Photos
Make photos indoors
Always use the flash when shooting indoors, even if you don't think you need it.
Indoor light appears yellow on analog film - the OneStep+’s flash is designed to compensate for this.
Make photos at night
When shooting at a party (or any indoor night-time environment), you should always use the flash.
You can also try moving the lighten/darken switch to the plus/lighten position to get a brighter shot.
Make photos outdoors
Natural light is your best friend when it comes to instant photography. On a sunny day
outdoors, you don't need to use your flash at all. Make sure not to shoot towards the sun; shoot with the sun behind you, facing your subject directly or side-on. If your environment is very bright, you can try moving the lighten/ darken switch to the minus/ darken position to let less light into the shot and prevent it from being "blown out".
In any situation where you are not shooting in bright, direct sunlight, we recommend still using the flash to achieve the best shots.
Make landscape photos
When trying to capture a landscape shot, make sure that the sun or main light source is behind you to prevent the image from being "blown out" by excess light.
On a cloudy or overcast day with low light, you may wish to place the camera on a tripod or steady surface which will make it easier for the entire scene to remain in focus.
Customer Support
The Polaroid Originals Customer Support Team is always more than happy to hear from you. Get in touch using the contact details provided. For more detailed and up-to-date information, visit polaroidoriginals.com/help
USA/Canada
usa@polaroidorphinals.com
+1 212 219 3254
Europe/Rest of World service@polaroidorphinals.com 0080057701500
Impossible B.V.
P.O. Box 242
7500 AE Enschede
The Netherlands
Technical Specifications
General
Dimensions
150mm L) × 111mm W × 97mm H Weight
493 grams (without film pack)
Operating Temperature
40-108oF/4-42oC,5-90%
relative humidity
Compatible Film
Polaroid Originals i-Type and 600
type film in both Color and Black &
White, including Special Editions. Battery
High performance lithium-ion battery, 1100mAh, 3.7V nominal voltage,4.07Wh
Materials
Outer shells
Polycarbonate ^+ ABS plastics
Lens
Optical grade polycarbonate lens,
coated
Shutter system
Custom design using precision
step motor
Optical System
Lens
Fixed focus lens
Focal length
Standard lens: 103 mm
Portrait lens: 89 mm
Field of view
41° vertical, 40° horizontal
Flash System Vacuum discharge tube strobe
Safety Information
Caution RISK OF ELECTRIC SHOCK -DO NOT OPEN/ DISASSEMBLE THE MOTORIZEDROLLER SYSTEM
- Do not disassemble the device. Incorrect reassembly can cause electrical shock if the device is used again.
- Do not immerse the device in water or other fluids.
- Do not operate the device in a high humidity environment or very dusty environments.
- Do not attempt to tamper with, adjust or remove the battery and/or the electronics located below the rollers behind the device's film door.
- Do not attempt to remove the door itself as it is connected electronically to the body of the device. Doing so is unsafe, will likely damage your device, and will void your warranty.
- Do not insert metal objects into the device.
- Do not insert any objects into the rollers or gears.
- Keep small children and infants away from device to avoid them being injured by the device's moving parts.
- Do not use or store the device near any heat source or any type of equipment that generates heat, including stereo amplifiers.
- Do not use the device near flammable or explosive gases.
- Do not charge the device if you notice any unusual odors, noise or smoke.
- Do not attempt to disassemble the film's battery or modify it in any way (if using 600-type film). If battery fluid gets in your eyes, immediately rinse your eyes with fresh, cold running water and seek medical attention immediately.
- Do not cover the flash.
Battery and Charger
- This device uses a custom lithium-ion battery that is non-removable and mounted inside the camera body.
No other type of battery can be used. Battery replacement can only be done by authorized service centers. The battery will provide many years of service if properly used. - Power consumption varies depending on the environment the device is used in and how the device has been stored. Used im
mediately after full charge, the battery will power the processing of up to 20 film packs with flash exposures. Due to the high energy requirements of the flash, we recommend charging the camera fully before every session for best results.
- Once the battery energy level falls below a certain level, the device will no longer process film. The LED will blink and signal when it needs to be recharged. This is to avoid a photo getting stuck as it is being processed through the roller system.
- The rechargeable battery is not fully charged at the time of purchase. Charge the battery fully with the USB charging cable (provided). This usually takes 1-2 hours (can vary depending on usage).
- The supplied battery charging cable has been tested to work with the Apple iPhone power adaptors. While it can be used in other USB ports e.g. computer, USB power adaptors, TVs, cars etc., correct operation cannot be guaranteed.
- When the device is no longer in use, please recycle it properly.
Usage Environment
To protect the high-precision technology contained in this device, never leave the camera in the following environments for extended periods of time: high temperature (+42^ / 108^) , high humidity, places with extreme changes in temperature (hot and cold), direct sunlight, sandy or dusty environments such as beaches, damp places, or places with strong vibrations.
- Do not drop the device or subject it to severe shocks or vibrations.
- Do not push, pull or press on the lens.
Compliance
Important directions for using Lithium-Ion Batteries
- Do not throw into fire.
- Do not short circuit.
- Do not disassemble.
- Do not continue to use when damaged.
- Dispose correctly after use.
- Keep away from water.
EU Declaration of Conformity
Hereby, Impossible B.V. declares that the OneStep+ analog instant camera is in compliance with the essential requirements of the Electromagnetic Compatibility Directive (2014/30/EU), Low Voltage Directive (2014/35/EU) and Rohs Directive (2011/65/EU) and other relevant provisions, when used for its intended purpose.
FCC Compliance Statement
This device complies with Part 15 of the FCC Rules. Operation is subject to the following two conditions: (1) this device may not cause harmful interference, and (2) this device must accept any interference received, including interference that may cause undesired operation.
Caution The user is cautioned that changes or modifications not expressly approved by the party responsible for compliance could void the user's authority to operate the equipment. This equipment must not be co-located or operated in conjunction with any other antenna or transmitter.
Note his equipment has been tested and found to comply with the limits for a Class B digital device, pursuant to part 15 of the FCC rules. These limits are designed to provide reasonable protection against harmful interference in a residential installation. This equipment generates, uses and can radiate radio frequency energy and, if not installed and used in accordance with the instructions, may cause harmful interference to radio communications. However, there is no guarantee that interference will not occur in a particular installation. If this equipment does cause harmful interference to radio or television reception, which can be determined by turning the equipment off and on, the user is encouraged to try to correct the interference by one or more of the following measures:
Reorient or relocate the receiving antenna.
- Increase the separation between the equipment and receiver.
- Connect the equipment into an outlet on a circuit different from that to which the receiver is connected.
- Consult the dealer or an experienced radio/ TV technician for help.
This equipment complies with fcc radiation
exposure limits set forth for an uncontrolled environment. End user must follow the specific operating instructions for satisfying rf exposure compliance.
Industry Canada (IC)
Radio Frequency (RF) Exposure Information
The radiated output power of the Wireless Device is below the Industry Canada (IC) radio frequency exposure limits. The Wireless Device should be used in such a manner such that the potential for human contact during normal operation is minimized.
This device has also been evaluated and shown compliant with the IC RF Exposure limits under portable exposure conditions. (antennas are less than 20~cm of a person's body).

The symbol means that according to local laws and regulations your product should be disposed of separately
from household waste. When this product reaches its end of life, take it to a collection point designated by local authorities. Some collection points accept products for free. The separate collection and recycling of your product at the time of disposal will help conserve natural resources and ensure that it is recycled in a manner that protects human health and the environment.
3. Fermer le compartment film
Un appeareil photo OneStep+
Industry Canada (IC)
This device complies with part 15 of the FCC Rule and Industry Canada license-exempt RSS standard(s). Operation is subject to the following two conditions: (1) This device may not cause harmful interference, and (2) this device must accept any interference received, including interference that may cause undesired operation. Le present appa
ECn CBeTo3aUHTHg 3acNoHka He NoBnAocb, M3BNeKIne KAcCety C nHeKOn I nepeCytaHOBnTe ee TAK, YTObI OHa BCTana Ha MeTo Do yNopa.
4. HactpoiKa BCbIuKmN 3KcNo3nM
Bcblska BcblskaHaΦoToaannapateOneStep+ BkIIOueHa no
ymoHaHIO n ABOTMaTHueckn
cpa6aTaBlaeT npu BbIOnHEnHH
KaKDo 0CHMka. YTo6bl CdeNaTb
CHMOK 6e3 BCbIuKn, Depknte
Hakatoi KHONKY OKJIHOeHNA
BCbIuKn Ha 3aJHei NaHei N
OHDOBpeMeHHO HAXMITE KONKy
3ATbOpa.
PepdynpexdHne CbEmKa 6e3 BCbluK, KaK npabUIno, yUyDlaeT B03MOXHOCTN FOToaannapata N KaueCTBO I3O-6paKeHHa Y cYIOBmX pa3-HOH CTENEH.
OcBeTneHne/3aTeMHeHne
3Kcno3nIyNcnoB3yIe pery
TJop 3Kcno3nIyN cnpaba OT
Kopnyca o6bekTnBa dIa Ha
CTPOIKI 3Kcno3nIyN cHIMKa. IIO
BepHnTe peryTOp 3Kcno3nIyN
BnpaBO b NpIoKeHne «PIIOC/OB
BetIeHne», ecNI HxNHO cDenatb
6Obee npKyIO pOTorpaHIO. IO
BepHnTe peryTOp 3Kcno3nIyN
BNEBO b NpIoKeHne «MmHyC/3a
TemHeHne», ecNI HxNHO cDenatb
6Obee TemHyIO pOTorpaHIO.
3Tn DBe HAcToPmKn COOTBETCTBYtO pAaHbM 3HaueHnAm 3KcNo3nIi (EV).DocTyNbHe Na foToanaparate 3HaueHnAm 3KcNo3nIi: +1 / 2 EV (perynTOpB nnonoKeHH
《Плioc/OCBETЛЕНИЗ})И-12EV (pernyяторВполюгеля«MHHC/3aTeMнEHNE)
5.Испонтьованые Вдонскател.
Фотоанnapat OneStep+ ocha-uen CTaHdApTbM BVDONCKATElem Cnpabov CTOpObHb KOPNYcaObBeKtBa. YTo6bI NaHTn N3o6bpaxHeNne I dyCbeMKn, npocTO NOcMOTpTe Yepe3 BVDONCKaTeB, pInIOJKB ERO K Tna3y.
PnmueyaHne He 3abBaiTe, YTO BIDONCKaTeNb HaxoDNTcR CnpBaA NyTb BblWe oBeKtNbBa FOToAnnapata, T. e. CBepxu CnEba NepCNEKTINbBO BpEmr CbEMKn, N03TOMy erO He06XODIMOp npaBnHO HABeCTN Ha ObEKT CbEMKn DnA CO3DaHnny HxKHO KOMPO3mU, ECmN CHMOK BbIOnHReTc PacCTOHNH He 6oone 1,2 Metpa.
6. Co3dahne KOMnO3nCnn foTOrpaFnn
OneStep+ ochaueh DBymBaBcOKokaueCTbeHHbIMN OObekTNBAWM: CTaNaprThbIM, KOTOpbI npedha3NaueH dIra CbemKn Ha
pacctoHmOT 60 cm (2 cyta) nDaane, mAKPOcBemOHybIM dIyCBemnHa paccctoHmOT 30 do90 cm (1-3 cyta). DnI Bb6bopaHyxHOro obBeKTHBa IcNoJIb3yIte NepeKlIOuATEnb ObeKTHBOBNaI KOpNcOM obEkeTBA. YTo6bI N36EkaTb CMAaHHbIX fOToRpaFni, pacCToHne Do obEeKa TcBemKn DOJIKHO bIb He MeHee 60 cm (2 cyta), ecIn BblNCOnlb3yeTe CTaNdAPThbI oBekTNB, INI He MeHee 30 cm(1 cyT),ecIN NCNoJIb3yeTcMaKPOcBemOHyb IObeKTHB. IJN NOnUeHnHaHInyUHnx Pe3yIbTaTOB NCTOHNK OCESeHnI DAJIKHe HAXOINTBc PNOaDnBAC.
7. CbeMka
ПОИСТБЮHAЖМITEKHONК 3aTbOpa,чTOбы cDENATb CHMOK.FOTORpaФЯ BbIdETn3 CNOTaHa nepeDneH naHenn FOToaannapata cpa3y nocLe OTNcKAnHKNKn3aTbOpa. OHa 3aUmIeHa OT CBeta 5TOKK OKHd NByBxOda FO- TOrpaФи; OHa OCTaHETcH MaCte, POKA BbI He peWnte ee CHrTB.
8.ИЗБЕЧЕНИ NG3aUNITA φοτorpαφήσι ON CBETA
I3BNeKInTe foTOrpaФnIO n3-NoI
IITOPKn I DoXdNITEcb, NOKa
IITOPKa BepHcTcR bCXOHDoe
POnIoKHeMe. IOnoKInTe foToRpaF
PfIOIeBOI CTOpOHOBn3,
YTOb6 3aUHTNTb eE ot CBeta BO
BpEMr npOABKn.
Bcblska He pa60taet, KOrda J deJao CHMOK
CnEeNTe 3a TEM, YTObI BO BVPBEM CBeMIX CnYauHIO He NaXbTb HA KHONK TYKJNUOHeH NCBIIuKIKOTOPARpaONIOKeHa 3aDneH paHEn FOtoAnnpapata.
End of life disposal warning: When the product has come to the end of life, dispose of it in accordance with local
regulations. This product is subject to the EU directive 202/96/EC on Waste Electrical and Electronic Equipment (WEEE) and should not be disposed as unsorted municipal waste.
Version 2.0 - 05/2018
Manufactured in China. This product is distributed and sold by Impossible B.V., P.O. Box 242, 7500 AE Enschede, The Netherlands and its wholly owned subsidiaries. Polaroid, Polaroid Classic Border Logo, Polaroid Originals Design and Polaroid OneStep are trademarks of PLR IP Holdings, LLC, used under license. PLR IP Holdings, LLC does not manufacture this product or provide any Manufacturer's Warranty or support.
The Bluetooth® word mark and logos are registered trademarks owned by the Bluetooth SIG, Inc. and any use of such marks by Impossible Camera GmbH is under license. Other trademarks and trade names are those of their respective owners.
Apple and the Apple logo are trademarks of Apple Inc., registered in the U.S. and other countries. App Store is a service mark of Apple Inc., registered in the U.S. and other countries.
Google Play and the Google Play logo are trademarks of Google LLC.