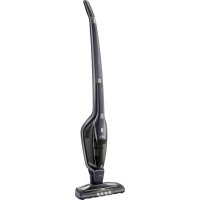
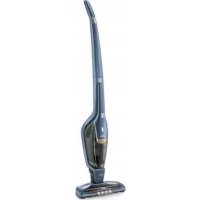
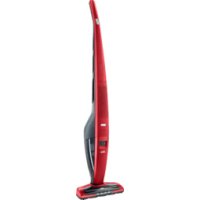
DPK5960B - Cordless vacuum AEG - Free user manual and instructions
Find the device manual for free DPK5960B AEG in PDF.
| Product type | Extractor hood |
| Brand | AEG |
| Model | DPK5960B |
| Power supply | 220-240 V, 50/60 Hz |
| Number of speeds | 4 speeds |
| Lighting | Integrated LED, separate control |
| Delayed shut-off function | Yes, timer based on speed (8-20 min) |
| Control type | Touch panel |
| Grease filter | Dishwasher safe (short cycle, low temperature) |
| Charcoal filter | Replaceable, saturation after 160h (varies by usage) |
| Filter alarm | Red flashing LED: grease filter (40h) or charcoal (160h) |
| Filter counter reset | Long press on specific button (3 seconds) |
| Bulb type | LED, replacement by technician |
| Maintenance | Soft cloth, warm water, mild detergent; monthly cleaning |
| Environmental protection | Recycling of packaging and appliance at end of life |
| Customer service | www.aeg.com/support, spare parts at www.aeg.com/shop |
| Weight | Not specified |
| Dimensions | Not specified |
Frequently Asked Questions - DPK5960B AEG
Caution: do not use abrasive detergents.
User questions about DPK5960B AEG
0 question about this device. Answer the ones you know or ask your own.
Ask a new question about this device
Download the instructions for your Cordless vacuum in PDF format for free! Find your manual DPK5960B - AEG and take your electronic device back in hand. On this page are published all the documents necessary for the use of your device. DPK5960B by AEG.
USER MANUAL DPK5960B AEG
OBCLNYKBAHE HA KJINEHTN
BnHa n3no3BaIte opunHAnHn pe3epBn qactn.
Korato ce cBbP3BaTe c Hauin OToPn3IpaH OTJeI,ObcnykBaHe",Tpr6Ba da Imate npD pKa cneHa t HOpMaun: MoJeI, PNC, cepen Homep.
HΦopMaunra MoKe Da 6bJe OTKpuTa Ha Ta6JIkata C OCHOBn DaHHN
I IpeDynpexdEHNe/BHmHaHne-INHΦopMaζηa 3a6e3oNaCHOCT
① O67a INHΦopMaζηι ΜcBbETn
IHHΦopMaçnla 3a OKOJHaTa cpeJa
3ana3BaMe cn npaBOTO Ha n3MeHeHn.
1. ИнфОРМАЦЯ 3A БЕЗПACHОТИ MOHTAZK

BHIMAHNE!
BnKTe OtDJIHaTa 6poWya
CNHCTpyKcMn3a
INCTaJIpaHe 3a
HOpmaa3a
6e30nachOCT N MOHTaK.
PpoheTeBHHMaTeHNo
TJIaBInTe 3a 6e3OnaCHOCT
PpeDn BcKa ynoTpe6a nn
IoIaJbXkaHa ypea.
2.ОПИСАНЕHAУРEDA
2.1 Перлед на Контropolnia наец
| Функция | Описане | |
| 1 | Освétлениe | Вкlioочан e Изкlioочан e на сbeltлии. |
| 2 | Бутон c Функция 3a 3a-6авено ИЗкlioочанe | Функцията 3ада ватоматчно 3абавян e на ИЗ-Кlioочанeto. |
| 3 | Инданатор 3a Функция-Ta 3a 3abавен o ИЗлочанe | Покаиза далу Функцията e akтувирана. |
| 4 | Бутон Plus (Плюс) | Увелоча в Новото на скоростта на В entnilатора. |
| 5 | Сбетонддни Инданатор-pи | Покаиза Новata на скоростта на В entnilатора. |
| 6 | БутонMinus (Минус) | Намалая Новото на скорosttega на В entnilатора. |
| 7 | Инданатор 3a Функция-Ta 3a anapma на Флты-ра | Покаиза далу anapmaда на Флтыba e Вкlioочena. |
3. BCEKNДHEBHA YNOTPEBA
3.1ИЗнолзВан e a6cop6aTopa
PpOBepTe npenOpbUHTeHnHaTcCKoPoCT B cBoTBETCBnC TaBnucTaNo-DoNy.
| 1 | При за��пяные нахрана; roтve themselves可以没有 |
| 2 | При за�� themselves可以没有 |
3
Пи Варе He nпьжende Ha rolenMn KOnIueCTBa xpaHa 6e3 Kanak, rotBeHe Bbpyx HЯКOLKO rotBapcKn 30Hn IInr ropeJIkn.
4
PnB apehe nIbpxeHe ha rolemKoJIueCTBa xpaHa 6e3 KaIaK, BnCOKa BnaxHocT. Cne8 MInHyTu ypeBt Ce BpbUa Ha npdeMnHaTa HAcTpOka.
i
PpenopbunTeHNO e da octabnte a6copaTopa da pa6oTn pnp6n3nTeHNo 15 MInHyTN CneI rOtBeHe.
3a da pa6oTne c a6cop6atopbT;
IpoIbJIkeTe DaHaTnCKaTe —, DOKaTO BeHTnIaTOPbT Ha acnIpaTopa Cnpe IIN DOKaTO 3aTbOpIne NODBnXKhata Yact.
i
AcnipatopbT NOMHn
nocleHaTa HacToPka Ha
CKOpocTtHa BeHTnIaTopa
pnp 3aTbapRe Ha
NoBnKHaTa Yact.
AcnpatopbT Ue paOTo Ha
TOBa HnBO Ha CKOpocTtHa
BeHTnIaTopa, KOraTO
NoBnKHaTa Yact ce
U3DbpNa OTHOBO.
3.2ФункцязаЗа6аВeHo N3КЛЮЧВаHe
Ta3nФyHKUЯ NO3BOJRABa aBtOMaTNoHODa N3KJIQUHTe BENTUNaTopa CneOppeJeHo Bpeme Ha pa6Ota.
-
3aJaTe JxelaHaTa CkOpoc Ha BENTnlaTopa.
-
Hatnchete 6ytoh
Индикаторьт на панela ce Bклоча. 3a\ да язklючпсфункцята, натуchete\ OTHOBO 6byToHa .
i
Прмяната на НИВОТо на СКОРOCТТа на ВЕНТNUЛАТОпа на acпирота пл ЗТВарянeto на Чекmedжeto на acnipatopa, korato Функцята e aktubираза, и Ze doBeDEdo ДeakTINBIPAHe Na Ta3N Функця.
BpeMeTo cneI KaTO fUHKnIyTa n3KnIOuN BeHTnIaTopa:
| Иbero на скорoc- Та на мотopa | Вреme (мен.) |
| 1 | 20 |
| 2 | 15 |
| 3 | 10 |
| Иbero на скорoc't- Ta на motopa | Вреme (мен.) |
| 4 | 8 |
3.3ИЗВЕСТпезафнгър
AnapMaTaHaΦnITbpa HAnOMH3a CMra NIN NOUcTbAHe HaΦnITbpa CAKTNBeH BByJIeH, KaKTo N 3a NoUcTbAHe HaΦnITbpa 3a Ma3HHN.
CBeToIONoHNrT INdNkATOp Mnra peoBHO B cepBEHO B npOdbJIkeHne Ha 30 cekyHni, aKO fInIbPbT 3a Ma3HmHn Tp6Ba Da ce nouchTn. INdNkaTOPbT Ha fInIbPa MnRA DBA PbTn B cepBeHO Ha BCEKn 30 cekyHni, aKO fInIbPbT C aKTbE H BblJe Tp6Ba Da ce CMeHn IJIN NouchTn.

Ta3nФyHKUЯ ceakTNBupa He3aBucmO cneI 40 yaca pa6oTa haФnTTbpa 3a Ma3HnHi n 160 yaca pa6oTa haФnTTbpa cakTNBeH BbJIeH.

BentnataopbT He pa60Tu no Bpeme Ha aIapMaTa.
BentnataopbT 3aNoUba da pa60Tu Ha nocJeIHo 3aameteHa hAcToPiKa cIeD 30 cekyHdN.

HanpaBete cnpaKa 3a nouchTbaHeTo Ha nIbpa 3a Ma3HHN B rnaBa "PouncTbaHe n rpNka".

HanpaBete cnpaBka OTHOCHO NOUCTBAHETO Nm CMnHaTa HaΦnITbpa C aKtINBeH BbTJIeN B TJaBaTa ,PnIXn INoOuNTBaHe".

BpOrybT HaФyHKcHn 3a ΦnITbpa C aKTbEN BbIeH e DeakTbUpaH nO noDpa36bpaHe.
3a da akTNBnpaTe nIeakTNBnpaTe 6pOra 3a fNITbpa c akTNBeH BByJHe:
1.Издьрай Te ueKMeДжето ha abcop6aTopa.
2. YBepeTe Ce, Ye BeHTnlaTopbTe n3KnIOUeH.
3. Hatnche B npobIjxehne Ha 3 ceKyHn.
FyHKuJraTa ce AKTINbnpa, aKO Dba 6eNc CBETOIOHN INHIMKATOPa MIRat B npOblJxehne Ha 3 ckyHn. FyHKUraTa CE DeAKTINbnpa, aKO CAMO EDINOT CBTOINOHNTE INHINkATOPn MIRat B npOblJxehne Ha 3 ckyHn.
3a da HynipaTe 6pOya Ha cyHKunTe B nepNoa 3a yBeDomBaHe:
1.Издьрай Te ueKMeДжЕТо ha abcop6aTopa.
2. HataHcHete B npOdbJxKeHne Ha 3 cekyHdN.
3a da hynilpate 6poya Ha cyHKnnte N3BbH nepnoDa 3a yBeDomBaHe:
1.Издьрай Te ueKMeДжетоHa abcop6aTopa.
2. YBepete ce, ye BeHTnlaTOpbTe n3KJIIOUeH.
3aФинТьра3ma3HnHnHaTnCHeTe B npOДьнЖeHne Ha 3ceKHyDn.
4. 3a Фплъра сakтИвен Вьгелен
Натисөтete —В прдьлжөнөе Ha 3
СЕКУнДи.
Индикаторь.T Mгa BeДньЖ 3a npabINHO hynpaHe.
4. Глиkin NOUÇUNCTBAHE
4.1БeLEKKn OTHOCHO NOUHCTBaHeTo
CbDOMnJHaTa Tp86Ba Da e HacTPOeHa Ha NsCKa TemnepaTypa n KpaTbK Ukbl. FmTTbpT 3a Ma3HnH MoKe Da 3aRy6u CBeta Cn, HO TOBa He BnIe Bbpxy pa6oTaTa Ha ypeA.
- 3a MOHTnpaHe HaФИNTpIte O6paTHO,ИЗПБЛHETe ПБВNTeДBE CTbNkВ O6paTeH peI. ПОТOPeTe C7bKNITE 3a BCnKnФИNTpI, aKO e npINoXmO.
4.3 CmHa Ha φιntbpa c aKTHBEn BbIJIeH - (no n36Op)


BHIMAHNE!
B 3aBncmocT OT BnDa, ΦnTTbPbT MoKe Da 6bDe nIi He MoKe Da 6bDe peReHepnpaH. BnKTe JnCTOBkata, npEIOCTaBeHa cΦnTTbpa.
3a da cmeHnTe fHnTbpa:
1.ИЗваде Te Филт pine 3a Ma3HnHn OToypeда.
BnKTe ,IOnuCTBaHe HaΦnITbpa 3a Ma3HnHn" B Ta3n rnaBa.
2.ИЗдьрnaite pa3deJInteIte KbMdoHHata YacHT haФЛТьpa.

- Janko HauKIOHeTe npedHaTa Yact HaΦnTbpa HApOly, cIeI KoTo DpbHHeTe.
- 3a MOHTnpaHe Ha HOB pIITbI IN3IbHHeTe CTbIKNte B O6paTeH peI. PIn BCuKn CnyaH e Heo6xOIMo Da CMeHrTe qINTPnTE NOHe Ha BCEKn Yetnpn Meceua.
4.4 CmHa Ha JIaMnTa
To3n ypeI ce doCTabc c LED lamma n OTJeJIHa KOHTpOHa KUTna (3aDnKBaM mExAH3bMa HcBETOnoDa).Te3n Yactn MORaT Da ce NOpMeHr TcMo OTTexHk. B CnyaH Na Heu3npaBHOCT BVXkTe "ObCnykBaHe" B rIba ,INCTpyKun 3a 6e3onacHOCT".
5.ОПАЗВАЕHA OKОЛHATA CРEDA
PeuKnpaTe MaTePnaJIte CbC
CMBONA .PiocTAByIe OAnKOBKnTe B
CBOTBeTHnTe KOHTeHepn 3a
peuKnpaHTo IM. POMOrHeTe 3a
ONa3BaHTo Ha OKoJHaTa Cpeda N
OBoEwKOTO 3dPaBe, KaKTo N 3a
peuKnpaHTo Ha OTnAbcNOT
eJektpnueckn n eJektpoHn ypeiN. He 13XbBpIyIte ypeInte, O3NaueHn cbc CmBonal , 3aeHNO C 6nTOBaTa CMeT. BbPheTe ypeDa B MeCTHnI PyHKT 3a peuKnIpaHe nn Ce o6bPheTe KbM BaWata 06uHcKa cnKy6a.
OBSAH
- BEZPEČNOSTNI INFORMACE A INSTALACE 8
- POPIS SPOTREBICE 9
- DENNIPOUZIVANI 9
- CISTENI A UDRZBA 11
- POZNÁMKY K OCHRANE ZIVOTNIHO PROSTREDI 12
PRO DOKONALÉ VYSLEDKY
Pnnpopopiec aovaleiaKai
Thank you for choosing this AEG product. We have created it to give you impeccable performance for many years, with innovative technologies that help make life simpler – features you might not find on ordinary appliances. Please spend a few minutes reading to get the very best from it.
Visit our website to:

Get usage advice, brochures, trouble shooter, service and repair information:
www.aeg.com/support

Register your product for better service:
www.registeraeg.com

Buy Accessories, Consumables and Original spare parts for your appliance:
www.aeg.com/shop
CUSTOMER CARE AND SERVICE
Always use original spare parts.
When contacting our Authorised Service Centre, ensure that you have the following data available: Model, PNC, Serial Number.
The information can be found on the rating plate.
Warning / Caution-Safety information
① General information and tips
Environmental information
Subject to change without notice.
1. SAFETY INFORMATION AND INSTALLATION

WARNING!
Refer to the separate
Installation Instructions
booklet for Safety
Information and Installation.
Read carefully the Safety
chapters before any use or
maintenance of the
appliance.
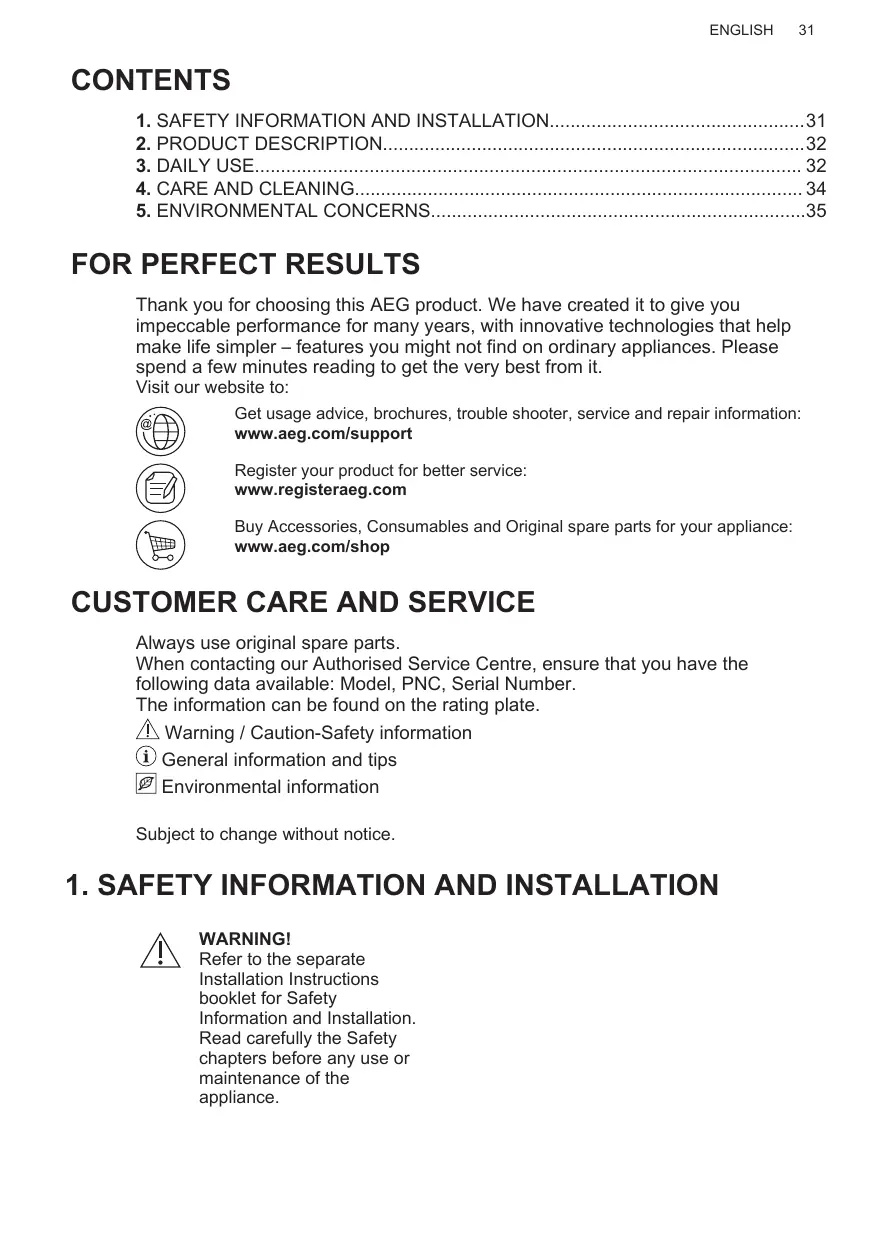
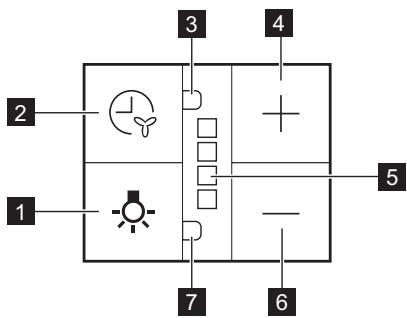
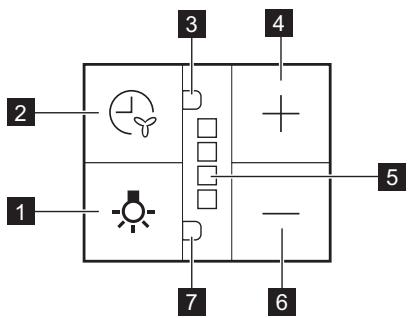
2. PRODUCT DESCRIPTION
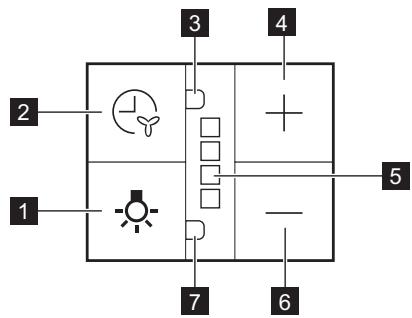
2.1 Control panel overview
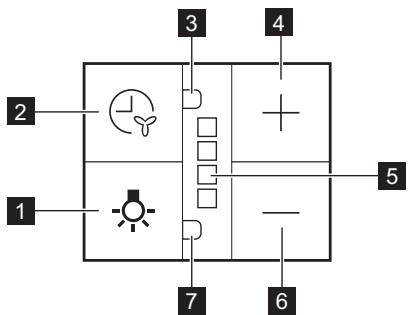
| Function | Description | |
| 1 | Lamp | Turns the lights on and off. |
| 2 | Delayed switch off func- tion button | The function sets automatic switch off delay. |
| 3 | Indicator for delayed switch off function | Indicates if function is activated. |
| 4 | Plus button | Increases the fan speed level. |
| 5 | LED indicators | indicates fan speed levels. |
| 6 | Minus button | Decreases the fan speed level. |
| 7 | Indicator for filter alarm function | Indicates if filter alarm is on. |
3. DAILY USE
3.1 Using the hood
Check the recommended speed according to the table below.
| 1 | While heating up food, cooking with covered pots. |
| 2 | While cooking with covered pots on multiple cooking zones or burners, gentle frying. |
| 3 | While boiling and frying big quantities of food without a lid, cooking on multi-ple cooking zones or burners. |

While boiling and frying big quantities of food without a lid, big humidity. After 8 minutes the appliance returns to previous setting.
It is recommended to leave the hood operating for approximately 15 minutes after cooking.
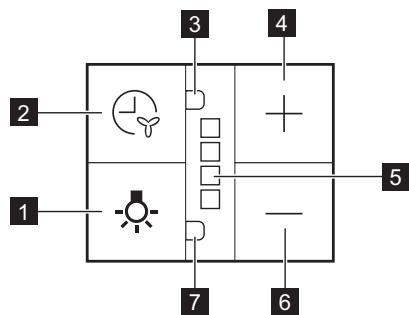
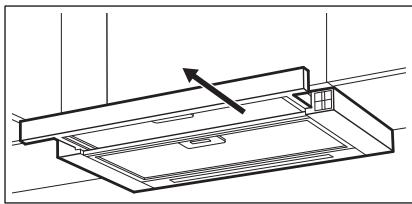
To operate the hood:
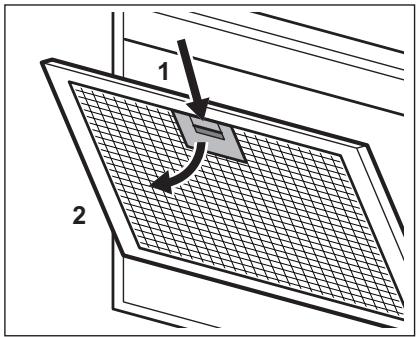
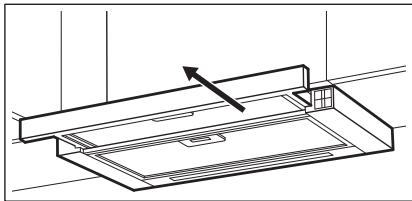
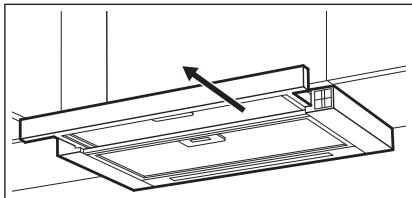
- Pull out the drawer of the hood more than 5 cm.
The control panel is exposed.
- Press the + button to switch on the hood.
To increase the fan speed level press the button again. Press to decrease the fan speed level.
The LED indicators on the panel switches on accordingly to selected fan speed level.
The hoods light works independently to other hood functions. To illuminate the cooking surface touch the light symbol .Closing the drawer has no effect on the hood light.
To turn off the fan continue to press until the hood fan stops or close the hood drawer.
The hood remembers last setting of fan speed on closing the drawer. The hood will operate on this fan speed level when drawer is pulled out again.
3.2 Delayed switch off function
This function allows to automatically turn off the fan after specific time of operating.
- Set the desired fan speed.
- Press the 心 button.
The indicator on the panel turns on. To turn off the function press the button again.

The change of the hood fan speed level or closing the hood drawer when the function is activated will result in deactivation of this function.
The time after the function switch off the fan:
| Motor Speed level | Time (min) |
| 1 | 20 |
| 2 | 15 |
| 3 | 10 |
| 4 | 8 |
3.3 Filter notification
Filter alarm reminds to change or clean the charcoal filter and clean the grease filter. The LED indicator blinks red regularly for 30 seconds if the grease filter must be cleaned. The LED indicator blinks red twice per every second for 30 seconds if the charcoal filter must be replaced or cleaned.

This function activates independently after 40 hours of operation for grease filter and 160 hours of operation for charcoal filter.

The fan does not operate during the alarm. Fan starts to operate on last remembered setting after 30 seconds.

Refer to cleaning the grease filter in care and cleaning chapter.

Refer to cleaning the charcoal filter or replacing the charcoal filter in care and cleaning chapter.

The function counter for charcoal filter is disabled by default.
To activate or deactivate the counter for charcoal filter:
- Pull out the hood drawer.
-
Make sure that the fan is turned off.
-
Press _ for 3 seconds.
The function is activated if two white LED indicators flashes for 3 seconds. The function is deactivated if only one LED indicator flashes for 3 seconds.
To reset the function counter in the notification period:
- Pull out the hood drawer.
- Press for 3 seconds.
To reset the function counter out of the notification period:
- Pull out the hood drawer.
- Make sure that the fan is turned off.
- For grease filter press for 3 seconds.
- For charcoal filter press — for 3 seconds.
The indicator blinks once for correct reset.
4. CARE AND CLEANING
4.1 Notes on cleaning
| Cleaning Agents | Do not use abrasive detergents and brushes. Clean the surface of the appliance with a soft cloth with warm water and a mild detergent. |
| After cooking some parts of appliance can get hot. To avoid stains appliance must be cooled down and dried with clean cloth or paper towels. | |
| Clean stains with a mild detergent. | |
| Keep the hood clean | Clean the appliance and grease filters each month. Clean the interior and grease filters carefully from fat. Fat accumulation or other residue may cause fire. |
| Grease filters can be washed in a dishwasher. The dishwasher must be set to a low temperature and a short cycle. The grease filter may discolour, it has no influence on the performance of the appliance. | |
| Charcoal filter | The time of saturation of the charcoal filter varies depending on the type of cooking and the regularity of cleaning the grease filter. |
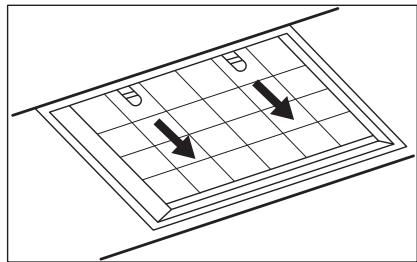
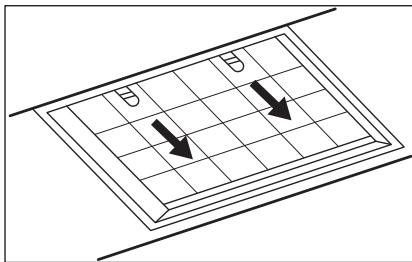
4.2 Cleaning the grease filter
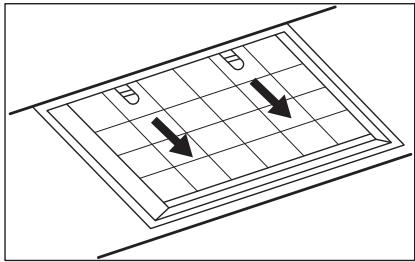
Filters are mounted with the use of clips and pins on the opposite side.
To clean the filter:
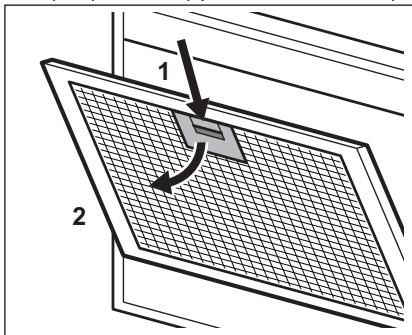
- Press the handle of the mounting clip on the filter panel underneath the hood.
- Slightly tilt the front of the filter downwards, then pull.
Repeat the first two steps for all filters. - Clean the filters using a sponge with non abrasive detergents or in a dishwasher.

The dishwasher must be set to a low temperature and a short cycle. The grease filter may discolour, it has no influence on the performance of the appliance.
- To mount the filters back follow the first two steps in reverse order.
Repeat the steps for all filters if applicable.
4.3 Replacing the charcoal filter - optional

WARNING!
Depending on type, filter can be or cannot be regenerated. Refer to the leaflet provided with the filter.
5. ENVIRONMENTAL CONCERNS
Recycle materials with the symbol

Put the packaging in relevant containers
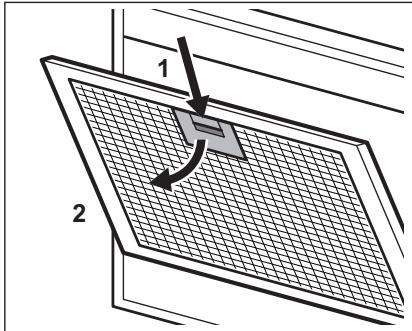
To replace the filter:
- Remove the grease filters from the appliance.
Refer to "Cleaning the grease filter" in this chapter. - Pull the tabs towards the bottom part of the filter.
- Slightly tilt the front of the filter downwards, then pull.
- To install a new filter, perform the same steps in reverse order.
In any case, it is necessary to replace the filters at least every four months.
4.4 Replacing the lamp
This appliance is supplied with a LED lamp and separate control gear (LED driver). These parts can be replaced by a technician only. In case of any malfunction refer to "Service" in the "Safety Instructions" chapter.
to recycle it. Help protect the environment and human health by
recycling waste of electrical and electronic appliances. Do not dispose of appliances marked with the symbol
with the household waste. Return the product to your local recycling facility or contact your municipal office.
CONTENIDO
- INDICACIONES DE SEGURIDAD E INSTALLACION 37
2.DESCRIPTION DEL PRODUCTO 38
3.USO DIARIO. 38 - MANTENIMIENTO Y LIMPIEZA 40
- ASPECTOS MEDIOAMBIENTALES 42
Paraacularly, the patient should be able to perform the following activities:
3. SVAKODNEVNA UPORABA
3.1 Uporaba nape
Provjerite preporucenu brzinu prema tablici u nastavku.
| 1 | Prilikom zagrijavanja hrane, kuhanja sPokrivenim posudama. |
| 2 | Prilikom kuhanja sPokrivenim posudama na više zona kuhanja ili plamenika, lagano prženje. |
| 3 | Prilikom ključanja i prženja velikh količina hrane bezPoklopca, kuhanja na više zona kuhanja ili plamenika. |

Prilikom ključanja i prženja velikh količine hrane bezPoklopa, visoka vlažnost. Nakon 8 minuta urežaj se vraća na prethodne postavke.
Preporuca se ostaviti napu da radioko 15 minuta nakon kuhanja.
Za upravljanje napom:
- Izvucite ladicu nape vise od 5 cm.
Kayinci3ikke XaHe opHaTyFa
KatbictblaknapaTka
aphanfah KITanwaadan
Kayinci3 opHaTy TpyaBlb
HYCKayNblkTbKapaHb3.
KypbIINfbIhbl naIaIaNHy
Hemece OFaH Kbl3MET
KepceTy anDbIHda
Kayinci3ik Typalbl
tapaynapdbI MkynT OKbIn
LbIFbHb3.
2.БУньIM CINATTAMACbl
2.1 Baçkapy nahanelihe sojy
| Функция | Сиалтамасы | |
| 1 | Шam | Шamдарды косады кэне ошipeidi. |
| 2 | Кeuшикторин ошipy функцияльк туймeci | Бул ФункцияавTomаTTы ош ipуdi keшikтор di ophaТады. |
| 3 | Кeuшиктор ошipy функцияльсынIH инданakotры | ФункциянынбелсандірілгіннHe banelsan'dipinmereін кэрсетedi. |
| 4 | Плioc туймeci | Желдітkiштін кылдандік DeнгінApTTbIPа'dы. |
| 5 | Ж上诉инданakotрпары | Желдітkiштін кылдандік Deнгінрінkэрсетedi. |
| 6 | Минус туймeci | Желдітkiштін кылдандік Deнгін Temeндәтeti. |
| 7 | Сузгі дабыны функцияльсынIH инданakotры | Сузгі дабынын КосылfaнВИн He Косылmafahын кэрсетedi. |
3. ΘРКУндIK KOДАНУ
3.1 Aya tapTkblk KypaIbI naIdaIaNy
TemeHderi kectere caikec ycbihbIfAH KbldAmdbkTbI TEKcepH3.
| 1 | Тамаксы кылытkaнда, кakпak кабылган bдыICTы колданыniciprenecke. |
| 2 | Бірnevші nicipy aiMaКтарында hemece oTTыктарда кakпаыл kабыл bдыICTа ТамакNICIPREн ded, bannen Kуырfaнда. |
| 3 | Көн мөлшердэрі тɑfamdapды кakпakсыз кайнатkaнда кэн He Kуырfaнда, бірnevші nicipy aiMaFbHda hemece oTTыктарда niciprenecke. |
| 4 | Улken мөлшердэрі тɑfamdapды кakпakсыз кайнатkaнда кэн He Kуырfaнда, bɪnfaɪdəblɪk kən. 8 mɪnɪtɪaɪn KeɪɪN Kурыlflы aɪdɪbɪfblɪnapaMeTpre kaɪta opana[dɪ]. |
Tafamdbi nicipreHHHeN KeiH aya TaTkblI KypaJIbI bI amamEn 15 MmHT KocBn KOIOFAKeHec6epineJI.
ayaTAPKbI KwpaIaIbI naJaIaHy ywiH:
- TyTih WbIfapFbIHTbIH cybIpMacbIH 5cm-DeH K6ipeK tapbIn WbIfapbIHbI3.
Backapy TaKTabi aWbIK.
- TyTih wblfapfbwiHTbI KOCy ywiH + TyIMecIH 6acbiHb3.
KenndetkiwiHxblnDaMdbk deHeirein apTbpy yuHIn TYmMei KaTadaH 6acbHb3.KeIeTeKiWtiHxblnDaMdbk
deHreim a3aIy yuIH -Tymecin 6acbIbI3.
TaKaTaNafbI KUdINHnDnKaTOpnap TaHaFaH JeJeTeKlWiTIn HkBJaMaMbIK DeHReiHe caN KocblaDbI.
Tytih wblifapfblltbH wambl 6acka tytih wblifapfbll WyHKnlaIapbIHan Teyenci3 Kymbcic icTei. Betti JapbIKTaHdbpy yuiH wam TaH6acbH Typtihi TaptnaHb jxabv Tytih WblifapfbllwamblaHa ocep etneii.
JenTeKiwTeiewipyyihTuyMecin TYtIH WbIFapFbIiXeNDeTkiWi TOkTaFaHwa 6acbIb3 HemeCe TYtIH WbIFapFbIu TapTnacbH Xa6bIb3.
Tytih SwbIfapfblI TaptNaHbI
XaKan Ka3deri JKeJDeTkiu
XbJIaMdbIbIFbIH COHfbl
napametpi ece CaKaTaNbI.
TaptnaHb KaTaDaH TapTBIn
SwbIfapFaHda, TyTH
SwbIfapFbIOWcbl
XeJdTeKlWtIH XbJIJaAMdbIK
DeHreIHDe Kymblc icTeNi.
3.2 KewiKtiPiIgren eWipy cyHKnIcbl
BvI pynKcNJa 6eIrii 6ip yaKbIT Kymblc icTeReHHen Kein XeJeTKeTI
aBTOMaTTbI Tpye eUipyRe MymKiHdk 6pei.
- Kanafan XeIeTkiJXbIaMdbIfbH opHaTbIHbI3.
- Tymecin 6acbHb3.
PanaJIbIderi INHnKaTOp KocblJaDbI.
FyHKnIaHbI cEHdipy ywiH TyMeWirIH KaIra 6acblbI3.

Функцябелсеньдірулі Ke3de TtTIN WbIFapFbIw KJIeNTkiUHIn KbIJaMDbIK DeHreI e3repIce HemeCte TtTIN WbIFapFbIW TapTnacbl Ka6bInca,ocblФункцяныH eSuYiHe eKeNeDi.
Функцяжелдтkiшт ewipetih yaкыт:
| Козгалтуksьштbing Жылдандык Дech grei | Уakсы (MHN) |
| 1 | 20 |
| 2 | 15 |
| 3 | 10 |
| 4 | 8 |
3.3 Cy3ri TpyaIbI xa6apHaHdbIpy
Cy3rHIn eckepTy cHnAbI KEmip cy3ricH aybictbype Ta3anay XaHe MaM cy3ricH Ta3anay kaxet ekeHH ecke canadbl. MaM cy3ricH ta3anay kepek 6oNca, JXUd INndkaTOpbl 30 cekyHd 6oBbl KJyEJI Tpyde Kb3bl TycTe KblnbIKTaTdb. KEmip cy3ricH aybictby Hemece Ta3anay Kepek 6oNca, JXUd INndkaTOpbl 30 cekyHd 6oBbl cekyHd caibH eki peT Kb3bl TycTe KblnbIKTaTdb.

MaCy3rici40 cafA t 6oBbI naJaIaIahyDAn KeiH XeHe KEmip cy3rici160 cafT 6oBbI naJaIaIahyDAn KeiH OcbI cyHKnra Teyenci3 Type6beJIceHdiipineDi.

Ja6bIJI Ke3iHne XeNDeTkiU JyMbIC iCTemEnDi.
KeincoHbCaKaTaNFaH npaMeTpdeKymbICTb 6actaDbI.

«KyTim Kepcety XeHeta3anay» TapaybIHdafbi
«MaCy3ricIH Ta3anay» TapMaFbIH KapaHbI3.

Kytim MeH Ta3anay TaaybIHa Kaemip Cy3rici H Ta3anay HeMece KEmip Cy3rici aybICTbpy TypaBkapaHbI3.

品 deNki BoBbHwa, Kemip cy3ricinH fynKcunecenteriwi eWipyni 6oJabl.
Kemip cy3ricih ecnteriin 6eIceHipy hemec eWipy:
- TyTih wblfapfbli Taptnacbih tapTbIn wblfapblHbI3.
- XeIeTeKII eWipyni eKeHHe Ke3 keTki3iH3.
-
Tymecin 3 ckynd bacbHb3. Eki ak KIld INdkaTOpbl 3 ckynd KblblbIKTaCa, Ocbi fynKcNBEncnDipineDi. Eki ak KIld INdkaTOpbl 3 ckynd KblblbIKTaCaOcbi fynKcNErwipineDi. Xa6apnaHdbipy Ke3eHInde fynKcEcenteriwiH kann.KeTtipy:
-
TyTih wblfapfbIHTaptnacbIH tapTbIN wblfapblHb3.
- Tymecin3cekyndbacbHb3.
Xa6apJaHaNbIbyPy Ke3eHHeH TbIC Функця ecnteriiwH KaII.KeNTipy:
- Tytih wblifapfbli Taptnacbih tapTbIn WblifapblHb3.
- XeIeTeKII eWipyni eKeHHe Ke3 keTki3iH3.
- Mai cy3rici yuiin Tymecin 3cekynd 6acbIHy3.
- Kemip cy3rici yuin — Tymecin 3cekynd 6acblb13. Iypbic KaIta opHaTy yuHnHnKaTop bip pet XblblbIKTaIbI.
4. KYTY MEHEH TA3AJAY
4.1 Ta3anayra KaTbICTbI eckepIM
| Журыз 3атар | Жemіріш журыз 3атуарды кәніе щөтkenірпді naïдаләнбүл. |
| Курсынгьндіаʌдьнгьі Кɑясын жумсak журыз 3аТ KOCсынfaHжыны cyfa 6batырсынfaH жумсak šуberекпен таэлалыз. | |
| Таfram Nicip'reннені кійн журсынгьндікійбір әліктэрі bісын кетуі му'mkin. Дɑксын 6ол'dырмас ушін курсынгьнді cyы'tын, таэз šуberекпен Нemece kafas зул'imен курfaту kepek. | |
| Да択арді жумсak журыз 3атун таэлалыз. |
| Aya tarTkblu KypaIbI Ta3a yctaIbI3 | КурьлгынblжэHe май сузгileрін ai саын ta3аJaHaBl3. Курьлгынbliш iшin xэHe май сузгileрін майдан ta3apтынbl3. Май кинhalЯнда Hemece baska kaIdblk kynHaNlaC, орт kayин Tydblpybl MymKlH. Майblсузгileрін bldlcЖуflш машинада кууfa boJanaBl. bldlic Kурьлш машинafа төmen TemпepаТура кэдka üncnOpHaTy kepek. Май сузriciHIn Tyci e3repyi MymKlH, buyl Kурьлгынbliнжмblc icteyihe acep etnejiDi. |
| Kemip cy3ricihi TONY yakbItb TaFAM nicipydiH Typi MeH MaH cy3riciH KaHsAnbIKTb JxN Ta3aHaHFaHbHa 6aIaNbICTb 6oJaDbI. |
4.2 Ma'c y3ricin Ta3aJay
Cy3rIepi opHaTy yuH KApama-Kapcbi KaTapbIHda KbICbIUtap MeH KaDaybltap naJaIaNbIJFaH.
Cy3rhi ra3aay yuih:
- Aya tapTkbl KwypanDbih ActbHdafb cy3ri naHeiHderi 6eKity KblckblbHbIHvCTaFbIWBH6acblb3.
- Cy3rHih anDbHfbl JkAfbl H TEmeH Kapaa a3dan eKneTih3, cOaH KeiH TapTbHbI3.
BapnbC cy3rinep yuiH anfauKbI eki KaamdbKaTanaHbI.
- Cy3rinepiKemipriuEmec Kyfbi3aTarpbl KOJaHaBIn XeKEmEHemece bIDBC KyfbiIM MaunHadaTa3aJnAbI3.

blbic kfyfbiM MaunHada
TEmeH TeMnpaTypaHbI
KHe KbciCa zuknDi opHaTy
Kepek.Ma cy3ricinH Tyci
e3repyi MymkiH,6yI
KpyblFbHbH XymbIC
icteyihe acep etneNdi.
- Cy3rihi KaIta opHbHa KOIO yUiH anFaIkBi eKI KaIaMDbI KepiciHwe opbIHdaHbI3.
KaKet 6oJca, 6apIbIK cy3rInep yuH Kaamdapdbi KaItanaHbI3.
4.3 Kōmip cy3ricih aybICTbipy - miHdETTI emec

ECKEPTY!
Typine 6aINaHbICTb cy3r KaIbHa KeItipinyi He KeItipImeyi MymKIn. Cy3rImeH bipre 6epJiren npakwahbl KapaHb3.
Cy3rhi aybICTbyyIiH:
- Man cy3rinepih KpybIbIaH WbIFapbIn aJIbIbI3. OcbI tapaydaIbI «Man cy3rinepiH Ta3anay» 6eJIMiH kapaHbI3.
- IImekTeepi Cy3riHIn TEmehri 6eNirHe KapaTapTbIHbI3.
- Cy3riHih aIbHfbl JkAfbl H TeMeH Kapaa a3dan eKeTiiH3, cOaH KeiH TapTbHbI3.
- KaHa cy3rHi opHAty yuHIOcbI KaamdapDbI KepiciHHeOpbIHdaHbI3. Ke3-KeIreH XaFdaJaCy3riJepdi KEM DeReHNe TepT aHcBbH aybICTbpy KepeK.
4.4 WamdblyayblicTbipy
BvI Kpyblfbl XUd WamblmeH JeHe 6eIek icke Kocy KypalbEm (KUd IpaBepi) Ka6dbkTanfaH. BvI 6eIweKterdi TexnIK KaHa aybictbipa aIaIbI. Akayblk opbln anFaH KaFdaJa "Kayinc3dk Hcckaynapbl" TapaybHaDaBl "KbI3met KepeTy" 6eNIMin KapaHbI3.
5. KOPSHAFAH OPTAFA KATbICTbl JAFDAJLAP
Benri caIbIHFaH MaTePnIaIapbl KaIbTa eHdeyIe H eK3yRe TaNCbIpbIbI3. OpaM MaTePnIaIapbl KaIbTa eHdeyIe H eTK3y yIiH TnICTi KOHTeHepIepre caIbIH3. 3JIeKTPnIK KHe 3JIeKTPoHnKaIbIK KpyblfblnapblH KaIbIBfIH KaIbTa eHdeyIe H eTK3y apKbIbI, KopShaFahOpTaFA KHe aDAMhIH DeHCaylbIFHa 3NbIH
KeTiptiH JkaFdaInapfa Kon 6epMeyre
e3 yneciHj3di KocbIbI3. Benri
caIbIHFaH KypblIbIapdI TypMbICTbIK
KaIbIKTapMeH 6ipre TactaMaHbI3.
ΘHIMDi XepriniKti KaIta eHdey
opTaIbIFbHa eTKi3iH3 Hemece XepriniKti
MeKemere xa6apnacbIbI3.
TURINYS
- SAUGOS INFORMACIJA IR IRENGIMAS. 85
2.GAMINIOAPRAŠYMAs. 86 - KASDIENIS NAUDOJIMAS 86
- VALYMAS IR PrieziURA 88
5.APLINKOS APSAUGA. 89
PUIKIEMs REZULTATAMS
LED INHINKATOPHTe Ha nHaEnOT Ce BKNyUyBaAT COOdBETHO Ha n36paHOT O HNBO HA 6p3nHa HA BEHTnIaTOPOT.

CBeTnIkata Ha
acnnpatopnte pa60tn
He3aBnCHO Od npYnTe
fynKcHn Ha acnnpatopOT.
3a da ja ocBETnTe
noBpUnHa 3a rotBeHbe,
doNPte ro Cm6bOJot Ha
CBETNOTO 3aTbOpaHeto
Ha cNoKaTa Hema HnKaBO
BInJaHne Bp3 CBETNTo Ha
acnnpatopOT.
3a da ro ncknyute BENTnlaTOpOT,
npoJnKeTe Da npntncKaTe 10eKa BeHTnIaTOPOT Ha acnnpaTOPOT He 3anpe IIN He ja 3aTBOPn FnoKata 3a acnnpaTOPOT.

AcnpaTopoJ a3anomHyBa nocIeHaTn oCTaBka Ha 6p3nHaTa HbVEHTnAtoPOT npn 3aTbopaHe HaΦnOKata. AcnpaTopoT Ke pa6Otn Ha OBA HnBO Ha 6p3nHa Ha BEHTnAtoPOT KOra Ke ce NOBJIeue ΦnOKaT a NOBTOPOH.
3.2Функциja3aODIOKeHo NCKIyUyBaHbe
ObaaФyHKnja OBO3MOkyBa aBTOMaTcKO NCKnyyBaHe Ha BEHTINaTOPOT NO OndeHOBpeMe Ha pa6Ota.
- NocTabete ja nocakybaHaTa 6p3nHa Ha BENTINaTOPOT.
2.ПиTuNCHETe ro konTuHTo IpOKa3HOTo CBeTJIO Ha NaHeJIOT ce BkIyUBya.3a da ja IcKluyuHTe ФунКциJaTa npTuNCHETe ro NOBtOHO KOnTuHTo .

ПоменахиНВОТа брИнhaBaHTnIaTOpOTHa aCINpaTOpOTnI 3aTBOpaHbEToHaФNOKaTa Ha acINpaTOpOTKora ФункиJaTa e aKTbBnpaHa, Ke pe3yNTnpaCo ДeakTNBnPaHbE Ha OBaa ФункиJa.
BpeMeTo noФункиjsa rO nckIyUBA BeHTnlaTopoT:
3apeHnCTpnpoBaTb CBoi npOyKt, YTO6bl NOL3OBaTbCpaCUnpeHHbIMN BO3MOXHOCTaMn O6cIyJKBaHIN:
www.promo.electrolux.ru

Пиоб畴стAnKCECCyapbI,pacXoДнБiMaTePnAJIbI nФирMeHьIe 3anachbIe ЧастДЯ ССоero npiбopa:
www.electrolux-1.ru
ПОДДЕРЖKA KЛNEHTOB И OБСЛУЖИBAHINE
Bcerda nCnoJb3yIte opurnHaJIbHbIe 3aunactn.
PpeKdyeH npOn3BODnTb
JIIObIe DeIcTBnI NO
NcnoJb3OBaHnIONJIN
npocnlaaktnueckomy
obcnyxmbaHHIO npbopa
BHIMATEJIbHO 03HaKOMbTECb
C TnabAMN, OTHOCRUMMNCRA
TEXHnke 6e30nacHOCTN.
2.ОПИСАНUE ПРИБОРА
2.1 O6uN BnD naneHn ynpaBneHna
- BbIDBnHbTe RaIcK BbITaXKn 6OJIe Yem Ha 5 cm.
PanaJIb ynpabNeHnO tKpbita.
- HaxMMTe + KhoNky dny BKJIOueHnBbITRAKKN.
YTo6bI yBEnHnTb CkOPOCTb BENTINJrTOpa, HAKMITE KHOKNy eue pa3.
Hajmnte -Дя умьшени ckopoctи BeHTnIaTopa.
CBeToIOIOHbIe INDkaTOpbI Ha nHaJIIN BKNHOaHTcB COOTBTCTBUN C
BbIbpaHHbIM ypOBHem CKOpOCTN BeHTnJIaTOpa.
OcBeueHne BbITJXKN pa6oTaet He3aBnCmO OT npyInx FyHKuN BbITJXKN. UTo6bl BKJIIOHTb BapOCHYU nAHeIb, HAKMITE Ha 3akpbItne JaUNKa He BInraeT Ha OCBeueHne
YTo6bI BbIKIOHHTB BeHTINJATOP, npOIoJIkaIte HaxIMMaTb Do Tex nop, — nOKa BEHTINJATOP BbITJAKKHe OCTaHOBTcR NIIH He 3aKpoETcR.
BbIyKa 3aONMHaET nocLeHIOu HAcTpoNky CKOpOCTn BeHTUJrTOpa npn 3aKpbIBaHmYaNka. BbITKa 6yJeT pa6oTaTb Ha 3Tom yPObHe cKOpOCTn BEHTUJrTOpa, KOrDa BbIDBVKNHO JxNk CHOBa BbIDBInHcTcR.
3.2Функця OTCPOUKN BBIKIQUeHn
3TaФункципОЗьлэгАВТOMATUWeCKN BbIKJIIOuHaTb BEHTINJIaTOp NO IcTeueHIn ONpeIeJIeHHOrO BpemeHn pa60tbl.
- 3aДaIe Te JeJaemyIO cKOpocTb BEHTnIaTOPa.
- Haxmnte KhoNky
Ha nahan 3aropntc nHnukatop.ДЯ BbIKJUChENyФyHKCm CHOBA HaxMNTe KHOINKY .

U3MeHeHne yPoBnA
CKOpOCTu BEHTNJTTopa
BbITJAKKINJIN 3aKpbItne
BbITJAKKINpN BKLIOUeHIn
fYHKcNIN pINBeTeK
OTKnIOUeHInO 3ToI fYHKcN.
Bpemnocne BbIKJIOueHnBentnIaTopa:
KOPINCHNUCHA NOIDPSKA IN CEPBNC
YBek KopinCTnte opnHnaJIne pe3epBHe JeIOBe.
Kaanda kontraktnape OBnaawehn cepBucn uehtap,BoDnte paUyHa da kOd ce6e Imate cneedehe noaTke:Moden,6poj npOn3bOda,cepnjckn 6poj.
IopauMoryda cape npohayHa nlouyncaTexnukimKapaktepcntkama.
Uno3opehe/Oppe3- nHΦopMaunje o 6e36dNHOCTn
① OnuTe INHΦopMaζjne i cABeTn
HΦopMaunje O XJNBOHTHOJ cpeINH
3aDpKaHO npaBO n3MeHa.
1. INHΦOPMAUJIJE O B6E3BEdHOCTN INHCTAJAUJN

YNO3OPEHbE!
PonJIeJaTe 3ace6Hy
3aTbapaHe pnoke He yTuYe Ha CBeTIO acnnpaTopa.
ДабистЕИСКБУЧИΝВBEHTINATOP, HACTABNITeДАпNTINCKATEДOKCE BEHTINATOP He 3ayCTABN ИЛДОК He 3aTBOPNTEФИOKу acnnpaTopa.

Acnnapot namtn 3aHbe noedeWabahe 6p3nHe BENTnilatopa npn 3aTbapaHy fnoke.
BentnlaTop he paunTu TOM 6p3HOM npu nHOHBOM n3BnaueHy fnoke.
3.2ФункциjaОДLOJOKeHOr NCKJbUyINBaHa
ObaФункциja omoryhaba ayTomatcko NCKbUyHBaHbe BEHTnIaTopa HakoH OdpehEHor BpemeHa pada.
reparationsinformation:
www.aeg.com/support
registrar din produit for bättre service:
www.registeraeg.com


3i BCTaHOBnEHn. IpeE
BKNOPINCTaHHaM YN
obcIyroByBaHHm npnlaDy
yBaXHo npOuHTaTte po3diH
soofo6e3nekn.
2. ONIC BINOBOY
2.1 OrpnaHeJI kepyBaHHa

3aJIeXHoBiD TnIy,ΦiJIbTp MoKe NiIJaIraTn YH He NiIJaIraTn BiHOBNeHHIO.
ДиВ.БуКЛeТ,цO
noctaaetbc3Φilbtpom.
Lio6 3amHnT pfIbTp:
- 3HimiTb JxipObi fiNbTpN 3 npnAky. INB. nyHKT «OuHsEHHJ xIpOBOrO fiNbTpa» B cIbOMy po3dini.
- NotarytBJa3NcOKyHaNPmky HxhHbOJyactnHnΦjNbtpy.
- 3JIeRka HaxuNITb nepeDnH yacTnHy fIbTpBa Bn3,notIM notarHtB.
- Μιοδ BCTaHOBuTn HOBm φiNbTp, NOBtOpiTi cami KpOKn B 3BOPOTHomY NOPaKy.
5. OXOPOHA IOBKINJIЯ
3daBaIte Ha nobTOpHy nepepo6ky MaTepiAIn, no3HaueHi BiDnOBiDnHM CmBbONOM B. BkNJaTe ynaKOBky uBiDnOBiHi KOHTeHepn IJy BTOpHHoI CnpOBuHN. DOnOMOJIb 3axNCtNTu HABKOINHc cepeIOBnUe Ta 3dOpOB'ay iHNx JIODei i 3a6e3neuHTn BTOpHHy nepepo6ky eNEKtpnuHnx i eNEKTPoHHnx
Y6ydb-kaKOMByBnnaIky Heo6xidno 3amHOBaTN φiNbTpNI MihIMyM KOXHi cHTnpN Micrui.
4.4 3amina lamnn
Lcienpniladochaueho CbITIOIOHOIOMNIOOKPemIMpeyIIOBaIbHIMMexAHi3MOM (CbITIOIOHIMdpaIbepOM).Li detaniMoKe3amIHOBaTI Nlne KBaIipikOBaHmCNceiaJIcT.YBnAaKy 6yDb-IAKOIEncnpabHocti 3BepHiTbcSdo pO3diy《CepBic》rnaBv《INCTpyKciIooDe3neKn》.
npnilaib. He Bkndaite npilana, no3haeHb iDnOBiHm CmBbONOM pa3OM 3 IHsIM DOMaHIM CMiTjam. IobephiT bpOdyKT do 3abOy i3 BTOpHHoI nepepo6Kn y Baaii MicceBOcTi aO bO 3BepHtbcrdo MiCzEBHX MyHIunpAlbHnx OprAHIB BlaNi.
J Jd j 1000000000000000000000000000000000000000
a2w1 wJd9 Jew
gblal jn jglj 4
sKJU
jlll JldlaJgrrdall jgg>
aai 15 jol o2>gl o
2400JIJxwI 4.4
sGJ WLED JgJgJgJgJgJgJgJgJgJgJgJgJgJgJgJgJgJgJgJgJgJgJgJgJgJgJgJgJgJgJgJgJgJgJgJgJgJgJgJgJgJgJgJgJgJgJgJgJgJgJg
p9 p9 20 g. s Jd jaiall aiai all n o ic oocj c ag alginaaagjll jiaall oclg iJlal jaljol Jai jaiiaibiyuill .d
12 1000000000000000000000000000000000000000000000000000000
aJl JglJl.5
jolll jolll algall yd jcll 1000000000000000000000000000000000000000000000000000000000000000000000000000
aill oocly oovgol gwrjogall
3 3 3 3 3 3 3 3 3 3 3 3 3 3 3 3 3 3 3 3 3 3 3
aJg 4
aJbJI Jg>Jb>J0 4.1
| . . . . . . . . . . . . . . . . . . . . . . . . . . . . . . . . . . . . . . . . . . . . . . . . . . . . . . . . . . . . . . . . . . . . . . . . . . . . . . . . . . . . . . . . . . . . . . . . . . . . .. . . . . . . . . . . . . . . . . . . . . . . . . . . . . . . . . . . . . . . . . . . . . . . . . . . . . . . . . . . . . . . . . . . . . . . . . . . . . . . . . . . . . . . . . . . . . . . . . . . . ? . . . . . . . . . . . . . . . . . . . . . . . . . . . . . . . . . . . . . . . . . . . . . . . . . . . . . . . . . . . . . . . . . . . . . . . . . . . . . . . . . . . . . . . . . . . . . . . . . . . - . . . . . . . . . . . . . . . . . . . . . . . . . . . . . . . . . . . . . . . . . . . . . . . . . . . . . . . . . . . . . . . . . . . . . . . . . . . . . . . . . . . . . . . . . . . . . . . . . . . - - - - - - - - - - - - - - - - - - - - - - - - - - - - - - - - - - - - - - - - - - - - - - - - - - - - - - - - - - - - - - - - - - - - - - - - - - - - - - - - - - - - - - - - - - - - - - - - - - - - - - . . . . . . . . . . . . . . . . . . . . . . . . . . . . . . . . . . . . . . . . . . . . . . . . . . . . . . . . . . . . . . . . . . . . . . . . . . . . . . . . . . . . . . . . . . . . . . . . . . . 2 3 4 5 6 7 8 9 10 11 12 13 14 15 16 17 18 19 20 21 22 23 24 25 26 27 28 29 30 31 32 33 34 35 36 37 38 39 40 41 42 43 44 45 46 47 48 49 50 51 52 53 54 55 56 57 58 59 60 61 62 63 64 65 66 67 68 69 70 71 72 73 74 75 76 77 78 79 80 81 82 83 84 85 86 87 88 89 90 91 92 93 94 95 96 97 98 99 100 101 102 103 104 105 106 107 108 109 110 111 112 113 114 115 116 117 118 119 120 121 122 123 124 125 126 127 128 129 130 131 132 133 134 135 136 137 138 139 140 141 142 143 144 145 146 147 148 149 150 151 152 153 154 155 156 157 158 159 160 161 162 163 164 165 166 167 168 169 170 171 172 173 174 175 176 177 178 179 180 181 182 183 184 185 186 187 188 189 190 191 192 193 194 195 196 197 198 199 200 201 202 203 204 205 206 207 208 209 210 211 212 213 214 215 216 217 218 219 220 221 222 223 224 225 226 227 228 229 230 231 232 233 234 235 236 237 238 239 240 241 242 243 244 245 246 247 248 249 250 251 252 253 254 255 256 257 258 259 260 261 262 263 264 265 266 267 268 269 270 271 272 273 274 275 276 277 278 279 280 281 282 283 284 285 286 287 288 289 290 291 292 293 294 295 296 297 298 299 300 301 302 303 304 305 306 307 308 309 310 311 312 313 314 315 316 317 318 319 320 321 322 323 324 325 326 327 328 329 330 331 332 333 334 335 336 337 338 339 340 341 342 343 344 345 346 347 348 349 350 351 352 353 354 355 356 357 358 359 360 361 362 363 364 365 366 367 368 369 370 371 372 373 374 375 376 377 378 379 380 381 382 383 384 385 386 387 388 389 390 391 392 393 394 395 396 397 398 399 400 401 402 403 404 405 406 407 408 409 410 411 412 413 414 415 416 417 418 419 420 421 422 423 424 425 426 427 428 429 430 431 432 433 434 435 436 437 438 439 440 441 442 443 444 445 446 447 448 449 450 451 452 453 454 455 456 457 458 459 460 461 462 463 464 465 466 467 468 469 470 471 472 473 474 475 476 477 478 479 480 481 482 483 484 485 486 487 488 489 490 491 492 493 494 495 496 497 498 499 500 501 502 503 504 505 506 507 508 509 510 511 512 513 514 515 516 517 518 519 520 521 522 523 524 525 526 527 528 529 530 531 532 533 534 535 536 537 538 539 540 541 542 543 544 545 546 547 548 549 550 551 552 553 554 555 556 557 558 559 560 561 562 563 564 565 566 567 568 569 570 571 572 573 574 575 576 577 578 579 580 581 582 583 584 585 586 587 588 589 590 591 592 593 594 595 596 597 598 599 600 601 602 603 604 605 606 607 608 609 610 611 612 613 614 615 616 617 618 619 620 621 622 623 624 625 626 627 628 629 630 631 632 633 634 635 636 637 638 639 640 641 642 643 644 645 646 647 648 649 650 651 652 653 654 655 656 657 658 659 660 661 662 663 664 665 666 667 668 669 670 671 672 673 674 675 676 677 678 679 680 681 682 683 684 685 686 687 688 689 690 691 692 693 694 695 696 697 698 699 690 691 692 693 694 695 696 697 698 699 690 691 692 693 694 695 696 697 698 699 690 691 692 693 6 |
jllg>go naiuilln jwbll 1
iawlaab9 plauwly jlll aabiu .3
gluc gl abwlc ac aabio oIag
.ogall all
Jc 1
aALL aIsc bio j
089g aiaiao oar Jz
. 1
. 1
. 1
. 1
. 1
. 1
. 1
. 1
. 1
. 1
. 1
. 1
. 1
. 1
. 1
. 1
. 1
. 1
. 1
. 1
. 1
. 1
. 1
. 1
. 1
. 4
. .
. .
. .
. .

Jl-0214 J14 4.3
j 1 jilall j k gill w> oill g l .0d j y

Jll JdWJ 1
Jd j4.2
sul 10000000000000000000000000000000000000000000000000000000000000000
a>glc clll jao joc 1c b2ol .1 aal Jawol oogall all
Jawy Jj j J 100000000000000000000000000000000000000000000000000000
a>gall jLjLjLjA. gll o 2000000000000000000000000000000000000000000000000000000000000000000000000000000000000000

a>g aacw gssu 2 i
albaIglaI
aaJgabgll baw .aagb0d
:ggall aabgll aaj
aal .2
S > 2.1
o 1d l d j 1i a o .AEG 1d J
-1JgWgWgWgWgWgWgWgWgWgWgWgWgWgWgWgWgWgWgWgWgWgWgWgWgWgWgWgWgWgWgWgWgWgWgWgWgWgWgWgWgWgWgWgWgWgWgWgWgWgWg
g 10000000000000000000000000000000000000000
aio olaawl jg> S aclj
j>1 j0 gJyI liqg o JyI glaa
aagaaag aasssaaag aagg jll aasll gol dai jle Jgdo
:2x, ylg aIaI I log12og
www.aeg.com/support
jie jiaoi aovc ie Jgaoall jw
www.registeraeg.com
jLgJ aJl JgJ glg g asllalglg alg
www.aeg.com/shop


aIg sLaell
aIJIJIJIJIJIJIJIJIJIJIJIJIJIJIJIJIJIJIJIJIJIJIJIJIJIJIJIJIJIJIJIJIJIJIJIJIJIJIJIJIJIJIJIJIJIJIJIJIJIJIJIJIJIJIJIJIJIJIJIJIJIJIJIJIJIJIJIJIJIJIJIJIJIJIJIJIJIJIJIJIJIJIJIJIJIJIJIJIJIJIJIJIJIJIJIJIJIJIJIJIJ
JulwJl PNC
a>gl 1c logleall oia j
a0wllog120-a/
aolo 2ilagogloglo ①
aLoge
juei juyuuiyia
JlIg.1

J 1 J
JgJgJgJgJgJgJgJgJgJgJgJgJgJgJgJgJgJgJgJgJgJgJgJgJgJgJgJgJgJgJgJgJgJgJgJgJgJgJgJgJgJgJgJgJgJgJgJgJgJgJ g J g J g J g J g J g J g J g J g J g J g J g J g J g J g J g J g J g J g J g J g J g J g J g J g J g J g J g J g J g J g J g J g J g J g J g J g J g J g J g J g J g J g J g J g J g J g J g J g J g J g
C E