LFT419W - Dishwasher ELECTROLUX - Free user manual and instructions
Find the device manual for free LFT419W ELECTROLUX in PDF.
| Product type | Kitchen hood |
| Brand | Electrolux |
| Model | LFT419W |
| Dimensions (height x width x depth) | Approximately 60 x 90 x 50 cm |
| Weight | Approximately 10 kg |
| Power supply | 220-240 V, 50 Hz |
| Number of speeds | 3 speeds (first, second, third) |
| Lighting | Integrated LED bulb (replacement by technician) |
| Control type | Touch control panel with buttons |
| Memory function | Records the last speed used when closing the drawer |
| Grease filter | Dishwasher safe (short cycle, low temperature) |
| Carbon filter | Replacement every 4 months (optional, non-regenerable) |
| Maintenance | Monthly cleaning of grease filters; exterior cleaning with a soft cloth and mild detergent |
| Safety | Detailed safety instructions in the manual; do not use abrasive detergents |
| Spare parts and repairability | Original spare parts available; LED bulb only by technician |
| Environmental information | Recycling at end of life; do not dispose of with household waste |
Frequently Asked Questions - LFT419W ELECTROLUX
User questions about LFT419W ELECTROLUX
0 question about this device. Answer the ones you know or ask your own.
Ask a new question about this device
Download the instructions for your Dishwasher in PDF format for free! Find your manual LFT419W - ELECTROLUX and take your electronic device back in hand. On this page are published all the documents necessary for the use of your device. LFT419W by ELECTROLUX.
USER MANUAL LFT419W ELECTROLUX
3. BCEKДнHEBHA YNOTPEBA
CbdomnJHata Tp86Ba da e HactpoeHa Ha Hncka TeMnepatya n KpaTbK Ukbl. FmIbpbT 3a Ma3HHMOKe Da 3ary6u CBeta CN, HO TOBA He Bnnae Bbpxy pa6oTa tHa ypea.
- 3a MOHTnpaHe HaФИNTpIte O6paTHO,ИЗПБЛHETe ПБВNTeДBE CTbNKN B O6paTeH peI. ПОТOPeTe CTbNKITE 3a BCnKnФИNTpI, aKO e npINIOXIMO.
5.ОПАЗBAHEHAOKOЛHATA CPEДA
PeuKnpaTe MaTePnaJIte CbC
CMBOla . NocTabraIte OAnKOBKeTBe
CBOTBEHTHNe KOHTeHepn 3a
peuKnnpaHTo IM. NOMOrHeTe 3a
Ona3BaHeTo Ha OKoJHaTa CpeDa n
YOBeWKOTO 3dpaBe, KaKTo U 3a
4.3 CmHa Ha φnIITbpa c aKTHBcH BbIeH - (no n36op)

BHIMAHHE!
B 3aBncmocT OT BnDa, ΦnTTbPbT MoKe Da 6bDe nIi He MoKe Da 6bDe peReHepuAn. BnKTe JNCTOBkata, IpeIoCTaBeHa cΦnTTpa.
3a da cmeHnTe qnIbpa:
1.ИЗваде Te Филт pine 3a Ma3HnHn OToypeда.
BnKTe ,PiOnCTBaHe Ha qInIbpa 3a Ma3HnHn" B Ta3n InaBa.
2.ИЗдьрnaite paZdeJInteTe KbMdoNHata YacT HaФЛТьpa.
- Janko HauKIOHeTe IpeDHaTa Yact HaΦIITbPa HApOly, CJIeI KoETo DpBnHete.
- 3a MOHTIpaHe Ha HOB pIITbI IN3IbJIHeTe CTbIKITE B O6paTeH peI. PnB CnUKN CnyaH e Heo6xOIMo Da CmEHaTe FInIPTpIe INoH Ha BCEKn YetIpu Mceca.
4.4 CmHa Ha JlamnKaTa
To3n ypei e cha6dien CbC CBETOINOHa lammnuka (LED). Ta3n qact Tpr6Ba da ce CMeHn eDInHCTBeHO OT texHnK. B cnUyai Ha Heu3npaBHOCT BVkTe "O6cnykBaHe" B rIaba ,INHcTpyKun 3a 6e3oNaCHOCT".
peuknnpaHTo Ha OTnaDbuO T eektpueckn n eektpoHHypei. He 3xBbprnTe ypeDnte, 03NaueHn Cbc CmboJal ,3aeNHO C6ntOBaTcMET. BbPheTe ypeDa B MeCTHnI pyHKT 3a peuknnpaHe nnCe o6bPheTe KbMaBaWata ObunHcKa cnYkba.
OBSAH
- BEZPEČNOSTNI INFORMACE A INSTALACE 6
- POPIS SPOTREBICE 7
3.DENNIPOUZIVANI 7
4.CISTENIA UDRZBA 8 - POZNÁMKY K OCHRANE ZIVOTNIHO PROSTREDI
MYSLÍME NA VÁS
i i 15 1eTTa eT a to ayepa.
Tia va xeiipioTeite ToV atoppoqntipa:
WE'RE THINKING OF YOU
Thank you for purchasing an Electrolux appliance. You've chosen a product that brings with it decades of professional experience and innovation. Ingenious and stylish, it has been designed with you in mind. So whenever you use it, you can be safe in the knowledge that you'll get great results every time.
Welcome to Electrolux.
Visit our website to:

Get usage advice, brochures, trouble shooter, service and repair information: www.electrolux.com/support

Register your product for better service: www.registerelectrolux.com

Buy Accessories, Consumables and Original spare parts for your appliance: www.electrolux.com/shop
CUSTOMER CARE AND SERVICE
Always use original spare parts.
When contacting our Authorised Service Centre, ensure that you have the following data available: Model, PNC, Serial Number.
The information can be found on the rating plate.
Warning / Caution-Safety information
① General information and tips
Environmental information
Subject to change without notice.
1. SAFETY INFORMATION AND INSTALLATION

WARNING!
Refer to the separate
Installation Instructions
booklet for Safety
Information and Installation.
Read carefully the Safetychapters before any use of
maintenance of the
appliance.
2.PRODUCT DESCRIPTION
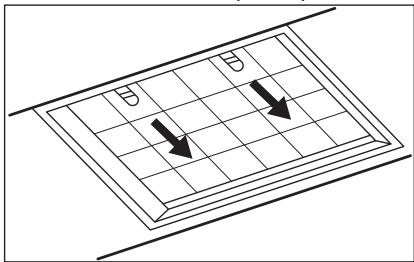
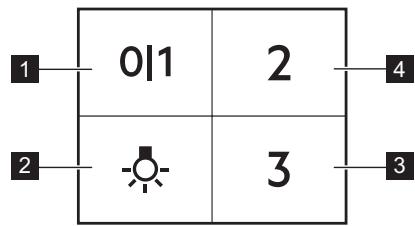
2.1 Control panel overview
| Function | Description | |
| 1 | First Speed | The fan switches to first speed level. |
| 2 | Lamp | Turns the lights on and off. |
| 3 | Third Speed | The fan switches to third speed level. |
| 4 | Second Speed | The fan switches to second speed level. |
3. DAILY USE
3.1 Using the hood
Check the recommended speed according to the table below.
| 01 | While heating up food, cooking with covered pots. |
| 2 | While cooking with covered pots on multiple cooking zones or burners, gentle frying. |
| 3 | While boiling and frying big quantities of food without a lid, cooking on multiple cooking zones or burners. |
It is recommended to leave the hood operating for approximately 15 minutes after cooking.
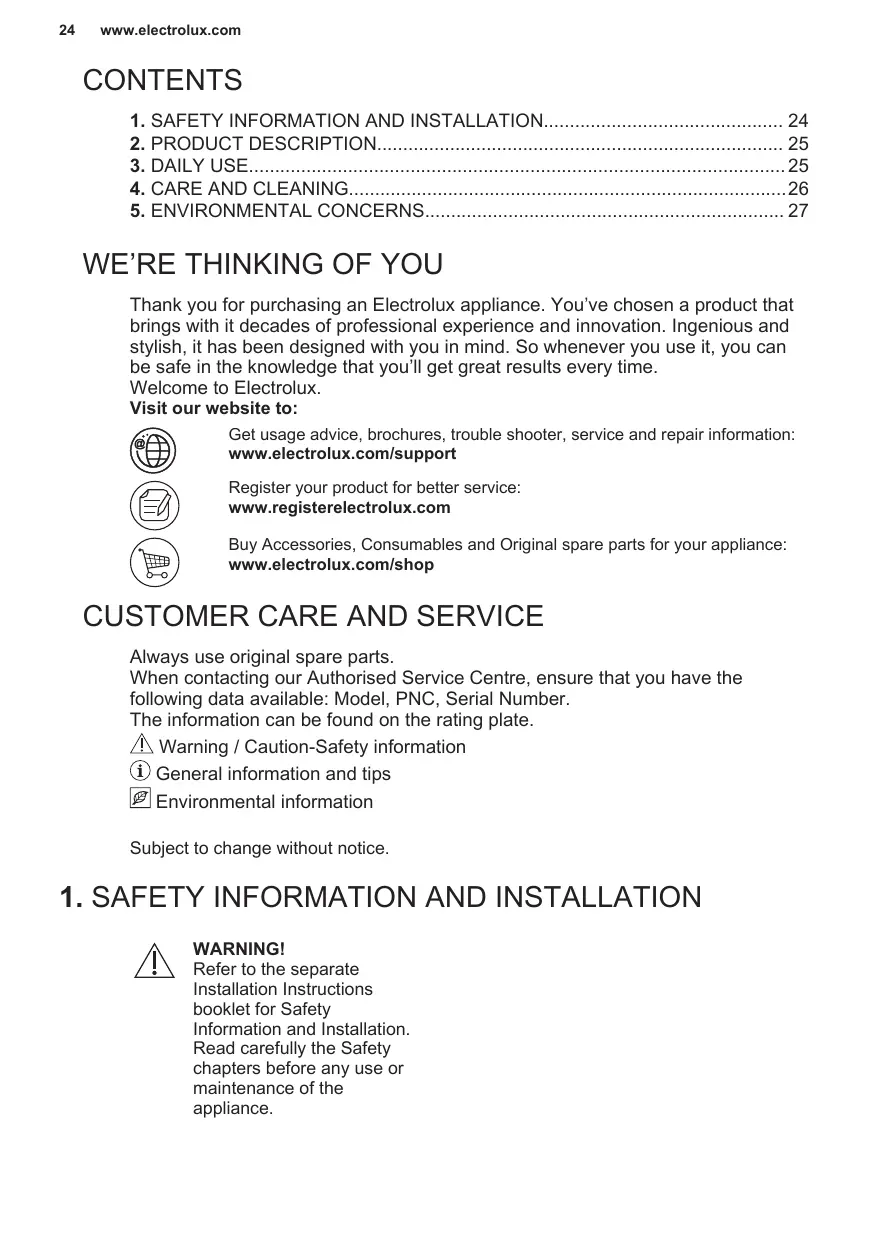
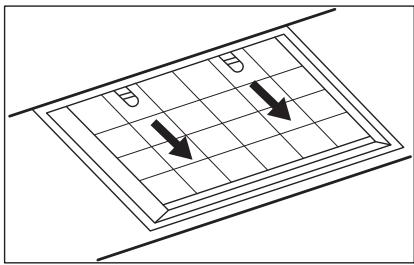
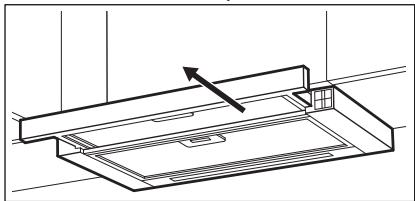
To operate the hood:
- Pull out the drawer of the hood more than 5 cm.

The control panel is exposed.
- To activate the function press the 01button.
- If needed, change the speed by pressing the desired button.

The hoods light works independently to other hood functions. To illuminate the cooking surface press the light button. Closing the drawer has no effect on the hood light.

The hood remembers last setting of fan speed on closing the drawer. The hood will operate on this fan speed level when drawer is pulled out again.
To turn off the fan press 01 or close the hood drawer.
4. CARE AND CLEANING
4.1 Notes on cleaning
| Cleaning Agents | Do not use abrasive detergents and brushes. Clean the surface of the appliance with a soft cloth with warm water and a mild detergent. |
| After cooking some parts of appliance can get hot. To avoid stains appliance must be cooled down and dried with clean cloth or paper towels. | |
| Clean stains with a mild detergent. | |
| Keep the hood clean | Clean the appliance and grease filters each month. Clean the interior and grease filters carefully from fat. Fat accumulation or other residue may cause fire. |
| Grease filters can be washed in a dishwasher. The dishwasher must be set to a low temperature and a short cycle. The grease filter may discolour, it has no influence on the performance of the appliance. | |
| Charcoal filter | The time of saturation of the charcoal filter varies depending on the type of cooking and the regularity of cleaning the grease filter. |
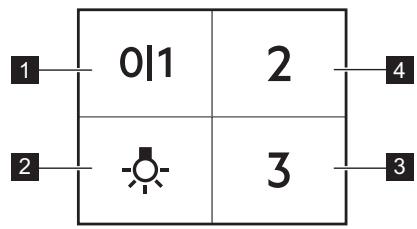
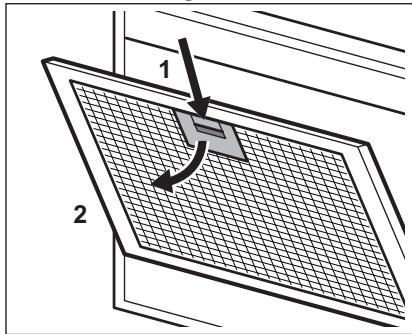
4.2 Cleaning the grease filter
Filters are mounted with the use of clips and pins on the opposite side.
To clean the filter:
- Press the handle of the mounting clip on the filter panel underneath the hood.
- Slightly tilt the front of the filter downwards, then pull.
Repeat the first two steps for all filters. - Clean the filters using a sponge with non abrasive detergents or in a dishwasher.

The dishwasher must be set to a low temperature and a short cycle. The grease filter may discolour, it has no influence on the performance of the appliance.
- To mount the filters back follow the first two steps in reverse order.
Repeat the steps for all filters if applicable.
4.3 Replacing the charcoal filter - optional

WARNING!
Depending on type, filter can be or cannot be regenerated. Refer to the leaflet provided with the filter.
To replace the filter:
- Remove the grease filters from the appliance.
Refer to "Cleaning the grease filter" in this chapter. - Pull the tabs towards the bottom part of the filter.
- Slightly tilt the front of the filter downwards, then pull.
- To install a new filter, perform the same steps in reverse order.
In any case, it is necessary to replace the filters at least every four months.
4.4 Replacing the lamp
This appliance is supplied with a LED lamp. This part can be replaced by a technician only. In case of any malfunction refer to "Service" in the "Safety Instructions" chapter.
5. ENVIRONMENTAL CONCERNS
Recycle materials with the symbol
Put the packaging in relevant containers to recycle it. Help protect the environment and human health by recycling waste of electrical and electronic appliances. Do not dispose of
appliances marked with the symbol with the household waste. Return the product to your local recycling facility or contact your municipal office.
CONTENIDO
- INDICACIONES DE SEGURIDAD E INSTALLACION 28
2.DESCRIPTION DEL PRODUCTO 29
3.USO DIARIO. 29 - MANTENIMIENTO Y LIMPIEZA 30
- ASPECTOS MEDIOAMBIENTALES 31
PENSAMOS EN USTED
3. SVAKODNEVNA UPORABA
3.1 Uporaba nape
Provjerite preporucenu brzinu prema tablici u nastavku.
| 0|1 | Prilikom zagrijavanja hrane, kuhanja sPokrivenim posudama. |
| 2 | Prilikom kuhanja sPokrivenim posudama na više zona kuhanja ili plame-nika, lagano prženje. |
| 3 | Prilikom ključanja i prženja velikih količina hrane bezPoklopca, kuhanja na više zona kuhanja ili plamenika. |

Preporuca se ostaviti napu da radioko 15 minuta nakon kuhanja.
Za upravljanje napom:
- Izvucite ladicu nape vise od 5 cm.
Upravljacka ploca je izložena.
- Za aktiviranje funkcjije pritisnite gumb 01
- Ako je potrebno, promijenite brzinu pritiskom na zenljenu tipku.

MbyHay ysiH Be6-caTbIMb13Fa KipiHi3:

PaianaHyTypaIbIaknapaTbI,KitanuapapdbI,aKaynbIKtbJIOKypaIbI, Kbi3MeT Kepcety XeHe XeHdey TypaIbI aknapaTbIMbHaXepdEanbHbI3:
www.electrolux.com/support

Kakcbipak Kb3met any ywiin eHimih3di tipkehi3:
www.registerelectrolux.com

KpybIyfbHbI 3 yihn akceccyapnapbl, bIbIbIH MaTePnaIapbIH XHe KocaIKbl 6eIweKtepdi catbn anblbI3:
www.electrolux.com/shop
TYTbIHyUbIAPFA KOJIaY JXHe Kbl3MET KOPCETY
Opkaaan TynHcyckaJIbIK KocalKbI 6eJIweKtePepi naJaIaNbIbI3.
ÖkiIeTTI Kbl3MeT KepCety optaIbIbIMbI3fa xa6apnackaHa, MblHa depeKTePiH 6OlybIH kAMTaMaCbI3 etiH3: YJrI, PNC, cepraJIbIK Hemip.
BynaknapaattbTexhikalbIKdepeKTep TaKaTaaCbHaH Ta6yfa 6oIaIbI.
EckepTy/caKtbik-Kayinci3dk Typanbla aknapaT
①Жань aknapaT peH KeheCTep
KopwaFaH opTa TypaIbI aknapaT
Ehnpuyi eceptyci3 e3repic hri3y Kykbfbihne.
1. KAYINCI3ДIКKE JXHE OPHATYFA APHAJFAH AKПAPAT

ECKEPTY!
Kayinci3dkke JxHe opHatyfa KaTbIcTb aKnapaTk aPnHaF an KITanWpaan Kayinci3 opHaty TypaNb HcKaynbIKb KaPaHb13. KyblfHbNb NaJaTaNaHy Hemece OFaH KbI3Met Kepcety aAnbHda Kayinci3dkTypaNb TapaynapDb MyKmT OKbIn LbIFbHb13.
2. BYиbIM CINATTAMACbl
2.1 Baçkapy nahanıne lony
4.1 Ta3anayFa KaTbIcTbI eckepIM
| ЖеміріWI 春уfliш 3aTTapДы JоHe WәTeKеpeppdi пайдананбаныЗ. КурblIfblHbIH aПдынFы JоФын JСМСАК 春уfliш 3aT KOCblIFaH JБIbI суfa 6aТырblIrfaH JСМСАК шУбepeкпeн ТаЗаланыЗ. |
| Таfram NicirpeHHEN KeiH NурblIfblHbIH KeiBip 6eJIkTePI bICbI KETyi МуMKiH. ДaКТы 6ОДырмAC YшIH NурblIfblHbI cyblTbI, TаЗA шYбepeкпeн Нemecе KaFA3 cYNrIMeH KурfaTу KepeK. |
| ДaКТарДы JСМСАК 春уfliш 3aTTpeH TаЗаланыЗ. |
| Aya tarTkbls KypaIbI Ta3a yctaHbI3 | КурьлгынblжэHe май сузгilepin ai саын ta3anahlbl3. Курьлгынbliш吉林省 Май сузгilepin Майдан ta3apMbI3. Май хиналгддам hemece backka kalдых кинанлса, орт kayин Тудыры MуMKH. |
| Майbls cy3riginepin bldlic kуьbls машинада kyyfa boJabl. bldic kуьbls машинafra Төмэн төmpатура kэн Быckeцкп opnatу kepek. Май сузricinH Tyci e3repyi MymkiH, buJ КурьлгынblHжмblc icteyiHe acep etneidii. |
| Kemip cy3rici | Kemip cy3riciH TONY yakbItbI Tafam nicipydiH Typi MeH MaI cy3riciH KANshaJIbIKTbI XnI TazalaHfAhsHa 6aIIaHbICTbI 6oJaIbI. |
4. MANUTENÇÂO E LIMPEZA
3apeHcTpnpoBaTb CBoi npOyKt, YTO6bl NJIb3ObaTbCpaCShnpeHHbIMN BO3MOXHOCTaMn O6cIyJxHBaHIN:
www.registerelectrolux.com

Пиоб畴стAn akceccyapbl,pacxoДымATEPnAnbIиФИрMeHьe 3anachbIe Част ДЯ CBоero npiбopa:
www.electrolux.com/shop
ПОДДЕРЖKA KЛNEHTOB И OБСЛУЖИBAHINE
Bcerda nCnoJb3yIte opurnHaJIbHbIe 3aunactn.
PnO6paueHnBcePbnc-TeHTp CneDyeT NMeTb nOy pkyoCneDyOuTO HOpMaunIO: MoJeIb, npOdyKToBbHomep (PNC), cepNHybHomep. DaHHa HOpMaunI npUBeDeHa Ha TabInuYKe cTexHnueckmN daHHbIMN.
BHMaHne / BaXhIe CBeDeHnI NO TEXHnke 6e3OnaCHOCTN
① Ośszań opomauń i pekomehdaźni
IInΦopMaζη no oxpaHe OkpykaUüe cpebli
3.1 IcnoJb3ObaHne BbITaKKN
PekomEnIOBaHHbIe 3NaueHnA cKOpocTn npBVeHehbl B Ta6JIuCe HnKe.
- BbIDBnHbTe RaIcK BbITaXKn 6OJIe yEM Ha 5 CM.

Pahenb ynpabneHn OTkpbTa.
KinpoynaBnBaIOuIe fNJIbTpbl MOxHO MblB NocydomoeyHOMaunHe.
Iocydomoeha MaunHa DoJxHa 6bItb HactpoeHa Ha Hn3KOTempeatpyHou MOkyu KopoTkn uKnL. XkpoynaBnBaIOuNfOJIbTp MoKET N3MeHHTb CBet; 3To He NOBnIeR Ha npOn3BOIDTeNbHOCTb Pn60pa.

YrOJIbHbIy cnJIbTp
BpemHaCbIeHn yroIbHoro fIbTpBaBpIpyETcB 3aBcMOnCTNOT BnDa pIrpTOBLeHn npeyIpaHOCtN OChCTKn KIpOyNaBInBaHOeOfHbTpa.
4.2 Ouchka
KinpoynaBnBaIOuIeOΦnIbTpA
KOPINCHNCHKA NOIDPSSHKA IN CEPBNC
YBeK KOpnCTnTe OpunHaHne pe3epBHe DeNoBe.
Kaanda KONTAKTnpate OBnawheHn cepBnCHn ceHTap, BODNTe paUHa da KOd ce6e ImaTe cneDeHe noDaTke: Moen, 6poj npOn3BoDa, cepNJcKn 6poj.
IopauMoryda cpe npohyHaPiOnuCi CaTexHnKIM KapaKTePnCTnKaMa.
Uno3opehe/Oppe3- nHΦopMaunje o 6e36eHnOCTn
① OnuTe INHΦopMaζηje n cabetn
IInΦopMaζηeOJXNBθHOJ cpeiHn
3aDpxKaHO npaBO n3MeHa.
1. INHΦOPMALUJNE O B6E3BEdHOCTN INHCTAJIALUJN

YI03OPEHbE!
Porjedajte 3ace6Hy
6pouypy C ynyTCTBnma 3a
HnctaJauJy 3a
HOpmaJne o
6e36eDnOCTn
reparationsinformation:
www.electrolux.com/support
registrar din produit for bättre service:
www.registerelectrolux.com


3aJIeXHo BiD TnIy, fIbTp MoKe NiIJaRaTn YH He NiIJaRaTn BiHOBLeHHIO. IINB.6yKnET, 10 NoCTaHaCTbCra 3 fIbTpOM.
5. OXOPOHA IOBKIIJIJI
3dabaiteHa nobtopHy nepepo6ky MATEPII, no3NaeHi BiIDnoBIDHIM
CnMBOJOM .BnKndaTye ynaKOBkyu BIDNObiDHi KOHTeHepn IJaB BTOpINHOI CnPOBHN. DOnOMOXITb 3aXnCTNTn HABKOJIINHc CEpeODBnIe Ta 3dOpOB'Y iHUnx JIOJe i 3a6e3neUHTN BTOPINHHy
Lio6 3amHnT pfInbTp:
- 3HimitsKipobi pInbtpn 3 npnilady. IINB.nyHKT «OuunueHHJ KnpOBORo pInbtpa» B cIbOMy po3dini.
- NotarytBJraNOKyHaNPaMky HxHbOJYactInHnΦinbtpy.

- 3JIeRka HaxnIiTb nepeDnH yactnHy fiIbTpBa BnI3,notIM notaHiTb.
- Lio6 BCTaHOBtN HOBn fIpIbTp, NOBTOPiTb Ti cami KpOKn B 3BOPOTOMy Noprky. Y 6yDb-RAKOMy BUNaIKy HEO6xIDHO 3AmIHOBaTI NfIbTpN MiHIMyM KOxHi QOTnpN Micrui.
4.4 3amHa JAmn
Ppnaad noctaayetcbci 3cblnoioHOJ lamnoIO. LIO detanb moke 3amHOBATn IINWE KBANIPIKOBAHN CNEUJIANT. Y BnnaIky 6yNb-RAKOI HecnpabHocTi 3BepHIbCra do pOzdiNy (CepBic) rnaBn (InCTpykuii zoDo 6e3neKn).
pepepo6ky eNeKtpuHnIX i eNeKtpoHHnx npJiaDIB.He BkndaTe npuaDi,
no3haeHi BiIIOBIDHM CUMBOJOM pa3OM 3 IHsIM DOMaHIM CMITTM.
Jawwll Jjwl 10000000000000000000000000000000000000000000000000000000000000
jLg a> g0 nJaiawlln jyabzll J 1a2b pJdwl Jdall .3
glwglalwl icaiiooslog .gall alw
12 12222222222222222222222222222
JgJgJgJgJgJgJg
Jg 4
SOLUOLIgOgOgOgOgOgOg
j 4.2
sul 10000000000000000000000000000000000000000000000000000000000
jolal
a>glc uill jao joc lbeol .1 aal Jawl oosgall
Jai 2
pSall a>gl joc 2.1

:2Lxylgaiualllogd2og
www.electrolux.com/support
joo 1000
www.registerelectrolux.com
jglal aolll jglg bgsaIgwall gallg caxlall
www.electrolux.com/shop


aIg cIg I
aaiy jia jia jia jia jia jia jia jia jia jia jia jia jia jia jia jia jia jia jia jia jia jia jia jia jia jia jia jia jia jia jia jia jia jia jia jia jia jia
jlll: jlll lllllllllllllllllllllllllllll
Julll PNC
a>gl 1c loglaall o i j k a
a0dwl10og120-a/
aole jilagloglgo ①
a uloglo
jolw jgduy aio
jlllJalalaloglo .1

Jr J 1000000000000000000000000000000000000000000000000000000

C E