TP501R09 - TP505D01 - TP507R04 - Coffee maker SIEMENS - Free user manual and instructions
Find the device manual for free TP501R09 - TP505D01 - TP507R04 SIEMENS in PDF.

User questions about TP501R09 - TP505D01 - TP507R04 SIEMENS
0 question about this device. Answer the ones you know or ask your own.
Ask a new question about this device
Download the instructions for your Coffee maker in PDF format for free! Find your manual TP501R09 - TP505D01 - TP507R04 - SIEMENS and take your electronic device back in hand. On this page are published all the documents necessary for the use of your device. TP501R09 - TP505D01 - TP507R04 by SIEMENS.
USER MANUAL TP501R09 - TP505D01 - TP507R04 SIEMENS
The future moving in.
A
B
C

D
E
F

G
1
3
4
5
6
7
8
9
10
11
12
13
14
15
16
17
18
19
20
21
Table of contents
Safety 8
General information 8
Intended use 8
User group restrictions. 8
Safe use 9
Environmental protection and energy saving 12
Disposing of packaging 12
Tips for saving energy. 12
Installation and connection 12
Scope of supply. 12
Installing and connecting the appliance. 12
Familiarising yourself with your appliance 13
Appliance 13
Controls. 13
Display 13
Drinks overview 14
Accessories 15
Before using for the first time. 15
Perform the initial start-up 15
Fill the water tank. 15
Fill coffee bean container. 16
Setting the language 16
Setting the water hardness. 16
General information 17
Basic operation 17
Switching the appliance on and off 17
Dispensing drinks 17
Dispensing a coffee drink made from fresh beans 18
Dispensing a coffee drink made from ground coffee 18
Dispensing drinks with milk. 19
Dispensing coffee drink with milk.....19
Dispensing special drinks 19
Dispensing milk froth 19
Dispensing hot water 20
Drink settings. 20
Water filter 22
Childproof lock 22
Activating the childproof lock 22
Deactivating the childproof lock..... 22
Cup heater 22
Basic settings 23
Overview of the basic settings 23
Changing the basic settings. 24
Cleaning and maintenance 24
Dishwasher-safe components 24
Cleaning agent 24
Cleaning the appliance 25
Cleaning the drip tray and coffeedregs container 25
Cleaning the ground coffee compartment 26
Cleaning the milk system 26
Cleaning brewing unit 27
Service programmes 27
Rectifying faults 31
Malfunctions 31
Notifications on the display panel..... 32
Problem with results 34
Transportation, storage and disposal 36
Activate frost protection 36
Disposing of your old appliance..... 36
After-sales service 36
E number and FD number 37
Warranty conditions 37
Technical specifications 37

Safety
Please read the safety information to ensure that you use the appliance safely.
General information
Here you can find general information about this information product.
- Read this manual carefully. Only then can you operate the appliance safely and efficiently.
This manual is intended for the user of the appliance. - Observe the safety instructions and warnings.
- Keep the manual and the product information in a safe place for future reference or for the next owner.
- Check the appliance for damage after unpacking it. Do not connect the appliance if it has been damaged in transit.
Intended use
Please read the information on intended use to ensure that you use the appliance safely and correctly.
Only use this appliance:
as specified in this instruction manual.
for preparing hot drinks.
Up to an altitude of max. 2000 m above sea level.
User group restrictions
Avoid risks to children and vulnerable persons.
This appliance may be used by children aged 8 or over and by people who have reduced physical, sensory or mental abilities or inadequate experience and/or knowledge, provided they are supervised or have been instructed on how to use the appliance safely and have understood the resulting dangers.
Do not let children play with the appliance.
Children must not perform cleaning or user maintenance unless they are at least 8 years old and are being supervised.
Keep children below the age of 8 at a safe distance from the appliance and power cable.
Safe use
Follow these safety instructions when using the appliance.
WARNING - Risk of suffocation!
-
Children may pull packaging material over their heads or wrap themselves up in it and suffocate.
-
Keep packaging material away from children.
Do not let children play with packaging material. -
Children may breathe in or swallow small parts, causing them to suffocate.
-
Keep small parts away from children.
Do not allow children to play with small parts.
WARNING - Risk of electric shock!
-
Improper installations can be dangerous.
-
Connect and operate the appliance only in accordance with the specifications on the rating plate.
- Connect the appliance to a power supply with alternating current solely via a correctly installed socket with earthing.
- The protective conductor system of the domestic electrical installation must be properly installed.
A damaged appliance or a damaged power cord can be dangerous.
- Never operate a damaged appliance.
- Never operate an appliance with a torn or fractured surface.
- If the appliance or the power cord is damaged, disconnect the appliance from the power supply immediately. Unplug the appliance from the mains or switch off the circuit breaker in the fuse box.
Call our customer service.
Repairs on the appliance must be carried out solely by trained, specialist personnel.
en Safety
- Improper repairs can be dangerous.
- Repairs on the appliance must be carried out solely by trained, specialist personnel.
Penetrating moisture may cause an electric shock. - Never immerse the appliance or the power cord in water.
- Liquids must not be spilled on the appliance plug connection.
- Use the appliance in enclosed spaces only.
Never expose the appliance to intense heat or humidity. - Do not use any steam cleaners or high-pressure cleaners to clean the appliance.
WARNING - Risk of fire!
The appliance will become hot.
Ventilate the appliance adequately.
Never operate the appliance in a cupboard.
It is dangerous to use an extended power cord and non-approved adapter.
Do not use extension cables or multiple socket strips.
If the power cord is too short, contact our customer service.
Only use the adapter approved by the manufacturer.
WARNING - Risk of burns!
Some appliances parts will become very hot.
- Never touch the hot appliance parts.
- Allow hot appliance parts to cool down before touching them.
WARNING - Risk of scalding!
Freshly prepared drinks are very hot.
Leave drinks to cool down if necessary.
- Do not let escaping liquids or steam come into contact with your skin.
WARNING - Risk of injury!
- Improper use of the appliance may endanger the user.
Use the appliance only for its intended purpose.
- Trapped fingers when closing the appliance door.
Be careful of your fingers when closing the appliance door.
The grinder rotates.
- Never reach into the grinder.
WARNING - Risk of magnetism!
The appliance contains permanent magnets. These may affect electronic implants, e.g. pacemakers or insulin pumps.
People with electronic implants must stand at least 10 cm away from the appliance.
This minimum distance of 10cm must also be observed for the water tank when removed.
WARNING - Risk of harm to health!
Dirt on the appliance may be dangerous to health.
Follow the cleaning instructions for the appliance.
Environmental protection and energy saving
Protect the environment by using your appliance in a way that conserves resources and by disposing of reusable materials correctly.
Disposing of packaging
The packaging materials are environmentally compatible and recyclable.
- Sort the individual components by type for disposal.
The types of plastic waste can be identified by the internationally standardised abbreviations such as "PS" for polystyrene.
Information about current disposal methods can be obtained from your specialist dealer or your local authority.
Tips for saving energy
If you follow these instructions, your appliance will use less power.
Set the interval for automatic switch-off to the smallest value.
- If the appliance is not being used, it will switch itself off earlier.
"Basic settings", Page 23
Do not interrupt the dispensing process prematurely. - The amount of water or milk that is heated is used optimally.
Descale the appliance regularly. - Limescale deposits increase the appliance's energy consumption.
Installation and connection
You can find out where and how best to install your appliance here. You will also learn how to connect the appliance to the power supply.
Scope of supply
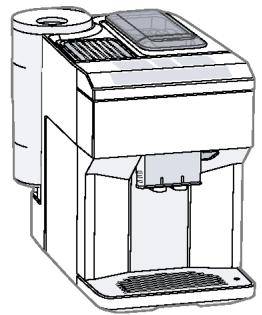
After unpacking all the parts, check for any damage in transit and for completeness of delivery.
→Fig.1
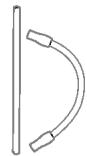
| A | Fully automatic coffee machine |
| B | Milk tube and suction pipe |
| C | Instruction manual |
| D | Cleaning tablets1 |
| E | Descaling tablets1 |
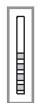
| F | Water hardness testing strip |
| G | Water filter1 |
1 Depending on the appliance specifications
Installing and connecting the appliance
ATTENTION!
Risk of damage to the appliance. If the appliance is not started up correctly, it may be damaged.
Use the appliance in frost-free rooms only.
If the appliance has been transported or stored below 0^ , wait 3 hours at room temperature before starting it up.
After plugging in, always wait approx. 5 seconds.
-
Remove the protective film.
-
Place the appliance on a level, water-resistant surface that is capable of bearing its weight.
- Using the mains plug, connect the appliance to an earthed socket that has been correctly installed.
Familiarising yourself with your appliance
Familiarise yourself with the parts of your appliance.
Appliance
Here you can find an overview of the parts of your appliance.
Note: Individual details and colours may differ, depending on the appliance model.
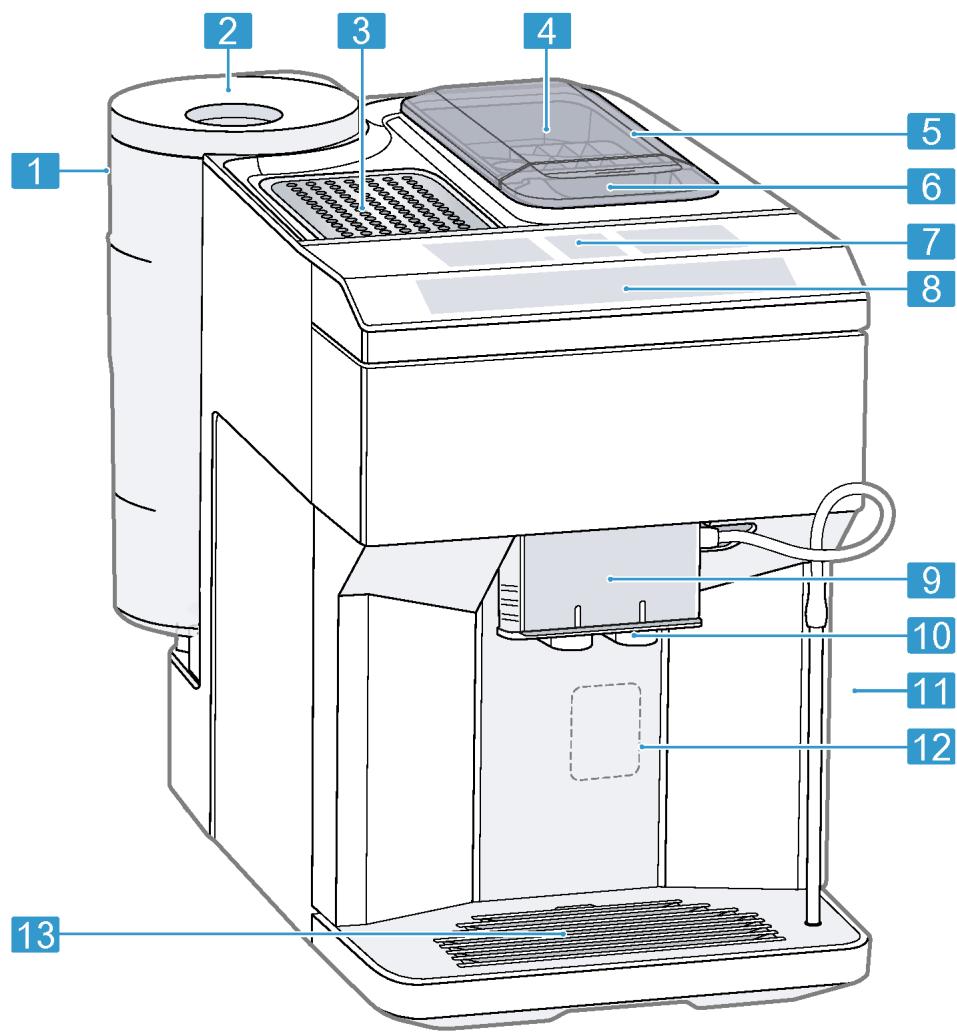
Fig. 2
| 1 | Water tank |
| 2 | Cover for water tank |
| 3 | Cup heater1 |
| 4 | Aroma lid |
| 5 | Bean container |
| 6 | Ground coffee compartment |
| 7 | Display |
| 8 | Control panel |
| 9 | Cover |
| 10 | Outlet system |
| 11 | Brewing chamber door |
Depending on the appliance specifications
| 12 | Rating plate |
| 13 | Drip tray |
1 Depending on the appliance specifications
Controls
Here you can find an overview of the symbols on your appliance. Press the symbols to make a selection, start the dispensing process or make/adjust a setting.
| Symbol | Explanation |
| ① | Switch appliance on/off |
| menu② | Open menu/leave menu Note: The menu buttons are only visible when the menu is open. |
| ^ | Navigate upwards in the menu |
| √ | Navigate downwards in the menu |
| ok | Confirm/save in the menu |
| $ | Go back in the menu |
| @ | Dispense two cups |
| ∅ | Select coffee strength |
| ml | Adjusting the amount |
| start stop | Start/stop |
Display
The display shows the selected drinks, settings and setting options, as well as messages about the appliance's operating status.
The display shows additional information and action steps. The information is hidden after a short period, or by pressing a button. The action steps are hidden when they have been completed.
Drinks overview
You can prepare a wide range of different drinks with your appliance.
Quick selection
| Symbol | Designation | Explanation | Category |
| Espresso | Concentrated coffee. Best served in small, thick-walled cups. Preheat cups with hot water. | → "Dispensing a coffee drink made from fresh beans", Page 18 → "Dispensing a coffee drink made from ground coffee", Page 18 | |
| Caffe crema | Coffee with a crema layer or large cup of coffee prepared using es- presso method. | → "Dispensing a coffee drink made from fresh beans", Page 18 → "Dispensing a coffee drink made from ground coffee", Page 18 | |
| Cappuccino | Espresso with frothed milk. Best served in small cups. | → "Dispensing coffee drink with milk", Page 19 | |
| LatteMacchiato | Coffee speciality with three layers: warm milk at the bottom, espresso in the middle, and milk froth on top. Best served in a glass. | → "Dispensing coffee drink with milk", Page 19 | |
| Special drinks | Dispense other drinks. | → "Dispensing special drinks", Page 19 |
Special drinks
| Symbol | Designation | Explanation | Category |
| Espresso mac-chiato1 | Espresso finished with milk froth. | → "Dispensing coffee drink with milk", Page 19 | |
| Flat white1 | Espresso with frothed milk. | → "Dispensing coffee drink with milk", Page 19 | |
| Americano1 | 1/3 espresso is topped up with 2/3 hot water. | → "Dispensing a coffee drink made from fresh beans", Page 18 → "Dispensing a coffee drink made from ground coffee", Page 18 | |
| Milk froth | For preparing speciality white coffees. | → "Dispensing milk froth", Page 19 | |
| 1 | Depending on the appliance specifications | ||
| Hot water | For preparing hot drinks, e.g. tea, or to preheat cups. | → "Dispensing hot water", Page 20 | |
| 1 | Depending on the appliance specifications | ||
Accessories
Only use original accessories. These have been made especially for your appliance. Here, you can find an overview of your appliance's accessories.
| Accessories | Retail | Customer Service |
| Cleaning tablets | TZ80001N | 00311807 |
| Descaling tablets | TZ80002N | 00576693 |
| Water filter | TZ70003 | 00575491 |
| Water filter pack of 3 | TZ70033 | - |
| Microfibre cloth | - | 00460770 |
| Care set | TZ80004 | 00576330 |
Before using for the first time
Configure the basic settings. Clean the appliance and the individual parts.
Perform the initial start-up
After connecting the appliance to the power supply, you must configure the settings for its initial start-up. The automatic display for the language selection and water hardness selection only appears when the appliance is switched on for the first time.
Tip: You can change the language and water hardness at any time.
"Overview of the basic settings", Page 23
Fill the water tank
Fill the water tank each day with fresh, cold, non-carbonated water.
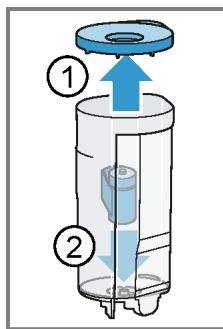
- Open the lid.
- Remove the water tank using the recessed grip.
- Rinse the water tank.
- If there is a water filter, insert the water filter.
"Insert water filter", Page 22
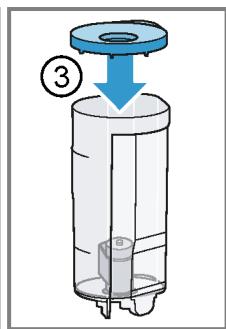
- Fill the water tank up to the "max" mark.
- Insert the water tank into the holder, keeping it upright.
- Close the lid.
Fill coffee bean container
ATTENTION!
Unsuitable beans can block up the grinder.
- Only use pure, roasted bean mixes that are suitable for use in fully automatic coffee or espresso machines.
Do not use glazed coffee beans.
Do not use caramelised coffee beans. -
Do not use coffee beans that have been treated with additives containing sugar.
Do not add ground coffee. -
Open the lid.
2 Fill with the coffee beans.
The appliance will adjust to the coffee beans with the next dispensing process.
3. Close the lid.
Tip: To keep the coffee beans at their best, store them in a sealed container in a cool place.
You can keep the coffee beans in the bean container for a number of days without them losing their aroma.
Setting the language
- Press to switch the appliance on.
- The display will show the language that is preset.
- Press or until the display shows the desired language.
- Press ok.
Tip: You can change the language at any time.
"Overview of the basic settings", Page 23
Setting the water hardness
It is important to set the water hardness correctly, so that the appliance indicates in good time that it needs descal
ing. You can use the enclosed test strip to determine the water hardness, or ask your local water company.
- Briefly dip the test strip in fresh tap water.
- Allow the water to drip off the test strip.
- The test strip will indicate the water hardness after 1 minute.
- If a water softening system is installed in your house, select "Softening system".
- Press or until the display shows the desired water hardness. The table shows the allocation of the levels to the different degrees of water hardness:
| Level | German de-grees in °dH | Total hard-ness in (mmol/l) |
| 1 | 1-7 | 0.18 - 1.25 |
| 2 | 8-14 | 1.42 - 2.49 |
| 3 | 15-21 | 2.67 - 3.74 |
| 4¹ | 22-30 | 3.92 - 5.34 |
Factory setting (may vary according to model)
- Press ok.
- Check whether the bean container has been filled.
- Press ok.
The appliance now rinses itself.
- When the symbols for drink selection and the buttons light up on the operating panel, the appliance is ready for use.
Tip: You can change the water hardness at any time.
"Overview of the basic settings",
Page 23
General information
Please bear this information in mind so that you can get the best out of your appliance.
Notes
The appliance has been programmed at the factory with standard settings for optimum operation.
- The grinder has been factory-set for optimum operation. If coffee is only dispensed drop by drop or is too thin with too little crema, you can adjust the grinding level when the grinder is running.
"Adjusting the grinding level", Page 21
- The appliance will switch off automatically if it has not been operated for a given period of time. You can change the duration in the basic settings.
"Overview of the basic settings", Page 23
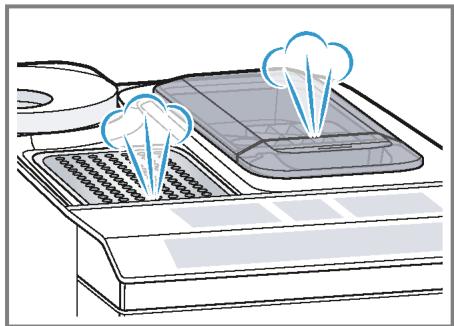
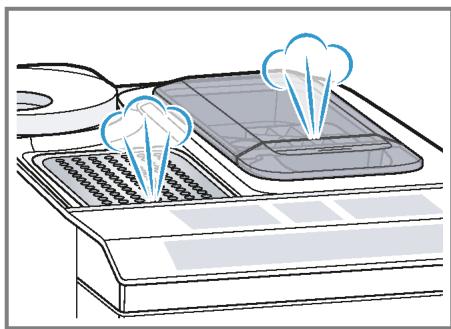
Water droplets may form on the ventilation slits and the lid of the ground coffee compartment while the appliance is in use. - For technical reasons steam can escape from the appliance.
Tips
- You can switch off the button tones in the basic settings.
"Overview of the basic settings", Page 23
- When you use your appliance for the first time or run a service programme, or if your appliance has not been used for a prolonged period, the first drink will not have its full aroma and should not be consumed.
Once you have started up your appliance and made a few cups, you will then achieve a thick, fine-pored crema every time.
Basic operation
Here you will find out everything you need to know about operating your appliance.
Switching the appliance on and off
- Turn the appliance on or off by pressing .
When the appliance switches itself on, the display shows the Siemens logo. When the appliance is turned on or off it rinses itself automatically. During the rinsing process, the display shows a drop. If the appliance is still warm when switched on, or if no drink was dispensed before it was switched off, the appliance doesn't rinse itself.
Dispensing drinks
Learn how to prepare a drink of your choice.
WARNING
Risk of scalding!
Freshly prepared drinks are very hot.
Leave drinks to cool down if necessary.
Do not let escaping liquids or steam come into contact with your skin.
Tips
- You can directly select the drink you want using the quick-selection buttons. The display shows you the drink and the current settings.
- Your appliance has other drinks besides the ones that you can obtain via the quick-selection buttons. "Dispensing special drinks", Page 19
- You can adapt your drink to your personal taste.
→ "Drink settings", Page 20
Notes
If you do not change any settings for approx. 5 seconds, the appliance will exit settings mode. The settings will be automatically saved.
- With a number of settings your coffee is prepared in several steps. Wait until the process is fully completed.
Dispensing a coffee drink made from fresh beans
- Place your pre-warmed cup under the outlet system.
- Press the drinks symbol for a coffee drink without milk.
The display will show the drink and your current settings. "Drink settings", Page 20 -
Change the settings where necessary:
-
Use ml to adjust the amount.
→ "Adjusting the amount", Page 21 -
Use to adjust the coffee strength. "Adjusting the coffee strength", Page 20
-
Press start stop. The coffee beans are freshly ground for each brewing process.
- The coffee is brewed and then dispensed into the cup.
Tip
- You can press start stop to stop the dispensing process early.
Find out how to make coffee drinks with milk. "Dispensing drinks with milk", Page 19
Dispensing a coffee drink made from ground coffee
ATTENTION!
The ground coffee compartment can become blocked.
Do not used coffee beans.
Do not use instant coffee.
Use a soft brush to gently direct the ground coffee residue into the shaft.
Note
When using ground coffee, the following selections are not available:
Two cups at once
Coffee strength
AromaDouble Shot
- Place your pre-warmed cup under the outlet system.
- Press the symbol for your desired drink.
- Press repeatedly until the display shows "Gr. coffee".
- Open the ground coffee compartment.
- Add a maximum of 2 level teaspoons of ground coffee, max. 12 g.
- Close the ground coffee compartment.
-
Press start stop,
-
The coffee is brewed and then dispensed into the cup.
Tip
- You can press stop to stop the dispensing process prematurely.
If you would like another drink with ground coffee, repeat the process.
Always add the ground coffee just before making the drink.
Dispensing drinks with milk
You can use your appliance to dispense coffee drinks with milk and milk froth.
Tip: You can also use plant-based alternatives to milk, e.g. soya milk.
Note: The quality of the milk froth depends on the type of milk or plant-based alternative used.
WARNING
Risk of burns!
The milk system can become extremely hot.
- Never touch the milk system when it is hot.
- Allow the hot milk system to cool down before touching it.
ATTENTION!
Milk residues can dry on surfaces and are difficult to remove.
Clean the milk system after every use.
"Cleaning the milk system",
Page 26
Dispensing coffee drink with milk
Requirements
The milk tube is connected.
The suction pipe is connected.
- Insert the suction pipe in the milk.
- Place your pre-warmed cup under the outlet system.
- Press the symbol for a coffee drink with milk.
- The display will show the drink and your current settings.
"Drink settings", Page 20
-
Change the settings where necessary:
-
Use m to adjust the amount.
"Adjusting the amount", Page 21 - Use to adjust the coffee strength.
"Adjusting the coffee strength", Page 20 -
Use the ground coffee compartment.
"Dispensing a coffee drink made from ground coffee", Page 18 -
Press start and wait until the process is complete.
After preparing the drink, the milk system will automatically clean itself with a short jet of steam.
Tip: If you want to stop the dispensing process early, press start stop. If you want to stop the dispensing process altogether, press 0.
Dispensing special drinks
Your appliance has other drinks besides the ones that you can obtain via the quick-selection buttons.
Press several times.
"Drinks overview", Page 14
Dispensing milk froth
Requirements
The milk tube is connected.
The suction pipe is connected.
WARNING
Risk of burns!
The milk system can become extremely hot.
- Never touch the milk system when it is hot.
- Allow the hot milk system to cool down before touching it.
en Basic operation
- Insert the suction pipe in the milk, e.g. Tetra Pak carton.
- Place your pre-warmed cup under the outlet system.
- Press repeatedly until the display shows "Milk froth".
-
Change the setting if necessary:
-
Use m to adjust the amount.
"Adjusting the amount",
Page 21
- Press start stop
- The milk froth will run out of the outlet system.
- Press start stop to stop the dispensing process.
Dispensing hot water
Requirements
The milk system has been cleaned. "Cleaning the milk system", Page 26.
The milk tube has been removed.
WARNING
Risk of burns!
The milk system can become extremely hot.
- Never touch the milk system when it is hot.
- Allow the hot milk system to cool down before touching it.
Note: If the milk system has not been cleaned, small amounts of milk may be dispensed with the water.
- Place your pre-warmed cup under the outlet system.
- Press repeatedly until the display shows "Hot water".
-
Change the setting if necessary:
-
Use m to adjust the amount.
"Adjusting the amount",
Page 21
- Press start stop.
If the following message appears: "Please remove suction hose.", remove the milk tube and press start stop.
Hot water will run out of the outlet system. - Press start stop to stop the dispensing process.
Drink settings
Prepare a drink according to your taste.
Adjusting the coffee strength
- Press the symbol for your desired drink.
- To select the strength of the coffee, press .
You can select the following coffee strengths:
- Mild
- Regular
- Strong
- Very strong
- AromaDouble Shot
Tip: For a strong taste of coffee, select a high coffee strength when setting a large capacity.
Selecting ground coffee
- Press the symbol for your desired drink.
- Press repeatedly until the display shows "Gr. coffee".
"Dispensing a coffee drink made from ground coffee", Page 18
AromaDouble Shot
You can dispense an extra-strong coffee by using the AromaDouble Shot function.
The longer coffee is brewed, the more bitter substances and undesirable aromas are released. The bitter substances and undesirable aromas affect the taste and digestibility of the coffee.
To ensure that only pleasant-tasting and easily digestible aromatic substances are released, fresh coffee beans are ground and brewed when half the quantity has been prepared.
Tip: You can select the AromaDouble Shot function for any drink containing a proportion of at least 35 ml coffee volume.
Note: The AromaDouble Shot function is not available for every drink and drink volume.
Adjusting the amount
- Press the symbol for your desired drink.
- Press ml repeatedly until the desired volume is shown on the display.
Dispensing two cups at once
Depending on the appliance model, you can prepare two cups at the same time for certain drinks.
Note
The "Two cups at once" function is not available for the following selections:
Ground coffee
AromaDouble Shot
Volume smaller than 35 ml
- Press the symbol for your desired drink.
- Press
The setting is shown on the display.
3. Place two cups on the left and right below the outlet system.
4. Press start stop.
The drink is prepared in 2 steps. The beans are ground in 2 grinding operations.
- The drink is brewed and then runs into the cup.
- Wait until the process is completed.
Grinder
Your appliance has an adjustable grinder, which you can use to customise the grinding level of your coffee beans.
Adjusting the grinding level
Set the desired grinding level while the coffee beans are being ground.
WARNING
Risk of injury!
The grinder rotates.
- Never reach into the grinder.
ATTENTION!
Risk of damage to the grinder. The grinder may be damaged if the grinding level is not set properly.
- Only set the grinding level when the grinder is running.
- Select the grinding level using the rotary selector step by step.
| Grinding level | Setting |
| Fine grinding level for dark-roasted beans. | Turn rotary selector counter-clockwise. |
| Coarse grinding level for light-roasted beans. | Turn rotary selector clockwise. |
The setting only has an effect after the second cup of coffee.
Tip: If the coffee is only dispensed drop by drop, set a coarser grinding level.
If the coffee is too thin with too little crema, set a finer grinding level.
Water filter
You can use a water filter to minimize limescale deposits and reduce impurities in the water.
Insert water filter
ATTENTION!
Possible damage to the appliance due to limescale build-up.
Change the water filter in good time.
Change the water filter after 2 months at the latest.
Note: If "Replace water filter" is shown on the display, replace the water filter. If you are not inserting a new filter, select "No filter" and follow the instructions on the display.
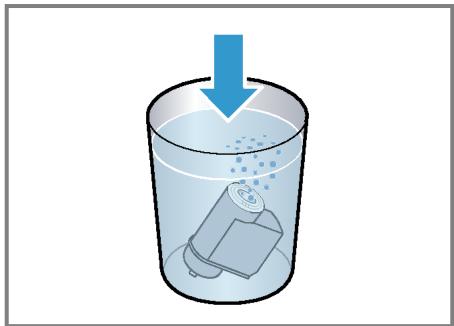
- Immerse the water filter in a glass of water until the air escapes.
Fig. 3 - Press menu.
- Press or "Water filter" and ok.
- Use or to select "New filter" or "Replace water filter" and press ok.
- Note: If you are not inserting a new filter, select "No filter" in the menu settings.
Push the water filter firmly into the water tank and press ok. Fig. 4
- Fill the water tank up to the "max" mark and press ok.
- Connect the milk tube to the milk system and the suction pipe.
- Insert the end of the suction pipe in the drip plate.
- Place a container with a capacity of 1 I under the outlet system and press ok.
- The filter will be rinsed and the following message displayed: "Rinsing complete."
The appliance is now ready to use.
Tip: You should also change your water filter for reasons of hygiene.
With a water filter, you need to descale your appliance less frequently.
If your appliance has not been used for a long period, for example if you were on holiday, you should rinse the water filter before use by dispensing a cup of hot water.
The water filter can be purchased from retailers or Customer Service.
"Accessories", Page 15
Learn how to insert the water filter.
"Insert water filter", Page 22
Childproof lock
You can lock the appliance, to protect children against scalding and burns.
Activating the childproof lock
Press and hold ml for at least 3 seconds.
- The following message will be displayed: "Child lock active. To deactivate press "ml" for 3 sec".
Deactivating the childproof lock
Press and hold ml for at least 3 seconds.
The following message will be displayed: "Child lock deactivated."
Cup heater1
You can use the cup heater to pre-heat your cups.

WARNING
Risk of burns!
The cup heater can become very hot.
- Never touch the cup heater when it is hot.
- Allow the hot cup heater to cool down before touching it.
Tips
- You can activate and deactivate the cup heater in the basic settings. "Overview of the basic settings", Page 23
- Place the cups with their base on the cup heater to heat the cups perfectly.
Basic settings
You can configure your appliance to suit your needs and call up additional functions.
Overview of the basic settings
| Setting | Selection | Description |
| Cleaning and care | Milk system | Start service programme. |
| Descale | → "Service programmes", | |
| Clean | Page 27 | |
| calc'nClean | ||
| Cup warmer1 | Cup warmer off2 | Switch cup heater on or off. |
| Cup warmer on | → "Cup heater", Page 22 | |
| Water filter | New filter | Set use of the water filter. |
| No filter | ||
| Coffee temp. | normal | Set the temperature for coffee |
| high | drinks. | |
| max. | Note: The setting is effective for all preparation types. | |
| Languages | See options on the appliance. | Set menu language. |
| Changes are immediately displayed. | ||
| Autom. switch-off | See options on the appliance. | Set how long the appliance should wait after preparing the last drink before automatically switching itself off. |
| Water hardness | 1 (soft) | Set the appliance to the local wa-ter hardness. |
| 2 (medium) | ||
| 3 (hard) | → "Setting the water hardness", | |
| 4 (very hard)2 | Page 16 | |
| Water-softening system |
Depending on the appliance specifications
2 Factory setting (may vary according to model)
| Setting | Selection | Description |
| Key tones | Key tones on 2 Key tones off | Switch the button tones on or off. |
| Factory settings | Full reset? Continue: OK Cancel: ← | Restore settings to the factory settings. Note: All individual settings will be deleted and reset to the factory settings. |
Depending on the appliance specifications
Factory setting (may vary according to model)
Changing the basic settings
- Press menu.
- Use or to select the desired basic setting and press ok.
- The display will show the setting options and the navigation symbols will light up. The display indicates the current setting.
- Use or to make the desired selection and press ok.
The setting is now saved. - Use to go back.
- Press menu to exit the menu.
Cleaning and maintenance
To keep your appliance looking its best and working efficiently for a long time, it is important to clean and maintain it carefully.
Dishwasher-safe components
Find out which components can be cleaned in the dishwasher.
ATTENTION!
Some components may be damaged if they are cleaned in a dishwasher.
-
Only put dishwasher-safe components in the dishwasher.
-
Only use programmes that do not heat the water over 60^ .
Dishwasher-safe components:
Drip plate
Drip grate
Coffee dregs container
Mechanical fill level indicator
Milk system with adapter
Ground coffee compartment with hinged lid
Drip tray
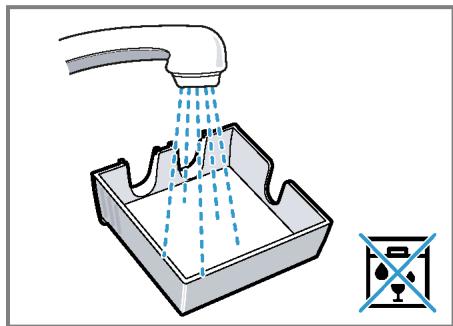
Not dishwasher-safe:
Water tank
Water tank lid
Aroma lid
Brewing unit
- Beverage dispenser cover


Cleaning agent
Find out which cleaning agents are suitable for your appliance.
WARNING
Risk of serious harm to health!
Cleaning liquids may lead to health impairments.
Never drink the cleaning liquids.
- Use descending and cleaning agents as described in the instructions and observe the relevant safety information.
ATTENTION!
Unsuitable cleaning products may damage the surfaces of the appliance.
- Do not use harsh or abrasive detergents.
Do not use cleaning agents containing alcohol or spirits. - Do not use hard scouring pads or cleaning sponges.
- Do not use citric acid, vinegar or any vinegar-based agents to descale the appliance.
For cleaning and descaling, only use suitable tablets.

Tips
Use descending and cleaning tablets that have been specially developed for your appliance. You can buy tablets from our customer service. "Accessories", Page 15
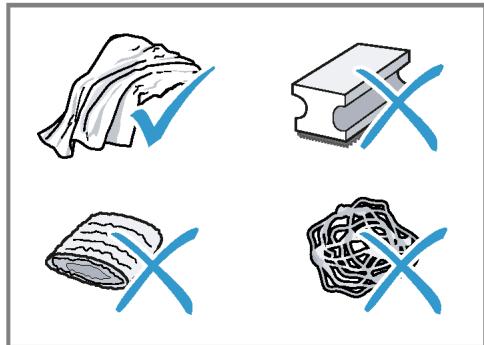
- Wash new sponge clothes thoroughly to remove any salt adhering to them. Salt can cause a rust film to develop on stainless steel surfaces.
Always remove any residues of limescale, coffee, milk, cleaning and descaling solutions immediately, to prevent the formation of corrosion.
Cleaning the appliance
WARNING
Risk of electric shock!
Penetrating moisture may cause electric shock.
- Never immerse the appliance or the power cord in water.
- Liquids must not be spilled on the appliance plug connection.
- Do not use any steam cleaners or high-pressure cleaners to clean the appliance.
WARNING
Risk of burns!
Some appliances parts will become very hot.
- Never touch the hot appliance parts.
-
Allow hot appliance parts to cool down before touching them.
-
Clean the housing, the high-gloss surfaces and the control panel with a microfibre cloth. "Accessories", Page 15
- Clean the outlet system with a soft, damp cloth after drinks have been dispensed.
- If the appliance has not been used for a long time, due to holiday for example, clean the entire appliance including the outlet system, milk system, trays and brewing unit.
Note: The appliance will rinse itself automatically if you switch it on when it is cold or switch it off after it has dispensed coffee. The system is therefore self-cleaning.
Cleaning the drip tray and coffee dregs container
Clean and empty the drip tray and coffee dregs container every day to prevent deposits.
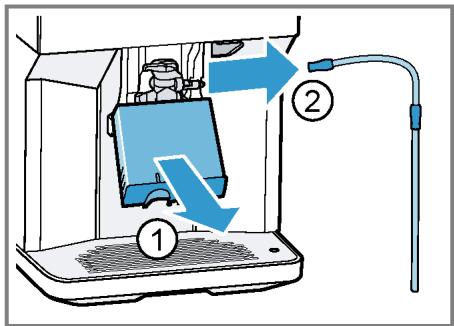
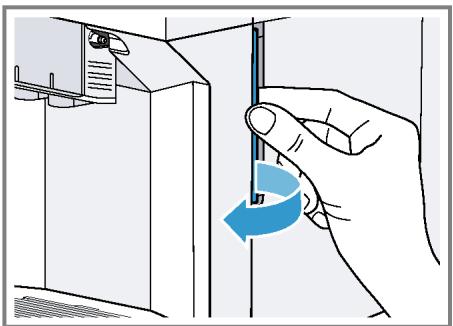
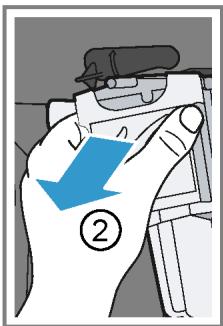
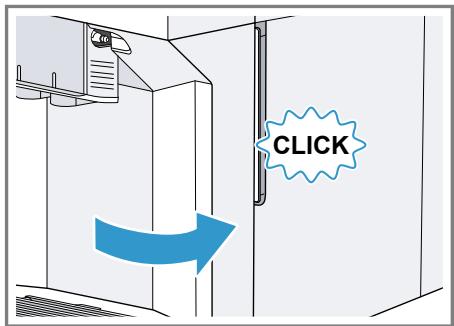
- Detach the milk tube from the outlet system.
Fig. 5 - Open the door.
- Pull the drip tray and the coffe dregs container forwards and out.
- Remove and clean the drip plate.
- Empty and clean the drip tray and coffee dregs container.
- Clean the appliance interior and the drip tray holder.
- Remove the mechanical fill level indicator and clean with a damp cloth.
- Assemble the drip tray, drip plate, coffee dregs container and mechanical fill level indicator and insert into the appliance.
- Close the door.
Cleaning the ground coffee compartment
Tip: You can clean the ground coffee compartment in the dishwasher.
- Pull out the ground coffee compartment by the open lid.
Fig. 6 - Clean the ground coffee compartment with washing-up liquid.
Fig. 7 - Dry the ground coffee compartment and insert it into the appliance.
Cleaning the milk system
WARNING
Risk of burns!
The milk system can become extremely hot.
- Never touch the milk system when it is hot.
- Allow the hot milk system to cool down before touching it.
ATTENTION!
The appliance may be damaged by improper cleaning.
- Do not put the cover of the outlet system in the dishwasher.
Tip
If you want to give the milk system a particularly thorough clean, you can use the "Clean milk system" service program.
"Using the milk system cleaning programme", Page 28
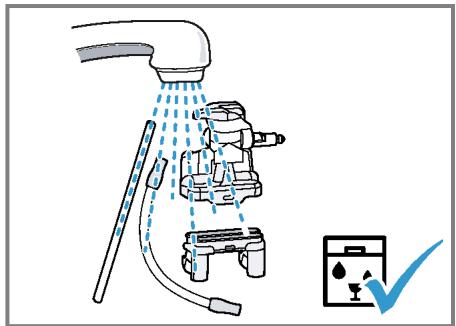
- All of the milk system's components are dishwasher-safe.
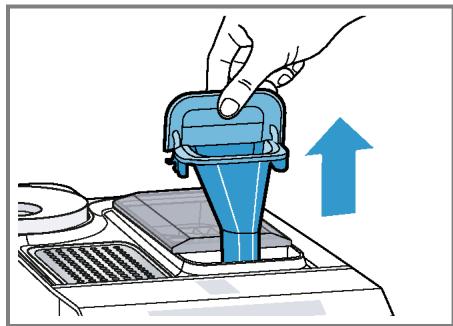
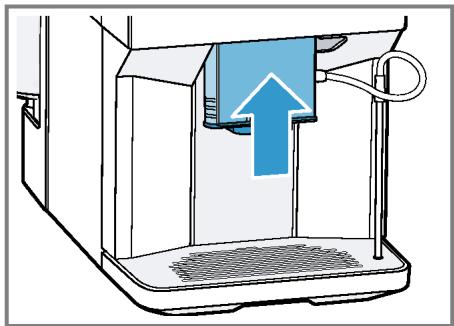
- Slide the outlet system right down.
- Pull the cover forwards and remove the milk tube.
Fig. 5
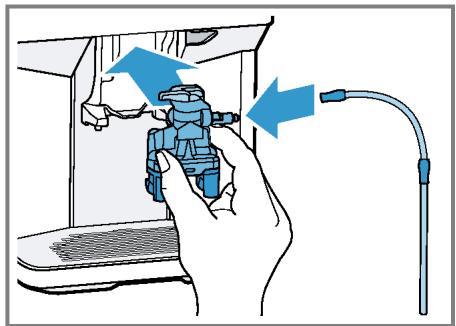
- Remove the milk system by pulling straight forwards.
Fig. 8
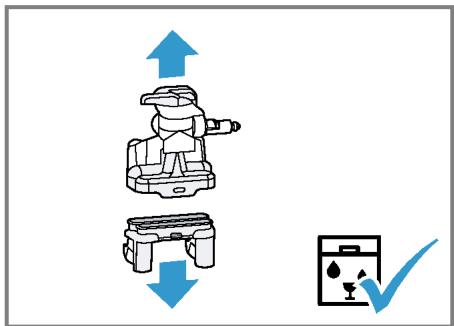
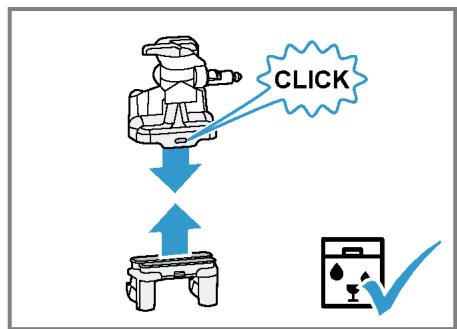
- Take the top and bottom section of the milk system apart.
→Fig.9
- Detach the milk tube from the suction pipe.
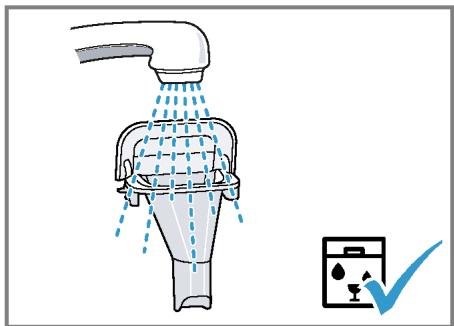
- Clean the components with detergent solution and a soft cloth.
Fig. 10
- Rinse all components with clean water and dry.
Fig. 11 - Any detergent residues in the milk system must be completely removed following the rinsing process.
- Assemble the top and bottom section of the milk system.
Fig. 12
-
Fit the milk tube.
-
Slide the outlet system right down.
- Place the milk system back in the appliance from the front, making sure it is straight.
Fig. 13
-
Replace the cover.
-
Slide the outlet system all the way up.
Fig. 14
Cleaning brewing unit
In addition to the automatic rinsing process, regularly remove and clean the brewing unit.
WARNING
Risk of burns!
Some appliances parts will become very hot.
- Never touch the hot appliance parts.
- Allow hot appliance parts to cool down before touching them.
ATTENTION!
The appliance may be damaged by improper cleaning.
Do not use washing-up liquid.
- Do not use cleaning agents containing vinegar or acids.
Do not clean in the dishwasher.
- Detach the milk tube from the outlet system.
Fig. 5 - Press to switch the appliance off.
- Open the door of the brewing chamber.
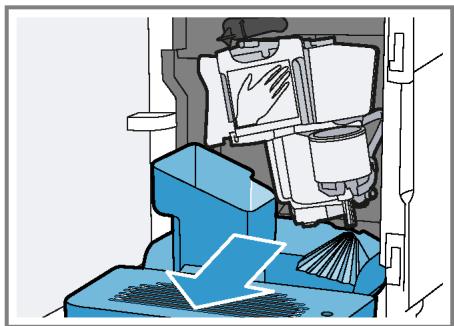
Fig. 15 - Remove the drip tray with the coffeed dregs container.
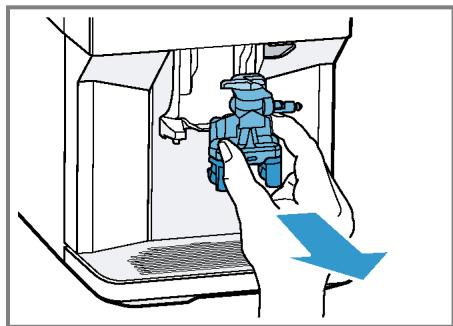
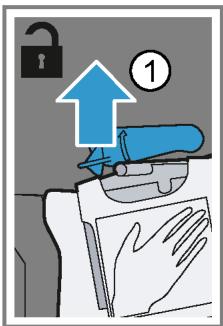
Fig. 16 - Push the red lever upwards.
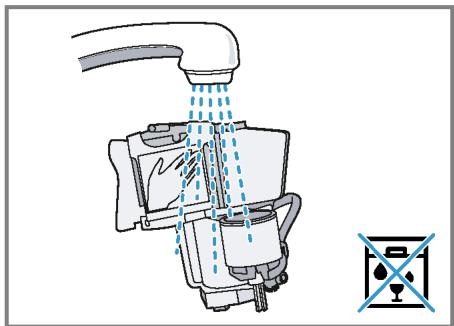
- Hold the brewing unit by the handle and carefully pull forwards and out.
Fig. 17 - Clean the brewing unit thoroughly under warm running water.
Fig. 18 - Clean the appliance interior with a damp cloth and remove any coffee residues.
-
Leave the brewing unit and the appliance interior to dry.
-
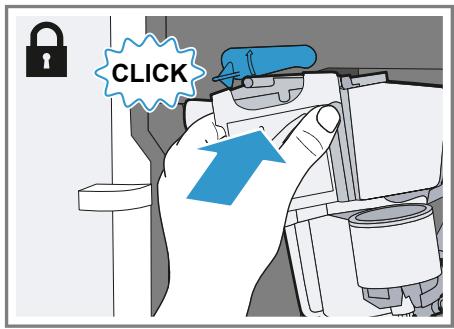
Hold the brewing unit by the handle.
- Push the red lever upwards.
- Position the brewing unit under the lever and slide it back as far as it will go.
Fig. 19
The lever will click into place.
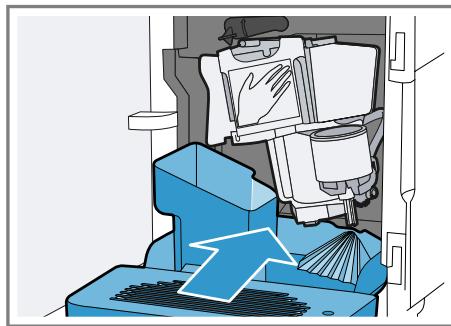
13.Insert the drip tray with the coffeed dregs container.
Fig. 20
14.Close the door.
Fig. 21
The door can only be closed if the brewing unit and drip tray are inserted correctly.
Service programmes
After certain time intervals, your appliance will recommend that you use the service programmes. Use the service programmes to clean your appliance thoroughly.
ATTENTION!
Risk of damage due to improper or insufficiently prompt cleaning and descaling.
- Immediately perform the descending process in accordance with the instructions.
- Do not put any descending tablets or other products into the ground coffee compartment.
Depending on the water hardness and use of the appliance, the display will show the following messages after prior notification:
"Please rinse milk system."
"Descending necessary. Please press menu for 3 sec."
"Cleaning necessary. Please press menu for 3 sec."
"calc'nClean nec. Please press menu for 3 sec."
Notes
The display indicates the progress of the descending or cleaning process.
If your appliance is not descaled in good time, the display will show the following message: "Descaling overdue. Appliance is locked. Please press menu for 3 sec."
If your appliance has been locked, you can only operate it again once the descending process has been carried out.
If you accidentally interrupt the service programme, you must reset it. "Resetting a service programme", Page 28
Tips
If you use a water filter, this prolongs the time interval until a service programmes needs to be performed.
- You can combine the cleaning and descaling programmes using the calc'nClean service programme. "Using calc'nClean", Page 29
Clean your appliance with a soft, damp cloth immediately after a service programme to remove any descaling solution residues and prevent corrosion.
Resetting a service programme
Take the following steps if the service programme is interrupted, e.g. due to a power failure.
- Rinse out the water tank.
- Fill the water tank with fresh, noncarbonated water up to the "max" marking.
-
Press ok.
-
The appliance will rinse itself for approx. 2 minutes.
- Empty and clean the drip tray.
- Insert the drip tray and close the door.
- Restart the service programme.
Using the milk system cleaning programme
Rinse the milk system with water, if necessary. The rinsing process takes approx. 1 minute.
Requirement: The brewing unit is cleaned.
"Cleaning brewing unit", Page 27
- Press menuQ.
- Use and to select "Cleaning and care" and press ok.
- Use and to select "Milk system" and press ok.
-
To start the programme, press ok.
-
The display will guide you through the programme.
- Place an empty glass under the outlet system and insert the end of the suction pipe in the glass.
-
Press ok.
-
The milk system will now clean itself automatically.
- Empty the glass and clean the suction pipe.
- The program has ended and the appliance is ready for operation.
Tip: If you want to clean the milk system particularly thoroughly, clean regularly by hand.
"Cleaning the milk system", Page 26
Using the descending programme
Run the descending programme when your appliance prompts you. The process takes approx. 30 minutes.
Requirement: The brewing unit is cleaned.
"Cleaning brewing unit", Page 27
- Press menuQ.
- Use and to select "Cleaning and care" and press ok.
-
Use and to select "Descale" and press ok.
-
To start the programme, press ok.
- The display will guide you through the programme.
- Empty and insert the drip tray.
- If there is a water filter, remove it.
- Press ok.
- Empty the water tank and fill with lukewarm water up to the "0.5 l calc" mark.
- Dissolve one Siemens descaling tablet in the water tank and press ok.
- Place a container with a capacity of 1 I under the outlet system.
- Place the end of the suction pipe in the container and press ok.
- The descending programme will run for approx. 20 minutes.
- If "Refill descaler." is shown on the display, add more descending solution and press ok.
13.Rinse the water tank. - Press ok.
15.If there is a water filter, insert the water filter. "Insert water filter",Page 22 - Press ok.
- Fill the tank with fresh water up to the "max" mark.
- Press ok.
- The descending programme takes approx. 1 minute and rinses the appliance.
- Empty and insert the drip tray.
- Thoroughly clean the suction pipe of the milk system.
- The program has ended and the appliance is ready for operation.
Using the cleaning programme
Run the cleaning programme when your appliance prompts you. The process takes approx. 9 minutes.
Requirement: The brewing unit is cleaned.
"Cleaning brewinging unit", Page 27
- Press menu.
- Use and to select "Cleaning and care" and press ok.
- Use and to select "Clean" and press ok.
-
To start the programme, press ok.
-
The display will guide you through the programme.
- Empty and insert the drip tray.
- Open the ground coffee compartment.
- Place one Siemens cleaning tablet into the ground coffee compartment.
- Close the ground coffee compartment and press ok.
- Place a container with a capacity of 1 I under the outlet system and press ok.
- The cleaning programme takes approx. 7 minutes.
- Empty and insert the drip tray.
- The program has ended and the appliance is ready for operation.
Using calc'nClean
You can combine the cleaning and descaling programmes using the calc'nClean service programme. Run the calc'nClean programme when your appliance prompts you. The process takes approx. 43 minutes.
Requirement: The brewing unit is cleaned.
"Cleaning brewing unit", Page 27
- Press menu.
- Use and to select "Cleaning and care" and press ok.
- Use and to select "calc'nClean" and press ok.
- To start the programme, press ok.
- The display will guide you through the programme.
- Empty and insert the drip tray.
- If there is a water filter, remove it.
- Press ok.
en Cleaning and maintenance
- Empty the water tank and fill with lukewarm water up to the "0.5 l calc" mark.
- Dissolve one Siemens descending tablet in the water tank and press ok.
- Place a container with a capacity of 1 I under the outlet system.
-
Place the end of the suction pipe in the container and press ok.
-
The descending programme will run for approx. 20 minutes.
- If "Refill descaler." is shown on the display, add more descending solution and press ok.
13.Rinse the water tank. - Press ok.
15.If there is a water filter, insert the wa-ter filter. "Insert water filter",Page 22 - Press ok.
- Fill the tank with fresh water up to the "max" mark.
-
Press ok.
-
The programme takes approximately 1 minute and rinses the appliance.
- Empty and insert the drip tray.
- Open the ground coffee compartment.
- Place one Siemens cleaning tablet into the ground coffee compartment.
22.Close the ground coffee compartment and press ok. -
Place a container with a capacity of 1 I under the outlet system and press ok.
-
The cleaning programme takes approx. 7 minutes.
- Empty and insert the drip tray.
- Thoroughly clean the suction pipe of the milk system.
- The program has ended and the appliance is ready for operation.
Rectifying faults
You can rectify minor faults on your appliance yourself. Read the troubleshooting information before contacting after-sales service. This will avoid unnecessary costs.

WARNING
Risk of electric shock!
Improper repairs can be dangerous.
Repairs on the appliance must be carried out solely by trained, specialist personnel.
Malfunctions
| Errors | Cause | Troubleshooting |
| Appliance no longer re-sponds. | Appliance has a fault. | 1. Pull out the mains plug and wait 5 seconds. 2. Re-insert the mains plug. |
| Appliance only dispenses water, not coffee. | Empty bean container is not detected by the appliance. | Pour in coffee beans. |
| Coffee shaft on brewing unit is blocked. | Clean the brewing unit. → "Cleaning brewing unit", Page 27 | |
| Beans are too oily and are not falling into the grinder. | Gently tap the bean container. Change the coffee variety. Do not use oily beans. Clean the empty bean container with a damp cloth. | |
| Appliance does not dispense milk or milk froth. | Milk system is soiled. | Clean the milk system in the dish-washer. → "Cleaning the milk system", Page 26 |
| Milk tube not immersed in milk. | Use more milk. Check whether the milk tube is immersed in the milk. | |
| No milk intake by the milk system. | The milk system is assembled incorrectly. | Assemble the milk system correctly. → "Cleaning the milk system", Page 26 Use more milk. Check whether the milk tube is immersed in the milk. |
| Milk tube not immersed in milk. | ||
| Appliance is not dispensing hot water. | Milk system is soiled. | Clean the milk system in the dish-washer. → "Cleaning the milk system", Page 26 |
| Appliance is not dispensing drinks. | Air is in the water filter. | 1. Immerse the water filter in water with the opening facing upwards until no more air bubbles escape. 2. Reinsert the filter. → "Insert water filter", Page 22 → Firmly press the water filter straight down into the tank connection. |
| There is dripping water on the inner floor of the appliance. | Drip tray was removed too soon. | Wait a few seconds after the last drink was dispensed before removing the drip tray. |
| Brewing unit cannot be removed. | Brewing unit is not in the re-moval position (e.g. frost protection activated). | Switch the appliance back on. |
| Appliance cannot be operated. | Appliance is in demo mode. | To deactivate demo mode, press and hold Ⓞ for at least 5 seconds. |
| Change displays. | ||
| Grinder won't start. | Appliance is too hot. | Wait 1 hour so the appliance can cool down. |
Notifications on the display panel
| Errors | Cause | Troubleshooting |
| Display shows "Close" despite the fact that the door is closed. | Door is not properly closed. | Press the door firmly shut. |
| Appliance is too hot. | Wait 1 hour so the appliance can cool down. | |
| Display shows "Please empty drip tray and reinsert." despite the fact that the drip tray is empty. | Appliance is switched off and does not detect emptying. | 1. Switch the appliance on, and remove the drip tray. 2. Re-insert the drip tray. |
| Drip tray is soiled. | Clean the drip tray thoroughly. | |
| Display shows "Please refill water tank" despite the fact that the water tank is full. | Water tank is wrongly inserted. | Insert the water tank correctly. |
| Carbonated water is in the water tank. | Fill the water tank with fresh tap water. | |
| Float is stuck in the water tank. | 1. Remove the water tank. 2. Clean the water tank thoroughly. | |
| Display shows "Please refill water tank" despite the fact that the water tank is full. | New water filter was not rinsed as per instructions. | 1. Rinse the water filter according to the instructions. → "Insert water filter", Page 22 2. Place the water filter into operation. |
| Air is in the water filter. | 1. Immerse the water filter in water with the opening facing upwards until no more air bubbles escape. 2. Reinsert the filter. → "Insert water filter", Page 22 | |
| Water filter is old. | ► Insert a new water filter. | |
| Limescale deposits in the water tank are blocking the system. | 1. Clean the water tank thoroughly. 2. Start the descaling programme. → "Using the descaling programme", Page 28 | |
| Display shows "Fill the bean container with coffee beans." despite the fact that the ban container is full. The grinder is not grinding any coffee beans despite full bean container. | Beans are too oily and are not falling into the grinder. | ► Gently tap the bean container. ► Change the coffee variety. Do not use oily beans. ► Clean the empty bean container with a damp cloth. |
| Display shows "Please clean brewing unit, replace and close door". | Brewing unit is soiled. | ► Clean the brewing unit. → "Cleaning brewing unit", Page 27 |
| Mechanism of brewing unit is stiff. | ► Clean the brewing unit. → "Cleaning brewing unit", Page 27 | |
| Too much ground coffee in the brewing unit. | ► Use no more than 2 level measuring spoons of ground coffee. → "Cleaning brewing unit", Page 27 | |
| Display shows "Voltage (V) incorrect". | Voltage in the house system is incorrect. | ► Only operate the appliance at 220 - 240 V. |
| Display shows "Please restart appliance". | Brewing unit is heavily soiled or cannot be removed. | ► Restart the appliance. ► Clean the brewing unit. → "Cleaning brewing unit", Page 27 |
| Appliance has a fault. | 1. Pull out the mains plug and wait 5 seconds. 2. Re-insert the mains plug. | |
| Display very frequently shows "calc'nClean". | Water is too hard. | 1. Insert a new water filter. → "Insert water filter", Page 22 2. Set the corresponding water hardness. → "Setting the water hardness", Page 16 |
| Incorrect or too little descal- ing agent used. | When descending, only use suitable tablets. |
Problem with results
| Errors | Cause | Troubleshooting |
| Coffee or milk froth quality varies widely. | Build-up of limescale in the ap- pliance. | Descale the appliance. → "Using the descending programme", Page 28 |
| Milk froth quality varies widely. | Milk froth quality depends on the type of milk or plant-based alternative used. | Optimise the result through the selec- tion of the milk or vegetable-based drink type. |
| Coffee is not dispensed or has slowed to a trickle. Set quantity is not reached. | Grinding level is set too fine. | Set a coarser grinding level. → "Adjusting the grinding level", Page 21 |
| Heavy build-up of limescale in the appliance. | Descale the appliance. → "Using the descending programme", Page 28 | |
| Air is in the water filter. | Immerse the water filter in water with the opening facing upwards until no more air bubbles escape. 2. Reinsert the filter. → "Insert water filter", Page 22 | |
| Coffee has no crema. | Type of coffee is not optimal. | Use a coffee variety with a higher pro- portion of Robusta beans. Use beans with a darker roast. |
| Beans are no longer fresh. | Use fresh beans. | |
| Grinding level is not appropri- ate for coffee beans. | Adjust the grinder to a finer setting. → "Adjusting the grinding level", Page 21 | |
| Coffee is too acidic. | Grinding level is set too coarse. | Adjust the grinder to a finer setting. → "Adjusting the grinding level", Page 21 |
| Coffee is too acidic. | Type of coffee is not optimal. | Use a coffee variety with a higher pro- portion of Robusta beans. Use beans with a darker roast. |
| Coffee is too bitter. | Grinding level is set too fine. | Set a coarser grinding level. → "Adjusting the grinding level", Page 21 |
| Type of coffee is not optimal. | Change the coffee variety. | |
| Coffee tastes burnt. | Grinding level is set too fine. | Set a coarser grinding level. → "Adjusting the grinding level", Page 21 |
| Type of coffee is not optimal. | Change the coffee variety. | |
| Coffee temperature setting is too high. | Set the coffee temperature lower. → "Overview of the basic settings", Page 23 | |
| Coffee grounds are not com- pact and are too wet. | The grinding level is not set optimally. | Adjust the grinder to a coarser or finer setting. → "Adjusting the grinding level", Page 21 |
| Too little ground coffee. | Use 2 level measuring spoons of ground coffee. | |
| Beans are too oily. | Use a different type of bean. |
Transportation, storage and disposal
Here you will find out how to prepare your appliance for transportation and storage. You will also find out how to dispose of old appliances.
Activate frost protection
Protect your appliance from frost during transportation and storage
Requirements
The appliance is now ready to use.
The water tank has been filled.
ATTENTION!
Possible damage to the appliance during transportation or storage due to liquid residues in the appliance.
-
Empty the pipe system before transportation or storage.
-
Place a large container under the outlet system.
- Press and select "Milk froth".
- Press start stop.
-
Remove water tank.
-
The appliance will automatically empty its pipe system and switch it-self off.
- Empty the water tank and the drip tray.
- Clean the appliance thoroughly.
Disposing of your old appliance
Valuable raw materials can be re-claimed by recycling old appliances.
- Unplug the appliance from the mains.
-
Cut through the power cord.
-
Dispose of the appliance in an environmentally friendly manner.
This appliance has been identified in accordance with the European Directive 2012/19/EU on Waste Electrical and Electronic Equipment (WEEE). This Directive provides an EU-wide framework for returning and recycling old appliances.
After-sales service
If you have any queries, are unable to rectify faults on the appliance yourself or if your appliance needs to be repaired, contact after-sales service.
You can solve many problems yourself by consulting the information on troubleshooting in these instructions or on our website. If this is not the case, contact our after-sales service.
We will always find an appropriate solution.
With any warranty claims, we will make sure that your appliance is repaired by after-sales customer service technicians using original spare parts, including after the manufacturer's warranty has expired.
Note: Under the manufacturer's warranty conditions, use of the after-sales service is free.
When contacting after-sales service, you will need the product number (E no.) and the production number (FD no.) of your appliance.
The contact details of the after-sales service can be found in the after-sales service directory at the end of the instructions or on our website.
E number and FD number
The E number and the FD number can be found on the appliance's rating plate.
Making a note of your appliance's details and the after-sales telephone number will enable you to find them again quickly.
Warranty conditions
You can make warranty claims for your appliance under the following conditions.
The guarantee conditions for this appliance are as defined by our representative in the country in which it is sold. Details regarding these conditions can be obtained from the dealer from whom the appliance was purchased. The bill of sale or receipt must be produced when making any claim under the terms of this guarantee.
Technical specifications
Facts and figures for your appliance can be found here.
| Voltage | 220–240 V ~ |
| Frequency | 50 Hz |
| Connection rating | 1500 W |
| Maximum static pump pres-sure | 15 bar |
| Maximum capacity of water tank (without filter) | 1.7 l |
| Maximum capacity of bean container | 270 g |
| Length of the power cable | 100 cm |
| Appliance height | 37.3 cm |
| Appliance width | 24.9 cm |
| Appliance depth | 42.8 cm |
| Weight, empty | 8-9 kg |
Type of grinder
Ceramic
Table des matieres
Sécurité 40
Indications generales 40
WAARSCHUWING - Risico van brand!
WAARSCHUWING - Risico van verbranding!
Versbereide dranken zicheer heet.
De dranken indien nodig lately afkoelen.
WAARSCHUWING - Gezondheidsrisico!
BkIIOUeHne I BbIKIOUeHne npI6opa... 183
PpnrtoBnHeHaHNTKOB 183
PnroTOBHeHne KoFeHOrO HAnITKa n3 CBexHX KoFeHbIX 3epeH. 183
PpIroTOBJIeHHe KoFeHOro HAnITKa 13MOJOTOrO KoFe. 184
PpIroTOBJIeHHe HAnITKOB C MoJIO-KOM 184
PnroTOBHeHKe KOeHOro HAnrKa C MoJOkOM 185
PpnrtoBnHeOcObix HAnHTKOB 185
PnirtoBHeHne MoIouHoN neHb... 185
PpnrroTOBHeHne ropuey BoDbl 186
HaCToPouKn DnI HaNtKOB. 186
ΦnIbTp DnIa BOIbl 187
UctpaHHeHHeHcnpaBHOCTeI 198
C6oBpa6ote 198
Yka3aHnHa dnCnPee 200
Ipo6JIeMa c pe3yJIbTaTOM pa6Otbl npI6opa 202
ru
TpaHcnpTnpoBka, XpaHeHne n yTHIN3aun. 205
AKTINBaUNI 3aIITbI OT 3aMep3AHNIA.....205
YTNIN3aun CTaporo 6bITOBoro npn-6opa .205
CepBnchna Cnyx6a. 205
Homep E n homep FD 206
TapaANTnHbIe yCIOBnA 206
TexHHueckne xapaKTepeHCTNKn 206

Бeэ�эсноctb
ДлбБeэ�аснОзКСплуataциnpriбopa cneDyTe yka3aHnMpo TeMe «Бeэ�аснocтВ».
06uine yka3aHHa
3ndeB npBVeHa o6uaI INΦopMaunO daHHOM INΦopMaunOHm IpOdyKTe.
He donyckaIte npckOB dIa DeTei n PoIbEpKeHHbIX ONaCHOCTn IInU.
He donyckaia Te DeTe MlaaIe 8 let K npnbopy n ero ceTeBomy npoBdy.
Be3oNaChoe npImMeHeHne
Pn noIb3oBaHnn npnbopom co6IOnaIte daHHbIe yKa3aHnI NO TexHnke 6e3oNaChOCTn.
I PENEYIPEJKDEHNE -Onacnoctb ydyusb!
IeTn MOryT 3aBepHybCBy yynakobOchB MaTePnaH nn HaeTb ero ce6e Ha rOIOBy n 3aDOxHyTbCra.
He noynckaTe DeTe K ynaKOBouHOMy MaTeHany.
He no3BOLJte DeTAM nIgPaTb c ynaKOBouHbIM MaTePnAJoM.
IeTN MoYr BdoXHyTb Hnn IpoIIOITb MeKne DeTaHn, B pe3yIbTaTe Yero 3aDOxHyTbC.
He noDnyscKaIe TeTee K MeIeKIM DeTaJIaM.
He no3BOLaIte DeTAM mIgpaTb C MeKIMM dTeJaMI.
I P E D Y N P E X J D E H I E - O n a c h o c t b n o p a j k e h n y 3 n e k T p u c e c k m T o k o m!
- Ecn np6op He nCnoJb3yETcR, OH oTknHouaETcpaHbwe. "Ba3OBblye yCTaHOBKn", Ctp.189
He npepbBaTe npexKeBpeMeHNo npiroTOBJIeHne HAnITka.
+HarpeToe KOJIuYeCTBO BOJbI INN MoIO-Ka HcNoJIb3yEtCOnTImaJIbHO.
Perylaepno ouuzaaiTe npnbop ot haknn.
+HaKInb npINBoODn K nOBbiueHHOMy 3HepronOTpe6JIeHIO.
YCTaHOBKa I NOdKJIHOue-Hne
3decBbIy3Haete,geN KaK LyuWe Bcero yctaHOBT np6op.Kpome TOrO,OnncHo NOdkHouHepe np6opa K 3neKtpocetn.
KomnJIeK TnoCTaBKn
Iocne paacnakOBKn npoBepbTe Bce DeTaII Na OTCyTCTBHe TpaHCnOpTHbIX NOBpeKJdH N KOMPJIeKTHOCTb NOCTaBKn.
Puc. 1
Pn6op no3B0JHET npiroTOBHT MHO rpa3Hoo6pa3HbIX HAnITKOB.
BbIcTpbI BbI6Op
Pnp6op npomBaetc.
EcHnHa naneyn ynpaBneHHn roprT CmBOnblIy BbIbopa HAnNTKOB N KHOIKN, np6Op roTOB K paOte.
COBeT:XeCTKoCTb BoDbl MoXHo N3MeHHTb B IIO6oe BpeM.
"O630p 6a3OBbIX yCTaHOBOK", Ctp.189
06üne yka3aHn
Co6IIOdaIte yka3aHnI dIJI ONTImaJIbHOrO IcNoJIb3OBAHnI npIbopa.
YKa3aHHA
Ha 3aBoJe-3rOToBHTe 3anporpaMMpoBaHbI cTaHdApTHbI e HacTpoKINДЯ ONTImaJIbHO ropeKIMa pa6oTbIpn6opa.
Ha 3aBoJe yCTaHOBJIe ONTtMaJIbHbIy peKIM paBoTb KoΦeMOJKn. EcII N KoΦe BblXOJNT IINb OTdJIbHbIMN KaJIaMn IN CINUJKOM KINIKN I CINUJKOM MaIO neHKn, MoJHO npu paBoTaIOSeI KoΦeMOJKe H3MeHHTb CTeNEHb NOMOA. "YCTaHOBKa CTeNEHn NOMOJa", Ctp.187
EcnBteueHne onpeeeneHHoro BpeMeHN OenepaunynynpaBHeHn np6bOpom HeBblIOJIHJOTcN, np6Op aBTOMaTHuecknBbIKIHOaETc. NITeINbHOCTb MOxHOu3MeHHTB B 6a3OBbIX yCTaHOBkax. "O63Op 6a3OBbIX yCTaHOBOK", Ctp.189
PnHcNoJIb3OBAHmI np6opaHa BeHTINaUHOHHbIX OTBepCTNIX Ha KpbIuKeOTceKa DnI MOIoTOro KoFe o6pa3yOTcKapeJIbKn BObl.
IIO TexHnuecknM npuHnAm n3 npbopa MoKeT BblOAnTb nap.
CoBeTbi
3Byk npn HaKaTNI KHOIOK MOXHO OTKIIOHTb B MeHIO 6a3OBbIX yCTaHOBOK. "O630p 6a3OBbIX yCTaHOBOK", Ctp.189
Pn nepBOM nCnoB3OBAHnn npnbopa, nocne BblnoHHeHn cepBnCHOn npo- rpaMMbl nnn noCne dInTeIbHoro nepepbBa B paOte apomat KoFe B nepBoy cauKe He packpblBaetc B NoHOn Mepe; 3OT KOFe NITb He peKOMeHdyTcN.
MeIkoOpncTa, KpeMoO6pa3HaJ KOcNCTeHcHn PEnbI NocToRHHo OBeCneuBaETc PocLe BBOda Pnp6opa B EKcnly-ataunopnp6opa n npiroTOBHeHn Heckolbknx YaWeK.
ОвICIneПринцпblуУпразВлени
3DecbPpeDcTaBHeHbOCHOBhIe CBeDeHn 06ynpaBHeHHnPnboPom.
BkIIOUeHn E BbIKIOUeHne npioopa
Pn6bOp BkIIOUaETcN BblKIIIOUaETcN KHOIKoO
Pn BkIIOUeHn Ha DnCnIee NOBILReTc nOrOTn Siemens. Pn BkIOUeHn N BbIKIOUeHn BbIOJNHeTc aBTOMaTHueckan pOmbIBKa np6oopa.B npouecce npOMbIBKn Ha DnCnIee OTo6paKaETc CmBBOKanEcn np6oopnpn BkIOUeHn eSe Harpet nnpeed BblKIOUeHem Kofo He roTOBnC, npOMbIBKa np6oopa He BbIOJNHeTc.
PnHroTOBJIeHHe HAnHTKOB
3Decb OINcHo, KaK pNpIroTOBHTb HAnITOK no BaWemy Bb6opy.
I PENEYIPEJKDEHNE OnachocTB ownapBaHn!
CBeXeepnroTOBJIeHHbIe HAnITKn OueHb roPraYne.
Ecnn noTpe6byetca, daTe ocTbTb HannTKam.
H36eraaTe KOHTaKa TbIeJIaHOuNXc HJIKoCTe I napOB c KOKeI.
COBeTbi
HAnitOK MoXHO BbIbpaTb HApPMyo KhoNkAmn 6bIcTpRo BbIbopa. Ha DnCnnnee OTo6paKaetcHAnitOK N TeKyuune HAcTpOKn.
Kpome HAnITkoB, BbIbpaembIX HaKaTHeM KHOJOK 6bICTporo BbIbopa, npi-6op MoKet pnpiroTOBnTB TaKke dpyrHne HAnITKn.
"ПриноьениocobixHaHTKOB", Ctp.185
Bbl MoKeTe HacTpoNTb npH6Op B cooTBeTCTBn C BaIIM INHINBnDyaJIbHbIM BKyCOM.
"HacTpoKnДЯнHaNTKOB", Ctp.186
Yka3aHHA
EcnB TeueHne np6n.5ceKynHn OHa n3 Hactpoek He 6ydet N3MeHeHa, np6op BbIXOHTn3 peXmHa HacTpoeK. BblonHeHHhe HactpoKn coxpaHIOCTaBTOMaTHueckn.
HeKoTObIe HacTpoiKn IpeIOnlaIaOT npiroTOBJIeHne KoFe B HeCKoJIbKO Ⅲa-roB. Joxdntecb OKOHyatelbHOrO 3a-BepWeHnI npoucecca.
PpHroTOBnEHNe KOeHOro HAnHTka N3 CBExHX KoEeHbIX 3epEN
- NocTaBbTe noDorpeTuO uAuKy noD nuc- neHceP.
- Haxmte Ha cHMBoJ KofoeHoro HAntKa 6e3 MoJoka.
Ha dncnlee oTo6paKaIOTcH aHNTOK n TeKyuNe HAcTpoKn.
"HacTpoKnДЯнHaHNTKOB", Ctp.186
ru 06uine npnucnbly nppaBneHna
3.Изменин Habtpoик moхно cneуu-uzimmобpa30M.
- N3MeHInTe KOJIInueCTBO HAnITKa KHOJkoI ml.
"U3MeHeHHe KOJIueCTBa HaIHTKa", Ctp.187 -
N3MeHHTe KpeNoctb KoΦe KhoNkoI
"HacTpoNka KpeNoCTn KoFe", CTp.186 -
HaKMMTe KHOIIKy stop
PnNcNoJIb3OBAHmN KoΦeHbIX 3epeH BblNOJIHReTcN IX CBeXn NOMOI JnKaJDoBapKn.
KoΦeBapKa CBapNT KoΦe HaJIbET erO BuaShKy.
Cobet
PnroToBHeHne HAnNTKa MoXHo npEeK-DeBpeMeHHo 3aKOHcHTb KHOKnOkOstop.
3Decb onncaho npnroToBneHne Ko-FeHbIx HAnNTKOB C MOnOKOM.
"PpHrTOBHeHHe HaHTKOB C MoIokOM", Ctp.184
PnroTOBneHne KofoeHHoro HauHTka n3 MOnToTOro Koo
BHIMAHNE!
Bo3MOxHa 3a6nBka OTeKa dJa MoIOToro KoPe.
He nCnoB3yIte KoFeiHbIe 3epHa.
He nCnoIb3yIte pactBOpIMbl KoFe.
MraKoI uTeOuKo ydaJIte oCTaTK MoIOTOro KoFe B OTCek IJa MOnIoTOro Ko-
Yka3aHHe
Pn npiroTOBHeHH HaHNTKOB n3 MoIOTOr KoOe BbI6Op CJeDyUoXn HAcTpoE KHeBO3MOxKeH.
Довецшкисау
Kpenoctb kohe
- aromaDouble Shot
- NocTaBbTe noDorpeTuO uAuKy noD nHc- neHcep.
-
HaKMTe Ha cIMBOJ HUXHOrO HAITKa.
-
HaxkmaTe KhoNky O, Noka Ha DnCnIe He NoBHTcra "Mol. KoPe".
- OtkpoTe oTceK IJI MOnIToR KoΦe.
- 3acbInbTe He 6oJee 2 MepHbIX loXeK MoIOTOrO KoPe 6e3 rOpKn, MaKc. 12r.
- 3akpoTe oTceK dJa MoJToRo KoFe.
- HaxMMTe KONky stop
KoepaKa CBapnt Kope H 3aTeM HaJIbET erO B yawky.
Cobet
PnIroTOBJIeHHe HAnITKa MoXHo IpeK-DeEBpeMeHHO 3aKOHyHTb KHOKnOi stop.
ДлпnpiroTOBHeHЯ eue OdHOro HaHNTKa n3 MoIToToro KoΦe NOBTopHTe npOceCC.
3aŋpykaTe MoIobI KoΦe Bcerda He-nocpeDCTBeHNO nepeI npnroTOBneHn-Em HaNTka.
PnHrTOBJIeHHe HAnHTKOB C MoJOKOM
B npbope MoKHO npiroTaBnBaTb Ko- fHbIe HAnITKn C MOIOKOM MOnOuHyo neHy.
COBET: Bbl MoKeTe BMeTo MOnoKa TaKKe HcNoJIb3OBAb HaHITKn H3 paCTHTeJIb-Horo cbIpBa, HanpIMep, H3 CON.
Yka3aHHe:KauecTBo MOnOuHoi NeHbI 3aBnCIT OT BnDa HcNoJIb3yEmoRO MoLOKa NnHaNITKa I3 PaCTtTeNbHorO cbIpBa.
I PNEyNPEKJDEHNE Onachoctb oxorob!
CnCTema nOdaun MOJOKa CnJIbHO HArpeBa-etca.
HnBkoem cnyuae He npKacaiTecb K cnCTeMe noaun MoIoka.
- Pered KONTAKTOM C ropaye cnCTeMoI noDaun MOJOKa daTe ee ocTbITb.
BHIMAHNE!
OcTaTkn MoIoka MOryT 3acoxHyTb, INx 6y- Det Tpydno ydaJIHTb.
- Pocne KaKdoRo HcNoIb3OBAHnHa Heo6XoIMo OuNtB CnCTeMy NpaHm MoJIOka.
"OuHcTKa cHcTeMbI NoJaUN MOJOKa", CTp.193
PnroToBleHne KofoeHoro HAnHTka c MOJOKOM
Heo6xOaHmBle yCNoBna
山naHdI MoIOKa NoDcoeINHeH.
BcacsBaHouaTpy6KaNoDcoEHHHeHa.
- Iorpy3nte KOHeu BCacbIbaIoUeN Tpy6Kn B MoJIOKO.
- NocTaBbTe noDorpeTyU qaUKy nOД dHc- neHceP.
- Haxmte Ha cHMBoJ KofoeHoro HAnITKa C MOnKOM.
Ha nucnlee oTo6paKaHOTcHaHNTOK m TeKyuune HAcTpoKn.
"HacTpoKnДЯнHaNTKOB", Ctp.186
4.ИЗмЕнITь HabТpoиКи можно слedyюшимобpa3OM.
-
N3MeHInTe KOJIInueCTBO HAnITKa KHOJkoI ml.
"H3MeHeHHe KOJIuYeCTBa HaIHTKa", Ctp.187 -
N3MeHnTe KpeNoctb Kofoe KhoNkoi
"HacTpoNka KpeNoCTn KoFe", Ctp.186
IcnoB3yIeOTceKdMOnOTOro KoΦe.
"PpHrOToBnEHHe KoFeHOro HAnHTKa H3 MoNoTORo KoFe", Ctp.184 -
HaxMMTe KhoNky start n DoXdntecb OKOHyateJIbHOro 3aBepWeHn npoecca.
CnCTema noaMOnoka nocne npiroTOBJIeHnHaNTka aBtOMaTnueckn OuNlaeTcKpaTKOBpeMeHHo Npaoe Napa.
Cobet: TTo6bl npExKeDeBpeMeHNo 3aKOH-HTb npiroTOBHeHne, HaxMnTe start. TTo6bl npexKeDeBpeMeHNO NIOHOCtBu 3aKOHHTb npiroTOBHeHne, HaxMnTe 日
PnuroToBnHeHne 0co6bIX HanNTKOB
Kpome HAnHTKOB, BbIbpaembIX HaKaTneM KHOOK 6bICTpOro BbIOba, PnIObOP MOKeT pNtROBOTb TaKke DpyrNe HAnHTKn.
HaKMMTe KhoNky HeckoJbKO pa3. "IpeueHb HAnITKOB", Ctp.179
PnHrTOBHeHne MoJOh neHbI
Heo6xoJnMbIe ycNoBna
LJnHr Dnra MoIoka NoDcoeINHeH.
BcacsBaHouaTpy6Ka noDcoEHHena.
I PENEYIPPEK.DEHNE OnachocTB oXorOB!
CnCTema noaun MoIoka cnIbHo HArpeBa-etca.
HnB Koem cnyae He npikacaiTecb K cnCTeMe noDaun MOIoka.
- Pered KoHTaKToM c rOpAe CnCTeMoI noDaun MOJOKa DaIte ee ocTbITb.
1.ПогузITEКоheц BCacsbIbAIOUeI Tpy6- KIN BMOJOKO,HaNPIMep,B ynaKOBky Tetrapack.
2. NocTaBbTe noDorpeTyU yauKu noD nnc- neHceP.
3. Haxkmaite KhoNky, noKa Ha DnCnIee He noBHTcR "Mono. PHea".
4. Пи HeобхODIMOCTN ИзмeнITE Ha-ctpoiKy.
- N3MeHInTe KOINueCTBO HAnHTKa KHOJKOJ ml.
"U3MeHeHHe KOJIuYeCTBa HaIITKa", Ctp.187
- HaxMMTe KhoNkY stop
MoNoHa nHa BbIXoHnI3 IncpeHce- pa.
6. 4To6bl nepeKpaTntb npnroTOBneHne, HaKMITE KHOIky start stop.
PpHroTOBHeNHe rOpuey BoDbl
Heo6xOaHmBle ycNoBna
CnCTema nOdaun MOnoka oUHueHa. "OChTka CnCTembl NDoaun MoIoka", Ctp.193.
山naHdMOnoKaOTcoeInHeH.
I NPEyNPEK.DEHNE OnachoctbOxorob!
CnCTema noaun MoIoka cnIbHo HaraeBa-etca.
Hn B koem clyuae He npikacaiTecb K cnCTeMe noDaun MOIoka.
IpeeKoHTaKToMc rOpaye cHCTeMoI NOdaunMOIoka daIte ee ocTbITb.
Yka3aHHe: Ecnn CnCTema noDaun MoIoka He ouHneHa, To He6oJbUoe KOINcTeBO MOIoka MoKet 6bITb pa3JIInTO BmecTe C BOdoi.
- NocTaBbTe noDorpeTuO uAuKy noD nCneHcep.
- Haxkmaite KhoNky, noKa Ha DnCnIee He NoBHTcR "Topyar BoJa".
-
Пи HeобхoДиМоCTи ИзмeнITE Ha-ctpoiKy.
-
IV3MeHInTe KOJIInueCTBO HAnHTKa KHOIIKOJ ml. "IV3MeHeHne KOJIInueCTBa HAnHTKa", Ctp.187
-
HaKMITE KONKY stop
Ecni noBnreTc coo6eHne "Otco- eDInHTe Tpy6ky nIy MoIoka.," otCoEINHtte WlaHr dIy MOnOka nHaXMMTe KHOIIKY start stop.
TogpaB0da BbIXOHTN3IncnEhcepa.
5. YTo6bI nepeKpaTb npnroTOBneHne, HaKMITE KHOINKY start stop.
HactpoKnДЯ HAnHTKOB
PnHrTOBbTe HAnHTOK NO BaWcEmy Bkycy.
HactpoKa Kpenocn KoFe
-
HaKMITE Ha cIMBOJ HUXHOrO HAITKa.
-
4To6bl BbI6paTb KpeNoctb KoΦe, Ha- XMITE KhoNkY
Bb moxete Bb6paTb cneyuOuNe Ha-ctpoKn KpeNoCTn KoΦe:
- cna6bni
HOpMaJIbH.
-KpeπKn - ouehb KpeKn
- aromaDouble Shot
Cobet: TTo6bI coXpaHnTb HHTeHCNBHbI Bkyc KoFe, PnI 6oJIbWOM KOJInuYeCTBe HaNTKa Bbl6epnte HactpoKy 6oJIbWeJ KpeNoCTn.
Bb6op monotoKofo
- HaKmTe Ha cIMBOJ HUxHOrO HaNTKa.
- HaxkmaIte KhoNky O, noka Ha duCnIe He noBHTcA "MOn. KoΦe". "PpHroTOBJIeHne KoΦeHOrO HAnHTKa m3 MoJToT O KoΦe", Ctp.184
aromaDouble Shot
Bbl Mojke Te npiroToBnTb ouheb KpeKni KoFe, nCNoJIb3OBAv FyHKcHIO aromaDouble Shot.
YemdoJIbe 3aBapNBaETcRA KoFe, Tem 6oJIbe TropkIX BeIeCTB H HeKeJatelh bix apOMaTOB nonaJaet B HanITOK. TOpkne BeIeCTBa H HeKeJatELbHbIe apOMaTbI OTPiUaTeJIbHO BnIHOT Ha BKyc N DeJaOT KoFe MeHee npAHTbIM DnI yNtpe6JeHn. IocIe npiroTOBHeHn NOLOBnHbI npiroTaBnBaEMOrO KOInueCTBa KoFeHbIe 3epHa 3aHO Bo nepMaJIbBAIoTcN 3aBapNBaOTc Ese pa3,B pe3yJIbTaTe Yero NOnyuaTeCBKChBI KoFe C npAHTbIM apOMaTOM.
Cobet:ФункциaromaDouble Shot MoXHo NOLb3OBAtbcraДЯnpiroTOBHeHna BCEx KoFeeHbIX HaNTKOB C KOInueCTBOM KoFe He MeHee 35 Ml.
Yka3aHHe:ФyHKua aromaDouble Shot BO3MOxHa He DJIa BCEx HaNTKOB INX KOJIInueCTB.
I3MeHeHne KOInHuEcTbHa HanHTka
- HaKMITE Ha cIMB0J HUJKHO RaHNTka.
- Haxkmaite KhoNky ml, noka Ha DnCnlee He NoaBnTcH yXHoe KOJIue-CTBO HAnNTka.
PpuroToBJeHne DByx Cpa3y
B 3aBnCmOCTOn OTnna npN6opa dIaONpeJeHHeHHx HAnNTKOB MoXHO pNroTOBnTb DBe YaAaKn OJHOBpeMeHHo.
Yka3aHne
Ecn He nCnObl3yetc HOBbI ΦHbTp, Bbl-6epnte "Het fHbtpa" n cIeDyIte yka3a-HnM Ha dncnlee.
1.Погу3nteФильтдяВоыВCTaKaH BOыИ NOДОЖДNTe,пOKаБиДТВ03- dYx. →Pnc. 3
2 HaKmTe KhONky menu
3. KhoNkoI Vnn A Bbl6epnTe "ΦnIbTp DnA BoDbl" n HaKMnTe ok.
4. KhoNkoI ∨ nII ∧ BbIepeIte "HObbl ΦIbTp" nII "3aM. φ. dIy BoDbl." I HaJxMnte ok.
5. Yka3aHHe: Ecnn He nCnOJIb3yETcHOBbIiФnJIbTp, Bbl6epnte "HetФnJIbTpa"BHaCTpOJkax MeHIO.
UaMK MoXHo NoDOrpeTb,NoIb3yAcb NoDOrpeBaTeJeM UaWeK.

IPEDYIPEXDEHNE
Onachoctb oxorob!
IopOrpeBaTeIb yauweK cnIbHo HArpeBaETcra.
HnB Koem clyuae He npikacaiTecb K ropaemy noDorpeBaTeIIO YaWeK.
- IpeepKoHTaKToM c rOpAum NoDOrpeBaTeIeMaWeK DaIte Emy OcTbITb.
COBeTbi
I OdoIgpeBaTeJIb YaIeK MoJHo BkHIOuHTb N BbIKIOUHTb B 6a30BbIX yCTaHOB-Kax. "O63Op 6a30BbIX yCTaHOBOK", Ctp.189
ДлЯ ONTIMaJIbHOrO NOdOrpeBa yCTaHOBnTE YaUKNДHom Ha NDoOrpeBaTeJb.
Ba3ObIe yCTaHOBKn
Bb MoKeTe BbIIOJIHnITb HacTpoKy npIbopa corIaCHO BaIIM NOTpe6HOCTAM N BbI3BaTb DoIIOJIHnTEbHbIe yHKuN.
0630p 6a3oBbIX ycTaHOBOK
H3MeHeHHe 6a3OBbIX yCTaHOBOK
- HαχΜΙTe KΗΝΚγ menu。
- Bb6epnte nocpeDCTBOM nHn HJxHyo 6a3OByU yCTaHOBky n HaKMnTe ok.
HaДисплго OTo6paKaIOTcB03MoKHOCTN HAcTpoEк 3aRopaIOTc CnMBOJIдЯ HabIrGaUN. HaДисплго OTo6paKa-ETcTekyUaHacTpoiKa.
- BbINOHnTe NocpeDCTBOM ∨ nI HJHKHbI BbIOp I HaKMnTe Ok.
Hactpoika coxpaneHa B namATn.
4.ДЯ BO3Bpata HaKMITE
5.ДЯВыховиЗМeнюHaЖмИte menu
OuHcTka n yXoJ
Длд Долговремен Ho Истразов рабтblпбора Требует сero Tцатьнан OчNTka n yxOD.
PnroDnblIaMbITbB NocyDoMoeHou MaHHe

IoAnOHnK
Pewetka
KoHTeHep dJa KoFeHOn rY-
Mexanhueckynyka3aTeIb ypoBnHaonHeHn
Cnctema noaun MoloKa c aanTepor
OTCEKДЯ MONOTOKoΦe c OTKINHOH KpbIshKOJ
IopdoH
He npiroDnbl IJI MaIbB B nocy- domoeuHm MaunHe

Pe3epByap nla BoDbl
KpbIkwKa eMKoCTn DJI BODbl
KpbIka, coxpaHoua apoMaT
3aBaOpHuBb6nok
KoKyx dncnHcepa
UHCTAaee cpeCDTO
Hnke yka3aHbI cHCTaUne cpeAdCTBa, npu-roDhbIe IaBaJero npn6opa.

IPEDYIPPEXDEHNE
BbICOKa onachocTb IJIa 3IOPOBbI!
Mooune JxuKoCTM MoryT cTaB npuHnoyuepe6a 3doPoBbO.
Kateropueeckn 3anpeucaetc nntb moIOUne KNDKoCTN.
HcnoIb3yIte cpeICTBa IaIydaJIeHNHaKINnIOUHCTKNB COOTBeTCTBN C HNCTpyKUnE,Co6IIIOJaIprn 3tOM COOTBeTCTByIOUne yKa3AHNn IO TexHnke 6e3ONaCHOCTn.
BHIMAHNE!
HenoXoJyIe YnCTaIe CpeDCTBa MoryT NOBpeNtB NOBepxHocTn npNoopa.
He nCnoB3yIte arpeCnBhIe nn a6pa- 3NBHbIe uNCTaIune cpeIcTBA.
He nCnOJIb3yIte MoIOUe cpeIcTBA, coIepKJauIe aIKoRojI b IIN CnIPT.
He nCnoJIb3yIte JxecTkne MoaJkn nn ny6kn.
Дя удаленя haKINи He nCNoIb3ynte JIMOHHyO KNCIoTy, yKCyc NIn CpeDCTBa Ha OCHOBe yKCcyca.
Дя удаленя haKINи OuNCTKNИc- noJIb3yIte TOnbKO nOxOJaUne Ta6NeT-KN.
COBeTbI
IcnoIb3yIte TaIbIeTKn Ia ydaIeHna HauKnnu OucNCTKn, CneuaJIbHo npEJa3HaueHHbIe Ia BaIero npIbOpa. Bbl MoKeTe npNo6peTn TaIbIeTKn Upe3 cepBnCHyIO cnyKoby. "PpHaJdJIeXHocTb", Ctp.180
TtataIbHO npOMoTe HObIe rHycbaTbe caJIfoTeKN, UTo6bl ydaIHTb CoN, KOTOpbIe MOrY TmEtbcRa HnX. CoN MoRyT npINBeCTn K o6pa3ObaHnIO HaJIeta pKaBUNbHa NoBepxHoCTaX n3 CTaII.
Berda cpa3y ydaJIaINe octaTKn HaKIN, KoFe, MoLOKa, MOIOx CpeCTB n CpeCTB dIy ydaJIeHn HaKIN ydaJIaI- Te HeMeJLeHNo, YTObI npedOTbpaTntb 6bpa3OBAHHe Koppo3nn.
Ouictka npH6opa
PNEpyNPEKDEHNE
Onachoctb nopakHeHHaJIeKTPnueckHM TOKOM!
- OuHCTHTe OTceK IJIa MoIOTOro KoFe, NJIb3yrcb MOUcIM CpeDCTBOM.
$$ \rightarrow \mathrm {P u c .} 7 $$
- BbicyuHTe OTeK dJa MoIOTOro KoFe n BcTaBbTe B npH6Op.
OuHCTKa CnCTeMbI NOaCh MOnoka
I PENEYNPENKDEHNE Onachoctb oxorob!
CnCTema noDaun MOJOKa CInbHo HArpeBa-etcra.
HnBkoem cnyuae He npKacaiTecb K cnCTeMe noaun MoloKa.
- IpeeKoHTaKToM cTropauecNCTeMoI NOdaH MoIoka daTe ee OCTbITb.
BHIMAHHE!
Pn HnPaBnBHO OuNCtKe Bo3MOxHbIOBpeKdEHNp6opa.
He nomeuaitekoxydxncencepab NocyuDoomoeuHyoMaunHy.
Cobet
Длгocobo TшаTeьночсTKn CNTeMbI NOdaun MOJOKa MOKHNO HcNoJIb3OBaTb cepBnCHyo nporpaMMу «ОчсTKa CNTeMbI NOdaun MOJOKa>. →"IporpMaДЯ OчсTKn CNTeMbI NOdaun MOJOKa", Ctp.195
Bce KOMnoHeHbI CnCTEmbl Noaun MoJIOka MOxHO MbITb B NocydomoeyHoMaunHe.
- Onyctnte duinceHcep do ynpa Bn3.
- Chmnte KoKxu, noJaB Bnepei, nocJe yero OTCoeDInHTe WlaHr DnA MOnoka. Pnc. 5
3.ИЗВЛЕКИТЕ снСТЕМУ NOДАЧNOЛOKA, NOТЯНΥВ ВПЕРЕД. →PиC. 8 - Pa36epnte BepxHIOU HNHHIOU yacTb cnCTembl NOdaun MOIoka. →Pnc. 9
- OToeDHHTe ⅢaHr dIy MoIoka N BcaCbIBaOuYIO Tpy6Ky.
-
OuHCTHTe KOMNHOHeHTbMbIbHbIM pactBOPOM MmRKOJ TKaHbIO. Pnc. 10
7.ПомоTe BCE KOMnoHEtbl ChCTOи BO-DoI N BbICyWnte HX. →Pnc. 11 -
Nocle npomblkntaateIbHo ydaHnTe octaTKMblbHOro pactBopa n3 cHcTeMbI NOdaH MOnoka.
- CObepnte BepxHIO HnHXHIO yacTb cnCTembl Npaun MoJoka. →Pnc. 12
10.ПодсоeДиHнTeшlaHrДЯМолoka. - Onyctnte duinchencep do ynpa Bn3.
12.BcTaBbTe CnCTeMy noaM MoIoka B npu6op cpeepi 6e3 nepekoca. Puc. 13
13.YcTaHOBIne Ha MeCTo KoxyX.
14.ПодайтЕ ДИСпЕнсерdo OТka3a BВeрх. →Pиc. 14
OuHCTka 3aBapouHOro 6noka
IOnOHnTeBHO KaBTOMaTHuecko npOmblBKe Heo6xoJnMo peyJnRpHo BbIHMaTb n OuHnAaTb 3aBaOpouhbl 6NoK.
I PNEyIpyKJEHNE Onachoctb oxorob!
HekotopbIe qactn npnbopa cnblho harpeBaIOCTa.
He npikacaiTecb K ropaHm qactm npibopa.
- Pered KoHTaKToM C rOpAChm YacTAm np6opa daTe NM OCTbIb.
BHIMAHNE!
Pn HnPaBnBHO OunchKe Bo3MOxHo nOBpeXdHne np6opa.
He nCnoJIb3yIte moIOuIne cpeIcTBA.
He nCnoB3yIte YnCTaIuIe CpeDcTBA, coDePkaIue yKcyc N KncIoTy.
3anpeaetcMbITbBnoCydomoeyHmawinHe.
- OToeDInHTe UJnAHr IJRA MOnOka OT DnCnEhcepa. Pnc. 5
- KhoNkoBbIKIOHnTe npNoOp.
-
OTKpoIte DBepuy KInIaTINbHnka. →Pnc. 15
-
BbInbTe nOdoH c eMKocTbIO dIa Ko-ΦeINHOI rUuN.
Pnc. 16
5.ПоДнHMITEВБЕХКрасьпpbiur.
6.Bo3bMnte 3aBapOchHbI 6JOK Ha pyky n octopoKHO BbIHbTe ero, NotaHyB BnepeJ.
Pnc. 17 - TsqaTeIbHo BbIMoIte 3aBaOpUhB I6JIOK TeJIIOI npOTouHOBOdoI.
Pnc. 18 - TsqatelbHo OunchTe BHyTppeHHee npoctpaHCTBO npnbopa BlaJxHn TKaHbU ydaJIte OctaTKn KoFe.
- Побождente, пoka 3аВарочьи 6лOKи BHyтpeHHee npoctpaHCTBO npi6opa BblcoxHyT.
10.Bo3bMITE 3aBapOuHbI 6IoK 3a pyUKy.
11.ПоднмITE Вьрх Красный рыuar.
12.YctaHOBInTe 3aBaPoUHbI 6JOK PoD pbl- yar n 3aDbHbTe eO Ha3aD Do yNopa.
Pnc. 19
PbUarФИКсИPyeTcIa.
13.BcTaBbTe NOdOH c eMKoCTbH dIa KofeHnOH rUuN.
Pnc. 20
14.3aKpOte DBepey.
Pnc. 21
Доверу можно 3аКрьт bToЛько npn yCIOBи, qTO 3aВapOчнbI 6JIoK n PoД-дОн павиьho yCTaHOBJIeHbl.
CepBnchIe npOrpaMMbl
Yepe3 onpeIeJIeHHbIe npOMeKytKn BpeMeHn peKoMeHdyeTc3aynyckatbB npIbOpe cepBnchIe npOrpaMMbl. HcnoJIb3yIte cepBnchIe npOrpaMMbl dIJI TuaTeJIbHOJ OouNCTKn npIbopa.
BHIMAHHE!
Pn HnepaBnIbHOM nHn HecBoeBpeMeHnHOM BblIOJIHeHHOuNCtKN yDaJIeHHaKnn BO3HnKaet ONaCHocTb NOBpeKdeHn.
HemeIeHHo BbIOnHnTe npOcecc ydaJIeHnHaKnnCOrnaCHO HcTpyKun.
He 3a rgykaite Ta6leTkn Iya ydaJIeHnHaKINI npOuHne cpeIcTBa B OTeK dIaMOIOTOro Kofoe.
B 3aBnCmOCTOn CTeNeH JKeCTKoCTN BObl N IcNoIb3OBaHN IprbOpa Ha IancPiee nocne npdeynpeJxDeHNIOABJIHOITc CneDyUOuNE COO6UeHN.
"OuHCTIte cHCTeMy IOpaUn MoIoka."
"Tpe6yETcY ydaJIeHHe HaKInn. HauKaTb MeHIO 3 cek."
"Tpe6yeTc8 ouHCTka. HaKaTb MeHIO 3 cek."
"Tpe6yetcra calc'nClean. HaxaTB MeHIO 3 cek."
Yka3aHHa
IinCnIeN poka3bIbAeT dInTeJIbHOcTb npocecca.
EcnB npbope cBoeBpeMeHNo He ydaJeHa HauNt, DnCnIe Noka3bBaet "YdaJeHne HaKInn IpocpOeHo. Pnp6Op 6JokIpOBaH. HaxTaB MeHIO 3 ceK."
Ecn npn6op 6IoknpoBaH,IM MoKHO 6ydt CHOba NOJIb3OBAbCra TOnJIbKO nOcne BblIOJNHeHHoro ydaJIeHnHaKIN.
EcnBbI cnyaHNO npepBaHn cepBncHyIO npoRpaMMy, Heo6xOAnMo 3anyCTNtBe ee 3aHOBO. "PobTOpHbI 3aynck cepBnsHOn npoRpaMMbI", Ctp.195
CoBeTbi
Ecnnncnoj3yeTcnaIbTp dna BOdbI, nepnoD do BblnoHHeNra cepBnchoi nporpaMMby yBeJIuHnBaETcna.
YdaiHHe NaKInn OoNCTky MoJHo BblIPOJIHTb COBMeCTHO B cepBnCHoi npOrpamme calc'nClean.
"Pporpamma calc'nClean", Ctp.196
IIO OKOHuaHn cepBnCHoI npOrpaMMbI cpa3y npOtpnte np6Op MmKo BlaJXHO TKAHBIO, YTO6bl ydaJIHTb OCTaTKn pactbopa dnydalaenHaKUnn N 36eKaTb Kopp03nN.
YcTpaHHe HEnCnPaBHOCTeI
MeKne HencnpaBHOCTn np6opab Bbl MOKeTe ycTpaHHTb camocToTebHO. NpeTe KAK o6paTHTCB CepBHCHyO CnyK6y, BOCNoJIb3yIteCb INHΦOpMaunEe O6 ycTpaHeHHN HeNCpapBHOCTe. 3TO No3BOJNT Bam H36ExKaTb HeHyXhIx 3aTpat.
PPEyIpeJ.DEHNE
Onachoctb nopaxeHn 3JeKtpnueckHM TOKOM!
Pn HeKbAinHnIuropoBaHHom pEmOHTe np6Op MoKet CTaTb HCTouHkOM ONaCHOCTN.
PemOHnPoBaTb np6op pa3peaetcToIbKo oBuyeHHbIM cneuaHIncTaM.
C6oH B pa6oTe
Tpy6ka nodaun Mooka He norgykeHa B MoIokO.
Pnup6op roTOB K pa6oTe.
Pe3epByap IJI B0BJI HAnOnJHeH.
BHIMAHHE!
Bo3MOxHbI NOBpeJdeHnI np6Opa npITpAHCnpOTnpOBKe IIN XpaHeHH BCJeCTBHe OCTaTKOB KInKoCTN B pN6Ope.
- Ipeep TpaHcnpTIpOBKoI nn Nome- ⅢeHnEM Ha XpaHeHne ONOpOxKnTe CnCTeMy nDaun JnKDocTn.
- YctaHOBInTe IOd IINcpeHceP eMKoCTb 60JIbIoro OObema.
- HaxMMTe KhoNky N BbIbepnTe "MoNo. Pena".
- HαχΜιTe KΗΝΟύΚy stop
4.ИЗВLEКИte pe3epByap ДЯ ВОДbl.
Пибов abTomatneckn cnBaet JNIOKoCTb n3 Tpybok n OTKJIHOyaeTcra.
5. Onopokhnte pe3epByap IJIa BOblI IOdoH.
6. TúaténbHo OuChiTe Ipn6op.
YtHn3auncStaporo 6bITOBORo np60pa
YTNIN3aUNB COOTBETCTBUN C Tpe6oBAHNAM 3KOLOgHNOOBecNEuHBaeT BO3MOK-HOCTb BTOPNHOrO INCNoJIb3OBAHnI CEHHbIX cbIpBeBbIX MaTePnaNoB.
- BbInbTe n3 po3eTKn BnIKy ceTeBOrO ka-6eIa.
- 06peKbTe ceTeBoi Ka6eIb np6opa.
- YTHNJH3NpyIte npH6Op B COOTBEcTBn C Tpe6OBaHNrMn 3KJONOrnN.
Даньи пибор Имeel обз�数е В COOTBetCTBNe C Tpe6BaHnA MIn peKTHBbI EbpocOTo3a 2012/19/EU o6 OToxodax элкгческого и олк- trpoHHoro obopydoBaHn (Waste electrical and electronic equipment - WEEE).
DAnHnA DnpeKTHBa OnpeDeIaTeTBeNCTByIOUeNe Ha TeppInTopn EbpocOio3a npaBnIa Bo3Bpata N yTINn3aunCtapoi 6bITOBW TexHKn.
CepBnchna cnjx6a
Ecn y Bac HMeHOTc BOpocbl, Bam He ydaetc cAmocToTEnbHo yctpaHnTb HenCnpaBnOCTb pIn6opa nn Tpe6yEtc OTpeMOHTnpoBaTb pIn6op, o6patntecb BaHsy cepBnCHyO cnJx6y.
MHorne HenoJaKn Bb CMOKeTe yCTpaHnTb CaMoCToTeJIbHO, BOCNoJIb3OBAuBIsncb INHOpMaunEe B daHNO IHCTpyKcNn IIn HaHaWe Me Be6-caIte. EcnI 3To Bam He ydaCTcra, ObaTntecb BaHaU cepBnchHyO cnlyk6y.
Mbl Bcerda NaHdEm nOxOJaUe peuHne.
PnpraHTHnHOM 6cnykHBaHHN nno HCteueHHn rapaHTHn npOn3BODnteJI Mbl oBeCneuHm peMOHT BaUero npNoBopa oyUyeHHbIMn CpeUHaIInCTAmN cepBnCHoN cLyKbIC nCnOJb3OBaHHeM opINHaJIbHbIX 3aNaChbIX DeTaleJ.
Yka3aHHe: PnBbIIOJIHeHH rapaHTNHBIX yCIOBNI pOIN3BOJNTeIraPbOtbl BbIIOJIHaIOTcA cepBnCHOn cnyX60B 6ecnJIaTHo.
Pn o6paueHn B cepBnchHyo cJyK6y yKaKnte HmOp n3deJnra (E-Nr.) n 3aBoDcKoH Nmep (FD-Nr.) np6bopa. AApEc n TeJeFOH cepBnCHOn CJyK6bl MoKHO HaTn B pInJaRaEMOM IpeueHe cepBnCHbIX cJyK6 B KOHc EHCtpyKcHn IIN Ha Hauem Be6-caTe.
Homep E n Hoomep FD
Homep E HOMep FD yka3aHbHa hIpyMeHHoT Ta6nUKe np6opa. YTo6bI 6bICTro HoT DaHHbIe np6opa HOMep TelefoHa cepBnCHoN cnyKbI, Bbl MoKeTe 3aHnCaTb 3TN daHHble.
TapaHTnHbIe ycJIOBnA
BbI nmeete npaBo Ha rapaHTnHoe o6cnyKINBaHne BaWero npnbopa B COOTBeTCTBnCO cNeDyUOUMN yCNOBnAMN.
Ionyntb hcyepnbBaHou HhOpMaunio 06 ycnobnax rapaHTnHoro 06cnykBaHnB Bbl MoKeTe B BaWe m 6nJaWem aTOpN3ObaHHOM cepBnchom ceHTpe, ININ B cepBnCHOM ceHTpe OT pOn3BOJNTeJI OOO «BCX BbITOBaTexHnKa», ININ B coPpOBoJNTeJbHoJ DOKyMeHTaUIn.
TexHnueckne xapaKTepeNCTHKN
3ndeBbI HauDeTe UINΦpbl I ΦaKTbl, OTHOcAunecK BaWemy npnbopy.
| Нарожени | 220-240 B ~ |
| Частota | 50 Гц |
| Потреблелемая мошноctь | 1500 Вт |
| Мakсималъные пост- насоча, статчhoe | 15 бар |
| Мakсималъные вмост- посъ peзервая ддя Вовъ (бeз Фильста) | 1,7 л |
| Мakсималъные вмост- посъ EMКОCTь ддя КО- фейнъх зерен | 270 г |
Central Service Contacts
A United Arab Emirates,
E
BSH Home Appliances FZE
Round About 13, Plot Nr M0-0532A
Jebel Ali Free Zone - Dubai
Tel.:048814401
mailto:service.uae@bshg.com
www.siemens-home.bsh-group.com/ae
unter: www.siemens-home.bsh-group.at
Gate 1, 1555 Centre Road
Clayton, Victoria 3168
Tel.: 1300 167 425
mailto: aftersales.au@bshg.com
www.siemens-home.bsh-group.com/
au
*Mo-Fr: 24 hours
www.siemens-home.bsh-group.com/
be
B Bahrain,
H Khalajfat Est.
P.O.Box 5111
Manama
Tel.: 017400553
mailto:service@khalaifat.com
B Belarus, Belapycb
Y 000"5CXbIToBaTExHnKa"
ten.: 4957372962
mailto:mok-kdhl@bshg.com
C Schweiz, Suisse, Svizzera, Switzerland
H BSH Hausgeräte AG
www.siemens-home.bsh-group.com/ ch
C Cyprus, Kūnpoc
Y BSH Ikiakes Syskeves-Service
39, Arh. Makaariou III Str.
2407 Egomi/Nikosia (Lefkosia)
Tel.: 777 78 007
mailto:bsh.ser
vice.cyprus@cytanet.com.cy
C Ceska republika, Czech Republic
www.siemens-home.bsh-group.com/cz
D Deutschland, Germany
www.siemens-home.bsh-group.com/dk
Espana, Spain
www.siemens-home.bsh-group.es
F Suomi, Finland
BSH Kodinkoneet Oy
Italahdenkatu 18A,PL 123
00201 Helsinki
Tel.: 0207 510 715*
mailto: Siemens-Service-FI@bshg.com
www.siemens-home.bsh-group.com/fi
www.siemens-home.bsh-group.fr
Grand Union House, Old Wolverton
Road.Wolverton
Milton Keynes MK12 5PT
To arrange an engineer visit, to order spare parts and accessories or for product advice please visit
www.siemens-home.bsh-group.com/
uk Or call Tel.: 0344 892 8999*
*Calls are charged at the basic rate,
please check with your telephone ser
vice provider for exact charges
G Greece, EAMaC
R BSH Ikiakes Siskeves A.B.E. Central Branch Service 17 km E.O. Athinon-Lamias & Pot-amou 20 14564 Kifisia TnAefovo:2104277701 TnAefovo:18182 mailto:nkf-CustomerService@bshg.com www.siemens-home.bsh-group.com/gr
H Hong Kong,香港
K BSH Home Appliances Limited
Unit 1 & 2, 3rd Floor, North Block, Skyway House, 3 Sham Mong Road
Tai Kok Tsui, Kowloon, Hong Kong
Tel.: 2565 6151 (HK)
Toll free 0800 030 (Macao)
mailto: siemens.hk.service@bshg.com
www.siemens-home.bsh-group.com.hk
Republic of Ireland
BSH Home Appliances Ltd.
M50 Business Park, Ballymount Road
Upper, Walkinstown
Dublin 12
To arrange an engineer visit, to order spare parts and accessories or for product advice please call Tel.: 01450 2655
www.siemens-home.bsh-group.ie
Calls are charged at the basic rate, please check with your telephone service provider for exact charges
Israel
C/S/B/ Home Appliance Ltd.
1, Hamasger St., North Industrial Park
Lod, 7129801
Tel.: 08 9777 222
mailto: csb-serv@csb-ltd.co.il
www.siemens-home.bsh-group.com.il
I India, Bharat, Maharashtra
N BSH Household Appliances Mfg. Pvt. Ltd.
Arena House, Main Bldg, 2nd Floor, Plot No. 103, Road No. 12, MIDC, Andheri East
Mumbai 400093
Toll Free 1800 209 1850
www.siemens-home.bsh-group.com/inMo-Sa: 8.00am to 8.00pm (exclude public holidays)
I Iceland
S Smith & Norland hf.
Noatuni 4
105 Reykjavik
Tel.: 0520 3000
www.sminor.is
Italy, Italy
BSH Elettrodomestici S.p.A.
Via. M. Nizzoli 1
20147 Milano (MI)
Tel. 02 412 678 200
mailto:info.it@siemens-home.bsh-group.com
www.siemens-home.bsh-group.com/it
L Lebanon,
B Tehaco s.a.r.l Boulevard Dora 4043 Beyrouth, P.O. Box 90449 Jdeideh 1202 2040 Tel.:01255211 mailto.info@teheni-Hana.com
L Luxembourg
U BSH électroménagers S.A.
13-15, ZI Breedeweues
1259 Senningerberg
Tel.: 26349821
Reparaturen: lux-repair@bshg.com
Ersatzteile: lux-spare@bshg.com
www.siemens-home.bsh-group.com/lu
M Malta
T Aplan Limited The Atrium
Mirehel by Pass
BKR3000 Birkirkara
Tel.: 025 495 122
mailtlo:lapap@aplan.com.mt
N Nederland, Netherlands
L BSH Huishoudapparaten B.V.
Taurusavenue 36
2132 LS Hoofddorp
Storingsmelding: Tel.: 088 424 4020
Onderdelenverkoop: Tel.: 088 424 4020
mailto:siemens-contactcenter@bshg.com
mailto:siemens-onderdelen@bshg.com
www.siemens-home.bsh-group.nl
N Norge, Norway
O BSH Hushholdningsapparater A/S
Grensesvingen 9
0661 Oslo
Tel.: 22 66 05 73
Tel.: 22 66 06 00
mailto: Siemens-Service-N0@bshg.com
www.siemens-home.bsh-group.com/
no
P Polska, Poland
L BSH Sprzegt Gospodarstwa Domowego Sp. z o.o.
Al. Jerozolimskie 183
02-222 Warszawa
Tel.: 801 191 534
mailt: Serwis.Fabryczny@bshg.com www.siemens-home.bsh-group.pl
P Portugal
T BSHP Electrodomesticos, Sociedade Unipessoal Lda.
Rua Alto do Montijo, n° 15
2790-012 Carnaxide
Tel.: 214 250 720
mailto: siemens.electrodomesticos.pt@bshg.com
www.siemens-home.bsh-group.com/pt
R Romania, Romania
O BSH Electrocasnice srl.
Sos. Bucuresti-Ploiesti, nr. 19-21, sect.1
13682 Bucuresti
Tel.: 021 203 9748
mailto:service.romania@bshg.com
www.siemens-home.bsh-group.com/ro
R Russia, Pocnia
U 000 «5CX BbTObIe PnIbOpbl»
CepBvC ot pOn3BODitela
Mana KaLyXckKa,15
119071 MoskBa
Ten.:8 (800)200 2962
mailt: mok-kdHI@bshg.com
www.siemens-home.bsh-group.ru
S Sverige, Sweden
BSH Home Appliances AB
Landsvagen 32
169 29 Solna
Tel.: 0771 195 500
Tel.: 0771 11 22 77
mailto: Siemens-Service-SE@bshg.com
www.siemens-home.bsh-group.com/se
S Slovensko, Slovakia
K BSH domáci spotřebiče s.r.o.
Firemi servis domácich spotřebiču Radlická 350/107c 158 00 Praha 5 Tel.: +421 244 452 041 mailto:opravy@bshg.com
T Türkiye, Turkey
R BSH Ev Aletleri Sanayi ve Ticaret A.S.
Fatih Sultan Mehmet Mahalles, Balkan Caddesi No: 51
34771 Ümraiye, Istanbul
Tel.: 0 216 444 6688
mailto:careline.turkey@bshg.com
www.siemens-home.bsh-group.com/tr
Cagri merkezini sabit hatlardan arama-nin bedeli sehir icı ücretendirme,
Cep Telefonlariindan ise kullanlan
tarifye gore degiskenlik gõstermek-
tedir
U Ukraine, YkpaHa TOB "5CX Ioobyroba Texhika" tel.:044 490 2095 mailto:bsh-service.ua@bshg.com www.siemens-home.bsh-group.com/ ua
X Kosovo
K Service-General SH.P.K.
rr.Magjistralja Ferizaj Prishtine
70000 Ferizaj
Tel:00381(0)290330723
Tel.: 0037744172309
mailto:servicegeneral527@gmail.com
Z South Africa
A BSH Home Appliances (Pty) Ltd.
15th Road Randjespark, Private Bag
X36, Randjespark
1685 Midrand-Johannesburg
Tel.: 086 002 6724
mailto:applianceserviceza@bshg.com
www.siemens-home.bsh-group.com/za
BSH group is a Trademark Licensee of Siemens AG. Manufacturer's Service for Siemens Home Appliances.
BSH Hausgeräte GmbH
Carl-Wery-StraBe 34
81739 München, GERMANY
siemens-home.bsh-group.com
Manufactured by BSH Hausgeräte GmbH under Trademark License of Siemens AG
© Fabriqué par BSH Hausgeräte GmbH titulaire des droits d'utilisation de la marque Siemens AG
Gefabriceerd door BSH Hausgeräte GmbH onder handelsmerklicentie van Siemens AG
© Wyprodukowano przyez BSH Hausgeräte GmbH na warunkach licenci ji na korzystanie ze znaku towarowego Siemens AG
© Vyrobeno BSH Hausgeräte GmbH v licenci k ochranné známce Siemens AG.
© N3rTOBnEHO O00 «BCX BbTObIe Pnp6Opbl» NOI TOBapHbIM 3HaKOM KOMIIaHN CImHeC A