
DHB7963X - Microwave DE DIETRICH - Free user manual and instructions
Find the device manual for free DHB7963X DE DIETRICH in PDF.
| Product Type | Cooker hood |
| Brand | De Dietrich |
| Model | DHB7963X |
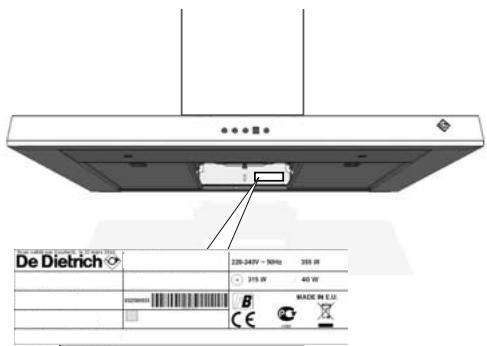
| Power supply | 220-240 V ~ 50 Hz, single-phase |
| Total power | 355 W |
| Motor power | 315 W |
| Lighting power | 40 W (LED) |
| Recommended fuse | 10 or 16 A |
| Installation type | External evacuation or recirculation (optional kit) |
| Evacuation duct diameter | Minimum ∅ 125 mm |
| Minimum distance to cooking surface | 65 cm (or according to hob instructions) |
| Suction speeds | 4 (1, 2, 3, Boost timed 8 min) |
| Automatic mode | Yes (heat and steam sensors) |
| Eolyse function | Yes (1-hour cycle: 5 min at speed 1, 10 min stop) |
| Delayed shut-off | 10 minutes |
| Fan auto-stop | After 9 hours of continuous operation |
| Lighting auto-stop | After 9 hours |
| Lighting | LED with variable intensity (25% per step) |
| Grease filters (cassettes) | Cleaning every 30 hours of use |
| Charcoal filters | Replacement every 120 hours (in recirculation mode) |
| Compatible hob types | Induction, ceramic, gas (selectable) |
| Energy class | B |
| Materials | Stainless steel, glass (estimate) |
Frequently Asked Questions - DHB7963X DE DIETRICH
User questions about DHB7963X DE DIETRICH
0 question about this device. Answer the ones you know or ask your own.
Ask a new question about this device
Download the instructions for your Microwave in PDF format for free! Find your manual DHB7963X - DE DIETRICH and take your electronic device back in hand. On this page are published all the documents necessary for the use of your device. DHB7963X by DE DIETRICH.
USER MANUAL DHB7963X DE DIETRICH
FR GUIDE D'UTILISATION
EN USER GUIDE 15
natural_image
Line drawing of a closed book with visible pages and cover (no text or symbols)1 x C

natural_image
Isometric line drawing of a 3D rectangular block with two circular holes on top (no text or symbols)1 x F
1 x J
1xK
natural_image
Simple line drawing of a two-tiered rectangular box (no text or symbols)1 x H
natural_image
Technical line drawing of a mechanical assembly with a 1×L scale indicator (no text or symbols on the diagram itself)1 x L

2 x M

2 × Q
2 x P
1.1
natural_image
Pure technical line drawing of a mechanical component with no text or symbols1 x G

natural_image
Isometric line drawing of a layered rectangular structure with parallel grooves (no text or symbols)1 x N
1.2
• 2

2.1

2.2
2.3
• 2


natural_image
Technical line drawing of a mechanical device with mounting holes and a handle (no text or symbols)2.3.1
1
2
3

natural_image
Technical line drawing of a mechanical device with no visible text or symbols2.3.2
• 2

• 3


• 4

natural_image
Diagram showing a hand holding a small electronic device with arrows indicating airflow or force, no text or symbols present.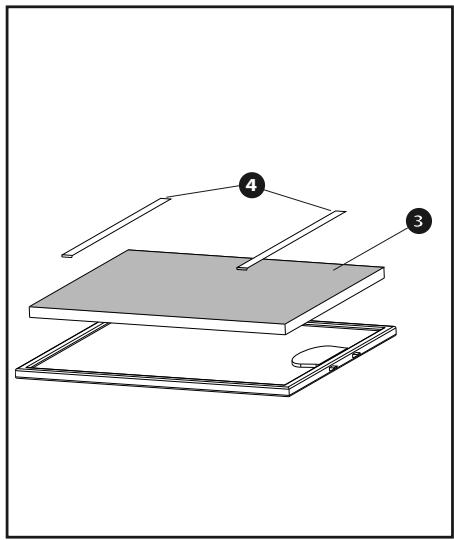
FR
CHÈRE CLIENTE, CHER CLIENT
Identification ....5
Installation 6
Interventions France ....14
SÉCURITÉ ET PRÉCAUTIONS IMPORTANTES
RELATIONS CONSOMMATEURS FRANCE
Discovering a De Dietrich product means experiencing the range of unique emotions.
The attraction is immediate, from the moment you set eyes on the product. The sheer quality of the design shines through, thanks to the timeless style and outstanding finishes which make each component an elegant and refined masterpiece in its own right, each one in perfect harmony with the others.
Next, comes the irresistible urge to touch it.
De Dietrich design makes extensive use of robust and prestigious materials, where the accent is place firmly upon authenticity.
By combining state-of-the-art technology with top quality materials, De Dietrich produces
beautifully crafted products to help you get the most from the culinary arts, a passion shared by all lovers of cooking and fine food. We hope that you enjoy using this new appliance.
Thank you for choosing a De Dietrich product.
Important safety advice and precautions ....3
Identification ....5
Installation 6
Electrical connection 6
Use in evacuation mode 6
Use in recycling mode 6
Fitting the hood 6
Fitting the duct 7
Use 8
Automatic mode 8
Selecting the type of hob 8
Changing to automatic mode....8
Switching on/off 8
Saturated filter cassettes 8
Saturated carbon filters 9
Changing speed....9
Configuration in recycling mode 9
Time delay / deferred stop 9
Eolysis function 9
Eolysis function programming 10
Fan auto-stop....10
Light auto-stop....10
Care....11
Problems 12
Environment....13
Customer service....14
IMPORTANT SAFETY ADVICE AND PRECAUTIONS
These instructions are also available on the brand's web site.
Please read this advice carefully before installing and using your appliance. These instructions are intended to protect your safety and the safety of others. Keep this manual with the appliance. If you sell or give the appliance to someone else, make sure that you also give them this manual.
- With a view to constantly improving our products, we reserve the right to make changes to their technical, functional or aesthetic characteristics in line with technological progress.
- To easily locate the make, model number, etc. of your appliance, we recommend that you note this information on the “After-Sales Service Department and Customer Support” page.
Important precautions
- This appliance was designed for use by private persons in their homes. Do not use it for commercial or industrial purposes or for any other purpose than that for which it was designed.
- When you receive the appliance, unpack it or have it unpacked immediately. Check its general appearance. Make a note of any reservations on the delivery slip and keep a copy.
- This appliance can be used by children aged under 8 and by persons with diminished physical, sensory or mental capacities, or persons without any experience or knowledge, provided that they are properly attended to or are given the instructions on how to use the appliance in complete safety and that any potential risks are anticipated. Children must not play with the appliance. The appliance must not be cleaned or maintained by unsupervised children.
- Caution: The accessible parts of this appliance may become hot when used with cooking appliances.
- The appliance can be disconnected by using an accessible power outlet or by incorporating a switch in the fixed lines, in accordance with installation rules.
- Do not modify or attempt to modify any of this appliance's characteristics. Doing so could be dangerous.
- The appliance should only be repaired by an approved specialist.
IMPORTANT SAFETY ADVICE AND PRECAUTIONS
- Always disconnect the hood before carrying out cleaning or maintenance.
- Never use steam or high-pressure tools to clean your appliance (due to electrical safety considerations).
Risk of asphyxiation
- Regulations on the evacuation of air must be complied with. Air must not be sent into a duct used to evacuate fumes from appliances that use gas or other fuels (this does not apply to appliances that only emit air into the room).
- The room must be suitably ventilated when the cooker hood is used at the same time as appliances that use gas or other fuels (this does not apply to appliances that only emit air into the room).
Risk of fire
- Flambé-ing food or turning on gas rings below the hood, unless they are covered by a pan is prohibited, since the flames could be sucked in and damage the appliance.
- Keep a constant watch on fryers used below the hood. When heated to very high temperatures, oil and fat can catch fire.
- Clean the appliance and replace filters at the recommended frequency. Accumulated deposits of grease could cause a fire.
- Using the hood above a solid fuel range (wood, coal, etc.) is prohibited.
- If the hood is installed above a gas-fired appliance, leave at least 65 cm between the top of the hob and the underside of the hood. If the instructions for a hob installed below the hood specify a distance greater than 65 cm, then that distance must be applied.
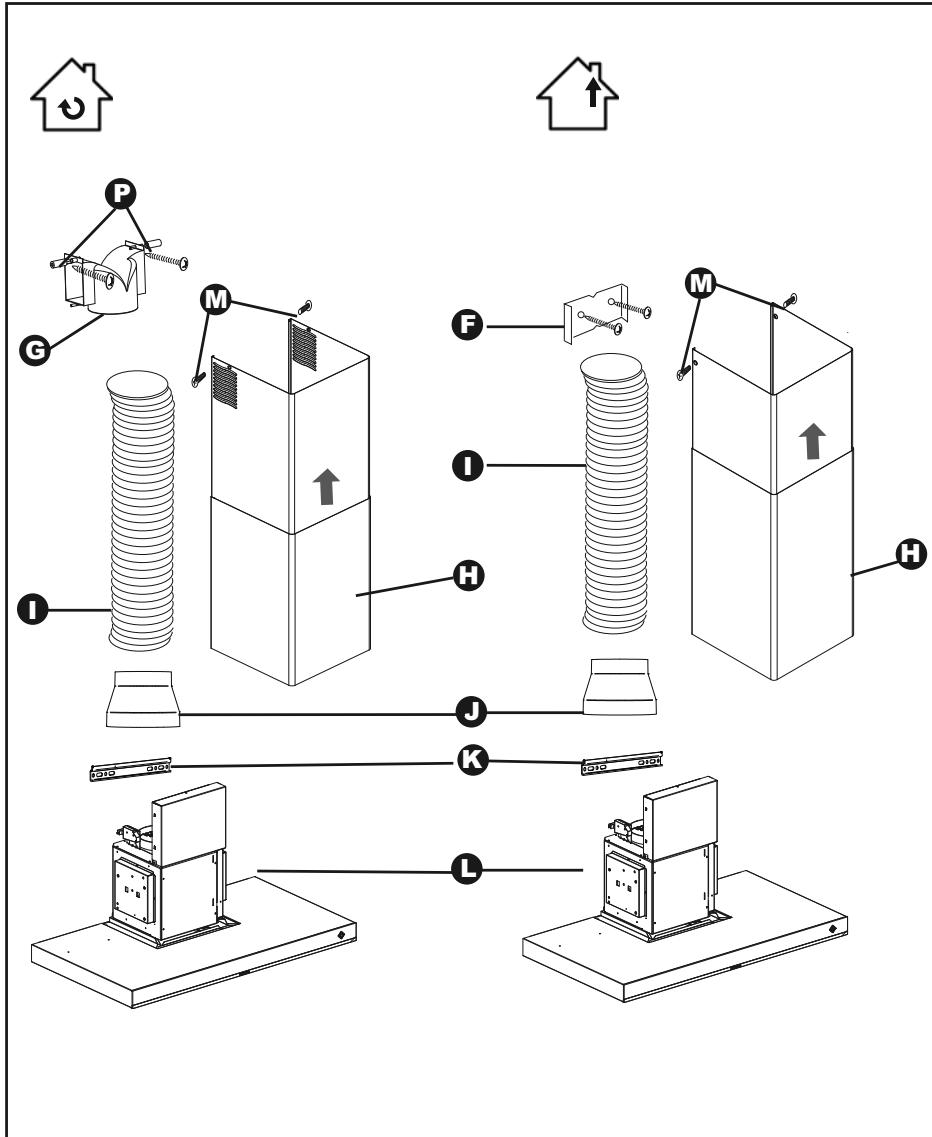
• 1 IDENTIFICATION

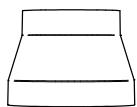
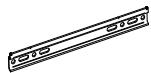
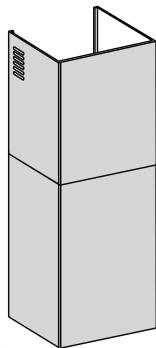
1.1 - PARTS LIST
C - Drilling template
D/E - Plug and + screws (duct support)
F - Duct support
J - Adapter
H - Duct
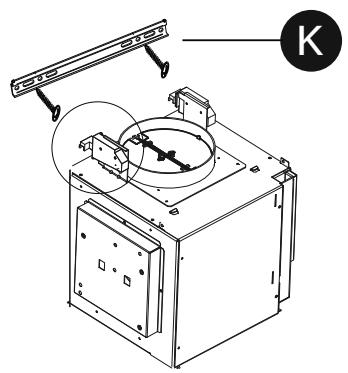
K - Fixing bracket
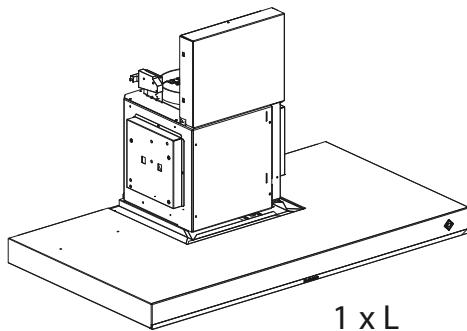
L - Hood
M - Screws (for fixing duct)
Q - Screws (for fixing motor)
P - Spacer
1.2 - OPTIONAL RECYCLING KIT
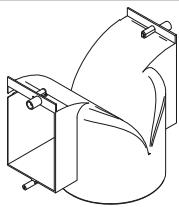
G - Fume deflector
N - Carbon filters
These parts are available from AFTER-SALES SERVICE
ELECTRICAL CONNECTION
During installation and maintenance operations, the appliance must be disconnected from the mains; fuses must be isolated or removed.
The electrical connections should be made before the appliance is installed in its housing.
Check that:
- the electrical installation is sufficiently rated,
- the supply wires are in good condition,
- the diameter of the wires complies with the installation requirements.
This appliance is supplied fitted with a 3-core (phase, neutral and earth) 0.75mm^2H 05 VVF cable. It must be connected to a 220-240V single phase mains network via an IEC 60083 socket which must remain accessible after installation, in accordance with the installation rules.
The fuse in your installation must be 10 or 16A. If the mains cable is damaged, call after-sales service and so avoid any danger.
If the electrical installation in your home requires any changes in order to connect your appliance, contact a professional electrician.
If the hood malfunctions in any way, unplug it or remove the fuse for the circuit concerned.
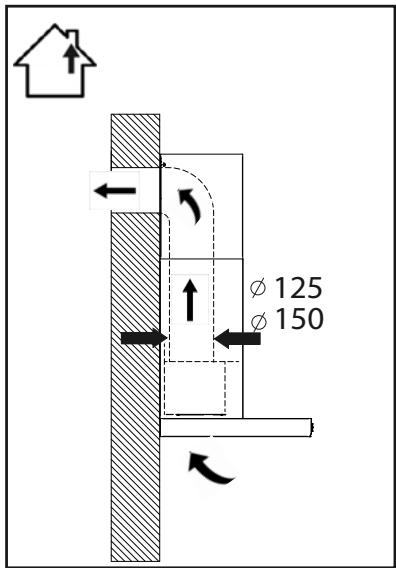
The installation must comply with current regulations for the ventilation of rooms. In particular, air must not be evacuated into a duct used to evacuate fumes from appliances using gas or other fuels. Disused ducts may only be brought into service, if approved by a competent specialist. The evacuation line, whatever its type, must not emerge in a loft space.
2.1 - USE IN EVACUATION MODE
You have a duct that leads outside.
Your hood may be connected to it via an evacuation duct (minimum 125mm dia., made of enamelled, aluminium hose or other non-flammable material). If your duct is less than 125mm in diameter, you must change to recycling mode.
2.2 - USE IN RECYCLING MODE
You do not have a duct leading to the outside.
All our appliances can operate in recycling mode.
In such a case, purchase a recycling kit comprising a set of active carbon filters and a deflector.

Energy saving advice
To obtain the best performance from your appliance, limit the number of bends and length of the duct as much as possible.
2.3 - FITTING THE HOOD
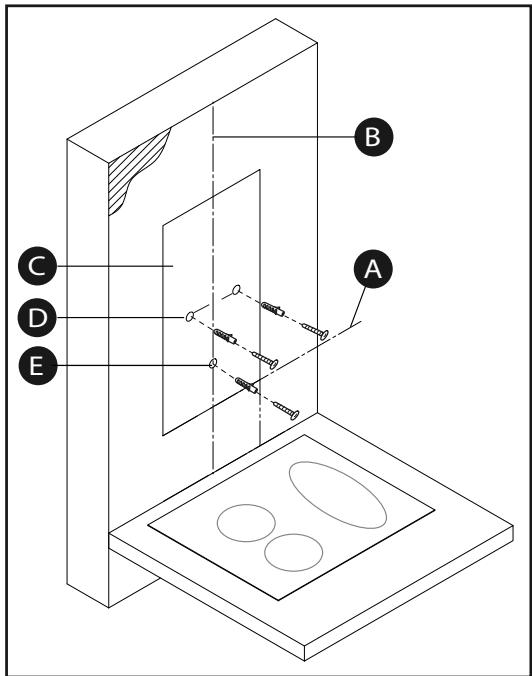
The minimum distance between the cooking surface (2.3) and the lowest part of the hood is 65cm. If the instructions for a hob installed below the hood specify a distance greater than 65 cm, then that distance must be applied.
- Draw a horizontal line (A) at least 65cm above the cooking surface.
- Draw a vertical line (B) on the wall, centred on the cooking surface running from the ceiling to the previous horizontal line (A).
- Place the drilling guide (C) against the wall.
- Drill the two holes. Install the plugs. For hollow walls, use suitable plugs and
• 2 INSTALLATION

screws (2.3).
- Screw the fixing bracket (K) to the wall with the two screws (D) (2.3.1).
- Attach the suction hood using the suspension fittings.
- Adjust the height and level, using the support adjustment screws (the top screw for horizontal adjustment and the lower screw for contact with the wall).
- Fit the locking screw that prevents the appliance being lifted off the suspension fittings (E).
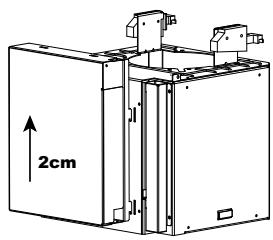
- Remove the adhesive tape from the enclosure
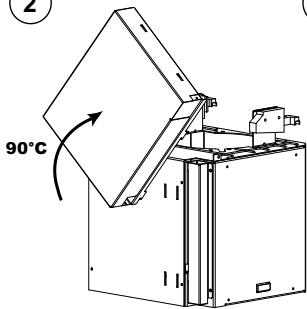
- Lift the enclosure approximately 2cm and then release it, make it move a quarter turn and then slide it and secure it with the two screws (Q) on the front of the motor.
Take care not to damage the cables during rotation and fixing.
2.4 - FITTING THE DUCT
•Evacuation outside
- Fix the metal duct support at ceiling height, using the two screws (D/E).
- For a 125mm diameter duct, use the adapter supplied (J).
If your duct to the outside is less than 125mm in diameter, you must connect your hood in recycling mode.
- Push the end of the duct on to the motor outlet.
- Prepare your telescopic duct, taking care to hide the ears.
- Push the duct, assembled thus, on to the hood and lift the upper part to adjust the height and then screw it on to the metal duct support using the two screws (M).
• Recycling (optional kit - available from after-sales service)
- Fix the plastic fume deflector (G) against the wall at ceiling height with the two screws. Take care to centre the deflector with reference to the vertical line (B) drawn on the wall.
Add the two spacers (P), supplied in the product pouch, to the deflector.
- Push one end of the duct on to the deflector and the other end on to the motor outlet.
- Prepare the duct, taking care to position the ears at the top, so that they are visible (H).
- Push the duct, assembled thus, on to the hood and lift the upper part to adjust the height and then screw it on to the fume deflector using the two screws (M).
• 3 USE


Note
This installation and user guide covers several models. Slight differences in the details and equipment may appear between your appliance and the descriptions given.
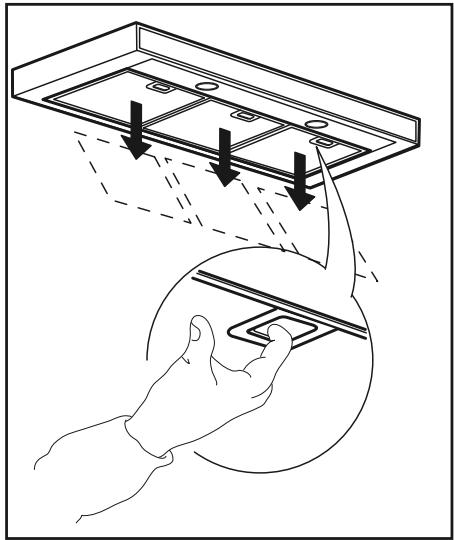
When the appliance is switched on for the first time, all the touch keys light and then switch off.
Automatic mode
These hoods have an in-built ability to adapt. Fitted with sensors, they trigger automatically when they detect any heat or emitted steam, adapt the suction speed spontaneously and switch off once the last fumes have been evacuated.
Hob type selection and sensitivity adjustment
To select your hob type, first switch off the hob.
Hold the ICS key pressed to enter configuration mode; the ICS key flashes rapidly and another key lights up.
Press the >2 key to select an induction hob,
Press the >3 key to select a ceramic hob,
Press the >> BOOST key to select an electric hob,
You can refine your hood's reaction time in automatic mode:
- give a short press on the ICS key which then flashes more slowly; you can then adjust the sensitivity.
-
give a short press on the >2 key for more sensitive detection.
-
give a short press on the >3 key for medium-sensitive detection.
- give a short press on the >> BOOST key for less sensitive detection.
Your configuration is confirmed automatically after 10 seconds or after a short press on the ICS key.
All the keys light up one after the other and your selections are saved.
Changing to automatic mode
Give a short press on the ICS key (ICS flashes). Automatic mode is active.
The hood starts when it detects heat; the ICS key is lit.
The hood stops after 40 seconds or 10 minutes depending on the length of time heat is detected.
Hood switch-off in automatic mode
If you are in automatic mode and you want to switch off the hood, press the ICS key.
On/Off
Pressing the Ⓐ key starts the hood in speed 1.
A long press on the Ⓘ key stops the hood.
Saturated filter cassettes
The >2 key flashes (1 short flash) for 2 minutes after the hood is switched off to indicate that the filter cassettes should be cleaned (see the “cleaning the filter cassette” section).
Hold the >2 key press (for at least 2 seconds) to reinitialise the “saturation” function.
Saturated carbon filters
The >3 key flashes (2 short flashes) for 2 minutes after the hood is switched off to indicate that the carbon filters should be changed (see the “changing the carbon filter” section).
Hold the >3 key pressed (for at least 5 seconds) to reinitialise the “saturation” function.
Changing speed
The >> function allows your hood to remain at maximum speed 4 for 8 minutes and then to switch to speed 2. After the hood has been started, you can change the suction speed by pressing on speed 2 (the >2 key lights) or >3 for speed 3 (the >3 key lights) for 10 minutes and then speed 2.
Configuring recycling mode
Your hood must be switched off.
By default the hood is in evacuation mode.
Pressing and holding the >2 and >3 keys together (for at least 2 sec) allows you to switch between Evacuation and Recycling modes. The >2 and >3 keys light and the 10' or >> BOOST keys flash.
A short press on the 10' key selects recycling mode (the 10' key flashes and the >> BOOST key switches off).
A short press on the >>_{BOOST} key selects evacuation mode (>>_{BOOST} key and the 10' key switches off).
A short press on the ⚙️ key confirms the configuration (or automatically confirmed after 10 seconds).
Time delay / deferred stop
At the end of cooking, you can press the 10' key to switch off the hood. This function maintains suction at the selected speed for 10 minutes; the 10' key flashes and power remains on.
To cancel the deferred stop, press the key again and the deferred stop is cancelled.
Light
A short press on the ⚙️ key switches the light on the hood on and off. With each long press on the ⚙️ key, the brightness is reduced by 25% for each second the key is held pressed.
Eolysis function
A short press on the ⚙ key starts the function. For 1 hour the hood alternates between 5 minutes at speed 1 with 10 minutes off; the ⚙ key is lit and the ⚙ key flashes.
After 1 hour, the hood switches off on its own. To interrupt this function, press the 🔒 key again.
Programming the Eolysis function
A long press on the 🔍 key activates programming.
The ⚙️ key flashes alternately with the ⚙️ key, indicating the start of programming.
The number of presses on the 10 , key is the desired number of program hours (maximum 9 = 9 hours).
• 3 USE

The ⚙️ key flashes alternately with the ⚙️ key (the number of successive flashes is the number of hours selected).
The program is confirmed automatically after 25 seconds or by a short press on the ⏻ key (the ⏻ key flashes alternately with the ⏻ key).
To cancel programming, press the flower key.
Fan auto-stop
If you forget to switch off your hood, it will switch off automatically after 9 hours.
Light auto-stop
If you forget to switch off the light on your hood, it will switch off automatically after 9 hours.
Energy saving advice
Adjust the speed to the cooking mode and the number of pans. Use the rear burners on your hob for preference.
CLEANING THE OUTER SURFACES
To clean the outer surfaces on your hood, use soapy water and do not use scouring creams or scouring sponges.
4.1 - CLEANING THE FILTER CASSETTES
They must be cleaned after every 30 hours approximately of use or at least once a month. Use a brush, warm water and a mild detergent. Rinse and dry them carefully before putting back in place.
4.2 - CHANGING THE CARBON FILTER
This filter holds odours; it should be replaced after approximately 120 hours of use.
Order these filters from your dealer.
- Remove the filter cassettes.
- Remove the two metal fixings (4)
- Remove the carbon filters (3)
- Fit new filter on to the filter cassettes.
- Re-position the 2 fixings (4).
- Fit the filter cassette back in place.
- Repeat this operation for all filter cassettes.
4.3 - CHANGING THE LED LAMPS
Contact after sales service.
• 5 PROBLEMS

The hood does not work.
Check that:
- there is not a power cut.
- a speed has actually been selected.
The hood is not coping.
Check that:
- the motor speed selected is sufficient for the quantity of fumes or steam released.
- the kitchen is sufficiently ventilated to allow air to be taken in.
- the carbon filter is not saturated (hood in recycling mode).
The hood stops during operation.
Check that:
- there is not a power cut.
- the all-pole cut-off device has not tripped.
CARE FOR THE ENVIRONMENT
This appliance's packaging can be recycled. Recycle and contribute towards protecting the environment by disposing of packaging in local waste containers designed for this purpose.
Your appliance also contains a lot of recyclable material. This logo indicates that used appliances must not be mixed with other waste.

Appliance recycling organised by your manufacturer is carried out under optimum conditions, in accordance with European Directive 2002/96/EC on the disposal of waste electrical and electronic equipment.
Contact your local authority or retailer for information on used appliance collection points close to your home.
Thank you for helping to protect the environment.
• 7 CUSTOMER SERVICE

Any repairs to your appliance must be made by a qualified professional accredited to work on the brand. When calling, please provide the full references of your appliance (commercial reference, service reference, serial number), so that we can handle your call better. This information appears on the manufacturer's nameplate on the equipment.
ES
ESTIMADO/A
CLIENTE/A:
4.3 - TROCA DAS LÂMPADAS LED
Contacte a SAV
• 5 ANOMALIAS

1.2 – VOLITEL'NÁ SÚPRAVA NA RE-CYKLÁCIU
2.2.4 – MONTÁŽ KOMÍNA
- Odvod von
Auto-stop ventilator 10
Auto-stop verlichting 10
Onderhoud 11
Storingen 12
Milieu....13
Consumentendienst 14
VEILIGHEID EN BELANGRIJKE VOORZORGS- MAATREGELEN
1.2 - RECYCLINGSET ALS OPTIE
Auto-stop ventilator
- 1.1
- 1.2
- • 2
- • 3
- • 4
- FR
- CHÈRE CLIENTE, CHER CLIENT
- Identification ....5
- Installation 6
- SÉCURITÉ ET PRÉCAUTIONS IMPORTANTES
- RELATIONS CONSOMMATEURS FRANCE
- Important safety advice and precautions ....3
- Use 8
- Care....11
- Problems 12
- Environment....13
- Customer service....14
- IMPORTANT SAFETY ADVICE AND PRECAUTIONS
- Important precautions
- Risk of asphyxiation
- Risk of fire
- • 1 IDENTIFICATION
- - PARTS LIST
- - OPTIONAL RECYCLING KIT
- ELECTRICAL CONNECTION
- Check that:
- - USE IN EVACUATION MODE
- - USE IN RECYCLING MODE
- Energy saving advice
- - FITTING THE HOOD
- • 2 INSTALLATION
- - FITTING THE DUCT
- •Evacuation outside
- • 3 USE
- Note
- Automatic mode
- Hob type selection and sensitivity adjustment
- Changing to automatic mode
- Hood switch-off in automatic mode
- On/Off
- Saturated filter cassettes
- Saturated carbon filters
- Changing speed
- Configuring recycling mode
- Time delay / deferred stop
- Light
- Eolysis function
- Programming the Eolysis function
- Fan auto-stop
- Light auto-stop
- CLEANING THE OUTER SURFACES
- - CLEANING THE FILTER CASSETTES
- - CHANGING THE CARBON FILTER
- - CHANGING THE LED LAMPS
- • 5 PROBLEMS
- The hood does not work.
- The hood is not coping.
- The hood stops during operation.
- CARE FOR THE ENVIRONMENT
- • 7 CUSTOMER SERVICE
- ES
- ESTIMADO/A
- CLIENTE/A:
- - TROCA DAS LÂMPADAS LED
- • 5 ANOMALIAS
- – VOLITEL'NÁ SÚPRAVA NA RE-CYKLÁCIU
- – MONTÁŽ KOMÍNA
- - Odvod von
- Onderhoud 11
- Storingen 12
- Milieu....13
- Consumentendienst 14
- VEILIGHEID EN BELANGRIJKE VOORZORGS- MAATREGELEN
- - RECYCLINGSET ALS OPTIE
- Auto-stop ventilator
Brand : DE DIETRICH
Model : DHB7963X
Category : Microwave