
LFG615W - Cooker ELECTROLUX - Free user manual and instructions
Find the device manual for free LFG615W ELECTROLUX in PDF.

| Product type | Range hood |
| Brand | Electrolux |
| Model | LFG615W |
| Dimensions (W x D x H) | 60 x 50 x 30 cm (estimated) |
| Weight | 15 kg (estimated) |
| Power supply | 230 V ~ 50 Hz |
| Motor power | 200 W (estimated) |
| Lighting | 2 LED bulbs (20 W each, estimated) |
| Number of speeds | 4 (including a boost speed "P") |
| Timer | 5 minutes |
| Installation type | Ducted or recirculating |
| Grease filters | Dishwasher safe, clean every 2 months |
| Charcoal filter | Not cleanable, replace every 4 months |
| Minimum distance to cooking surface | 65 cm |
| Insulation class | Class II (double insulation, no grounding required) |
| Exterior maintenance | Damp cloth with warm water and mild detergent |
| Noise level | 55 dB (estimated) |
| Included accessories | Grease filters, charcoal filter (for recirculating version) |
Frequently Asked Questions - LFG615W ELECTROLUX
User questions about LFG615W ELECTROLUX
0 question about this device. Answer the ones you know or ask your own.
Ask a new question about this device
Download the instructions for your Cooker in PDF format for free! Find your manual LFG615W - ELECTROLUX and take your electronic device back in hand. On this page are published all the documents necessary for the use of your device. LFG615W by ELECTROLUX.
USER MANUAL LFG615W ELECTROLUX
WE'RE THINKING OF YOU
Thank you for purchasing an Electrolux appliance. You've chosen a product that brings with it decades of professional experience and innovation. Ingenious and stylish, it has been designed with you in mind. So whenever you use it, you can be safe in the knowledge that you'll get great results every time.
Welcome to Electrolux.
Visit our website to:

Get usage advice, brochures, trouble shooter, service information:
www.electrolux.com

Register your product for better service:
www.registerelectrolux.com

Buy Accessories, Consumables and Original spare parts for your appliance:
www.electrolux.com/shop
ENVIRONMENT CONCERNS
Recycle the materials with the symbol ⬆ Put the packaging in applicable containers to recycle it. Help protect the environment and human health and to recycle waste of electrical and electronic appliances.
Do not dispose appliances marked with the symbol 📄 with the household waste. Return the product to your local recycling facility or contact your municipal office department for household waste or the shop where you purchased this product.
CUSTOMER CARE AND SERVICE
Always use original spare parts.
When contacting our Authorised Service Centre, ensure that you have the following data available: Model, PNC, Serial Number.
The information can be found on the rating plate.
⚠ Warning / Caution-Safety information
i General information and tips
Environmental information
Subject to change without notice.
1. SAFETY WARNING
The minimum distance between the hob surface on which the pans stand and the lower part of the hood must be 65 cm, unless otherwise specified in the installation instructions. If the hob installation instructions specify a greater distance, it must be taken into account.
The air collected must not be conveyed into a duct used to blow off smokes from appliances fed with an energy other than electricity (central heating systems, thermosiphons, water-heaters, etc.).
Comply with the official instructions provided by the competent authorities in merit when installing the disposal duct. In addition, exhaust air should not be discharged into a wall cavity, unless the cavity is designed for that purpose.
The room must be well aerated in case a hood and some other heat equipment fed with an energy other than electricity (gas, oil, coal heaters, etc) operate at the same time.
In fact the intake hood, disposing of air, could create a vacuum in the room. The vacuum should not exceed 0,04mbar. This prevents the gas exhausted by the heat source from being intaken again. It is therefore advisable to ensure the room contains air taps able to ensure a steady flow of fresh air.
Check the data label inside the appliance; if the symbol (☐) is printed, read the following: this appliance has such technical particulars that it belongs to class II insulation, therefore it must not be earthed.
Check the data label inside the appliance; if the symbol (☐) is NOT printed, read the following: ⚠️ ATTENTION: This appliance must be earthed. When making the electrical connections, check that the current socket has a ground connection.
When making the electrical connections, check that the voltage values correspond to those indicated on the data plate inside the appliance itself. In case your appliance is not fitted with a supply cord and a plug or with other means for disconnection from the supply mains having a contact separation in all poles that provide full disconnection under overvoltage category III conditions, that means for disconnection must be incorporated in the fixed wiring in accordance with the wiring rules. If your unit features a power lead and plug, position this so the plug is accessible.
Always switch off the electricity supply before carrying out any cleaning or servicing operations on the appliance.
If the supply cord is damaged, it must be replaced by the manufacturer, its service agent or similarly qualified persons in order to avoid a hazard.
⚠ Warning: Failure to install the screws or fixing device in accordance with these instructions may result in electrical hazards.
The appliance must be installed by a qualified person in compliance with the instructions provided.
Avoid using materials which could cause spurts of flame (flambées) near the appliance.
Do not flambé under the range hood.
When frying, take particular care to prevent oil and grease from catching fire. Already used oil is especially dangerous in this respect. Do not use uncovered electric grates.
To avoid possible risks of fire always comply with the indicated instructions when cleaning grease filters and when removing grease deposits from the appliance.
This appliance can be used by children aged from 8 years and above and persons with reduced physical, sensory or mental capabilities or lack of experience and knowledge if they have been given supervision or instruction concerning use of the appliance in a safe way by a person responsible for their safety and understand the hazards involved. Children shall not play with the appliance. Cleaning and user maintenance shall not be made by children without supervision.
Caution: accessible parts may become hot when used with cooking appliances.
This kitchen hood is intended for installation in domestic kitchens above cooktops, cooking devices and similar kitchen equipment.
2. USE
FILTERING OR DUCTING VERSION ?
The hood may be in filtering or in ducting version. Decide from the outset which type is to be installed.
For better efficiency, we recommend installing the hood in the ducting version (if possible).

Ducting version
The hood purifies the air and evacuates it to the outside through an exhaust duct.

Filtering version
The hood purifies the air and recycles the clean air back into the room.
3. MAINTENANCE
Thorough servicing guarantees correct and long-lasting operation.
Any fat deposits should be removed from the appliance periodically depending on amount of use (at least every 2 months). Avoid using abrasive or corrosive products. To clean
painted appliances on the outside, use a cloth dipped in lukewarm water and neutral detergent. To clean steel, copper or brass appliances on the outside, it is always best to use specific products, following the instructions on the products themselves. To clean the inside of the appliance, use a cloth (or brush) dipped in denatured ethyl alcohol. Clean grease filters in relation to use, at least every 2 months to prevent the risk of fire. Hand wash or clean in a dishwasher using a neutral detergent. If washing in the dishwasher, possible discoloration of the filters does not in any way compromise their functioning.
natural_image
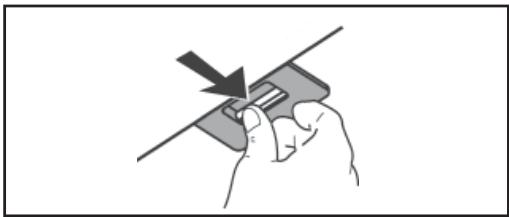
Hand holding a small electronic component with an arrow indicating direction (no text or symbols)The activated charcoal filter is not washable and cannot be regenerated, and must be replaced approximately every 4 months of operation, or more frequently for particularly heavy usage.
natural_image
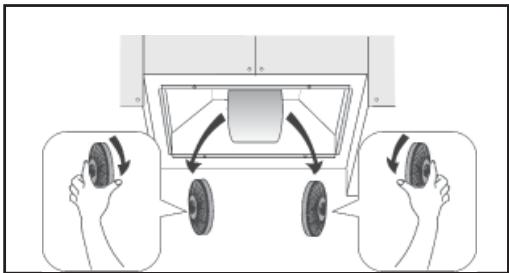
Diagram showing two hands operating a vehicle chassis with wheels and directional arrows indicating motion (no text or symbols)4. CONTROLS
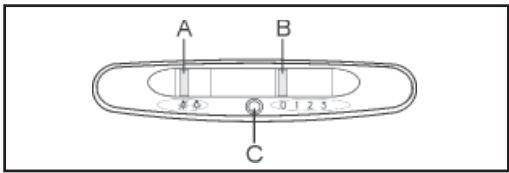
Models LFG525S, LFG525W, LFG525K:
Switch A: LIGHT; position 0: light off; position 1: light on.
Switch B: MOTOR SPEED: makes it possible to select the motor operating speed; position 0: motor off.
C: Motor on light.

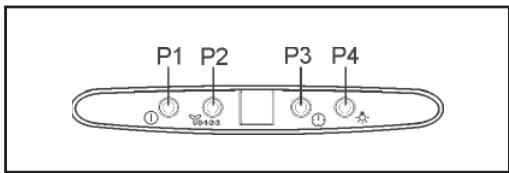
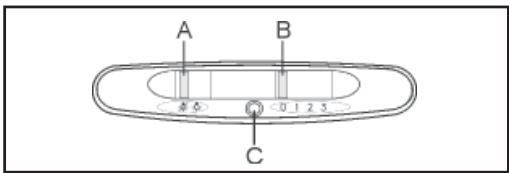
Models LFG517X, LFG615X, LFG615W:
Button P1: first speed motor ON/OFF switch.
Button P2 (Models LFG615X, LFG615W):
Change motor speed (1-2-3-P-1-2-3-P....).
At fourth speed the letter on display “P” is on (Booster). The 4th speed remain active for 5 minutes then going back in 3th.
Button P2 (Model LFG517X): Change motor speed (1-2-3-4-1-2-3-4....).
Button P3: Timer. Activate and deactivate timer (5 minutes). If the timer is active, the number correspondent at the speed flashing.
Button P4: Lights. Turns the lights on/off.
Button P1 + P4 : Filter Alarm Reset. When display shown an “F” letter flashing, the grease filters must be cleaned (40 hours of operation). When display shown an “C” letter flashing, the charcoal filters must be replaced (160 hours of operation) and the grease filters must be cleaned.
Obviously, if the hood is not a filtering model and does not have a charcoal filters, clean the grease filters both when display shown "F" and when display shown "C". The filter alarm can be seen when the motor is off and for about 30 seconds. To RESET the hour counter, keep simultaneously the buttons P1 and P4 pressed for 2 seconds while the alarm can be seen.
5. LIGHTING
If the light spot is damaged, it must be replaced only by the manufacturer, its service agent or similarly qualified persons in order to avoid a hazard.
INHALT
natural_image
Hand holding a device with a downward arrow indicating compression or disassembly (no text or symbols)natural_image
Diagram showing two hands operating a vehicle chassis with wheels, no text or symbols present4. BEDIENELEMENTE
Modelle LFG525S, LFG525W, LFG525K:
natural_image
Hand holding a small object with a downward arrow, no text or symbols visiblenatural_image
Diagram showing two hands operating a vehicle chassis with wheels, illustrating wheel movement (no text or symbols)4. COMMANDES
1. VEILIGHEIDSWAARSCHUWINGEN
AFVOER OF RECIRCULATIE?
natural_image
Hand holding a device with a downward arrow indicating compression or disassembly (no text or symbols)natural_image
Diagram showing two hands operating a vehicle chassis with wheels, no text or symbols present4. BEDIENINGEN
Modellen LFG525S, LFG525W, LFG525K:
Modellen LFG517X, LFG615X, LFG615W:
natural_image
Hand holding a device with a downward arrow indicating compression or disassembly (no text or symbols)natural_image
Diagram showing two hands operating a vehicle chassis with wheels and directional arrows indicating motion (no text or symbols)4. MANDOS
Modelos LFG525S, LFG525W, LFG525K:
natural_image
Hand holding a small electronic device with a downward arrow indicating compression (no text or symbols)natural_image
Diagram showing two hands operating a vehicle chassis with wheels and directional arrows indicating motion (no text or symbols)4. COMANDOS
natural_image
Hand holding a tool with a downward arrow indicating direction (no text or symbols)natural_image
Diagram showing two hands operating a vehicle chassis with wheels, illustrating wheel movement (no text or symbols)4. COMANDI
Modelli LFG525S, LFG525W, LFG525K:
Tasto P2 (Modelli LFG615X, LFG615W):
natural_image
Hand holding a tool with a downward arrow indicating compression or disassembly (no text or symbols)natural_image
Diagram showing two hands operating a vehicle chassis with wheels, illustrating wheel movement (no text or symbols)4. KOMMANDON
KUNDESERVICE OG VEDLIKEHOLD
Vi anbefaler kun bruk av originale reservedeler.
natural_image
Hand holding a tool with a downward arrow indicating compression or disassembly (no text or symbols)natural_image
Diagram showing two hands operating a vehicle chassis with wheels, illustrating wheel movement (no text or symbols)4. KONTROLLER
Modeller LFG525S, LFG525W, LFG525K:
Modeller LFG517X, LFG615X, LFG615W:
P2-knapp (Modeller LFG615X, LFG615W):
Endre motorhastighet (1-2-3-P-1-2-3-P...).
natural_image
Hand holding a tool with a downward arrow indicating compression or disassembly (no text or symbols)natural_image
Diagram showing two hands operating a vehicle chassis with wheels, illustrating wheel movement (no text or symbols)4. OHJAIMET
Malli LFG525S, LFG525W, LFG525K:
Malli LFG517X, LFG615X, LFG615W:
natural_image
Hand holding a small electronic component with a black arrow indicating direction (no text or symbols)natural_image
Diagram showing two hands operating a vehicle chassis with wheels, no text or symbols present4. BETJENING
Modellieme LFG525S, LFG525W, LFG525K: Tast A: LYSET: position 0: lyset slukket; position 1: lyset tændt.
Modellieme LFG517X, LFG615X, LFG615W:
5. BELYSNING
natural_image
Hand holding a tool with a downward arrow indicating compression or disassembly (no text or symbols)natural_image
Diagram showing two hands operating a vehicle chassis with wheels, illustrating wheel movement (no text or symbols)Модели LFG525S, LFG525W, LFG525K:
natural_image
Hand holding a small electronic component with a downward arrow indicating compression or disassembly (no text or symbols)natural_image
Diagram showing two hands adjusting a vehicle chassis with wheels, no text or symbols present4. JUHIKUD
Mudelid LFG525S, LFG525W, LFG525K:
Mudelid LFG517X, LFG615X, LFG615W:
Nupp P2 (Mudelid LFG615X, LFG615W):
FILTRĒJOŠAIS VAI UZSŪCOŠAIS VEIDS?
natural_image
Hand holding a small electronic component with a downward arrow indicating compression or disassembly (no text or symbols visible)4. VADĪBAS ELEMENTI
Modeli LFG525S, LFG525W, LFG525K:
Modeli LFG517X, LFG615X, LFG615W:
Poga P1: pirmā motora ātruma IESLĒG-ŠANAS/IZSLĒGŠANAS slēdzis.
Poga P2 (Modeli LFG615X, LFG615W):
Mainīt motora ātrumu (1-2-3-P-1-2-3-P....).
natural_image
Hand holding a small electronic component with a downward arrow indicating compression or disassembly (no text or symbols present)natural_image
Diagram showing two hands operating a vehicle chassis with wheels, illustrating the mechanism (no text or symbols present)4. VALDYMAS
natural_image
Hand holding a tool with a downward arrow indicating compression or disassembly (no text or symbols)natural_image
Diagram showing two hands operating a vehicle chassis with wheels, no text or symbols presentnatural_image
Hand holding a small electronic component with an arrow indicating direction (no text or symbols)natural_image
Diagram showing two hands operating a vehicle chassis with wheels, no text or symbols present4. KEZELŐSZERVEK
LFG525S, LFG525W, LFG525K modellek:
natural_image
Hand holding a tool with a downward arrow indicating compression or disassembly (no text or symbols)natural_image
Diagram showing two hands operating a vehicle chassis with wheels, no text or symbols present4. PŘÍKAZY
Modele LFG517X, LFG615X, LFG615W:
natural_image
Hand holding a tool with a downward arrow indicating compression or disassembly (no text or symbols)natural_image
Diagram showing two hands operating a vehicle chassis with wheels, illustrating wheel movement (no text or symbols)4. OVLÁDAČE
Modele LFG525S, LFG525W, LFG525K:
Prepínač A: SVETLO; poloha 0: svetlo vypnuté;; poloha 1: svetlo zapnuté.
Modele LFG517X, LFG615X, LFG615W
Tlačidlo P2 (Modele LFG615X, LFG615W):
Zmena rýchlosti motora (1-2-3-P-1-2-3-P....).
natural_image
Hand holding a small electronic component with a downward arrow indicating compression (no text or symbols)natural_image
Diagram showing a vehicle under load with three wheels and two hands, illustrating wheel movement (no text or symbols)4. COMENZI
Modele LFG525S, LFG525W, LFG525K:
Modele LFG517X, LFG615X, LFG615W:
Butonul P2 (Modele LFG615X, LFG615W):
natural_image
Hand holding a tool with a downward arrow indicating compression or disassembly (no text or symbols)natural_image
Diagram showing two hands operating a vehicle chassis with wheels, no text or symbols present4. STEROWANIE
natural_image
Hand holding a tool with a downward arrow indicating compression or disassembly (no text or symbols)natural_image
Diagram showing two hands operating a vehicle chassis with wheels and directional arrows indicating motion (no text or symbols)4. NAREDBI
Modeli LFG525S, LFG525W, LFG525K:
Sklopka A: SVJETLO; položaj 0: svjetlo ugašeno; položaj 1: svjetlo upaljeno.
Sklopka B: BRZINA RADA MOTORA: omogućuje izbor brzine rada motora; položaj 0: motor isključen.
C: motor uključen.
Modeli LFG517X, LFG615X, LFG615W:
Tipka P1: sklopka Uključi/lsključi, prva brzina motora.
Tipka P2 (Modeli LFG615X, LFG615W):
promijeni brzinu motora (1-2-3-P-1-2-3-P....).
natural_image
Hand holding a tool with a downward arrow indicating compression or disassembly (no text or symbols)natural_image
Diagram showing two hands operating a vehicle chassis with wheels and directional arrows indicating motion (no text or symbols)4. UPRAVLJALNI GUMBI
Modeli LFG525S, LFG525W, LFG525K:
Modeli LFG517X, LFG615X, LFG615W:
Tipka P1: stikalo Vklop/Izklop prva hitrost motorja
Tipka P2 (Modeli LFG615X, LFG615W):
spremeni hitrost motorja (1-2-3-P-1-2-3-P....).
natural_image
Hand holding a small electronic component with a black arrow indicating direction (no text or symbols)natural_image
Diagram showing hands operating a vehicle with three wheels and directional arrows indicating motion (no text or symbols)4. XEIPISTHPIA
Μοντέλα LFG525S, LFG525W, LFG525K:
natural_image
Hand holding a tool with a downward arrow indicating compression or disassembly (no text or symbols)natural_image
Diagram showing two hands operating a vehicle chassis with wheels, illustrating wheel movement (no text or symbols)4. KONTROLLER
LFG525S, LFG525W, LFG525K Modelleri:
LFG517X, LFG615X, LFG615W Modelleri:
natural_image
Hand holding a small electronic component with a black arrow indicating direction (no text or symbols)natural_image
Diagram showing two hands operating a vehicle chassis with wheels and directional arrows indicating motion (no text or symbols)4. УПРАВЛЕНИЯ
Модели LFG525S, LFG525W, LFG525K:
natural_image
Hand holding a tool with a downward arrow indicating compression or disassembly (no text or symbols)natural_image
Diagram showing two hands operating a vehicle chassis with wheels and directional arrows indicating motion (no text or symbols)natural_image
Hand holding a small electronic component with a downward arrow indicating compression (no text or symbols)natural_image
Diagram showing two hands operating a vehicle chassis with wheels, illustrating wheel movement (no text or symbols)4. КОНТРОЛИ
Модели LFG525S, LFG525W, LFG525K:
natural_image
Hand holding a tool with a downward arrow indicating compression or disassembly (no text or symbols)natural_image
Diagram showing two hands operating a vehicle chassis with wheels, no text or symbols present4. KOMANDIMET
Modelet LFG525S, LFG525W, LFG525K:
Modelet LFG517X, LFG615X, LFG615W:
Butoni P2 (Modelet LFG615X, LFG615W):
natural_image
Hand holding a tool with a downward arrow indicating compression or disassembly (no text or symbols)natural_image
Diagram showing a vehicle under load with hands operating the wheel rim and wheels, no text or symbols present4. КОМАНДЕ
Modeli LFG525S, LFG525W, LFG525K:
Sklopka A: SVETLO; položaj 0: svetlo ugašeno; položaj 1: svetlo upaljeno.
Sklopka B: BRZINA RADA MOTORA: omogućuje izbor brzine rada motora; položaj 0: motor isključen.
C: motor uključen.
Modeli LFG517X, LFG615X, LFG615W:
Tipka P1: sklopka Uključi/lsključi, prva brzina motora.
Tipka P2 (Modeli LFG615X, LFG615W):
promijeni brzinu motora (1-2-3-P-1-2-3-P....).
LFG517x و LFG615x و LFG615w
natural_image
Diagram showing two hands operating a vehicle chassis with wheels and directional arrows indicating motion (no text or symbols)natural_image
Hand holding a card with a downward arrow indicating compression or dislocation (no text or symbols)natural_image
Repeating geometric pattern of gray squares and white circles on white background (no text or symbols)- WE'RE THINKING OF YOU
- Visit our website to:
- ENVIRONMENT CONCERNS
- CUSTOMER CARE AND SERVICE
- SAFETY WARNING
- USE
- MAINTENANCE
- CONTROLS
- LIGHTING
- INHALT
- BEDIENELEMENTE
- COMMANDES
- VEILIGHEIDSWAARSCHUWINGEN
- BEDIENINGEN
- MANDOS
- COMANDOS
- COMANDI
- KOMMANDON
- KUNDESERVICE OG VEDLIKEHOLD
- KONTROLLER
- OHJAIMET
- BETJENING
- BELYSNING
- JUHIKUD
- VADĪBAS ELEMENTI
- VALDYMAS
- KEZELŐSZERVEK
- PŘÍKAZY
- OVLÁDAČE
- COMENZI
- STEROWANIE
- NAREDBI
- UPRAVLJALNI GUMBI
- XEIPISTHPIA
- УПРАВЛЕНИЯ
- КОНТРОЛИ
- KOMANDIMET
- КОМАНДЕ
Brand : ELECTROLUX
Model : LFG615W
Category : Cooker