
UA-HG50E-L - Air purifier SHARP - Free user manual and instructions
Find the device manual for free UA-HG50E-L SHARP in PDF.
| Product type | Air purifier with humidification |
| Brand | SHARP |
| Model | UA-HG50E-L |
| Dimensions (W × D × H) | 345 × 262 × 631 mm |
| Weight | 9.2 kg |
| Power supply | 220-240 V, 50-60 Hz |
| Power consumption (max) | 53 W (purification), 33 W (humidification) |
| Maximum airflow (purification) | 306 m³/h |
| Maximum noise level | 52 dBA (purification), 46 dBA (humidification) |
| Water tank capacity | 2.5 L |
| Filtration | Pre-filter, HEPA filter (99.97% of particles 0.3 µm), deodorizing filter |
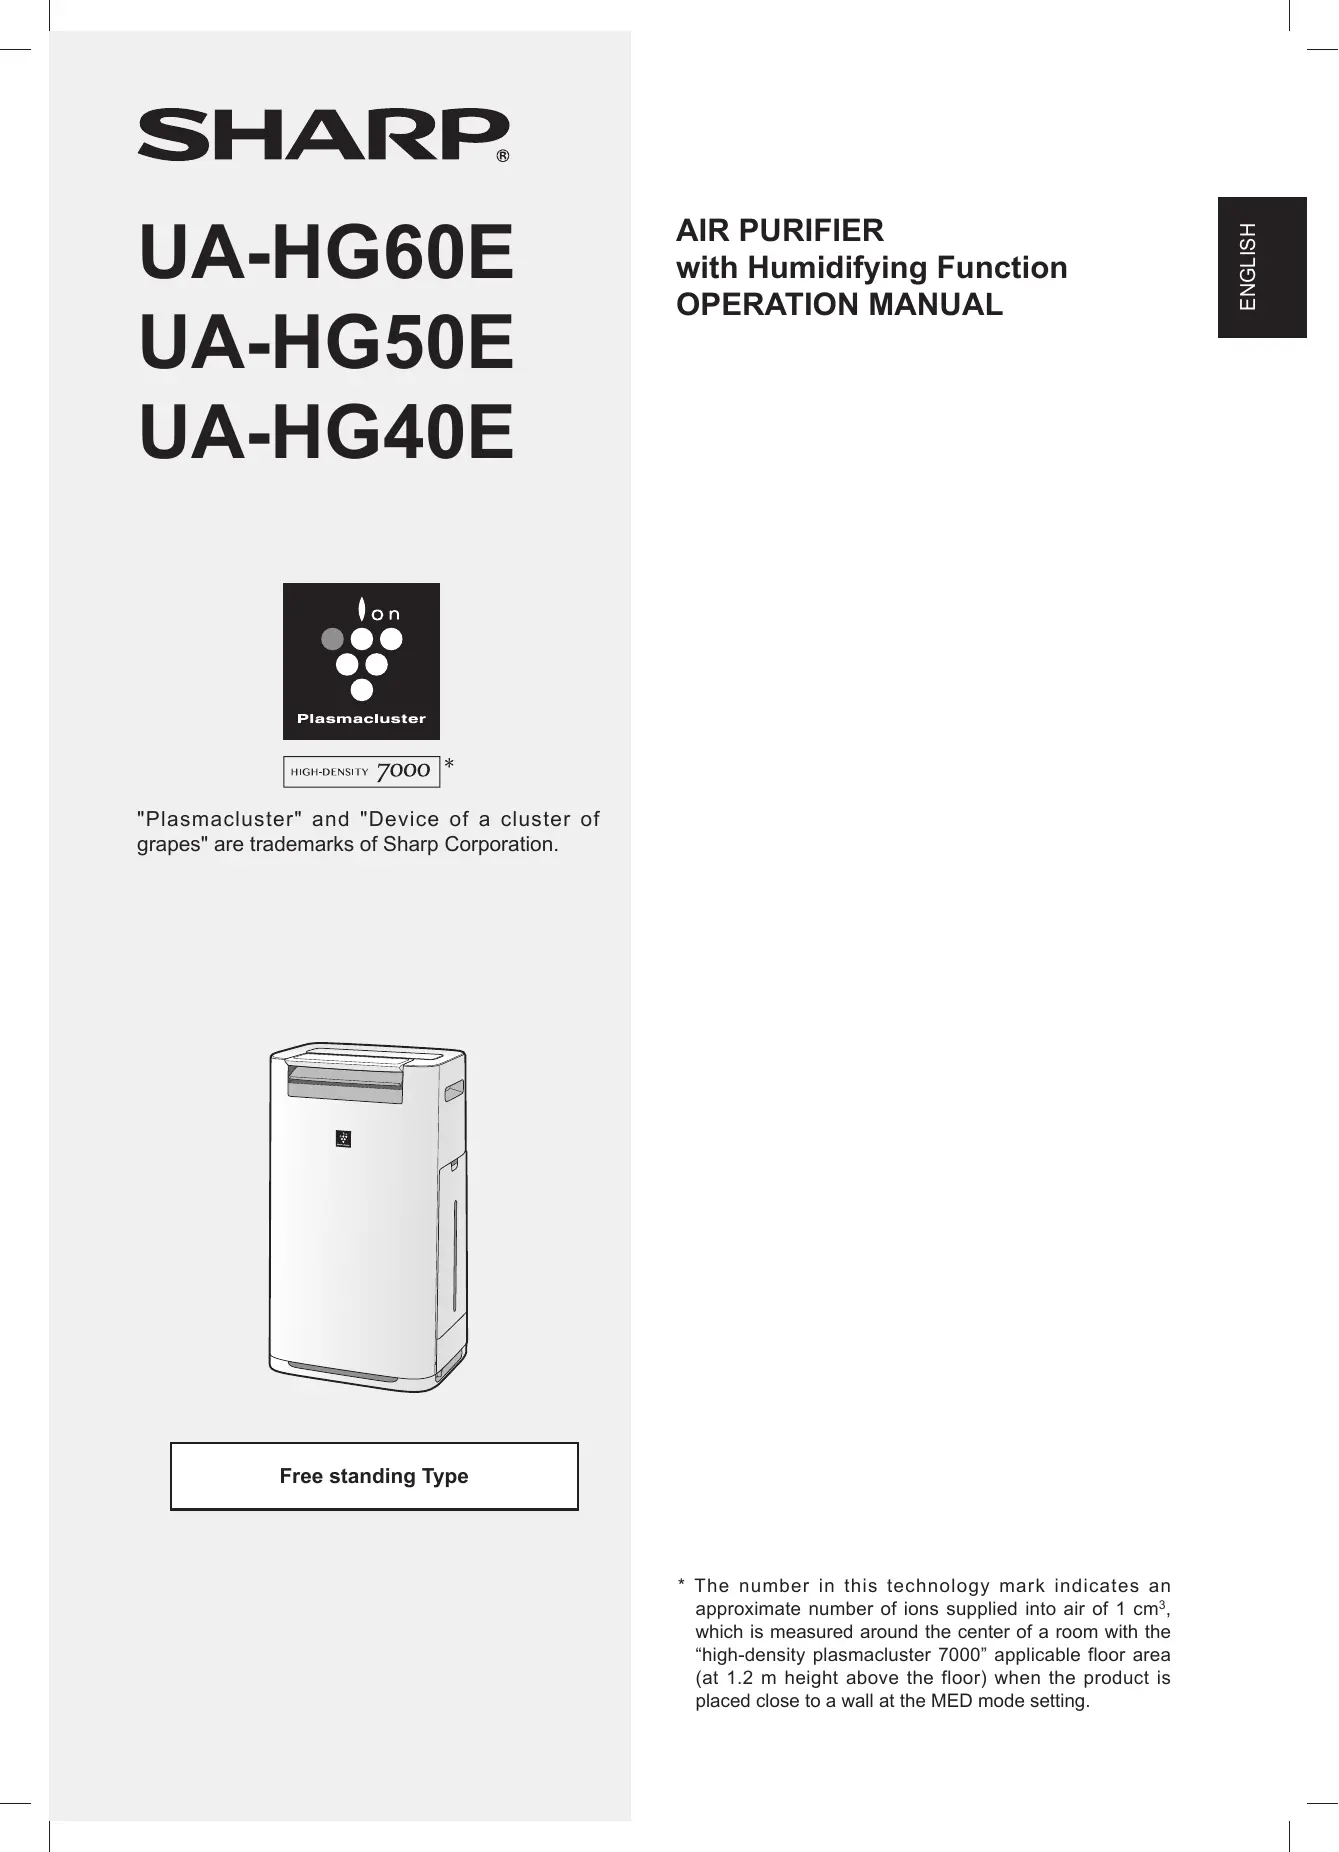
| Ionic technology | Plasmacluster high density 7000 |
| Sensors | Dust (sensitive), odor, light, temperature, humidity, motion |
| Operating modes | Intelligent, Auto, Ion shower cleaning, Plasmacluster spot ions, Sleep, Manual (MAX/MID/LOW) |
| Special functions | Safety function (indicator of conditions favorable to viruses/heatstroke), child lock, on/off timer |
| Filter lifespan | HEPA and deodorizing: approximately 10 years; humidification: approximately 10 years |
| Maintenance | Regular cleaning of pre-filter, water tank, humidification tray, filters (do not wash HEPA/deodorizing) |
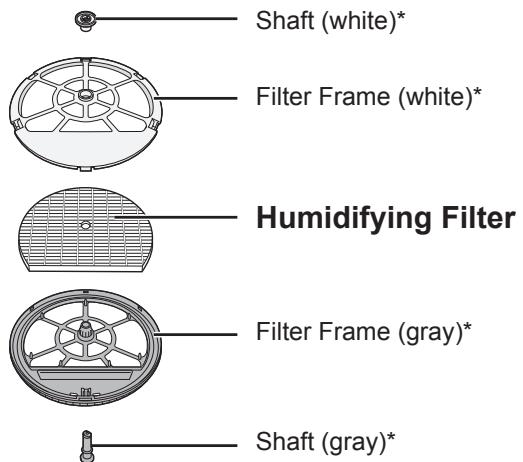
| Spare parts | HEPA filter: UZ-HD4HF; Deodorizing filter: UZ-HG4DF; Humidification filter: UZ-HG6MF |
Frequently Asked Questions - UA-HG50E-L SHARP
User questions about UA-HG50E-L SHARP
0 question about this device. Answer the ones you know or ask your own.
Ask a new question about this device
Download the instructions for your Air purifier in PDF format for free! Find your manual UA-HG50E-L - SHARP and take your electronic device back in hand. On this page are published all the documents necessary for the use of your device. UA-HG50E-L by SHARP.
USER MANUAL UA-HG50E-L SHARP
"Plasmacluster" and "Device of a cluster of grapes" are trademarks of Sharp Corporation.
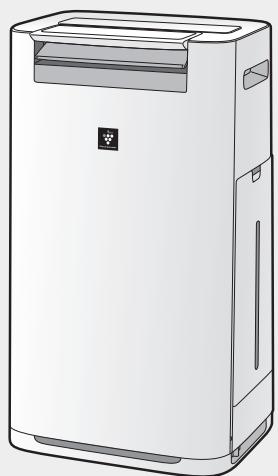
Free standing Type
AIR PURIFIER with Humidifying Function OPERATION MANUAL
FEATURES
A unique Combination of Air Treatment Technologies
Triple Filtration System + Plasmacluster + Humidification
TRAPS DUST
Pre-filter traps dust larger than approx 240 micron particles.
DECREASES ODOURS
Deodorizing filter absorbs harmful gases*1 and many common household odours.
REDUCES TINY DUST. POLLEN & MOLD*2
HEPA filter traps 99.97% of particles as small as 0.3 microns.
FRESHENS
By emitting a balance of positive and negative ions, Plasmacluster air treatment is a natural process.
HUMIDIFIES
Controls humidity by sensing temperature and humidity automatically.
1: VOC, NOx, SOx. The deodorizing performance for a single component odours substance in a 1 m^3 test container may be different than the deodorizing performance in actual use.
2: When air is circulated through the filter system.
Sensor Technology continuously monitors air quality and room condition, and automatically adjusts operation.
INTELLIGENT MODE
(UA-HG60E / UA-HG50E)
6 sensors sensing 7 factors precisely control automatic operation.

7detection by 6 sensors
| SENSOR | DETECTION |
| Dust (sensitive) | PM2.5(particulate matter less than 2.5 microns), etc. |
| Tobacco smoke, house dust (dirt, mite feces and remains, mold spores, pollen) | |
| Odour | Tobacco, cosmetic, alcohol, spray, and other odours |
| Temperature | Room temperature |
| Humidity | Room humidity |
| Light | Room brightness |
| Motion*3 | Movement of persons or pets |
*3: Senses only when Intelligent mode is in operation.
When a person or pet is in the sensory area\*4
(^*4:Ref.E - 5)
- When there is little movement of a person or pet (example: when sleeping), automatically switches to quiet air flow.
- When the room is dark, the Front Display, Cleanliness Monitor and Air Outlet LED turn off automatically.
When there is no movement in the sensory area
- The Front Display, Cleanliness Monitor and Air Outlet LED turn off, humidifying stops, and the unit switches to minimum airflow to save power consumption.
- When room humidity is over 80% and the room is bright, Plasmacluster lons are emitted with strong airflow.
NOTE
- When in Intelligent mode you can manually switch humidifying ON or OFF (Ref. E-8)
- Front Display and Air Outlet LED automatically switch ON and OFF based on room brightness. (When light control is set to "Auto". Ref. E-11)
- When the Motion Sensor senses that no one has been in the room for a set interval of time it determines that the room is unoccupied.
- You can change brightness of Display / Monitor, sensor sensitivity, and Motion Sensor sensing time. (Ref. E-11, E-12)
- Motion sensor may sense movement other than persons or pets. (waving curtain etc.)
Please read before operating your new Air Purifier
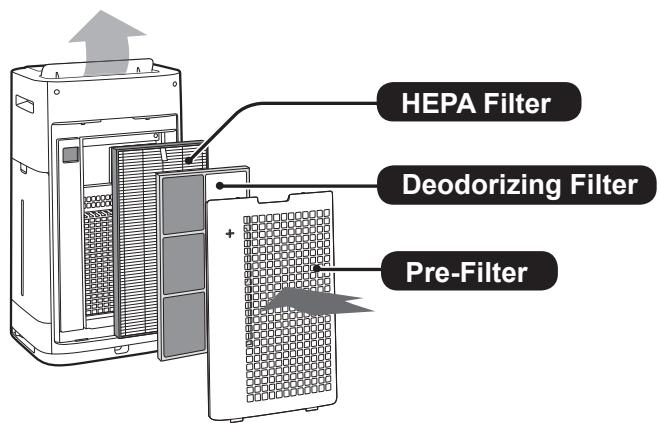
The air purifier draws in room air through the air intake, circulates it through a Pre-Filter, a Deodorizing Filter and a HEPA Filter inside the unit, and then discharges it through the air outlet. The HEPA Filter can remove 99.97% of dust particles as small as 0.3 microns that pass through the filter and also helps absorb odours. The Deodorizing Filter gradually absorbs odours as they pass through the filter.
Some odours absorbed by the filters will break down over time, causing additional odours. Depending on usage conditions, and especially if the unit is used in environments significantly more severe than a normal household, these odours may become noticeable sooner than expected. If these odours persist, replace the filters. (Ref. E-15)
When minerals in tap water adhere to the filters and become a hard and white, they absorb odours in the room that can cause the emission of an unpleasant odour when the humidifying filter is dry. (Varies depending on water quality and other environmental factors) If this occurs, perform humidifying filter maintenance. (Ref. E-14)
NOTE
- The air purifier is designed to remove air-suspended dust and the odours.
The air purifier is not designed to remove harmful gases such as carbon monoxide contained in cigarette smoke.
The air purifier may not completely remove an odour if the source of the odour is still present.
CONTENTS
IMPORTANT SAFETY INSTRUCTIONS...E-3
WARNING
NOTE
- CAUTIONS CONCERNING OPERATION
- INSTALLATION GUIDELINES
- FILTER GUIDELINES
PART NAMES E-5
TROUBLESHOOTING E-16
SPECIFICATIONS E-17
Thank you for purchasing this SHARP Air Purifier. Please read this manual carefully before using the air purifier.
After reading, keep the manual in a convenient location for future reference.
IMPORTANT SAFETY INSTRUCTIONS
Always follow basic safety precautions when using electrical appliances, including the following:
WARNING – Always observe the following to reduce the risk of electrical shock, fire, or injury:
- Read all instructions before using the unit.
-
Use only a 220-240 volt outlet.
-
This appliance can be used by children aged from 8 years and above and persons with reduced physical, sensory or mental capabilities or lack of experience and knowledge if they have been given supervision or instruction concerning use of the appliance in a safe way and understand the hazards involved. Children shall not play with the appliance. Cleaning and user maintenance shall not be made by children without supervision.
- If the power cord is damaged, it must be replaced by the manufacturer, its service agent, a Sharp authorized Service Centre or similarly qualified persons in order to avoid a hazard.
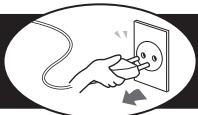
- Be sure to remove the power plug when refilling the Water Tank, before performing maintenance, when removing and attaching and replacing the filter and when not using for a long time. Failure to do so can cause a short circuit resulting in electrical shock or fire.
- Do not use the unit if the power cord or plug is damaged or if the connection to the wall outlet is loose.
Periodically remove dust from the plug. - Do not insert fingers or foreign objects into the air intake or air outlet.
- When removing the power plug, always hold the plug and never pull on the cord. Failure to do so can cause a short circuit resulting in electrical shock or fire.
- When removing the unit, do not damage the power cord with the casters. Failure to do so can cause electric shock, heat generation, or fire.
- Be careful not to damage the power cord, it may cause electric shock, excess heat or fires.
- Do not remove the plug when your hands are wet.
-
Do not place the unit near gas appliances or fireplaces.
-
Only a Sharp Authorized Service Centre should service this air purifier. Contact the nearest Service Centre for any problems, adjustments, or repairs.
- Do not operate the unit in rooms where aerosol insecticides are present. Do not operate the unit in rooms where there is oily residue, incense, sparks from lit cigarettes, or chemical fumes in the air. Do not operate the unit in places where it may get wet, such as a bathroom.
- Be cautious when cleaning the unit. Strong corrosive cleansers can damage the exterior.
- When carrying the unit, first remove the Water Tank and Humidifying Tray, and then hold the unit by the handles on both sides.
- Do not drink the water in the Humidifying Tray or Water Tank.
- Do not expose the unit to water. Doing so can cause a short circuit or electrical shock.
- Replace the water in the Water Tank daily with fresh tap water, and regularly clean the Water Tank and Humidifying Tray (see E-8, E-13, E-14). When the unit is not in use, dispose of the water in the Water Tank and Humidifying Tray. Leaving water in the Water Tank or Humidifying Tray can cause mold, bacteria, and bad odours.
In rare cases, such bacteria can be a health hazard.
NOTE - What to do if the unit interferes with radio or TV reception
If the air purifier interferes with radio or television reception, try one or more of the following measures:
- Adjust or reposition the receiving antenna.
- Increase the distance between the unit and the radio or TV.
- Connect the equipment into an outlet on a circuit different from that of the radio or TV receiver.
- Consult the dealer or a qualified radio or TV technician.
CAUTIONS CONCERNING OPERATION
- Do not block the air intake or air outlet.
-
Do not place the unit near or on hot objects, such as stoves or heaters, or where it may come into contact with steam.
-
Always operate the unit in an upright position.
- When moving the unit, use the handles on both sides.
Do not move the unit when it is in operation. - If the unit is on easily damaged flooring, an uneven surface, or thick-piled carpet, lift it up when moving.
- When moving the unit by its casters, move it slowly and in a horizontal direction.
- Turn the unit off and remove the water tank before moving, take care not to catch your fingers.
- Do not operate the unit without the filters, the Water Tank, and the Humidifying Tray properly installed.
- Do not wash and reuse the HEPA filter and the Deodorizing filter. Doing so will not improve filter performance and can also cause electric shock or operating malfunctions.
- Clean the exterior with a soft cloth only. Do not use volatile fluids or detergents. The unit surface may be damaged or cracked with Benzene paint thinner or polishing powder. In addition, the sensors may malfunction as a result.
- The frequency of descending maintenance will depend on the hardness of and the impurities in the water that you use; the harder the water the more often descending will be necessary.
- Keep the unit away from water.
- When refilling the Water Tank, make sure of no water leaking from the Water Tank.
- Be sure to wipe off any excess water on the outside of the Water Tank.
- Do not use hot water (40 °C or more), chemical agents, aromatic substances, dirty water, or other damaging substances. Doing so can deform the unit or cause it to malfunction.
- Use only fresh tap water. Using other water sources risks the growth of molds, fungi, or bacteria.
- Do not shake the Water Tank with holding the carrying handle.
- Do not remove the Humidifying Filter from the filter frame except when replacing it.
- Avoid spilling water when removing or cleaning the Humidifying Tray.
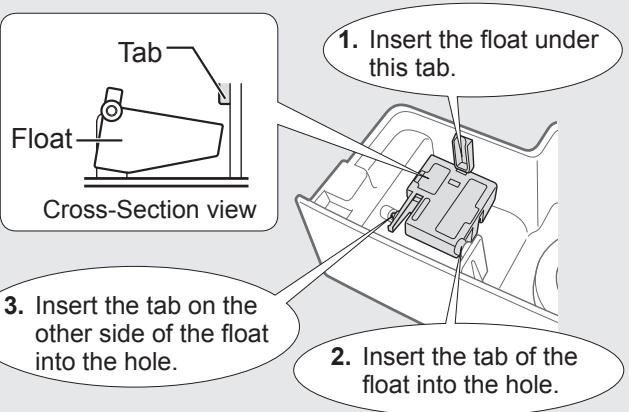
- Do not remove the Float. If it comes off, refer to E-15.
-
Do not use the detergents for maintenance of the Humidifying Tray and Cover. If cause deformation, tarnishing, cracking (water leakage).
-
Do not scrub the Back Panel hard during its maintenance.
INSTALLATION GUIDELINES
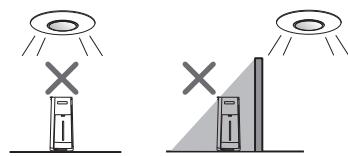
- Avoid locations where the sensors are exposed to direct wind. Doing so can cause the unit to malfunction.
- Avoid locations where furniture, fabrics, or other objects can come in contact with the unit and interfere with the intake and outtake of air.
- Avoid locations where the unit is exposed to condensation or drastic changes in temperature. Appropriate room temperature is between 0 - 35^ .
- Place the unit on a level and stable surface with sufficient air circulation. When placed on heavy carpet, the unit may vibrate slightly. Place the unit on a level surface to avoid water leakage from the Water Tank and Humidifying Tray.
- Avoid locations that generate grease or oily smoke. Doing so can cause the unit exterior to crack and the sensors to malfunction.
- The dust collecting ability of the unit is effective even when the unit is as close to 3 cm from the wall, the surrounding walls and floor may get dirty. Please place the unit at a distance from the wall.
- The wall directly behind the air outlet may become dirty over time. When using the unit for an extended period of time at the same location, periodically clean the walls adjacent to it.
FILTER GUIDELINES
- Follow the instructions in this manual for proper filter care and maintenance. (Ref. E-13, E-14, E-15)
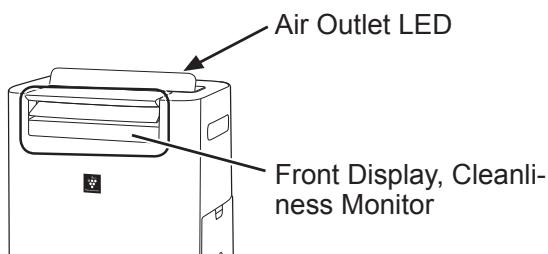
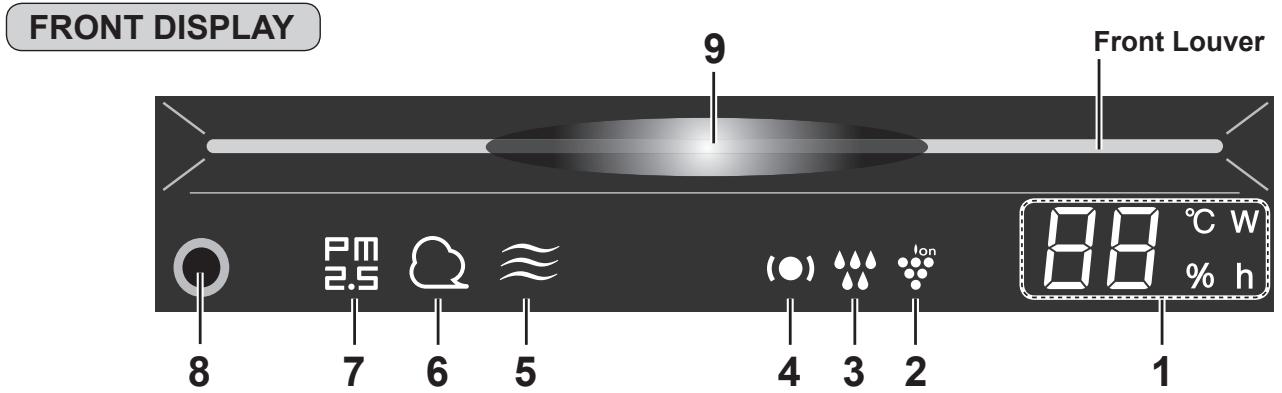
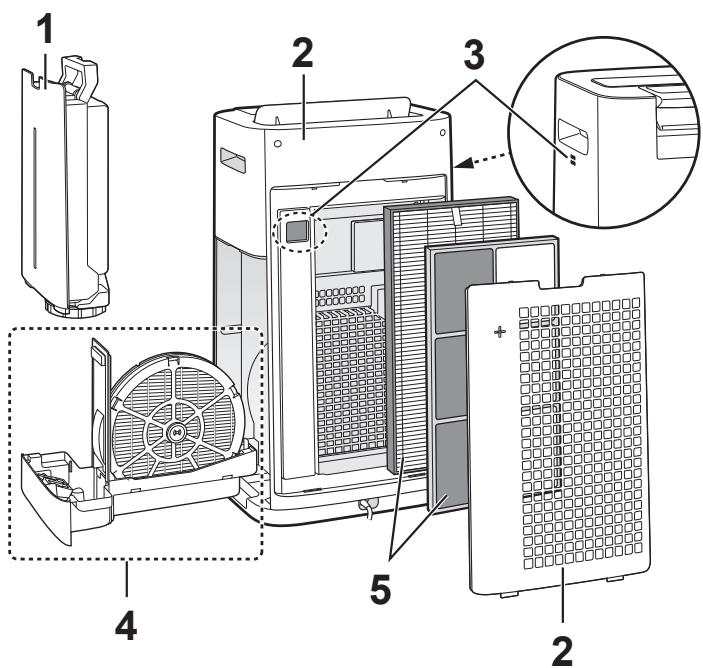
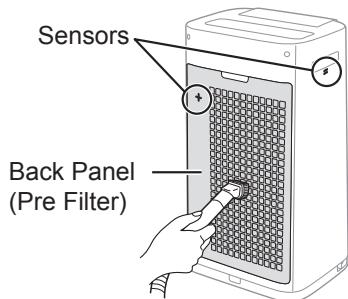
PART NAMES
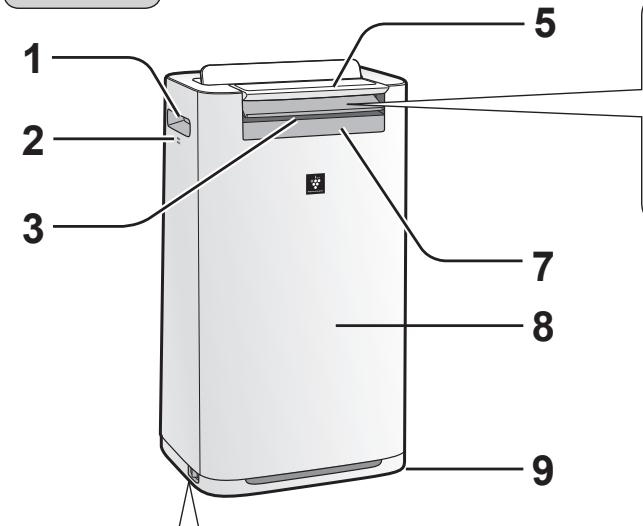
FRONT
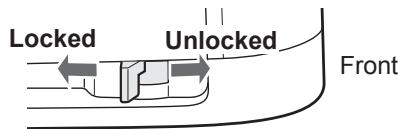
4 To Lock a caster stopper (Right & Left)
6
| 1 | Handle (2 Locations) |
| 2 | Sensor (Internal) Temperature / Humidity / Odour* (*UA-HG60E / UA-HG50E) |
| 3 | Air Outlet (Front) |
| 4 | Caster Stopper (Right & Left) |
| 5 | Operation Panel |
| 6 | Front Louver (Adjustable) |
| 7 | Front Display |
| 8 | Unit |
| 9 | Caster (4 Locations) |
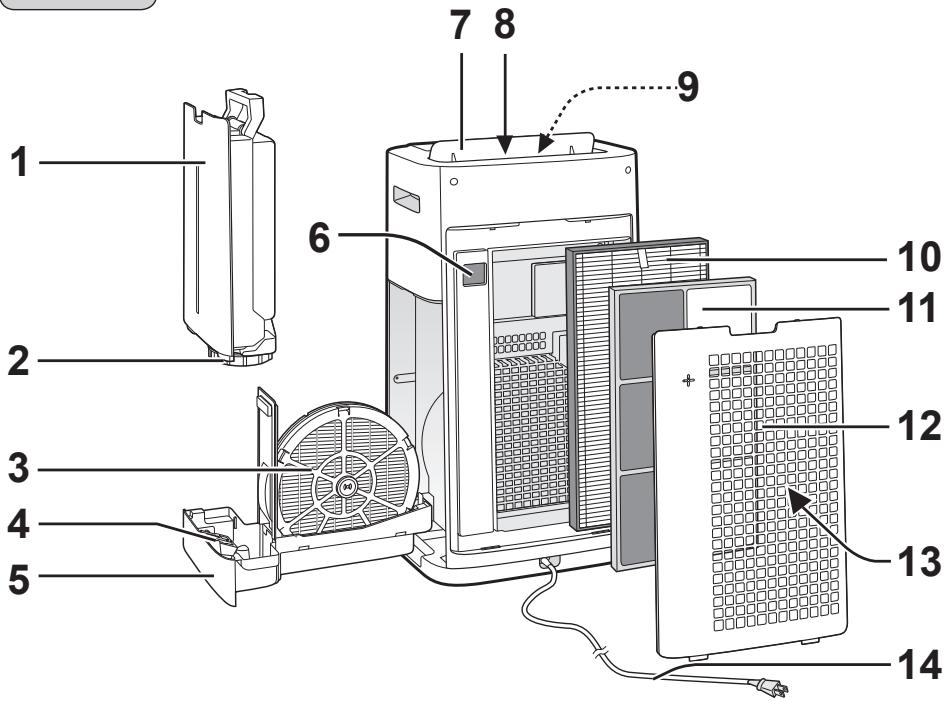
BACK
(Plug shape varies by country.)
| 1 | Water Tank | 7 | Back Louver |
| 2 | Tank Cap | 8 | Air Outlet (Back) |
| 3 | Humidifying Filter | 9 | Air Outlet LED(White) |
| 4 | Float | 10 | HEPA Filter |
| 5 | Humidifying Tray | 11 | Deodorizing Filter |
| 6 | Dust(sensitive) Sensor / Sensor Filter | 12 | Back Panel (Pre-Filter) |
| 13 | Air Inlet | ||
| 14 | Power Cord / Plug |
Detection range
Light Sensor
Do not install the unit in the following places.
The Light Sensor may not sense correctly.
Directly under a light fixture.
In shadow
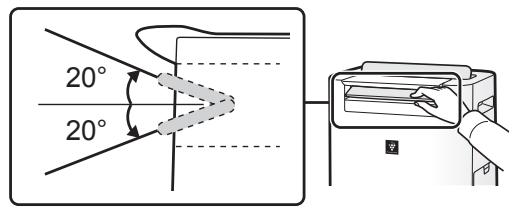
Motion Sensor
(UA-HG60E / UA-HG50E)
Sensory range is the area shown below.
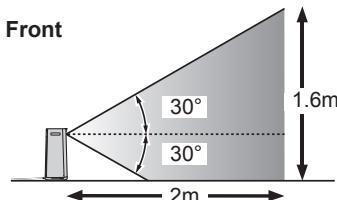
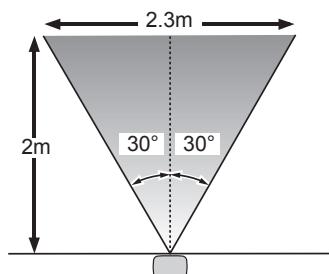
Right and Left
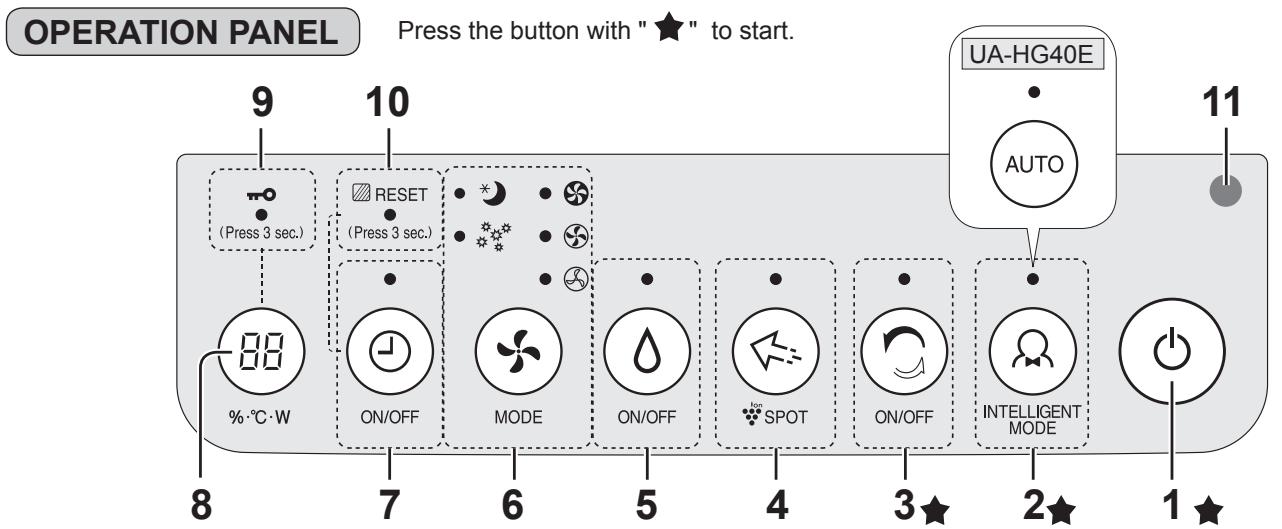
| 1 | POWER ON / OFF Button | 7 | ON / OFF TIMER Button, Indicator Light (White) |
| 2 | INTELLIGENT MODE Button, Indicator Light (White) | ||
| 3 | CLEAN ION SHOWER Button, Indicator Light (White) | 8 | DISPLAY SELECT Button |
| 4 | Plasmacluster Ion SPOT Button, Indicator Light (White) | <Press 3 sec.> CHILD-LOCK Button | |
| 9 | CHILD-LOCK Indicator Light (White) | ||
| 5 | HUMIDIFY ON / OFF Button, Indicator Light (White) | 10 | FILTER RESET Indicator Light (Orange) |
| 6 | MODE Button, Indicator Light (White) | 11 | Light Sensor |
| 1 | Humidity / Temperature Monitor Indicates the approximate humidity level or temperature in the room. The humidity setting cannot be adjusted. Humidity 20% to 90% is displayed. 20% or less 20%←55%→90% or more Temperature 0°C to 50°C is displayed. -1°C or less 0°C←25°C→H°C50°C or more Wattage Monitor Indicates wattage by current operation. Timer Monitor Indicates setting time or remaining time of ON/OFF timer. | 4 | Patrolling Light (Green / Orange / Red) (Ref.E-9, E-10) |
| 5 | Odour Light (White) (UA-HG60E / UA-HG50E) Indicates the Odour Sensor detects odours. | ||
| 6 | Dust Light (White) Indicates the Dust(sensitive) Sensor detects usual dust. | ||
| 7 | PM2.5 Light (White) Indicates the Dust(sensitive) Sensor detects microscopic dust. (particulate matter less than 2.5 microns) | ||
| 8 | Motion Sensor (UA-HG60E / UA-HG50E) | ||
| 2 | Plasmacluster Ion Light (Blue) | 9 | Cleanliness Monitor Indicates the air purity of the room in 7 levels with colour changes. Blue ⇌ Red Clean Impure |
| 3 | Humidify Light Green Humidity ON Off Humidity OFF Red(Flashing) Unit needs water |
PREPARATION
Always be sure to remove the power plug from the wall outlet.
FILTER INSTALLATION
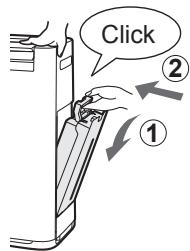
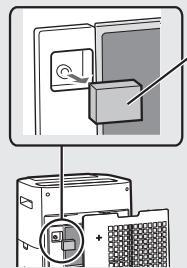
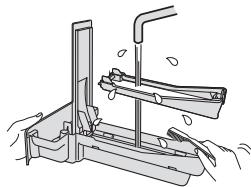
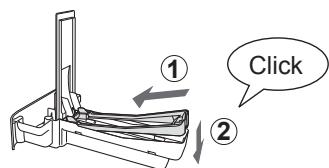
1 Remove the Back Panel.
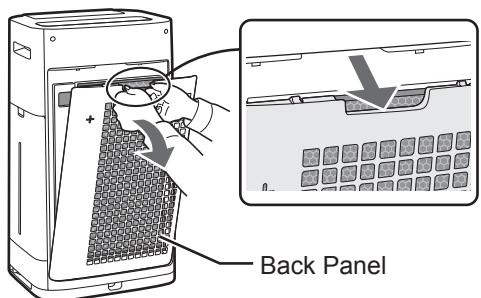
2 Remove the plastic bag from the each filter.

HEPA Filter
Deodorizing Filter
3 Install the filters in the correct order as shown.
4 Install the Back Panel.
NOTE
- When replacing the filter, making a memo of the start of use date is recommended.
OPERATION
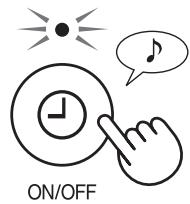
START/STOP
START
CLEAN ION SHOWER MODE
The unit releases Plasmacluster ions with strong airflow and collects dusts while decreasing static electricity for 10 minutes. After that, the DUST sensor sensitivity is automatically set to "HIGH" and quickly detects impurities and clean the air powerfully for 50 minutes.

ON/OFF
NOTE
- When the operation finishes after 60 minutes, the unit will return to the prior operation mode. It is able to change the other mode during this mode.
- The Plasmacluster Ion can not be turned "OFF". (Ref. E-10)
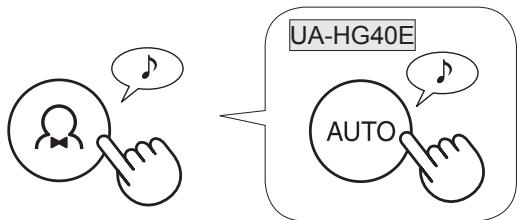
INTELLIGENT MODE (UA-HG60E / UA-HG50E)
The fan speed is automatically controlled depending on the 7 detection. (Ref. E-1)

INTELLIGENT MODE
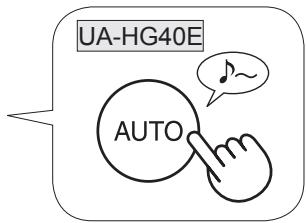
AUTO MODE (UA-HG40E)
The fan speed is automatically controlled depending on the 5 detection. (PM2.5 / Usual dust / Temperature / Humidity / Light)

NOTE
- Front Display, Cleanliness Monitor and Air Outlet LED automatically switch ON and OFF based on room brightness. (When light control is set to "Auto". Ref. E-11)
PLASMACLUSTER ION SPOT MODE
Use this mode when you want to remove adhering odour, germs, and other substances from cloths, sofas and curtains.
SPOT
Adjust Front Louver manually.
NOTE
- Emits highdensity Plasmacluster Ions only in the forward direction.
- Discharges stronger air for 8 hours. When the operation finishes, the unit will return to its prior operation mode.
- The Plasmacluster Ion can not be turned "OFF". (Ref.E-10)
SELECTING MODE

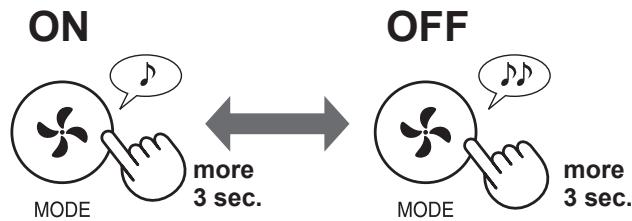
MODE
NOTE
SLEEP
The unit will operate quietly, and the fan speed is automatically switched depending on the amount of impurities in the air.
The Front Display, Cleanliness Monitor and Air Outlet LED go off automatically.
(When light control is set to "Auto". Ref.E-11)
POLLEN
The DUST SENSOR sensitivity is automatically set to "HIGH" and quickly detects impurities such as dust and pollen and clean the air powerfully.
CHILD LOCK
Operation of the operation panel will be locked.
ON
CANCELLATION
HUMIDIFICATION SETTING
REFILLING THE WATER TANK
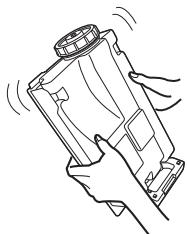
1 Remove the Water Tank.
2 Fill the Water Tank with the tap water.
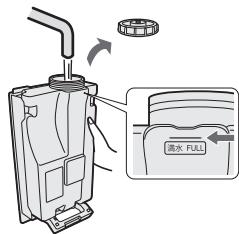
3 To prevent leaks, securely tighten the Tank Cap.
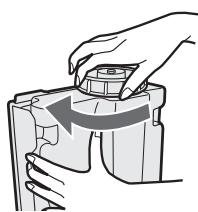
4 Install the Water Tank.

ON


OFF
ON/OFF
NOTE
When operating with Humidification ON in the modes in the table below, the unit automatically controls humidity by sensing temperature and humidity. (Except MAX / MED / LOW mode.)
| Temperature | Humidity | |
| ALL MODE(Except MAX / MED / LOW / SLEEP) | SLEEP MODE | |
| ~18 °C | 65 % | 65 % |
| 18 °C~24 °C | 60 % | 65 % |
| 24 °C~ | 55 % | 60 % |
ON TIMER
Select the length of time you want. The unit automatically starts once the selected time is passes.
(with the unit OFF)
OFF TIMER
Select the length of time you want. The unit automatically stops once the selected time is reached.

(with the unit ON)
PATROLLING FUNCTION
The sensor detects a state requiring attention to room temperature and humidity during operation and tells it with Patrolling Light. Both "Dry and Low temperature patrolling" and "High temperature and High humidity patrolling" work. (This function informs a room condition. The unit cannot adjust temperature or lower humidity)
It tells that the room is dry or the room temperature is low.
When Patrolling Light turns to red, the unit operates with airflow a little stronger during Intelligent mode (Auto mode).
| Patrolling Light (●) | If the beeping sound is set to "ON". (Ref. E-12) | Indoor environment | Temperature and humidity area (Figure below) | |
| Humidity / Temperature Monitor (for 30 seconds) | Beeping sound | |||
| Red | "%" Light turns on | Beep (once) | Dry | (3) |
| "°C" Light flashing | Beep (once) | Low temperature | ||
| Green | (Normal) | None | Not dry or low temperature | (1)-(2) |
When the room is dry and the room temperature is low, viruses survive more easily. We recommend that you increase humidity with humidification setting and temperature using heating appliances according to your room environment.
Material source: Dr. Makoto Shoji, Director of Shoji internal medicine and pediatrics clinic in Sendai City, Miyagi Prefecture, Japan
| Right fig-ure | Absolute humidity*1 | Virus environment | Survival rate*2 |
| (1) | Over 11 g | Environment which is less suitable for viruses to survive | 0 % to small per-cent |
| (2) | 11 g or less | Environment where viruses can survive | 5 % |
| (3) | 7 g or less | Environment which is suitable for viruses to survive | 20 % |
1 The absolute humidity is the total mass of water vapor present in 1 m^3 of air regardless of temperature and is expressed in g. While humidity generally used for a weather forecast is called relative humidity, which is the ratio of the partial pressure of water vapor to the equilibrium vapor pressure of water at a given temperature and is expressed in %. Therefore, the absolute humidity is approximately 8 g at 15^ C and 18 g at 30^ C even at the same relative humidity of 60% .
2 Survival rate of viruses emitted in air after 6 hours under each environment.
NOTE
- It does not notify of the existence of viruses themselves.
- Patrolling Light's illuminating "Green" does not assure prevention of infection. Use it as a reference to make an environment to prevent infection during typical daily life.
While adjusting humidity to approximately 55% to 65% during operation in Intelligent mode (Auto mode), the unit controls humidification, but does not make changes according to the virus' environment.
SELECTING DISPLAY
PLASMACLUSTER ION ON/OFF
When the Plasmacluster function is ON, the Plasmacluster Ion light on the Front Display is on. (Ref.E-6)
(with the unit ON)
The beeping sound of Patrolling Function is set to "Off" at the default. You can change it to "On" or "Cancel Patrolling Function". (Ref. E-11, E-12)
It tells high temperature and high humidity. When Patrolling Light turns to orange or red, the unit stops humidification automatically. (However, it is in MAX/MED/LOW mode, it does not stop humidification)
| Patrolling Light (●) | If the beeping sound is set to "ON". (Ref. E-12) | Indoor environment | Temperature and humidity area (Figure below) | |
| Humidity / Temperature Monitor (for 30 seconds) | Beeping sound | |||
| Red(Flashing) | "○C" Light flashing | Beep · · · (for 30 seconds) | High temperature and high humidity | D |
| Red | "○C" Light turns on | Beep · · · (for 30 seconds) | C | |
| Orange | "○C" Light turns on | None | Relatively high temperature and high humidity | B |
| Green | (Normal) | None | Not high temperature nor high humidity | A |
We recommend that you drink some water or lower the room temperature.
Guideline for preventing heatstroke in daily life
| Temperature standard | Overview of life activities to be noted | Precautions |
| D Danger | Risks that could occur in all life activities | Elderly people are highly likely to suffer from heartstroke even in a resting state. Avoid going out and move to a cooler room. |
| C Heavy alert | Avoid blazing sun when going out and pay attention to an increase of room temperature when staying in a room. | |
| B Alert | Risks that could occur in middle level or higher life activities | Rest regularly when doing exercise or intense work. |
| A Caution | Risks that could occur in hard life activities | Generally the risk is low, but people may suffer when doing hard exercise or hard work. |
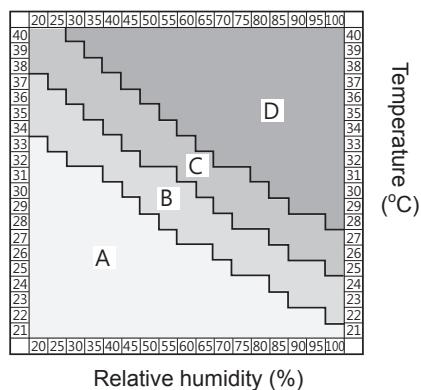
NOTE
This is not a function to prevent heatstroke. Please use this function as an assistance.
HOW TO CHANGE VARIOUS SETTINGS
You can change the functions in the "Type of setting" table in the following.
1 Turn the unit power OFF.
2


3 Select "Function number" from the table in the following.

Forward
or

Reverse

Set
4 Select "Setting number" from the table in the following.

Forward
or

Reverse

set

5 Press Power button to finish the setting.


Turn off
Type of setting
Function
Light Control
You can select the brightness of the Front Display, Cleanliness Monitor and Air Outlet LED.


Setting
Auto (default)
Light automatically switches ON or OFF based on room brightness.
Room is bright: light is ON
Room is dark: light is OFF

Darker
Turn off
- When set to "Turn off", the "Darker" light illuminates for 3 seconds after operation starts and then the light turns off.
- The Humidity Light flashes darker only when the unit needs water.
- Patrolling Light flashes/lights dimmer only when the room temperature or humidity requires attention.
| Function | Setting |
| Sound Indicator Setting You can set the unit to make a beeping sound when the Water Tank is empty. | OFF ON |
| Auto Restart If the unit is unplugged or if there is a power failure, the unit will resume operation with the previous settings after power is restored. | OFF ON (default) |
| Adjusting Sensor Sensitivity (F4-F7) Light Sensor | OFF Low |
| Dust(sensitive) Sensor | OFF Standard (default) |
| Odour Sensor (UA-HG60E / UA-HG50E) | OFF High |
| Motion Sensor (UA-HG60E / UA-HG50E) You can set the time until the Motion Sensor detects that no one is in the room. You can also cancel Motion Sensor sensing. | OFF ON(Standard sensing time) (default) ON(Longer sensing time) Cancellation |
| Patrolling Function Setting You can set the unit to make a beeping sound when Patrolling Light turn to red. You can also cancel Patrolling Function. | OFF ON(notifies with Patrolling Light and sound) The beeping sound continues for 30 seconds at maximum. Pressing any button on the operation panel stops the sound. When Patrolling Light is red, the beeping sounds hourly. ON(notifies with Patrolling Light only)(default) Cancellation |
CARE AND MAINTENANCE
FILTER INDICATOR
The filter reset Indicator light will turn on after approximately 720 hours operating. (30 days × 24 hours =720 hours)
This is a reminder to perform the maintenance described below. After performing maintenance, reset the Filter Indicator.
CARE INDEX
| Place | Ref. | |
| 1 | Water Tank | E-13 |
| 2 | Unit / Back Panel (Pre Filter) | |
| 3 | Sensors | |
| 4 | Humidifying Filter | E-14 |
| Humidifying Tray | ||
| 5 | HEPA Filter | E-15 |
| Deodorizing Filter | ||
WATER TANK
Rinse the inside with water.
NOTE How to clean hard to remove dirt.
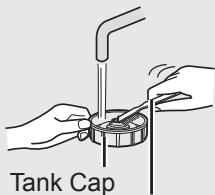
Clean the inside of the Water Tank with a soft sponge and the Tank Cap with a cotton swab or toothbrush.
Toothbrush
UNIT / BACK PANEL
Wipe with a dry, soft cloth.
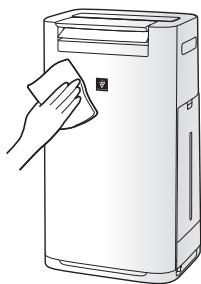
Remove the dust gently with a cleaning tool such as a vacuum cleaner.
NOTE How to clean hard to remove dirt.
Back Panel
- Add a small amount of kitchen detergent to water and soak for about 10 minutes.
CAUTION
Do not apply excessive pressure when scrubbing the back panel.
- Rinse off the kitchen detergent with clean water.
- Completely dry the filter in a well ventilated area.
Sensor Filter
Sensor Filter
- Remove the Back Panel.
- Remove the sensor filter.
- If the sensor filter is very dirty, wash it with water and dry it thoroughly.
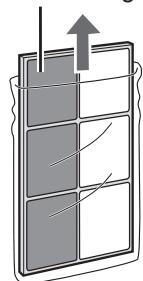
HUMIDIFYING FILTER AND TRAY
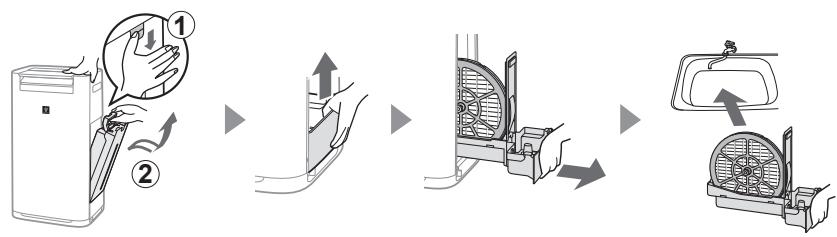
HOW TO REMOVE THE HUMIDIFYING FILTER AND TRAY.

HOW TO ATTACH THE HUMIDIFYING FILTER AND TRAY.
After maintenance, correctly reattach the parts.
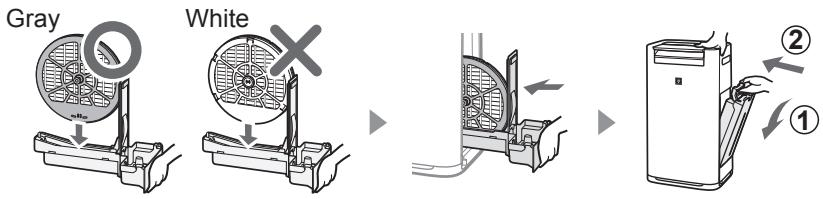
Humidifying Filter
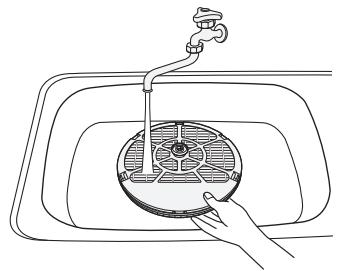
Rinse with plenty of water.
NOTE
If you remove the Humidifying Filter shaft, be sure to reattach it to its original position.

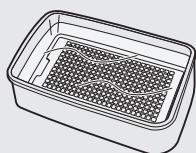
Humidifying Tray
1 Remove the Humidifying Tray Cover.
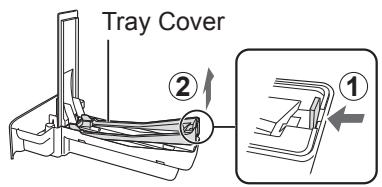
2 Rinse with plenty of water.
3 Reattach the Humidifying Tray Cover.
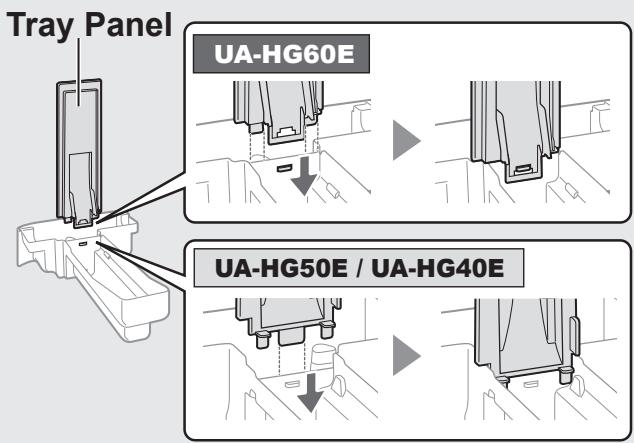
- Do not remove the Float and the Tray Panel. If they come off, refer to E-15.
NOTE How to clean hard to remove dirt.
| Kitchen detergent (only Humidifying tray) | Citric acid (available at some drugstores) | 100% bottled lemon juice with no pulp | |
| 1 | 1. Fill the tray half-way with water. 2. Add a small amount of kitchen detergent. | 2 1/2 cups of water 3 teaspoons | 3 cups of water 1/4 cup |
| 2 | Soak for 30 minutes. | Soak for 30 minutes. (When using lemon juice as your descaling solution, allow for more soak time.) | |
| 3 | Rinse off the kitchen detergent or the descaling solution with clean water. | ||
HEPA FILTER / DEODORIZING FILTER
Remove the dust on the HEPA Filter and Deodorizing Filter.
CAUTION
- Do not wash the filters. Do not expose to sunlight.
HEPA FILTER
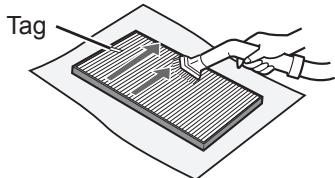
Maintain only the tagged surface. Do not clean up the opposite surface. The filter is fragile, so be careful not to apply too much pressure.
DEODORIZING FILTER
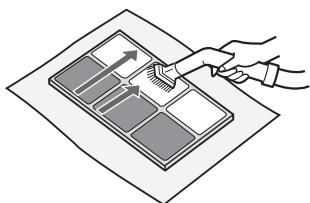
Both surfaces can be maintained.
The filter may be broken if being too much power is applied on it, so please handle it with care.
Some odours absorbed by the filters will break down over time, causing additional odours. Depending on usage conditions, and especially if the unit is used in environments significantly more severe than a normal household, these odours may become noticeable sooner than expected.
Replace the filter in those cases or if dust is unable to be removed after maintenance.
How to install the Float and the Tray Panel
Float
FILTER REPLACEMENT
LIFE OF FILTERS
Filter life varies depending on the room environment, usage conditions, and location of the unit.
Lifespan of HEPA filter and Deodorizing filter and replacement suggestions are based on purifying a room in which 5 cigarettes are smoked per day and the unit's dust collection and deodorizing performance has declined to half the level of a new filter.
We recommend replacing the filter more frequently if the unit is used in conditions significantly more severe than a normal household.
HEPA Filter
About 10 years after opening
-Deodorizing Filter
About 10 years after opening
- Humidifying Filter
About 10 years after opening
Replacement Filter Model
Consult your dealer when purchasing a replacement filter.
| Replacement Filter | UA-HG60E | UA-HG50E | UA-HG40E |
| HEPA Filter (1 unit) | UZ-HD6HF | UZ-HD4HF | UZ-HD4HF |
| Deodorizing Filter (1 unit) | UZ-HG6DF | UZ-HG4DF | UZ-HG4DF |
| Humidifying Filter (1 unit) | UZ-HG6MF | UZ-HG6MF | UZ-HG6MF |
*Do not dispose these parts.
Disposing of filters
Dispose of used filters according to local laws and regulations.
HEPA Filter material:
- Filter: Polypropylene
- Frame: Polyethylene
Deodorizing Filter material:
Filter: Paper
- Frame: ABS resin
Humidifying Filter material:
- Filter: Rayon, polyester
TROUBLESHOOTING
Before contact for service, review the troubleshooting chart below to make sure that the problem is not a unit malfunction.
| SYMPTOM | REMEDY (the following are not due to a malfunction) |
| Odour and smoke persists. | ·Check the filters. If they appear to be extremely dirty, clean or replace them. (Ref. E-15) |
| The Cleanliness Monitor is blue even when the air is not clean. | ·The air may have been dirty when the unit was plugged in. Unplug the unit, wait one minute, and then plug the unit in again. |
| The Cleanliness Monitor light is red even when the air is clean. | ·Dirty or clogged dust(sensitive) sensor openings interfere with sensor operation. Gently clean the sensor filter or the back panel. (Ref. E-13). |
| The unit makes a clicking or ticking sound. | ·The unit may make clicking or ticking sounds when it is generating ions. |
| Air discharged from the unit has an odour. | ·Check to see if the filters are extremely dirty. ·Clean or replace the filters. (Ref. E-13, E-14, E-15) ·Use only fresh tap water. Using other water sources risks the growth of mold, fungi, or bacteria. |
| The unit does not operate when cigarette smoke is in the air. | ·Make sure the unit is installed in a location in which the sensors can detect cigarette smoke. ·Check to see if the dust(sensitive) sensor openings are blocked or clogged. If they are blocked or clogged, clean the sensor filter or the back panel. (Ref. E-13) |
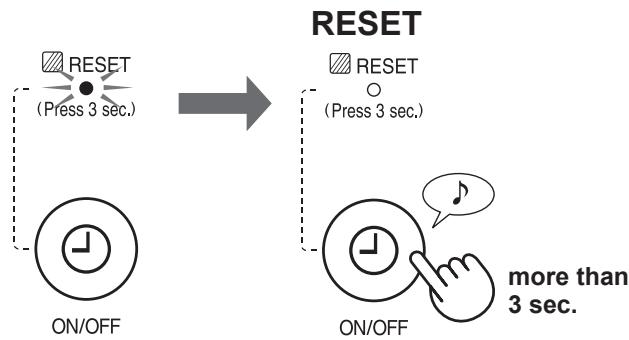
| The FILTER RESET Indicator Light is on. | ·Whenever after performing maintenance or replacing the filters, connect the power cord to an outlet and then press the Filter Reset Button. (Ref. E-13) |
| The Front Display is turned off. | ·When Light control is set to "Auto", the light automatically turns off when the room is dark. Moreover, when Light control is set to "Turn off", the light is always off. If you do not want the light to be off, set Light control to the "Darker" setting. (Ref. E-11) |
| The Humidify Light on the Front Display does not light up when the tank is empty. | ·The room has reached the appropriate level of humidity and has stopped humidifying. ·Check the styrofoam float for impurities. Clean the Humidifying Tray. Make sure that the unit is on a level surface. (Ref. E-14) |
| The water level in the tank does not decrease or decreases slowly. | ·Check to see if the Humidifying Tray and Water Tank are correctly installed. Check the Humidifying Filter. (Ref. E-14) ·If the filter is extremely dirty, clean or replace it. (Ref. E-15) |
| The Cleanliness Monitor changes colour frequently. | ·The Cleanliness Monitor automatically changes colour when the dust (sensitive) sensor and odour sensor* detect impurities. If you are concerned about the change, you can change sensor sensitivity. (Ref. E-11,E-12) (*UA-HG60E / UA-HG50E) |
| There is a discrepancy between the unit's Humidity Monitor and another hygrometer in the room. | ·There is a difference in the humidity level within the same room. ·The sensor have different measurement parameters. ·If the monitor indicates wattage or temperature, switch the display by pressing the DISPLAY SELECT button. (Ref. E-10) |
| The unit PM2.5 Light does not match weather report or other local PM2.5 data. | ·Outdoor and indoor as well as the home environment (the volume of traffic near-by, number of stories in home, etc.) may cause a reading different than local PM2.5 data. |
| “℃” Light flashing | ·The room is suitable for viruses to survive due to low room temperature. We recommend you adjust the temperature using heating appliances. (Ref. E-9) ·The room temperature and humidity is high. We recommend that you drink some water or lower the room temperature. (Ref. E-10) |
ERROR DISPLAY
If error occurs repeatedly, contact the Sharp Service Centre.
| DIGITAL INDICATION | REMEDY |
| 82 | Make sure that the Humidifying Filter and Humidifying Tray are properly installed, and then turn the power to ON again. |
| C1 C4 C6 C9 | Unplug the unit, wait one minute, and then plug the unit in again. |
SPECIFICATIONS
| Model | UA-HG60E | UA-HG50E | UA-HG40E | |||||||
| Power supply | 220-240 V 50-60 Hz | |||||||||
| Fan Speed Adjustment | MAX | MED | LOW | MAX | MED | LOW | MAX | MED | LOW | |
| CLEAN AIR | Fan Speed (m3/hour) | 408 | 240 | 72 | 306 | 180 | 60 | 240 | 120 | 60 |
| Rated Power (W) | 72 | 38 | 5.0 | 53 | 26 | 5.0 | 31 | 12 | 5.0 | |
| Noise Level (dBA) | 53 | 48 | 24 | 52 | 47 | 19 | 46 | 40 | 19 | |
| CLEAN AIR & HUMIDIFY | Fan Speed (m3/hour) | 342 | 240 | 72 | 240 | 120 | 60 | 210 | 120 | 60 |
| Rated Power (W) | 55 | 40 | 6.5 | 33 | 14 | 6.5 | 24 | 14 | 6.5 | |
| Noise Level (dBA) | 49 | 48 | 24 | 46 | 40 | 20 | 43 | 40 | 20 | |
| Humidification (mL/hour) *1 | 630 | 470 | 200 | 450 | 300 | 150 | 400 | 300 | 150 | |
| Recommended Room Size (m2) *2 | ~50 | ~38 | ~28 | |||||||
| High density Plasmacluster ion recommended room size (m2) *3 | ~35 | ~28 | ~21 | |||||||
| Water Tank Capacity (L) | 3.0 | 2.5 | 2.5 | |||||||
| Sensors | Dust(sensitive) / Odour / Light / Temperature & Humidity / Motion | Dust(sensitive) / Light / Temperature & Humidity | ||||||||
| Cord Length (m) | 2.0 | |||||||||
| Dimensions (mm) | 370 (W) × 293 (D) × 660 (H) | 345 (W) × 262 (D) × 631 (H) | 345 (W) × 262 (D) × 631 (H) | |||||||
| Weight (kg) | 10.5 | 9.2 | 9.2 | |||||||
1 · The amount of humidification changes in accordance with indoor and outdoor temperature and humidity.
The amount of humidification increases as temperatures rises or humidity decreases.
The amount of humidification decreases as temperatures decrease or humidity rises.
- Measurement Conditions: 20^, 30% humidity (JEM1426)
2 · The recommended room size is appropriate for operating the unit of maximum fan speed.
- The recommended room size is an area in which a given amount of dust particles can be removed in 30 minutes.
*3 - Room size in which approximately 7000 ions per cubic centimeter can be measured in the centre of the room when the unit is placed next to a wall, is running at MED mode settings, and is at a height of approximately 1.2 meters from the floor.
Standby Power
When the unit's power plug is inserted in a wall outlet it consumes about 1.2 watts of standby power in order to operate electrical circuits.
To conserve energy, unplug the power cord when the unit is not in use.


Attention: Your product is marked with this symbol. It means that used electrical and electronic products should not be mixed with general household waste. There is a separate collection system for these products.
A. Information on Disposal for Users (private households)
1. In the European Union
IF YOU WISH TO DISPOSE OF THIS EQUIPMENT, DO NOT USE THE ORDINARY WASTE BIN, AND DO NOT PUT THEM INTO A FIREPLACE!
Used electrical and electronic equipment should always be collected and treated SEPARATELY in accordance with local law.
Separate collection promotes an environment-friendly treatment, recycling of materials, and minimizing final disposal of waste. IMPROPER DISPOSAL can be harmful to human health and the environment due to certain substances! Take USED EQUIPMENT to a local, usually municipal, collection facility, where available.
If in doubt about disposal, contact your local authorities or dealer and ask for the correct method of disposal.
ONLY FOR USERS IN THE EUROPEAN UNION, AND SOME OTHER COUNTRIES; FOR INSISTANCE NORWAY AND SWITZERLAND: Your participation in separate collection is requested by law.
The symbol shown above appears on electrical and electronic equipment (or the packaging) to remind the users of this.
Users from PRIVATE HOUSEHOLDS are requested to use existing return facilities for used equipment. Return is free of charge.
If the equipment has been used for BUSINESS PURPOSES, please contact your SHARP dealer who will inform you about take-back. You might be charged for the costs arising from take-back.
Small equipment (and small quantities) might be taken back by your local collection facility. For Spain: Please contact the established collection system or your local authority for take-back of your used products.
2. In other Countries outside the EU
If you wish to discard this product, please contact your local authorities and ask for the correct method of disposal.
For Switzerland: Used electrical or electronic equipment can be returned free of charge to the dealer, even if you don't purchase a new product. Further collection facilities are listed on the homepage of www.swico.ch or www.sens.ch.
B. Information on Disposal for Business Users.
1. In the European Union
If the product is used for business purposes and you want to discard it:
Please contact your SHARP dealer who will inform you about the take-back of the product. You might be charged for the costs arising from take-back and recycling.
Small products (and small amounts) might be taken back by your local collection facilities.
For Spain: Please contact the established collection system or your local authority for take-back of your used products.
2. In other Countries outside the EU
If you wish to discard of this product, please contact your local authorities and ask for the correct method of disposal.

SHARP®
UA-HG60E UA-HG50E UA-HG40E

HIGH-DENSITY 7000
"Plasmacluster" y "Device of a cluster of grapes" son marcas commerciales de Sharp Corporation.

Tipo autonomo
VIDA U T I L DE LOS F I LTROS
"Plasmacluster" e "Device of a cluster of grapes" sãoscarcasregistadasdaSharpCorporation.

Tipointependente
CUIDADOS E MANUTENÇA. PT-13
- INDICADOR DO Filtro
- INDICE DE CUIDADOS
- DEPOŚITO DE ÁGUA
- UNIDADE / PAINEL DE TRÁS
- FILTRO E TABULEIRO DE HUMIDIFICAÇÃO
FILTRO HEPA/FILTRO DESODORIZANTE - SUBSTITUÇÃO DO FILTRO
RESOLUÇÃO DE PROBLEMAS. PT-16
ESPECIFICAÇÖES. PT-17
1 Remova o paine deTRS.

CONSIGNES RELATIVES AU FILTRE
MODE SPOT IONS PLASMACLUSTER
IONS PLASMACLUSTER MARCHE/ARRÉT
FILTR NAWILŽAJACY I POJEMNIK NAWILŽACZA
SPOSOB DEMONTAZU FILTRA NAWILZAJACEGO I POJEMNIKA NAWILZACZA
SPOSOB MONTAZU FILTRA NAWILZAJACEGO I POJEMNIKA NAWILZACZA
PROBLEMOPLOSING .NL-16
SPECIFICATIONS.. .NL-17
PLASMACLUSTERIONEN AAN/UIT
UMC Poland Sp. z o.o.
Ostaszewo 57B, 87-148 Lysomice,
Poland
SHARP CORPORATION
OSAKA, JAPAN
SDA/MAN/0023
www.sharpcounter.eu