EDITH SENSE JAZZ - Range hood ELICA - Free user manual and instructions
Find the device manual for free EDITH SENSE JAZZ ELICA in PDF.

| Product type | Extractor hood |
| Brand | ELICA |
| Model | EDITH SENSE JAZZ |
| Installation type | Ceiling mounting |
| Operation version | Filtering (recirculation) or extraction (via optional kit) |
| Number of speeds | 4 (speed 1, 2, 3, intensive 4) |
| Control | Remote control (provided) |
| Lighting | LED (cooktop lighting and diffused light on some models) |
| Grease filter | Metal, dishwasher safe (max 70°C) |
| Charcoal filter | Active, washable (every 2 months), replacement every 3 years |
| Filter saturation indicator | LED L1: steady red for grease, flashing red for charcoal |
| Programmable delayed shut-off | Yes, via remote control (20, 15, 10 min depending on speed) |
| Supply voltage | 220-240 V (standard estimate) |
| Minimum distance from cooktop | 50 cm (electric) / 65 cm (gas or mixed) |
| Usage | Domestic (kitchens, offices, hotels, etc.) |
| Included accessories | Remote control, fixing plugs |
| Spare parts | Replacement LED (available via after-sales service) |
| Filter maintenance | Grease filter: monthly cleaning; charcoal filter: cleaning every 2 months |
Frequently Asked Questions - EDITH SENSE JAZZ ELICA
User questions about EDITH SENSE JAZZ ELICA
0 question about this device. Answer the ones you know or ask your own.
Ask a new question about this device
Download the instructions for your Range hood in PDF format for free! Find your manual EDITH SENSE JAZZ - ELICA and take your electronic device back in hand. On this page are published all the documents necessary for the use of your device. EDITH SENSE JAZZ by ELICA.
USER MANUAL EDITH SENSE JAZZ ELICA
natural_image
Simple line drawing of a hanging lamp mounted on a wall, with no text or symbols present.
1-2-3-4-5-6-7-8-9- 10-11-12-13-14-15- 16-17-18-19-20-21- 22-28
natural_image
Simple line drawing of a garage structure with a bucket, mounted on a brick wall (no text or symbols)
natural_image
Simple line icon of a shopping cart inside a circle with an asterisk above it (no text or symbols)
4-5-6-7-23a-24-25a- 26a-27-28 4-5-6-7-23b-24-25b- 26b-27-28


natural_image
Symbol of a person crossed out by a diagonal line, representing prohibition or exclusion (no text present)
natural_image
Two identical black silhouette figures of men, no text or symbols present
natural_image
Illustration of two gloves, one open and one closed, with no text or symbols present.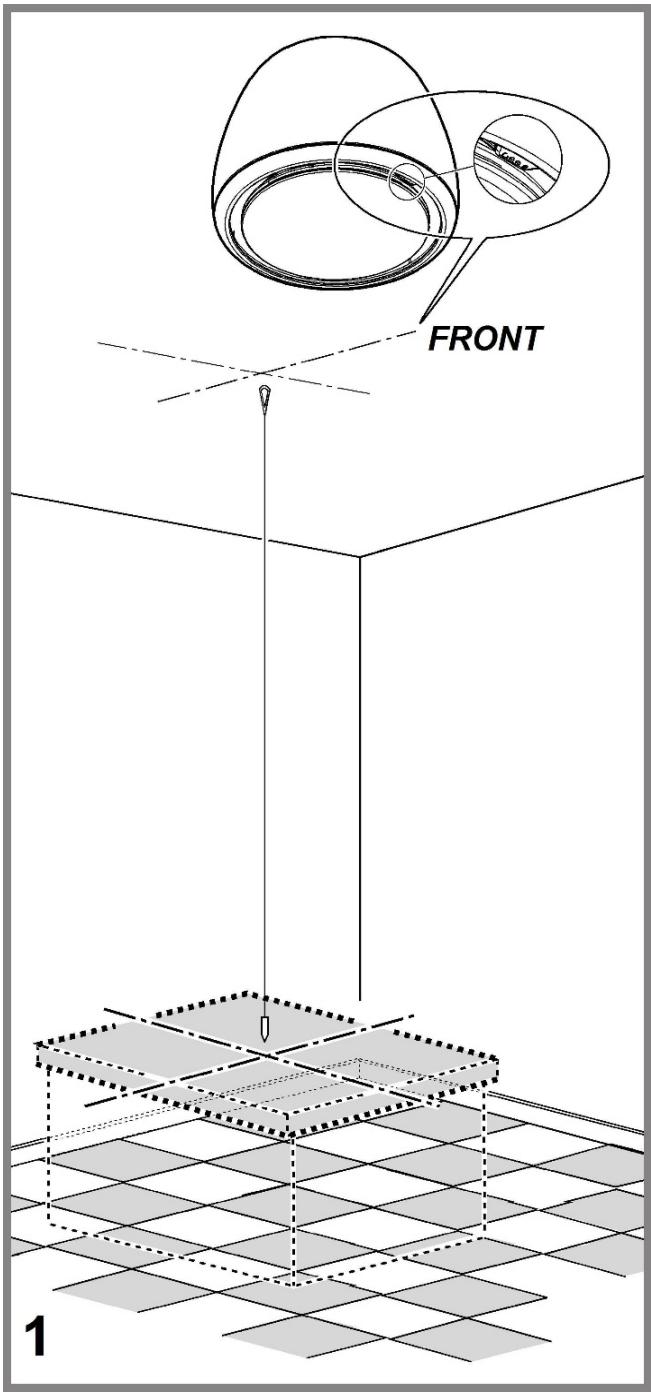
natural_image
Technical line drawing of a mechanical clamp or bracket assembly with multiple curved wires extending outward (no text or symbols)
natural_image
Mechanical clamp assembly diagram showing a handle and bracket (no text or symbols)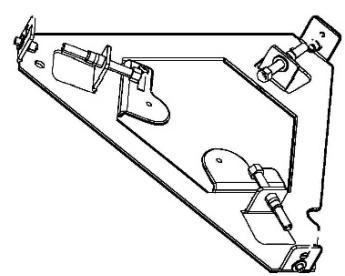
natural_image
Technical line drawing of a mechanical bracket assembly (no text or symbols)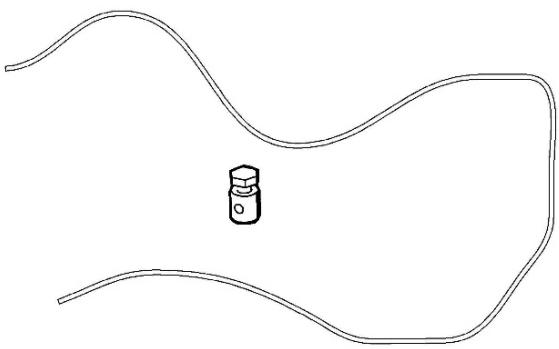
natural_image
Simple line drawing of a wavy path with a small hexagonal object in the center (no text or symbols)2
natural_image
3D diagram of a container inside a transparent box, no text or symbols present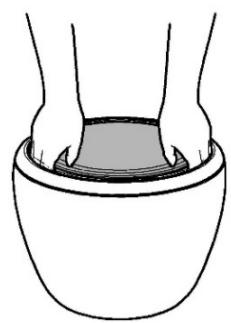
natural_image
Line drawing of a person's hands holding a bowl (no text or symbols)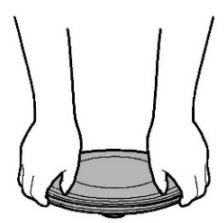
natural_image
Illustration of two hands holding a circular object, possibly a device or tool, with no visible text or symbols..1
natural_image
Simple line drawing of a bowl-like object with a lid and internal structure (no text or symbols)5
natural_image
Illustration of a box with a lid and a cup above it, no text or symbols present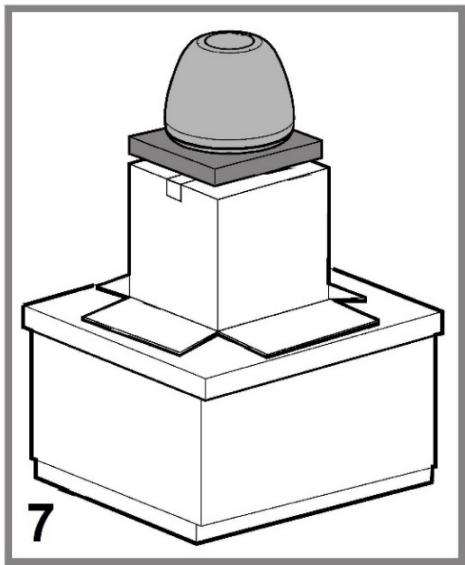
natural_image
Isometric line drawing of a mechanical component with a dome-shaped top and base (no text or symbols)8
natural_image
Three identical cylindrical objects with curved and ring-like features, no text or symbols present.
natural_image
Simple 3D illustration of a conical-shaped object with a circular top (no text or symbols)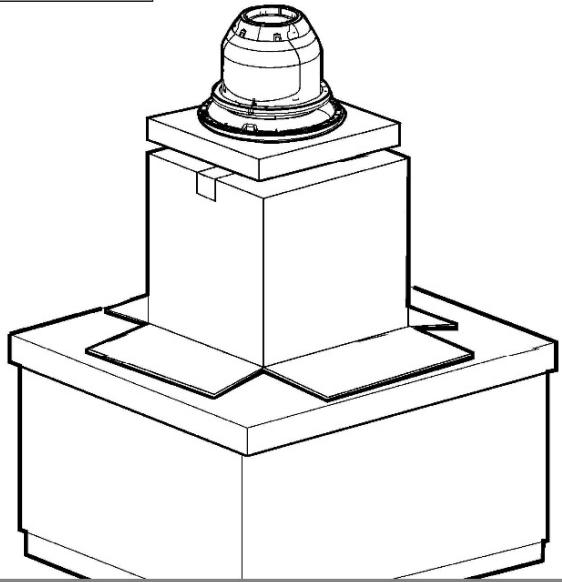
natural_image
Technical line drawing of a mechanical component with a cylindrical top and base (no text or symbols)
9

10
natural_image
Diagram showing a cable being inserted into an electrical switch (no text or symbols present)
natural_image
Diagram of an open electrical switch box with internal components and a cable, labeled '12.4' (no text or symbols on the diagram itself)13

14
natural_image
Technical line drawing of a mechanical bracket assembly (no text or symbols)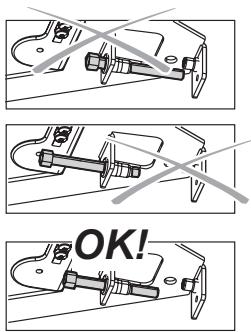
natural_image
Illustration of a hand using a tool to adjust or install a mechanical component (no text or symbols visible)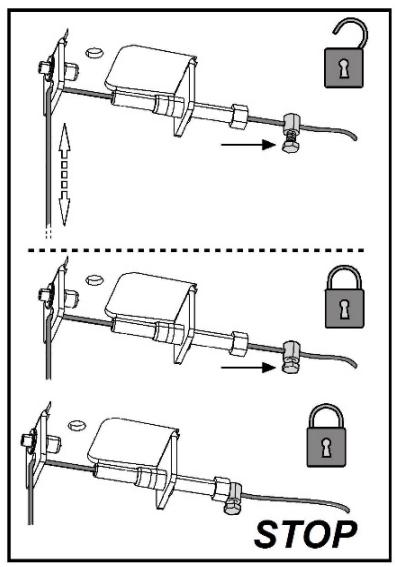
15
natural_image
Technical line drawing of a mechanical assembly with no visible text or symbols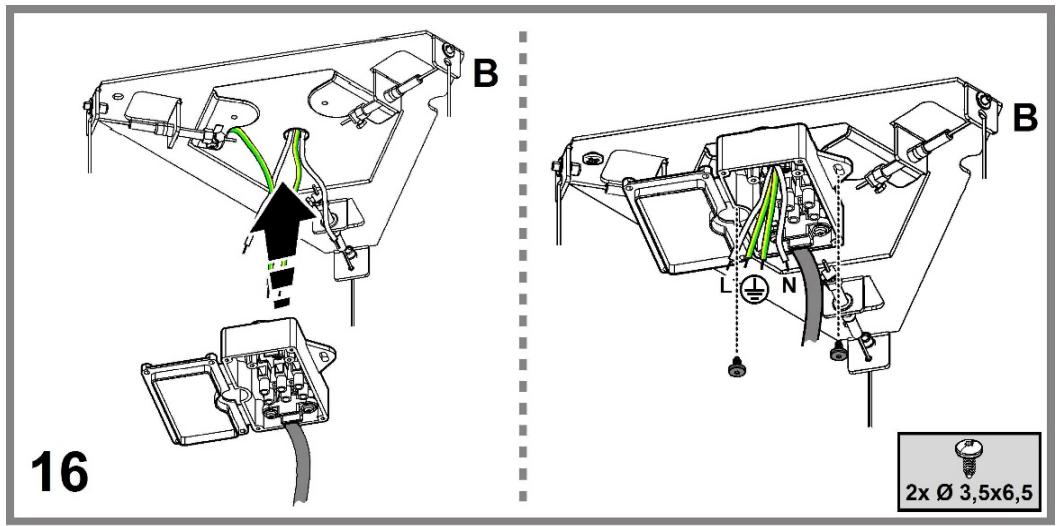
natural_image
Technical illustration of a laboratory apparatus with a conical flask and base, showing a transformation from a beaker to a box (no text or symbols present)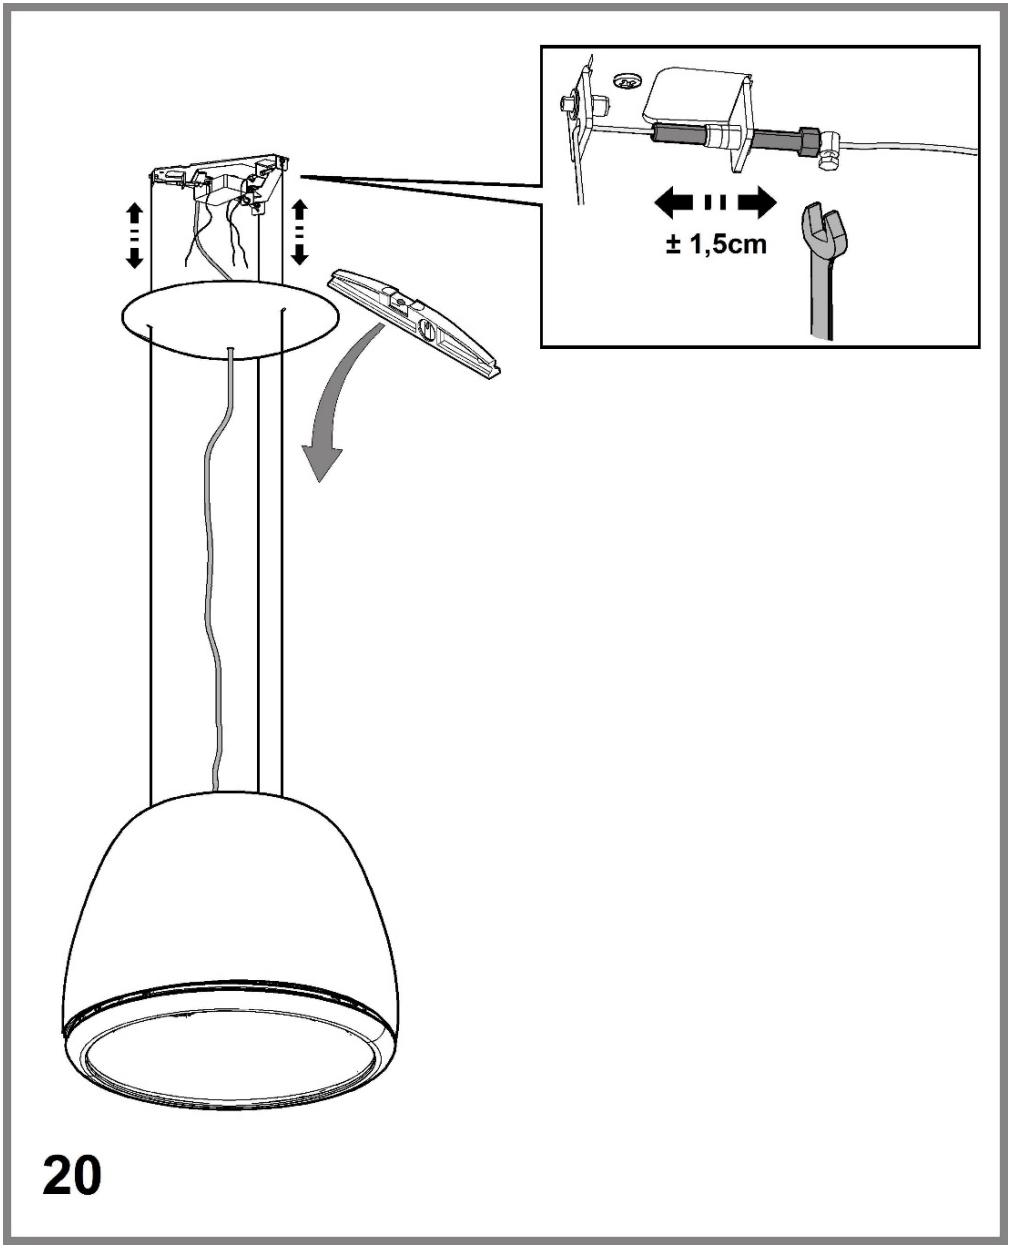
21
22
natural_image
Simple line drawing of a cylindrical device with a circular base and internal components (no text or symbols)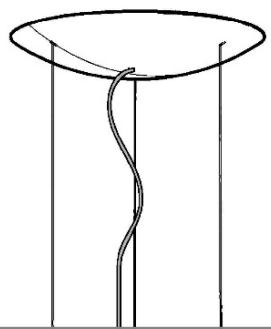
natural_image
Simple line drawing of a twisted rope or cable inside a cylindrical structure (no text or symbols)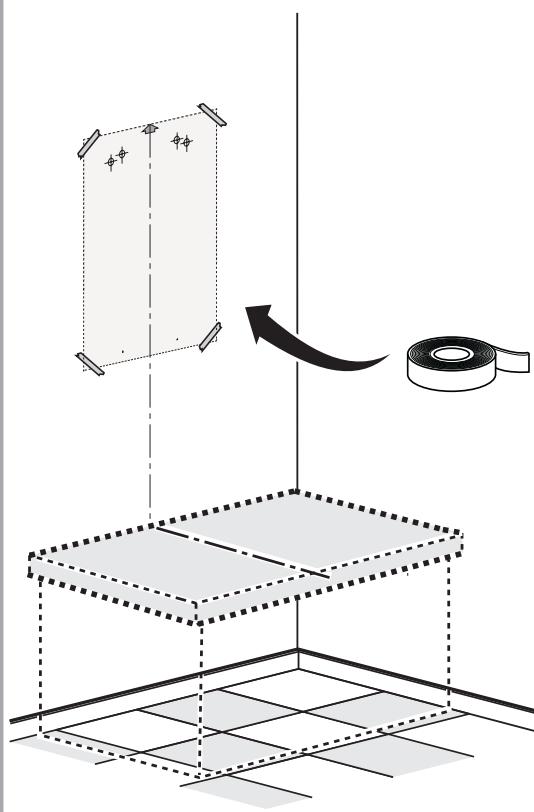
23a


4 x ∅8x40mm

4 x ∅5x45mm

natural_image
Simple line icon of a shopping cart inside a circle with an asterisk above it (no text or symbols)
23b

natural_image
Technical line drawing of a mechanical clamp or bracket assembly with multiple screws and bolts (no text or symbols)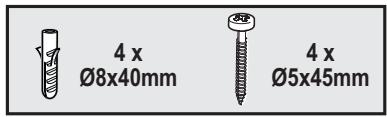

natural_image
Simple line icon of a shopping cart inside a circle with an asterisk above it (no text or symbols)24

natural_image
Simple line icon of a shopping cart inside a circle with an asterisk above it (no text or symbols)25a

natural_image
Simple line icon of a shopping cart inside a circle with an asterisk above it (no text or symbols)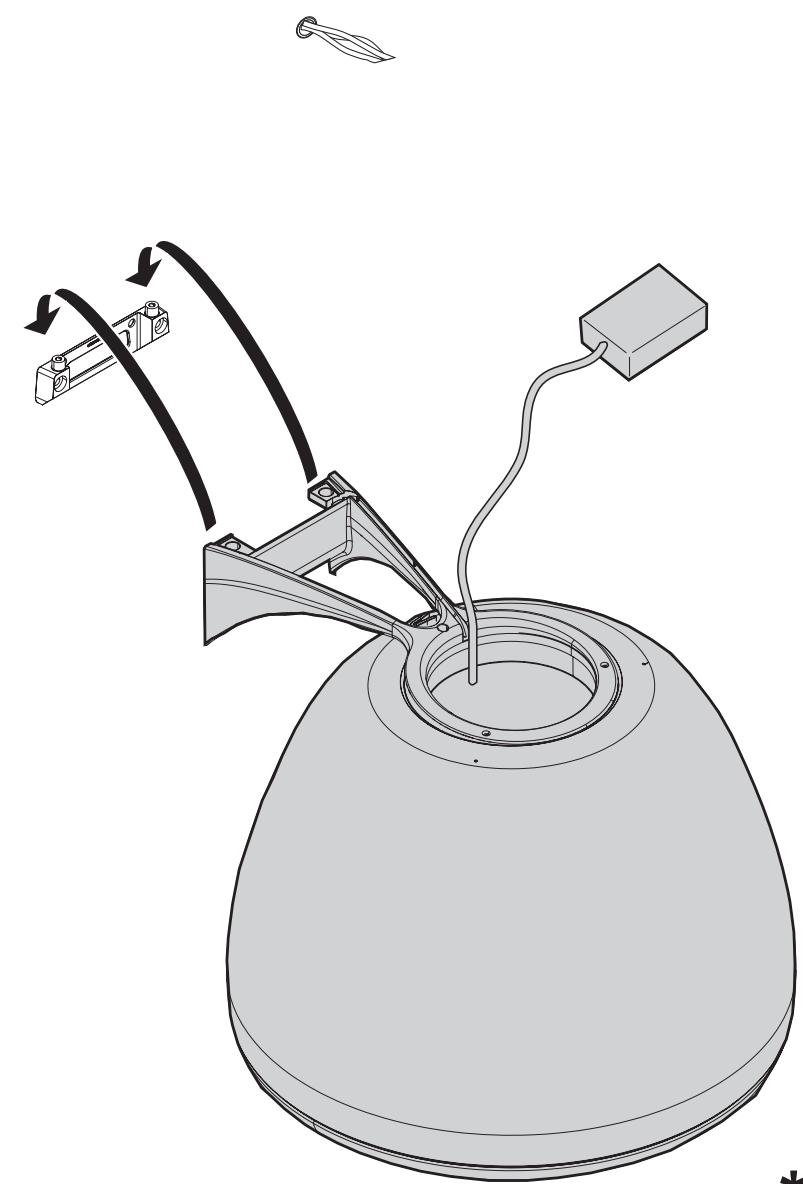
natural_image
Technical line drawing of a mechanical device with attached components and wiring (no text or symbols)25b

natural_image
Simple line icon of a shopping cart inside a circle with an asterisk above it (no text or symbols)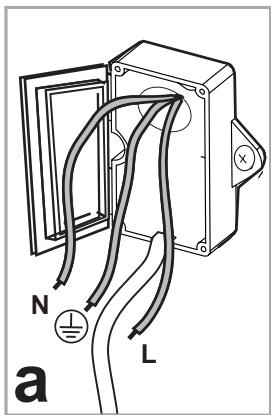


26a.1
natural_image
Technical diagram of a mechanical assembly with wiring and a labeled part '26a.2' (no readable text or symbols beyond label)26a.3
natural_image
Technical line drawing of a mechanical assembly with no visible text or symbols
26a
26a.4

natural_image
Simple line icon of a shopping cart inside a circle with an asterisk above it (no text or symbols)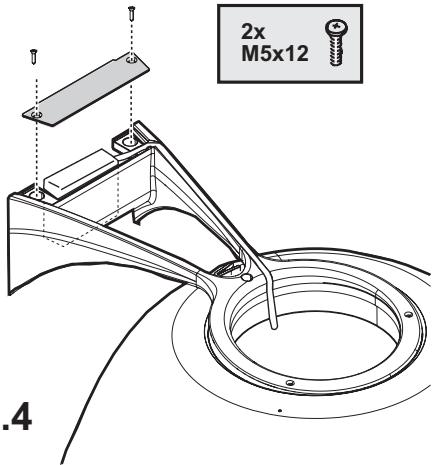


26b

natural_image
Technical line drawing of a mechanical assembly with a central ring and attached components (no text or symbols)
natural_image
Simple line icon of a shopping cart inside a circle with an asterisk above it (no text or symbols)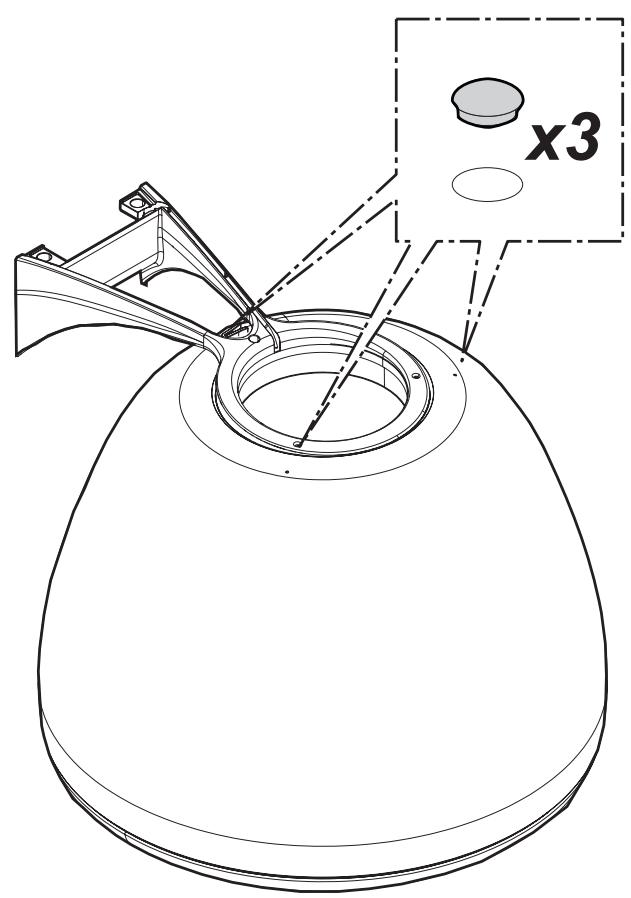
27

natural_image
Simple line icon of a shopping cart inside a circle with an asterisk above it (no text or symbols)28

natural_image
Simple line drawing of a dome-shaped object with a central circular component (no text or symbols)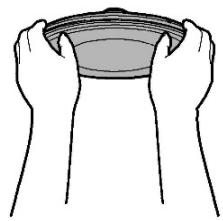
natural_image
Line drawing of two hands holding a bowl (no text or symbols)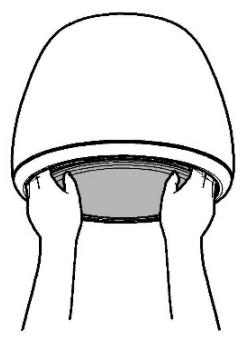
natural_image
Simple line drawing of a person's head wearing a dome-shaped hat, with hands holding the cup (no text or symbols)
natural_image
Simple line drawing of a person's head wearing a hat, no text or symbols present

natural_image
Line drawing of hands holding a circular object inside a dome-shaped container (no text or symbols)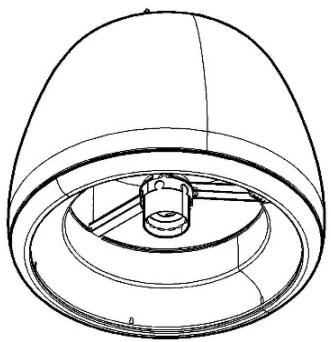
natural_image
Technical line drawing of a dome-shaped mechanical component with internal components (no text or symbols)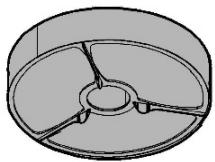
natural_image
3D diagram of a mechanical component with three curved surfaces and a central hub (no text or symbols)29
natural_image
Diagram of a circular mechanical component with internal blades and directional arrows (no text or symbols)30.1
natural_image
Abstract geometric diagram with three concentric ovals and internal lines, no text or symbols present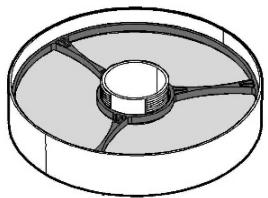
natural_image
3D diagram of a circular mechanical component with internal channels and central hub (no text or symbols)30.2
natural_image
Diagram illustrating a mechanical assembly with cross-sections and an inset showing a hand holding a tool (no text or symbols present)30
natural_image
Illustration of a hand holding a ribbon tied to a piece of fabric (no text or symbols)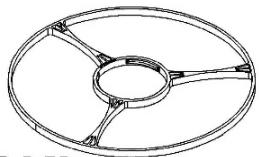
natural_image
Technical line drawing of a circular mechanical component with three radial arms (no text or symbols)OK!
natural_image
Simple line drawing of a round, flanged washer or donut-shaped object with no text or symbols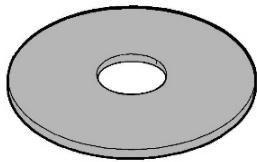
natural_image
Simple 3D illustration of a gray washer or flange with a central hole (no text or symbols)30.3
natural_image
Technical line drawing of a circular mechanical component with internal channels (no text or symbols)natural_image
Icon showing a microphone emitting wireless signal, no text or symbols presentClosely follow the instructions set out in this manual. All responsibility, for any eventual inconveniences, damages or fires caused by not complying with the instructions in this manual, is declined. This appliance is intended to be used in household and similar application such as: - staff kitchen areas in shop, offices and other working environments; - farm houses; - by clients in hotels, motels and other residential type environments; - bed and breakfast type environments.
- It is important to conserve this booklet for consultation at any moment. In the case of sale, cession or move, make sure it is together with the product.
- Read the instructions carefully: there is important information about installation, use and safety.
- Do not carry out electrical or mechanical variations on the product or on the discharge conduits.
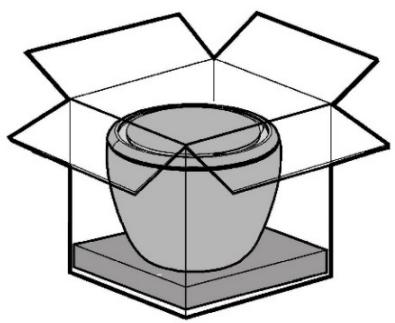
- Before proceeding with the installation of the appliance verify that there are no damaged all components. Otherwise contact your dealer and do not proceed with the installation.
Note: The parts marked with the symbol "(*)" are optional accessories supplied only with some models or otherwise not supplied, but available for purchase.

Caution
- Before any cleaning or maintenance operation, disconnect hood from the mains by removing the plug or disconnecting the mains electrical supply.
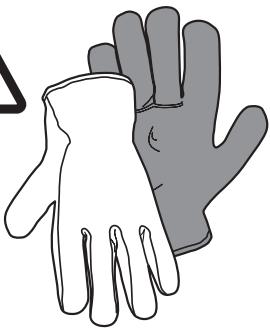
• Always wear work gloves for all installation and maintenance operations. - This appliance can be used by children aged from 8 years and above and persons with reduced physical, sensory or mental capabilities or lack of experience and knowledge if they have been given supervision or instruction concerning use of the appliance in a safe way and understand the hazards involved.
- Children shall not be allowed to tamper with the controls or play with the appliance.
- Cleaning and user maintenance shall not be made by children without supervision.
- The premises where the appliance is
installed must be sufficiently ventilated, when the kitchen hood is used together with other gas combustion devices or other fuels.
- The hood must be regularly cleaned on both the inside and outside (AT LEAST ONCE A MONTH).
- This must be completed in accordance with the maintenance instructions provided. Failure to follow the instructions provided regarding the cleaning of the hood and filters will lead to the risk of fires.
- Do not flambé under the range hood.
- For lamp replacement use only lamp type indicated in the Maintenance/Replacing lamps section of this manual.
The use of exposed flames is detrimental to the filters and may cause a fire risk, and must therefore be avoided in all circumstances.
Any frying must be done with care in order to make sure that the oil does not overheat and ignite.
CAUTION: Accessible parts of the hood may become hot when used with cooking appliances.
- Do not connect the appliance to the mains until the installation is fully complete.
- With regards to the technical and safety measures to be adopted for fume discharging it is important to closely follow the regulations provided by the local authorities.
- The air must not be discharged into a flue that is used for exhausting fumes from appliance burning gas or other fuels.
- Do not use or leave the hood without the lamp correctly mounted due to the possible risk of electric shocks.
- Never use the hood without effectively mounted grids.
- The hood must NEVER be used as a support surface unless specifically indicated.
- Use only the fixing screws supplied with the product for installation or, if not supplied, purchase the correct screws type.
- Use the correct length for the screws which are identified in the Installation Guide.
- In case of doubt, consult an authorized service assistance center or similar qualified person.
WARNING!
- Failure to install the screws or fixing device in accordance with these instructions may result in electrical hazards.
-
Do not use with a programmer, timer, separate remote control system or any other device that switches on automatically.
-
This appliance is marked according to the European directive 2012/19/EC on Waste Electrical and Electronic Equipment (WEEE).
- By ensuring this product is disposed of correctly, you will help prevent potential negative consequences for the environment and human health, which could otherwise be caused by inappropriate waste handling of this product.

- The symbol ■ on the product, or on the documents accompanying the product, indicates that this appliance may not be treated as household waste. Instead it should be taken to the appropriate collection point for the recycling of electrical and electronic equipment. Disposal must be carried out in accordance with local environmental regulations for waste disposal.
- For further detailed information regarding the process, collection and recycling of this product, please contact the appropriate department of your local authorities or the local department for household waste or the shop where you purchased this product.
Appliance designed, tested and manufactured according to:
- Safety: EN/IEC 60335-1; EN/IEC 60335-2-31, EN/IEC 62233.
- Performance: EN/IEC 61591; ISO 5167-1; ISO 5167-3; ISO 5168; EN/IEC 60704-1; EN/IEC 60704-2-13; EN/IEC 60704-3; ISO 3741; EN 50564; IEC 62301.
- EMC: EN 55014-1; CISPR 14-1; EN 55014-2; CISPR 14-2; EN/IEC 61000-3-2; EN/IEC 61000-3-3. Suggestions for a correct use in order to reduce the environmental impact: Switch ON the hood at minimum speed when you start cooking and kept it running for few minutes after cooking is finished. Increase the speed only in case of large amount of smoke and vapor and use boost speed(s) only in extreme situations. Replace the charcoal filter(s) when necessary to maintain a good odor reduction efficiency. Clean the grease filter(s) when necessary to maintain a good grease filter efficiency. Use the maximum diameter of the ducting system indicated in this manual to optimize efficiency and minimize noise.
Use
The hood has been made for use in the internal recirculating filtering version.
Cooking fumes and steam are aspirated inside the hood, filtered and cleaned, passing through the fat filter/s and the carbon filter/s that MUST be supplied with the hood.
Important
It is possible to buy an extraction operation Kit.
In this case the charcoal filter must not be installed.
Furthermore, the use of the extraction kit may require a different installation of the hood from what shown in this manual; therefore, before starting the installation of the hood, buy the extraction kit and consult the instructions enclosed with the kit.
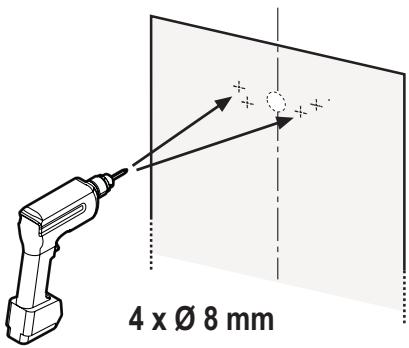
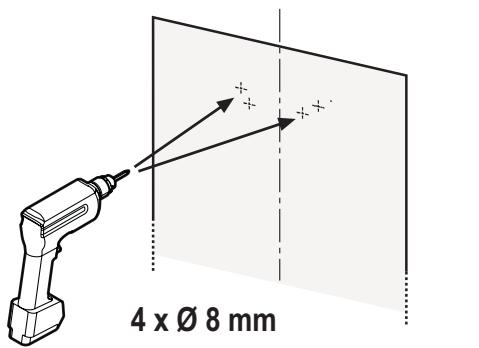
Installation
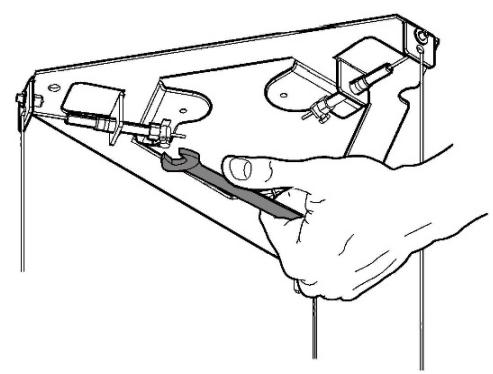
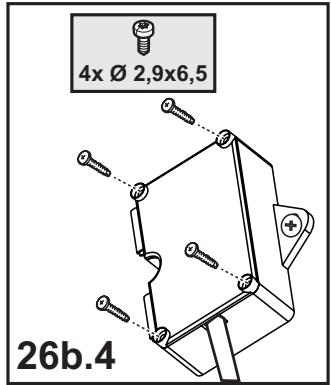
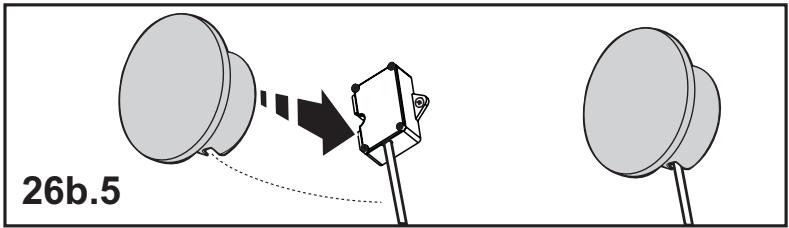
Specialised personnel must carry out both the electrical and the mechanical installation.
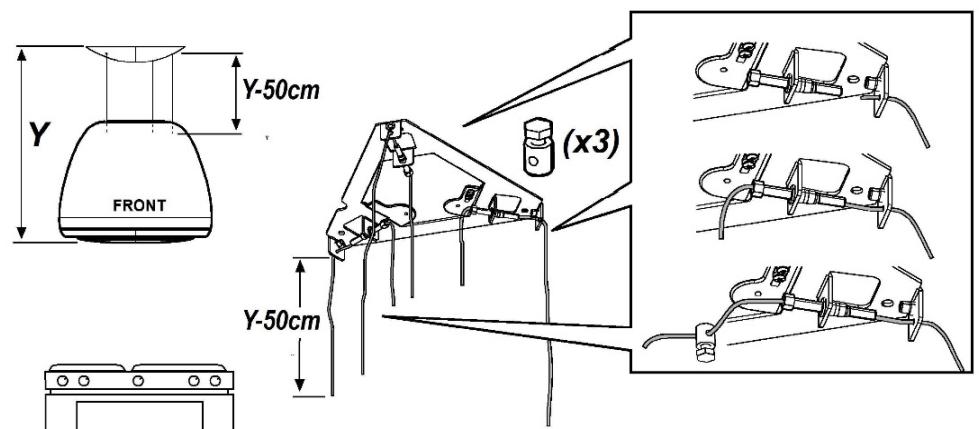
The minimum distance between the supporting surface for the cooking equipment on the hob and the lowest part of the range hood must be not less than 50cm from electric cookers and 65cm from gas or mixed cookers.
If the instructions for installation for the gas hob specify a greater distance, this must be adhered to.

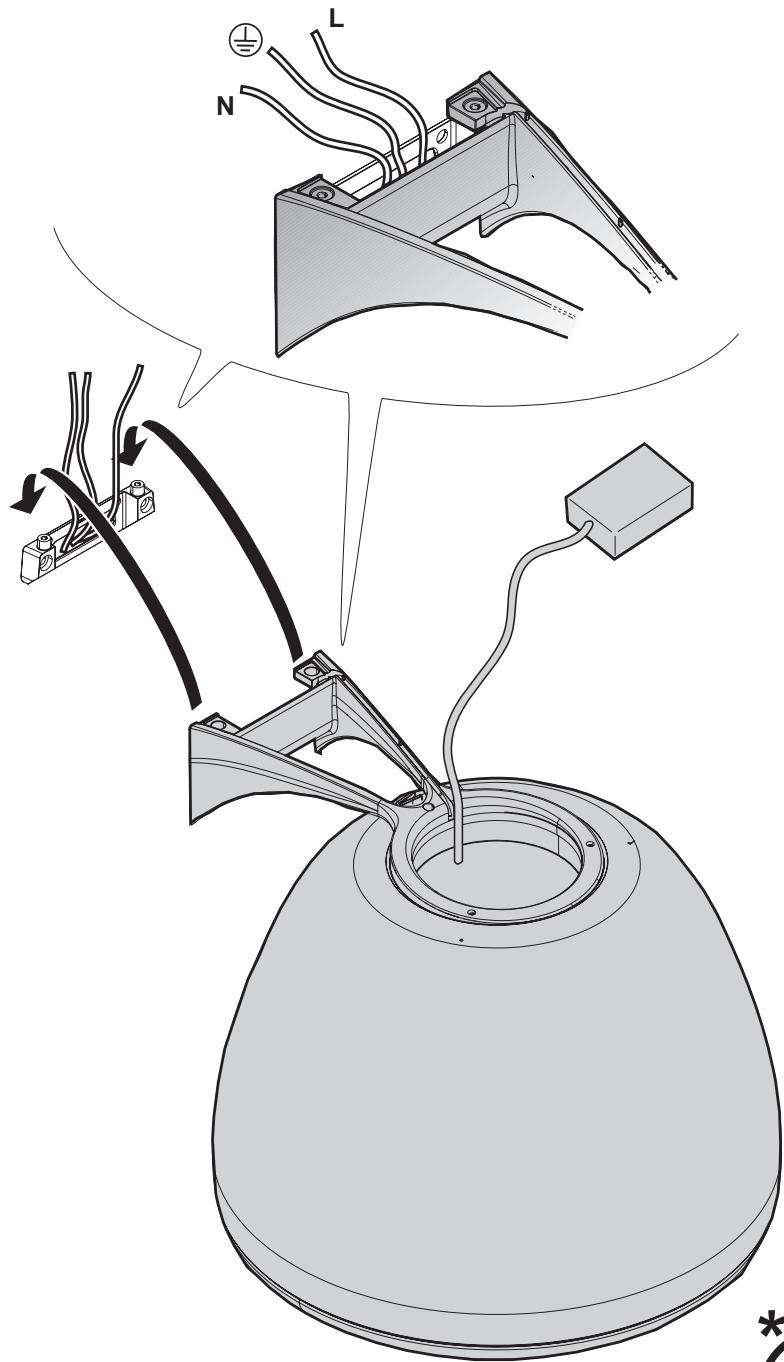
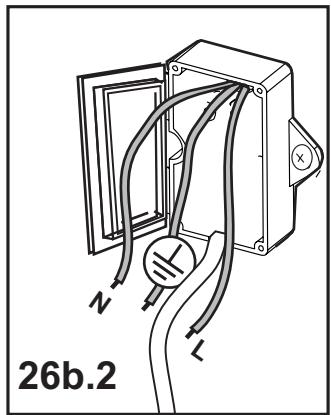
Electrical connection
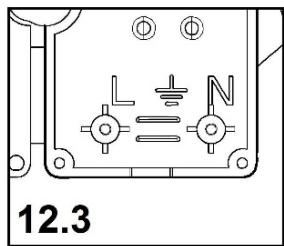
The mains tension must correspond to the tension shown on the characteristic label situated inside the hood.
The product is meant for connecting directly to the mains supply, therefore apply a regulation bipolar switch that ensures complete disconnection from the mains in the conditions of category III over-tension, conforming to the installation rules.
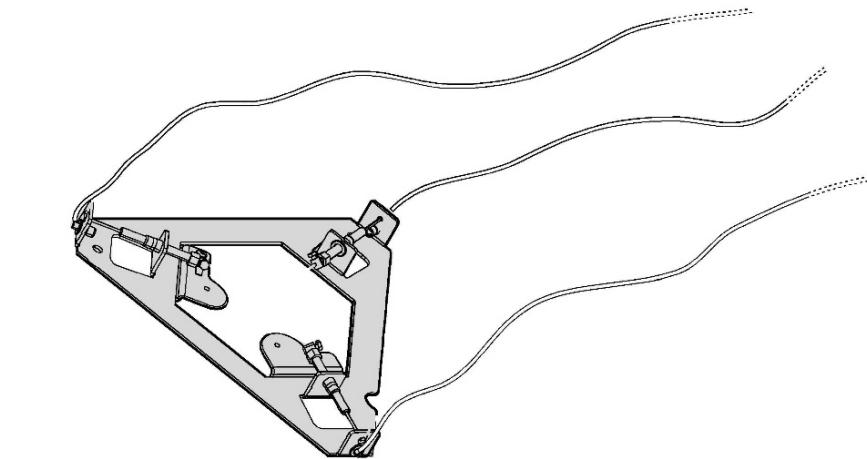
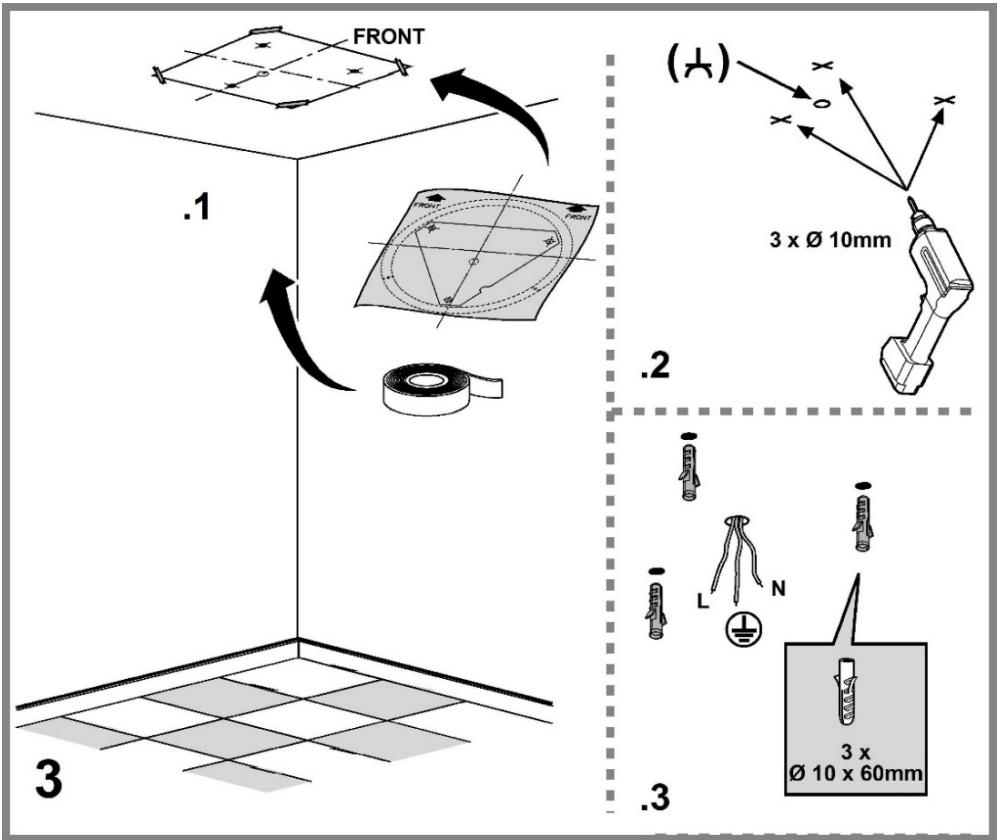
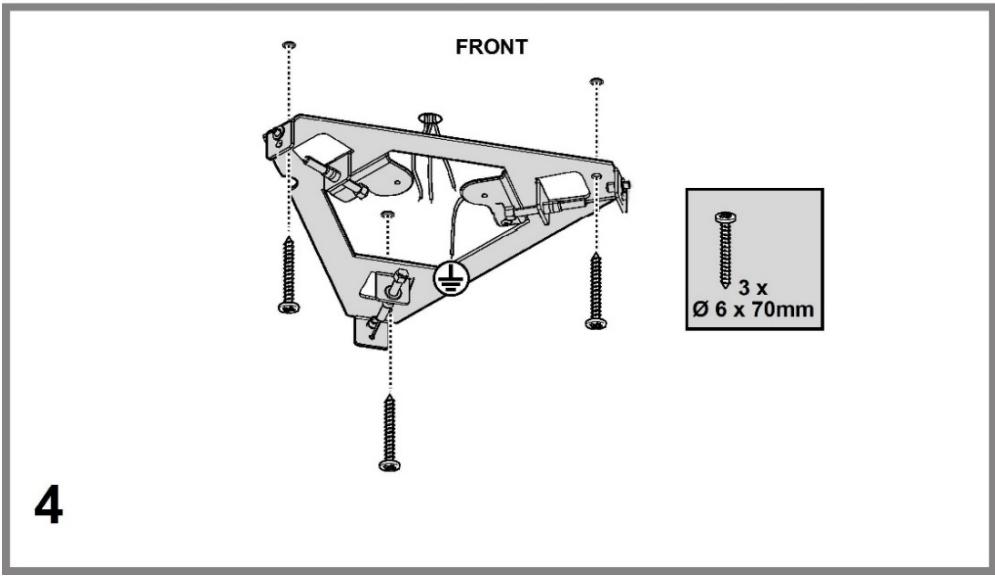
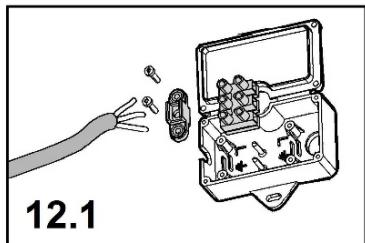
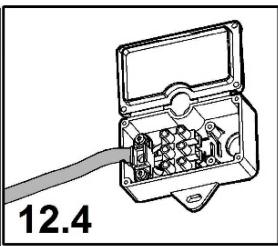
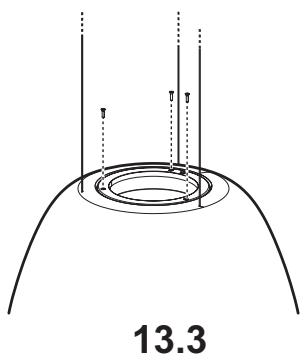
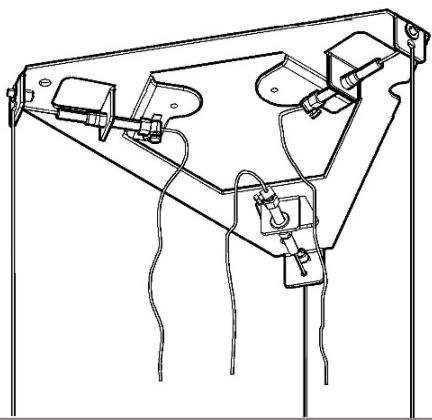
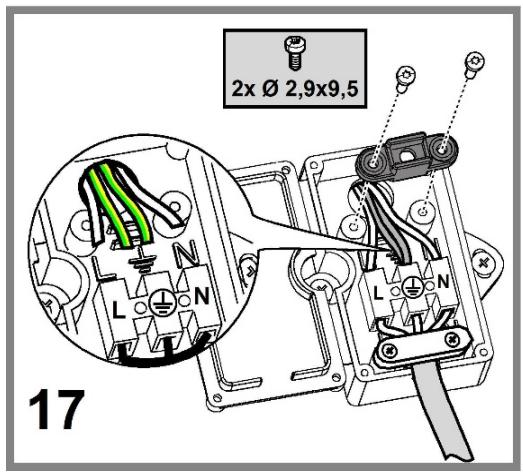
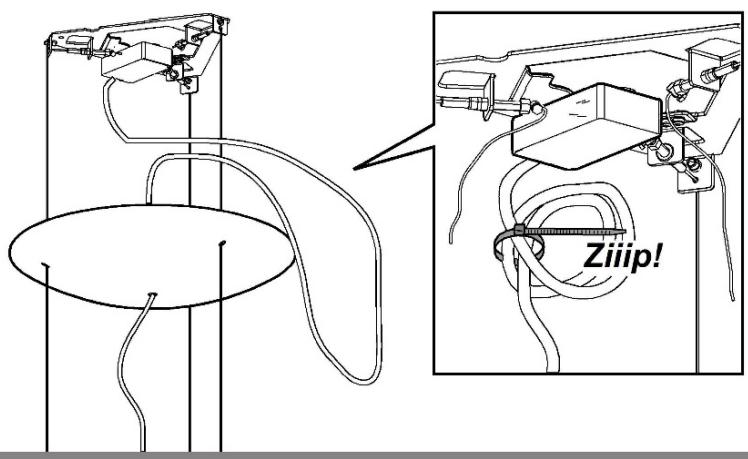
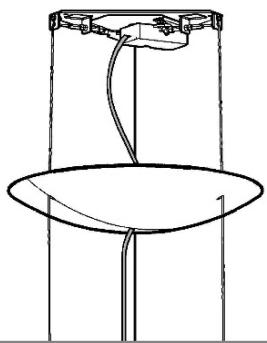
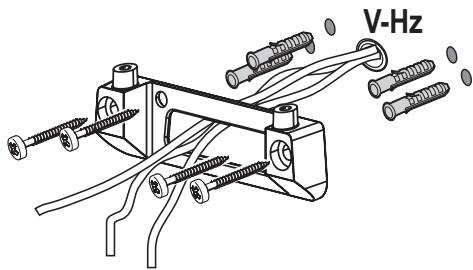
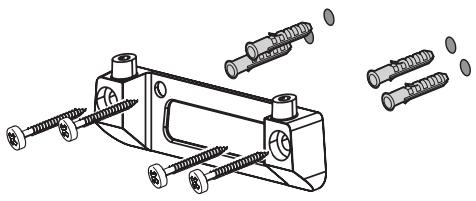
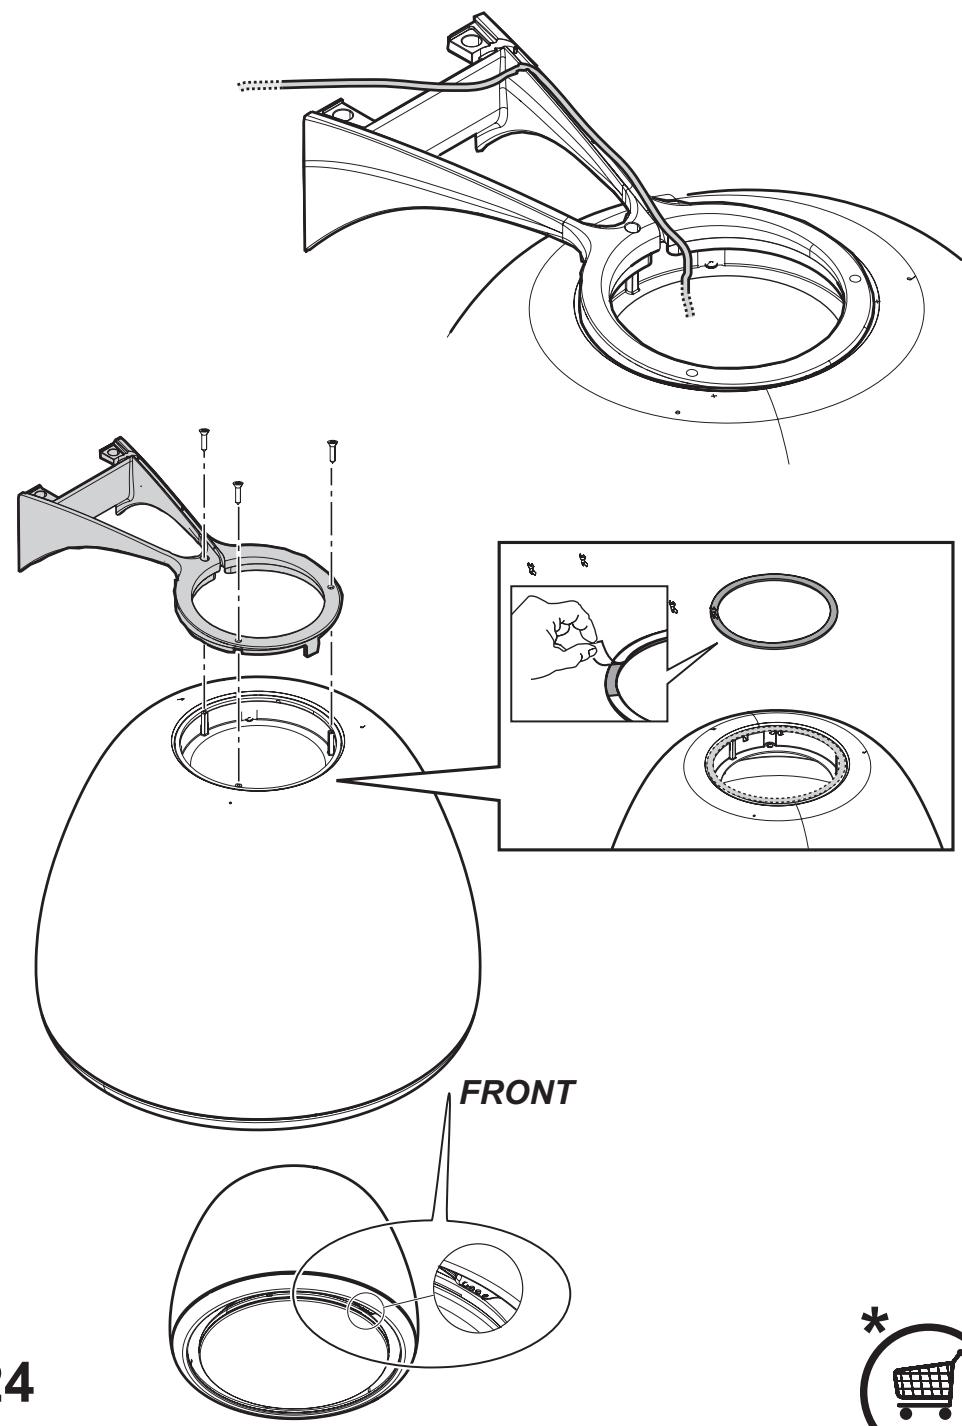
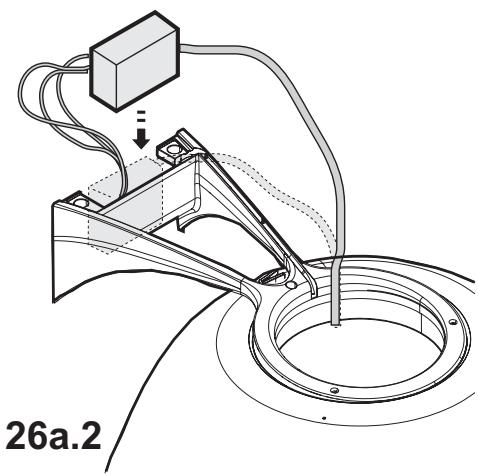
Warning! Detail B (fixing bracket to the ceiling) is equipped with a conductor (yellow-green) that must be connected to the earth of the domestic electrical plant. Fig. 16-17

ATTENTION! Be particularly careful about positioning excess cable. Failure to observe this indication could cause damage to the apparatus and/or an electric shock to user or the installer.
Warining! Changing the interconnection cable must be carried out by the authorised technical assistance service.
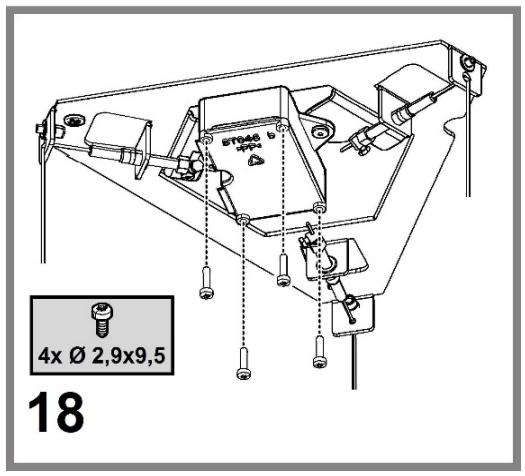
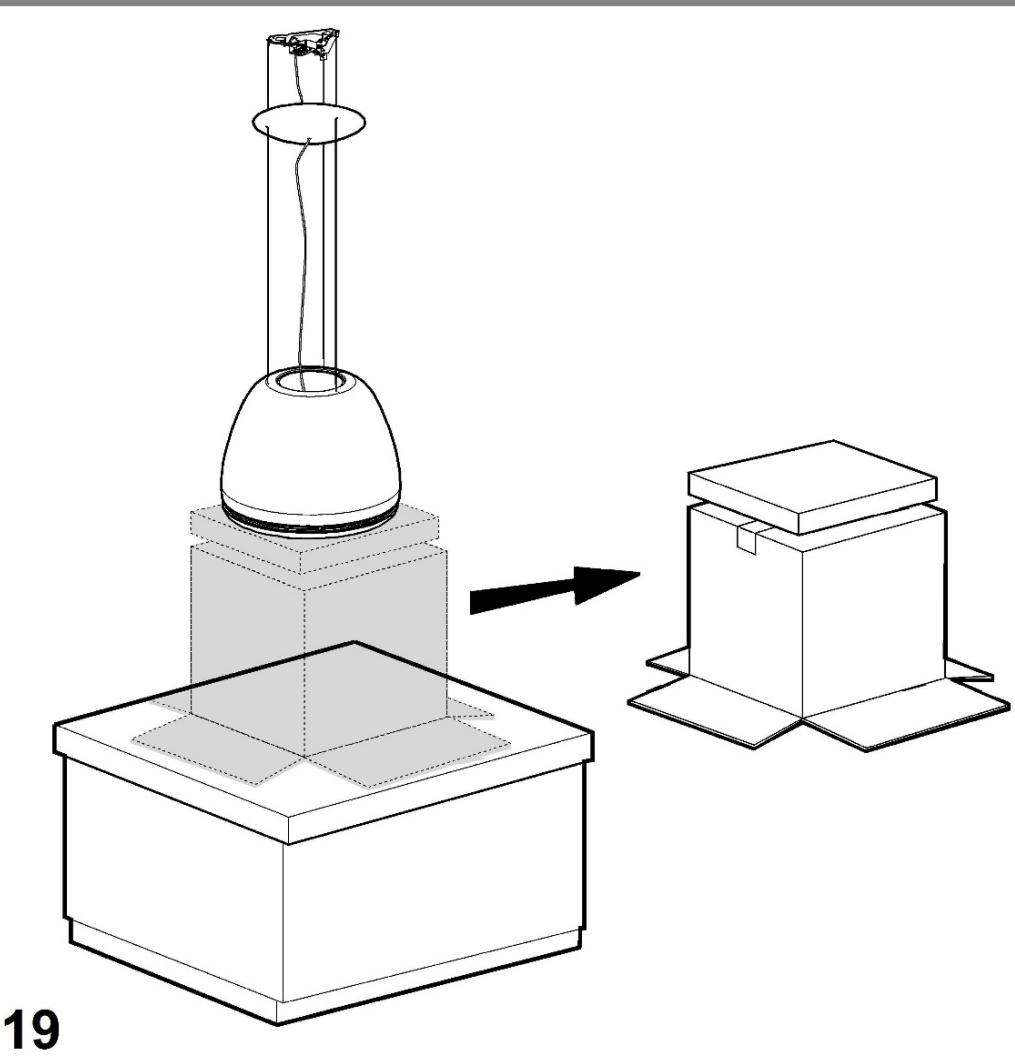
Mounting
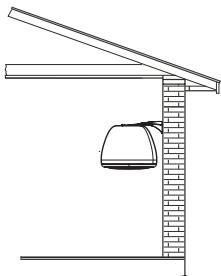
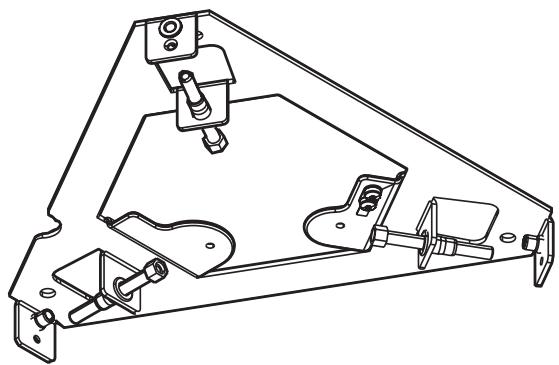
This type of cooker hood must be fixed to the ceiling.
Very heavy product; hood handling and installation must be carried out by at least two persons.
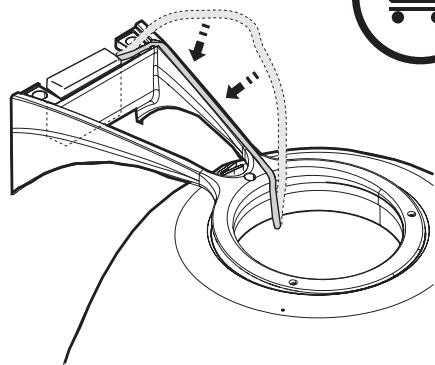
Expansion wall plugs are provided to secure the hood to most types of walls/ceilings. However, a qualified technician must verify suitability of the materials in accordance with the type of wall/ceiling. The wall/ceiling must be strong enough to take the weight of the hood.
Do not tile, grout or silicone this appliance to the wall. Surface mounting only.
Operation
natural_image
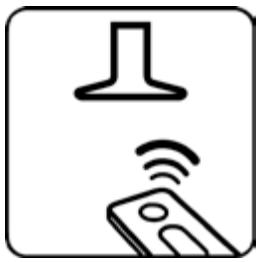
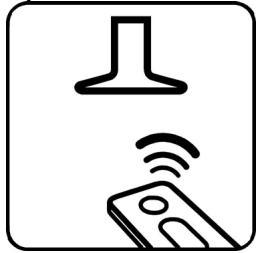
Icon showing a device emitting wireless signal waves, no text or symbols presentThis product is designed to work with an Elica remote control, either supplied with the product or purchased separately as an optional.
To control the hood via remote control, the affiliation procedure must be carried out.
CAUTION!
To begin, the hood must be disconnected and then reconnected to the power supply and the affiliation procedure must be carried out within the first minute of connection to the power.
Read the instructions supplied with the remote control, which provide detailed instructions on affiliation and correct use.
Note: Using the remote control, delayed shut-down can be programmed based on the aspiration speed (power) enabled at that moment:
Speed 1 (low aspiration): 20 minutes
Speed 2 (medium aspiration): 15 minutes
Speed 3 (high aspiration): 10 minutes
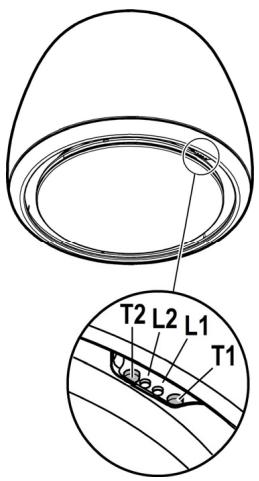
T1. Suction speed (power) control key.
Press repeatedly until the desired speed is selected, choosing between:
Speed OFF - LED L1: off
Speed 1 (low suction) – LED L1: green light
Speed 2 (medium suction) – LED L1: yellow light
Speed 3 (high suction) – LED L1: light blue light
Speed 4 (intensive suction) – LED L1: light blue button
Note: Speed 4 has a limited duration of 5 min., and then the hood passes automatically to speed 2.
T2. Light control key (hob light-dim light)
Press briefly to light up the hob
Keep it pressed longer to light up the dim light
Note: The dim light is only available on some models.
Grease filter saturation warning - LED L1: red light
The warning is visible for about one minute after switching the hood off.
When this warning appears, the grease filter requires maintenance.
Charcoal filter saturation warning - LED L1: red light
The warning is available for about one minute after switching the hood off.
When this warning appears, the charcoal filter requires maintenance.
Deactivation/activation of charcoal filter saturation warning:
This warning is normally activated, to deactivate it:
with the hood off, press the keys T1 and T2 simultaneously for more than 5 seconds.
LED L1 lights up red (signal on) and then begins to flash (signal off).
Repeat the operation if you want to reactivate the signal.
LED L1 will switch from flashing red (signal off) to remaining lit (signal on).
Filter saturation warning reset
With the hood off, press the keys T1 and T2 simultaneously for at least 5 seconds. The LED L1 will stop signalling saturation.
Repeat the operation in case of simultaneous warnings of both filters.
Pairing the remote control
Once the remote control has been successfully paired both LEDs light up in several colours in sequence.
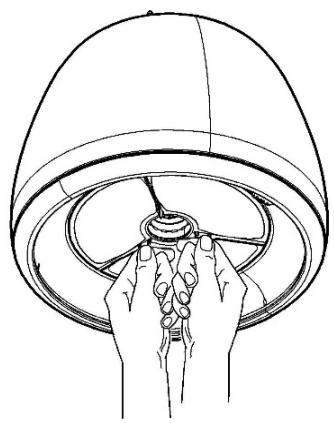
Maintenance
Cleaning
Clean using ONLY the cloth dampened with neutral liquid detergent. DO NOT CLEAN WITH TOOLS OR INSTRUMENTS. Do not use abrasive products. DO NOT USE ALCOHOL!
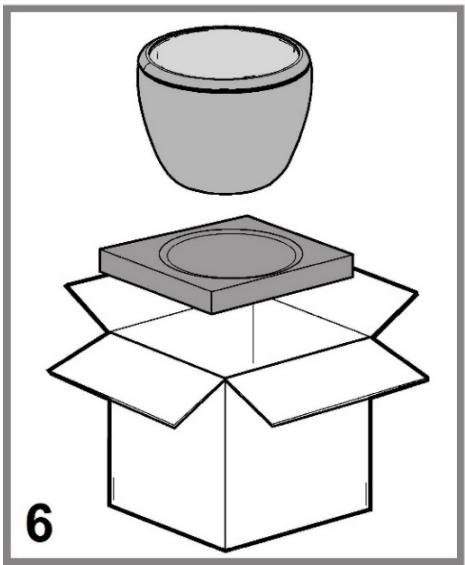
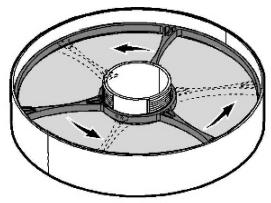
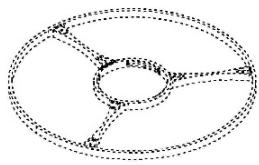
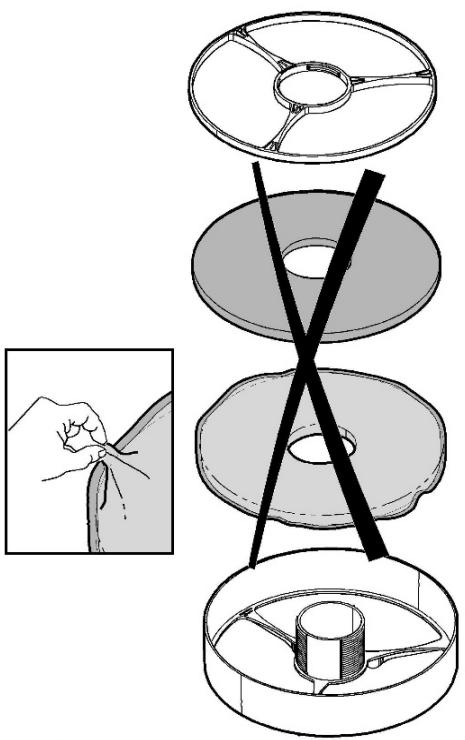
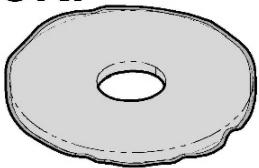
Grease filter
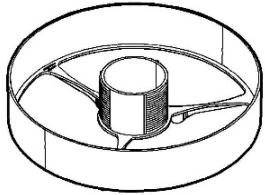
Fig. 28-29-30
Traps cooking grease particles.
This must be cleaned at least once a month (or when the filter saturation indication system - envisaged on the model in possession - indicates this necessity), using non-aggressive detergents, in a dishwasher, which must be set to a low temperature and a short cycle (Tmax: 70°C).
When washed in a dishwasher, metal parts may discolour slightly.
The filter must be dried in an oven for one hour at a max temperature of 100^ C; if the filter is still moist, repeat the operation.
Replace the filter at least every 2 years.
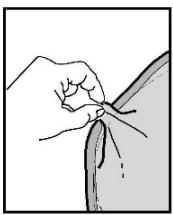
Attention! After having performed maintenance on the filter, FIRST install the grease filter in the specific container and THEN the charcoal filter. The latter can be recognised as it is sealed inside a braiding.
Once the container has been repositioned, make sure only the grease filter is visible.
Charcoal filter (filter version only)
Fig. 28-29-30
It absorbs unpleasant odors caused by cooking.
Attention! The active charcoal filter can be recognised as it is sealed inside a braiding. Perform disassembly, maintenance and cleaning operations of the filter, managing it with the utmost care to avoid damaging or opening the braiding.
The charcoal filter can be washed once every two months (or when the filter saturation indication system – if envisaged on the model in possession – indicates this necessity) using hot water and a suitable detergent, or in a dishwasher at 65^ C (if the dishwasher is used, select the full cycle function and leave dishes out).
Eliminate excess water without damaging the filter, then put it in the oven for 10 minutes at 100^ C to dry completely. Replace the mattress every 3 years and when the cloth is damaged.
Attention! After having performed maintenance on the filter, FIRST install the grease filter in the specific container and THEN the charcoal filter. The latter can be recognised as it is sealed inside a braiding.
Once the container has been repositioned, make sure only the grease filter is visible.
Replacing lamps
Fig. 29
The hood is equipped with a lighting system based on LED technology.
The LEDs guarantee an optimum lighting, a duration up to 10 times as long as the traditional lamps and allow to save 90% electrical energy.
To purchase spare LEDs, contact the technical assistance service.
natural_image
Icon showing a device emitting wireless signal, no text or symbols presentnatural_image
Icon showing a device emitting wireless signal, no text or symbols presentnatural_image
Icon showing a device emitting wireless signal, no text or symbols presentnatural_image
Icon showing a device emitting wireless signal waves, no text or symbols presentnatural_image
Icon showing a device emitting wireless signal waves, no text or symbols presentnatural_image
Icon showing a device with wireless signal waves and a top-mounted device (no text or symbols)T1. DéPêôñï äëYã÷ïõ ôçò ôá÷yôçôaò (éó÷yiò) áíánñüöçóçò.
ĐáôPóôâ êáo' âðáiÜëççç ¡Y÷ñé íá âðéëYíâôâ ôcí ôá÷ýôçôá ðïõ â- déèõiâßôâ iâôáîy:
Ôá÷yôçôá OFF – Led L1: óâçóôü
Ôá÷yôçôá 1 (÷aìçëP áíánññüöçóç) – Led L1: öùò ëåõêü
Ôá÷yôçôá 2 (iYóç áíánññüöçóç) – Led L1: öùò äáëÜæéï
Ôá÷yôçôá 3 (õœçëP áíánññüöçóç) – Led L1: öùò iðëå
Ôá÷ýôçôá 4 (âíôáôêêP áíáññüöçóç) – Led L1: iðëå ðïð áíáâïóâPíåé
Óçiâßuóç: Ç ôá÷ÿôçôá 4 Ý÷âé léa âñéiñéóiYíç äeÜñêáéá 5 êâðôpí, êâõûðéí öïyöïð í áðînñïöçôPñáo IàôáöŸñáôáé áôüiáóá óòçí Ó- á÷ÿôçôá 2.
T2. DéPêôñï äëYã÷ïõ oùôéóìy (öùò âðéöÜlåéáo láãåénYíáôiõ-÷álçëüò oùôéóìüò).
ĐáôPóôâ óyíôïiá ăéá ôï ǒuôéóiü ɔçò ăðéöÜíåéáo ìáãæñYíáôïò.
ĐáôPóôâ êaé êñáôPóôâ ðáôçìYíi ãéaá ðañéóóüôâñī ÷ñüíí íyòùò póôâ íá Ý÷åôâ ÷àìçëü öùôéóiü.
Óçlâßuóç: Í ÷aìçëüò ǒuôéólüò âßíáé äéaèÝóéliò lüíí óa iînéóiÝíá liííôÝéá.
ÓPiaíóç êïnáóiíy ößëôníõ ëßðiõõ - Led L1: êüêêéiī ǒuò.
Ç óPíáíóç ǎiöáíßæåðáé ăéá Ýíá căðòü ðañßðiő ɪaôÜ ɔï óâPóéiì ɔïö áði-nñiöçôPñá.
¼ôáí ǎiöáíßæåðáé ç óPiaíóç áðôP æêôäëYóôâ ôç óõíôPñçóç ôuí ößëônúí ëßðïòò.
ÓPiaíóç eïñáóiíy ößëôníö Üíeñáéá - Led L1: êüêêéiī oùò ðiō áíáaióâpíáe.
Ç óPiaíóç âiöáíßæåôáé ãéa Yía ëaðõü dãñßðïð làôÜ ôcí áðaíáñaiðißçóç ôïð áðiñniöçôPñá.
¼ôáí ăiöáíßæåôáé ç óPìáíóç áðôP ăêôàëYóôâ ɔç óõíôPñçóç ôuí ößëônuí Üièñáêa.
natural_image
Icon showing a device emitting wireless signal, no text or symbols presentnatural_image
Icon showing a device emitting wireless signal, no text or symbols presentnatural_image
Icon showing a device emitting wireless signal waves, no text or symbols presentT1. Kontrollknapp for sugehastighet (effekt).
natural_image
Icon showing a device emitting wireless signal, no text or symbols presentFor at disaktivere den:
natural_image
Icon showing a device emitting wireless signal, no text or symbols presentnatural_image
Icon showing a microphone emitting wireless signal, no text or symbols presentnatural_image
Icon showing a device emitting wireless signal, no text or symbols presentnatural_image
Icon showing a device emitting wireless signal waves above a tower (no text or symbols)- Waste Electrical and Electronic Equipment (WEEE).
natural_image
Icon showing a device emitting wireless signal, no text or symbols presentT1. Áóòíí çà óiðaâêaíèa íà ñêîðînòòà (ìùííñò) íà àñïèðàöèy.
Íaòèñêaéoà lǐíāiêðaòíí, äîêaòì èçáǎðaòà ææäaíàòà ñêîðînò làæão:
Ñêîðînò OFF – Ñâåòë. èíäèêaòîðL1: èçêëp÷âí
Nêîðînò 1 (ñëàáà añïèðàöèÿ) – Nââòë. èíäèêaòîð L1: çâëâía ñââòëèía
êîðînò 2 (ñðåäía àñïèðàöèÿ) - âåòë. èíäèêàòîð L1: æúëòà ñâåòèèía
Ñêîðînò 3 (ñèëíà añïèðàöèÿ) – Ñâåòë. èíäèêaòîð L1: ñâåòëî ñeíÿ ñâåòëèía
Ñeîðînò 4 (èíóáíçèaía añïèðàöèÿ) – Ñâåòë. èíäèêaòîð L1: ïóëñèðàùà ñâåòeî ñéíÿ ñâåòëèía
Çaáäëåæå: lõîäüëæèòàëîînòà íà nêîðînò 4 à 5 lèí., nëëää êîàôì aîïèðàòîð- uò aàôìàòè÷fî i'õâlèíààà íà nêîðînò 2.
T2. Áóòí çà óiðaâëåíèå íà ñnâàòëåíèåöî (ñâàòëèía íà áiòààðñêêÿ ïeïò - lâèa ñnâàòëèía)
Íaòèníáòá êðàòêî, çà äà íñâåòèòå aîòâàðñêèÿ ëëîò
Íaòèñíáòà è çàäðúæòà íaòèñíào ïī-äúëãî, çà äà îñâåòèòà ñ làêà ñâåòëèía.
Çaáäëææå: Înâàòëàíèåòî ñ îaêà ñâàòëèía à íaëè÷îî ñàiî îðè íyêiè îläääèe.
Ñeáiaë çà íañèuàíá ía õèèòúðà çà iàçíeïe - Ñâôëéiái éiäeêaòið L1: ÷åôáia ñâôëéiá
Ñeáíàéúò a âèäèì a ëðiäúëæaíèa íà îêiēī ääíà lèíóòà ñëåä èçêëp÷àaíá íà àñ-ïèðàòiðà.
Ïðè iïÿàà íà oîçè ñeâíàë èçáúðøåðà Iåðïiðèÿoèÿòà íì iïääðúæêa íà õèëòúðà çà iàçíéiè.
Ñeāiàë ça íañèuàia ía eàðáííèÿ õèèòúð - Ñāàòëeìaí éiäèêaòið L1: lèāàùa ÷àðāaía ñāàòëeìa
Ñeāiàēuò à âèäèì à ëðiāúëæaíèa íà îêiēī ääíà lèíóòà ñëää èçêëp÷àaíá íà aîn-ïèðàòiðà.
lõe iīyāa íà oîçè ñeāíaë èçauðəða lǎðiǐðeyòèyòà iī iīäðúæèa íà eàðáííèy ðèèóúð.
Ääaêõeâêðaíå/Àêoêâêðaíå íà ñeãíaëà çà íañèuàíå íà éaðáíííèÿ õeëòúð:
Ôîçè ñêâíàë îâèêîîââíî â âêòèâèðaí, çà äà ãî äåàèòèâèðàòa:
ïðe èçêèp÷áí àñïèðaòìð íàòènǐaòà aäílìaðàìalííí áóòííè T1 è T2 çà ïīâå÷å òò 5 ñåéóíäè.
Use the correct length for the screws which are identified in the Installation Guide.
natural_image
Icon showing a device emitting wireless signal, no text or symbols presentViteza OFF – Led L1: stins
Viteza 1 (vitezã redusã de aspirapie) – Led L1: luminã albã
natural_image
Icon showing a device emitting wireless signal waves, no text or symbols presentT1. Êííiêa êííòðîëÿ ñêîðîñòè (ìùííñòè) âñàñûâàíèÿ.
Íañêîëüêî ðaç íàæaòù íà êíïiêó äî âuáîða òðåáóàìíé ñêîðîñòè ïæäó:
Ñêîðîñòü ÂÛÊË – Ñ naïàôîäeîäL1: âûêëp÷åí
êîðînòü 1 (îèçêîâ âñàñûâàíèâ) - ââôîäeîä L1: ñââo çâëâíûé
Ñêîðîñòü 2 (ñðàäíåå âñànñûâàíèå) – Ñnâåòîäeîä L1: ñâåò ææèòûé
êîðînòü 3 (ûnîêîâ âñàñûâàíèâ) - ââoîäeîã L1: ñâåò âîëóáîé
Ñêîðînòü 4 (èíòàíñèaííå âñànûâàíèå) – Ñâåòîäèïä L1: âîëóáîé ièãàpùèé
Ïðèiå÷aíèå: Ñêîðînòü 4 èiàåò Íãðaïe÷aífóp ïðîäïëæèòàëüíñòü - 5 ièí, ïïñëå ÷aâí, âûòÿæèå aâôìlàòe÷añêè ïåðãõïaèo íà ñêîðînòü 2.
T2. Êííièa óiðàâëáíèÿ íñààuáíeài (îñààuáíèa âàði÷ííé iïàåðííñòè - iÿäèèé ñá-àò)
Âûñòðî íàæaòü äëÿ îñâàuàíèÿ âàðî÷îîé îîâàðõíîñòè
Íàæàòü è äåðæàòü íàæàòîé aîëüøå äëy ïÿãêîãî îñâàùaíèy.
Ïðèiå÷aíèå. Iÿãêîå ìñâàuàíèå aïñòóííî òîëüêî íà íáêîòîðûõ ïïääëÿõ.
Ñeāiāe īnāyùaíey æeðióēaāēeāapùeð õèëüòðīa - Ñāāòiāeīa L1: êðañíúé ñāāò
Ñeāíaë íñòà,ǒnÿ âèäèiùì a òa÷åíèe îeîêi îäííé ièíóòù ïīnèa âûêèp÷åíèy âuòÿæ-êè.
Êiãäà iïyäëÿåònÿ íañòîÿuèé ñeãíäë, aúüïeíèòù òåðîáñëóæèâàíèå æèðîóëàä- èèâàpùàāī ðèëüòà.
Ñèaíàë íàñùuàíèy óáíēüíīāi õèëüòða - Ñnàòìäeïa L1: êðañíúé ièāàpùèé ñnàò
Ñeālàë íñòà,ǒnÿ âèäelùì a òå÷åíèè îelēi fālǐé lèlóòù iīněå âûêèp÷aíèy âuòÿæ- èè.
Êîãäà ìïyãëÿåònÿ íañòíÿuèé ñèáíàë, âüîëièòü òåöîánëóæèâàìèå óaîëüífāi ðèë-üòðà.
Îòêëp÷aíèa/Îîâêëp÷aíèa ñèâíaëà íañùuàíèy óâîeüîîâî ôèëüòða:
Ààííûé ñèāíàë îáû÷íî îïäêëp÷âí, ÷òîáû îòêëp÷èòü âãî:
êîãäà âûòÿæèà âûêëp÷åìà, îäîîâðaïâííí íàæaòü íà êîîièè T1 è T2 áîëåå ÷åì íà 5 ñåêóíä.
Ñááóíäeïä L1 çàã¡ðááòñÿ êðañíúì õåáòì è ía ìèààò (ñèáíàë ïïäêèp÷áí), çàòàì ía÷éíàào ìèàòü (ñèáíàë ïòêèp÷àáòñÿ).
Îâôiðéòù ìâðaöèp, ânëè íáîáóîaèiî ñíîàa ïïäêèp÷èòù ñêaíàe, êðaîníúe ièààpúèe ñâáóîaëiã L1 ïâðañòa_ò ièāaòù (ñêaíàe ðèêèp÷áí) è çàâîðaàonÿ íáîðaðuáiúì ñâaóìi (ñêaíàe ïïäêèp÷áí).
Ñáðīn ñeāíàèa íañúuáíèy ôèüòðiâ
Éiãäa âuòÿæêa âûëep÷åìà, íàæàòü íäíîâðåiálíí íà éíïièè T1 è T2 íà íáíåå, ÷åí íà 5 ñåéóíä, ñååöîäeîä L1 ïðåèðàùaàò ïïäàààòü ñēafíäè íànúùaíèy
natural_image
Icon showing a device emitting wireless signals, no text or symbols presentT1. Ēīīiēa ēādōāaíy øaēäe³ñop (īròóæf³ñop) añīiēoóāaíy Íaòènēaéoà iīaôiðīi äi âeáíðó áàæaíí¿ øaêäeīnò³:
^3 OFF – ^3^3 L1: íå äîðèòü
âèäe^3ñòü 1 (ñëàáêå âñìîèòóâàííÿ) – ñâ^3òëïä^3ïä L1: ñâ^3òëî á^3ëå
natural_image
Icon showing a device emitting wireless signal waves above a tower (no text or symbols)natural_image
Icon showing a device emitting wireless signal, no text or symbols presentT1. Traukos greièio (galingumo) valdymo mygtukas.
Pakartotinai spauskite mygtukà, kol nustatysite norimà greitá ið:
natural_image
Icon showing a device emitting wireless signal waves, no text or symbols presentT1. Nosûkõanas âtruma (jaudas) kontroles poga.
Nospiediet atkârtoti, lai atlasîtu vajadzîgo âtrumu starp:
Âtrums OFF (IZSLÇGTS) – LED lampiòa L1: izslçgts
- âtrums (zema nosûkõana) – LED lampiòa L1: zaïa gaisma
- âtrums (vidcja nosûkõana) – LED lampiòa L1: dzeltena gaisma
- âtrums (augsta nosûkõana) – LED lampiòa L1: gaiši zila gaisma
- âtrums (intensîva nosûkõana) – LED lampiòa L1: gaiši zili mirgojoša
Piezîme. 4. âtruma ilgums ir ierobepots lîdz 5 minûtçm, pçc kura nosûccjs automâtiski pârslçdzas uz 2. âtrumu.
T2. Apgaismojuma kontrolpoga (plîts virsmas tuvâ gaisma)
Îsi nospiediet, lai apgaismotu plîts virsmu
Nospiediet to un turiet nospiestu tuvâs gaismas apgaismojumam.
Piezime. Tuvâs gaismas apgaismojums ir pieejams tikai noteiktos modeïos.
Tauku filtra piesâtinâmjuma indikators - LED lampiòa L1: sarkanâ gaisma
Dis indikators ir redzams apmçram minūti pçc nosûccja izslçgõanas.
Parâdoties õim indikatoram, jâveic tauku filtra apkope.
Ogles filtra piesâtinâmjuma indikators - LED lampiòa L1: mirgo sarkanâ gaisma
Dis indikators ir redzams apmçram minūti pçc nosûcçja izslçgõanas.
Parâdoties õim indikatoram, jâveic ogles filtra apkope.
Ogles filtra piesâtinâmjuma indikatora deaktivizâcija/aktivizâcija:
Dis indikators parasti ir aktivizçts, lai to atslçgtu:
ar izslçgtu nosûcçju vienlaikus nospiediet pogas T1 un T2 ilgâk par 5 sekundçm.
LED lampiòa L1 deg ar vienmçrīgu sarkanu krāsas gaismu (indikators aktivizçts) un pçc tam sâk mirgot (indikators deaktivizçts).
Atkârtojiet ðo darbîbu, ja vçlaties indikatoru aktivizçt no jauna. LED lampiòa L1, kas mirgo ar sarkanas krâsas gaismu (indikators deaktivizçts), iedegas ar vienmçrîgu gaismu (indikators aktivizçts)..
Filtru piesâtinâjuma indikatoru atiestatîðana
Ar izslçgtu nosûcçju vismaz uz 5 sekundçm vienlaikus nospiediet pogas
natural_image
Icon showing a microphone with wireless signal waves above it, no text or symbols presentOvaj proizvod je namenjen za rad sa daljinskim upravljačem, koji se isporučuje sa proizvodom ili se može kupiti posebno, kao opcija.
Za kontrolu aspiratora daljinskim upravljačem potrebno je pokrenuti postupak povezivanja.
PAŽNJA!
T1. Taster za kontrolu brzine (snage) usisa.
natural_image
Icon showing a device with wireless signal waves and a stopper (no text or symbols)T1. Tipka za nadzor hitrosti (moèi) sesanja.
Pritiskajte, dokler ne izberete želene hitrosti med naslednjimi možnostmi:
Hitrost OFF – LED L1: ugasnjena
Hitrost 1 (šibko sesanje) – LED L1: luèka zelene barve
Hitrost 2 (srednje moèno sesanje) – LED L1: luèka rumene barve
Hitrost 3 (moèno sesanje) – LEDL1: luèka svetlo modre barve
Hitrost 4 (intenzivno sesanje) – LEDL1: utripajoèa luèka svetlo modre barve
natural_image
Icon showing a device emitting wireless signal waves, no text or symbols presentOvaj proizvod je namijenjen za rad s daljinskim upravljačem Elica, koji se isporučuje s proizvodom ili se može kupiti zasebno, kao opcija.
Za kontrolu nape daljinskim upravljačem potrebno je pokrenuti postupak povezivanja.
PAŽNJA!
T1. Tipka za kontrolu brzine (snage) usisa.
Pritisnite više puta sve dok ne odaberete željenu brzinu između:
natural_image
Icon showing a device emitting wireless signal, no text or symbols presentT1. Emme hýzý (gücü) kontrol tu°u.
natural_image
Icon showing a device emitting wireless signal, no text or symbols presentT1. Ñîðó æûëäàïäûfû (κόὰ) áàkûëaó ê³ëò³.
Òyéiǎn³í á³ðíáøå ðåò áàñûñúç kàæåòo³ æüëäàïäük òaħääërgaí ä-äé³í, àðàñûïäà òaħääó:
Æûëäàïäûk OFF - LED L1: əø³ðó
Æûëäàïäûk 1 (Òeìaí ñîðó) - LED L1: æàñûë æàðûk
Æûëäàïäûk 2 (Îðòà ñîðó) - LED L1: àkøûë-ñàðû òyñò³
Æûëäàïäûk 3 (Æîràðû ñîðó) - LED L1: àkøûë êeê æàðûk
Æûëäàïäûk 4 (Κὰðkûíäû ñîðó) - LED L1: àκøûë êeê òyéiåø³ã³
Âñêâðòó: 4 æuëäaiäûrû. 5 lèí øâêòåöë³ yçàkòûrû áàð, ñïäaí êåé³í ñîðrûø
æûëäàìäûrû 2 àâôîìàòòû òyðää ðòåä³.
T2. Light ààkûëaó îåðíån³ (ïëèòà æàðûk æàðûk)
Ïëèòàíû æaïäûđó γø³í κûñkàøà Áàñïàñəç
Εθιάñê³ æàðûk æaíàäû yçàfûðàk yñòàï òyðûnîûç
Äñêåðòó: êeìåñê³ æàðûk êaéá³ð yëã³ëåðäå fàíà kîë æaò³iä³.
Ìàéäŭ ñòàï àëó ôèëüòð³ kèíûkòûđó âñêåđòó - LED L1: kèûçûë æàđûk
aó e^3 e^3i a^3 ieioo o^3^3i e^3i^3.
Áyë ânêaðóó ìaéäà áiëráí êaçää, làé yñòaéòuí õèëüöð êyò³iä³ òàèaï àòaä³.
Êəi³ðë³ ôèëüòðä³H қaîûróû âñêåðòó - LED L1: қûçûë æàðûk
âñêåðòó Ññôüï əø³ðó êæé³í øàìàìaí á³ð ièlóòòaí γø³í κίë æåò³iä³ áîëüï òàáûëàäû.
Áyë âñêâðòó ìaéäà áîëràí êaçää, Êeì³ðë³ ôèüòðä³ êyò³iä³ òaëàï àòaä³.