
PASTAMAKER HR2375 - Food Processor PHILIPS - Free user manual and instructions
Find the device manual for free PASTAMAKER HR2375 PHILIPS in PDF.

| Product type | Food processor / Pasta machine |
| Brand | Philips |
| Model | PASTAMAKER HR2375 |
| Dimensions (W x D x H) | Approx. 35 x 20 x 30 cm |
| Weight | Approx. 6 kg |
| Power supply | 220-240 V, 50-60 Hz |
| Power | 220 W |
| Flour capacity | 200 g to 500 g per batch |
| Functions | Kneading, automatic extrusion, extrusion only |
| Number of programs | 2 (automatic and extrusion only) |
| Housing material | Plastic |
| Disc material | Stainless steel |
| Safety | Safety buttons, automatic shut-off in case of overheating or lid opening |
| Included accessories | Measuring cup, spatula, cleaning brush, pasta cutter, shape discs |
| Maintenance | Removable parts washable with water, discs air-dry |
| Repairability | Spare parts available, Philips customer service |
| Warranty | 2 years |
Frequently Asked Questions - PASTAMAKER HR2375 PHILIPS
User questions about PASTAMAKER HR2375 PHILIPS
0 question about this device. Answer the ones you know or ask your own.
Ask a new question about this device
Download the instructions for your Food Processor in PDF format for free! Find your manual PASTAMAKER HR2375 - PHILIPS and take your electronic device back in hand. On this page are published all the documents necessary for the use of your device. PASTAMAKER HR2375 by PHILIPS.
USER MANUAL PASTAMAKER HR2375 PHILIPS
Specifications are subject to change without notice.
All rights reserved.
3000 018 30081A

00% recycled paper
00% papier recyclé
| EN | User manual | 5 | IT | Manuale utente | 47 |
| DA | Brugervejledning | 11 | NL | Gebruiksaanwijzing | 53 |
| DE | Benutzerhandbuch | 17 | NO | Brukerhandbok | 59 |
| EL | Εγχερίδια Κρήσης | 23 | PT | Manual do utiliser | 65 |
| ES | Manual del usuario | 29 | SV | Användarhandbok | 71 |
| FI | ΚΑγτώραs | 35 | TR | Kullanim klavuzu | 77 |
| FR | Mode d'emploi | 41 |
2
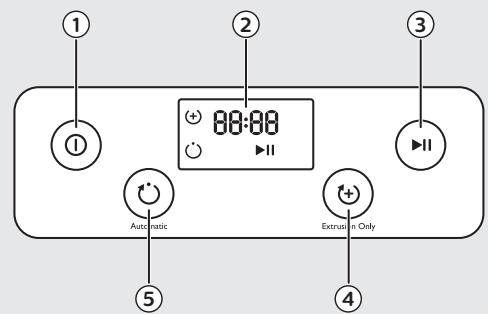
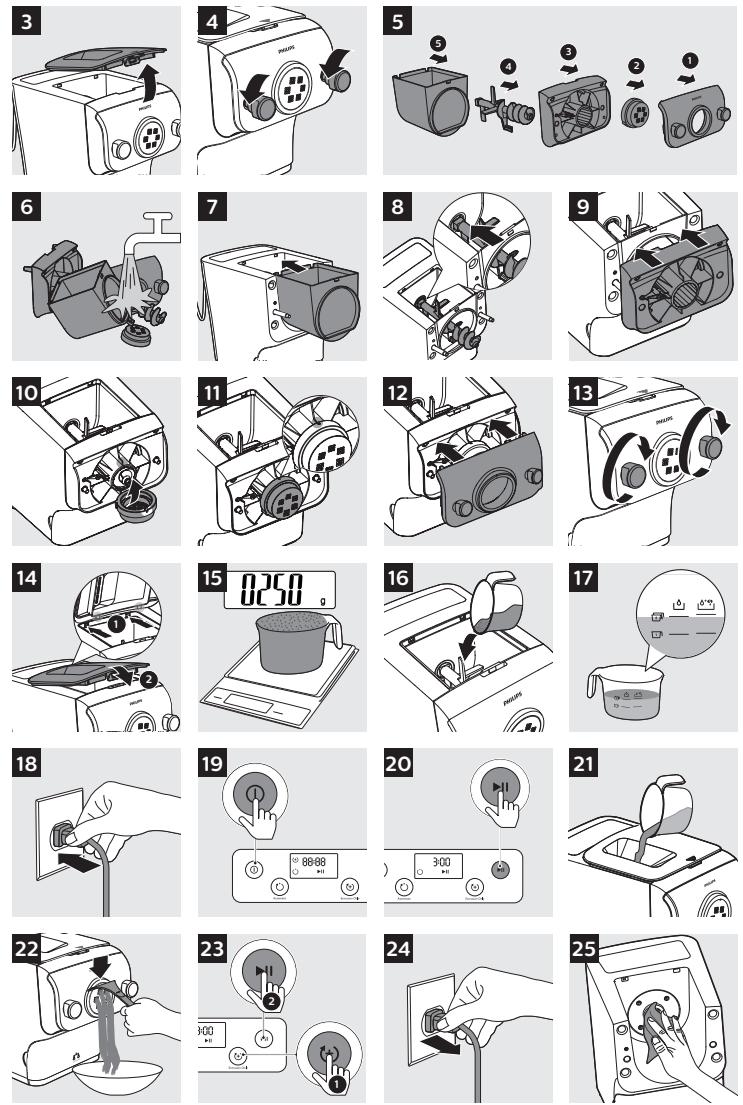
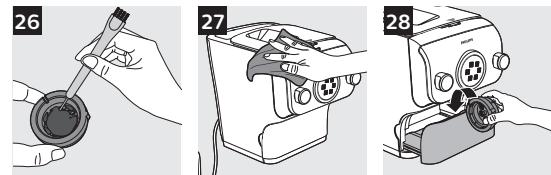
Table of Contents
Introduction 6
Product overview (Fig. 1) 6
Control panel overview (Fig. 2) 6
Available Accessories 6
6
Disassembling and cleaning before first use 6
Assembling 7
Using the Pasta maker 7
Preparing the ingredients 7
Starting the pasta making program 8
Important! 8
Cleaning 9
Storage 9
Troubleshooting 9
Introduction
Congratulations on your purchase, and welcome to Philips!
To fully benefit from the support that Philips offers, register your product at www.philips.com/welcome.
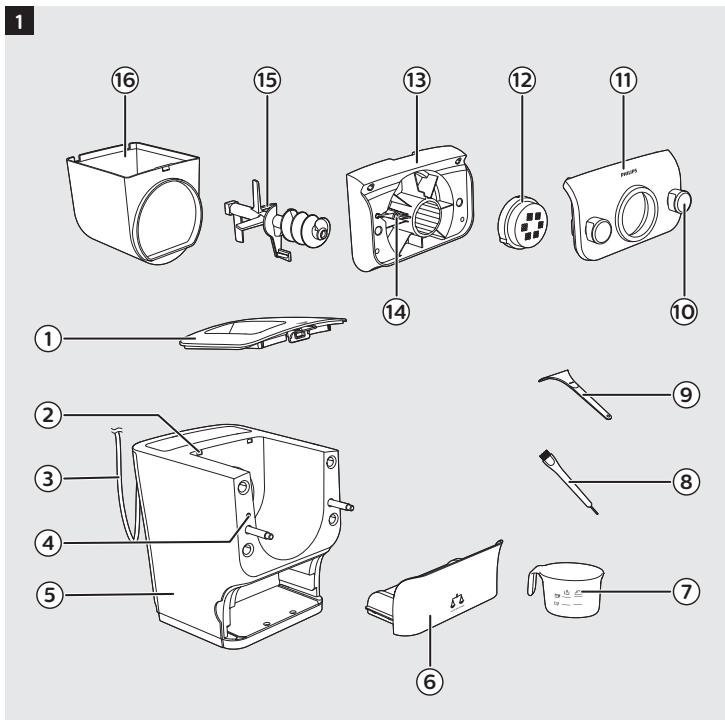
Product overview (Fig. 1)
| ① | Mixing chamber lid | ⑨ | Pasta cutter |
| ② | Safety switch hole of the mixing chamber lid | ⑩ | Front panel knobs |
| ③ | Power cord | ⑪ | Front panel |
| ④ | Disc holder safety switch | ⑫ | Shaping disc |
| ⑤ | Main unit | ⑬ | Disc holder |
| ⑥ | Shaping disc storage | ⑭ | Disc holder safety switch lever |
| ⑦ | Water/flour cup | ⑮ | Mixing paddle |
| ⑧ | Cleaning brush | ⑯ | Mixing chamber |
Control panel overview (Fig. 2)
| ① | On/off button | ④ | Extrusion only button |
| ② | Display | ⑤ | Automatic button |
| ③ | Start/pause button |
Available Accessories
Shaping discs
| Spaghetti | Fettuccine | Penne | Lasagna | |
| HR2375 | ✓ | ✓ | ✓ | ✓ |
Disassembling and cleaning before first use
1 Remove the mixing chamber lid. (Fig. 3)
2 Loosen the front panel control knobs. (Fig. 4)
Note: The front panel is heavy. Take extra caution when removing it.
3 Disassemble the front panel, the shaping disc, the shaping disc holder, the mixing paddle, and the mixing chamber in order. (Fig. 5)
4 Clean all detachable parts, and wipe them dry. (Fig. 6)
Assembling
1 Push the mixing chamber into the appliance. (Fig. 7)
2 Point the mixing paddle to the hole in the main unit. Insert the mixing paddle all the way into the main unit. (Fig. 8)
3 Attach the disc holder onto the appliance. (Fig. 9)
4 Put the shaping disc onto the disc holder, and make sure it is firmly fixed on the disc holder. (Fig. 10)
Note: Make sure the inner cavity of the shaping disc and disc holder is properly fitted. (Fig. 11)
5 Attach the front panel to the main unit. (Fig. 12)
Note:
- Make sure the front panel is completely fastened before using the appliance.
- The front panel is heavy. Take extra caution when assembling it.
6 Fasten the front panel control knobs. (Fig. 13)
Note: If the front panel or the shaping disc is not properly assembled, a safety switch will prevent the appliance from working.
7 Close the mixing chamber lid. (Fig. 14)
Note: If the mixing chamber lid is not properly installed, the safety switch will prevent the appliance from working.
Using the Pasta maker
Preparing the ingredients
Note: Use the supplied flour/water cup to measure flour and liquid.
| Flour | Water | Water + Egg |
| 1 cup of flour (~250 g) | ||
| 2 cups of flour (~500 g) |
1 Use a kitchen scale to measure the flour. (Fig. 15)
Note: Refer to the table above or the recipe book for the correct ratios.
2 Remove the mixing chamber lid. (Fig. 3)
3 Pour the flour into the chamber. (Fig. 16)
Note: Do not put less than 200g or more than 500g of flour in the chamber.
4 Measure the required amount of liquid according to the flour you have used. (Fig. 17)
Note: Refer to the table above or the recipe book for the correct ratios.
Starting the pasta making program
1 Put the plug in the power socket. The appliance sounds once, and all indicators flash once. (Fig. 18)
2 Press the On/off button to switch on the appliance. (Fig. 19)
3 Press the Start/pause button to start the automatic pasta making program. (Fig. 20)
Note: If the appliance is not in the automatic mode, press the Automatic button before pressing the Start/pause button.
4 After the mixing starts, slowly pour in the liquid along the entire length of the slot in the lid. (Fig. 21)
Note: During dough mixing, do not add other ingredients after you have poured in the liquid. Otherwise, it will affect the result of the pasta texture.
5 After the pasta maker finishes mixing, it will beep once and start extruding pasta after a few seconds. Use the pasta cutter to cut the pasta into the length you need. (Fig. 22)
Note: If the ratio of liquid and flour is not correct, the extrusion will not succeed. In this case, prepare the ingredients again.
6 After the pasta making is complete, if you notice some leftover dough inside the chamber, you can press the Extrusion only button, and then the Start/pause button to start extra extrusion. (Fig. 23)
Note
- The extra extrusion lasts for 3 minutes.
- The cooking time of the pasta varies depending on personal preferences, pasta shapes, and number of servings.
Important!
The pasta recipes provided in the recipe book have been tested for success. If you experiment with or use other pasta recipes, the flour and water/egg ratios will need to be adjusted. The pasta maker will not operate successfully if you do not adjust the new recipe accordingly.
Note
- To ensure the quality of the pasta, use gluten flour to make pasta. Follow the recommended proportion to add the ingredients.
- Seasonal changes and using ingredients from different regions may affect the flour/water ratio. You may adjust based on the recommended proportion.
- When making egg pasta or vegetable pasta, make sure you whisk the egg mixture or vegetable juice evenly with the water before pouring into the chamber through the slot in the lid. When adding ingredients, make sure the ingredient is in a liquid form.
- See the recipe book provided for additional pasta recipe variations.
Cleaning
1 Disconnect the plug from the power outlet. (Fig. 24)
2 Remove the mixing chamber lid. (Fig. 3)
3 Loosen the front panel control knobs. (Fig. 4)
Note: The front panel is heavy. Take extra caution when removing it.
4 Disassemble the front panel, the shaping disc, the shaping disc holder, the mixing paddle, and the mixing chamber in order. (Fig. 5)
5 Use a dry cloth to clean flour residue on the main unit. (Fig. 25)
6 Clean the shaping disc with the supplied cleaning tool to remove the dough residues. After that, you can clean it with water. (Fig. 26)
Note: For the spaghetti, thick spaghetti, angel hair and fettuccine shaping discs, let the discs air-dry 2 to 4 hours. Then use the corresponding cleaning tool to poke out the dough in the holes.
7 Clean all detachable parts, and wipe them dry. (Fig. 6)
8 Use a dry cloth to clean the control panel, and the exterior of the pasta maker. (Fig. 27)
Storage
1 Unplug the appliance and let it cool down.
Note: Make sure all parts are clean and dry before storing.
2 You can store the shaping discs in the storage drawer. (Fig. 28)
Troubleshooting
This chapter summarises the most common problems you could encounter with the appliance. If you are unable to solve the problem with the information below, visit www.philips.com/support for a list of frequently asked questions or contact the Consumer Care Center in your country.
| Problem | Cause | Solution |
| The indicators do not light up. | The power plug is not connected correctly. | Check whether the power plug is plugged correctly and the outlet is working properly. |
| After pressing the On/off button the appliance sounds but does not work. | The mixing chamber, the shaping disc, or the front panel is assembled incorrectly. | Make sure you follow the user manual to assemble all parts correctly. |
| The safety switch is triggered and the appliance suddenly stopped or suddenly restarts during the processing. | The front panel knob is loose. | Make sure the front panel is securely assembled. |
| Excessive ingredients in the pasta maker. | The maximum amount of flour used for each batch is 500g. If more than 500g is added, reduce the amount of flour before next batch. | |
| During processing, the appliance stops working when you open the lid. | For safety reasons, the appliance always stops working when the lid is opened during processing. | If you need to resume the previous operation, close the lid properly, and press the Start/pause button. |
| During processing, the appliance stops. There is no alarm sound or flashes. | The pasta maker has overheated due to long continuous working time. | Disconnect from the power source, and allow the pasta maker to cool down. To better protect the lifetime of the appliance, the continuous working time should be less than 45 minutes. You can restart using the appliance after 15 minutes of rest. |
| Small amount of water is leaking out from the appliance. | Water is added before the program starts. | Follow the user manual instructions to add water right after the program starts. |
| E1 displays on the screen. | The shaping disc is not attached. | Attach the disc holder to the main unit, attach the shaping disc properly and fix the front panel properly to the device. |
| The lid is not in place or not properly attached. | Attach the lid properly. | |
| The appliance stops during processing, E2 displays on the screen, the indicators are flashing quickly, and the alarm sounds. | The mixing paddle may be blocked by some foreign objects. | Disconnect from the power source, clean the pasta maker, and follow the user manual again to restart the pasta making. |
| The dough may be too dry. | ||
| The wrong program is selected. | ||
| EEE displays on the screen. | The appliance malfunctions. | Contact the service center. |
Indhold
Introduktion 12
Produktoversigt (fig. 1) 12
Oversigt over kontrolpanel (fig. 2) 12
| Spaghetti | Fettuccine | Penne | Lasagne | |
| HR2375 | ✓ | ✓ | ✓ | ✓ |
| Spaghetti | Fettuccine | Penne | Lasagne | |
| HR2375 | ✓ | ✓ | ✓ | ✓ |
| Spagetti | Fettuccine | Penne | Lasagne | |
| HR2375 | ✓ | ✓ | ✓ | ✓ |
| Spaghetti | Fettuccine | Penne | Lasagne | |
| HR2375 | ✓ | ✓ | ✓ | ✓ |
| Spaghetti | Fettuccine | Penne | Lasagne | |
| HR2375 | ✓ | ✓ | ✓ | ✓ |
| Spaghetti | Fettuccine | Penne | Lasagne | |
| HR2375 | ✓ | ✓ | ✓ | ✓ |
| Esparguete | Fettuccine | Penne | Lasanha | |
| HR2375 | ✓ | ✓ | ✓ | ✓ |
| Spagetti | Fettuccine | Penne | Lasagne | |
| HR2375 | ✓ | ✓ | ✓ | ✓ |
| Spagetti | Fettuccine | Penne | Lazanya | |
| HR2375 | ✓ | ✓ | ✓ | ✓ |