
HR7640 - Food Processor PHILIPS - Free user manual and instructions
Find the device manual for free HR7640 PHILIPS in PDF.


| Product Type | Food Processor |
| Model | HR7640 |
| Power Consumption | 600 W |
| Bowl Capacity | 2.1 L |
| Dimensions (W x D x H) | 30 x 25 x 20 cm |
| Weight | 3.5 kg |
| Housing Material | Plastic |
| Blade Material | Stainless Steel |
| Main Functions | Chopping, Slicing, Shredding, Mixing, Kneading, Grinding |
| Number of Speeds | 2 + Pulse |
| Safety Features | Safety lock system, Non-slip feet |
| Dishwasher Safe Parts | Yes (bowl, lid, blades, pusher) |
| Spare Parts Availability | Available from Philips service centers |
| Wattage | 600 W |
| Voltage | 220-240 V, 50-60 Hz |
Frequently Asked Questions - HR7640 PHILIPS
User questions about HR7640 PHILIPS
0 question about this device. Answer the ones you know or ask your own.
Ask a new question about this device
Download the instructions for your Food Processor in PDF format for free! Find your manual HR7640 - PHILIPS and take your electronic device back in hand. On this page are published all the documents necessary for the use of your device. HR7640 by PHILIPS.
USER MANUAL HR7640 PHILIPS
Recipes & Directions for use
Recipes & Directions for use



ENGLISH 6
BAHASA MELAYU 24
BAHASA INDONESIA 43
TIẾNG VIỆT 65
简体中文 83
中文 101
한국어 119
ไทย 136
ENGLISH 6
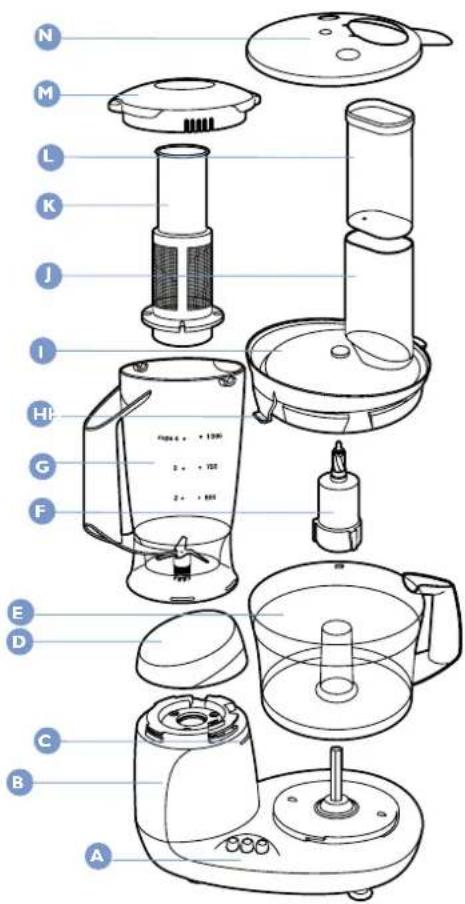
Food processor: parts and accessories
A) Speed control B) Motor unit C) Built-in safety lock D) Screw cap (for closing the blender attaching hole when the blender is not in use) E) Bowl F) Tool holder G) Blender jar H) Peg of lid (activates and deactivates the safety switch) I) Lid of bowl J) Feed-tube K) Filter L) Pusher M) Lid of blender jar N) Cover with closable insert storage space O) Mill beaker P) Mill blade unit Q) Chinese shredding insert R) Slicing insert medium S) Shredding insert fine T) Insert holder U) Blade (+ protection cover) V) Kneading accessory W) Emulsifying disc X) Spatula
Introduction
This appliance is equipped with an automatic thermal cut-off system. This system will automatically cut off the power supply to the appliance in case of overheating.
If your appliance suddenly stops running:
Pull the mains plug out of the socket.
Press the 'PULSE / 0' button.
Let the appliance cool down for 60 minutes.
Put the mains plug into the socket.
Switch the appliance on again.
Please contact your Philips dealer or an authorised Philips service centre if the automatic thermal cut-off system is activated too often.
CAUTION: In order to avoid a hazardous situation due to inadvertent resetting of the thermal cut-off, this appliance must not be connected to a timer switch.
Important
- Read these instructions for use carefully and look at the illustrations before using the appliance.
- Keep these instructions for use for future reference.
- Check if the voltage indicated on the appliance corresponds to the local mains voltage (110-127V or 220-240V) before you connect the appliance.
- Never use any accessories or parts from other manufacturers or that have not been specifically advised by Philips. Your guarantee will become invalid if such accessories or parts have been used.
- Do not use the appliance if the mains cord, the plug or other parts are damaged. If the mains cord of this appliance is damaged, it must always be replaced by Philips or a service centre authorised by Philips, in order to avoid hazardous situations.
- Thoroughly clean the parts that will come into contact with food before you use the appliance for the first time.
- Do not exceed the quantities and preparation times indicated in the tables and recipes.
- Do not exceed the maximum content indicated on the bowl or the blender jar, i.e. do not fill beyond the top graduation.
- The emulsifying disc, the knife and the kneading accessory have to be placed on the tool holder that stands in the bowl.
- Unplug the appliance immediately after use.
- Never use your fingers or an object (e.g. a spatula) to push ingredients down the feed-tube while the appliance is running. Only the pusher is to be used for this purpose.
- Always unplug the appliance before reaching into the blender jar with your fingers or an object (e.g. a spatula).
- Keep the appliance out of the reach of children.
- Never let the appliance run unattended.
- Switch the appliance off before detaching any accessory.
- Never switch the appliance off by turning the lid. Always switch the appliance off by pressing the PULSE / 0 button.
- Never immerse the motor unit in water or any other fluid, nor rinse it under the tap. Use only a moist cloth to clean the motor unit.
- When you mount the blender jar, the bowl and/or the screw cap properly onto the motor unit, you will hear a click.
- Remove the cover from the blade before use.
- Avoid touching the SHARP blades, especially when the appliance is plugged in.
- If the blades get stuck, unplug the appliance before removing the ingredients that are blocking the blades.
- Let hot ingredients cool down before processing them (max. temperature 80°C / 175°F).
- If you are processing a liquid that tends to foam, do not put more than 1 litre into the blender jar to avoid spillage.
Note that if both the blender and the bowl have been correctly mounted, only the blender will function.
Using the appliance
Bowl
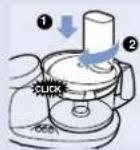
- If you want to use the bowl, remove the blender jar and close the fixing hole with the screw cap. All functions that require the use



of the bowl will only work if the blender jar has been removed.
1 Mount the bowl on the food processor by turning the handle in the direction of the arrow until you hear a click. 2 Put the lid on the bowl. Turn the lid in the direction of the arrow until you hear a click (this requires some force).
Built-in safety lock
Both the motor unit and the lid have been provided with marks. The appliance will only function if the arrow on the motor unit is placed directly opposite the mark on the lid. Make sure that the mark on the lid and the arrow on the bowl are directly opposite each other. The projection of the lid will now cover the opening of the handle.
Feed-tube and pusher
1 Use the feed-tube to add liquid and/or solid ingredients. Use the pusher to push solid ingredients through the feed-tube.

2 You can also use the pusher to close the feed-tube in order to prevent ingredients from escaping through the feed-tube.
Blade
- The blade can be used for chopping, mixing, blending, pureeing and preparing cake mixtures. 1 Put the bowl on the motor unit. 2 Remove the protective cover from the blade.
The cutting edges of the blade are very sharp. Avoid touching them!
3 Put the blade on the tool holder.
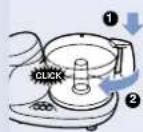


4 Put the tool holder in the bowl. 5 Put the ingredients in the bowl. Pre-cut large pieces of food into pieces of approx. 3 x 3 cm. Put the lid on the bowl.

6 The speed settings allow you to adjust the speed of the appliance to obtain optimal results.
- Setting 'PULSE / 0': for pulse operation and for turning the appliance off. If the PULSE / 0 button is pressed, the appliance runs at max. speed. After releasing the button, the appliance stops running. ▶ Setting 1: for normal speed. ▶ Setting 2: for fast speed.
See the table for the recommended speed settings. Processing takes 10-60 seconds.
Tips
The appliance chops very quickly. Use the pulse function for short periods at a time to prevent the food from becoming too finely chopped. - Do not let the appliance run too long when you are chopping (hard) cheese. The cheese will become too hot, will start to melt and will turn lumpy. - Do not use the blade to chop very hard ingredients like coffee beans, nutmeg and ice cubes.
If food sticks to the blade or to the inside of the bowl:
1 Turn the appliance off.
2 Remove the lid from the bowl.
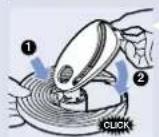
3 Remove the ingredients from the blade or from the wall of the bowl with the spatula.
Inserts
1 Put the selected insert in the insert holder.
The cutting edges of the inserts are very sharp. Do not touch them!
Do not process hard ingredients (like ice cubes) with the inserts.
2 Place the insert holder onto the tool holder that stands in the bowl.
3 Put the lid on the bowl.
4 Put the ingredients in the feed tube. Pre-cut large chunks to make them fit into the feed-tube.
5 Fill the feed-tube evenly for the best results.
When you have to cut large amounts of food, process only small batches at a time and empty the bowl regularly between the batches.
4 Select the appropriate speed setting to obtain optimal results. See the table for the recommended speed settings.
Processing takes 10-60 seconds.

5 Press the ingredients slowly and steadily down the feed tube with the pusher.
6 To remove the insert from the insert holder, take the insert holder in your hands with its back pointing towards you. Push the edges of the insert with your thumbs to make the insert fall out of the holder.
Kneading accessory
The kneading accessory can be used for kneading dough for bread, steamed buns and dumplings and for mixing batters and cake mixtures.
1 Fit the kneading accessory onto the tool holder.
2 Put the ingredients in the bowl.
3 Close the bowl with the lid.
4 Close the feed tube by placing the pusher in it.


5 Select the appropriate speed setting to obtain optimal results. See the table for the recommended speed settings.
Emulsifying disc
You can use the emulsifying disc to prepare mayonnaise, to whip cream and to whisk egg whites.

Put the emulsifying disc onto the tool holder that stands in the bowl.
2 Put the ingredients in the bowl and put the lid on the bowl.
3 Select the appropriate speed setting to obtain optimal results. See the table for the recommended speed settings.
Tips
- When you want to whisk egg whites, make sure that the egg whites are at room temperature.
Take the eggs out of the refrigerator at least half an hour before you are going to use them.
- All the ingredients for making mayonnaise should be at room temperature.
Oil can be added through the small hole in the bottom of the pusher.
- If you are going to whip cream, the cream should be taken straight from the refrigerator. Please observe the preparation time in the table. Cream should not be whipped too long. Use the pulse function to have more control over the process.
Blender

The blender is intended for:
- Blending fluids, e.g. dairy products, sauces, fruit juices, soups, mixed drinks, sweet teas, shakes.
- Mixing soft ingredients, e.g. pancake batter or mayonnaise.
- Pureeing cooked ingredients, e.g. for making baby food.
1. Remove the screw cap.
2. Mount the blender jar in the fixing hole by turning it in the direction of the arrow until it is firmly fixed.
Do not exert too much pressure on the handle of the blender jar.
3. Put the ingredients in the blender jar. 4. Screw the lid onto the blender jar. 5. Switch the appliance on and blend the ingredients. The speed settings allow you to adjust the speed of the appliance to obtain optimal results. See the table for the recommended speed settings.

Tips
- Pour the liquid ingredients into the blender jar through the hole in the lid.
- The longer you let the appliance run, the finer the blending result will be.
- Pre-cut solid ingredients into smaller pieces before putting them into the blender. If you want to prepare a large quantity, process small batches of ingredients instead of trying to process a large quantity at once.
- Hard ingredients may require soaking in water prior to processing.
- If you have doubts about the right speed, always select the highest speed (position 2).
If ingredients stick to the wall of the blender jar:
1 Switch the appliance off and unplug it. 2 Remove the lid.
Never remove the lid while the appliance is still running.
3 Use a spatula to remove the ingredients from the wall of the jar.
Keep the spatula at a safe distance from the blades (approx. 2 cm).
Filter

You can use the filter to make delicious fresh fruit juices, cocktails or soy milk in no time. All pips and skins will be caught in the filter.
Put the filter in the assembled blender jar. Make sure that the grooves of the filter fit exactly onto the ribs inside the blender jar. 2 Put the ingredients in the filter. 3 Pour water or another liquid (e.g. for cocktails) into the blender jar. 4 Place the lid in the sieve position. 5 Switch the appliance on. See the table for the right speed setting.
If you have doubts about the right speed, select the highest speed setting.
6 Switch the appliance off and remove the blender jar from the motor unit. 7 Pour out the drink through the spout of the blender jar. Do not remove the lid!
For best results, put the blender jar with the remaining ingredients back onto the appliance and let it run for a few more seconds. Then pour out the rest of the drink.

Tips
Particularly when you are processing large quantities, we advise you not to put all the ingredients in the filter at the same time. Start processing a small quantity, let the appliance run for a moment, switch it off and then add another small quantity. Always place the lid! Repeat this procedure until you have processed all the ingredients. - For making soy milk:
Soak soy beans for 4 hours before processing them. You can process max. 50 g of dried soy beans or max. 2/3 of the metal sieve of the filter filled with soaked soy beans. Add 500 ml water and blend until smooth.
Mill
Preparing the mill for use
Never use the mill for more than 30 seconds without interruption.

Put the ingredients in the inverted beaker.
Process only dry ingredients. Do not fill the beaker beyond the "MAX" indication.
2 Pick up the blade unit by the safety ring.
Place the blade unit in the beaker. Take care that all grooves fit the ribs inside the beaker.


3 Press and turn clockwise until the blade unit is properly fixed.
4 Turn the assembled mill upside down and screw it onto the motor unit.
After processing, unscrew the mill from the motor housing:
5 Pull the safety ring out and turn it anti-clockwise. Then remove the blade unit.
The mill is suitable for grinding e.g. ingredients as mentioned in the table. Do not exceed the quantities!
| Ingredients | Quantities |
| pepper corns | 5-25g |
| sesame seeds | 10-50 g |
| rice, wheat | 25-75 g |
| soy beans | 25-75 g |
| dried peas | 25-75 g |
| coconut | 25-50 g |
| hard (e.g. Parmesan) cheese | 50-100 g |
| bread crumbs | 20-40 g |
| sugar cubes | 10-30 g |
| nuts (shelled) | 50-100 g |
| coffee beans | 20-50 g |
Cleaning
Always unplug the appliance before you start cleaning the motor unit.
Clean the motor unit with a damp cloth. Do not immerse the motor unit in water and do not rinse it either.
Always clean the parts that have come into contact with food in hot water with washing-up liquid immediately after use.
The bowl, the lid of the bowl, the pusher and the accessories can also be cleaned in a dishwasher.
These parts have been tested for dishwasher resistance according to DIN EN 12875. The cover with insert storage space and the blender jar are not dishwasherproof!
Clean the blade, the knife unit of the blender and the inserts very carefully. Their cutting edges are very sharp!
Make sure that the cutting edges of the blade, the blade unit of the blender and the inserts do not come in contact with hard objects. This could cause them to become blunt.
Certain ingredients may cause discolourations on the surface of the accessories. This does not have a negative effect on the accessories. The discolourations usually disappear after some time.
Cleaning of filter
Hold the filter over a waste bin immediately after use and gently shake out its contents and rinse it under the tap.
Cleaning of mill
Unplug the appliance.
Detach the mill from the motor unit.
Clean the beaker and the blade unit under a running tap with lukewarm water and some washing-up liquid.
Be careful with the sharp edges of the blade unit!
- After washing up the parts, rinse them with clean water and dry them thoroughly.
Blender quick-clean operation

Pour lukewarm water (not more than 0.5 liters) and some washing-up liquid into the blender jar. 2 Assemble the lid. 3 Let the appliance run for a few moments by pressing the Pulse button. (the appliance stops running when you release the button). 4 Detach the blender jar and rinse it with clean water.
Storage
MicroStore

Put the accessories (emulsifying disc, blade, kneading accessory, insert holder) on the tool holder and store them in the bowl. Always end up with the insert holder. - Two inserts can be stored in the storage space of the lid cover as indicated on the inside of the cover. The inserts have to be slid into the cover, not pressed. - Place the cover with insert storage space on the transparent lid of the bowl. - Wrap the mains cord round the reel on the back of the appliance.
Guarantee & service
If you need information or if you have a problem, please visit the Philips Web site at www.philips.com or contact the Philips Customer Care Centre in your country (you will find its phone number in the worldwide guarantee leaflet). If there is no Customer Care Centre in your country, turn to your local Philips dealer or contact the Service Department of Philips Domestic Appliances and Personal Care BV.
Quantities and preparation times
| Ingredients & results | Max. quantity | Speed setting / accessory | Procedure | Applications |
| Batter - whisking | 250ml milk | 2 / ♂ | First pour the milk into the blender and then add the dry ingredients. Mix the ingredients for approx. 1 minute. If necessary, repeat this procedure 2 times. | Pancakes, waffles |
| Bread crumbs - chopping | 100g | 2 / ♂ | Use dry, crispy bread. | Breadcrumbsbed dishes, au gratin dishes |
| Butter cream (creme au beurre) - whisking | 300g | 2 / ♂ | Use soft butter for a light result. | Deserts, toppings |
| Vegetables (e.g. carrots, turnips, white radishes, yams) - grating | 350g | 2 / ♂ | Cut the food into pieces that fit into the tube. Fill the tube with the pieces and grate them while pressing the pusher down lightly. | Garnishing, raw vegetables, turnip-yam dishes or cakes, dips |
| Vegetables (e.g. celery, leeks, carrots) - slicing | 350g | 2 / P / ♂ | Fill the tube with the vegetables and press them carefully down the tube with the pusher. | Stir-fries, salads |
| Cheese (Parmesan) - chopping | 200g | 2 / ♂ | Use a piece of rindless Parmesan and cut it into pieces of approx. 3 × 3 cm. | Garnishing, soups, sauces, au gratin dishes |
| Cheese (Gouda) - shredding | 200g | 2 / ♂ | Cut the cheese into pieces that fit into the tube. Press carefully with the pusher. | Sauces, pizzas, au gratin dishes, fondues |
| Chilli - chopping | 300g | P / ♂ | De-seed the chilli peppers. Always press the pulse button several times to avoid chopping the chilli peppers too fine. Use at least 150g. | Garnishing, dips |
| Chilli -slicing | 300g | 1 / ♂ | De-seed the chilli peppers. Fill the tube with de-seeded chilli peppers. Use at least 150g. | Garnishing, dips |
| Chocolate - chopping | 200g | 2 / ♂ | Use hard, plain chocolate. Break it into pieces of 2 cm. | Garnishing, sauces, pastry, puddings, mousses |
| Cooked peas, beans - pureeing | 250g | 2 / ♂ | Use cooked peas or beans. If necessary, add some liquid to improve the consistency of the mixture. | Purees, soups |
| Cooked vegetables and meats - pureeing | 300g | 2 / ♂ | For a coarse puree, add only a little liquid. For a fine puree, keep adding liquid until the mixture is smooth. | Baby and infant food |
| Cucumbers - slicing | 1 cucumber | 1 / ♂ | Put the cucumber into the tube and press it down carefully. | Salads, garnishing |
| Dough (for bread) - kneading | 350g flour | 2 / ♂ | Mix warm water with yeast and sugar. Add flour, oil and salt and knead the dough for approx. 90 seconds. Leave to rise for 30 minutes. | Bread |
| Ingredients & results | Max. quantity | Speed setting / accessory | Procedure | Applications |
| Dough (glutinous) - kneading | 300g glutinous rice flour | 2 / 8 | Put flour and warm water into the bowl and knead it all to a soft dough. This takes approx. 30 seconds. | Glutinous rice ball |
| Dough (for pizzas) - kneading | 400g flour | 2 / 8 | Follow the same procedure as for bread dough. Knead the dough for approx. 1 minute. First put in the flour and then the other ingredients. | Pizza |
| Dough (shortcrust pastry) - kneading | 200g flour | 2 / 8 | Use cold margarine, cut into pieces of 2cm. Put all the ingredients in the bowl and knead until the dough has turned into a ball. Allow the dough to cool before further processing. | Apple pies, sweet biscuits, open fruit flans |
| Dough (for tarts, pies) - kneading | 200g flour | 2 / 8 | Use cold margarine and cold water. Put flour in the bowl and add the margarine cut into pieces of 2cm. Mix at the highest speed until the dough has become crumbly, then add cold water while mixing. Stop as soon the dough starts to turn into a ball. Allow the dough to cool before further processing. | Fruit tarts, pies, quiches |
| Dough (for wrappers) - kneading | 300g flour | 2 / ♂ | Put flour, salt and water in the bowl and knead them to a smooth dough. Leave it for 15 minutes, then knead it into a ball again and roll it into thin sheet. | Dumplings, wrappers, steamed buns |
| Dough (yeast) - kneading | 300g flour | 2 / ♂ | First mix yeast, warm water and some sugar in a separate bowl. Put all ingredients in the food processor bowl and knead the dough until it is smooth and does not stick to the bowl (takes approx. 1 minute). Leave it to rise for 3 hours. | Pork and vegetable buns |
| Dough (yeast) - kneading | 300g flour | 2 / ♂ | First mix yeast, warm milk and some sugar in a separate bowl. Put all the ingredients in the bowl and knead the dough until it no longer sticks to the bowl (this takes approx. 1 minute). Leave it to rise for 30 minutes. | Luxury bread |
| Egg whites - emulsifying | 4 egg whites | 2 / ♂ | Use egg whites at room temperature. Note: use at least 2 egg whites. | Puddings, soufflé meningues |
| Fish - mincing | 300g | 2 / P / ♂ | First remove the fish bones. Cut the fish into cubes of 3cm. Use the pulse button to get a coarser chopping result. | Fish balls |
| Ingredients & results | Max. quantity | Speed setting / accessory | Procedure | Applications |
| Fruit (e.g. apples, bananas, water chestnut) - chopping/pure cing | 500g | P / ♂ | Tip: add a little lemon juice to prevent the fruit from discolouring. Add some liquid to obtain a smooth puree. | Water chestnut cake, puddings, baby food |
| Garlic - chopping | 300g | 1 / P / ♂ | Peel the garlic. Always press the pulse button several times to avoid chopping the garlic too fine. Use at least 150g. | Gamishing, dips |
| Herbs (e.g. parsley) - chopping | Min. 75g | 2 / P / ♂ | Wash and dry the herbs before chopping. | Sauces, soups, garnishing, herb butter |
| Juices (e.g. made of papaya, water melon, pear, guava) - blending | 500g (total amount) | 2 / ♂ | Add water or another liquid (optional) to obtain a smooth juice. | Fruit juices |
| Mayonnaise - emulsifying | 3 eggs | 1-2 / ♂ | All the ingredients must be at room temperature. Note: use at least one large egg, two small eggs or two egg yolks. Put the egg and a little vinegar in the bowl and add the oil drop by drop. | Salads, garnishing and barbecue sauces |
ENGLISH
| Ingredients & results | Max. quantity | Speed setting / accessory | Procedure | Applications |
| Meats (lean) - mincing | 300g | 2 / P / 2 | First remove any sinews or bones. Cut the meat into cubes of 3cm. Use the pulse function to get a coarser chopping result. | Steaks tartare, hamburgers, meat balls |
| Milkshakes - blending | 250ml milk | 2 / 6 | Puree the fruit (e.g. bananas, strawberries) with sugar, milk and some ice cream and mix well. | Milkshakes |
| Mixture (cake) - mixing | 3 eggs | 2 / 2 | The ingredients must be at room temperature. Mix the softened butter and the sugar until the mixture is smooth and creamy. Then add milk, eggs and flour. | Various cakes. |
| Nuts - chopping | 250g | 2 / P / 2 | Use the pulse button for coarse chopping or speed setting 2 for fine chopping. | Salads, puddings, nut bread, almond paste |
| Onions - chopping | 400g | P / 2 | Peel the onions and cut them into 4 pieces. Note: use at least 100g. Always press the pulse button several times to prevent the onions from being chopped too fine. | Stir-fries, garnishing |
| Onions - slicing | 300g | 1 / 2 | Peel the onions and cut them into pieces that fit into the tube. Note: use at least 100g. | Stir-fries, garnishing |
| Ingredients & results | Max. quantity | Speed setting / accessory | Procedure | Applications |
| Poultry - mincing | 200g | 2 / P / ♂ | First remove any sinews or bones. Cut the meat into cubes of 3cm. Use the pulse button for a coarser chopping result. | Minced meat |
| Soups - blending | 500ml | 2 / ♂ | Use cooked vegetables. | Soups, sauces |
| Soy beans - blending | 50g (dried soy beans) | 2 / ♂ | Put the pre-soaked (min. 4 hours) soy beans in the filter. Process max. 2/3 of the metal sieve of the filter filled with soaked soy beans. Add water and blend until smooth. | Soy milk |
| Variety of sweet teas (e.g. almond, black sesame, peanut) - blending | 100g | 2 / ♂ | Place the nuts (or seeds) in the filter. Add 600 ml. water and blend until smooth and homogeneously mixed; blend for 2 minutes and repeat 3 to 4 times, with rest times of 1 minute in between. Boil the sweet tea solution, thicken with rice solution and add sugar to sweeten. | Almond sweet tea, peanut sweet tea, black sesame tea. |
| Vegetables, ginger - chopping | 250g | 2 / ♂ | Pre-cut into cubes of 3cm and chop them with the blade. | Raw vegetables, stir-fries, filling for dumplings and buns |
| Vegetables - chinese shredding | 350g | 2 / 6 | Trim vegetables to fit the tube. Put the vegetables in the tube and use the pusher to press them down while shredding. | Raw vegetables, stir-fries, filling for dumplings and buns |
| Whipping cream - whipping | 350ml | P / 6 | Use cream that comes straight from the refrigerator. Note: use at least 125ml cream. The whipped cream is ready after approx. 20 seconds. | Garnishing, cream, ice-cream mixtures |
Recipes
Soy milk
[3]
- 100g pre-soaked (min. 4 hours) soy beans
- Ⅱ water
- granulated or rock sugar to taste
Set the soy beans aside to drain.
- Place the soaked beans in the filter. Add 500 ml water and blend until smooth at speed 2 for 3 minutes. Pour out the soy milk.
- Bring the soy milk and remaining 500 ml water to the boil, then add sugar and leave to simmer. Serve hot or cold.
- You can possess max. 2/3 of the metal sieve of the filter filled with soaked soy beans at any one time.
Fruit cake
2
- 450 g dry pitted dates, halved
- 200 g dry plums, halved
- 650 g pecan nuts
- 160 g shredded coconut
- 300 g glazed pineapple
- 1 tin (400 g) sweetened condensed milk
- 1 tsp vanilla essence
Grease two 20cm-long baking tins and preheat the oven to 135°C. Put the halved dates and plums in the food processor bowl and chop at maximum speed for 30 seconds. Then empty the bowl. Put the pecan nuts in the food processor bowl and roughly chop the nuts, using the pulse function. Then empty the bowl. Put the glazed pineapple in the food processor bowl and chop into pieces, using the pulse function. Then empty the bowl. Mix the dates, plums, pecan nuts, pineapple and shredded coconut in a large mixing bowl and mix them. Add milk and vanilla to the ingredients and mix. Put the fruit mixture in the baking tins and bake the cakes at 135°C for 90 minutes. Do not process this recipe more than once without interruption. If you need more quantities, let the appliance cool down first and then continue the process.
Walnut sweet tea
①
- 100g skinned walnuts
- 120g rock sugar
- 3 tbsp rice
- 1.2L water
- 50ml evaporated milk
- Blanch skinned walnuts in salt water for 3 minutes. Drain and air-dry. Fry the walnuts in a wok over medium heat until cooked and browned.
- Soak rice and liquidise in the blender at pulse/speed 2. Filter the rice solution.
- Place the walnuts in the filter. Add 600 ml. water and blend at speed 2 for 2 minutes. Repeat about 4-5 times, with rest times of 1 minute in between. ▶ Dissolve rock sugar in the remaining 600 ml of water, add walnut solution and allow to boil. Thicken with rice solution.
- Mix in evaporated milk, serve hot.
Vegetarian spring rolls
图 - 10 sheets frozen spring roll wrappers ▶ For the filling: - 2 cloves garlic - 50g golden mushrooms - 120g carrot - 120g jicama (sa got) - 70g white cabbage ▶ For the seasonings - 3/4 tsp salt
- 3/4 tsp sugar
- 1 tsp light soy sauce
- 1.5 tbsp oyster sauce
- 1.5 tsp cornflour
- 4 tbsp water
- Cut the cabbage using the slicing insert at speed 1.
- Shred the carrot and jicama using the Chinese shredding insert at speed 1.
- Crush the garlic. Heat 1 tbsp oil in the wok, sauté crushed garlic, discard. Add golden mushrooms, cabbage, jicama and carrot, stir for 1 minute, add seasonings, and fry until thickened, put in a dish and let it cool off.
- Place sufficient filling in the centre of each spring roll wrapper. Wrap into a roll and seal with a little flour mixture (plain flour mixed with a little water). ▶ Deep-fry spring rolls over moderate heat, move spring rolls constantly to avoid burning.
- Drain, put in a dish, cut into halves, serve with Worcestershire sauce.
Bean curd sheet rolls
- 1 large fresh soy bean sheet
- 4 sheets of instant laver
- 50g golden mushrooms
- 1 greenhouse cucumber
- 1 carrot
- some light soy sauce (for glazing)
For the sauce:
- 90ml stock
- 1/2 tsp sugar
- 1/2 tbsp light soy sauce
- some salt
- a dash of sesame oil
- pinch of pepper
- some cornflour dissolved in water for thickening
▶ Peel the carrot. Shred the carrot and cucumber using the Chinese shredding disc at speed 1.
- Wipe the soy bean sheet with a wet cloth. Cut it into 4 equal portions and glaze with some light soy sauce.
- Put a sheet of laver onto each soy bean sheet. Put the shredded carrot, cucumber and mushrooms in the centre of the sheet. Wrap into a roll.
▶ Steam over a high heat for 5 - 8 minutes until done. Cut into long sections. Dish up and keep warm.
- Heat some oil, bring ingredients for the sauce to the boil and thicken with some cornflour dissolved in water. Pour the sauce onto the beancurd sheet rolls.
Steamed pork buns
82
- 300g flour
- 2 tsp baking powder
- 1 tbsp granulated sugar
- 1 tbsp vegetable lard
- approx. 150ml water
- some light soy sauce (for glazing)
For the filling:
- 300g lean pork shank, cut into pieces of about 2×2×2cm
- 3 tbsp spring onions
For seasoning:
- 1/2 tsp salt
- 2 tsp light soy sauce
- 1/2 tsp granulated sugar
- dash of sesame oil
- pinch of pepper
- 3/4 cup stock
Put the blade on the tool holder in the bowl and mince the pork and spring onions at speed 2 or use the pulse function. Remove the minced meat from the bowl.
Bring the seasoning ingredients to the boil in a wok. Add pork and cook over low heat until the sauce thickens. Remove and leave to cool. Replace the blade with the kneading hook. Sift the flour and baking powder into the bowl. Mix in the granulated sugar and water. Add oil and knead into a soft and smooth dough at speed 2. Remove the bowl and cover it with a cloth. Allow the dough to rise for 30 minutes. Put the bowl with the dough back onto the appliance and knead for a while. Divide the dough into 10 equal portions. Roll the portions into round wrappers with a rolling pin. Put in a suitable amount of filling. Pinch to fold the edges to form a bun. Place the buns onto pieces of rice paper. Put into a steamer and steam over high heat for 10 - 15 minutes. Serve immediately.
Sauteed turnip & celery with dace
2
- 300g dace
- 150g turnip, peeled
- 50g Chinese celery, sectioned into lengths of 5 cm
- 2 cloves garlic
- 1/2 inch ginger
- 5g coriander
- 2 small pieces dried tangerine peel
For seasoning:
- 1/2 cup stock
- 1 tsp salt
- 3/4 tsp sugar
- 2 tsp cornflour
- 1/2 egg white, beaten
- Soak dried tangerine peel until soft, scrape its segment and shred it.
- Put the Chinese shredding insert in insert holder and shred the turnip at speed 1. Take out the shredded turnip. Remove insert and insert holder and place the blade onto the tool holder. Put the dace along with 1/4 tsp salt, 1/4 tsp sugar, 2 tsp cornflour, coriander, garlic, ginger, grated tangerine peel and 2 tsp water in the bowl and mince into a sticky paste at speed 2. Remove the paste from the bowl.
- Heat some oil in a wok and then put in the dace mixture. Flatten it with the spatula and fry both sides until done. Then cut the dace patties into slices and keep for later use.
Heat some oil and sauté the celery. Pour in stock and shredded turnip and cook for a while. Put in sliced dace patties and seasoning, thicken with some cornflour dissolved in water and serve.
Glutinous rice dumplings
B
- 300g glutinous rice flour
- 270ml warm water
- 200g red bean paste
- 1 cup desiccated coconut
- Put glutinous rice flour and water in the bowl and knead to a soft dough with the kneading hook at speed 1. Divide the dough into 20 equal portions. Lightly knead red bean paste and divide into small lumps. Shape the dough portions into round patties, press slightly, put red bean paste on the patties, seal and shape into a ball. Cook dumplings in a large pot of boiling water until they float to the surface.
- Drain and coat with desiccated coconut. Serve hot.
Steamed turnip cake
- 2.8kg white radish (turnip)
- 434g rice flour
- 5 sticks Chinese sausages, diced
- 1 stick preserved pork, diced
- 36g dried shrimp
- 10 - 15 Chinese mushrooms
For the seasonings:
- 2 tsp coarse salt
- 1 tbsp pepper
- Rinse and peel the radish and cut it into pieces that fit into the tube. Shred the radish with the shredding insert at speed 2.
- Put the shredded radish in a wok and bring it to the boil. Then cook it for another 5 - 10 minutes, adding 1/2 - 3/4 cup of water if too dry. Remove radish and put into a 9 cm high baking tin. Save the cooking water from the radish for later use.
- Add rice flour, salt and pepper to the radish and stir. Set aside.
- Soak dried shrimps and mushrooms until soft. Chop the mushrooms roughly with the blade using the pulse function. ▶ Sauteed dried shrimps, mushrooms, sausages and preserved pork in a wok for a while.
- Then stir in the radish mixture. Check the consistency. If too dry, add the saved radish liquid or water, approx. 1.5 - 2 cups, to arrive at the right consistency (must not be too dry).
- Place the baking tin with radish mixture in the wok and steam it for two hours. Do not fill the pan with radish mixture up to the brim as turnip cake will rise during steaming.
- Allow turnip cake to cool down thoroughly at room temperature before cutting it into smaller pieces.
Bitter gourd salad
- 300g bitter gourd
- 1 tbsp hot bean sauce
- 2 tsp light soy sauce
- 1 tbsp sesame oil
- 2 tbsp brown vinegar
- 1 pinch of pepper
- 1.25 tbsp sugar
- Halve the bitter gourd and remove its seeds. Rinse in cold water.
- Put the slicing insert into the insert holder and slice the bitter gourd into thin pieces at speed 2.
- Add in some fine salt and leave for a while until soft. Squeeze out its moisture. ▶ Put the bitter gourd in a deep bowl. Add hot bean sauce and seasoning. Serve.
Five spice powder
Mill
- 2g cinnamon
- 2g star anise
- 2g clove
- 2g liquorice slices
- 2g aniseed
- Cut the cinnamon and liquorice slices into smaller pieces before using.
- Put all the ingredients into the mill and grind at high speed for 30 seconds. NEVER GRIND FOR MORE THAN 30 SEC.
- 100g skinned walnuts
- 120g rock sugar
- 3 tbsp rice
- 1.2l water
- 50ml evaporated milk
- 1 piece of salted pork belly, diced
- 36g dried shrimp
- 10-15 Chinese mushrooms
For seasoning
- 2 teaspoons salt
- 1 tablespoon white pepper
- Rinse and peel the radish and cut into small pieces that fit into the tube. ▶ Put the shredded radish into a pot and let it boil. Then cook for 5-10 minutes, add 1/2 - 3/4 cup of water if too dry. Remove the radish and place it into a baking tin 9 cm high. ▶ Add rice flour, salt and white pepper to the radish and stir. Set aside. ▶ Soak the dried shrimp and mushrooms until soft. Chop the mushrooms coarsely with a knife using the pulse function.
- Stir-fry the dried shrimp, mushrooms, sausage and salted pork belly in a wok briefly.
- Then stir in the radish mixture. Check frequently. If too dry, add the reserved radish liquid, about 1.5 - 2 cups, for proper consistency (not too dry).
- Place the baking tin with the radish mixture into the steamer and steam for 2 hours. Do not fill the container with the radish mixture to the brim because the turnip cake will rise during steaming. ▶ Let the turnip cake cool completely at room temperature before cutting it into small pieces.
Bitter gourd salad
- 300g peria
- 1 tablespoon spicy peanut sauce
- 2 teaspoons soy sauce
- 1 tablespoon sesame oil
- 2 tablespoons dark vinegar
- a little pepper
- 1.25 tablespoons sugar
Built-in safety lock.


Quantities and preparation times

Storage
Storing parts
1. Mount the juicer onto the tool stand.
2. Place the ingredients into the tray.
3. Cover the tray with its lid.
4. Insert the pusher into the feed tube to close it.


Filter
1. Place the ingredients into the inverted cup.

Storage
Space-saving

In addition to the following steps: In addition, the number of steps is 10-60
Additional recommendations


100% recycled paper
100% recycled paper
www.philips.com
4222 002 25502



- ENGLISH
- FOOD PROCESSOR: PARTS AND ACCESSORIES
- INTRODUCTION
- IF YOUR APPLIANCE SUDDENLY STOPS RUNNING
- IMPORTANT
- USING THE APPLIANCE
- BOWL
- BUILT-IN SAFETY LOCK
- FEED-TUBE AND PUSHER
- BLADE
- TIPS
- INSERTS
- KNEADING ACCESSORY
- EMULSIFYING DISC
- BLENDER
- FILTER
- MILL
- CLEANING
- CLEANING OF FILTER
- CLEANING OF MILL
- BLENDER QUICK-CLEAN OPERATION
- STORAGE
- MICROSTORE
- GUARANTEE & SERVICE
- RECIPES
- SOY MILK
- FRUIT CAKE
- WALNUT SWEET TEA
- VEGETARIAN SPRING ROLLS
- BEAN CURD SHEET ROLLS
- STEAMED PORK BUNS
- FOR SEASONING
- SAUTEED TURNIP & CELERY WITH DACE
- GLUTINOUS RICE DUMPLINGS
- STEAMED TURNIP CAKE
- BITTER GOURD SALAD
- FIVE SPICE POWDER
- STORING PARTS
- SPACE-SAVING
- ADDITIONAL RECOMMENDATIONS
Brand : PHILIPS
Model : HR7640
Category : Food Processor