
EA 81R8 - Automatic coffee machine KRUPS - Free user manual and instructions
Find the device manual for free EA 81R8 KRUPS in PDF.


| Product type | Automatic coffee machine |
| Brand | KRUPS |
| Model | EA 81R8 |
| Pressure | 15 bar |
| Heating system | Compact Thermoblock System with integrated percolation chamber |
| Water tank capacity | 1.7 L |
| Bean hopper capacity | Approximately 200 g (estimate) |
| Grinder | Adjustable metal burr |
| Grind fineness | Continuously adjustable (left: fine, right: coarse) |
| Display | LCD with navigation |
| Preparation functions | Ristretto, Espresso, Coffee, Steam (cappuccino, latte) |
| Customizable settings | Strength (1 to 3 beans), Volume (20 to 180 ml), Temperature (3 levels) |
| 2-cup function | Yes, automatic chained cycles |
| Maintenance programs | Automatic rinsing, Cleaning (tablet), Descaling (sachet) |
| Automatic rinse on startup | Programmable (ON/OFF) |
| Automatic shut-off | Adjustable from 15 to 120 min |
| Safety | Alert messages, stop in case of anomaly |
| Steam wand | Removable, with cleaning needle included |
| Auto-cappuccino set | Optional (ref. XS 6000) |
| Filter cartridge | Claris - Aqua Filter System (optional) |
| Power supply | 220-240 V, 50-60 Hz (estimate) |
| Power | 1450 W (estimate) |
Frequently Asked Questions - EA 81R8 KRUPS
User questions about EA 81R8 KRUPS
0 question about this device. Answer the ones you know or ask your own.
Ask a new question about this device
Download the instructions for your Automatic coffee machine in PDF format for free! Find your manual EA 81R8 - KRUPS and take your electronic device back in hand. On this page are published all the documents necessary for the use of your device. EA 81R8 by KRUPS.
USER MANUAL EA 81R8 KRUPS
FR HOTLINE:BE:3270233159-FR:0974501061-CH:0800377737 DE HOTLINE:DE:08009800000-AT:0800225225-CH:0800377737 EN HOTLINE:UK:0345 3306460-ROI:(01)6774003 NL HOTLINE:NL:0318582424 IT SERVIZIO CONSUMATORI: IT: 199 207701 - CH: 0800 37 77 37 ES HOTLINE:ES:902312300 PT CENTRO DE CONTACTO DO CONSUMIDOR: PT : 808 284 735 EL EANAA:GR:2106371251 RU TOPRAJAJINHNA:RU:4952133228 UK yKPAIHA:UK:0443001304 PL INFOLINIA:PL:0801300420 CS HOTLINE: CZ:731010111 SK ZAKAZNLCKA LINKA:SK:233595224 HU ÜGYFÉLSZOLGÁLAT: HU : (1) 8018434 567

www.krups.com
8080014573-04 03/2018
KRUPS
EA815 - EA816 - EA817


www.krups.com


1
2
3
4
25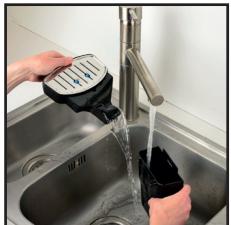
26
27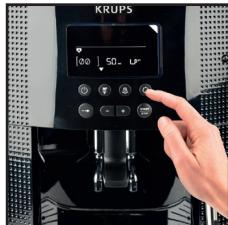
28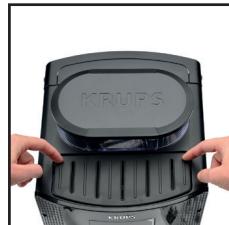
5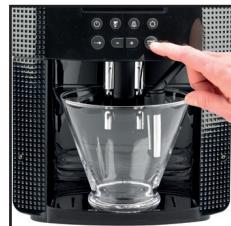
1:
19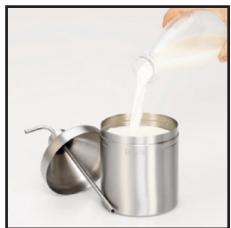

2 2 23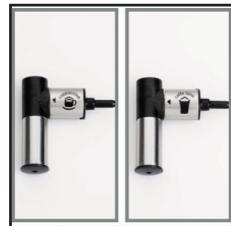
24
33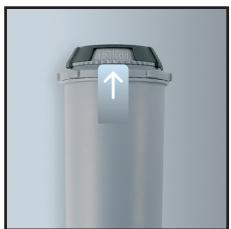
34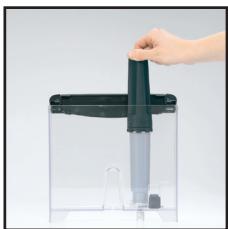
| KRUPS INTERNATIONAL GUARANTEE: COUNTRY LIST SMALL HOUSEHOLD APPLIANCES www.krups.com | |||||
| ARGENTINA | 0800-122-2732 | 香港 HONG KONG | 852-8137 0128 | PORTUGAL | 808 284 735 |
| RUSSUISTU ARMENIA | 010 55-76-07 | MAGYARORSZAG HUNGARY | 06 1 801 8434 | QATAR | 44600002 |
| AUSTRALIA | 1 300 307 824 | INDONESIA | +62 21 5793 7007 | REPUBLIC OF IRELAND | 01 677 4003 |
| ÖSTERREICHE AUSTRIA | 01 890 3476 | ITALIA ITALY | 1 99 207 701 | ROMANIA | 0 21 316 87 84 |
| اللهutron BAHRAIN | 17291537 | 日本 JAPAN | 0570-07772 | POCCN RUSSIA | 495 213 32 28 |
| БЕЛAPСВ BELARUS | 017 2239290 | اللهutron JORDAN | 4629700 | اللهسيرة الحرفية الحرفية SAUDI ARABIA | 920023701 |
| BELGIQUE BELGIE BELGIUM | 070 23 31 59 | КAZAKCTAH KAZAKHSTAN | 727 378 39 39 | SRIJI SERBIA | 060 0 732 000 |
| BOSNA I HERCEGOVINA | Info-linja za potrošače 033 551 220 | Hangover KOREA | 080-733-7878 | SINGAPORE | 6550 8900 |
| BRASIL BRAZIL | 0800-7257877 | الله UT KUWAIT | 1807777 Ext :2104 | SLOVENSKO SLOVAKIA | 232 199 930 |
| Бълтаги BULGARIA | 0700 10 330 | LATVIJA LATVIA | 6 616 3403 | SLOVENIA SLOVENIA | 02 234 94 90 |
| CANADA | 1-800-418-3325 | LEBANON | 1364392 Ext: 189-182 | ESPAÑA SPAIN | 933 06 37 59 |
| CHILE | 02 2 884 46 06 | LIETUVA LITHUANIA | 5 214 0057 | SVERIGE SWEDEN | 08 629 25 00 |
| COLOMBIA | 018000520022 | LUXEMBOURG | 0032 70 23 31 59 | SUISSE SCHWEIZ SWITZERLAND | 044 837 18 40 |
| HRVATSKACROATIA | 01 30 15 294 | MAKEDONJA MACEDONIA | (02) 20 50 319 | Татулич THAILAND | 02 765 6565 |
| ČESKA REPUBLIKACZECH REPUBLIC | 731 010 111 | MALAYSIA | 603 7802 3000 | ТURKIYE TURKEY | 444 40 50 |
| DANMARKDENMARK | 44 66 31 55 | MEXICO | (01800) 112 8325 | اللهسيرة الحرفية الحرفية UAE | 8002272 |
| EGYPT | 16622 | MOLDOVA | 22 224035 | Украши UKRAINE | 044 300 13 04 |
| EESTIONIA | 668 1286 | NEDERLAND The Netherlands | 0318 58 24 24 | UNITED KINGDOM | 0345 330 6460 |
| SUOMIFINLAND | 9 8946 150 | NEW ZEALAND | 0800 700 711 | U.S.A. | 800-526-5377 |
| FRANCE Continentale + Guadeloupe, Martinique, Réunion, St-Martin | 09 74 50 10 61 | NORGE NORWAY | 22 96 39 30 | VIETNAM | 1800-555521 |
| DEUTSCHLAND GERMANY | 0212 387 400 | Großes Salzpflanz OMAN | 80075000 | 17/01/2018 | |
| ELLADA GREECE | 2106371251 | POLSKAPOLAND | 801 300 420 koszt jak za polączenersie lkalne | ||
KRUPS INTERNATIONAL GUARANTEE
Date of purchase / Date d'achat / Fecha de compra / Købsdato / Ostopäivä / Kjøpsdato / Inköpsdatum / Ostukuupäev / Pirkuma datums / Įsigijimo data / Data zakupu / Datum izročitve blaga / Datum kupovine / Vásárlás dátuma / Data achiziției / Data na zakupyannie / Data prodazhy / Chūshun op. / Data prodazhn / Cañtánan Kyni / 購入日 / fúyá / / Na umi jat / Daуtmá Na kynbáne:
Product reference / Référence produit / Référence du produit / Référencenumero / Tuotenumero / Artikkelinumero / Produktreferens / Toote viitenumber / Produkta atsauces numurs / Gaminio numeris / Referencja produktu / Oznaka proizvoda / Tip aparata / Készülék típusa / Cod produs / Moen / Moelb / UnŋbL / Moelb / Yarici / 製品リファレンス番号 /�nafalow / [kehlofny / Itoaouan]эврнлдов:
Retailer name and address / Nom et adresse du revendeur / Nombre y dirección del minorista / Forhandler navn & adresse / Jälleenmyyjän nimi ja osoite / Forhandler navn og adresse / Återförsäljarens namn och adress / Müüja kauplus ja aadress / Veikala nosaukums un adrese / Parduotuvės pavadinimas ir adresas / Nazwa i adres sprzedawcy / Naziv i adresa prodajnog mjesta / Naziv in naslov trgovine / Forgalmazó neve és címe / Numele și adresa vânzătorului / Tkrobokn 6eok / Hāza ra i āpèca pro Ḁaɪn / Hαqúlui pμηρι μηu lūnulmufi h uhuŋl. / Hābaνne i anpèc pro Ḁaɪnuər / Catuynhniya atayu'm Meh mekēn-kaiy / 販売店店名、住所 / haiauaaiaaiaiaiaiaiaiaiaiaiaiaiaiaiaiaiaiaiaiaiaiaiaiaiaiaiaiaiaiaiaiaiaiaiaiaiaiaiaiaiaiaiaiaiaiaiaiaiaiaiaiaiaiaiaiaiaiaiaiaiaiaiaiaiaiaiaiaiaiaiaiaiaiaiaiaiaiaiaiaiaiaiaiaiaiaiaiaiaiaiaiaiaiaiaiaiaiaiaiaiaia
Distributor stamp / Cachet / Sello del distribuidor / Forhandler stempel / Jälleenmyyjän leima / Forhandler stempel / Återförsäljarens stämpel / Tempel / Zīmogs / Antspaudas / Pieczęć sprzedawcy / Pečat distributera / Pečat trgovine / Forgalmazó pecsétje / Ștampila vânzătorului / Πeuer hat lybrpopckn osekr / Πeuerkatka propaizbua / Chp. / Πeuerbat propaizbua / Catuynnmni mopi / 販売印 / Μαρονησουντην/ Σошт��суку / Πeuer hat nystriptbvyep
Dear Customer, dear Customer
Congratulations! You are now the proud owner of an Espresso Automatic EA815-EA816-EA817 Series. With your machine, you can make a wide range of drinks: espressos, coffees or ristrettos, completely automatically. You can also make milk-based drinks such as cappuccinos. It has been designed so that you can enjoy restaurant quality coffee at home, whatever the time of the day and every day of the week. You will appreciate its ease-of-use and the quality of your cup of coffee. You can set the amount, strength and temperature of your drinks.
Thanks to its Compact Thermoblock System with built-in percolation chamber, its 15 bar pump, and because it uses coffee beans which have been freshly ground just before making the coffee, your machine will give you hot ristrettos, espressos and coffees from the first cup with maximum aroma and a creamy golden-brown froth.
To give the drink maximum flavour, an espresso is traditionally served in a small, flared porcelain cup. For an optimum temperature espresso and a dense creamy froth, we recommend that you pre-heat your cup.
You will probably need to try several types of coffee before you find the one that suits you.
By experimenting with the blend and/or roast, you will eventually arrive at the ideal result.
Espresso coffee has a richer aroma than classic filter coffee. Despite its stronger taste which remains longer on the palate, an espresso contains less caffeine than filter coffee (around 60 to 80 mg per cup compared to 80 to 100 mg per cup) due to its shorter percolation period.
The quality of water used is another determining factor which affects the overall quality of the brewed coffee. You should ideally use water which is fresh from the tap (so that it hasn't had time to stagnate due to air contact), which is cold and which does not smell of chlorine.
The ergonomic, compact LCD display makes the machine easy to use. It will guide you through each step, from preparing your drink to servicing your machine.
We wish you many years of enjoyment with your Krups machine.
The Krups team

| Buttons and knobs | ||
| "On-off" button | → | Navigation button (cursor key) |
| Favourite coffee type button A or press B Save favourite button A or press and hold B | - + | To adjust selected settings |
| Steam drink button | START STOP | Start or stop equipment |
| Maintenance and settings button | To adjust how finely ground you would like the coffee beans. | |
| Symbols | Constant | Flashing | Meaning |
| ● | The coffee grounds collector is missing or improperly positioned | ||
| ● | Empty the coffee grounds collector + empty the drip tray | ||
| ● | Refill the water tank The water tank is not properly in place | ||
| ● | Place a container (0.6 L minimum) under the steam and coffee jets | ||
| ● | Maintenance cycle in progress | ||
| ● | Malfunction: unplug the machine for ten seconds then plug it back in | ||
| ● | Install filter cartridge | ||
| ● | Rinsing cycle in progress | ||
| ● | ● | Clean machine with KRUPS cleaning tablet | |
| ● | Cleaning cycle interrupted | ||
| ● | ● | Descale machine with KRUPS descaling sachet | |
| ● | Descaling cycle interrupted | ||
| ● | Adjust the water hardness | ||
| ● | Enable automatic rinsing of the coffee circuit when the machine starts. | ||
| ● | Program the length of time after which your machine switches off automatically (standby) | ||
| ● | ● | Adjust the coffee temperature/Pre-heating indicator | |
| ● | Favourite A or B - 2 drinks can be saved in memory | ||
| ● | Registering favourite A or B | ||
| ● | ● | Preparation progress indicator | |
| PRESS START | ● | Press the START-STOP button | |
| ● | Coffee strength indicator | ||
| Volume or time indicator | |||
| ● | Number of cups (1 or 2) | ||
| Active use indicator | |||
| Maintenance or settings selection |
APPLIANCE DESCRIPTION
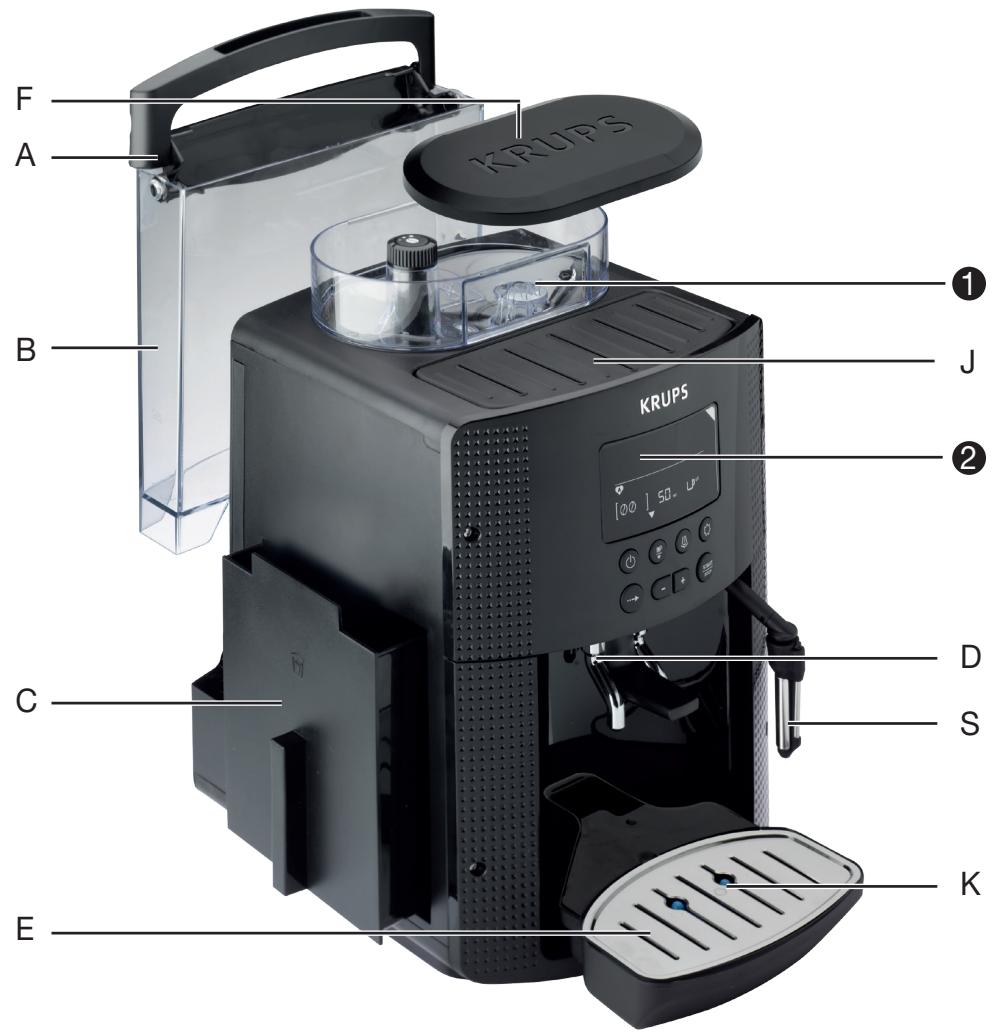
A. Water tank lid B. Water tank C. Used grounds collector D. Coffee outlet and height-adjustable handle E. Grid and removable drip tray F. Coffee bean container lid ① Coffee bean container G. Coffee grounds fineness adjustment knob H. Metal grinder I. Cleaning tablet funnel J. Cup grid (may vary according to model)
K. Water level float 2 Graphic screen L. On/off button M. Coffee and favourites button N. Steam button 0. Settings button P. Navigation button Q. + or - button R. Start/stop button S. Steam nozzle
BEVERAGE PREPARATION
| TYPES OF COFFEE | Number of possible cups | Possible settings Volume (ml) | Possible settings Strength |
| RISTRETTO | 1 | 20 to 30 ml (per 10 ml) | 1 to 3 beans |
| 2 x 1 | 2 x 20 to 30 ml (per 10 ml) In two cycles | ||
| ESPRESSO | 1 | 30 to 70 ml (per 10 ml) | 1 to 3 beans |
| 2 x 1 | 2 x 30 to 70 ml (per 10 ml) In two cycles | ||
| COFFEE | 1 | 80 to 180 ml (per 10 ml) | 1 to 3 beans |
| 2 x 1 | 2 x 80 to 180 ml (per 10 ml) In two cycles |
BEVERAGE PREPARATION
Appliance preparation
To prevent used water spillage from making your work surface dirty and to avoid burning yourself, don't forget to attach the drip tray. Remove and refill the water tank (1-2). ■ Refill the coffee bean container (3).
First use
Turn on the appliance by plugging it in then pressing the on/off button (4). The machine pre-heats. At the end of the cycle, the symbols and start button start to flash. Put a 0.6L container underneath the two coffee and steam nozzles. Press the start/stop button (5). The machine starts and rinses the hydraulic circuits (coffee and steam) for around 2 minutes. At the end of the initialisation cycle, the coffee types menu appears. (6) ■ You are advised to rinse the circuit if you have not used your machine for several days (see the chapter on Maintaining Your Appliance).
Preparing the grinder
You can adjust the strength of your coffee by adjusting how finely the coffee beans are ground.
Generally, the finer the coffee is ground, the stronger and creamier the coffee will be, but this also depends on the type of coffee used.
Adjust the fineness of grinding by turning the coffee grounds fineness adjustment knob 0 which is located in the coffee bean container. It is advised that you do this during grinding, one notch at a time.
After 3 rounds, you will notice a pronounced difference in taste. To the left, the grounds are finer. To the right, the grounds are coarser. (7)
Claris F 088 - Aqua Filter System cartridge (Sold separately)
To optimise the taste of your drinks and the lifespan of your appliance, you are advised to only use a Claris - Aqua Filter System cartridge with your machine (see the chapter OTHER FUNCTIONS - Installing the filter).
Every time you place a Claris-Aqua Filter into the machine you must prime the filter before using the machine by activating the "install filter cartridge" program.
MAKING AN ESPRESSO AND A COFFEE
Note:
The amount of water for making an espresso is between 30 and 70 ml.
The amount of water for making a coffee is between 80 and 180 ml.
Starting preparation (with 1 or 2 cups)
Press the on-off button, and wait for the appliance to finish heating up. The coffee types menu is displayed. The function indicator ▷ is shown above the coffee types button (6). Place one or two cups under the coffee jets. You can lower or raise the coffee jets according to the size of your cup (8). Select the coffee strength (shown coffee beans displayed on the screen in brackets) with the + button to increase or the - button to decrease. (9). Press the navigation button to set the volume: select the volume of water displayed on the screen between brackets using the + or - buttons (10). - Press the navigation button to set the number of cups: select 1 or 2 cups, displayed on the screen between brackets using the + or - buttons. Press the START button (11). ■You can set the water volume at any time using the + or - buttons. To stop the flow into your cup, press the STOP button. ■ You can also adjust the temperature of your coffee (see the chapter OTHER functions - Settings).
Two cup function
The appliance will automatically carry out 2 full cycles of coffee preparation.
MAKING DRINKS USING STEAM
Steam is used to froth the milk, for example when preparing a cappuccino or caffe latte, and also to heat up liquids. As a higher temperature is required when producing steam than when making an espresso, the appliance will launch an additional pre-heating phase.
Frothing milk
■ For best results, you are advised to use very fresh, very cold pasteurised or UHT milk, recently opened. Unpasteurised milk does not produce the best results. Check that the steam nozzle is correctly positioned. Pour the milk into a milk jug which has a handle or into a cappuccino cup. Only fill it half way. ■ When the screen displays the drink selection menu, press the steam button (12). The function indicator is located above the steam button. Insert the steam nozzle into the milk.
A screen indicates that the appliance is heating up. Once the appliance has finished heating up, you can begin to make steam by pressing START, and following these steps (13):
Step 1: holding the milk jug in place, insert the steam nozzle approximately 2 cm into the milk and wait for it to start frothing.
Step 2: raise the container slightly (approximately 1 cm). Do not completely submerge the metal tube.
Step 3: gradually lower the container as the froth accumulates. (14)
When you have frothed the milk enough, press the STOP button to stop the cycle. Warning: the cycle does not stop immediately. To remove any milk traces from the steam nozzle, place a container under the nozzle and start the steam function again (approximately 10 seconds). The steam nozzle is removable in order to allow for deep cleaning. Wash it with water and a little non-abrasive detergent using a brush. Rinse and dry (15-16). Before replacing, make sure that the air holes are not clogged with milk residue. Unclog the holes with the needle supplied with your appliance if necessary (17). To stop the steam, press the STOP button
WARNING: THE CYCLE DOES NOT STOP IMMEDIATELY.
Steam can be produced for a maximum of 2 minutes per cycle.
Auto-cappuccino XS 6000 set (sold separately)
This auto-cappuccino accessory enables you to make cappuccinos or lattes (18). Connect the different parts to each other. Ensure that the pipe is not pierced by keeping the knob in the correct place. After removing the lid, fill the jug with milk (19) and place a cup or glass under the auto-cappuccino nozzle (20). Select cappuccino or latte on the special nozzle (21). Start steam, as indicated in the chapter Making drinks with steam. Once you have made the milk froth, place your cup under the coffee jets and start a coffee cycle (22).
To prevent the milk from drying on the auto-cappuccino accessory, ensure that you clean it thoroughly. You are advised to wash it immediately by running a steam cycle with the accessory jug filled with water in order to clean the inside of the nozzle. For this you can use the KRUPS liquid detergent available separately.
MAINTAINING YOUR APPLIANCE
Emptying the coffee grounds collector and the drip tray
■ If the symbol starts flashing, empty and clean the drip tray (the drip tray may contain coffee grains) and the coffee grounds collector (23-25). The drip tray is fitted with floats which indicate when it needs to be emptied (26). Once you have removed the coffee grounds collector, you should empty it completely in order to avoid any overflow. The warning message will continue to be displayed if the coffee grounds collector is not pushed in or inserted correctly (24). You cannot make an espresso or a coffee while the warning message is shown.
Rinsing the circuits :
Press the maintenance and settings button (27). The function indicator is shown above the maintenance button.
If necessary, using the navigation button, select the rinse symbol
Press START, rinsing starts and finishes when the coffee menu appears.
Automatic rinsing of the circuits when the machine starts.
You can choose to program the machine to be rinsed automatically each time it is turned on. To do this, press the maintenance and settings button (27). Using the navigation button, select the automatic rinsing programming symbol. Press the button to choose ON, which confirms this program. If you press the button again, automatic rinsing is disabled. You can return to the coffee types menu by pressing the bullet button.
Warning: after this rinsing process, hot water will be released from the coffee jet. Ensure that the drip tray is in place even when the machine is not being used. The cycle lasts only a few seconds and stops automatically.
Cleaning program - total duration: approximately 13 minutes
You do not have to run the cleaning program as soon as the appliance requests it, but it must be done reasonably soon after. If cleaning is postponed, the alert message will remain illuminated until the process is carried out.
- When the bullet symbol lights up, you can run the automatic cleaning program by pressing the maintenance and settings button. The bullet symbol is selected. The function indicator bullet is shown above the maintenance button. The automatic cleaning program is divided into 2 stages: the cleaning cycle itself, followed by the rinse cycle. You can clean the machine at any time by pressing the maintenance and settings button, then, using the navigation button, select the cleaning symbol. To run this cleaning program, you will need a container which holds at least 0.6 L and which can be placed beneath the coffee jets and the steam nozzle. The symbol flashes. Lift the cup grid (28). Insert the KRUPS cleaning tablet (29). Fill the water container to its maximum level of 1.7 L (2). Empty the coffee grounds collector and the drip tray (23-25). Put a 0.6 L container under the coffee and steam jets (30). Press START. The symbol becomes constant. The first phase (approximately 10 minutes) begins. When this phase has finished, empty the container and the drip tray. The symbol flashes. Put the parts back in place. Press START. The symbol becomes constant, the final phase (approximately 3 minutes) begins. When this phase has finished, empty the container and the drip tray. The cycle has finished, the coffee types menu appears.
Note: if you turn off or unplug your machine during cleaning or if there is a power failure, the cleaning program will start from the beginning of the program once the power is restored to the appliance. It is not possible to postpone this process. It is obligatory in order to rinse the water circuit. In this case, a new cleaning tablet may be necessary. It is best to run the full cleaning program in order to avoid any risk of poisoning. The cleaning cycle is irregular: do not put your hands under the coffee jets while the cycle is running.
Descaling program - duration: approximately 20 minutes
You do not have to run the descaling program as soon as the appliance requests it, but it must be done reasonably soon after. If descaling is postponed, the alert message will remain illuminated until the process is carried out.
The amount of limescale collected depends on the hardness of your water.
Warning: if your product is fitted with our Claris - Aqua Filter System cartridge, remove the cartridge before descaling.
- When the □ symbol lights up, you can run the automatic descaling program by pressing the maintenance and settings button (27). If necessary, using the navigation button, select the □ symbol. The □ symbol flashes and the function indicator is located above the maintenance button. ■ To run the descaling program, you will need a container which holds at least 0.6 L and a sachet of KRUPS descaler. ■ Fill the water tank up to the CALC mark then pour in the contents of one sachet (31). Put a 0.6 L container under the coffee and steam nozzles. Press START to begin the first phase (approximately 8 min). The symbol becomes constant. When this phase has finished, empty the container and the drip tray. The and symbols flash. Remove and clean the water tank using a sponge. Once clean, refill your water tank and replace all parts. The symbol disappears. Press START to begin the second phase (approximately 6 min). The symbol becomes constant. When this phase has finished, empty the container and the drip tray. The symbol flashes.
Press START to begin the final phase (approximately 6 min). The symbol becomes constant. When this phase has finished, empty the container and the drip tray. Descaling is complete.
Note: if you turn off or unplug your machine during descaling or if there is a power failure, the cleaning program will start from the beginning of the program once the appliance is restarted. It is not possible to postpone this process. It is obligatory in order to rinse the water circuit. Running the descaling program is advisable. The descaling cycle is irregular: do not put your hands under the steam jet.
Once the cycle has finished, the coffee types menu appears.
OTHER FUNCTIONS
■ You can access the appliance's OTHER FUNCTIONS menu by pressing the maintenance and settings button. For all settings, use the navigation button ● and + or - for the values. ■ To come out of the maintenance and settings menu, press the ● button.
MAINTENANCE
All of the following options allow you to run the selected programs:
| MAINTENANCE | Allows you to access rinsing. | |
| K | Allows you to access cleaning. | |
| Allows you to access descaling when the appliance requests it. | ||
| Allows you to prime the filter (Claris cartridge). | ||
| Return to coffee types menu. |
TURNING OFF YOUR APPLIANCE
You can turn off your appliance at any time. When stopped, the machine emits a double beep and OFF is displayed on the screen. The appliance has registered your request and will stop as soon as possible.
SETTINGS
All of the following options allow you to run the selected programs:
| SETTINS | You can set your water hardness between 0 and 4 by pressing the + or - buttons . See “Measuring water hardness” (below) | |
| You can program automatic rinsing each time the appliance is turned on by pressing the buttons and selecting ON. | ||
| You can choose the period after which your appliance will turn off automatically (between 15 and 120 minutes by pressing the buttons). | ||
| You can adjust the temperature of your coffee to three different levels by pressing the buttons. | ||
| Return to coffee types menu. |
Measuring water hardness
It is advisable to adjust the appliance according to the hardness of the water used. To check the water hardness, use the stick supplied with your machine or contact your local water authority.
| Degree of hardness | Class 0 Very soft | Class 1 Soft | Class 2 Average hardness | Class 3 Hard | Class 4 Very hard |
| ° dH | < 3° | > 4° | > 7° | > 14° | > 21° |
| ° e | < 3,75° | > 5° | > 8,75° | > 17,5° | > 26,25° |
| ° f | < 5,4° | > 7,2° | > 12,6° | > 25,2° | > 37,8° |
| Appliance settings | 0 | 1 | 2 | 3 | 4 |
Installing the filter (Claris - Aqua Filter System cartridge) (32)
Note: To correctly install your cartridge, ensure that you follow the installation procedure each time you replace it. (33) A mechanism which memorises the month in which the cartridge was changed and replaced (after a maximum of 2 months): set the date using the cartridge cursor. Fit the cartridge in the tank (34). In the maintenance and settings menu, the function indicator is located above the maintenance button. Using the navigation button, select the filter cartridge installation symbol. The symbols and the start button start to flash. Place a 0.6 L container under the steam nozzle.
Press start. The start-up cycle begins and finishes when the coffee types menu appears.
TROUBLESHOOTING
If one of the problems described in the table persists, contact KRUPS customer service.
| PROBLEM MALFUNCTION | CORRECTIVE ACTION |
| Your machine detects a fault: a ① symbol appears. | Switch off and disconnect the machine, remove the filter cartridge, wait for a minute and restart the machine. |
| The appliance does not turn on when the ⑧ button is pressed. | Check your fuses and plug sockets. Check that the two power plugs are pushed in properly both on the appliance and at the socket. |
| The coffee grinder makes a strange noise. | There is a foreign body in the grinder. Disconnect the machine before investigating. See if you can extract the foreign body using your vacuum cleaner. |
| The steam nozzle makes a noise. | Check that the steam nozzle is correctly attached to its corresponding end piece. |
| The steam nozzle on your machine seems partially or completely clogged. | Ensure that the opening in the end piece is not obstructed by milk residue or limescale. Unclog the holes with the needle supplied with your appliance. |
| The steam nozzle makes little or no milk froth. | For milk-based drinks, you use very fresh, very cold pasteurised or UHT milk. It is also advisable to use a cold container. If the results do not improve, try changing the brand of milk. |
| No steam comes out of the nozzle. | Empty the tank and temporarily remove the filter cartridge. Fill the water tank with mineral water which is high in calcium (>100 mg/l) and run successive steam cycles. |
| The auto-cappuccino setting makes little or no froth. The auto-cappuccino setting does not take in milk. | Check that the accessory is correctly attached to the appliance, remove it then replace it. Check that the flexible tube is not obstructed or pierced and that it is correctly attached to the accessory so as to make it airtight. Rinse and clean the accessory (refer to the "Auto-cappuccino accessory" chapter). |
| There is water underneath the appliance. | Before removing the water tank, wait for 15 seconds after the coffee has fini-shed flowing so that the machine finishes its cycle properly. Check that the drip tray is correctly positioned on the machine; it should always be in place, even when the appliance is not in use. Check that the drip tray is not full. The drip tray should not be removed during a cycle. |
| After emptying the coffee grounds collector, the warning message is still displayed on the screen. | Correctly replace the coffee grounds collector and follow the instructions on the screen. Wait at least 8 seconds before replacing them. |
| The coffee dispenses too slowly. | Turn the coffee fineness knob to the right to make the grounds courser (this could also depend on the type of coffee used).Run one or several rinsing cycles. Run a machine clean (see “Cleaning program”). Change the Claris Aqua Filter System cartridge (see “Installing the filter”). |
| Water or steam comes out abnormally from the steam nozzle. | At the beginning or end of making a drink, the steam nozzle may drip slightly. |
| The coffee fineness knob is difficult to turn. | Only change the grinder setting when it is running. |
| The espresso or coffee is not hot enough. | Increase the coffee temperature in the Maintenance and settings menu ❶. Warm the cup by rinsing it with hot water before making the drink. |
| The coffee is too lightly coloured or too weak. | Avoid using oily, caramelised or flavoured coffee. Check that the coffee bean container has coffee in it and that it is dispensing correctly. Decrease the drink volume, increase the drink strength. Turn the coffee fineness knob to the left to make the grounds finer. Make the drink in two cycles by using the 2 cups function. |
| The appliance is not producing coffee. | A problem has been detected during preparation of the drink. The appliance has restarted automatically and is ready for a new cycle. |
| Why can I not run descending/why does my machine not request a descending cycle? | The machine only requests a descending cycle once it has made a certain number of drinks using steam. |
| A power failure occurs during a cycle. | The appliance is automatically restarted when power is switched back on. |
| The appliance is working but no liquid is coming out. | Check that the water container is in the correct position and that the cord is not jammed between the appliance itself and the water container. |
| Coffee grains have found their way into the drip tray. | This happens if coffee grains fall outside the percolation tank; this keeps the machine clean. |

Danger: Only a qualified technician is authorised to carry out repairs on electrical wiring and carry out work on the electrical grid. If you do not follow these instructions, you risk death by electrocution! Do not use an appliance that is visibly damaged!

To prevent clogging of the working surface of the press from dripping water, don't forget to place a drip tray. Remove the water reservoir and fill it (1-2). Fill the container for coffee beans (3).
First use
Plug in the machine, connecting it to the power supply and press the On/Off switch (4). The machine performs a preheating cycle. At the end of the cycle, the start button indicator lights up. Place a container with a capacity of 0.6 L under the coffee spouts.
Press the start/stop button (5). The machine is in the rinsing mode of the hydraulic systems (coffee and steam) for about 2 minutes. At the end of the cycle, the machine is ready for use, and the coffee recipes are displayed on the display. (6) It is recommended to rinse the system through a few days after use (see the maintenance section).
Preparing the coffee
You can adjust the strength of your coffee by setting the fineness of the coffee bean grind. In general, the finer the grind of the coffee beans, the stronger the coffee. The quality of the drink also depends on the type of coffee used.
Adjust the fineness of the grind by turning the grinder adjustment knob located in the coffee bean container. It is recommended to perform the grinding operation gradually, moving the switch step by step. By trying coffee with different grinds, you will clearly notice the difference in taste. Turning clockwise sets a finer grind. Turning counterclockwise sets a coarser grind.
Starting preparation (1 or 2 cups)
Press the On/Off button and wait for the end of the preheating process. The coffee recipe menu is displayed on the display. The function indicator is located on the coffee recipe selection buttons (6). Place one or two cups under the coffee dispensing spouts. You can lower or raise the dispensing spouts according to the size of your cups. (8). Adjust the coffee strength (indicated by coffee beans on the display in brackets) using the + button to increase and the - button to decrease. (9). Press the navigation button to switch to the water volume menu: select the water volume, displayed on the display in brackets, using the + and - buttons (10). Then press the navigation button to switch to the number of cups setting: select 1 or 2 cups, displayed on the display in brackets, using the + and - buttons. Press the START button (11). At any time, you can adjust the water volume with the + and - buttons. To stop the coffee flow into the cup, press the STOP button. You can also adjust the temperature of your coffee (see the section on advanced functions).
Function: two cups
The machine automatically produces 2 full cycles of coffee preparation.
Preparation using steam
Steam is used to froth milk for preparing cappuccino or latte, as well as to heat liquids. Since producing steam requires a higher temperature than preparing espresso, the machine performs an additional preheating stage. Milk froth
We recommend using fresh pasteurized milk for the best results. If you use raw milk, you may not get the desired result. After using the frother, the milk may be hot, so we advise you to wait a few minutes before performing any manipulation with it. Make sure the steam nozzle is correctly installed. Pour the milk into the milk container with a handle or into a cup for cappuccino. Do not fill the container/cup more than half full. When the display shows the drink selection menu, press the button (12). The function indicator is located on the control panel. Lower the steam nozzle into the milk. A message about preheating the appliance will appear on the screen. As soon as the preheating cycle is finished, you can start the frothing process by pressing the START button, then proceed to the following steps (13):
Step 1: Lower the steam nozzle into the milk about 2 cm deep and wait for the start of foam formation. Step 2: Slightly lift the container (approximately 1 cm). Do not fully immerse the metal tube in the milk. Step 3: Gradually lower the container as the foam forms. (14)
When enough foam has formed, press the STOP button to stop the cycle. Note: the cycle does not stop instantly. To clean the milk frother nozzle, place a container under it and restart the frothing process using water (about 10 seconds). For a deeper cleaning, the steam nozzle can be disassembled. Soak it in hot water with a small amount of mild dishwashing detergent. Then rinse and dry (15-16). Before reinstalling the nozzle, make sure the air intake holes are not clogged with milk residue. Clean them if necessary with the special needle included in the machine's accessories (17). To stop frothing, press the STOP button.
ATTENTION! THE CYCLE DOES NOT STOP INSTANTLY.
The maximum duration of frothing in one cycle is no more than 2 minutes.
Automatic cappuccino maker XS 6000 (sold separately)
The automatic cappuccino maker prepares cappuccino and latte (18). Connect its parts together. Make sure the tube is not kinked while maintaining a comfortable position of the knob. After the cleaning cycle, fill the container with milk (19) and place the cup or glass under the automatic cappuccino maker (20). Select the cappuccino or latte position on the special nozzle (21). Prepare the foam as indicated in the chapter 'Preparation with foam'. As soon as the milk foam is ready, place the cup under the coffee outlet and start the coffee cycle (22).
To prevent milk from drying on the automatic cappuccino maker, it must be cleaned thoroughly. It is recommended to rinse it immediately by running a cycle with water and a full cup of water to clean the inside. For this purpose, you can also use liquid detergent from KRUPS.
VENTILATION OF THE APPLIANCE
Cleaning the container for used coffee grounds and the drip tray
The programming menu appears, empty the drip tray (some coffee may drip into the drip tray) and the coffee grounds container (23-25). The drip tray has floats that signal when the drip tray needs emptying (26). As soon as you remove the coffee grounds container, you must empty it completely to prevent overflow. A warning message will be displayed if the coffee grounds container is not installed correctly (24). When the warning message is displayed, preparing espresso or coffee is impossible.
System rinsing:
Press the service and configuration button (27). The function indicator is located above the service button.
If necessary, use the navigation button to select the rinsing program.
When you press the START button, the rinsing process starts and ends when the coffee menu appears on the display.
AUTOMATIC SYSTEM RINSING AFTER MACHINE START-UP
You can select an automatic rinsing program at each start-up. To do this, press the service and configuration button (27). Use the navigation button to select the automatic rinsing program. Press the button to confirm the selection, which activates the program. If you press the button, the automatic rinsing is cancelled. You can return to the recipe menu by pressing the button.
Warning! During the rinsing operation, hot water flows out of the coffee outlet. Make sure the drip tray is in place, even when the machine is not in use. The rinsing lasts only a few seconds and stops automatically.
Cleaning program - total duration: about 13 minutes
You are not required to start the cleaning program immediately after the machine prompts
you about the need for descaling. But try to carry out this procedure as quickly as possible. If the cleaning process is delayed, a warning message will be displayed until the cleaning is carried out.
The program can be started by pressing the service button. The program indicator is located next to the service button. The cleaning program consists of two parts: first the cleaning cycle, then the rinsing cycle. At any time you can start the cleaning process by pressing the service button and then, using the programming button, select the cleaning program. To carry out the cleaning process, you need a container with a capacity of at least 0.6 L, which must be placed under the coffee outlet and the steam nozzle. The program starts. Remove the water tank (28). Insert the descaling tablet KRUPS into its housing (29). Fill the reservoir with water up to the maximum level of 1.7 L (2). Empty the container for used coffee and the drip tray (23-25). Place a container with a capacity of 0.6 L under the coffee nozzle and the steam nozzle (30). Press the START button. The program runs continuously. The first phase (about 10 minutes) starts. At the end of this phase, empty the container and the drip tray. The symbol flashes. Place the elements back. Press the START button. When the symbol stops flashing, the final phase starts (about 3 minutes). At the end of this phase, empty the container and the drip tray. At the end of the cycle, the coffee recipe menu appears.
Note: If you use the machine during the cleaning process, or if there is a power failure, the cleaning program will start again from the beginning when power is restored. It is not possible to postpone this operation, as it is mandatory for starting the rinsing process. In this case, a new descaling tablet may be needed. It is important to carry out the cleaning process correctly and completely to avoid the risk of poisoning. The cleaning cycles are carried out with interruptions; do not put your hands under the coffee outlets during the cycle.
Descaling program - Duration: about 20 minutes
You are not required to start the descaling program immediately after the machine informs you of the need to do so. But try to carry out this procedure as soon as possible. If the descaling procedure is delayed, a warning message will be displayed until it is carried out.
The amount of scale formation depends on the hardness of the water used.
Attention! If your machine is equipped with the Claris - Aqua Filter System, remove it before starting the descaling operation.
The program can be started automatically by pressing the service and configuration button (27). If necessary, use the navigation button to select the program. The program indicator is located next to the service button. To perform descaling, you will need a container with a capacity of at least 0.6 L, as well as KRUPS descaling agent. Fill the reservoir with water up to the CALC mark, then add the descaling agent (31). Place a container with a capacity of 0.6 L under the coffee spout and the steam wand. Press the START button to start the first stage (about 8 min). The program runs continuously. At the end of this stage, empty the container and the drip tray. The program indicator is off. Rinse the water reservoir with a sponge. Fill the reservoir if it is empty, and put all elements back in place. The program does not run. Press the START button to start the second stage (about 6 min). The program runs continuously. At the end of this stage, empty the container and the drip tray. The indicator is off. Press START to start the final stage (about 6 min). The program runs continuously. At the end of this phase, empty the container and the drip tray. The descaling cycle is complete.
Note: If you switch off the machine during the cleaning process, or if a power failure occurs, the descaling program will restart from the beginning when power is restored. It is not possible to postpone this operation, as it is mandatory for the descaling system to run. For proper execution of the descaling procedure, the descaling must not be interrupted. It is forbidden to put your hands under the steam outlet.
At the end of the cycle, the coffee recipes menu is displayed.
OTHER FUNCTIONS
Access to the other functions menu of the device is done using the service and configuration button. For some functions, use the navigation button and the + or - buttons to set values. To exit the service and configuration menu, press the button.
MAINTENANCE
All these operations allow you to start the selected programs:
You may need to know the water hardness in your area to adjust the settings.
Experiment with different coffees and/or different maintenance cycles to get the best result.
Coffee is a natural product; its taste can vary depending on the origin. Do not hesitate to adjust the grind setting if the coffee is not to your taste. The coffee is filtered (approximately 60-80 drops over 80-100 ml of water) thanks to continuous filtering.
The quality of the water used for making coffee is very important for the taste and quality of the beverage. Ideally, the water for making coffee should be fresh, cold, and free from foreign odors, especially chlorine.
The ergonomic and user-friendly control panel will help you manage your coffee machine. The display shows all the steps for preparing the beverage, as well as maintenance operations.
PREPARING ESPRESSO AND COFFEE
Note:
The amount of water for espresso is 30-70 ml.
PROBLEMS AND THEIR SOLUTIONS


- KRUPS
- KRUPS INTERNATIONAL GUARANTEE
- DEAR CUSTOMER, DEAR CUSTOMER
- APPLIANCE DESCRIPTION
- BEVERAGE PREPARATION
- APPLIANCE PREPARATION
- FIRST USE
- PREPARING THE GRINDER
- CLARIS F 088 - AQUA FILTER SYSTEM CARTRIDGE (SOLD SEPARATELY)
- MAKING AN ESPRESSO AND A COFFEE
- NOTE
- STARTING PREPARATION (WITH 1 OR 2 CUPS)
- TWO CUP FUNCTION
- MAKING DRINKS USING STEAM
- FROTHING MILK
- WARNING: THE CYCLE DOES NOT STOP IMMEDIATELY
- AUTO-CAPPUCCINO XS 6000 SET (SOLD SEPARATELY)
- MAINTAINING YOUR APPLIANCE
- EMPTYING THE COFFEE GROUNDS COLLECTOR AND THE DRIP TRAY
- RINSING THE CIRCUITS
- AUTOMATIC RINSING OF THE CIRCUITS WHEN THE MACHINE STARTS
- CLEANING PROGRAM - TOTAL DURATION: APPROXIMATELY 13 MINUTES
- DESCALING PROGRAM - DURATION: APPROXIMATELY 20 MINUTES
- OTHER FUNCTIONS
- MAINTENANCE
- TURNING OFF YOUR APPLIANCE
- SETTINGS
- MEASURING WATER HARDNESS
- INSTALLING THE FILTER (CLARIS - AQUA FILTER SYSTEM CARTRIDGE) (32)
- TROUBLESHOOTING
- PREPARING THE COFFEE
- STARTING PREPARATION (1 OR 2 CUPS)
- FUNCTION: TWO CUPS
- PREPARATION USING STEAM
- ATTENTION! THE CYCLE DOES NOT STOP INSTANTLY
- VENTILATION OF THE APPLIANCE
- CLEANING THE CONTAINER FOR USED COFFEE GROUNDS AND THE DRIP TRAY
- SYSTEM RINSING
- AUTOMATIC SYSTEM RINSING AFTER MACHINE START-UP
- CLEANING PROGRAM - TOTAL DURATION: ABOUT 13 MINUTES
- DESCALING PROGRAM - DURATION: ABOUT 20 MINUTES
- PREPARING ESPRESSO AND COFFEE
- PROBLEMS AND THEIR SOLUTIONS
Brand : KRUPS
Model : EA 81R8
Category : Automatic coffee machine