ESLE8 1B - Tumble drier ESSENTIELB - Free user manual and instructions
Find the device manual for free ESLE8 1B ESSENTIELB in PDF.
User questions about ESLE8 1B ESSENTIELB
0 question about this device. Answer the ones you know or ask your own.
Ask a new question about this device
Download the instructions for your Tumble drier in PDF format for free! Find your manual ESLE8 1B - ESSENTIELB and take your electronic device back in hand. On this page are published all the documents necessary for the use of your device. ESLE8 1B by ESSENTIELB.
USER MANUAL ESLE8 1B ESSENTIELB
To help you enjoy your purchase
We thank you For purchasing an Essentiel b brand product. We pay special attention to the RELIABILITY, EASE OF USE and DESIGN of our products. We hope that you will be fully satisfied with this dryer.
contents 35
saFety instructions 37
datasheet 45
installation 46
Suitable installation location 46
Installation under a worktop 47
Installation on top of washing machine 47
Ventilation hose and connector 47
Adjusting the feet 49
49
Initial operation 50
laundry preparation 51
51
51
Preparing laundry for drying 51
Energy saving measures 52
Appropriate load capacity 52
use 53
Description of the control panel 53
Explanation of symbols 53
Preparing the dryer 54
Programme selection 54
1) MAIN PROGRAMS: 54
2) SPECIAL PROGRAMMES: 55
3) TIMED PROGRAMMES: 56
Audible signal cancellation 56
Table of programmes and consumption values 57
The indicator lights 58
1) CLEAN THE FILTER: 58
2) LOW TEMPERATURE DRYING: 58
3) DELAYED START: 58
4) PROGRAMME PROGRESS: 59
Modify a running programme 59
Adding/removing laundry 59
Child safety 59
Cancelling a running programme 60
End of programme 60
cleaning and maintenance 61
Lint filter 61
61
Replacing the interior light 62
troubleshooting guide 63
safety instructions
READ THESE INSTRUCTIONS CAREFULLY BEFORE USING THE APPLIANCE AND KEEP THEM FOR LATER REFERENCE AS NEEDED.
- This section includes safety information which will help you to protect yourself against the risks of bodily injury and material damage. Failure to comply with these instructions will result in the warranty being cancelled, and no liability will be accepted.
Intended use
- This appliance is intended for domestic use only.
- It is not intended for use in residential environments, bed-and-breakfasts, catering establishments or other similar applications.
- Only use the appliance to dry laundry that has a label permitting this operation.
- For safety reasons, do not modify the appliance or attempt to change its operating characteristics. Doing so could be dangerous.
Safety of children
- This appliance can be used by children of 8 or over and by persons with physical, sensory or mental impairment, or people with no knowledge or experience as long as they are supervised or given instructions on using the appliance safely and that they understand the dangers involved. Children must not play with this appliance. Cleaning and maintenance by the user must not be carried out by children unless they are more than 8 years old and supervised. Keep the appliance and its cord out of the reach of children under 8 years old.
- Electrical appliances are dangerous to children. Keep them away from the appliance during operation. Do not let them play near the appliance.
- Children under the age of three should be kept away unless they are under constant supervision.
- Packaging materials are dangerous to children. Keep packaging materials out of reach of children or dispose of them according to the waste guidelines.
- Do not allow children to sit on, climb on or enter the dryer.
- Small pets can slip inside the dryer drum. Check the drum before using the appliance. Close the door when you leave the room where the dryer is located.
Unpackaging
- Remove all parts from the package.
- Remove all the labels and stickers.
- Please carefully check that the appliance is not damaged in any way once unwrapped. In the event of damage, do not use the appliance; contact your dealer immediately.
Installation
- Never install your appliance on a rug or carpet-covered floor. Otherwise, the lack of air circulation under your appliance could cause the electrical parts to overheat. This could cause problems with your appliance.
- Adequate ventilation is required to prevent gases from appliances burning other combustible substances, including open fires, from flowing back into the room.
- Exhaust air must not be released through a vent used for exhaust fumes from appliances burning gas or other combustible substances.
- The power cable plug must be easily accessible after installation.
- The appliance must not be installed behind a locking door, a sliding door or a door with hinges on
the opposite side of the dryer's hinge, preventing the dryer from fully opening.
- Do not install or leave this appliance where it may be exposed to outdoor conditions.
Electrical connections
- Connect the appliance to an outlet fitted with an earthing connection and protected by a fuse with the appropriate capacity (see the rating plate), correctly installed and connected to the electrical network in accordance with the standards in force.
- The appliance must be connected to the electrical network through an omnipolar switch (e.g. circuit breakers, fuses, circuit breakers and contactors) with at least 3mm between the contacts.
- Improper connection of the product earthing conductor can result in electric shock. If you have any doubts about the earthing connection, have it checked by a qualified electrician, service agent or maintenance personnel.
- To reduce the risk of electric shock, do not use extension cords, power strips or adapters to connect the dryer to the power outlet.
-
Do not modify the plug provided with the appliance in any way. If the plug does not fit the outlet, have the outlet replaced by a qualified electrician.
-
If the power cord is damaged, it must be replaced by your dealer, the customer service department or a similarly qualified person to prevent harm.
- This appliance must be unplugged during installation, maintenance and repair. These must always be performed by the technical service. The manufacturer cannot be held responsible for damage resulting from work carried out by unauthorised persons.
Use
- Use your appliance at temperatures between +5^ C and +35^ C .
- Do not use electrical appliances inside the dryer.
- Before loading the laundry into the machine, check for and remove any items left behind (lighters, coins, objects, needles, etc.).
- Never use the dryer without the lint filter.
- Never touch the plug with wet hands. Never unplug the machine by pulling on the cable; always grasp the plug to disconnect it. Do not operate the machine if the power cable or plug is damaged!
-
The final part of the drying cycle uses no heat (cooling cycle) to ensure that the items are left at a temperature that will not damage them.
-
Do not stop the dryer before the end of the drying cycle unless you remove all the items from the machine quickly and hang them up to dissipate heat.
- Use softeners or similar products according to the instructions on the softener.
- When not using the dryer or after removing the laundry at the end of the drying process, switch the appliance off by pressing the marche/arrêt (on/off) button. Keep the dryer door closed when the dryer is on.
- Unplug the appliance when it is not in use.
Specific safety precautions
- Do not dry unwashed laundry in the dryer.
- Items soiled with substances such as cooking oil, acetone, alcohol, petrol, kerosene, stain removers, turpentine, wax or wax removers should be washed in hot water with additional detergent before being dried in the dryer.
- Items such as foam rubber (latex foam), shower caps, waterproof textiles, rubber-lined items and clothing or pillows with foam rubber parts should not be dried in the dryer.
- Items washed or cleaned with diesel, petrol, dry cleaning solvents or other combustible or explosive materials, as well as items contaminated or stained
with these types of material, should not be dried in the dryer as they give off flammable or explosive vapours.
- Do not dry items cleaned with chemicals in the dryer.
- Lingerie containing metal wire should not be placed in the dryer. The dryer can be damaged if the metal wires fall off during drying.
Maintenance and cleaning
Always clean the lint filter before or after each load.
- Do not allow lint to accumulate around the dryer.
- Lint should not be allowed to accumulate around the dryer (not applicable for appliances connected to ventilation outside the building).
- Never clean the appliance with water! This would expose you to electric shock! Before cleaning, always unplug the appliance to disconnect the power.
- The exhaust duct and the interior of the appliance must be regularly cleaned by qualified personnel.
- Prevent fibres, dust and dirt from accumulating around the gas exhaust area and the adjacent areas.
Precautions in case of appliance failure
- Never try to repair the machine yourself. For malfunctions that you cannot resolve using the
information in this manual, switch off the appliance, unplug it and contact your retail store service desk.
Scrapping the appliance
- Dispose of your old appliance in an eco-friendly manner.
- Consult your local agent or the municipal solid waste collection centre for more information on how to dispose of your machine.
- Before disposing of your old appliance, cut off the mains plug and disable the door lock to avoid risk to children.
RoHS compliance
- The appliance you purchased complies with the European Union's RoHS directive (2011/65/EU). It does not contain dangerous or prohibited materials mentioned in the directive.
Packaging information
- This product's packaging is made of recyclable materials, in accordance with our national environmental regulations. Do not dispose of the packaging materials with domestic or other waste. Take them to a packaging material collection site as identified by local authorities.
datasheet
| Description | Value | Unit |
| Brand | Essentiel b | |
| Model references | ESLE8-1b | |
| Product codes | 8007957 | |
| Max. Capacity dry linen for cotton | 8 | kg |
| Type of dryer | Ventilation | |
| Energy efficiency class | C | |
| Energy consumption of 577.1 kWh per year, based on 160 standard washing cycles per year for standard cotton programmes at full and half loads, and consumption on low power modes. Actual annual energy consumption per cycle depends on how the appliance is used. | ||
| Automatic tumble dryer | Yes | |
| Energy consumption of the standard "cotton" programme at full load | 4.84 | kWh |
| Energy consumption of the standard "cotton" programme at half load | 2.64 | kWh |
| Energy consumption in "off" mode | 0.5 | W |
| Energy consumption in "left-on" mode | 1 | W |
| The information on the rating label and product datasheet relates to the "Eco cotton"®programme at full and half load. This programme is suitable for drying normally damp cotton fabric. It is the most efficient programme in terms of combined energy consumption for cotton. | ||
| Weighted duration of the "standard cotton programme" at full and half load | 115 | minutes |
| Duration of the standard cotton programme at full load | 155 | minutes |
| Duration of the standard cotton programme at half load | 85 | minutes |
| Acoustic emission - Weighted average value - Lwa expressed in dB (A) re 1 pW | 67 | dB(A) |
| Built-in dryer | No | |
| Number of programmes | 15 | |
| Delayed start | Yes | |
| Maximum delay for delayed start | 9 | hours |
| Voltage | 230 | V~ |
| Frequency | 50 | Hz |
| Maximum power | 2200 | W |
| Protection rating | 16 | A |
| Height (min/max) | 85.6/86.6 | cm |
| Width | 59.7 | cm |
| Depth | 58.4 | cm |
| Net weight (± 4 kg) | 30 | kg |
installation
The customer is responsible for the site preparation and the electrical installation of the appliance.
Qualified personnel must perform the installation and electrical connections.
Visually inspect the product for defects before installation.
If any are found, do not proceed with the installation. A damaged appliance can pose safety risks.
Suitable installation location
Install the appliance in a stable and level position in an area not prone to frost.
- Use your appliance in a well-ventilated and dust-free environment.
- Do not obstruct the appliance's air lines.
- Do not place the product on carpet or similar surfaces.
- Do not install the appliance behind a swinging or sliding door or a door with hinges on the opposite side of the dryer's hinges. Make sure that you are still able to fully open the dryer door.
- Once the appliance is installed, it must remain in the same place where the connections were made. When installing the appliance, make sure that the rear wall is not in contact with any object (tap, wall outlet) and make sure to install the appliance in its final location.
- Never set the appliance down on top of its power cord.
- Leave at least 1.5 cm of space between the appliance and adjacent furniture.
Installation under a worktop
- If you want to install your dryer under a worktop or in a cupboard, you must obtain a special part to replace the top panel of the appliance. Check with the retail store service desk. This part must be installed by a qualified technician. The dryer should never be operated without this top panel.
- When installing the appliance, make sure to leave at least 3cm between the side and rear walls of the appliance and the walls of the worktop/cupboard.
Installation on top of washing machine
- To use the dryer on top of a washing machine, a fastener must be used between the two machines. The fastener must be installed by an authorised service agent.
- When placed on top of each other, the total weight of the washing machine and dryer when fully loaded is approximately 180kg . Place the appliance on solid ground with sufficient resistance capacity!

Do not place a washing machine on top of the dryer. Pay attention to the above warnings when installing the dryer on top of your washing machine.
| Washer and dryer installation | ||||
| Dryer depth | Washer depth | |||
| 62 cm | 60 cm | 54 cm | < 50 cm | |
| 54 cm | May be installed | May not be installed | ||
| 60 cm | May be installed | May not be installed | ||
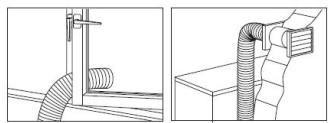
Ventilation hose and connector
The ventilation hose releases air from inside the appliance.
A ventilated dryer is equipped with an air vent.
Tin or aluminium ducts can also be used. Their diameter must be at least 10cm . The maximum lengths of hoses and ducts (in metres) are indicated in the table below.
| Hose | Duct | |
| Maximum length | 4 m | 5 m |
| One 45° elbow connector | - 1 m | - 0.3 m |
| One 90° elbow connector | -1.8 m | - 0.6 m |
| One short 90° elbow connector | - 2.7 m | |
| One bulkhead connector | - 2 m | - 2 m |
Each elbow connector and other passages must be subtracted from the maximum length mentioned above.
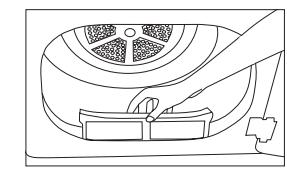
- Ventilation hose connector:
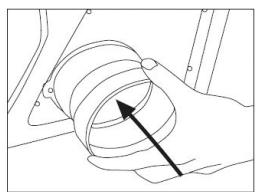
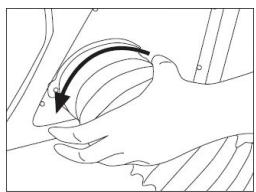
-
Connect the air ventilation hose to the hose clamping piece by turning it anti-clockwise.
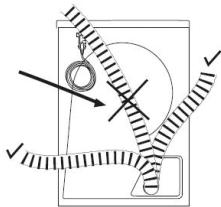
-
Organise the pipe passages as shown in the adjacent figure.
- Humid air from the dryer released
into the room can cause issues. It can damage the walls and furniture in the room.
- The ventilation hose can be brought outside through a window or connected to the air exhaust duct in the bathroom.
- The air exhaust duct must be brought directly outside. A minimum number of elbow connectors should be used to avoid impeding air circulation.
- To prevent water from accumulating in the hose, make sure that the hose is not bent at ground level.

The ventilation hose must not be connected to the exhaust duct of a stove or chimney.
Do not operate your dryer at the same time as heating appliances such as coal or gas stoves. The air flow could cause the exhaust duct to explode.
Adjusting the feet
Your appliance must be stable, horizontal and level to ensure silent operation without vibration. Adjust the front feet to level the dryer.
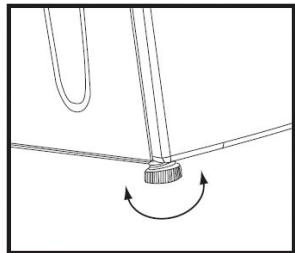
- Manually loosen the feet.
-
Adjust the feet until the appliance is level and balanced.
-
Do not use any tools to unscrew the adjustable feet as you may damage them.
- Never unscrew the adjustable feet from their housing.
Electrical connection
Your appliance can only be connected to a wall outlet powered by single phase 230V 50Hz
Before plugging your dryer in, make sure that your home's mains voltage matches that specified on the dryer's data plate and that the mains plug is correct for the wall socket.
- Earthing
- This appliance is equipped with an earthed mains plug.
- It must be plugged into a wall socket with a properly installed earth that is connected to the electricity network in accordance with the applicable standards.
- It is imperative for this power cord to remain accessible after installation.
- WARNING: Risk of electric shock if the earth is not connected correctly.
In the event of a short circuit, the earth connection reduces the risk of electric shock by providing a route to earth for the current to take.
- If you have any questions about earthing or the electrical connection, please consult a qualified person.
-
We cannot be held responsible in the event of accidents or incidents caused by a non-existent or defective earthing.
-
If the power cord is damaged, it must be replaced by your dealer, the customer service department or a similarly qualified person to prevent harm.
- Never use with an extension cord to connect the appliance.
-
If your home's fuse or circuit breaker is less than 16 amps, have a qualified electrician install a 16-amp fuse.
-
A contact distance of at least 3mm must be maintained between the fuse and the main switches.
- If the appliance is defective, it must not be used until it has been repaired! This would expose you to electric shock!
Initial operation
- Before the appliance is delivered, make sure that the site and the electrical installation are appropriate. If not, contact a qualified electrician to make the necessary arrangements.
- Make sure that the appliance's connections comply with the instructions provided in this user guide.
laundry preparation
Laundry suitable for machine drying
- Always follow the recommendations on laundry labels. Only dry laundry that has a label stating that it is suitable for the dryer.
| Dry at normal temperature | Dry | Iron at 110°C max |
| Dry at low temperature | Dry | Iron at 150°C max |
| Suitable for dryer | Suitable for dryer | Iron at 200°C max |
| Do not machine dry | Do not machine dry | Do not iron |
| Dry flat | Dry flat | |
| Hang wet | Hang wet | |
| Dry on a hanger | Dry on a hanger |
Laundry not suitable for machine drying
- Do not put items such as wool, silk, and nylon clothing, delicate embroidered fabrics, clothing with metallic accessories and bulky items such as sleeping bags, pillows, etc. in the dryer.
- Delicate fabrics and lace curtains can wrinkle. Do not tumble dry them!
- Do not put excessively wet or dripping fabric into the dryer.
- Do not dry clothes cleaned with chemicals in the dryer.
- Do not dry unwashed clothes in the dryer.
Preparing laundry for drying
- The laundry must be spun beforehand in your washing machine at the highest speed allowed for the type of laundry.
- Laundry may become tangled after washing. Separate your laundry before placing it in the dryer.
- Flip clothes with metal accessories such as zippers inside out before putting them in the dryer.
- Fasten zippers, hooks, buckles and buttons.
Energy saving measures
- Spin the laundry at maximum speed during washing. This reduces drying time and energy consumption.
- Dry the same types of laundry together and select a suitable programme.
- Do not open the appliance door during drying unless absolutely necessary. If you must open the door, do not leave it open for too long.
- Do not add wet laundry while drying.
- The lint filter collects lint and fibres released from the laundry into the air during the drying cycle. Always clean the filter before or after each drying cycle.
- Respect the exhaust air standards in this user, and make sure to clean the air vent.
- Ventilate the dryer room during drying.
Appropriate load capacity
- Please see the information in the "Programme table". Do not load more laundry than the maximum capacities indicated in this table.
- Place your unfolded laundry in the drum so that it is not tangled.
The following weights are provided for informational purposes:
| Household linen | Approximate weight (in grams) | Laundry | Approximate weight (in grams) |
| Cotton quilt (double) | 1500 | Blouse | 150 |
| Cotton quilt (single) | 1000 | Cotton shirt | 300 |
| Bed sheet (double) | 500 | Shirt | 200 |
| Bed sheet (single) | 350 | Cotton dress | 500 |
| Large tablecloth | 700 | Dress | 350 |
| Small tablecloth | 250 | Jeans | 700 |
| Napkin | 100 | Handkerchiefs (10 items) | 100 |
| Bath towel | 700 | T-shirt | 125 |
| Hand towel | 350 |
use
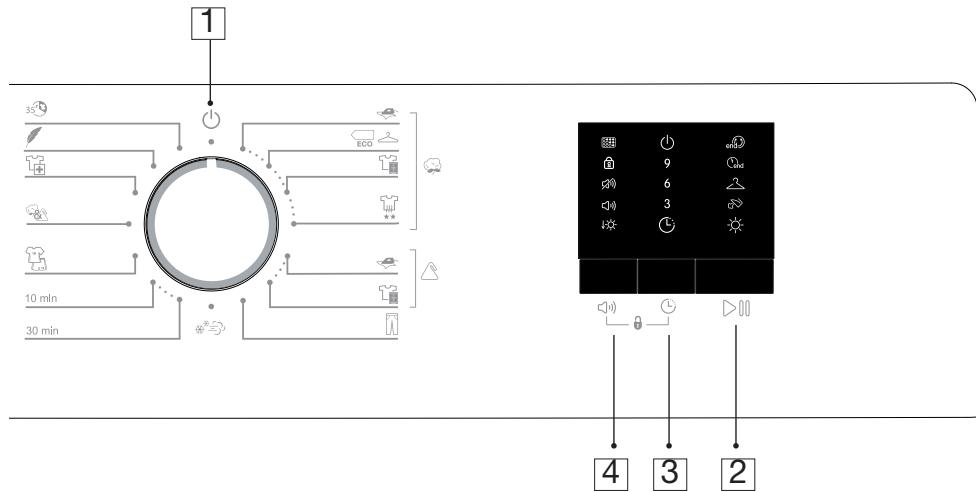
Description of the control panel
- Programme selection knob
- Start/pause button
- Delayed start selection button
- Cancel signal/low temperature dry button
Child safety lock: press buttons (3) and (4) simultaneously.
Explanation of symbols
Preparing the dryer
Plug in the dryer.
- Open the loading door.
- Place the laundry in the dryer without over packing it.
- Close the door. Make sure that nothing is stuck in the door.
Programme selection
- Select a programme using the programme selection knob.
Select either:
- A main programme depending on the type of fabric (cotton or synthetic) and the desired drying temperature,
- A special programme adapted to laundry type, or
-
A predefined drying time (a timed programme).
-
Press the button to start the drying programme.
NOTE: For best drying results, laundry should be washed beforehand and then spun with a suitable programme.
1) Main programs:
COTTON
You can dry your resistant clothes with this programme. It dries at a high temperature. It is recommended for cotton laundry (bed linen, towels, etc.).
SYNTHETIC
You can dry your less resistant clothes with this programme. Drying is carried out at a lower temperature than with the Cotton programme. It is recommended for synthetic clothing.
WRINKLE GUARD
A 2-hour wrinkle guard programme is automatically activated if you do not remove your laundry from the appliance at the end of a programme. The wrinkle guard cycle spins the laundry at 10-minute intervals to prevent wrinkling.
- DRYING TEMPERATURE SELECTION
Select the desired drying temperature based on the type of fabric (cotton or synthetic) according to the table below.
| Extra dry cotton ★★ | High temperature drying, reserved for cotton laundry only. For thick, multi-layer laundry (e.g. towels, bathrobes, tablecloths, etc.). |
| Ready-to-wear | Normal temperature drying for cotton (trousers, tracksuit, etc.) and synthetic (shirts, T-shirts, etc.) clothing. The laundry will be drier than with the “Ready-to-iron” programme. |
| Eco cotton ECO | For cotton laundry. Economic programme. For T-shirts, trousers, pyjamas, baby clothes, undergarments, etc. You can put away your laundry directly after drying, without ironing. |
| Ready-to-iron | For all types of laundry. The laundry remains slightly damp so that it can be ironed. |
2) Special programmes:
Additional programmes are available for special cases:

You can use this programme to dry your trousers, skirts, shirts or denim jackets.
COOL-DOWN CYCLE
Only unheated air is used for 10 minutes. Use this programme to air out clothes that have been kept in closed environments for a long time and eliminate unpleasant odours. This programme is also used to soften wool that can be machine washed. Do not use this programme for complete drying.
Use this programme for cotton, synthetic or mixed sportswear as well as for waterproof clothing. Turn them inside out before drying.

Use this programme to dry synthetic and cotton laundry that does not fade. Workout and fitness clothing can also be dried with this programme.
Hygiene+

Use this programme to minimise the risk of allergy; for sensitive skin, baby clothes etc. A higher temperature guarantees better hygiene.
DELICATE

Use this programme to dry delicate laundry (silk blouses, lingerie, etc.) that can be machine-dried at a low temperature. This programme reduces wrinkles and makes ironing easier.
- Quick

Use this programme to dry a small load of cotton laundry (3 shirts or 3 T-shirts) that has been previously spun at high speed in your washing machine.
3) Timed programmes:
You can select a drying time of 10 or 30 minutes using the programme selection knob.
These programmes dry the laundry at a low temperature without taking the desired drying temperature into account.
Audible signal cancellation
Your appliance beeps when the programme is finished. If you do not want the audible signal to sound, you can press the button to cancel the audible signal. If the indicator light is on, no signal will sound at the end of the programme.
You can select this function before or during the programme.
Table of programmes and consumption values
| Programmes | Maximum capacity (kg) | Spin speed of the washing machine (RPM) | Drying duration (min) | |
| Cotton | Ready-to-iron | 8 | 1000 | 115 |
| Eco ECO | 155 | |||
| Ready-to-wear | 165 | |||
| Extra dry ★★ | 170 | |||
| Synthetic | Ready-to-iron | 3.5 | 800 | 40 |
| Ready-to-wear | 50 | |||
| Jeans | 4 | 1200 | 90 | |
| Cool-down cycle | - | - | 10 | |
| Timed dry (10 min and 30 min) | - | - | - | |
| Sport | 2 | 1000 | 50 | |
| Mix | 4 | 1000 | 85 | |
| Hygiene+ | 5 | 800 | 170 | |
| Delicate | 1.5 | 1200 | 28 | |
| Quick 35 | 0.5 | 1200 | 35 | |
| Energy consumption values | ||||
| Programmes | Maximum capacity (kg) | Spin speed of the washing machine (RPM) | Approximate amount of residual moisture (%) | Energy consumption value (kWh) |
| Eco cotton* | 8 | 1000 | 60% | 4.84 |
| Ready-to-iron cotton | 8 | 1000 | 60% | 3.75 |
| Ready-to-wear synthetic | 3.5 | 800 | 40% | 1.99 |
| ECO | The information on the rating label and product datasheet relates to the “Eco cotton” programme at full and half load. This programme is suitable for drying normally damp cotton fabric. It is the most efficient programme in terms of combined energy consumption for cotton. | |||
- Energy label standard programme (EN 61121: 2012)
All the values indicated in this table have been determined in accordance with standard EN 61121: 2012.
Please note that these values may vary slightly depending on the type of laundry, the spin speed, environmental conditions and voltage variations.
The indicator lights
1) "Clean the filter":
The filter indicator light comes on to remind you to clean the lint filter at the end of the programme.
2) Low temperature drying:
For certain programmes, for specific fabrics (delicate, synthetic, etc.), the indicator light comes on automatically. This means that the appliance is drying at a low temperature to protect the laundry.
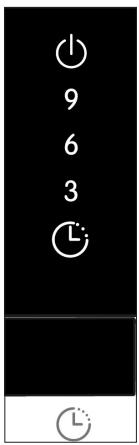
3) Delayed start:
You can delay the start of a programme by 3, 6 or 9 hours.
- Select a programme using the programme selection knob.
- Press the button once to select a delayed start of 3 hours (the "3" indicator light comes on). Press the button again to select a delayed start of 6 hours (the "6" indicator light comes on). Press the same button a third time to select a delayed start of 9 hours (the "9" indicator light comes on).
- If you press the button a fourth time, all delayed start programmes will be cancelled.
- Press the button to save the delay start. The countdown begins.
- You can add or remove laundry during the countdown. At the end of the countdown, the indicator light turns off and drying begins.
To modify a delayed start:
- Cancel the programme by turning the programme selection knob to the "Stop" position ( )
-
Select the same programme again and repeat the delayed start activation steps (see above).
-
To cancel the delayed start and start the programme immediately:
-
Cancel the programme by turning the programme selection knob to the "Stop" position (b).
- Select the same programme again and press the button to start it. The "drying" indicator light comes on indicating that the programme has started.
4) Programme progress:
A programme's progress is displayed on the programme monitoring indicator. Each time new drying stage begins, the corresponding indicator light comes on and the previous stage's light turns off.

2-hour wrinkle guard
End of programme
"Ready-to-wear" drying level
"Ready-to-iron" drying level
Drying in progress
Modify a running programme
You can change the selected drying programme and choose a new programme even if the dryer is operating.
For example:
- Select the "Extra dry" programme by turning the programme selection knob to the "Extra dry" position instead of "Ready-to-iron".
- Press the button to start the new programme.
Adding/removing laundry
To add or remove laundry after a programme has started:
- Press the button to "pause" the appliance. This will interrupt the drying process.
- Open the door, add or remove laundry, then close the door.
- Press the button to restart the programme.
NOTE: Laundry added during the drying process may cause the laundry already dried in the machine to mix with wet laundry. As a result, the laundry will still be wet at the end of the drying process.
NOTE: Laundry can be added or removed as many times as you like during a drying cycle. However, this will repeatedly interrupt the drying process and lengthen the duration of the programme, resulting in increased energy consumption. For this reason, adding or removing laundry during a programme is not recommended.
NOTE: If you select a new programme by turning the programme selection knob while the dryer is in “pause” mode, the current programme ends.
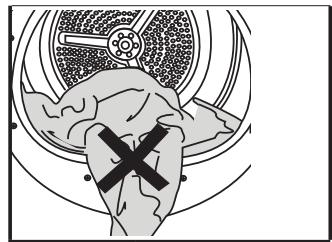
WARNING: Do not touch the interior surface of the drum when adding or removing laundry during a running programme as it is very hot!
Child safety
The child lock prevents programme interruption by locking the buttons when a programme is running.
When the child lock is activated, the dryer door and all the buttons are deactivated (you can still stop the appliance by turning the programme selection knob).
- To activate the child lock:
Simultaneously hold the (acoustic signal cancellation) and L; (delayed start) buttons for three seconds. The indicator light comes on.
- When you turn the programme selection knob or press a button, two beeps sound to inform you that the child lock is activated.
- To start a new programme at the end of the previous one or to interrupt the programme, you must deactivate the child lock.
- To deactivate the child lock:
Repeat the steps for activation: simultaneously hold the (acoustic signal cancellation) and (delayed start) buttons for three seconds.
The child lock also deactivates when you turn off the appliance by turning the programme selection knob to the "Off" position and then turn it on again.
Cancelling a running programme
To cancel a running programme or stop the drying process for any reason after the programme has started, turn the programme selection knob to the "Stop" position.
If the inside of the appliance is very hot, run a "Cool-down cycle" programme to cool it.
End of programme
The "end" end and "clean filter

indicator lights come on at the end of the programme.
To turn off the dryer, turn the programme selection knob to the "Off" position.
NOTE: A 2-hour wrinkle guard programme is automatically activated if you do not remove your laundry from the appliance at the end of a programme. The dryer spins the laundry every ten minutes to prevent it from wrinkling.
- Clean the filter after each use (see the "Cleaning the Filter" section).
cleaning and maintenance
Lint filter
The lint filter collects lint and fibres released from the laundry into the air during the drying cycle.
These particles generally form due to wear and washing.

Always clean the filter after each drying programme.
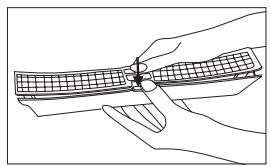
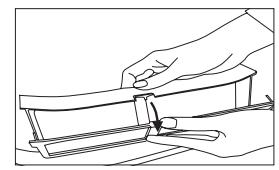
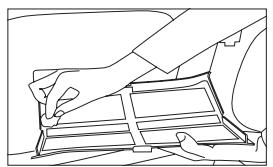
To clean the filter:
- Open the dryer door.
- Remove the filter by lifting it up, then open it.
- Remove lint, fibres and cotton residue by hand or with a soft cloth.
- Close the filter and correctly place it back in its housing.
NOTE: Over time, the filter surface may become clogged. If this happens, wash the filter with water. IMPORTANT: Make sure that the filter mesh is completely dry before putting it back in its housing.
Moisture sensors
Your appliance is equipped with moisture sensors that detect whether or not the laundry is dry.
To clean the moisture sensors:
- Open the loading door of the dryer.
- Let the appliance cool down if drying has just finished.
- Clean the metal sensors with a soft cloth dampened with vinegar and then dry them.
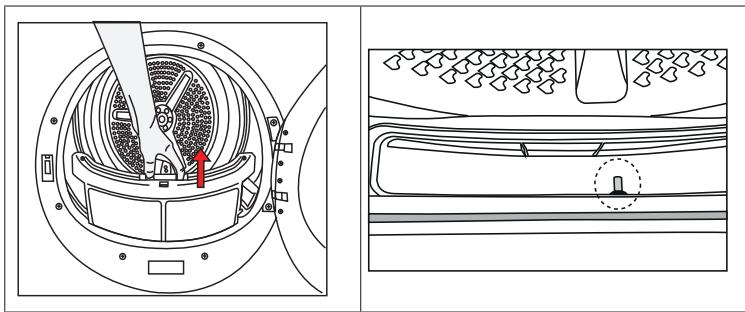
Clean the metal sensors four times a year.
Never use solvents, cleaning products or other similar substances when cleaning as these products may cause fire or explosion.
Replacing the interior light
If the drum light is defective, please contact your retail store service desk.
Do not attempt to replace the light yourself.
The light used in this appliance is not suitable for lighting a room. This light is designed to help you comfortably place laundry inside the appliance. The light used in this appliance can withstand extreme physical conditions (such as vibration) and temperatures exceeding 50^ .
troubleshooting guide
-
The drying process is taking a very long time.
-
The lint filter and its housing are not properly cleaned.
- The filter mesh may be clogged. Wash the filter with water.
IMPORTANT: Make sure that the mesh is completely dry before putting the filter back in its housing.
- The dryer room may have insufficient ventilation. Open the door to the room or a window.
- Lint has accumulated on the moisture sensors. Clean the moisture sensors.
- Too much laundry has been placed in the machine. Do not overload your dryer. Respect the maximum quantities recommended in the programme table.
-
The laundry has not been spun enough in the washing machine before being placed in the dryer. Spin at a higher speed with your washing machine.
-
Laundry is still damp after drying.
-
You may have used a programme that is not suitable for the type of laundry. Check the clothing labels and select a suitable programme and/or use a timed programme as well (10 or 30 minutes).
- The filter mesh may be clogged. Wash the filter with water.
IMPORTANT: Make sure that the mesh is completely dry before putting the filter back in its housing.
- The filter housing may be clogged with lint. Make sure that lint is not clogging the filter housing.
- Too much laundry has been placed in the machine. Do not overload your dryer. Respect the maximum quantities recommended in the programme table.
-
The laundry has not been spun enough in the washing machine before being placed in the dryer. Spin at a higher speed with your washing machine.
-
The appliance or the programme is not starting.
-
The appliance may be unplugged.
- The appliance door may be ajar. Make sure that the appliance door is closed properly.
- You have not selected a programme or you have not pressed the button to start the programme.
- The child lock may be enabled. Disable the child lock.
- You may have selected a delayed start.
The programme stopped for no reason.
- The appliance door may be ajar. Make sure that the appliance door is closed properly.
- There may have been a power outage. Press the button to restart the programme.
The laundry has shrunk or is damaged.
- Always select a programme suitable for the type of laundry being dried.
- Only dry clothes suitable for machine drying after checking the clothing labels.
The clean filter indicator light is on/flashing.
- The filter may not have been cleaned. Clean the lint filter.
- The filter housing may be clogged with lint. Make sure that lint is not clogging the filter housing.
- The filter mesh may be clogged. Wash the filter with water.
IMPORTANT: Make sure that the mesh is completely dry before putting the filter back in its housing.
Water is flowing out of the appliance door.
- Lint may have collected inside the unit and in the door seal. Clean the interior surface and the door seal.
If the information above does not help you solve your specific problem, please do not carry out the repairs yourself. Please contact your retail store service desk.
Voorbereiding van de was
- De was is gekrompen of beschadigd.
All information, designs, drawings and pictures in this document are the exclusive property of SOURCING & CREATION. SOURCING & CREATION reserves all rights to its brands, designs and information. Any copy and reproduction through any means shall be deemed and considered as counterfeiting.
Protection of the environment
This symbol attached to the product means that it is an appliance whose disposal is subject to the directive on waste from electrical and electronic equipment (WEEE). This appliance may not in any way be treated as household waste and must be subject to a specific type of removal for this type of waste. Recycling and recovery systems are available in your area (waste removal) and by distributors. By taking your appliance at its end of life to a recycling facility, you will contribute to environmental conservation and prevent any harm to your health.
Tested in our laboratories
Warranty valid from the date of purchase (receipt as proof of purchase). This warranty does not cover defects or damage caused by improper set up, incorrect use, or normal wear and tear of this product.
Getest in once laboratoria
Customer Relations Department /
Please behave responsibly towards the environment.
Recycle this product at the end of its life.