
NE-2140 - NE-2140 - Microwave Oven PANASONIC - Free user manual and instructions
Find the device manual for free NE-2140 - NE-2140 PANASONIC in PDF.
| Product type | Professional microwave oven |
| Brand | Panasonic |
| Model | NE-2140 |
| External dimensions (W × D × H) | 650 × 526 × 471 mm |
| Cavity dimensions (W × D × H) | 535 × 330 × 250 mm |
| Net weight | 54 kg |
| Electrical supply | 400 V 2N/PE, 50 Hz, 9.5 A |
| Power consumption | 3650 W |
| Microwave power (max) | 2100 W |
| Power levels | High (2100 W), Medium (1050 W), Low (340 W), Defrost (170 W) |
| Microwave frequency | 2450 MHz |
| Capacity (volume) | Approximately 44 L (calculated) |
| Control type | Electronic with selectors and buttons |
| Main functions | Manual cooking, 2-level cooking, defrost, cycle counter, sound beep adjustment |
| Safety | Safety lock, automatic stop if door opened, overheat protection |
| Maintenance and cleaning | Regular cleaning of interior, air filters, and door latch system |
| Air filters | 2 removable and washable air filters |
| Intermediate shelf | Removable ceramic shelf for 2-level cooking |
| Installation | Flat and stable surface, minimum clearance: 5 cm on sides and rear, 20 cm above |
| Repairability | Repair by qualified technician only; displayed error codes (F01, F05, F33-34, F44, F81-84, F86-89) |
| General information | Complies with European EMC standards (group 2, class B) |
Frequently Asked Questions - NE-2140 - NE-2140 PANASONIC
User questions about NE-2140 - NE-2140 PANASONIC
0 question about this device. Answer the ones you know or ask your own.
Ask a new question about this device
Download the instructions for your Microwave Oven in PDF format for free! Find your manual NE-2140 - NE-2140 - PANASONIC and take your electronic device back in hand. On this page are published all the documents necessary for the use of your device. NE-2140 - NE-2140 by PANASONIC.
USER MANUAL NE-2140 - NE-2140 PANASONIC
Thank you for purchasing this Panasonic product.
Please read these instructions completely before operating this oven and keep for future reference.
Important Safety Instructions 2-10
Care of Your Microwave Oven 10-11
Types of Container to Use 12-13
Before Use 14
Outline Diagram of NE-3240/NE-2140/NE-1840 15
How to Operate NE-3240/NE-2140/NE-1840 15
A.MANUALHEATING. 15
B.CYCLE COUNTER 16
C.BEEP TONE 16
Outline Diagram of NE-1880 17
How to Operate NE-1880 18
A. MANUAL HEATING Single stage heating 18
2 or 3 stages heating 19
B.PROGRAMMEDHEATING. 20
C.PROGRAMMING MEMORY PADS Single stage heating 21
2 or 3 stages heating. 22
D.PROGRAM LOCK. 22-23
E.BEEP TONE 23-24
F.PROGRAM LIST. 24
G.CYCLE COUNTER 24
Before Cooking. 25
Cooking Instructions - Heating and Defrosting Time Charts 26
Self Diagnostics Failure Code Explanation 27
Technical Specifications 245
Information on Disposal for Users of Waste Electrical & Electronic Equipment. 249
This product is an equipment that fulfills the European standard for EMC disturbances (EMC = Electromagnetic Compatibility) EN 55011. According to this standard this product is an equipment of group 2, class B and is within required limits. Group 2 means that radio-frequency energy is intentionally generated in the form of electromagnetic radiation for warming and cooking of food. Class B means that this product may be used in normal household areas.
Manufactured by: Panasonic Corporation, 1006 Oaza Kadoma, Kadoma City, Osaka, Japan
Importer: Panasonic Marketing Europe GmbH
Panasonic Testing Centre,
Winsberging 15, 22525 Hamburg,
Germany
Important Safety Instructions
INSTALLATION
EXAMINE YOUR OVEN
Unpack the oven, remove all packing material, and examine the oven for any damage such as dents, broken door latches or cracks in the door. Notify the dealer immediately if the unit is damaged. DO NOT install it if the unit is damaged.
REMOVAL OF PROTECTIVE FILM
A protective film is used to prevent scratching of the outer case during transportation. Peel this film off before installation or use.
ATTACH CAUTION LABEL.
If a caution label is enclosed with your oven, please attach it to the top of the appliance before using.
EARTHING
IMPORTANT: FOR PERSONAL SAFETY, THIS APPLIANCE MUST BE PROPERLY EARTHED.
When an outlet is not earthed, it is personal responsibility and obligation of the customer to have it replaced with a properly earthed outlet.
VOLTAGE AND POWER WARNING
The voltage used must be the same as specified on the microwave oven. Using a higher voltage than that which is specified is dangerous, and may result in a fire or other type of accident causing damage. Do not plug your oven in via an extension cable as this can be dangerous. It is important to plug the oven directly into a wall socket. The back of the appliance heats up during use. Do not allow the cord to be in contact with the back of the appliance or cabinet surface.
Important Safety Instructions
CAUTION (NE-3240/NE-2140)
This appliance is delivered without a plug and must be installed by a qualified electrician to a 16 A fused power supply 400 ~V 3 / N / PE 50 ~Hz . Installation must conform to local rules and standards. Please refer the data on the nameplate.
IMPORTANT: The wires in the mains lead are coloured in accordance with the following:
Green and Yellow: Earth
Blue: Neutral
A precise assignment of the live wires is not necessary as the connection is not dependant on phase sequence. The colour of the live wires may vary.
PLACEMENT OF THE OVEN
Locate the oven on a surface which is flat and stable. Do not place the oven in a hot or damp place;
e.g. near a gas or electric range. Do not operate the oven when the room temperature is higher than 40^ and/or the humidity is more than 85% . Free airflow around the oven is important.
There is a possibility of a small amount of interference with weak broadcast signals if the microwave oven is too close to a radio or TV. For safe and efficient operation, the oven must have sufficient air flow to the air vents i.e. 5 cm at the side and rear; 20 cm at the top.
Do not install the appliance at heights above 1.6 ~m and, also, less than 0.8 ~m .
The oven must be placed for easy access to the control panel and door and, also, for easy access to be able to disconnect power or shut off power by fuse or circuit breaker.
An external equipotential bonding conductor is provided at the back side of the oven and it is marked by this symbol.
GUARANTEE CARD
Fill out and post the pre-addressed guarantee card.
Sound pressure level is less than 70 dB (A weighted).
Important Safety Instructions
WARNING
- If the door or door seals are damaged, the oven must not be operated until it has been repaired by a competent person.
- The contents of feeding bottles and baby food jars shall be stirred or shaken and the temperature checked before consumption, in order to avoid burns.
- Liquids and other foods must not be heated in sealed containers since they are liable to explode.
- Microwave heating of beverages can result in delayed eruptive boiling, therefore care must be taken when handling the container.
- It is hazardous for anyone other than a competent person to carry out any service or repair operation that involves the removal of a cover which gives protection against exposure to microwave energy.
CAUTION
- To reduce the risk of burns, electric shock, fire, injury to persons or excessive microwave energy: Read all instructions before using the microwave oven.
- In order to maintain the high quality of the magnetron tubes and other components, you are requested not to turn the oven on with no food inside.
- High voltages are present inside the cabinet. Repairs and adjustments should be done only by qualified service personnel.
Important Safety Instructions
- This microwave oven requires free airflow in the back for maximum cooling efficiency. You should keep the air vents clear while cooking.
- Do not dry clothes in the microwave oven since there is a possibility of the clothes burning if left in the oven for too long of a time.
- Use this microwave oven only for its intended use as described in this manual.
- Do not operate this microwave oven if it is not working properly, or if it has been damaged or dropped.
- Do not use outdoors.
- Do not immerse the cord or plug in water.
- Keep the cord away from heated surfaces.
- Do not let the cord hang over edge of table or counter.
- To reduce the risk of fire in the oven cavity:
a) Do not overcook food. Carefully attend microwave oven if paper, plastic, or other combustible materials are placed inside the oven to facilitate cooking.
b) Remove wire twist-ties from bags before placing bag in oven.
c) If materials inside the oven should ignite, keep oven door closed, turn oven off at the wall switch, or shut off power at the fuse or circuit breaker panel.
- Do not store flammable materials next to, on top of, or in the oven. It could be a fire hazard.
Important Safety Instructions
- Do NOT use this oven to heat chemicals or other non-food products. Do NOT clean this oven with any product that is labelled as containing corrosive chemicals. The heating of corrosive chemicals in this oven may cause microwave radiation leaks.
- Do not use your oven for home canning or the heating of any closed jar. Pressure will build up and the jar may explode. In addition, the microwave oven cannot maintain the food at the correct canning temperature. Improperly canned food may spoil and be dangerous to consume.
- Do not attempt to deep fat fry in your microwave oven.
- Potatoes, apples, egg yolks, whole squash and sausages are examples of foods with nonporous skins. This type of food must be pierced before cooking, to prevent bursting.
- DO NOT USE A CONVENTIONAL MEAT THERMOMETER IN THE MICROWAVE OVEN. To check the degree of cooking of roasts and poultry use a MICROWAVE THERMOMETER. Alternatively, a conventional meat thermometer may be used after the food is removed from the oven. If undercooked, return meat or poultry to the oven and cook for a few more minutes at the recommended power level. It is important to ensure that meat and poultry are thoroughly cooked.
- Extreme care should be taken when cooking popcorn in a microwave oven. Cook for the minimum time as recommended by the popcorn manufacturer. Use the directions suitable for the wattage of your microwave oven. NEVER leave the microwave oven unattended when popping popcorn.
Important Safety Instructions
- When reheating babies bottles always remove top and teat. Liquid at the top of the bottle will be much hotter than at the bottom and must be shaken thoroughly before checking the temperature. The lid must also be removed from babies food jars, the contents must also be stirred or shaken before the temperature is checked.
- The door seals and door seal areas should be cleaned with a damp cloth.
- If smoke is observed, switch off or unplug the appliance and keep the door closed in order to stifle any flames.
- If the supply cord is damaged, it must be replaced by the manufacturer, its service agent or similarly qualified persons in order to avoid a hazard.
- Before use, the user should check that utensils are suitable for use in the microwave ovens.
- When heating liquids, e.g. soup, sauces and beverages in your microwave oven, overheating of the liquid beyond boiling point can occur without evidence of bubbling. This could result in a sudden boil over the hot liquid. To prevent this possibility the following steps should be taken:
a) Avoid using straight-sided containers with narrow necks.
b) Do not overheat.
c) Stir the liquid before placing the container in the oven and again halfway through cooking time.
d) After heating, allow to stand in the oven for a short time, stirring again before carefully removing the container.
Important Safety Instructions
- When heating food in plastic or paper containers, keep an eye on the oven due to the possibility of ignition.
- Eggs in their shell and whole hard-boiled eggs should not be heated in microwave ovens since they may explode, even after microwave heating has ended.
- This appliance can be used by children aged from 8 years and above and persons with reduced physical, sensory or mental capabilities or lack of experience and knowledge if they have been given supervision or instruction concerning use of the appliance in a safe way and understand the hazards involved. Children shall not play with the appliance. Cleaning and user maintenance shall not be made by children without supervision.
- The appliance should not be cleaned with a water jet.
- There is possibility of danger due to electromagnetic fields, and persons with heart pacemakers are advised to move away from areas with electromagnetic fields. In this case, take note of the instructions provided by the manufacturer.
- If this product is not going to be used, do not keep items inside. Doing so may result in danger to the surroundings if the switch is accidentally turned on.
- Do not use recycled paper products, as they may contain impurities which may cause sparks and/or fires when used, unless packaging states they are specifically designed for microwave use.
Important Safety Instructions
- The appliance shall be disconnected from its power supply during service and whilst replacing parts. Following the removal of the supply plug, the plug should remain visible to the service operator to ensure that inadvertent reconnection is avoided.
- The oven should be cleaned regularly and any food deposits removed.
- Do not use metal ware, ceramics trimmed with gold or silver, or any container with a metal content.
- It is essential reheated food is served “piping hot” (72 °C). Always check before serving and if in doubt return the food to the oven for further heating.
- Standing times are essential for foods cooked or reheated by microwave. During the stand time, heat will continue to conduct to the centre to cook the food completely. The denser the food, the longer the stand time.
Reheated foods also require a standing time.
USING YOUR OVEN
Do not store any objects inside the oven in case it is accidentally turned on.
In case of electronic failure, the oven can be turned off at wall socket.
Do not slide the removable shelf in or out when placing or removing food. This action could cause damage to the shelf or cause hot food to tip towards the operator.
If the second level is used, do not pull out or insert the second level tray together with dishes or food items.
Important Safety Instructions
WHEN YOUR OVEN REQUIRESA SERVICE call your local Panasonic engineer.
Do not attempt to tamper with or make any adjustments or repairs to the door, control panel housing, safety interlock switches or any other part of the oven.
Care of Your Microwave Oven
Failure to maintain the oven in a clean condition could lead to deterioration of the surface that could adversely affect the life of the appliance and possibly result in a hazardous situation.
- Remove the plug from the electrical socket before cleaning.
- Keep the inside of the oven clean. If pieces of food or spilled liquids stick to the oven walls, or between door seal and door surface, they will absorb microwaves and may cause arcing or sparks. Wipe up all spills with a damp cloth. Kitchen detergent or Food Sanitizer Solution may be used if the oven gets very dirty. Do not use harsh detergents or abrasives.
- The outside surface of this microwave oven should be cleaned with soap and water, then dried with a soft cloth. Make sure that water does not get into the back ventilation or control panel opening since this can damage the unit.
- The window of the door should be washed with very mild soap and water. Be sure to use a soft cloth. Never use window cleaner. The front door can be scratched by harsh soap or cleaners.
- Do not spray anything directly onto the door and the walls, and into the oven cavity. Spray onto a cloth and wipe over.
- Failure to follow these cleaning instructions may invalidate the warranty on this machine.
Care of Your Microwave Oven
CLEANING OF THE DOOR HOOK SYSTEM
Make sure that kitchen detergent or soap does not get into the hole of the door hook system, since this can get inside the door hook system and also damage the unit.
Make sure to clean the door hooks with a damp cloth after cleaning the oven, or when the door hooks are dirty. Never close the door if soap or kitchen detergent remains on the door hooks. The soap or kitchen detergent will get into the unit through the hole and then damage the unit.
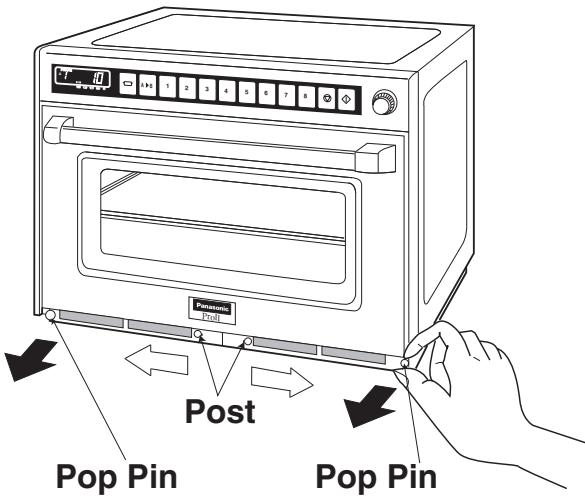
CLEANING OF THE AIR FILTERS
Clean the Air Filters occasionally according to the following instructions. Problems may occur with the oven if the Air Filters become clogged with dirt or dust.*
- Remove the right Air Filter from the front bottom skirt by pulling the right Pop Pin straight out, then slide the filter to the right and lift it off the post at the centre. Remove the left Air Filter in a similar manner, sliding to the left.
- Wash the Air Filters with soap and water.
- To replace, align the Air Filter with the centre post, and holding the front of the Pop Pin forward, locate the back of the pin into its hole. Press the front of the pin and it will pop into place. Be sure to replace the Air Filters before using this oven.
- If the Air Filter becomes clogged with dust or grease this will cause an overheat problem on the oven.
Types of Container to Use
1. GLASS
DO USE: Heat resistant glass eg. Pyrex
DO NOT USE: Delicate glass, lead crystal, etc, which may crack or arc.
2. CHINA/CERAMICS
DO USE: Glazed china dishes, porcelain and ceramic dishes designed for cooking.
DO NOT USE: Fine bone china dishes with metal patterns. Jugs with glued handles.
3. POTTERY/EARTHENWARE/STONEWARE
DO USE: If completely glazed.
DO NOT USE: If unglazed - these dishes can absorb water which absorbs energy.
This makes the dish hot and increases the heating time.
4. FOIL/METAL
DO USE: Small amounts of aluminium foil can be used to shield joints of meat during DEFROSTING - take care that foil doesn't touch sides or door.
DO NOT USE: Metal platters, Wire Rack Shelf, METAL SKEWERS, any dish with METAL PATTERN or TRIM.
DO NOT USE FOIL CONTAINERS - ARCING may occur as they become DENTED/DAMAGED. Do not use Le Crueset-style dishes (Cast iron covered by enamel).
Types of Container to Use
5. PLASTIC
DO USE:
High temperature plastic like Durable Polysulfon rather than soft flexible dishes. (Remove any metal twist ties.)
DO NOT USE:
Container made from Melamine, Polypropylene, Phenol Urea, also do not use plastic food storage bags and containers eg. Margarine, Yoghurt and Mayonnaise tubs.
6. COVERING FILMS
DO USE:
Non plasticiser cling film designed for Microwave use. Do not allow the film to touch the food. To prevent nasty steam burns, pierce the film to allow steam to escape and remove the film from the dish carefully.
DO NOT USE:
Film designed only for covering food.
7. WOOD/WICKER
DO USE:
Wooden skewers designed for food use.
DO NOT USE:
Wicker baskets, wooden bowls (with prolonged use these tend to dry out and may ignite)
8. PAPER
DO USE:
Disposable, polyester coated paper board dishes if designed for microwave.
DO NOT USE:
Paper napkins (these can ignite), wax coated cups, recycled products (unless stated suitable by manufacturer)
TWO LEVEL COOKING
When heating, one item always place the container in the centre of the base shelf.
When using the microwave mainly for reheating one item at a time, remove the shelf and work on the base plate.
When reheating two items at a time place both dishes on the base shelf side by side, unless the containers are too large and then place one on each shelf.
When heating more than two plates, place the dishes evenly on the two shelves.
Allow some space between each plate, do not cram too much food into the oven.
When defrosting or cooking in the oven, only work on the bottom shelf, do not use the two shelves simultaneously.
DEFROSTING FROZEN FOODS
- If you try to completely defrost frozen food in the microwave oven, uneven defrosting may occur due to the differences in the thickness and shape of the food. Drippings may also result, and sometimes a part of the food cooks although other parts still remain frozen. In actual usage of frozen foods, you should not normally defrost them 100% . 70% defrosting in the microwave oven is ideal and helpful for the next cooking operation.
- To defrost evenly, turn over or rearrange the food during defrosting.
- To defrost fatty meat, heat it in the microwave oven for a short time and leave it to stand at room temperature, or heat it intermittently until defrosted.
- When you defrost a whole chicken, or any frozen food of irregular shape, wrap legs or thin parts with aluminium foil. Otherwise thin parts will be defrosted faster and sometimes cooked before other parts have properly defrosted. For big pieces of meat, wrap the sides with aluminium foil so that they will be uniformly thawed by vertical microwaves only.
- Ice should be removed at times during defrosting.
OTHER HELPFUL INSTRUCTIONS
FOR BEST RESULTS
- When determining time for particular foods, always figure minimum time and check occasionally during cooking for progress. The microwave oven cooks so quickly, therefore it is easy to overcook your foods.
- Be careful of the cooking time for small quantities of foods, or foods with low water content. They may burn if cooked too long.
- Do not use the oven for drying kitchen towels or napkins. They may burn if heated too long.
- Do not try to boil eggs in the oven.
- When you cook an egg be sure to pierce the yolk membrane prior to placing into the oven to prevent the egg bursting.
HOW TO GET BROWNED FINISH
Generally foods do not brown when cooked by a microwave oven. This is one of the features of the equipment. To brown chickens, brush sauce on the surface before or during cooking. You can also brown meat in a conventional frying pan before cooking in the oven. A browning skillet for the microwave oven can obtain the same result.
FOR EVEN FINISHED COOKING
Open the door and give the dish a half turn, or turn the food over during cooking. This helps to achieve more even cooking.
Outline Diagram of NE-3240/NE-2140/NE-1840
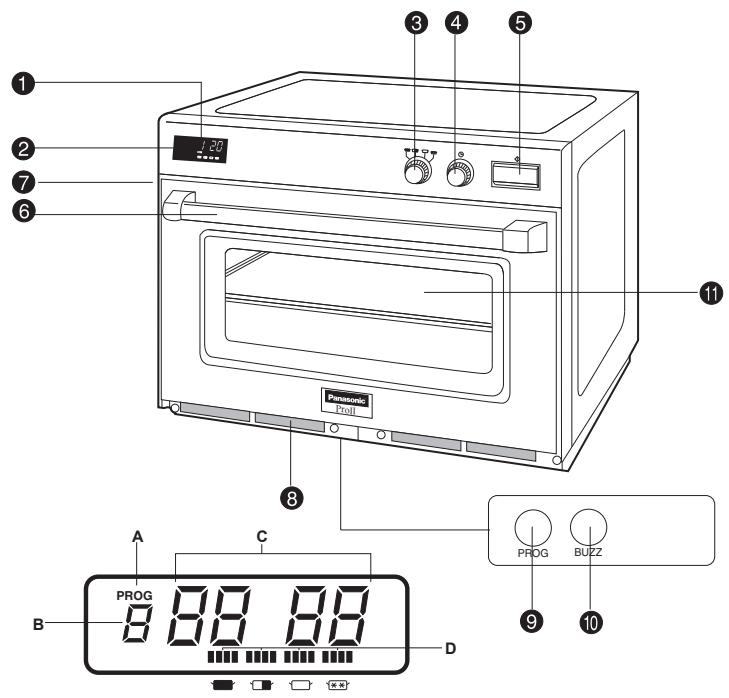
Digital Display Window
Power Level Indicator Display
Power Level Selector Dial
4 Timer Dial
Start Button
Door Handle
Oven Lamp Cover
Air Filters
Program Entry Switch (behind Air Filter)
Buzzer Switch (behind Air Filter)
Middle Shelf
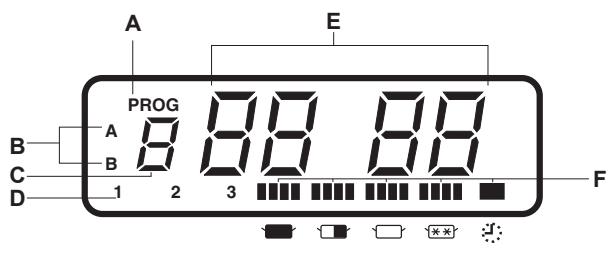
A—Program Display
B—Beep Tone Mode Display
C—Heating Time Display (min. sec.)
D—Power Level Indicator
HIGH
MEDIUM
LOW
DEFROST
How to Operate NE-3240/NE-2140/NE-1840
A. MANUAL HEATING
Example: To cook food at HIGH power for 2 minutes
| PAD | INSTRUCTION | DIGITAL DISPLAY WINDOW | |
| 1 | Open the door and put the food in the oven. ● The oven lamp will turn on. “0” and Power Level Indicator will appear. | ○ ○ ○ ○ | |
| 2 | Select the desired Power Level by turning the Power Level Selector Dial. | ○ ○ ○ ○ | |
| 3 | Set the desired heating time. ● Please check the heating time will appear. Note: up to 60 minutes. | ○ ○ ○ ○ | |
| 4 | Press Start Button. ● The oven lamp will turn on and heating will start. Power Level Indicator will start to blink, and heating time will count down. | ○ ○ ○ ○ ○ | |
| ·At the end of the time, the beep tone will sound and all heating will stop. The oven lamp will go off. 1 minute later the cooling fan will stop. The display will blink “0” until the door is opened. ·Open the door and take the food out. “0” will appear in the display window and the Power Level will be displayed. The oven lamp will be turned on. ·Close the door. The oven lamp will go off and 1 minute later the display window will go blank. ·When you press the Start Button with door open, “0” will appear in the display in all cases. ·Even after setting the heating time you can still change the power level. ·If you wish to change the heating time during heating, simply adjust the timer to desired minutes and seconds. The microwave oven can also be turned OFF by turning the Timer Dial to the left until “0” appears in the digital display and beep tone can be heard. | ○ ○ ○ ○ ○ ○ ○ ○ ○ ○ ○ ○ ○ ○ ○ ○ ○ ○ ○ ○ ○ ○ ○ ○ ○ ○ ○ ○ ○ ○ ○ ○ ○ ○ ○ ○ ○ ○ ○ ○ ○ ○ ○ ○ ○ ○ ○ ○ ○ ○ ○ | ||
B. CYCLE COUNTER
To Read Total Cumulative Times That The Oven Has Been Used
| PAD | INSTRUCTION | DIGITAL DISPLAY WINDOW | |
| 1 | Open the door. The oven lamp will be turned on. “0” will appear in the display. | 0 | |
| 2 | Close the door. Note: Carry out Step 3 within 60 seconds of closing the door, or the display will go blank. | 0 | |
| 3 | BUZZ + PROG | While pressing Buzzer Switch, press Program Entry Switch. Example: 99999 times | 999 99 |
C. BEEP TONE
To Cancel Beep
| PAD | INSTRUCTION | DIGITAL DISPLAY WINDOW | |
| 1 | PROG | Press Program Entry Switch. (The door may be open or closed at this stage.) | PROG |
| 2 | BUZZ | Press Buzzer Switch. “bEEP” and first stage heating indicator “1” will appear in Digital Display Window. | I BE EP |
| 3 | BUZZ | Press Buzzer Switch again. “0 bEEP” will appear in Digital Display Window. | I BE EP |
| 4 | PROG | Press Program Entry Switch again. “PROG” will stop blinking. You have completed setting silent level. | PROG I BE EP |
Outline Diagram of NE-1880
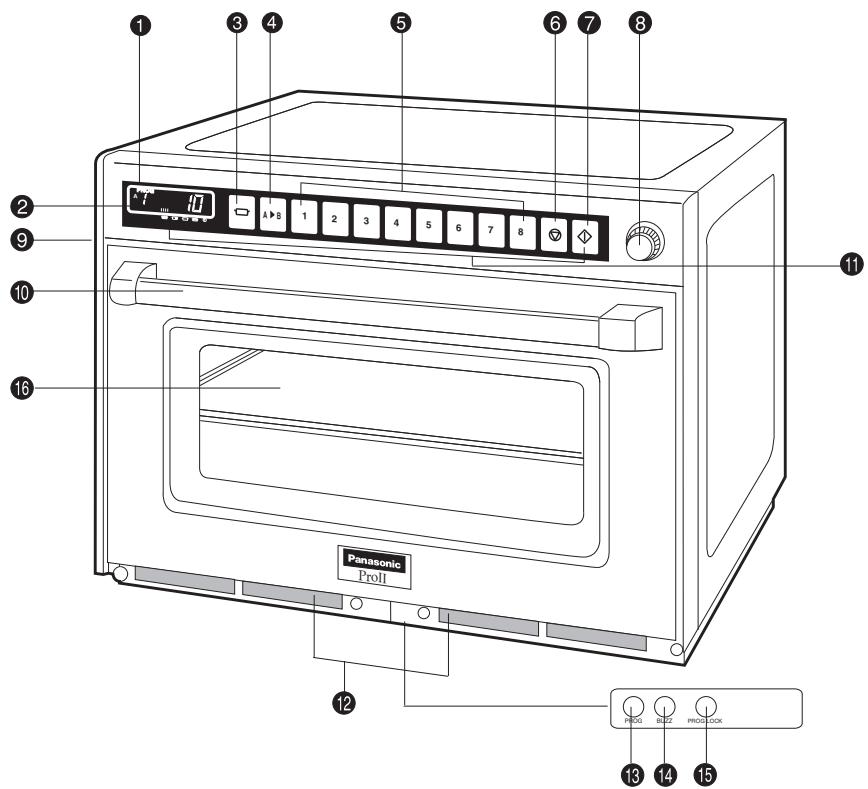
Digital Display Window
Power Level Indicator Display
Power Level Selector Pad ()
4 Memory Shift Pad ( > B)
Memory Pads
Stop/Reset Pad (⑦)
7 Start Pad (0)
3 Timer Dial
Oven Lamp Cover
Door Handle
Control Panel
Air Filters
Program Entry Switch (behind Air Filters)
Buzzer Switch (behind Air Filters)
Program Lock Switch (behind Air Filters)
Middle Shelf
A—Program Display
B—Memory Area Code Display
C—Memory Pad Number Display
D—Stage Heating Indicator
E—Heating Time Display (min. sec.)
F—Power Level Indicator
HIGH
MEDIUM
LOW
DEFROST
STAND
This oven is preset at the factory for the following:
Manual operation
Memory pads preset HIGH power at the indicated heating times for single stage heating
1 = 10 sec. 2 = 20 sec. 3 = 30 sec. 4 = 45 sec. 5 = 1 min.
6 = 1 min. 15 sec. 7 = 1 min. 30 sec. 8 = 2 min.
(There are two sides, A and B. Only A-side is preset.)
Program Unlock
Cycle Counter set to "0" on all pads
If you wish to change these times, please consult the operating instructions to find how to program them.
How to Operate NE-1880
A. MANUAL HEATING
Single stage heating
Example: To cook food at HIGH power for 2 minutes
| PAD | INSTRUCTION | DIGITAL DISPLAY WINDOW | |
| 1 | Open the door and put the food in the oven. ● The oven lamp will turn on and “0” will appear. Note: While “0” appears, operation is available. One minute after the door is closed, “0” will disappear. | ||
| 2 | Press Power Level Selector pad once. ● The selected power level will be indicated and 1st Stage Heating Indicator “1” will start to blink. Note: Press once for HIGH power, twice for MEDIUM power, 3 times for LOW, four times for DEFROST and 5 times for STAND. | ||
| 3 | Set the desired heating time using the Timer Dial. ● The selected heating time will appear. Note: up to 15 min. on or or, 60 min. on or or or | ||
| 4 | Press Start pad. ● The oven lamp will turn on and heating will start. Power Level Indicator will start to blink, and heating time will count down. | ||
| ·When all time expires, beep tone will sound and heating will stop. The oven lamp will turn off. “0” will blink until the door is opened. One minute later, cooling fan will stop. ·Open the door and take the food out. The oven lamp will turn on. Digital Display Window will show the originally selected time and power. ·Close the door. The oven lamp will turn off. One minute later, Digital Display Window will go blank. | |||
2 or 3 stages heating
Example: To cook food at HIGH power for 2 minutes and at DEFROST power for 1 minute
| PAD | INSTRUCTION | DIGITAL DISPLAY WINDOW | |
| Follow steps 1 to 3 on page 18. | 200 ※ - | ||
| 4 | Press Power Level Selector pad four times. The selected power level will be indicated and 2nd Stage Heating Indicator “2” will start to blink. | 1※ - | |
| 5 | Set the desired heating time for the second stage using the Timer Dial. The set heating time will appear. Note: up to 15 min. on or or, 60 min. on, or or | 100 1※ - | |
| 6 | Press Start pad. The oven lamp will turn on. The total time for both stages will appear and start to count down. 1st Stage Heating Indicator “1” and Power Level Indicator for the first stage heating will start to blink. | 300 ※ 2 - | |
| After the first stage heating, a single beep tone will sound. 2nd Heating Stage Indicator “2” and Power Level Indicator for the second stage heating will start to blink and the remaining heating time will count down. When all time expires, beep tone will sound and heating will stop. The oven lamp will turn off. “0” will blink until the door is opened. One minute later, cooling fan will stop. Open the door and take the food out. The oven lamp will turn on. Digital Display Window will show the originally set time and power. Close the door. The oven lamp will turn off. One minute later, Digital Display Window will go blank. | 59 ※ - | ||
| - | |||
| 300 1 2 - | |||
Note: For 3 stages Heating, repeat steps 4 and 5 above before pressing Start pad .
SPECIAL NOTE: For both single and 2 or 3 stages heating
- While heating, one press on Stop/Reset pad stops the operation. You can restart it by pressing Start pad or a second press on Stop/Reset pad will cancel the selected program.
- While not heating, one press on Stop/Reset pad cancels the selected program.
- You can repeat exactly the same manually selected heating time by pressing only Start pad , if you use the oven again within one minute (within 30 minutes when the door has been left open).
- One minute later of non-use with door closed, the repeat feature will be cancelled.
How to Operate NE-1880
B. PROGRAMMED HEATING
In Program Unlock Mode:
MAKE SURE THE UNIT IS PROPERLY PROGRAMMED (see page 21).
| Example: To select Memory pad “5” at A side in which your desired heating program (at HIGH power for 3 min., single stage heating) is set | |||
| PAD | INSTRUCTION | DIGITAL DISPLAY WINDOW | |
| 1 | Open the door and put the food in the oven. • The oven lamp will turn on and “0” will appear. Note: While “0” appears, operation is available. One minute after the door is closed, “0” will disappear. | 0 | |
| 2 | 5 | Press the Desired Memory Pad “5”. • The currently programmed information will be indicated. | 5 3 00 |
| 3 | ◇ | Press Start pad. • The oven lamp will turn on and heating will start. The heating time will count down. | 5 2 59 |
| ·When all time expires, beep tone will sound and heating will stop. The oven lamp will turn off. “0” will blink until the door is opened. One minute later, cooling fan will stop. ·Open the door and take the food out. The oven lamp will turn on. ·Close the door. The oven lamp will turn off. One minute later, Digital Display Window will go blank. | 0- | ||
| 0 | |||
Note:
- When you want to select Memory Area B, press Memory Shift pad A>B before pressing the desired Memory pad.
In Program Lock Mode:
Just press the desired Memory pad. Heating will automatically start without pressing Start pad.
How to Operate NE-1880
C. PROGRAMMING MEMORY PADS
Single stage heating
THE OVEN CAN NOT BE PROGRAMMED WHEN PROGRAM LOCK IS ACTIVATED! (see pages 22-23) DO NOT OPEN THE DOOR WHILE PROGRAMMING!
Example: To program cooking at DEFROST power for 1 minute into Memory pad "5"
| PAD | INSTRUCTION | DIGITAL DISPLAY WINDOW | |
| 1 | Keep the door closed. Digital Display Window must be blank or show “0”. | ||
| 2 | PROG | Press Program Entry Switch. “PROG” will start to blink. | |
| 3 | 5 | Press Memory pad you wish to program. The selected pad number will appear and currently programmed information will be indicated. | |
| 4 | Press Power Level Selector pad four times. The selected power level will be indicated, “PROG” and 1st Stage Heating Indicator “1” will start to blink. | ||
| 5 | Set the desired heating time using Timer Dial. The set heating time will appear. Note: up to 15 min. on or or, 60 min. on or or | ||
| 6 | PROG | Press Program Entry Switch again. “PROG” and 1st Stage Heating Indicator “1” will stop blinking. This means that you have completed programming. | |
| ·Three seconds later, Digital Display Window will go blank. | |||
Note:
- Program the remaining Memory pads as desired by repeating steps 2-6 above.
- When you want to select Memory Area B, press Memory Shift pad A>B before selecting the desired Memory pad.
2 or 3 stages heating
THE OVEN CAN NOT BE PROGRAMMED WHEN PROGRAM LOCK IS ACTIVATED! (see pages 22-23) DO NOT OPEN THE DOOR WHILE PROGRAMMING!
Example: To program cooking at DEFROST power for 1 minute and at HIGH power for 2 minutes into Memory pad “5”
| PAD | INSTRUCTION | DIGITAL DISPLAY WINDOW | |
| Follow steps 1 to 5 on page 21. | A PROG 100米米 | ||
| 6 | Press Power Level Selector pad once. The power level for 2nd stage will be indicated, 2nd Stage Heating Indicator “2” will start to blink. | A PROG 5米米 | |
| 7 | Set the desired heating time using Timer Dial. The set heating time will appear. Note: up to 15 min. on or or, 60 min. on or or | A PROG 200米米 | |
| 8 | PROG | Press Program Entry Switch again. “PROG” and 2nd Stage Heating Indicator “2” will stop blinking. The total time for both stages will appear. This means that you have completed programming. | A PROG 300米米 |
| ·Three seconds later, Digital Display Window will go blank. | |||
D. PROGRAM LOCK
To Activate Program Lock:
| PAD | INSTRUCTION | DIGITAL DISPLAY WINDOW | |
| 1 | Keep the door closed. Digital Display Window must be blank. | ||
| 2 | PROGLOCK | Press Program Lock Switch until “PROG”, “P” and “L” appear. (for five seconds) “PROG”, “P” and “L” will appear. | PROG P L |
In Program Lock mode:
- The oven is started by pressing the desired Memory pad. There is no need to press Start pad.
- Opening the door cancels the remaining time on the program.
- The oven can not be programmed until the program lock is released.
How to Operate NE-1880
To Release Program Lock:
| PAD | INSTRUCTION | DIGITAL DISPLAY WINDOW | |
| 1 | Keep the door closed. ► Digital Display Window must be blank. | ||
| 2 | PROGLOCK | Press Program Lock Switch until “PROG” and “P” appear. (for five seconds) ► “PROG” and “P” will appear. | PROG P |
In Program Unlock mode:
- Oven reverts to a two-touch operating mode (Memory pad + Start pad).
- Repeat and interrupt feature are operational.
- Memory pads can be programmed.
- Tone loudness control and length control are operational.
E. BEEP TONE
The loudness of beep tone and the length of beep tone at the end of heating cycle can be set.
There are four levels of the loudness.
There are two options of the length of beep tone at the end of heating cycle.
The loudest level and 3 beeps are preset at the factory.
To Select Loudness Level and Length "3 beeps":
| PAD | INSTRUCTION | DIGITAL DISPLAY WINDOW | |
| 1 | PROG | Press Program Entry Switch. “PROG” sign will start to blink in the display window. (The door may be open or closed at this stage) | PROG |
| 2 | BUZZ | Press Buzzer Switch. The tone will sound at its loudness level and the loudness level “3” followed by the word “bEEP” will appear. “PROG” will start to blink and 1st Stage Heating Indicator “1” (the length of beep tone “3 beeps”) will be indicated. Note: Repeating to press Buzzer Switch will lower the loudness level all the way to silent. (3bEEP — loudest, 2bEEP — middle, 1bEEP — quietest, and 0bEEP — silent) | 36E EP |
| 3 | PROG | Press Program Entry Switch again. “PROG” will stop blinking. That means that you have completed program. Three seconds later, the display window will go blank when the door is closed. | PROG 36E EP |
How to Operate NE-1880
To Select Length of Tone "short beeps for 60 seconds":
| PAD | INSTRUCTION | DIGITAL DISPLAY WINDOW | |
| Follow steps 1 to 3 on page 23. | 36E EP | ||
| 4 | BUZZ | Within three seconds after pressing Program Entry Switch at step 3, press Buzzer Switch. “PROG” will start to blink and 2nd Stage Heating Indicator “2” (the length of beep tone “short beeps for 60 seconds”) will be indicated. | 36E EP |
| 5 | PROG | Press Program Entry Switch again. “PROG” will stop blinking. This means that you have completed programming. Three seconds later, the display window will go blank when the door is closed. | 36E EP |
F. PROGRAM LIST
| PAD | INSTRUCTION | DIGITAL DISPLAY WINDOW | |
| 1 | Open the door and leave it open. The oven lamp will turn on and “0” will appear. | ||
| 2 | While pressing Stop/Reset pad, press Start pad. All currently programmed information (the program set into each Memory pad (A/B sides), Beep Tone, and Program Lock information) will continuously appear. | ||
| PROG A 1000 B 1000 C 400 D 36E EP E L |
G. CYCLE COUNTER
To Read Total Cumulative Times That The Oven Has Been Used:
| PAD | INSTRUCTION | DIGITAL DISPLAY WINDOW | |
| 1 | Open the door and leave it open. → The oven lamp will turn on and “0” will appear. | 0 | |
| 2 | Close the door. → Carry out Step 3 within 60 seconds of closing the door, or the display will go blank. | 0 | |
| 3 | BUZZ + PROG | While pressing Buzzer Switch, press Program Entry Switch. → The display shows the total cumulative number of times the oven has been used. | 999 99 |
MICROWAVE BASICS
Fundamental principles determine the success of microwave food preparation.
They include:
- TEMPERATURE OF FOODS — Frozen or refrigerated food items will require longer heating times to reach a desired serving temperature than foods from room temperature.
- FOOD COMPONENTS — Foods high in sugar, salt, fats and moisture content heat faster because these properties attract microwave energy. Denser foods high in protein and fiber, absorb microwave energy slower which means a lengthier heating time.
- BULK/VOLUME — The greater the mass of food, the longer it takes to heat.
- CONTAINERS — Ceramic, paper, china, styrofoam, glass and plastic are suitable for use in microwave ovens with the following caution.
Heating foods with either high sugar or high fat content should be done ONLY in high temperature-resistant containers since these foods get very hot. Using styrofoam containers for these foods will cause the styrofoam to warp. Other low temperature restaurant glass or plastic platters may crack or wrap under similar conditions.
DO NOT HEAT foods in a SEATED container or bag. Foods expand when heated and can break the container or bag.
- AVOID METAL because it "bounces" the microwaves, causing uneven heating and sometimes even flashes, which may pit or mark the interior of the oven, the metal container or plate trim.
- Heated liquids can erupt if not mixed with air. Do not heat liquids in your microwave oven without first stirring.
GENERAL GUIDELINES FOR HEATING IN A MICROWAVE OVEN
For specific time, see each food category for appropriate heating techniques, plus necessary pre-preparation of foods.
HEATING FOODS FROM REFRIGERATED TEMPERATURE
Foods stored in the refrigerator (5^) should be covered before reheating with the exception of breads, pastries or anybreaded product, which should be heated uncovered to prevent sogginess.
Most conventionally prepared foods should be slightly undercooked, and held in the refrigerator, so that overcooking does not occur during microwave heating.
Cooked items, such as vegetables, may be portion plated and covered for reheating without loss of color, texture or nutritional content.
HEATING FOODS FROM ROOM TEMPERATURE
Food items such as canned entree, vegetables, etc. will require significantly less heating time than those from refrigerated temperatures.
IMPORTANT RECOMMENDATIONS
- For best results it is recommended that foods conventionally prepared be slightly undercooked when subsequently heated in this oven.
- REMEMBER that after the heating cycle has been completed, internal food temperatures continue to rise slightly in foods heated in this oven.
- A major abuse of microwave applications is the category of breads, pastries and pies. They are drier than insides or fillings, they heat more slowly. Therefore, baked goods should ONLY be heated until the crust is warm to the touch (50 °C–55 °C).
- DO NOT OVERHEAT YOUR FOOD: 99% of all food quality complaints of microwave heated foods can be traced to overheating.
Cooking Instructions — Heating and Defrosting Time Charts —
The times given in the chart below are a guideline only. Many factors eg starting temperature of the food can affect the final heating time required. The cooking and defrosting times must be adjusted when necessary. All times are tested using foods at starting temperatures as below;
Chilled foods . . . Approx. +5^
Frozen foods . . . . Approx. -18 °C
Always check for the correct core temperature with a temperature probe to comply with current Government Food Hygiene Regulations.
| Function | Food | Weight | Power Level | Approx. Time | ||
| NE-3240 | NE-2140 | NE-1880/1840 | ||||
| Defrosting | Fish Fillets | 500 g | ★ | 6 min 40 s | 6 min 40 s | 8 min |
| Minced Beef | 500 g | ★ | 4 min 15 s | 4 min 15 s | 5 min | |
| Whole Chicken | 1.36 kg | ★ | 21 min 15 s | 21 min 15 s | 25 min | |
| Composite Dish | ||||||
| Multi portion | 1.36 kg | ★ | 17 min | 17 min | 20 min | |
| Single portion | 275 g | ★ | 6 min 40 s | 6 min 40 s | 8 min | |
| Apple Pie | 1 portion | ★ | 1 min 05 s | 1 min 05 s | 1 min 15 s | |
| Cake | 1 portion | ★ | 1 min 40 s | 1 min 40 s | 2 min | |
| Bread Rolls | 1 portion 50 g | ★ | 25 s | 25 s | 30 s | |
| Cooking from Chilled Raw Food | Scrambled Egg | 2 eggs + 2 tbsp. milk | ★ | 13–17 s | 22–25 s | 26–30 s |
| Broccoli | 500 g | ★ | 1 min 40 s | 3 min | 3 min 30 s | |
| Fish Fillets | 500 g | ★ | 2 min 20 s | 4 min | 4 min 45 s | |
| Bacon | 2 rashers | ★ | 25 s | 40 s | 50 s | |
| Chicken Portions | 500 g | ★ | 2 min 30 s | 6 min | 7–8 min | |
| -3 min 25 s | -6 min 50 s | |||||
| Cooking and/or Reheating from Frozen | Peas | 500 g | ★ | 2 min 10 s | 3 min 25 s | 4 min |
| Cooked Rice | 167 g | ★ | 1 min | 1 min 25 s | 1 min 40 s | |
| Cooked Sausages | x 3 (50 g each) | ★ | 40 s | 50 s | 1 min | |
| Cooked Chicken Wings | x 7 pieces | ★ | 1 min | 1 min 25 s | 1 min 40 s | |
| Cooked Boxed Cheeseburger | 75 g | ★ | 40 s | 50 s | 1 min | |
| Chocolate Fudge Cake | 1 portion | ★ | 25 s | 25 s | 30 s | |
| Reheating from Cooked Chilled | Lasagne | 325 g | ★ | 1 min 40 s | 2 min 30 s | 3 min |
| Chilli | 325 g | ★ | 1 min 40 s | 2 min 30 s | 3 min | |
| Apple Pie | 1 portion | ★ | 8 s | 14 s | 16 s | |
| Pepper Sauce | 100 ml | ★ | 35 s | 40 s | 50 s | |
| Baked Beans | 100 ml | ★ | 35 s | 40 s | 50 s | |
| Soup | 125 ml | ★ | 26 s | 40 s | 50 s | |
HINTS: • Do not cook/reheat/defrost directly onto the base of the oven — use a suitable container.
- When defrosting multi portions of foods, turn over and break apart halfway through defrost time to allow better penetration of microwave energy.
- Solid/dense foods should not be cooked from frozen as they will be overcooked round the edges before the centre has reached the required temperature.
- Cover dishes where appropriate during cooking/reheating. This will retain moisture and prevent splashing/spillages.
- Loosen lids/pierce clingfilm before cooking/reheating covered foods.
- Stir or shake foods halfway through cooking/defrosting time to distribute the heat evenly.
- Allow a Stand Time before food temperature is checked and/or offered for consumption.
Self Diagnostics Failure Code Explanation
This oven monitors its operation and displays a Failure Code in the display window when a problem occurs.
What to do when a failure code appears:
| CODE | CAUSE | WHAT TO DO |
| F01 | • Overcooked food. • Temperature of exhaust air too high. | • Unplug the appliance to stop beep. • Wait for appliance to cool down to reset operation. • If food ignites, do not open the door. • If normal operation does not resume, call the service agent with information of failure code. |
| F05 | • Defective Memory IC. | • Unplug the appliance and wait more than 1 minute and reconnect. • If normal operation does not resume, call the service agent with information of failure code. |
| F33-34 | • Defective thermistor circuit. | |
| F44 | • Defective control panel. | |
| F81-F84 | • Defective relay circuit. | |
| F86-F89 |
Note: Above codes shown in the display do not indicate all the possible failures on the unit.
Inhalt
Panasonic Testing Centre,
Winsberging 15, 22525 Hamburg,
Deutschland
PRÜFEN SIE IHR GERÄT
Panasonic Testing Centre,
Winsberging 15, 22525 Hamburg,
Allemagne
RECOMMANDATIONS IMPORTANTES
Kadoma City, Osaka, Japan
Invoerder: Panasonic Marketing Europe GmbH
Panasonic Testing Centre,
Winsberging 15, 22525 Hamburg,
Duitsland
WAARSCHUWINGS-STICKER.
BEVESTIG DE WAARSCHUWINGSLABEL.
WAARSCHUWING BETREFFENDE VOLTAGE
VOORZORGSGMAATREGELEN (NE-3240/NE-2140)
VOORZORGSGMAATREGELEN
DIEPVRIESPRODUCTEN ONTDOOION
Panasonic Testing Centre,
Winsbergring 15, 22525 Hamburg,
Alemania
Panasonic Testing Centre,
Winsberging 15, 22525 Hamburg,
Germania
Come usare ilorno (NE-1880)
Come usare ilorno (NE-1880)
Come usare ilorno (NE-1880)
D. Blocco programma
Come usare ilorno (NE-1880)
F. Listadei programmi
Fore tillagning. 170
Panasonic Testing Centre,
Winsbergring 15, 22525 Hamburg,
Tyskland
Viktiga Sakerhets Instruktioner
INSTALLATION
UNDERSÖK DIN UGN
ANDRA NYTTIGA INSTRUCTIONER
FÖR BÄSTA RESULTAT
Produceret af: Panasonic Corporation, 1006 Oaza Kadoma, Kadoma City, Osaka, Japan
Importør: Panasonic Marketing Europe GmbH
Panasonic Testing Centre,
Winsberging 15, 22525 Hamburg,
Tyskland
I program lately
For at programmere B-siden,
tryk omskifter knappen for den onskede nummerknap vaelges.
Kolevarer: ca. +5^
Frostvarer: ca. -18 °C
Panasonic Testing Centre,
Winsberging 15, 22525 Hamburg,
Tyskland
Viktig Sikkerhetsregler
INSTALLASJON
UNDERSØK OVNEN DIN
SETT PÅ ADVARSEL-MERK
VEDLIKEHOLD AV OVNEN
NAR DET ER PÅ TIDE MED EN SERVICE skal du ringe ditt lokale Panasonic-verksted.
TILBEREDNING I TO HØYDER
A. MANUELL TILBEREDNING
| BRYTER/TAST | ANVISING | |
| 1 | Apne døren og sett maten inn i ovenn. Påse at “0” og effektivändikator vises på Displayet. | |
| 2 | Velg ønsket effektivå med effektivåtryteren. | |
| 3 | Still inn ønsket oppvarmingstid. (opptil 60 min.) | |
| 4 | Trykk på starttasten. | |
| · Hvis du trykker på starttasten med øren äpen, vises “0” på displayet. · Effektivået kan endres øså under oppvarmingstiden. · Hvis du vil endre oppvarmingstiden under oppvarming, stiller du bare timerbryteren til ønsket antall minutter og sekunder. · Mikrobølgeovnen kan øså slås av ved ä dreie timerbryteren mot venstre til “0” vises på displayet og en pipetone hjores. | ||
Betjening (NE-3240/NE-2140/NE-1840)
B. SYKLUSTELLEREN
A. MANUELL TILBEREDNING
Ett-trinns tilberedning
Eksempel: Tilbereding av mat med HØY effekt i 2 minutter
| BRYTER/TAST | ANVISNING | |
| 1 | Apne døren og sett maten inn i ovenen. Påse at “0” vises på displayet. | |
| 2 | Trykk på effektnivåtasten en gang. | |
| 3 | Still inn ønsket oppvarmingstid. opptil 15 min. på erller , 60 min. på , erller ⊙ | |
| 4 | Trykk på starttasten. |
- Repetisjon
For a programmere B-innstillinger,
C. PROGRAMMERING AV MINNETASTER
Ett-trinns tilberedning
OVNEN KAN IKKE PROGRAMMERES NAR PROGRAMLASEN ER AKTIVERT!
DÖREN MÄ IKKE APNES UNDER PROGRAMMERING!
For a programmere B-innstillinger,
Panasonic Testing Centre,
Winsberging 15, 22525 Hamburg,
Saksa
Technical Specifications
| NE-1880/NE-1840 | NE-2140 | NE-3240 | |
| Power source | 50 Hz. 230 V | 50 Hz. 2N 400 V | 50 Hz. 2N 400 V |
| Required power | 15.0 A 3200 W | 9.5 A 3650 W | 12.9 A 4960 W |
| Output | HIGH 1800 W* MEDIUM 900 W LOW 340 W *DEFROST 170 W | HIGH 2100 W* MEDIUM 1050 W LOW 340 W *DEFROST 170 W | HIGH 3200 W* MEDIUM 1600 W LOW 340 W *DEFROST 170 W |
| Frequency | 2450 MHz | 2450 MHz | 2450 MHz |
| Outer dimensions (W×D×H) | 650×526×471 mm | 650×526×471 mm | 650×526×471 mm |
| Cavity dimensions (W×D×H) | 535×330×250 mm | 535×330×250 mm | 535×330×250 mm |
| Net weight | 54 kg | 54 kg | 65 kg |
*IEC Test Procedure
Specifications subject to change without notice.
As for the production month, country and serial no., please refer to the name plate on the microwave oven.
Technische Daten
Information on Disposal for Users of Waste Electrical & Electronic Equipment (private households)
This symbol on the products and/or accompanying documents means that used electrical and electronic products should not be mixed with general household waste.
For proper treatment, recovery and recycling, please take these products to designated collection points, where they will be accepted on a free of charge basis. Alternatively, in some countries you may be able to return your products to your local retailer upon the purchase of an equivalent new product.
Disposing of this product correctly will help to save valuable resources and prevent any potential negative effects on human health and the environment which could otherwise arise from inappropriate waste handling. Please contact
your local authority for further details of your nearest designated collection point.
Penalties may be applicable for incorrect disposal of this waste, in accordance with national legislation.
For business users in the European Union
If you wish to discard electrical and electronic equipment, please contact your dealer or supplier for further information.
Information on Disposal in other Countries outside the European Union
This symbol is only valid in the European Union.
If you wish to discard this product, please contact your local authorities or dealer and ask for the correct method of disposal.
© Panasonic Corporation 2001
- Important Safety Instructions
- INSTALLATION
- EXAMINE YOUR OVEN
- REMOVAL OF PROTECTIVE FILM
- ATTACH CAUTION LABEL.
- EARTHING
- VOLTAGE AND POWER WARNING
- CAUTION (NE-3240/NE-2140)
- Green and Yellow: Earth
- Blue: Neutral
- PLACEMENT OF THE OVEN
- GUARANTEE CARD
- WARNING
- CAUTION
- USING YOUR OVEN
- Care of Your Microwave Oven
- CLEANING OF THE DOOR HOOK SYSTEM
- CLEANING OF THE AIR FILTERS
- Types of Container to Use
- GLASS
- CHINA/CERAMICS
- POTTERY/EARTHENWARE/STONEWARE
- FOIL/METAL
- PLASTIC
- COVERING FILMS
- WOOD/WICKER
- PAPER
- TWO LEVEL COOKING
- DEFROSTING FROZEN FOODS
- OTHER HELPFUL INSTRUCTIONS
- FOR BEST RESULTS
- HOW TO GET BROWNED FINISH
- FOR EVEN FINISHED COOKING
- Outline Diagram of NE-3240/NE-2140/NE-1840
- How to Operate NE-3240/NE-2140/NE-1840
- MANUAL HEATING
- CYCLE COUNTER
- BEEP TONE
- Outline Diagram of NE-1880
- How to Operate NE-1880
- Single stage heating
- or 3 stages heating
- SPECIAL NOTE: For both single and 2 or 3 stages heating
- PROGRAMMED HEATING
- In Program Unlock Mode:
- Note:
- In Program Lock Mode:
- PROGRAMMING MEMORY PADS
- PROGRAM LOCK
- In Program Lock mode:
- To Release Program Lock:
- In Program Unlock mode:
- BEEP TONE
- To Select Loudness Level and Length "3 beeps":
- To Select Length of Tone "short beeps for 60 seconds":
- PROGRAM LIST
- CYCLE COUNTER
- To Read Total Cumulative Times That The Oven Has Been Used:
- MICROWAVE BASICS
- GENERAL GUIDELINES FOR HEATING IN A MICROWAVE OVEN
- HEATING FOODS FROM REFRIGERATED TEMPERATURE
- HEATING FOODS FROM ROOM TEMPERATURE
- IMPORTANT RECOMMENDATIONS
- Cooking Instructions — Heating and Defrosting Time Charts —
- Self Diagnostics Failure Code Explanation
- Inhalt
- PRÜFEN SIE IHR GERÄT
- RECOMMANDATIONS IMPORTANTES
- WAARSCHUWINGS-STICKER.
- BEVESTIG DE WAARSCHUWINGSLABEL.
- WAARSCHUWING BETREFFENDE VOLTAGE
- VOORZORGSGMAATREGELEN (NE-3240/NE-2140)
- VOORZORGSGMAATREGELEN
- DIEPVRIESPRODUCTEN ONTDOOION
- Come usare ilorno (NE-1880)
- Blocco programma
- Listadei programmi
- Viktiga Sakerhets Instruktioner
- UNDERSÖK DIN UGN
- ANDRA NYTTIGA INSTRUCTIONER
- FÖR BÄSTA RESULTAT
- I program lately
- Viktig Sikkerhetsregler
- INSTALLASJON
- UNDERSØK OVNEN DIN
- SETT PÅ ADVARSEL-MERK
- VEDLIKEHOLD AV OVNEN
- TILBEREDNING I TO HØYDER
- MANUELL TILBEREDNING
- Betjening (NE-3240/NE-2140/NE-1840)
- SYKLUSTELLEREN
- Ett-trinns tilberedning
- - Repetisjon
- PROGRAMMERING AV MINNETASTER
- Technical Specifications
- Information on Disposal for Users of Waste Electrical & Electronic Equipment (private households)
- For business users in the European Union
- Information on Disposal in other Countries outside the European Union
Brand : PANASONIC
Model : NE-2140 - NE-2140
Category : Microwave Oven