
DW50R4040BB - Dishwasher SAMSUNG - Free user manual and instructions
Find the device manual for free DW50R4040BB SAMSUNG in PDF.
| Product Type | Dishwasher |
| Brand | Samsung |
| Model | DW50R4040BB |
| Power Supply | 220-240 V~, 50 Hz, 16 A max |
| Water Pressure | 0.04 to 1 MPa |
| Max Water Temperature | 60 °C |
| Capacity (place settings) | 13 (approx.) |
| Dimensions (W x D x H) | 60 x 60 x 85 cm (approx.) |
| Net Weight | 45 kg (approx.) |
| Programs | ECO, Automatic, Normal, Intensive, Delicate, Express, Quick, Pre-wash, Absolute Silence, Self-clean |
| Water Consumption (ECO cycle) | 9.5 L |
| Power Consumption (ECO cycle) | 0.780 kWh |
| ECO Cycle Duration | 220 min |
| Special Features | Aqua Stop, adjustable water softener, detergent and rinse aid dispenser, adjustable baskets |
| Safety | Aqua Stop, control lock, overheating protection |
| Maintenance | Monthly filter cleaning, spray arm cleaning, self-clean cycle |
| Spare Parts | Available for 10 years (gaskets, hinges, spray arms, filters, baskets) |
| Repairability | Repair by qualified technician recommended |
Frequently Asked Questions - DW50R4040BB SAMSUNG
User questions about DW50R4040BB SAMSUNG
0 question about this device. Answer the ones you know or ask your own.
Ask a new question about this device
Download the instructions for your Dishwasher in PDF format for free! Find your manual DW50R4040BB - SAMSUNG and take your electronic device back in hand. On this page are published all the documents necessary for the use of your device. DW50R4040BB by SAMSUNG.
USER MANUAL DW50R4040BB SAMSUNG
Installation requirements 3
Before you start 4
Using Detergent 4
UsingRinse 9
Using Softener 12
Operations 14
Cycle overview 14
Energy, water saving tip 15
Cycle chart 16
Maintenance 23
Cleaning 23
Troubleshooting 27
Checkpoints 27
Information codes 30
2 English
Installation requirements
To prevent a risk of fire, electric shock, or personal injury, all wiring and grounding must be done by a qualified technician.
Power supply
An individual 220-240 V~, 50 Hz branch circuit that is dedicated to the dishwasher.
- Power outlet with a maximum allowable current of 16 A (maximum 11 A for the dishwasher)
WARNING
- Do not use an extension cord.
- Use only the power plug that comes with the dishwasher.
After installation is complete, make sure the power plug is not bent or damaged.
Grounding
For permanent grounding, the dishwasher must be properly grounded to a grounded metal or permanent wiring system. The grounding conductor must be run with the circuit conductors and then connected to the grounding terminal or lead on the dishwasher.
WARNING
- Do not connect the ground wire to plastic plumbing, gas lines, or hot water pipes. Improperly connected grounding conductors may cause electric shock.
- Do not modify the power plug of the dishwasher. If the power plug does not fit the outlet, have a proper outlet installed by a qualified electrician.
Water supply
- The water supply line must support water pressures between 0.04 and 1MPa .
Water temperatures must be lower than 60^ - A stopcock with a 3/4 male thread must be installed on the water tap.
To reduce a risk of leaks:
Make sure water taps are easily accessible.
- Turn the water tap off when the dishwasher is not in use.
- Check for any leaks at the water hose fittings on a regular basis.
- To stop any leak, seal the water line connections and joints using Teflon tape or sealing compound.
Aqua Stop
The Aqua Stop is an electrical component that is designed to prevent water leaks. The Aqua Stop is attached to the water hose and automatically cuts off the water flow in the event of damage to the hose.
CAUTION
- Handle the Aqua Stop with care.
- Do not kink or twist the water hose connected to the Aqua Stop. If the Aqua Stop is damaged, shut off the water taps and unplug the power plug immediately. Then, contact a local Samsung customer centre or a qualified technician.
Flooring
Make sure the dishwasher is level using the height adjustable feet.
- When levelling is complete, check if the door opens and closes properly.
Before you start
There are two types of dispenser as follows. Check the instructions for the right dispenser for your dishwasher.
Type A
Type B
Using Detergent
Detergent compartment
All dishwasher cycles require detergent in the detergent compartment. Apply detergent as recommended for the selected cycle to ensure best performance.
WARNING
- Do not place dishwasher detergent in your mouth. Avoid breathing in detergent fumes. Dishwasher detergent contains irritants and caustic chemicals that can induce respiratory conditions. If you have consumed dishwasher detergent or inhaled detergent fumes, seek medical attention immediately.
- Keep dishwasher detergent out of children's reach.
CAUTION
- Use dishwasher detergent only. Other types of detergent produce excessive foam, which may decrease the dishwasher's performance or cause it to malfunction.
- The dishwasher may not wash well if there is not much detergent. For normally soiled items, we recommend 20-25 grams; however, this may differ depending on the detergent manufacturer, so please follow that manufacturer's recommendations.
We recommend 15-20 grams for DW5****** models.
4 English
Filling the detergent
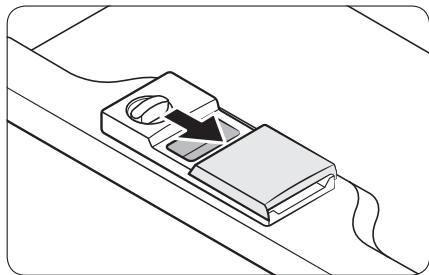
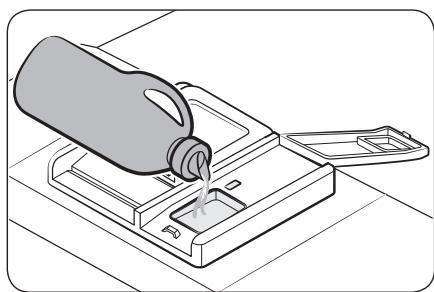
- Type A
NOTE
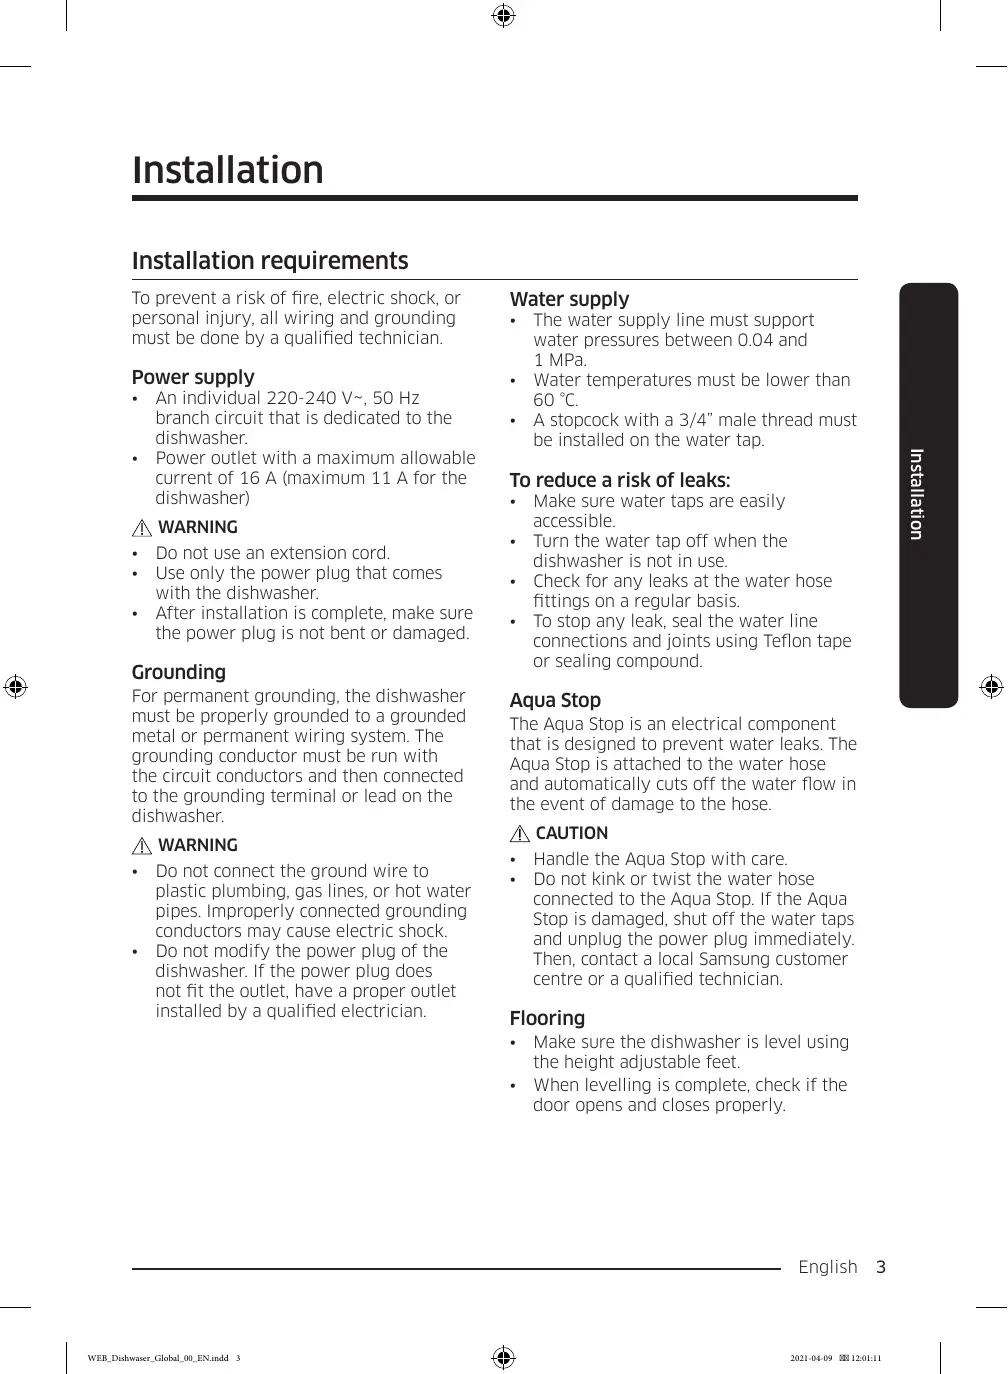
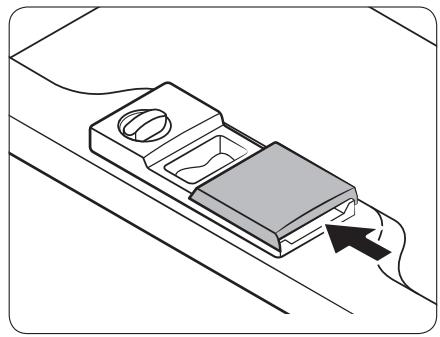
- Open the detergent dispenser cap by pushing the detergent dispenser catch to the right.
The cap remains open at the end of a cycle. - Add the recommended amount of detergent to the main wash detergent compartment.
- Close the lid by sliding it up.
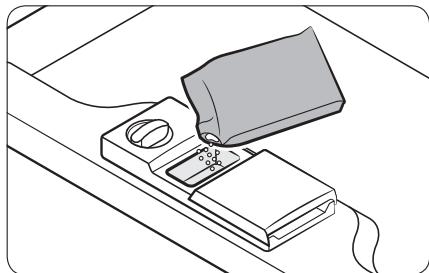
Before you start
- If the items are heavily soiled, pour a small amount of detergent onto the door for better cleaning results.

The additional detergent will activate during the pre-wash process.
The cover opens automatically to dispense the detergent during the wash.
6 English
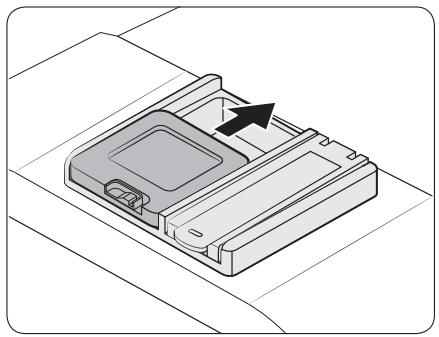
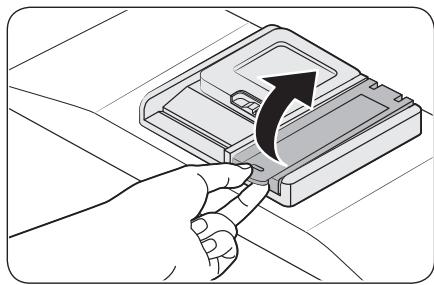
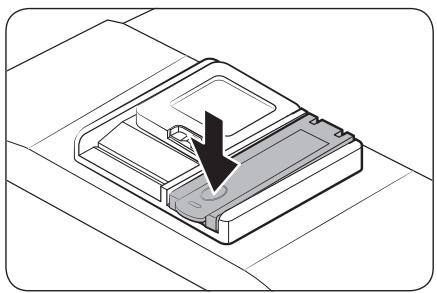
- Type B

- Open the detergent dispenser flap by pushing the detergent dispenser release catch.
NOTE
The flap is always open at the end of a dishwashing cycle.
-
Add the recommended amount of detergent to the main wash detergent compartment.
-
Close the flap by sliding it to the left and then pressing it down.
NOTE
There is no separate button that is specific to using tablet detergents.
Before you start
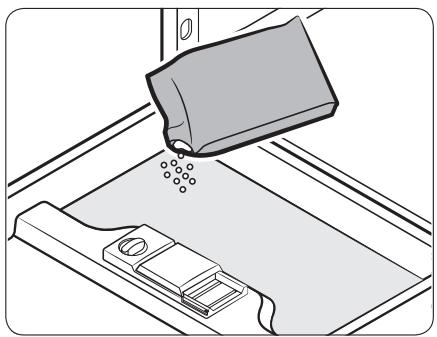
- If the items are heavily soiled, pour a small amount of detergent onto the door for better cleaning results.

The additional detergent will activate during the pre-wash process.
The cover opens automatically to dispense the detergent during the wash.
8 English
Using Rinse
Rinse aid reservoir
Rinse aid improves the drying performance of the dishwasher. When the Rinse Refill indicator lights up on the control panel, refill with rinse aid. Only use liquid rinse aid.
Powdered rinse aid will clog the reservoir opening and cause the dishwasher to malfunction.
CAUTION
- Do not apply any type of detergent to the rinse aid reservoir.
- Do not excessively fill the reservoir. Excessive rinse aid may overflow during a cycle.
Filling the rinse aid
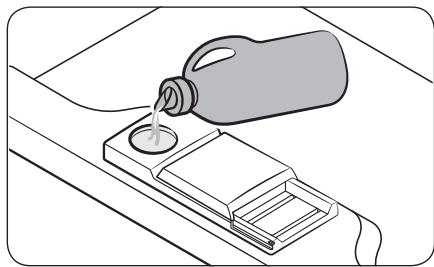
- Type A
- Open the rinse aid reservoir cap.
NOTE
Adding rinse aid to tablet detergents will improve drying performance.
- Fill the rinse aid reservoir with rinse aid.
CAUTION
Do not fill the reservoir above the full level indicator. Excess rinse aid can overflow during the wash cycle.
Before you start
- Close the rinse aid reservoir cap.
Rinse aid setting
You can change the amount of rinse aid applied during a cycle.
The buttons used to enter the setting mode may vary depending on the model.
Check the buttons for your model.
- DW6R70/DW5R407BB/DW5R406*BB:A(AUTO),B(Sanitize)
-
DW5R405BB / DW5R404BB : A (Normal), B (Sanitize)
DW5*R40**F':A(Program),B(RinseAdd) -
Press and hold the A button for five seconds.
-
Press the B button to select the rinse aid level setting menu.
-
The display shows the current setting. (Default setting: 'd4')
-
Press the A button to change the setting.
- You can select from d1-d5 (minimum-maximum)
- Wait 5 seconds to save the setting.
DW6M5**BB / DW60M5070IB : A (Express)
DW6*M5***F*/S*/U* models : A (Program)
1. Press and hold the A button for five seconds.
2. Press the Delay Start button to enter the Rinse aid setting mode.
-
The display shows the current setting.
-
Press the A button to select the amount of rinse aid you want.
- You can select from d1-d5 (minimum-maximum)
- Wait 5 seconds to save the setting.
- Type B

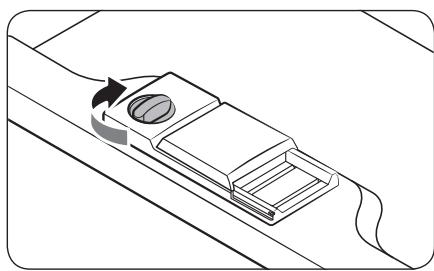
- Remove the rinse aid reservoir cap by rotating it counterclockwise.
NOTE
Adding rinse aid to tablet detergents will improve drying performance.
- Fill the rinse aid reservoir with rinse aid.
NOTE
Use the viewing port when filling the rinse aid reservoir.
CAUTION
Do not fill the reservoir above the full level indicator. Excess rinse aid can overflow during the wash cycle.
-
Turn the rinse aid indicator dial to a number between 1 and 6.
-
The higher the number, the more rinse aid the dishwasher uses.
- To improve the drying performance, select a higher level.
-
If there is discoloring on the dishes, switch to a lower level.
If you are unable to rotate the rinse aid dial easily, try using a coin. -
Close the rinse aid reservoir cap by rotating it clockwise.
Before you start
Using Softener
Salt storage
The water softener is designed to remove minerals from the water, which would have a detrimental or adverse effect on the operation of the appliance. We recommend using soft water for better results. Hard water contains impurities that can reduce the washing performance. You will need to soften the water if the supplied water is harder than 1.0 mmol/l (6 °d - German scale).
- To soften the water, you need dishwasher-specific salt and configuration of the water hardness level according to your area. For more information about the water hardness level in your area, contact your local water department.
- If the hardness level of the supplied water supply is unsteady, set the dishwasher to the highest measurement. For example, if the water hardness reading ranges from 6.7 mmol/l to 9.0 mmol/l, set the dishwasher to 9.0 mmol/l.
- The dishwasher's default water hardness level is 3 (2.1-3.0 mmol/l). If this setting matches the water hardness level in your area, you do not need to change it.
NOTE
- It is recommended that adjustments should be made in accordance with the following (or Manual) table.
The manufactory setting: H3
| Water hardness | Water hardness setting | Salt consumption (gram/cycle) | Autonomy (cycles/1 kgs) | |||
| °dH | °fH | °Clear | mmol/l | |||
| 0-5 | 0-9 | 0-6 | 0-0.94 | H1 | 0 | / |
| 6-11 | 10-20 | 7-14 | 1.0-2.0 | H2 | 20 | 60 |
| 12-17 | 21-30 | 15-21 | 2.1-3.0 | H3 | 30 | 50 |
| 18-22 | 31-40 | 22-28 | 3.1-4.0 | H4 | 40 | 40 |
| 23-34 | 41-60 | 29-42 | 4.1-6.0 | H5 | 50 | 30 |
| 35-55 | 61-98 | 43-69 | 6.1-9.8 | H6 | 60 | 20 |
NOTE
1 dH (German degree) = 0.178 mmol/l
1 Clark (British degree) = 0.143 mmol/l
1 fH (French degree) = 0.1 mmol/l
- Contact your local water board for information on the hardness of your water supply.

NOTE
How water softener regeneration works (ECO cycle with H3 level setting)
- Operates for about 2 minutes when drying starts and uses 2 L water, 0.0002 kWh energy
Regenerates once every 5 cycles
How to set the softener level
The dishwasher is designed to allow for adjusting the amount of salt consumed based on the hardness of the water used. This is intended to optimise and customise the level of salt consumption so that the salt consumption could be set proceed as follows:
The buttons used to enter the setting mode may vary depending on the model. Check the buttons for your model.
- DW6R70/DW5R407BB/DW5R406*BB:A(AUTO)
-
DW5R405BB / DW5R404BB : A (Normal)
-
Press and hold the A button for five seconds.
- Press the Delay Start button to select the water hardness level setting menu. - The display shows the current setting.
- Press the A button to change the setting. - You can select from H1-H6 (soft - hard)
- Wait 5 seconds to save the setting.
DW6M6BB / DW60M6070IB : A (Pre Wash)
DW6M5***BB / DW60M5070IB : A (Express)
DW6*M***F*/S*/U* models : A (Program)
-
Press the A button for five seconds to select the water hardness level setting menu. - The display shows the current setting.
-
Press the A button to change the setting. - You can select from H1-H6 (soft - hard
- Wait 5 seconds to save the setting.
Operations
Cycle overview
| ECO | ECO* | This cycle reduces power and water consumption, which is appropriate for normally soiled items |
| AUTO | AUTO / Auto wash | This cycle detects the level of soil and automatically initiates the optimal cycle, which is appropriate for all levels of soiled items. |
| Normal | For normally soiled loads, such as pots, plates, glasses, and lightly soiled pans. | |
| Intensive | Select this cycle for heavily soiled items. | |
| Delicate | Select this cycle for lightly soiled, fragile items such as glasses. | |
| Express | Normally soiled daily using items, with short cycle time. | |
| Quick / Quick wash | Select this cycle to clean lightly soiled items in a short time. | |
| Pre Wash | Cold water rinse for removing dirt before running another program. | |
| Extra Silence | Select this cycle for more smooth and quiet washing. This cycle washes a little bit slower, but creates 2 decibels less noise than the ECO program. | |
| Self Clean | Select this cycle to clean the inside of the dishwasher. Make sure the dishwasher is empty. | |
The cycle used may vary depending on the model.
* The values for the ECO program have been obtained following the test standard EN 60436:2020. The values given for the other programs are indicative only.
Energy, water saving tip
- ECO programme is suitable to clean normally soiled tableware, that for this use, it is the most efficient programme in terms of its combined energy and water consumption, and that it is used to assess compliance with the EU ecodesign legislation (COMMISSION REGULATION (EU) 2019/2022).
- Manual pre-rinsing of tableware items leads to increased water and energy consumption and is not recommended. Use a knife, etc. to remove only large bits of food before loading.
- Water supplied can be up to 60^ , and less power is consumed when hot water is connected.
It's better to fill the basket if possible but without overloading. - To save water and energy, use the ECO cycle. ECO is the most efficient program when washing normally soiled items.
- Use an appropriate amount of detergent and rinse according to the manufacturer's guidelines.
- Dishwasher use saves water compared to ordinary washing by hand.
- Ecodesign information can be found by going to www.samsung.com/support.
To access the EPREL registration of the model :
- Go to https://eprel.ec.europa.eu
- Get the model identifier from the energy label of the product and type it in the search box
- Energy Labelling information of the model is shown
- You can directly access the product information via https://eprel.ec.europa.eu/qr/###
The registration no. can be found on the rating label on your product.
Operations
Cycle chart
DW6R707/DW6R705/DW6R704**
| Cycle | AUTO | ECO | Intensive |
| Amount of food remains | Normal | Normal | Heavy |
| Cycle sequence | Pre wash (45 °C) ▷ Main wash (55 °C-65 °C) ▷ Rinse ▷ Hot rinse (50 °C -70 °C) ▷ Dry ▷ End | Pre wash ▷ Main wash (50 °C) ▷ Rinse ▷ Hot rinse (48 °C) ▷ Dry ▷ End | Pre wash (50 °C) ▷ Main wash (65 °C) ▷ Hot rinse (58 °C) ▷ Dry ▷ End |
| Water consumption (L) | 8.5-18 | 9.9 | 16.6 |
| Energy consumption (kWh) | 0.85-1.55 | 0.848 (DW6*R707**/ DW6*R705**) 0.836 (DW6*R704***) | 1.5 |
| Cycle time (min.) | 150 | 210 | 205 |
| Cycle | Delicate | Express | * Pre Wash |
| Amount of food remains | Light | Normal | Light |
| Cycle sequence | Pre wash (40℃) Main wash (50℃) Rinse Hot rinse (50℃) Dry ▶ End | Main wash (60℃) Rinse Hot rinse (55℃) Dry ▶ End | Pre wash ▶ End |
| Water consumption (L) | 13.5 | 15 | 4.1 |
| Energy consumption (kWh) | 0.95 | 0.95 | 0.02 |
| Cycle time (min.) | 120 | 60 | 15 |
| Cycle | Extra Silence | ** Self Clean |
| Amount of food remains | Normal | - |
| Cycle sequence | Pre wash (35 °C) Main wash (60 °C) Rinse Hot rinse (55 °C) Dry ▶ End | Pre wash Main wash (70 °C) Rinse Hot rinse (70 °C) Dry ▶ End |
| Water consumption (L) | 13 | 15 |
| Energy consumption (kWh) | 1.5 | 1.25 |
| Cycle time (min.) | 270 | 145 |
- Pre Wash : This cycle does not activate the Auto Door function nor the drying process. Continuous use of the Pre Wash cycle for an extended time is not recommended. This may reduce the performance of the water softener.
** Self Clean : Only for DW6R707/DW6R705 models
NOTE
The power consumption and cycle time depends on the water temperature and/or load.
Operations
DW5R407/DW5R406***
| Cycle | AUTO | ECO | Intensive |
| Amount of food remains | Very light to heavy | Normal | Heavy |
| Cycle sequence | Pre wash (45 °C) ▲Main wash (45 °C-55 °C) ▲Rinse ▲Hot rinse (65 °C) ▲Dry ▲End | Main wash (50 °C) ▲Rinse ▲Hot rinse (50 °C) ▲Dry ▲End | Pre wash (50 °C) ▲Main wash (60 °C) ▲Rinse ▲Rinse ▲Hot rinse (70 °C) ▲Dry ▲End |
| Water consumption (L) | 9.5-13 | 9.9 (DW5*R406***) 9.5 (DW5*R407*** | 15.5 |
| Energy consumption (kWh) | 0.85-1.2 | 0.704 (DW5*R406***) 0.755 (DW5*R407*** | 1.33 |
| Cycle time (min) | 150 | 220 | 175 |
| Cycle | Delicate | Express | Quick |
| Amount of food remains | Light | Normal | Light |
| Cycle sequence | Pre wash ▲ Main wash (40 °C) ►Rinse ▲Hot rinse (60 °C) ►Dry ▲End | Pre wash (40 °C) Main wash (45 °C) Hot rinse (60 °C) Dry ▲End | Main wash (35 °C) Rinse (35 °C) |
| Water consumption (L) | 12 | 9.1 | 10.5 |
| Energy consumption (kWh) | 0.71 | 0.77 | 0.28 |
| Cycle time (min) | 125 | 60 | 20 |
DW5R405/DW5R404
| Cycle | Normal | ECO | Intensive |
| Amount of food remains | Normal | Normal | Heavy |
| Cycle sequence | Pre wash (45 °C) ▷ Main wash (55 °C) ▷ Rinse ▷ Hot rinse (65 °C) ▷ Dry ▷ End | Main wash (45 °C) ▷ Rinse ▷ Hot rinse (60 °C) ▷ Dry ▷ End | Pre wash (50 °C) ▷ Main wash (60 °C) ▷ Rinse ▷ Rinse ▷ Hot rinse (70 °C) ▷ Dry ▷ End |
| Water consumption (L) | 13.1 | 9.5 (DW5*R404***) 9.9 (DW5*R405*** | 16.5 |
| Energy consumption (kWh) | 1.1 | 0.780 (DW5*R404***) 0.836 (DW5*R405*** | 1.3 |
| Cycle time (min) | 175 | 220 | 165 |
| Cycle | Delicate | Express | Quick |
| Amount of food remains | Light | Normal | Light |
| Cycle sequence | Pre wash ▲ Main wash (40 °C) ►Rinse ▲Hot rinse (60 °C) ►Dry ▲End | Pre wash (50 °C) Main wash (60 °C) Hot rinse (60 °C) Dry ▲End | Main wash (35 °C) ►Rinse (35 °C) |
| Water consumption (L) | 13.4 | 9.1 | 10.5 |
| Energy consumption (kWh) | 0.78 | 0.75 | 0.3 |
| Cycle time (min) | 125 | 60 | 20 |

NOTE
The power consumption and cycle time depends on the water temperature and/or load.
Operations
DW6M503/DW6M505/DW60M5070IB
| Cycle | Intensive | Normal | ECO |
| Amount of food remains | Heavy | Normal | Normal |
| Cycle sequence | Pre wash (50 °C) ▷ Main wash (60 °C) ▷ Rinse ▷ Rinse ▷ Hot rinse (70 °C) ▷ Dry ▷ End | Pre wash (45 °C) ▷ Main wash (55 °C) ▷ Rinse ▷ Hot rinse (65 °C) ▷ Dry ▷ End | Main wash (45 °C) ▷ Rinse ▷ Hot rinse (65 °C) ▷ Dry ▷ End |
| Water consumption (L) | 18.5 | 15 | 12 |
| Energy consumption (kWh) | 1.5 | 1.35 | 1.037 |
| Cycle time (min) | 170 | 180 | 195 |
| Cycle | ** Delicate | Express |
| Amount of food remains | Light | Normal |
| Cycle sequence | Pre wash ▲ Main wash (40 °C) ▷ Rinse ▲ Hot rinse (60 °C) ▲ Dry ▲ End | Pre wash (50 °C) ▲ Main wash (60 °C) ▲ Hot rinse (60 °C) ▲ Dry ▲ End |
| Water consumption (L) | 14.5 | 10 |
| Energy consumption (kWh) | 0.95 | 0.9 |
| Cycle time (min.) | 130 | 60 |
** Delicate : Only for DW6M505**/DW60M5070IB models

NOTE
The power consumption and cycle time depends on the water temperature and/or load.
DW6M6031/DW6M605/DW60M6070IB/DW6M604*
| Cycle | Intensive | Auto wash | ECO |
| Amount of food remains | Heavy | Normal | Normal |
| Cycle sequence | Pre wash (50 °C) ▷ Main wash (60 °C) ▷ Rinse ▷ Rinse ▷ Hot rinse (70 °C) ▷ Dry ▷ End | Pre wash (45 °C) ▷ Main wash (45-55 °C) ▷ Rinse ▷ Hot rinse (65 °C) ▷ Dry ▷ End | Pre wash ▷ Main wash (50 °C) ▷ Hot rinse (55 °C) ▷ Dry ▷ End |
| Water consumption (L) | 17.5 | 11-15 | 10.5 |
| Energy consumption (kWh) | 1.6 | 0.9-1.3 | 0.950 (DW6*M6031**/DW6*M605***/DW60M6070IB) 0.936 (DW6*M604*** ) |
| Cycle time (min) | 175 | 150 | 225 |
| Cycle | Express | Pre Wash | Delicate |
| Amount of food remains | Normal | Light | Light |
| Cycle sequence | Pre wash (50 °C) Main wash (60 °C) Hot rinse (60 °C) Dry End | Pre wash ▷ End | Pre wash ▷ Main wash (40 °C) ▷ Rinse ▷ Hot rinse (60 °C) ▷ Dry End |
| Water consumption (L) | 10 | 4 | 13 |
| Energy consumption (kWh) | 1.15 | 0.02 | 0.9 |
| Cycle time (min) | 60 | 15 | 130 |
Operations
| Cycle | ** Quick wash |
| Amount of food remains | Light |
| Cycle sequence | Main wash (45 °C) ► Hot rinse (50 °C) ► Hot rinse (55 °C) ► End |
| Water consumption (L) | 11 |
| Energy consumption (kWh) | 0.75 |
| Cycle time (min) | 30 |
** Quick wash: Only for DW6M6031/DW6M605***/DW60M6070IB models Continuous use of the Quick Wash cycle for an extended time is not recommended. This may reduce the performance of the water softener.

NOTE
The power consumption and cycle time depends on the water temperature and/or load.
Maintenance
Cleaning
Keep the dishwasher clean to improve performance, reduce unnecessary repairs, and lengthen the lifecycle.
Exterior
Clean spills on the surface of the dishwasher immediately. Use a soft, damp cloth on the control panel to gently wipe away spills and dust.
CAUTION
- Do not use benzene, wax, thinner, chlorine bleach, alcohol, or other chemical substances. These materials may discolour the surface of the dishwasher and cause stains.
- The dishwasher has electric parts inside. Do not spray water directly onto the dishwasher. Protect electrical components from water.
- For a stainless-steel door panel, use a stainless steel cleaner for home appliances and a clean, soft cloth.
Interior
Clean the interior of the dishwasher on a regular basis to remove any dirt or food particles. Wipe inside the dishwasher and inside the door with a wet dishcloth.
CAUTION
- Do not remove the front seal (the long rubber seal enclosing the opening of the dishwasher). The seal keeps the inner side of the dishwasher sealed.
- Use a damp cloth to remove lime scale or grease deposits inside the dishwasher. Alternatively, apply some detergent, and then run an empty cycle using the highest rinse temperature.
Maintenance
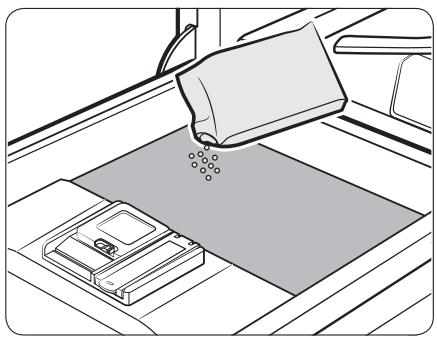
Nozzles
To prevent the nozzles from being clogged or if the nozzles are clogged, remove and clean each nozzle. Use caution when removing the nozzles as they may break.
Upper nozzle

Lower nozzle
- Open the door, and then pull out the upper rack to reveal the upper nozzle.
- Loosen and remove the nut, and then remove the nozzle.
- Unclog and clean the nozzle.
- Reinsert the nozzle, and then tighten the nut by hand.
-
Rotate the nozzle by hand to make sure the nozzle is engaged correctly.
-
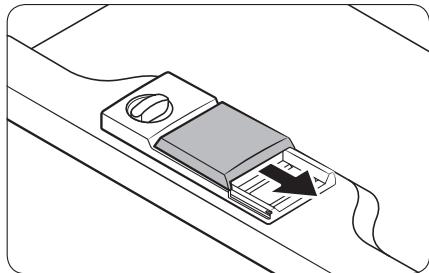
Open the door, and then pull out the lower rack. The lower nozzle is visible on the bottom.
- Unclog and clean the nozzle.
- Reinsert the nozzle.
- Rotate the nozzle by hand to make sure the nozzle is engaged correctly.

NOTE
Depending on the models, actual parts may look differ from the figures.
Internal Cleaning
We recommend internal cleaning every month. You can use the Self Clean cycle (if available) or the Intensive cycle without putting in dishes. In some models with a notification feature, the LED may blink after 20-22 cycles.
If your tap water is hard, you can prevent limescale inside the dishwasher by adding citric acid to the detergent when operating the dishwasher.
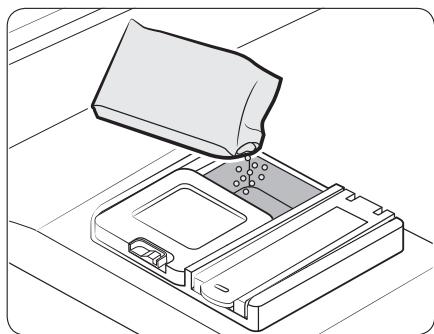
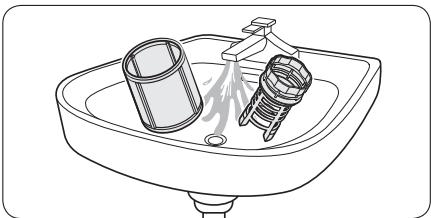
Filter
We recommend cleaning the filter every month.
-
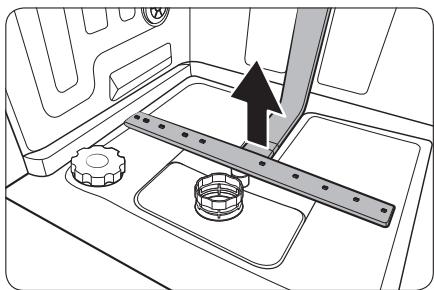
Open the door, and then remove the lower rack first.
-
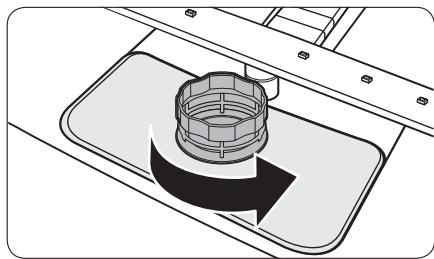
Turn the filter handle counterclockwise to unlock the Coarse filter.
-
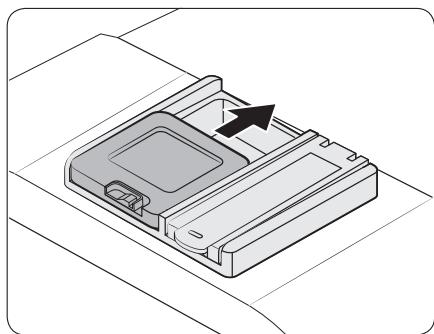
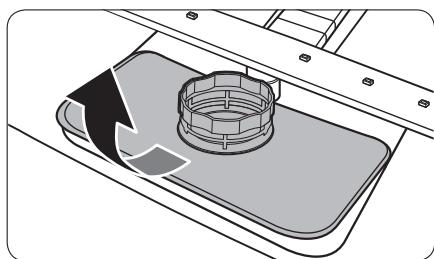
Remove the Coarse filter, and then the cylindrical micro filter underneath.
Maintenance

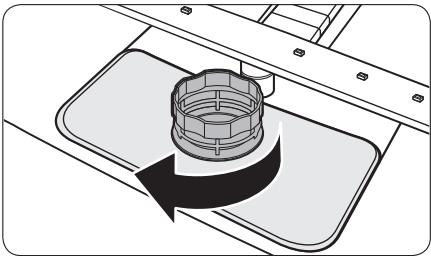
- Remove any dirt and impurities from the micro filter and the Coarse filter.
-
Rinse them with running water, and then dry well.
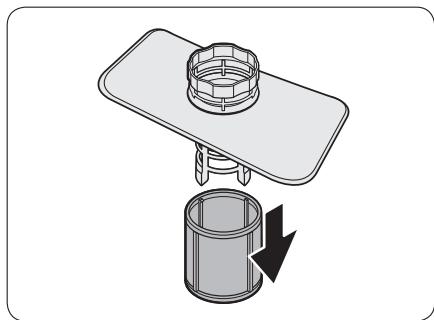
-
Reinsert the filter, and then the Coarse filter.
- Turn the filter handle clockwise to lock.
NOTE
Depending on the models, actual parts may look differ from the figures.
CAUTION
Make sure the Coarse filter is closed properly. A loose cover can reduce the filtering performance.
Troubleshooting
Checkpoints
If you encounter an issue with the dishwasher, first check the table below and try the suggestions.
Following the repair by a non-authorised service provider, self-repair or non-professional repair of the product, Samsung is not liable for any damage to the product, any injury or any other product safety issue caused by any attempt to repair the product which does not carefully follow these repair and maintenance instructions. Any damage to the product caused by an attempt to repair the product by any person other than a Samsung certified service provider will not be covered by the warranty.
| Symptom | Possible cause | Action |
| The dishwasher does not start. | The door is not completely closed. | ·Make sure the door is latched and completely closed. ·Make sure the upper rack is properly joined with the nozzle. ·Make sure the upper rack is properly assembled. |
| The power cord is not connected. | ·Connect the power cord. | |
| Water is not being supplied. | ·Make sure the water supply valve is open. | |
| The control panel is locked. | ·Deactivate the Control Lock. | |
| The dishwasher has bad odours. | Water remains from the previous cycle. | ·With the dishwasher empty, add detergent, and then run the Quick cycle. This is available only on applicable models. |
| Water remains in the dishwasher after a cycle has finished. | The drain hose is folded or clogged. | ·Straighten and unclog the hose. |
Troubleshooting
| Symptom | Possible cause | Action |
| Food remains on dishes. | An incorrect cycle was selected. | • Select a cycle according to the soil level of the dishes as instructed in this manual. |
| The filters are clogged or not correctly fastened. | • Clean the filters. • Make sure the filters are correctly fastened. | |
| An insufficient amount of detergent was used. | • Use the correct amount of detergent for each load. | |
| The water pressure is low. | • Make sure the pressure is between 0.04-1.0 MPa. | |
| The nozzles are clogged. | • Clean and unclog the nozzles. | |
| Dishes improperly loaded or overloaded. | • Arrange the dishes so they do not interfere with the nozzles and/or the detergent dispenser. | |
| The water is too hard. | • Check the salt refill indicator, and refill with dishwasher salt. | |
| Dishes are not dried well. | There is no rinse aid in the dispenser, or not enough rinse aid was used. | • Add rinse aid. • Check the rinse aid settings. |
| Too many dishes are loaded. | • Overloading may reduce the drying performance. Load your dishes as recommended. | |
| Glasses and cups spilled water onto other dishes while being unloaded. | • Empty the lower rack first, and then the upper rack. This will avoid water dripping from the upper rack onto the dishes in the lower rack. | |
| Multiple detergent tablets were used without selecting the Sanitize option. | • Select the Sanitize option or use rinse aid. | |
| The dishwasher is too noisy. | The dishwasher makes a sound when the dispenser cover is open and the drain pump is operating. | This is normal. |
| The dishwasher is not level. | Make sure the dishwasher is level. | |
| The nozzle bumps against the dishes, creating a chopping sound. | Rearrange the dishes. | |
| Yellow or brown film remains on dishes. | Coffee and tea soils. | Use a cycle with a higher temperature. |
| Indicators do not light up. | The power cord is not connected. | Connect the power cord. |
| The nozzles do not rotate smoothly. | The nozzles are clogged with food particles. | Clean the nozzles. |
| A white coating remains on dishes. | The water is too hard. | Make sure the salt fill indicator and softener settings are correct according to the water hardness of your area. Make sure the salt storage cap is correctly fastened. |
| Air bubbles and scratch marks are on the control panel. | Air gets into the protective film, causing EPS marks to remain. | Remove the protective film from the control panel. |
Troubleshooting
Information codes
If the dishwasher fails to operate, you may see an information code on the display. Check the table below and try the suggestions.
| Code | Action |
| LC | Leakage check • Close the water supply valve. Go to your home's circuit breaker panel, and set the dishwasher's circuit breaker switch to off. Then, contact the installer to repair. If the issue continues, contact a local Samsung service centre. |
| 4C | Water supply check • Check if the water supply valve is closed, if the water supply is suspended, or if the water inlet valve or line is frozen or clogged by foreign particles. If the issue continues, contact a local Samsung service centre. |
| AC | PCB communication check • Abnormal communication between the main PCB and the sub PCB. • If the problem continues, contact an authorised Samsung service centre. |
| HC | High temperature heating check • Functional check. With the dishwasher empty, add detergent, and then run a cycle. If the issue continues, go to your home's circuit breaker panel, and set the dishwasher's circuit breaker switch to off. Then, contact a Samsung service centre. |
| tC | Thermistor check • Temperature sensor is broken (short or open circuit). If the problem continues, contact an authorised Samsung service centre. |
| EC | Washing pump check • Abnormal working with washing pump. If the issue continues, contact a local Samsung service centre. |
| PC | Distribution motor check • Abnormal working with distribution motor assembly, or main PCB. If the issue continues, contact a local Samsung service centre. |
| bc2 | Button check • Button pressed for 30 seconds. • Check if there is a water or foreign substances on the button part. • If the issue continues, contact a local Samsung service centre. |
If any information code keeps appearing on the screen, contact a local Samsung service centre.
Spare parts for end-users are available for a minimum of 10 years*.
- Applicable parts : door hinge and seals, other seals, spray arms, drain filters, interior racks and plastic peripherals such as baskets and lids.
** This means a minimum of 10 years after Samsung places the last unit of the model on the market.
QUESTIONS OR COMMENTS?
| COUNTRY | CALL | OR VISIT US ONLINE AT |
| UK | 0333 000 0333 | www.samsung.com/uk/support |
| IRELAND (EIRE) | 0818 717100 | www.samsung.com/ie/support |
| FRANCE | 01 48 63 00 00 | www.samsung.com/fr/support |
| NETHERLANDS | 088 90 90 100 | www.samsung.com/nl/support |
| GERMANY | 06196 77 555 77 | www.samsung.com/de/support |
| SWEDEN | 0771 726 786 | www.samsung.com/se/support |
| NORWAY | 21629099 | www.samsung.com/no/support |
| FINLAND | 030-6227 515 | www.samsung.com/fi/support |
| DENMARK | 707 019 70 | www.samsung.com/dk/support |
| ITALIA | 800-SAMSUNG (800.7267864) | www.samsung.com/it/support |
| SPAIN | 91 175 00 15 | www.samsung.com/es/support |
| PORTUGAL | 808 207 267 | www.samsung.com/pt/support |
| POLAND | [IM]801-172-678* lub +48 22 607-93-33*Specialistyczna infolinia do obstogi zapytań dotycznych Telefonówkomórkowych:801-672-678*(opłata według taryfy operadora)[CE]801-172-678* lub +48 22 607-93-33*(opłata według taryfy operadora) | http://www.samsung.com/pl/support/ |
| HUNGARY | 0680SAMSUNG (0680-726-7864) | www.samsung.com/hu/support |
| CROATIA | 072 726 786 | www.samsung.com/hr/support |
| ALBANIA | 045 620 202 | www.samsung.com/al/support |
| North Macedonia | 023 207 777 | www.samsung.com/mk/support |
| SLOVENIA | 080 697 267 (brezplačna številka) | www.samsung.com/si/support |
| BOSNIA | 055 233 999 | www.samsung.com/ba/support |
| ESTONIA | 800-7267 | www.samsung.com/ee/support |
| LITHUANIA | 8-800-77777 | www.samsung.com/lt/support |
| LATVIA | 8000-7267 | www.samsung.com/lv/support |
Lave-vaisselle
DW6M503/DW6M505/DW60M5070IB
DW6M503/DW6M505/DW60M5070IB
DW6M503/DW6M505/DW60M5070IB
DW6M503/DW6M505/DW60M5070IB
Energisparingships 15
Programtabell 16
Vedlikehold 23
Rengjoring 23
Feilsøking 27
Kontrollpunkter 27
Beholder for oppvaskmiddel
DW6M503/DW6M505/DW60M5070IB
| Syklus | Intensiv | Normal | ØKO |
| Mengde matrester | Mye | Normal | Normal |
| Syklussekvens | Forvask (50 °C) ▲Hovedvask (60 °C) ▲Skylling ▲Skylling ▲Varm skylling (70 °C) ▲Tørking ▲Slutt | Forvask (45 °C) ▲Hovedvask (55 °C) ▲Skylling ▲Varm skylling (65 °C) ▲Tørking ▲Slutt | Hovedvask (45 °C) ▲Skylling ▲Varm skylling (65 °C) ▲Tørking ▲Slutt |
| Vannforbruk (L) | 18,5 | 15 | 12 |
| Strømforbruk (kW/t) | 1,5 | 1,35 | 1,037 |
| Tid for vaskesyklus (min.) | 170 | 180 | 195 |
| Syklus | ** Finvask | Ekspress |
| Mengde matrester | Lite | Normal |
| Syklussekvens | Forvask ▲Hovedvask (40 °C) ▲Skylling ▲Varm skylling (60 °C) ▲Tørking ▲Slutt | Forvask (50 °C) ▲Hovedvask (60 °C) ▲Varm skylling (60 °C) ▲Tørking ▲Slutt |
| Vannforbruk (L) | 14,5 | 10 |
| Strømforbruk (kW/t) | 0,95 | 0,9 |
| Tid for vaskesyklus (min.) | 130 | 60 |
** Finvask : Bare for DW6M505**/DW60M5070IB-modeller

MERK
DW6M503/DW6M505/DW60M5070IB
KYSMYKSET JA KOMMENTIT
| MAA | SOITA | TAI VIERAILE VERKKOSIVUILLAMME |
| UK | 0333 000 0333 | www.samsung.com/uk/support |
| IRELAND (EIRE) | 0818 717100 | www.samsung.com/ie/support |
| FRANCE | 01 48 63 00 00 | www.samsung.com/fr/support |
| NETHERLANDS | 088 90 90 100 | www.samsung.com/nl/support |
| GERMANY | 06196 77 555 77 | www.samsung.com/de/support |
| SWEDEN | 0771 726 786 | www.samsung.com/se/support |
| NORWAY | 21629099 | www.samsung.com/no/support |
| FINLAND | 030-6227 515 | www.samsung.com/fi/support |
| DENMARK | 707 019 70 | www.samsung.com/dk/support |
| ITALIA | 800-SAMSUNG (800.7267864) | www.samsung.com/it/support |
| SPAIN | 91 175 00 15 | www.samsung.com/es/support |
| PORTUGAL | 808 207 267 | www.samsung.com/pt/support |
| POLAND | [IM]801-172-678* lub +48 22 607-93-33*Specialistyczna infolinia do obstugi zapytańdotyczących Telefonów komórkowych:801-672-678*(opłata wedlug taryfy operatora)[CE]801-172-678* lub +48 22 607-93-33*(opłata wedlug taryfy operatora) | http://www.samsung.com/pl/support/ |
| HUNGARY | 0680SAMSUNG (0680-726-7864) | www.samsung.com/hu/support |
| CROATIA | 072 726 786 | www.samsung.com/hr/support |
| ALBANIA | 045 620 202 | www.samsung.com/al/support |
| North Macedonia | 023 207 777 | www.samsung.com/mk/support |
| SLOVENIA | 080 697 267 (brezplačna številka) | www.samsung.com/si/support |
| BOSNIA | 055 233 999 | www.samsung.com/ba/support |
| ESTONIA | 800-7267 | www.samsung.com/ee/support |
| LITHUANIA | 8-800-77777 | www.samsung.com/lt/support |
| LATVIA | 8000-7267 | www.samsung.com/lv/support |
Opvaskemaskine
Økodesignvejledning
SAMSUNG
Indhold
Installation 3
Installationskrav 3
För du starter 4
Brug af opvaskemiddel 4
Brug af Skylning 9
Brug af blodgorgingsmiddel 12
14
Programoversigt 14
Energi, vandbesparende spids 15
Programoversigt 16
Vedligeholdelse 23
Rengoring 23
Problemløsning 27
Kontrolpunkter 27
Informationskoder 30
2 Dansk
Installationskrav
Selvrens: Kun for DW6R707/DW6R705 modeller

BEMÄERK
DW6M503/DW6M505/DW60M5070IB
| Program | Intensiv | Normal | ØKO |
| Resterende mængde madvarer | Stor | Normal | Normal |
| Programsekvens | Forvask (50 °C) ▷ Hovedvask (60 °C) ▷ Skylining ▷ Skylining ▷ Varm skylining (70 °C) ▷ Tørring ▷ Slut | Forvask (45 °C) ▷ Hovedvask (55 °C) ▷ Skylining ▷ Varm skylining (65 °C) ▷ Tørring ▷ Slut | Hovedvask (45 °C) ▷ Skylining ▷ Varm skylining (65 °C) ▷ Tørring ▷ Slut |
| Vandforbrug (L) | 18,5 | 15 | 12 |
| Energiforbrug (kWh) | 1,5 | 1,35 | 1,037 |
| Programtid (min.) | 170 | 180 | 195 |
| Program | ** Fint | Ekspres |
| Resterende mængde madvarer | Lille | Normal |
| Programsekvens | Forvask ▲Hovedvask (40 °C) ▲Skylining ▲Varm skylining (60 °C) ▲Tørning ▲Slut | Forvask (50 °C) ▲Hovedvask (60 °C) ▲Varm skylining (60 °C) ▲Tørning ▲Slut |
| Vandforbrug (L) | 14,5 | 10 |
| Energiforbrug (kWh) | 0,95 | 0,9 |
| Programtid (min.) | 130 | 60 |
** Fint : Kun for modellerne DW6M505**/DW60M5070IB

BEMAKER
DW6M503/DW6M505/DW60M5070IB
DW6M503/DW6M505/DW60M5070IB
DW6M503/DW6M505/DW60M5070IB
DW6M503/DW6M505/DW60M5070IB
DW6M503/DW6M505/DW60M5070IB
- Before you start 4
- Operations 14
- Maintenance 23
- Troubleshooting 27
- English
- Installation requirements
- Power supply
- WARNING
- Grounding
- Water supply
- To reduce a risk of leaks:
- Aqua Stop
- CAUTION
- Flooring
- Before you start
- Using Detergent
- Detergent compartment
- English
- Filling the detergent
- NOTE
- - Type B
- Using Rinse
- Rinse aid reservoir
- Filling the rinse aid
- Rinse aid setting
- Using Softener
- Salt storage
- How to set the softener level
- Operations
- Energy, water saving tip
- To access the EPREL registration of the model :
- Cycle chart
- Maintenance
- Cleaning
- Exterior
- Interior
- Nozzles
- Upper nozzle
- Lower nozzle
- Internal Cleaning
- Filter
- Troubleshooting
- Checkpoints
- Information codes
- Lave-vaisselle
- Vedlikehold 23
- Feilsøking 27
- Beholder for oppvaskmiddel
- MERK
- Opvaskemaskine
- Indhold
- Installation 3
- För du starter 4
- 14
- Vedligeholdelse 23
- Problemløsning 27
- Dansk
- Installationskrav
- BEMÄERK
- BEMAKER
Brand : SAMSUNG
Model : DW50R4040BB
Category : Dishwasher