BMOB17131X - BMOB 17131 X - Microwave BEKO - Free user manual and instructions
Find the device manual for free BMOB17131X - BMOB 17131 X BEKO in PDF.



| Product type | Built-in microwave |
| Brand | Beko |
| Model | BMOB17131X / BMOB 17131 X |
| Capacity | 17 liters |
| Dimensions (W x H x D) | 595 x 336 x 382 mm |
| Net weight | 15 kg |
| Power supply | 230 V ~ 50 Hz |
| Operating frequency | 2 450 MHz |
| Nominal input power (microwave) | 1 050 W |
| Nominal output power (microwave) | 700 W |
| Turntable diameter | 245 mm |
| Timer | 0 to 95 minutes |
| Cooking functions | Microwave (10 levels), weight/time defrost, multi-stage cooking, auto menu (8 programs) |
| Special features | Quick start, programmable clock, child lock |
| Installation type | Built-in (minimum height 85 cm, no back wall) |
| Cavity material | Stainless steel interior (estimated) |
| Maintenance and cleaning | Regular cleaning with soapy water, mild detergent; turntable dishwasher safe |
| Safety | Child lock, automatic stop when door open, overheat protection |
| Spare parts and repairability | Contact Beko authorized service for repairs (cover, turntable, etc.) |
| Energy efficiency class | Not specified |
| Package contents | Microwave oven, glass tray, turntable support, fixing screws, plastic cover |
| General information | User manual available in multiple languages. Compliant with WEEE and RoHS directives. |
Frequently Asked Questions - BMOB17131X - BMOB 17131 X BEKO
User questions about BMOB17131X - BMOB 17131 X BEKO
0 question about this device. Answer the ones you know or ask your own.
Ask a new question about this device
Download the instructions for your Microwave in PDF format for free! Find your manual BMOB17131X - BMOB 17131 X - BEKO and take your electronic device back in hand. On this page are published all the documents necessary for the use of your device. BMOB17131X - BMOB 17131 X by BEKO.
USER MANUAL BMOB17131X - BMOB 17131 X BEKO
Please read this manual first!
Dear Customer,
Thank you for purchasing a Beko product. We hope that you get the best results from your product which has been manufactured with high quality and state-of-the-art technology. Therefore, please read this entire user manual and all other accompanying documents carefully before using the product and keep it as a reference for future use. If you handover the product to someone else, give the user manual as well. Follow all warnings and information in the user manual.
Meanings of the symbols
The following symbols are used in various sections of this user manual:
| i | Important information and useful hints about usage. |
| ! | Warnings for dangerous situations concerning the safety of life and property. |
| Warning for hot surfaces. |

This product has been manufactured in environmentally friendly modern plants without causing any harm to nature.
CONTENTS
| ENGLISH | 04-19 |
| DEUTSCH | 20-38 |
| FRANÇAIS | 39-56 |
| ESPÁÑOL | 57-76 |
| ČESKY | 77-95 |
| HRVATSKI | 96-112 |
| NEDERLANDS | 113-130 |
| SLOVENSKI | 131-149 |
| SLOVENŠĆINA | 150-166 |
| СРБИ | 167-183 |
| POLSKI | 184-203 |
| SHQIPTARE | 204-221 |
| MAKΕΝΟΝΚΙ | 222-244 |
| ΡΥСΚΗ | 245-268 |
1 Important safety and environmental instructions
Important Safety Instructions Read Carefully And Keep For Future Reference
1.1 Safety warnings
This section contains safety instructions that will help protect from risk of fire, electric shock, exposure to leak microwave energy, personal injury or property damage. Failure to follow these instructions shall void any warranty.
- Beko Microwave Ovens comply with the applicable safety standards; therefore, in case of any damage on the appliance or power cable, it should be repaired or replaced by the dealer, service center or a specialist and authorized service alike to avoid any danger. Faulty or unqualified repair work may be dangerous and cause risk to the user.
- This appliance is intended to be used in household and similar applications such as:
Staff kitchen areas in shops, offices and other working environments; - Farm houses - By clients in hotels, and other residential type environments; - Bed and Breakfast type environments.
- It is not intended for industrial or laboratory use.
- Do not attempt to start the oven when its door is open; otherwise you may be exposed to harmful microwave energy. Safety locks should not be disabled or tampered with.
- The microwave oven is intended for heating food and beverages. Drying of food or clothing and heating of warming pads, slippers, sponges, damp cloth and similar may lead to risk of injury, ignition or fire.
1 Important safety and environmental instructions
- Do not place any object between the front side and the door of the oven. Do not allow dirt or cleaning agent remnants to build up on the closure surfaces.
- Any service works involving removal of the cover that provides protection against exposure to microwave energy must be performed by authorized persons/ service. Any other approach is dangerous.
- Your product is intended for cooking, heating and defrost food at home. It must not be used for commercial purposes.
- Your oven is not designed to dry any living being.
- Do not use your appliance to dry clothes or kitchen towels.
- Do not use this appliance outdoors, bathrooms, humid environments or in places where the it can get wet.
- No responsibility or warranty claim shall be assumed for damages arising from misuse or improper handling of the appliance.
- Never attempt to dismantle the appliance. No warranty claims are accepted for damage caused by improper handling.
- Only use the original parts or parts recommended by the manufacturer.
- Do not leave this appliance unattended while it is in use. Always use the appliance on a stable, flat, clean, dry, and nonslip surface.
- The appliance should not be operated with an external clock timer or separate remote control system.
- Before using the appliance for the first time, clean all parts. Please see the details given in the "Cleaning and Maintenance" section.
- Operate the appliance for its intended purpose only as described in this manual.
- The appliance becomes very hot while it is in use. Pay attention not to touch the hot parts inside the oven.
- Do not operate the oven empty.
1 Important safety and environmental instructions
- Cooking utensils may get hot due to the heat transferred from the heated food to the utensil. You may need oven gloves to hold the utensil.
- Utensils shall be checked to ensure that they are suitable for use in microwave ovens.
- Do not place the oven on stoves or other heat-generating appliances. Otherwise, it may be damaged and the warranty becomes void.
- Steam may come out while opening the covers or the foil after cooking the food.
- The appliance and its accessible surfaces may be very hot when the appliance is in use.
- The door and outer glass may be very hot when the appliance is in use.
- Make sure that your mains power supply complies with the information supplied on the rating plate of the appliance.
- The only way to disconnect the appliance from the power supply is to remove the power plug from the power outlet.
- Use the appliance with a grounded outlet only.
- Never use the appliance if the power cable or the appliance itself is damaged.
- Do not use this appliance with an extension cord.
- Never touch the appliance or its plug with damp or wet hands.
- Place the appliance in a way so that the plug is always accessible.
- Prevent damage to the power cable by not squeezing, bending, or rubbing it on sharp edges. Keep the power cable away from hot surfaces and naked flame.
- Make sure that there is no danger that the power cable could be accidentally pulled or that someone could trip over it when the appliance is in use.
- Unplug the appliance before each cleaning and when the appliance is not in use.
1 Important safety and environmental instructions
- Do not pull the power cable of the appliance to disconnect it from its power supply and never wrap its power cable around the appliance.
- Do not immerse the appliance, power cable, or power plug in water or any other liquids. Do not hold it under running water.
- When heating food in plastic or paper containers, keep an eye on the oven due to the possibility of ignition.
- Remove the wire strings and/or metal handles of paper or plastic bags before placing bags in the oven.
- If smoke is observed, switch off or unplug the appliance if safe to do so and keep the door closed in order to stifle any flames.
- Do not use the microwave oven for storage. Do not leave paper items, cooking utensils, or food inside the oven when it is not in use.
- The contents of feeding bottles and baby food jars should be stirred or shaken and the temperature checked before consumption, in order to avoid burns.
- This appliance is a Group 2 Class B ISM equipment. Group 2 contains all ISM (Industrial, Scientific and Medical) equipment in which radio-frequency energy is intentionally generated and/or used in the form of electromagnetic radiation for the treatment of material, and spark erosion equipment. Class B equipment is suitable for use in domestic establishments and establishments directly connected to a low voltage power supply network.
- Do not use cooking oil in the oven. Hot oil may damage the components and materials of the oven, and it may even cause skin burns.
- Pierce food with thick crust such as potatoes, courgettes, apples and chestnuts.
- The appliance must be placed so that the rear side is facing the wall.
1 Important safety and environmental instructions
- Before moving the appliance, please secure the turntable to prevent damage.
- Eggs in their shell and whole hard-boiled eggs must not be heated in microwave ovens since they may explode, even after microwave heating has ended.
WARNING: If the door or door seals are damaged, the oven must not be operated until it has been repaired by a competent person.
WARNING: It is hazardous for anyone other than a competent person to carry out any service or repair operation which involves the removal of a cover which gives protection against exposure to microwave energy.
WARNING: Liquids and other foods must not be heated in sealed containers since they are liable to explode.
- The oven should be cleaned regularly and any food deposits removed.
- There should be min 20 cm free space above the top surface of the oven.
- Do not over-cook foods; otherwise, you may cause a fire.
- Do not use chemicals and steam assisted cleaners to clean the appliance.
- Extreme caution is advised when being used near children and persons who are restricted in their physical, sensory or mental abilities.
- This appliance can be used by children who are at the age of 8 or over and by people who have limited physical, sensory or mental capacity or who do not have knowledge and experience, as long as they are supervised with regard to safe use of the product or they are instructed accordingly or understand the risks of using the product. Children should not play with the appliance. Cleaning and user maintenance procedures should not be performed by children unless they are controlled by their elders.
- Danger of choking! Keep all the packaging materials away from children.
1 Important safety and environmental instructions
- Due to excessive heat that arises in grill and combination modes, children should only be allowed to use these modes under supervision of an adult.
- Keep the product and its power cable so that they are inaccessible by children under 8 years old.
- Do not cook food directly on the glass tray. Put the food in / on appropriate kitchen utensils before placing them in the oven. Metallic containers for food and beverages are not allowed during microwave cooking. Otherwise, sparking may occur.
- Microwave oven must not be placed in a cabinet that is not in compliance with the installation instructions.
- Microwave oven is intended for built-in use only.
- If built-in appliances being used equal or higher than 900 mm above the floor, care should be taken not to displace the turntable when removing containers from the appliance.
- If the built-in product is in a cabinet with a door, the product must be operated with the cabinet door open.
1.2 Compliance with the WEEE Directive and Disposing of the Waste Product:
This product complies with EU WEEE Directive (2012/19/EU). This product bears a classification symbol for waste electrical and electronic equipment (WEEE).
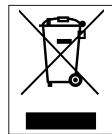
This symbol indicates that this product shall not be disposed with other household wastes at the end of its service life. Used device must be returned to official collection point for recycling
of electrical and electronic devices. To find these collection systems please contact to your local authorities or retailer where the product was purchased. Each household performs important role in recovering and recycling of old appliance. Appropriate disposal of used appliance helps prevent potential negative consequences for the environment and human health.
1.3 Compliance with RoHS Directive
The product you have purchased complies with EU RoHS Directive (2011/65/EU). It does not contain harmful and prohibited materials specified in the Directive.
1.4 Package information

Packaging materials of the product are manufactured from recyclable materials in accordance with our National Environment Regulations. Do not dis
pose of the packaging materials together with the domestic or other wastes. Take them to the packaging material collection points designated by the local authorities.
2 Technical Specifications of the Product
2.1 Overview
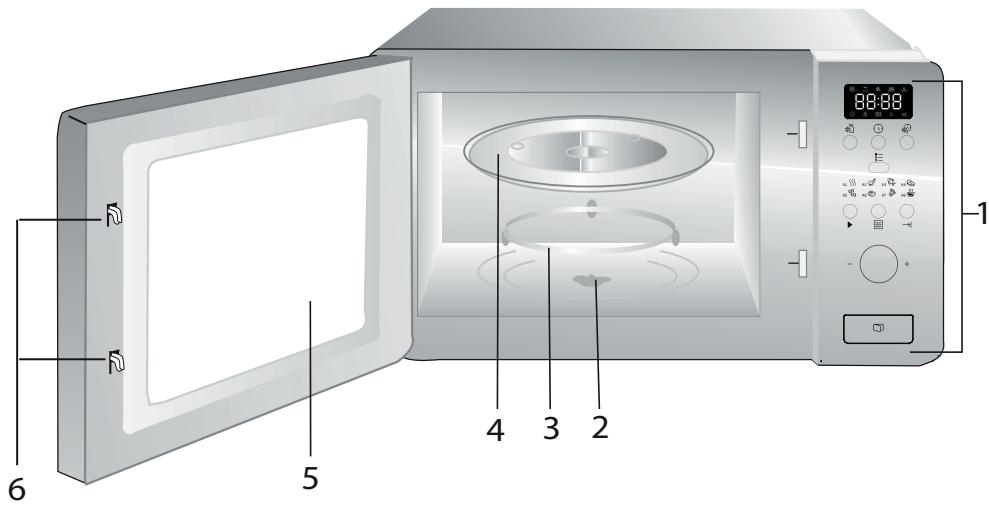
- Control panel
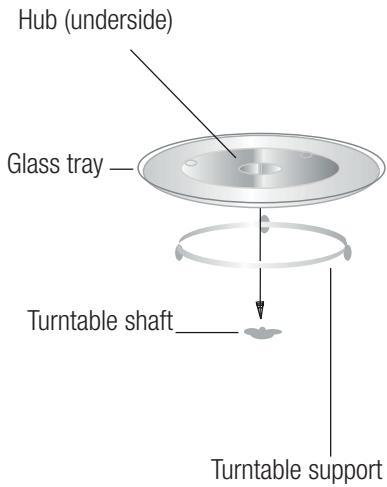
- Turntable shaft
- Turntable support
- Glass tray
- Oven window
- Door safety interlock system
2.2 Technical data
| Rated voltage: | 230 V~, 50 Hz |
| Operation frequency | 2450 MHz |
| Rated input power (microwave) | 1050 W |
| Rated output power(microwave) | 700 W |
| Oven capacity | 17 L |
| Turntable diameter | ø 245 mm |
| Timer | 0-95' |
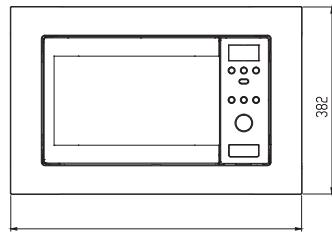
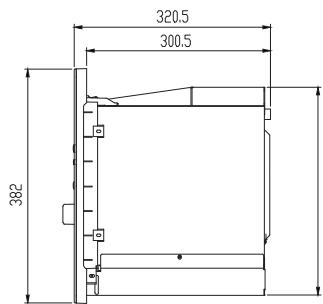
| External dimensions | 595*336*382 mm |
| Net weight | 15 kg |
Technical and design modification rights are reserved.
Markings on the appliance or the values stated in other documents supplied with the product are values obtained under laboratory conditions as per relevant standards. These values may vary according to the usage of the appliance and ambient conditions.
2 Technical Specifications of the Product
2.3 Installing the turntable
- Never place the glass tray upside down. The glass tray should never be restricted.
- Both glass tray and turntable support must always be used during cooking.
- All food and containers of food must always be placed on the glass tray for cooking.
- If glass tray or turntable support crack or break, contact your nearest authorized service center.
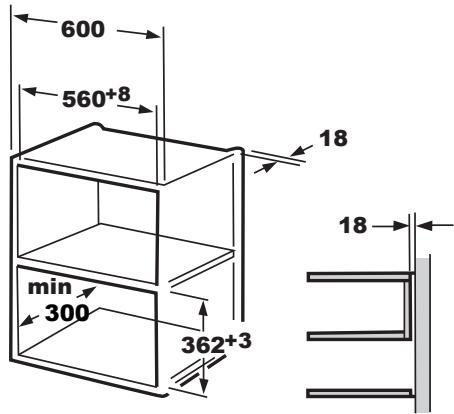
3.1 Built-in furniture
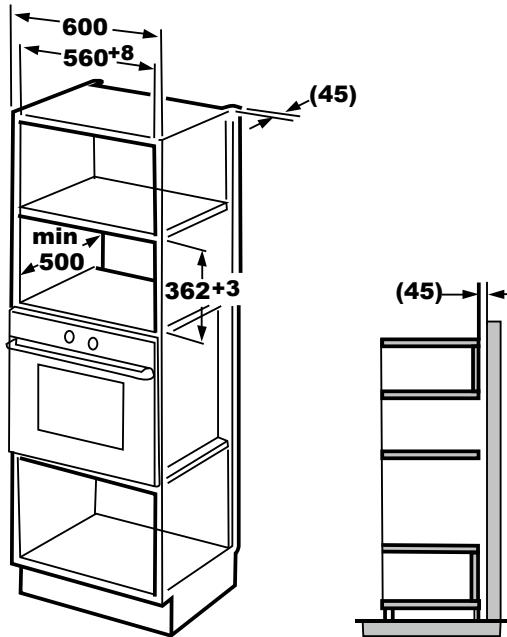
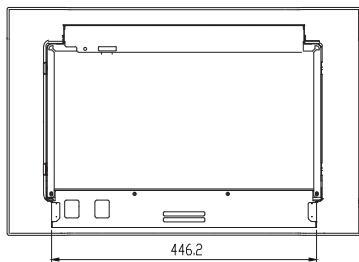
The built-in cabinet shall not have a rear wall behind the appliance.
Minimum installation height is 85 cm
Do not cover ventilation slots and air intake points.
1.
2.
3 Installation and connection
3.2 Install the Oven
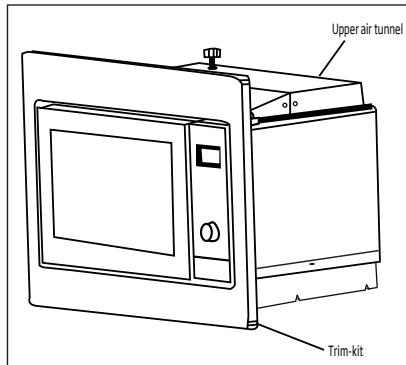
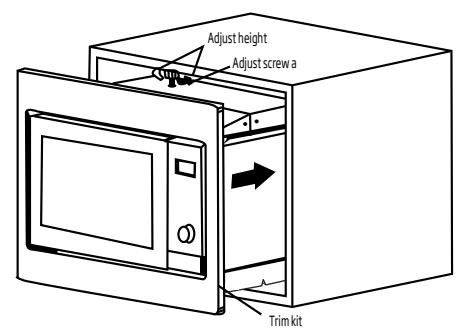
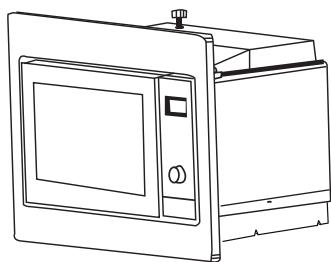
- Install the oven into the cabinet.
- Do not trap or kink the power cord.
- Make sure that the oven is installed in the center of the cabinet.
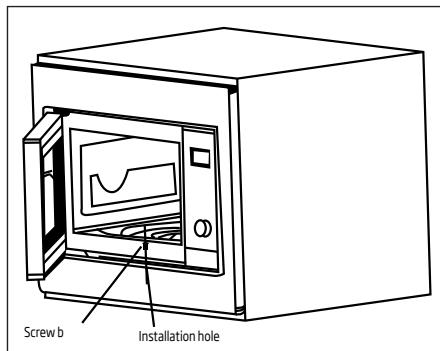
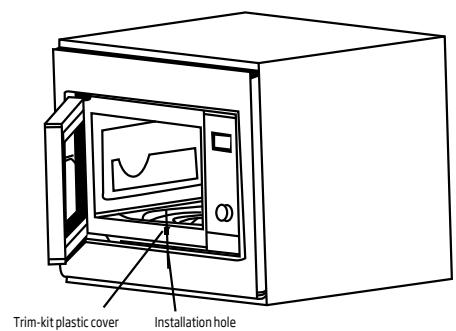
- Open the door; fix the oven to the cabinet with screw b at the installation hole of trim kit. Then fix the trim-kit plastic cover to the installation hole.
4.1 Control panel
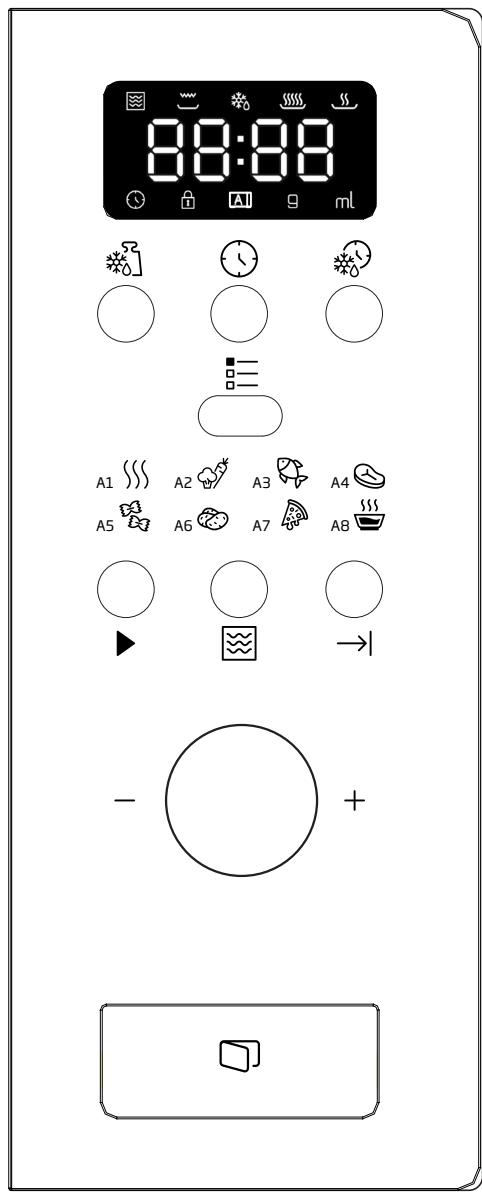
Defrost By Weight Clock/Pre-Set Defrost By Time - Menu Quick Start/Start - Microwave • → Cancel/Stop A-1 Auto Reheat A-2 Vegetable A-3 Fish A-4 Meat A-5 Pasta A-6 Potato A-7 Reheat Pizza A-8 Soup
4.2 Clock setting
When the microwave oven is electrified, the oven will display "0:00", buzzer will rings once.
- Press "S", the hour figures will flash, and the indicator for clock "S" will light.
- Turn "Q" to adjust the hour figures, the input time should be within 0--23.
- Press "O", the minute figures will flash.
- Turn "Q" to adjust the minute figures, the input time should be within 0--59.
- Press "O" to finish clock setting. The indicator for clock "O" will go out, ":" will flash, and the time will light.
4.3 Cooking food
- Press "P100" will flash.
- Then turn "Q" to select the power, "P100", "P80"... and "P10" will display in order.
- Press "..." to confirm, and then turn "..." to select the cooking time.
- Press "▶" to start cooking.

Example: If you want to use 80% microwave to cook food for 20 minutes, you can operate the oven as the following steps.
- Press "∑", the screen display "P100".
- Turn "O" to adjust 80% microwave power until the oven displays "P 80".
- Press "☑" to confirm, the screen displays "P 80".
- Turn "O" to adjust the cooking time until the oven displays "20:00".
- Press "▶" to start cooking or press "→|" to cancel the settings.
The step quantities for the adjustment time of the coding switch are as follows:
| 0---1 min | 5 seconds |
| 1---5 min | 10 seconds |
| 5---10 min | 30 seconds |
| 10---30 min | 1 minute |
| 30---95 min | 5 minutes |
"Microwave" Pad instructions
| Order | Display | Microwave Power |
| 1 | P 100 | 100% |
| 2 | P 80 | 80% |
| 3 | P 50 | 50% |
| 4 | P 30 | 30% |
| 5 | P 10 | 10% |
4.4 Pre-Set cooking
Set the clock first. (Consult the instruction of clock setting.)

Example: If you want to use 80% microwave to cook food for 15 minutes, you can operate the oven as the following steps.
- Press "P100", the screen displays "P100".
- Turn "O" to adjust 80% microwave power until the oven displays "P 80".
- Press "☑" to confirm, the screen displays "P 80".
- Turn "O" to adjust the cooking time until the oven displays "15:00".

Please do not press "→|" to start cooking.
- Press "S", the hour figures will flash, and the indicator "S" will light.
- Turn "O" to adjust the hour figures, the input time should be within 0--23.
- Press "O", the minute figures will flash.
- Turn "Q" to adjust the minute figures, the input time should be within 0--59.
- Press "▶" to finish setting. The indicator for clock "①" will flash. If the door is closed, buzzer will ring twice when the time starts automatically and the indicator for clock "②" will go out.
4.5 Defrost by weight
- Press "press" button. The screen will display "dEF1", "press" and "press" will light.
- Turn "O" to select the weight of food. The weight is from 100 to 2000 g.
- Press "▶" to start defrosting food. "▶" and "▶" will flash.
4.6 Defrost By Time
- Press "..." button. The screen will display "dEF2", "..." and "..." will light.
- Turn "Q" to select the cooking time. The MAX. time is 95 minutes.
- Press "▶" to start defrosting food. "▶" and "▶" will flash.
4.7 Multi-section cooking
At most 3 sections can be input for cooking. In multi-section cooking, if one section is defrosting, then defrosting shall be placed in the first section.

Example: If you want to use “20 minutes of 100% microwave power + 5 minutes of 80% microwave power” to cook food.
- Press "pad, the screen displays "P100".
- Press "∑" to confirm the microwave power.
- Turn "Q" to select cooking time.
- Press "pad, the screen displays "P100".
- Turn "Q" to select 80% microwave power.
- Press "pad, then turn " to select cooking time of 80% microwave power.
- Press "▶" to start cooking or press "→|" to cancel the setting.
4.8 Start/Quick start
When the oven is in the waiting state, press "▶" to start cooking food with full microwave power for 1 minute. Each press will increase one minute. The maximum cooking time is 95 minutes.
4.9 Auto menu

Example: If you want to use "Auto Menu" to cook fish of 250 g.
- Press "三", "和A" will light.
- Turn "Q" to select the function you want.
- Press "B" button to confirm.
- Turn "h" to select the weight of fish. "g" will light.
- Press "▶" to start. "g" will go out, "☑" and "A" will flash.
The automatic menu procedure:
| Menu | Order | Weight | Display |
| A-1 Auto Reheat | 1 | 200 g | 200 g |
| 400 g | 400 g | ||
| 600 g | 600 g | ||
| A-2 Vegetable | 2 | 200 g | 200 g |
| 300 g | 300 g | ||
| 400 g | 400 | ||
| A-3 Fish | 3 | 250 g | 250 g |
| 350 g | 350 g | ||
| 450 g | 450 g | ||
| A-4 Meat | 4 | 250 g | 250 g |
| 350 g | 350 g | ||
| 450 g | 450 g | ||
| A-5 Pasta | 5 | 50 g (with water 450ml) | 50 g |
| 100 g (with water 800ml) | 100 g | ||
| A-6 Potato | 6 | 200 g | 200 g |
| 400 g | 400 g | ||
| 600 g | 600 g |
4 Operating your product
| A-7 Reheat Pizza | 7 | 200 g | 200 g |
| 400 g | 400 g | ||
| A-8 Soup | 8 | 200 ml | 200 ml |
| 400 ml | 400 ml |
4.10 Child Lock Function
Lock: In waiting state, press "→" for 3 seconds, there will be a long beep denoting entering the children-lock state and oven will display "C" and "□".
Lock quitting: In locked state, press "→" for 3 seconds, there will be a long "beep" denoting that the lock is released.
4.11 Inquiring Function
- In microwave state, press "☑", the current power will be displayed for 4 seconds. After 4 seconds, the oven will turn back to the former state;
- In cooking state, press "S" to inquire the present time and the time will flash for 4 seconds.
- In preset state, press "S" to inquire the preset time and it will flash for 4 seconds.
5.1 Cleaning
| WARNING: Never use gasoline, solvent, abrasive cleaning agents, metal objects or hard brushes to clean the appliance. | |
| WARNING: Never immerse the appliance or its power cable in water or in any other liquid. |
- Turn the appliance off and disconnect it from wall socket.
- Wait for the appliance to completely cool down.
- Keep the inside of the oven clean. Wipe with a damp cloth when splashed food or spilled liquids stick on the walls of the oven. A mild detergent may be used if the oven gets very dirty. Avoid using sprays and other harsh cleaning agents as they may cause stains, marks, and opaqueness on the door surface.
- Outer surfaces of the oven must be cleaned with a damp cloth. Do not allow water ingress from ventilation openings to prevent damage to the operating parts in the oven.
- Wipe both sides of the door and the glass, door gaskets and parts near the gaskets frequently with a damp cloth in order to remove the overflowing and splashing stains. Do not use abrasive cleaning agents.
- Do not allow control panel to get wet. Clean with a soft damp cloth. Leave the door of the oven open to prevent inadvertent operation while cleaning the control panel.
- If steam accumulates inside or around the oven door, wipe with a soft cloth. This may occur when the microwave oven is operated under high humidity conditions. It is normal.
- In some cases, you may need to remove the glass tray for cleaning. Wash the tray in warm soapy water or in a dishwasher.
- The roller ring and oven floor should be cleaned regularly to avoid excessive noise.
- It would be sufficient to wipe the lower surface of the oven with a mild detergent. Roller ring may be washed in warm soapy water or in a dishwasher. When you remove the roller ring from oven internal floor for cleaning, ensure that you install it in the correct position while replacing it.
- In order to remove bad odors in your oven, put a glass of water and juice and peel of a lemon to a deep bowl suitable for use in microwave and operate the oven for 5 minutes in microwave mode. Wipe thoroughly and dry with a soft cloth.
- Please contact the authorized service when the oven lamp needs to be replaced.
- The oven should be cleaned regularly and any food deposits should be removed. If the oven is not kept clean, this may cause surface defects that would affect the lifecycle of the appliance negatively and that would possibly cause risks.
- Please do not dispose this appliance with household waste; old ovens shall be disposed to special waste centers provided by the municipalities.
- When the microwave oven is used in grill function, a small amount of smoke and odor may occur which will disappear after a certain time of usage.
5.2 Storage
- If you do not intend to use the appliance for a long time, please store it carefully.
- Please make sure that the appliance is unplugged, cooled down and totally dry.
- Store the appliance in a cool and dry place.
- Keep the appliance out of the reach of children.
6 Troubleshooting
| Normal | |
| Microwave oven interferes with TV reception | Radio and TV reception may be interfered when microwave oven is operating. It is similar to the interference caused by small electrical appliances, like mixer, vacuum cleaner, and electric fan. It is normal. |
| Oven light is dimmed | In low power microwave cooking, oven light may be dimmed. It is normal. |
| Steam accumulating on door, hot air coming out of vents | During cooking, steam may arise from the food. Most of this steam will get out from vents. But some may accumulate on a cool place like oven door. It is normal. |
| Oven started accidentally with no food in it. | It is not allowed to run the appliance without any food inside. It is very dangerous. |
| Problem | Possible Reason | Solution |
| Oven cannot be started. | 1) Power cable is not plugged in properly. | Unplug. Then plug again after 10 seconds. |
| 2) Fuse is blown or circuit breaker is activated. | Replace fuse or reset circuit breaker (repaired by professional personnel of our company). | |
| 3) Trouble with outlet. | Test the outlet with other electrical appliances. | |
| Oven does not heat. | 4) Door is not closed properly. | Close the door properly. |
| Glass turntable makes noise when microwave oven operates | 5) Turntable and bottom of the oven is dirty. | Refer to “Cleaning and Maintenance” section to clean dirty parts. |
Dear customer,
4.8 Start/Quick start
When the microwave oven is connected to the power supply, the display will show "0:00", and the buzzer will ring once.
1. Press the " " button, the clock digits will flash, and the clock indicator " " will light up.
2. Turn the knob to set the hour digits. The entered time should be within the range of 0-23. 3. Press "S", the minute digits will flash. 4. Turn the knob to set the minute digits. The entered time should be within the range of 0-59. 5. Press "S" again to finish setting the clock. The clock indicator "S" will disappear, ":" will flash, and the time will be displayed.
4.3 Cooking food
1. Press the " " button, "P100" will flash. 2. Turn the knob to select the power level. "P100", "P80"... and "P10" will be displayed alternately. 3. Press " " to confirm, then turn the knob to select the cooking time. 4. Press " " to start cooking.

Example: If you want to use 80%
Microwave power to cook food for 20 minutes, you can operate the microwave oven as follows.
1. Press " ", the display will show "P100". 2. Turn the knob to set the microwave power level to 80%, and the display will show "P80". 3. Press " " to confirm, the display will show "P80". 4. Turn the knob to set the cooking time until the display shows "20:00". 5. Press " " to start cooking, or press " " to cancel the setting.
| 0---1 min | 5 sekyндii |
| 1---5 min | 10 sekyндii |
| 5---10 min | 30 sekyндii |
| 10---30 min | 1 минута |
| 30---95 min | 5 минутуи |
Parts of the microwave oven ("Microwave")
| Hapeи | Прinksхи | Миробравова мokhoeст |
| 1 | P 100 | 100% |
| 2 | P 80 | 80% |
| 3 | P 50 | 50% |
| 4 | P 30 | 30% |
| 5 | P 10 | 10% |
4.4 Setting the timer
First, set the timer. (See the section on setting the timer.)

Example: If you want to use 80%
microwave power to cook food for 15 minutes, you can operate the microwave in the following way.
1. Press the button, the display shows "P100". 2. Turn the dial to set the microwave power to 80%, until the display shows "P 80". 3. Press the button to confirm, the display shows "P 80". 4. Turn the dial to set the cooking time, until the display shows "15:00".

Never press the button to start cooking.
5. Press the button, the timer digits will blink, and the indicator light will turn on. 6. Turn the dial to set the timer digits, the entered time should be within the range of 0-23. 7. Press the button, the minute digits will blink. 8. Turn the dial to set the minute digits, the entered time should be within the range of 0-59.
9. Press the button to finish the setting. The timer indicator will blink. If the door is closed, the buzzer will sound twice, the time will start automatically, and the timer indicator will disappear.
4.5 Defrosting by weight
1. Press the button. The display shows "dEF1". 2. Turn the dial to select the weight of the food. The weight is from 100 to 2000 g. 3. Press the button to start defrosting. The indicator will blink.
4.6 Defrosting by time
1. Press the button. The display shows "dEF2", and the indicator will light up. 2. Turn the dial to select the defrosting time. The maximum time is 95 minutes. 3. Press the button to start defrosting. The indicator will blink.
4.7 Cooking multiple dishes
Moxat da ce Bhecat HajMHory 3 deNa 3a roTBeHe. Kaj roTbeHcTo Ha noBeKe DeIOBn, aKo eDen DeJ ce Odmp3HyBa, TORaW Odmp3HyBaHcTo Ke 6nDe CTabeHo BO npBnot JeI.

Example: If you want to use "20 minutes 100% microwave power + 5 minutes 80% microwave power" for cooking food.
1. Press the "Tile" and the display will show "P100". 2. Press "" to confirm the microwave power. 3. Turn "" to select the cooking time. 4. Press the "Tile" and the display will show "P100". 5. Turn "" to select 80% microwave power. 6. Press the "Tile" and then turn "" to select the cooking time with 80% microwave power. 7. Press "" to start cooking or press "" to cancel the setting.
4.8 Quick start
When the oven is in standby mode, press "" to start cooking food with the set microwave power for 1 minute. With each press, the time will increase by 1 minute. The maximum cooking time is 95 minutes.
4.9 Auto Menu

Example: If you want to use "Auto Menu" for cooking fish of 250 g.
1. Press "" and "A" will light up. 2. Turn "" to select the function you want. 3. Press the knob to confirm. 4. Turn "" to select the weight of the fish. "g" will light up. 5. Press "" to start. "g" will flash.
Decor for auto menu:
| Мени | НаPECи | Текина | Прinksки |
| A-1 АВТOMATСКО побраве | 1 | 200 g | 200 g |
| 400 g | 400 g | ||
| 600 g | 600 g | ||
| A-2 Зеленчuk | 2 | 200 g | 200 g |
| 300 g | 300 g | ||
| 400 g | 400 | ||
| A-3 Риба | 3 | 250 g | 250 g |
| 350 g | 350 g | ||
| 450 g | 450 g | ||
| A-4 Месо | 4 | 250 g | 250 g |
| 350 g | 350 g | ||
| 450 g | 450 g | ||
| A-5 Тechтейни | 5 | 50 g (co вota 450 ml) | 50 g |
| 100 g (co вota 800ml) | 100 g | ||
| A-6 Komпир | 6 | 200 g | 200 g |
| 400 g | 400 g | ||
| 600 g | 600 g | ||
| A-7 Побравальец на пица | 7 | 200 g | 200 g |
| 400 g | 400 g | ||
| A-8 Сuya | 8 | 200 ml | 200 ml |
| 400 ml | 400 ml |
4.10 Function for ending cooking
Ending: In standby mode, press (\longrightarrow) for 3 seconds, a long beep will sound, which indicates entering the end cooking mode, and the display will show (\text{[} \text{[} \text{[} \text{[} \text{[} \text{[} \text{[} \text{[} \text{[} \text{[} \text{[} \text{[} \text{[} \text{[} \text{[} \text{[} \text{[} \text{[} \text{[} \text{[} \text{[}
To cancel the end cooking: In the end cooking mode, press "" for 3 seconds, a long beep will sound, which indicates that the end cooking is cancelled.
4.11 Function for checking
1. In microwave mode, press "", the current power will be shown on the display for 4 seconds. After 4 seconds, the microwave will return to the previous state. 2. In cooking mode, press "" to check the current time, and the time will flash for 4 seconds. 3. In the preset program mode, press "" to check the set time, and the time will flash for 4 seconds.
5.1 Cleaning
| ПЕДУРЕДУBAЛБЕ: Hemojte Да Корисптete бензин, pactворвач, абразимвни сретсва За чиренье,metаллни праздмени ТВ рди чеки КORA го чисптete anapаТOT. |
|  | ПЕДУПЕДУBA№E: He ro notonyba起重机 anapatot Или КабелOT BO BODA Или BO Hekoja друга TeuHOCT. |
1. Unplug the appliance and plug it back in, then check the fan. 2. Wait for the appliance to cool down completely. 3. The door seal should always be clean. Wipe the seal with a damp cloth when the appliance is in use. If the seal is very dirty, it can be cleaned with a mild detergent. Do not use abrasive cleaners or sharp objects, as they can damage the surface of the door. 4. The outer surfaces of the microwave must be cleaned with a damp cloth. Do not allow water to enter the ventilation openings to avoid damaging the functional parts of the microwave. 5. Clean the door and the glass on both sides with a damp cloth, the door hinges and the parts near the hinges to remove any dirt that has accumulated from use and splashes. Do not use abrasive cleaning agents.
- Do not allow the control panel to get wet. Clean it with a soft, damp cloth. Leave the microwave door open to prevent it from accidentally turning on while you clean the control panel.
- If steam appears inside the microwave door, wipe it with a soft cloth. This can happen if the microwave is used in conditions of high humidity. This is a normal occurrence. 8. In some cases, you may need to remove the glass tray to clean it. Wash the tray with warm soapy water or in a dishwasher. 9. The turntable ring of the microwave should be cleaned regularly to prevent unpleasant noises. 10. It will be enough to wipe the entire surface of the oven with a mild detergent. The turntable ring can be washed with warm soapy water or in a dishwasher. When you remove the turntable ring from the inside of the microwave to clean it, be careful to put it back in the correct position. 11. To remove unpleasant odors from the oven, place a bowl of water with lemon juice in a deep dish suitable for microwave use and run the microwave for 5 minutes on microwave mode. Wipe it well and then dry it with a dry, soft cloth. 12. Contact the service center when the microwave lamp needs to be replaced.
13. The microwave should be cleaned regularly and all food residues should be removed. If it is not kept clean, the surfaces of the microwave may deteriorate, which can adversely affect the lifespan of the appliance and pose potential risks. 14. Do not dispose of the appliance with household waste; old microwaves should be disposed of at special collection points designated by the local authorities. 15. When the microwave is used with the grill function, a large amount of smoke may be produced, but it will disappear after the microwave has been used for a while.
5.2 Cleaning
When storing the appliance for a long time, carefully pack it. - Make sure the appliance is exclusively for household use. - Store the appliance in a cool and dry place. The appliance should not be exposed to children.
| Hopmaлино | |
| Микробанова та чека го порочува ріпемот на TB | Пріпемот на радио и ТВ може да биde порочен дodeka работи микробанова та чека. Toa e спунно на порочуваъETO ШTO го прешивкуваат малітіе еnéтprочи уреіи, касо ШTO ce микcertи, павосмукалкіte и леничніte Фенови. Toa e hopmaлина nojabа. |
| Сижашиckaраза на микрочьраза в замаглеса | Прі涩 rotve病变с co микробановс co Ниска мокhoeCT, сижашичkaраз може да се замаглі. Toa e hopmaлина nojabа. |
| На враза тс собра паREA, od отворітіе ИЗлergувжeworkК ВОздУХ | ДODEKA ce rotви, od xpaнatura може дa ИЗлergув паREA. Поголемот дeел od паеат яизлесе od OTborpіte. Ho, дeel od Hea може дa се насobende настуда повшинka касо ШTO e враза та на микрочьраза. Toa e hopmaлина nojabа. |
| Микрочьраза понala да пботи сизачно 63храна bohea. | He e dozvolenho anapatot дa paбoting beshхрана bo Hero. Toa e MHORY onacno. |
| ПюбLEM | Можна ручна | Решения |
| Микрочькata не може за почne за павOTи | 1)Елекtrочиnot кабел не e Исправно ручкив стейков. | Извашие то одштесерот. Повторно сставете то по 10 сени. |
| 2)Осигувачot e пегорен ялп пекинувачot e akтувиран. | Заменete то осигувачot ялп ресетираJTе то пекинувачOT (поравен од сTRAпа на струнлися на нашата kompanиJA). | |
| 3)ПюбLEM coштесерот. | Пюверete тоштесерOT с дуги Елекtrочи anapatNi. | |
| Микрочькata не заг徕Вa. | 4)ВразATA He e Исрравно стВорета. | Затворete ja вразATA КAKО StTo Tpe6a. |
| Сто Kahnенata Врлпва п loча Испuystа галсан Зву КдODEka павOTи МИКрочьновATERе чka | 5)Врлвatable п loча и ДНOTO на микрочьката се Нechости. | Пючтajte КAKО ду ГИ Исчincte валданITE DeLOВИ BO роглавjectо "Чисné и одожува". |

Microwave oven
User manual
BM0B17131X
RU
Please read this manual carefully before use!
Dear customer!
Thank you for choosing our product. We hope that you will get the best results from its use: the appliance is manufactured with high quality based on the latest technologies. Therefore, carefully read this user manual and all other accompanying documents before using the appliance. It is recommended to keep this document as a reference for future use. When transferring the device to any other person, include the user manual. Follow all instructions and information in the user manual.
Meaning of symbols
In various sections of this user manual, the following symbols are used:
4.7 Multi-stage cooking
For cooking, you can enter a maximum of 3 stages. When cooking in several stages, if the oven operates in defrost mode, then defrosting should be included in the first stage.

- PLEASE READ THIS MANUAL FIRST
- MEANINGS OF THE SYMBOLS
- CONTENTS
- 1 IMPORTANT SAFETY AND ENVIRONMENTAL INSTRUCTIONS
- IMPORTANT SAFETY INSTRUCTIONS READ CAREFULLY AND KEEP FOR FUTURE REFERENCE
- 1.1 SAFETY WARNINGS
- 1.2 COMPLIANCE WITH THE WEEE DIRECTIVE AND DISPOSING OF THE WASTE PRODUCT
- 1.3 COMPLIANCE WITH ROHS DIRECTIVE
- 1.4 PACKAGE INFORMATION
- 2 TECHNICAL SPECIFICATIONS OF THE PRODUCT
- 2.1 OVERVIEW
- 2.3 INSTALLING THE TURNTABLE
- 3.1 BUILT-IN FURNITURE
- 3 INSTALLATION AND CONNECTION
- 3.2 INSTALL THE OVEN
- 4.1 CONTROL PANEL
- 4.2 CLOCK SETTING
- 4.3 COOKING FOOD
- 4.4 PRE-SET COOKING
- 4.5 DEFROST BY WEIGHT
- 4.6 DEFROST BY TIME
- 4.7 MULTI-SECTION COOKING
- 4.8 START/QUICK START
- 4.9 AUTO MENU
- 4 OPERATING YOUR PRODUCT
- 4.10 CHILD LOCK FUNCTION
- 4.11 INQUIRING FUNCTION
- 5.1 CLEANING
- 5.2 STORAGE
- 6 TROUBLESHOOTING
- 4.4 SETTING THE TIMER
- 4.5 DEFROSTING BY WEIGHT
- 4.6 DEFROSTING BY TIME
- 4.7 COOKING MULTIPLE DISHES
- 4.8 QUICK START
- 4.10 FUNCTION FOR ENDING COOKING
- 4.11 FUNCTION FOR CHECKING
- 5.2 CLEANING
- MICROWAVE OVEN
- PLEASE READ THIS MANUAL CAREFULLY BEFORE USE
- MEANING OF SYMBOLS
- 4.7 MULTI-STAGE COOKING
Brand : BEKO
Model : BMOB17131X - BMOB 17131 X
Category : Microwave