
ERDV165-55S3 - Fridge ESSENTIELB - Free user manual and instructions
Find the device manual for free ERDV165-55S3 ESSENTIELB in PDF.
| Product type | Combined refrigerator-freezer |
| Brand | ESSENTIELB |
| Model | ERDV165-55S3 |
| Climate class | SN (10°C to 32°C), N (16°C to 32°C), ST (16°C to 38°C), T (16°C to 43°C) |
| Power supply | 220-240 V, 50 Hz |
| Main functions | Independent temperature adjustment for refrigerator and freezer, automatic defrost, LED lighting, reversible door |
| Refrigerator capacity | Not specified (standard combined type) |
| Freezer capacity | Not specified (4-star compartment) |
| Estimated dimensions (H x W x D) | 170 x 60 x 65 cm |
| Estimated weight | Approximately 50 kg |
| Materials | Exterior in steel and plastic, glass shelves |
| Included accessories | Ice cube tray, vegetable crisper, door bins, adjustable shelves |
| Maintenance and cleaning | Regular cleaning with a soft cloth and mild detergent, automatic freezer defrost, do not use abrasive products |
| Safety | Disconnect before cleaning, do not repair yourself, use original parts, risk of electric shock |
| Warranty | 5 years (spare parts available during this period) |
| Spare parts and repairability | Original spare parts available for 5 years, professional intervention recommended |
| Regulatory information | Compliant with WEEE directive, energy label available at eprel.ec.europa.eu |
Frequently Asked Questions - ERDV165-55S3 ESSENTIELB
User questions about ERDV165-55S3 ESSENTIELB
0 question about this device. Answer the ones you know or ask your own.
Ask a new question about this device
Download the instructions for your Fridge in PDF format for free! Find your manual ERDV165-55S3 - ESSENTIELB and take your electronic device back in hand. On this page are published all the documents necessary for the use of your device. ERDV165-55S3 by ESSENTIELB.
USER MANUAL ERDV165-55S3 ESSENTIELB
You can find information on the appliance model in the following Internet product database by searching for your model ID. The model ID can be found on the energy label:
https://eprel.ec.europa.eu/
The service life of your appliance is 5 years. During this period, original spare parts will be available to ensure proper operation of the appliance.
Link to the manufacturer's website where the information referred to in point 4a of the appendix to Commission Regulation (EU) 2019/2019 can be found:
https://www.boulanger.com/info/assistance/
installation of your new appliance
Please read the following tips before using your appliance for the first time.
WARNING!
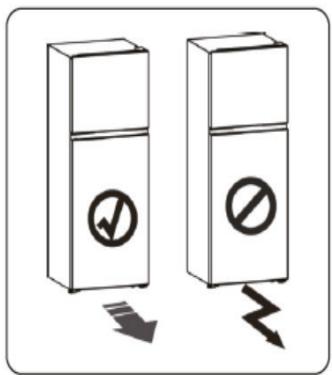
For proper installation, the refrigerator should be placed on a flat and stable surface. This surface must be strong enough to support a fully loaded refrigerator.
The adjustable feet are not casters and should only be used to move the appliance forwards and backwards. Moving the refrigerator sideways can damage the floor and the adjustable feet.
Ventilation of the appliance
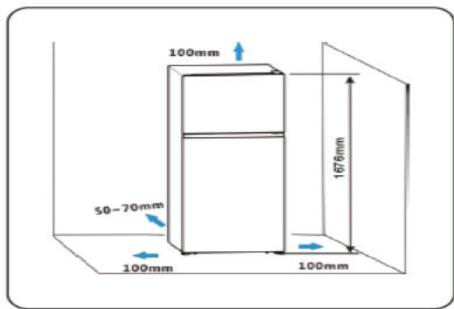
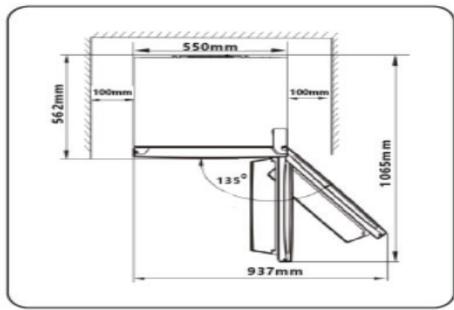
To improve the efficiency of the cooling system and save energy, you must leave enough ventilation space around the appliance to dissipate heat generated by it. Leave sufficient space around the refrigerator: It is recommended to leave at least 50 - 70mm between the wall and the back of the appliance, 100mm above and to the sides, and sufficient space in front to allow the door to open to 135 degrees, as shown below:
Note: This appliance works ideally in the climates indicated in the table below.
| Climate class | Room temperature |
| SN | +10 °C to +32 °C |
| N | +16 °C to +32 °C |
| ST | +16 °C to +38 °C |
| T | +16 °C to +43 °C |
It may not operate properly at temperatures above or below those indicated.
Install your appliance in a dry place.
- Keep the appliance out of direct sunlight, rain or frost, and install away from heat sources such as hotplates or radiators.
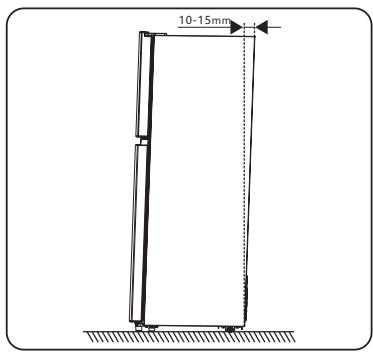
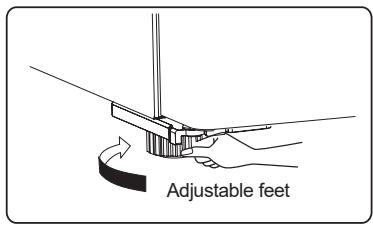
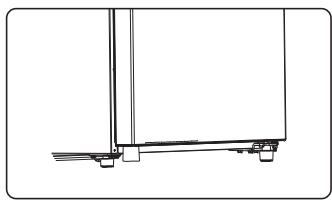
Levelling the appliance
- The feet can be adjusted to level the appliance and ensure proper air circulation at the back of the refrigerator. You can adjust the feet manually or using a spanner.
- To allow the door to close automatically, tilt the top slightly by about 10 - 15mm
Note:
If you need access to the underside of the refrigerator, you can tilt it backwards. It should be placed on a padded surface or similar material to avoid damage to the rear panel of the refrigerator.
It is not necessary to install the parts listed below under normal conditions of use.
Only for use under extreme circumstances: If, for example, the door is open to about 90 degrees, the refrigerator may be at risk of tipping over.
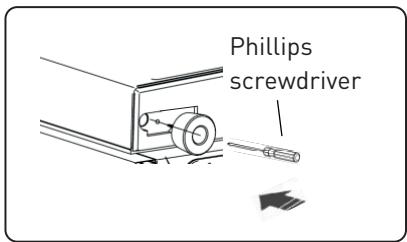
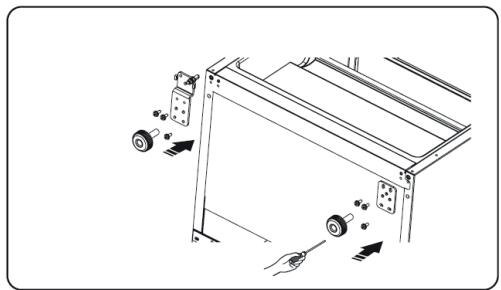
Please follow the following procedure to stabilise the appliance by attaching the rubber support foot to the underside of the appliance.
- Tilt the appliance to locate the hole under the door.
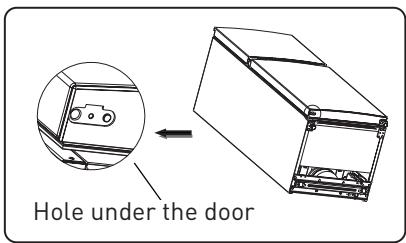
- Pass the screw through the rubber support foot.
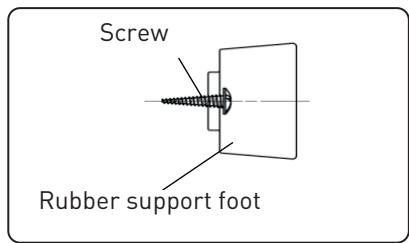
- Screw the assembly under the door using a Phillips screwdriver.
Reversing the opening direction of the doors
If necessary, you can change the direction that your refrigerator doors open. To make these changes, remove all shelves from inside the appliance and from the doors, the fruit and vegetable compartment and all accessories, then proceed in order as shown below or contact a qualified professional.

IMPORTANT:
Unplug the appliance from the electrical outlet when reversing the direction that the doors open.
Tools required:
| 8 mm socket spanner | Phillips screwdriver | |
| Flat head screwdriver | Adjustable spanner 8 mm spanner | |
Reversing the opening direction of the door
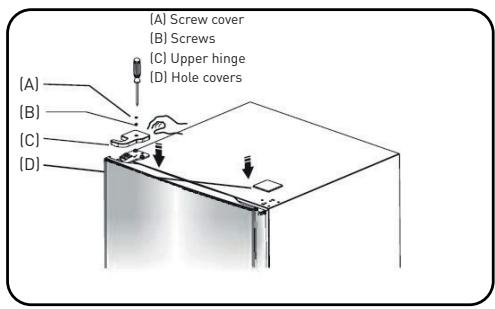
- Remove the screw cover (A) from the freezer door, located on the top of the appliance, then unscrew the screw (B) and the top right hinge (C). Using a flat-blade screwdriver, remove the hole cover (D) on the top left of the appliance.
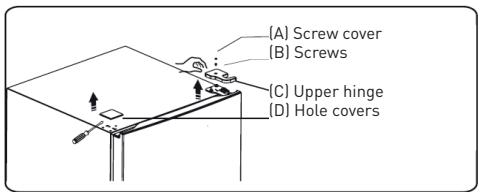
- While holding the freezer door to prevent it from falling out, unscrew the hex screws (E) securing the top hinge (C).

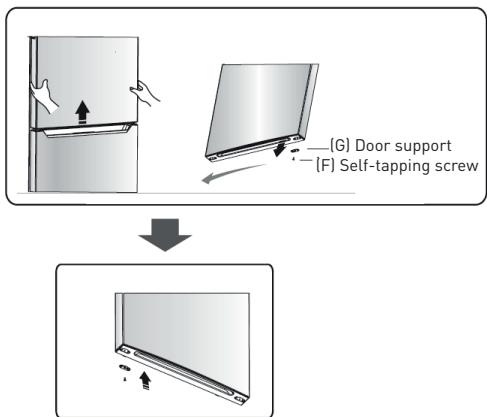
- Lift and remove the freezer door and place it on a soft surface with the outside face up to avoid scratches. Then unscrew the self-tapping screws (F), remove the door bracket (G) and install items (F) and (G) on the other side of the appliance.
- Unscrew the screws (H) securing the intermediate hinge (I) and remove the hinge. Lift the refrigerator door slightly to remove it.
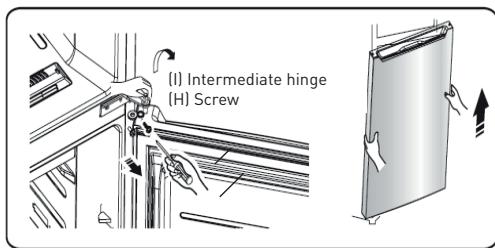
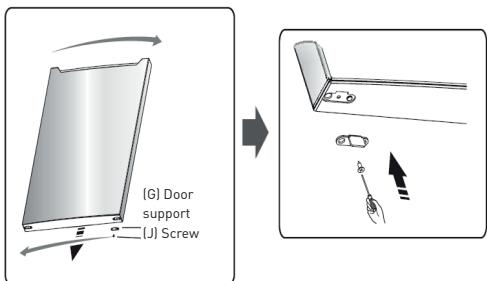
- Place the refrigerator door on a soft surface to avoid scratches, with the outside face up. Then unscrew the screws (J), remove the door bracket (K) and install items (J) and (K) on the other side of the appliance.
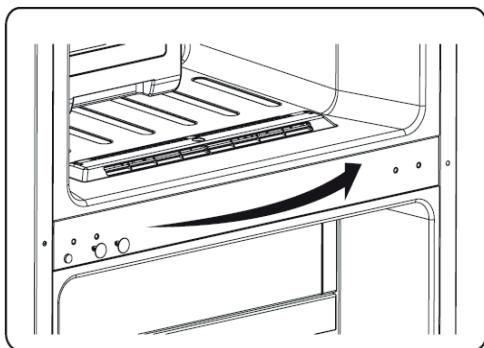
- Remove the hole covers on the appliance and place them on the opposite side.
- Place the refrigerator on the floor on its back and remove the left front foot (L). Unscrew the self-tapping screws (M), then remove the metal plate (N) and the lower hinge (O).
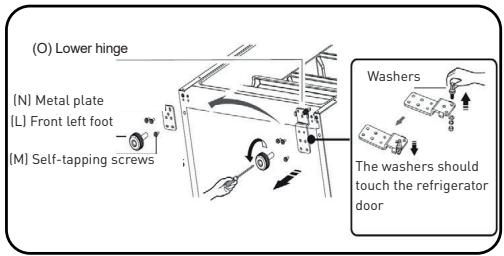
- Reinstall these parts on the opposite side of the refrigerator.
- Replace the refrigerator door and align it with the lower hole and lower pivot pin. Rotate the intermediate hinge 180^ , place the washers on the upper axis, adjust and fix the intermediate hinge.

- Screw in the upper pivot pin, turn the upper hinge 180^ and secure it.

- Place the screw cover (A) from the left-hand side top hinge (C), secure it with the screws (B) and install the cover (D) over the remaining hole on the right-hand side.
- Open the freezer and refrigerator door, replace the shelves and accessories, and reconnect the electrical supply.
Appliance control buttons
Use your appliance taking the following controls into account. Your appliance has the functions and modes shown in the illustrations below.
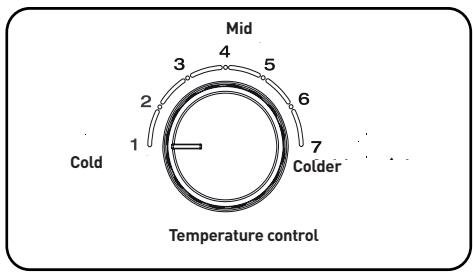
Temperature control
- Insufficient refrigeration: Set the temperature control to a colder setting.
- Normal use of the refrigerator: Set the temperature control to 5.

IMPORTANT:
High room temperatures (e.g. in summer) and low temperature settings can lead to continuous operation of the compressor!
We do not recommend turning the temperature control to "Colder" or "Cold" under normal conditions. This is because when the ambient temperature is high, the compressor must run continuously to keep the appliance's temperature low.
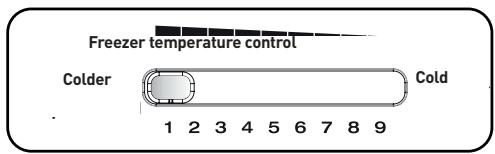
Freezer temperature control
The temperature control allows you to adjust the temperature inside the freezer.
- If you have a lot of food to freeze: Turn the temperature control to the "Colder" position.
- Under normal conditions: Set the temperature control to 4.
- If you don't have a lot of food to freeze: turn the temperature control to the "Cold" position.
IMPORTANT:
We do not recommend setting the temperature control to the "Colder" or "Cold" position under normal conditions.

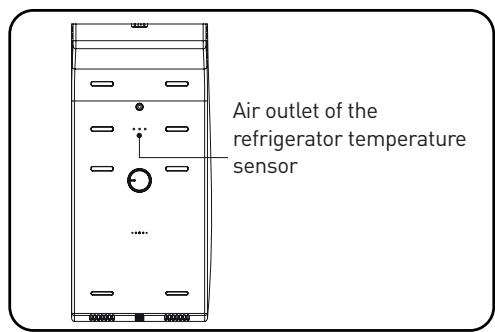
IMPORTANT:
Do not place too much food directly against the air outlet of the temperature sensor as this may affect the operation of the appliance.

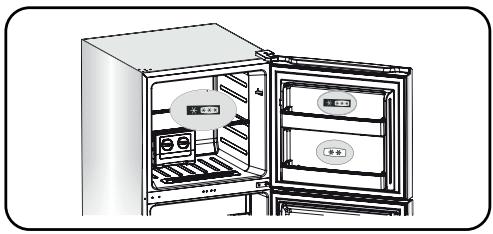
IMPORTANT:
If 2 or 4 stars appear on the top door, the freezer compartment is divided into two sections. One will correspond to the 2-star compartment and the other to the 4-star section, as shown below.
USING THE APPLIANCE
Your appliance is equipped with the accessories listed in the section, "Description of the appliance". The following instructions will help you to use them correctly.
Door shelves
- Door shelves are suitable for storing eggs, bottled or canned drinks, packaged foods, etc. Do not store any heavy items in this area.
- The intermediate compartment can be placed in different places according to your needs. Please remove the food before repositioning it.
Note: Egg racks are available in the upper compartment and bottle holders in the lower compartment.
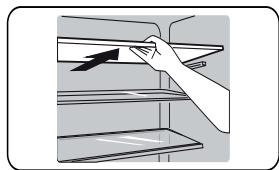
Refrigerator shelves
- The shelves in the refrigerator can be removed for cleaning.
Cool zone drawer (not available on some models)
-
The temperature is 2 to 3^ lower than in the rest of the refrigerator.
-
This area is intended for storing fish, meat or other perishable foods.
Vegetable compartment (crisper) door (not available on some models)
- It controls the temperature and humidity of the crisp.
Vegetable crisper
- It is intended for the storage of fruit and vegetables.
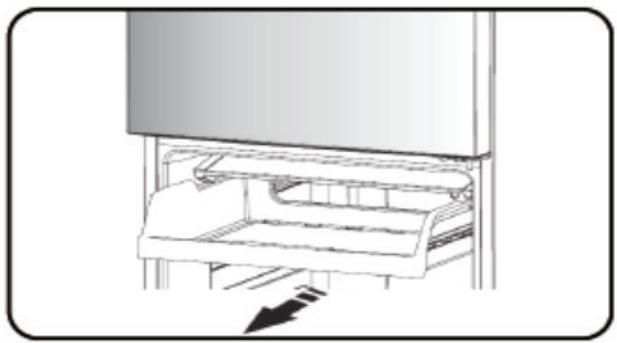
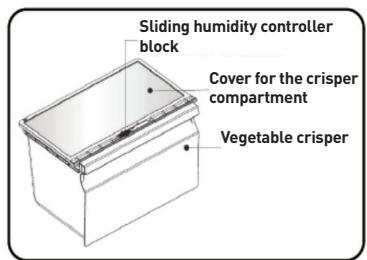
The vegetable crisper and humidity control (not available on some models)
- Mounted on a sliding extension, the crisper is designed to store vegetables and fruit. Adjust the humidity using the sliding adjustment block.
- The sliding adjustment block on the crisper can be moved to cover or uncover the ventilation holes. More ventilation means less moisture. Conversely, less ventilation will lead to more moisture.
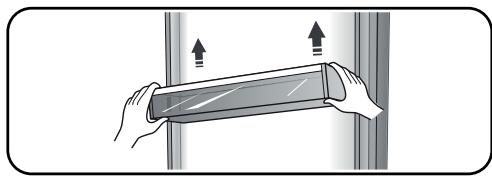
- We recommend increased humidity for vegetables and reduced humidity for fruit.
- To remove the crisper, pull it towards you and then lift it. Don't forget to take all the food out first. Be sure to push the runners back in completely once the drawer has been removed.
temperature indicator
To help set the temperature correctly, your appliance's temperature sensor is located in the coldest zone.
For proper food storage in your refrigerator and particularly in the coldest zone, make sure the temperature indicator displays "OK"
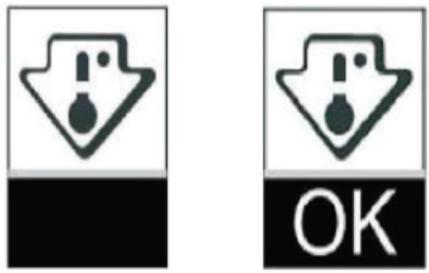
The symbol above
indicates the top of the coldest area in your refrigerator.
If "OK" does not appear, the average temperature of the zone is too high. Set the thermostat to a colder setting.
Whenever you change the temperature thermostat setting in the appliance, wait for the temperature to stabilise before making any further changes. Change the thermostat position only gradually and wait at least 12 hours before rechecking.
NOTE: After loading the appliance with fresh food or opening the door repeatedly or leaving it open for a prolonged period, it is normal that the word “OK” does not appear in the temperature indicator; Wait at least 12 hours before readjusting the thermostat.
Energy-saving advice
Follow the energy-saving guidelines below:
- In order to conserve energy, try not to leave the door open for too long.
- Make sure that the appliance is located away from any source of heat (direct sunlight, electric heating, kitchen utensils, etc.)
- Do not set the appliance to a colder temperature than necessary.
- Do not store hot food or liquids that will evaporate in the appliance.
- Place the appliance in a well-ventilated room free of moisture. Please refer to the section on installing your appliance.
- Follow the recommendations in the illustration for the position of shelves and compartments in the appliance. These are the ideal positions to save energy.
Hints for fresh food refrigeration
- Do not place hot food directly in the refrigerator or freezer, as this would increase the inside temperature, making the compressor work harder and therefore consume more energy.
- Cover or wrap food, especially if it has a strong flavour.
- Position food in the refrigerator correctly so that air can circulate freely.
Refrigeration Tips
- Meat (all types):
Wrap and place on the glass shelf above the vegetable crisper.
Cooked food, cold dishes, etc.:
Cooked and cold food should be covered and may be placed on any shelf.
- Fruit and vegetables:
Should be kept in the compartment provided for this purpose.
Butter and cheese:
Wrap them in aluminium foil or cling film.
Milk:
Keep in the door compartments.
Freezing Tips
- Before plugging the appliance into the electrical outlet for the first time, please leave it to remain static and upright for two hours if it was transported in the upright position, or 24 hours if it was transported horizontally. This is to allow the refrigerant gas to settle back down into the compressor. Not respecting this waiting period may damage the compressor.
- Prepare food in small portions so that it will freeze quickly and so that only the required amount can be defrosted.
- Wrap in aluminium foil or cling film.
- Do not allow fresh food to come into contact with already frozen food as this may increase the temperature of the frozen food.
- Frozen products can cause cold burns if consumed immediately after removing them from the freezer.
- It is recommended to date all frozen items, in order to keep track of their shelf life.
Tips for storing frozen food.
- Make sure that the frozen product has been properly stored by the vendor.
- Once thawed, frozen food spoils quickly and cannot be refrozen. Do not exceed the storage period indicated by the food manufacturer.
Turning off your appliance
If you need to turn off this appliance for a long period of time, the following steps should be followed to prevent the growth of mould.
- Remove all food.
- Remove the plug.
- Clean and dry the inside of the appliance thoroughly.
- Make sure that the doors remain open to allow air to circulate.
cleaning and maintenance
For reasons of hygiene, the appliance (including the exterior and accessories) must be cleaned regularly (at least once every 2 months).

IMPORTANT:
The appliance must not be plugged in during cleaning. Risk of electrocution!
Turn off and unplug the appliance before cleaning it.
Cleaning the outside of the appliance
To maintain the appearance of your appliance, you should clean it regularly.
- Wipe the display panel with a soft, clean cloth.
- Spray water on the cloth rather than on the surface of the appliance. This ensures a good distribution of moisture on the surface.
- Clean doors, handles and surfaces with a mild detergent, then wipe them down.
Cleaning the inside

IMPORTANT:
Do not use sharp objects as they may scratch surfaces.
Do not use thinner, car detergent, Clorox, ethereal oil, abrasive cleaners or organic solvents such as benzene. They can damage surfaces and catch fire.
Regularly clean the inside of the appliance. It is easier to do this when the appliance is less full. Wipe the inside walls of the freezer with a mild baking soda solution and rinse with warm water, using a sponge or damp cloth. Dry well before replacing shelves and other removable parts. Although this appliance defrosts automatically, a layer of frost may appear on the inside walls of the freezer if the doors are opened frequently or for too long. If the layer of frost is too thick, choose a time when there is little food in the appliance and follow the instructions below:
-
Remove food and compartments, unplug the appliance and leave the door open. Ventilate the room to speed up the defrosting process.
-
When defrosting is complete, clean the freezer as described above.

IMPORTANT:
Do not use sharp objects to remove frost from the freezer compartment.
Do not reconnect and turn the appliance on again until the interior is completely dry.
Cleaning the door seals
Clean the door seals thoroughly. Sticky food and beverages may stick to the appliance and loosen the seals when you open the door. Clean the seals with a mild detergent and warm water. Rinse them and dry them well.

IMPORTANT:
Do not switch the appliance on again until the seals are completely dry.
Replacing the LED strip

IMPORTANT:
The user must not replace the LED strips!
If the LED strip is damaged, contact your dealer's service department. Do not attempt to change the LED strip yourself.
Troubleshooting
If you have any problems with your appliance or if you think it is not working properly, there are a few simple checks that you can make before calling your dealer's service department.

IMPORTANT:
Never attempt to repair the appliance yourself. If the problem persists after checking the points below, contact a qualified electrician, authorised service technician, or the store where you purchased the appliance.
| Problems | Possible causes and solutions |
| The appliance is not working properly. | Check if the power cord is properly connected. |
| Check your electrical supply circuit and fuse - replace it if necessary. | |
| Room temperature is too low. Try raising the room temperature. | |
| To protect the compressor, it is normal for the freezer not to operate during the automatic defrost cycle or for a short period of time after the appliance is turned on. | |
| Odours in the food compartments | The interior of the refrigerator might need to be cleaned. |
| Some foods, containers or packages can cause odours. | |
| Noise of the appliance | The following noises are normal: • Compressor noise when running. • Ventilation noise from the small freezer fan and other compartments. • Gurgling noise similar to boiling water. • Power-on noise during automatic defrost. • Clicking before the compressor starts. |
| Other unusual noises due to the following reasons may require your intervention: • The appliance is not level. • The back of the appliance is touching the wall. Bottles or containers are touching each other. | |
| The motor runs continuously. | It is normal to hear the noise of the motor frequently, it will run even more under the following circumstances: · The temperature settings are colder than necessary. · A large amount of hot food has recently been stored in the appliance. · The temperature outside the appliance is too high. · The doors are open too often and for too long. · If you have just installed the appliance or if you turn it on again after a long period of non-use. |
| There is a layer of frost in the compartment. | Check that the air outlets are not blocked by food and make sure that the stored food provides sufficient ventilation. Make sure the door is locked. For defrosting, please refer to the maintenance and cleaning section. |
| The internal temperature is too high. | You may have left the doors open too long or opened them too often. It is also possible that the doors remain open because of an obstacle, or that there is not enough space around the appliance. |
| The internal temperature is too low. | Increase the temperature as described in the "Appliance controls" section. |
| The doors do not close easily | Check whether the top of the refrigerator is tilted backwards by 10 to 15 mm, allowing the doors to close properly, or whether there is an object inside that prevents the doors from closing. |
| There is water dripping on the floor. | The water tank (located at the rear of the refrigerator) may not be level or the drip pan (located under the top of the compressor) may not be connected properly to the water tank or may be blocked. You may need to pull out the refrigerator to check the tank and drip pan. |
| The light is not working. | · The light may be damaged. Refer to the section on the cleaning and maintenance of LED bulbs. · The control system deactivated the lights because the door stayed open too long. Close the door and reopen it to turn the light back on. |
Recycling this appliance
It is prohibited to dispose of this appliance as household waste.
Packaging
Packaging bearing the recycling symbol is recyclable. Dispose of packaging in the appropriate containers.
Before recycling the appliance
- Pull the plug out.
- Cut the power cord and dispose of it with the main plug.

IMPORTANT:
Refrigerators contain refrigerants and gases. Refrigerants and gases must be professionally disposed of as they can cause eye injury or fire.
Make sure that the refrigerant circuits are not damaged before disposing of the appliance.

INFORMACION

https://eprel.ec.europa.eu/
All information, designs, drawings and pictures in this document are the property of SOURCING & CREATION. SOURCING & CREATION reserves all rights to its brands, designs and information. Any copy and reproduction through any means shall be deemed and considered as counterfeiting.
Protection of the environment
This symbol attached to the product means that it is an appliance whose disposal is subject to the directive on waste from electrical and electronic equipment (WEEE). This appliance may not in any way be treated as household waste and must be subject to a specific type of removal for this type of waste. Recycling and recovery systems are available in your area (waste removal) and by distributors. By taking your appliance at its end of life to a recycling facility, you will contribute to environmental conservation and prevent any harm to your health.
* Tested in our laboratories
Warranty valid from the date of purchase (receipt as proof of purchase). This warranty does not cover defects or damage caused by improper set up, incorrect use, or normal wear and tear of this product.
* Getest in once laboratoria
Please behave responsibly towards the environment. Recycle this product at the end of its life.