
ECAVD185-70B1 - Fridge ESSENTIELB - Free user manual and instructions
Find the device manual for free ECAVD185-70B1 ESSENTIELB in PDF.

| Product type | 4-star upright freezer, convertible to refrigerator |
| Brand | Essentiel b |
| Model | ECAVD185-70B1 / ECAVD185-70V1 |
| Total net volume | 380 L |
| Total gross volume | 424 L |
| Dimensions (H x W x D) | 185.5 x 71 x 77 cm |
| Weight | 85 kg |
| Power supply | 220-240 V ~, 50/60 Hz, 1.1 A |
| Energy class | A++ |
| Annual energy consumption | 311 kWh/year |
| Freezing capacity | 18 kg/24h |
| Power cut autonomy | 18 hours |
| Minimum storage temperature | -18 °C (adjustable, down to -32 °C in fast freeze) |
| Climate class | SN/N/ST/T (from +10°C to +43°C) |
| Refrigerant | R600a (82 g), flammable but eco-friendly |
| Number of stars | 4 stars |
| Defrost | Automatic (frost-free) |
| Interior lighting | LED (replacement by after-sales service) |
| Main functions | Freezing, refrigeration, fast freeze (Fast Freezer), fast cool (Fast Cool), open door alarm, child lock, digital display |
| Supplied accessories | 6 glass shelves, 5 drawers (2 large capacity), ice cube tray, metal handle |
| Maintenance and cleaning | Clean interior with warm water and white vinegar; dust the compressor once a year |
| Safety | Child lock (control panel lock), open door alarm, compressor protection in case of micro-cut |
| Repairability | Spare parts available via after-sales service; repair reserved for qualified technicians |
Frequently Asked Questions - ECAVD185-70B1 ESSENTIELB
User questions about ECAVD185-70B1 ESSENTIELB
0 question about this device. Answer the ones you know or ask your own.
Ask a new question about this device
Download the instructions for your Fridge in PDF format for free! Find your manual ECAVD185-70B1 - ESSENTIELB and take your electronic device back in hand. On this page are published all the documents necessary for the use of your device. ECAVD185-70B1 by ESSENTIELB.
USER MANUAL ECAVD185-70B1 ESSENTIELB
natural_image
Front view of a white stainless steel refrigerator with a digital display and control panel (no visible text or symbols)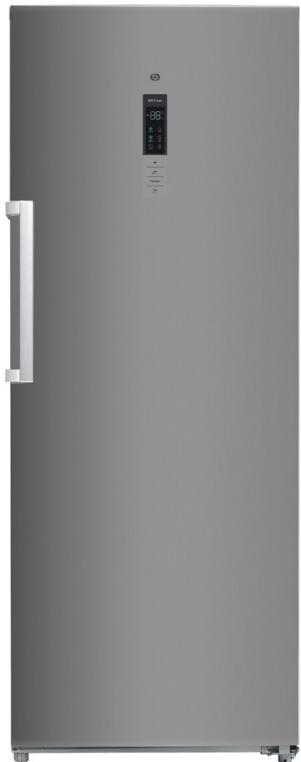
natural_image
Front view of a modern stainless steel refrigerator with a digital display and control panel (no visible text or symbols)To help you get the best out of your purchase
natural_image
Diagram showing directional arrows and curved arrows around a rectangular structure (no text or symbols)
natural_image
3D rendered green mechanical component with mounting holes and a handle (no text or symbols visible)natural_image
3D mechanical assembly diagram showing a green bracket with mounting holes and a tool, no visible text or symbols
natural_image
3D rendered mechanical component with green and blue internal sections (no text or symbols)
natural_image
3D rendering of a smartphone mounted on a wall with visible components and mounting holes (no text or symbols)
natural_image
3D rendering of a server cabinet with open door and shelves (no text or symbols visible)natural_image
3D CAD model of a mechanical assembly with mounting bracket and mounting base (no text or symbols visible)natural_image
3D mechanical assembly diagram showing a bracket with bolts and mounting features (no text or symbols)natural_image
Close-up of a mechanical component with a yellow circular component and a gray handle (no visible text or symbols)natural_image
3D rendering of a two-tone cabinet with purple and cyan panels (no text or symbols)natural_image
3D mechanical assembly diagram showing a yellow bracket with mounting holes and a blue frame (no text or symbols)
natural_image
3D rendering of a mechanical bracket or bracket with two mounting holes, no visible text or symbolsnatural_image
3D rendering of a pipe joint with support structure (no text or symbols visible)natural_image
3D rendering of a mechanical bracket with two side protrusions, shown against a plain background (no text or symbols)natural_image
Diagram showing a structural change between two panels, one with internal components and the other with a rectangular frame (no text or symbols)
natural_image
Simple illustration of a rectangular door with a handle and a vertical line on the top (no text or symbols)Mise en route
12. Touche OK (appui court) / Touche de verrouillage (appui long)
We thank you for purchasing an Essentiel b brand product. We pay special attention to the RELIABILITY, EASE OF USE and DESIGN of our products.
We hope that you will be completely satisfied with this freezer.
contents
instructions 35
product information 43
description of the appliance 45
unpacking 46
Before first use 46
installation 46
Where to install 46
Climate class 47
Correct ventilation 47
Leveling 48
Reversing the direction of the door opening 48
using the appliance 53
Getting started 53
Description of the control panel 53
Making ice 56
helpful tips for use 57
Food storage 57
Energy saving tips 57
Improved food hygiene 58
cleaning and care 59
Cleaning 59
Defrosting 59
troubleshooting guide 60
Noises when in use 60
In the event of a power outage 60
Resolving malfunctions 61
LED interior light 61
instructions
PLEASEREADTHESEINSTRUCTIONSCAREFULLY BEFORE USING THE APPLIANCE AND KEEP THEM FOR FUTURE REFERENCE.
- Should this appliance be sold or transferred to another person, please make sure that the instructions for use are included with the appliance.
Before first use
- Before connecting the appliance to the mains outlet for the first time, leave the appliance standing upright for two hours if it has been transported in a vertical position, or 24 hours if the appliance has been transported in a horizontal position. This will allow the refrigerant gas to flow back down into the compressor. Failure to complete this step could damage the compressor.
Intended Use
- This appliance is intended for home use only.
- It is not intended for use in:
- Staff kitchen areas in shops, offices or other professional environments;
- Farms or use by any clients of hotels, motels and other residential environments;
- bed and breakfast type environments;
- Catering or similar industries, except for retail.
- It is suitable for freezing or storing frozen foods, as well as making ice.
- For safety reasons, please do not alter or attempt to alter the features of this appliance. To do so would pose a danger to you.
Child Safety
- Packaging materials (wrapping paper, polystyrene, etc.) can pose a hazard to children. Beware of choking hazard! Do not leave packaging within reach of children!
- This appliance may be used by children ages 8 and up, and by persons with reduced physical, sensory or mental abilities, or persons lacking in experience or knowledge, provided they have proper supervision or have been given relevant safety instructions for using this appliance, and that any risks involved have been addressed. Children must not play with this appliance. Cleaning and user maintenance should not be carried out by children without adult supervision.
- Children aged from 3 to 8 years are allowed to load and unload refrigerating appliances.
Power cable
- Before plugging in your appliance, make sure that your home power supply voltage matches the information shown on the rating plate.
- This appliance is equipped with a grounded power outlet. It must be connected to a wall outlet equipped with a grounded power outlet that has been correctly installed and connected to the electrical network in accordance with the current applicable standards.
- Ensure the power cable is not being crushed or jammed, especially at the plug, power outlet and appliance connection point.
- When unplugging the cable, always grip the plug to disconnect it. Never pull on the power cable itself.
- If the power cable is damaged, it must be replaced by the retailer, their after-sales services or a person with similar technical qualifications, in order to avoid any danger.
- Do not use an extension cord or power strip.
- Never unplug with wet hands to avoid risking an electric shock.
Daily use
- Always unplug from the power outlet before cleaning or servicing the appliance.
- WARNING: keep all ventilation openings clear inside the appliance and the encasing structure.
- WARNING: do not use any mechanical devices or tools other than those recommended by the manufacturer to speed up the defrosting process.
- WARNING: do not use electrical appliances (e.g. ice-cream makers, mixers, etc.) inside the food storage compartment, unless they are the kind recommended by the manufacturer.
- WARNING: any containers containing flammable gases or liquids may leak at low temperatures. This could cause a risk of explosion! Do not store any containers containing flammable materials such as atomizers, extinguishers, ink cartridges, etc. in this appliance.
-
Bottles and cans should not be stored in the freezer as they may break when their contents freeze. Carbonated drinks may even explode! Never store lemonades, juices, beers, sparkling wines, etc. in the freezer compartment.
-
Do not ingest ice-cream or ice immediately after removing from the freezer. Very cold ice may freeze your lips or tongue and cause injury.
- Do not touch frosted surfaces and frozen products with wet hands and do not consume certain products, such as freeze pops, immediately after their removal from the appliance, as the low temperature they are stored at can causes skin burns.
- Thawed products should never be re-frozen (unless they have been cooked between thawing and re-freezing).
- Do not place heavy objects on top of the appliance.
Food preservation
- For tips on how to maximize the shelf-life of your food, please refer to the corresponding paragraph of this user manual.
To avoid contamination of food, please respect the following instructions:
- Opening the door for long periods can cause a significant increase of the temperature in the compartments of the appliance.
-
Clean regularly surfaces that can come in contact with food and accessible drainage systems.
-
Clean water tanks if they have not been used for 48 h; flush the water system connected to a water supply if water has not been drawn for 5 days.
- Store raw meat and fish in suitable containers in the refrigerator, so that it is not in contact with or drip onto other food.
- Two-star frozen-food compartments are suitable for storing pre-frozen food, storing or making ice-cream and making ice cubes.
- One-, two- and three-star compartments are not suitable for the freezing of fresh food.
- If the refrigerating appliance is left empty for long periods, switch off, defrost, clean, dry, and leave the door open to prevent mould developing within the appliance.
Refrigeration
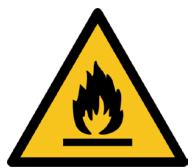
- The refrigeration circuit uses a very environmentally friendly but flammable natural gas (R600a).
- This symbol "Danger; fire hazard/flammable materials" indicates that the refrigerant gas in your appliance is flammable in the event of a leak caused by damage to the appliance.
- Ensure none of the components of the refrigeration circuit have been damaged during the transport and installation of your appliance.
- If the refrigeration system is damaged:
- Keep the device away from any open flames or ignition sources;
- Ensure that the room your appliance is located in has good ventilation.
- WARNING: do not damage the refrigeration circuit.
Installation
- WARNING: to avoid any risk caused by instability of the appliance, make sure it is secured in accordance with the instructions provided.
- WARNING: ensure that the power cord is not jammed or damaged when positioning the appliance.
- WARNING: do not place any portable multi-outlet bases or portable power packs behind the appliance.
Transportation
- Caution - incorrect transportation of the appliance can lead to a risk of injury or damage.
- The appliance must be packaged and secured when being moved. Follow the transportation rules indicated on the packaging. Do not stand the appliance horizontally or at an angle of more than 45^ .
- Before moving or transporting the appliance, ensure you have removed all detachable elements from the appliance (trays, accessories, vegetable bins, etc.) or that you have secured them inside the appliance.
In case of malfunction
- If the appliance is not working properly, please refer to the "TROUBLESHOOTING GUIDE" at the end of this manual. If you find the information in this manual is insufficient, do not attempt to carry out any further repairs yourself.
- Repairs carried out by inexperienced persons can cause injury or serious malfunction. Contact your retailer's after-sales service.
Disposal
- Please dispose of your appliance by taking it to an approved recycling facility. Do not expose appliance to flames.
- Please make sure that all used appliances are rendered unusable before disposing of them. Disconnect and cut the power cable, break or remove the door spring and, if necessary, remove the door screws. By doing so, you will prevent children and/or animals from becoming trapped inside the appliance, for example, when playing (suffocation hazard), or from putting themselves at risk in any other way.
product information
| Designation | Value | Item |
| Make | Essentiel b | |
| Model code | ECAVD185-70b1ECAVD185-70v1 | |
| Category of refrigeration appliance model | 8 - Upright freezer | |
| Article code | 8008222 & 8008223 | |
| Electrical classification | I | |
| Voltage | 220-240 | V ~ |
| Frequency | 50/60 | Hz |
| Current | 1.1 | A |
| Defrosting power | 180 | W |
| Energy efficiency class | A++ | |
| Maximum bulb wattage | 1.32 | W |
Power consumption of 311 kWh per year, based on results obtained from a period of 24 hours under standard testing conditions. The actual power consumption depends on the operating conditions and the location of the appliance.
Climate class: SN/N/ST/T
This device is designed to be used at an ambient temperature between +10^ [lowest temperature] ^ and +43^ [highest temperature].
| Total gross volume | 424 | L |
| Total usable volume | 380 | L |
| Number of stars | 4 | |
Self-sufficiency of 18 hours in case of a power outage
| Freezing capacity | 18 | kg/24h |
| Refrigerant fluid | R600a (82 g) | |
| Foaming agent | C5H10 | |
| Freezer defrosting method | Automatic | |
| Minimum storage temperature* * Pre-programmed or can be manually set by the end-user to a fixed temperature. | -18°C | |
| "Frost free" | Yes | |
| Noise emissions | 40 | dB(A) |
| Overall dimensions (H x W x D) | 185.5 x 71 x 77 | cm |
| Space occupied when in-use (H x W x D) | 185.5 x 129.7 x 140.7 | cm |
| Weight | 85 | kg |
description of the appliance
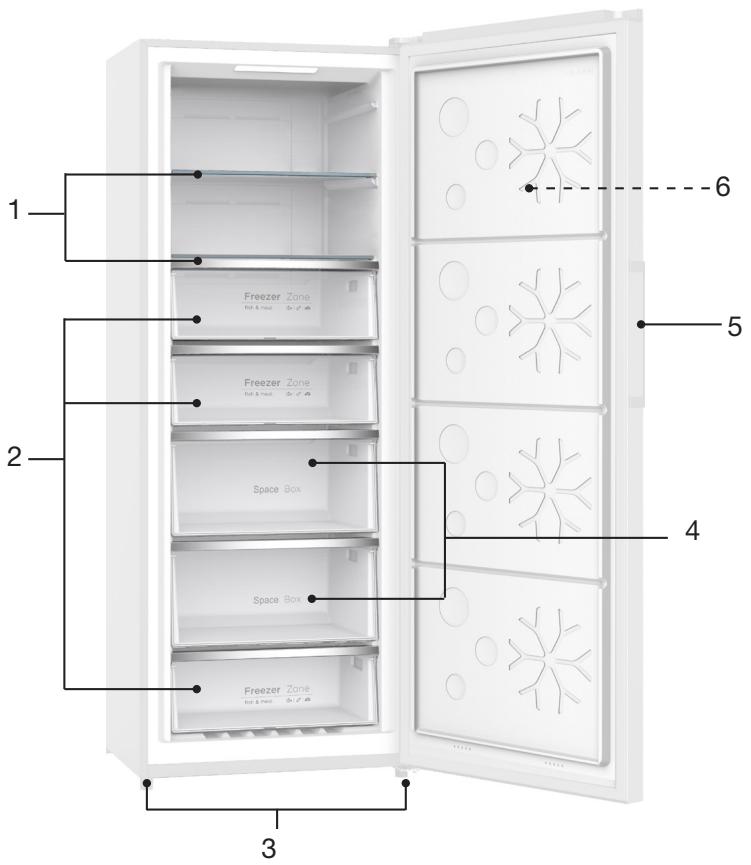
-
Glass trays x 6
-
Standard storage drawers x 3
-
Height adjustable front feet
-
Large storage drawers x 2
-
External metal handle
-
Display screen and control panel on front of door
unpacking
- Remove the transportation packaging.
- Check that the appliance has not been damaged during transport. You should never connect a damaged appliance! If the appliance is damaged, please contact your retailer.
- Remove all adhesive tape and packaging materials from the appliance's interior and exterior.
Before first use
- Clean the interior of the appliance and all accessories provided using warm water and a small amount of white vinegar. Do not use soap or detergent as the smell may persist. After cleaning, make sure to completely dry the appliance.
- You can use mineral spirits to remove any adhesive left on the appliance's exterior.
- You should always disconnect the appliance, or remove the fuses/switch off the circuit breaker when cleaning the appliance.
installation
Where to install
- Position your appliance on a stable, flat surface. Your appliance will become heavy once it has been loaded with food and must be placed on a solid and resistant floor.
- The appliance must be installed in a dry, well-ventilated room at ambient temperature (minimum 10^ and maximum 43^ ).
- The appliance should not be exposed to direct sunlight.
- The appliance should not be exposed to rain.
- The appliance should not be installed next to a radiator, stove or any other heat source.
-
The power consumption and effective functioning of this appliance are affected by the ambient temperature.
-
The appliance must be installed in such a way that the power outlet is still accessible.
- After installation, make sure that the appliance is not resting on its own power cable.
- Leave the appliance in its final location for 2 hours before connecting to the mains. This will allow the refrigerant circuit to stabilize.
- WARNING: to avoid any risk caused by instability of the appliance, make sure it is fixed in place in accordance with the instructions provided.
Climate class
Only install the appliance in a place where the ambient temperature matches the climate class it has been designed for.
The climate class is indicated on the rating plate, which is located on the exterior of the appliance. The below table indicates the appropriate ambient temperature for each climate class:
| Climate class | Ambient temperature |
| SN | From +10 to +32°C |
| N | From +16 to +32°C |
| ST | From +16 to +38°C |
| T | From +16 to +43°C |
Your appliance is rated "SN/N/ST/T". When below or above the indicated ambient temperatures, the performance of your appliance may be affected and there is a risk of food expiration.
Correct ventilation
Make sure that air can always circulate freely around the appliance.
To ensure the proper functioning of your appliance, please do not obstruct the ventilation openings.
When in use, your appliance will give off heat. Be sure to maintain a minimum clearance of 300mm above the appliance, 100mm on each side and 50mm behind the appliance.
If installing your appliance next to another refrigerator or freezer, be careful not to place the two appliances too close to each other in order to prevent any condensation from forming on the exterior of the appliance.
Leveling
Your appliance needs to be leveled in order to prevent it from vibrating when in use. To do this, adjust the front leveling feet to correctly balance the appliance.

natural_image
Diagram showing directional arrows and curved arrows around a rectangular structure (no text or symbols)
Reversing the direction of the door opening
You can change the direction of the door opening of your freezer if necessary. To make this change, follow the indications in the diagrams below in their order, or alternatively contact a qualified professional.

Disconnect the appliance from the power outlet when changing the direction of the door opening.
Note: wiring to connect the control panel to the power supply is located on both sides of the door.
- Unscrew the screws from the upper right hinge cover and remove the cover.

natural_image
3D rendered mechanical component with green and gray parts, no visible text or symbols- Unscrew the three screws from the top right hinge, remove the hinge and set aside.
- Thread the power cable from the control panel through the hole in the door.
- Unscrew the screws from the upper left hinge cover and remove the cover. Remove the wiring harness from the hole and install the sleeve.
- Lift the freezer door by about 50mm to remove it. Place it on a soft surface to avoid any scratches.

natural_image
3D mechanical assembly diagram showing green component with mounting holes and bolts (no text or symbols)
natural_image
3D rendered mechanical component with green and blue internal sections (no text or symbols)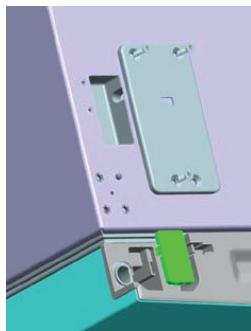
natural_image
3D rendering of a mobile phone module with green and teal components, no visible text or symbols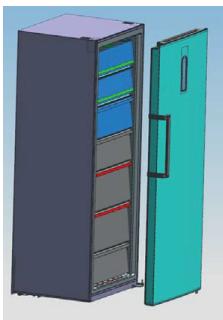
natural_image
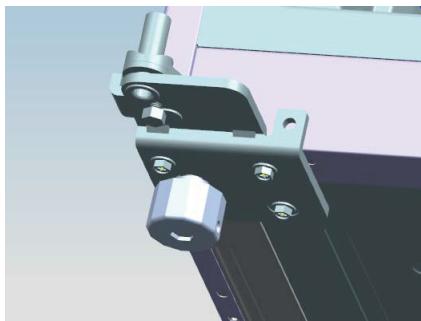
3D rendering of a server cabinet with open door and shelves (no text or symbols visible)- Tilt the appliance backwards. Remove the leveling feet. Make sure to also remove the 4 screws used to secure the right lower hinge and remove the hinge.

natural_image
3D CAD model of a mechanical assembly with mounting bracket and mounting base (no text or symbols visible)- Using the lower left hinge provided, install the hinge on the left-hand side.
natural_image
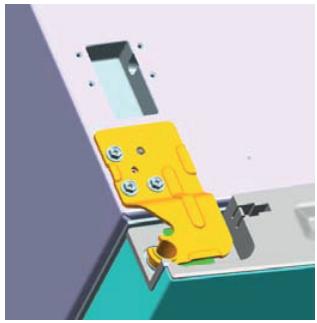
3D mechanical assembly diagram showing a bracket with bolts and a central nut (no text or symbols)- Remove the door stopper and door lock from the right-hand side. Using the left door lock provided, install it on the left-hand side.

natural_image
Close-up of a mechanical component with a yellow handle and circular button (no text or symbols visible)- Replace the feet and reinstall the door.

natural_image
3D rendering of a two-tone refrigerator with front and back panels (no text or symbols)- Using the upper left hinge provided, install it on the left-hand side using the corresponding screws, and reconnect the wiring harness. Replace the cover.
natural_image
3D mechanical assembly diagram showing a yellow bracket with mounting holes and a blue frame (no text or symbols)
natural_image
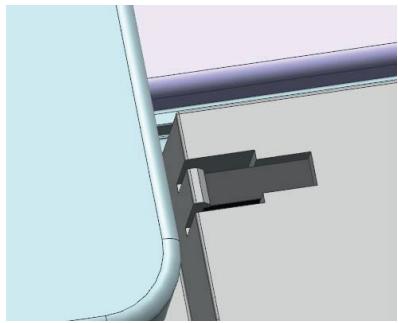
3D rendering of a mechanical bracket or bracket with two mounting holes, no visible text or symbols- Remove the magnet located on the right-hand side of the door and install it on the left-hand side.
natural_image
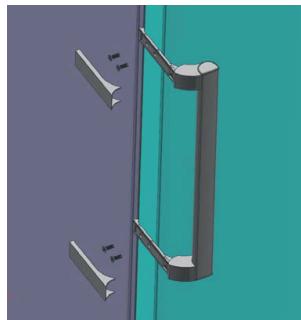
3D rendering of a pipe joint with a bracket and support structure (no text or symbols visible)- Remove the covers from the handle. Unscrew the screws that are used to secure the handle to the door and remove the handle.
natural_image
3D rendering of a mechanical bracket with two side brackets and a vertical guide (no text or symbols)- Install the handle on the left side of the door: rotate it 180^ into a vertical position and secure to the door.
- With the handle now back in place, the door reversal process is complete.

natural_image
Diagram showing a structural change between two panels, one with internal components and the other with a rectangular frame (no text or symbols)
natural_image
Simple illustration of a rectangular door with a handle and a vertical line on the top (no text or symbols)Getting started
- Before connecting the appliance to the mains for the first time, please allow the appliance to stand for 2 hours, which will allow the refrigerant gas to stabilize in the compressor. Failure to complete this step could damage the compressor.
- Connect the appliance to the mains supply.
- Wait at least 2 hours before filling the appliance with any food in order to ensure the appropriate temperature has been reached inside the freezer.
Description of the control panel

- This appliance is equipped with both a refrigerator function and a freezer function. It is controlled by an electronic control panel.
- When plugging in the appliance for the first time, all the icons on the control panel will light up for 2 seconds.
- The appliance is set to operate at a default temperature of -18^ .
- When the door is closed, the control panel will automatically switch off after 3 minutes of inactivity. It will turn back on if you open the door or press one of the buttons.
1. Digital temperature display
Caution:
- When the freezer mode is activated and the inside temperature is more than -10^ , the display temperature will flash.
- If error codes E0, E1, E2, EH, or EC are being displayed, this indicates the appliance is malfunctioning. Please contact your after-sales service.
2. "Freezer" mode indicator
This mode is used to preserve foods such as fish, meat, etc. that need to be stored frozen for long periods of time.
We recommend using this mode and setting the temperature to -18^ for normal everyday use.
3. "Fast Freezer" mode indicator
If you intend to freeze a large amount of fresh produce, select this option just before loading the appliance with this food.
This function allows you to quickly lower the freezer temperature to -32^ . Fast freezing will automatically turn off after 26 hours.
This rapid drop in temperature preserves the nutrients and freshness of your food. It is impossible to change the temperature when this function is enabled.
- To enable this function, the appliance must be in "Freezer" mode.
- Press the function selection button and select the "Fast Freezer" mode. The corresponding icon will flash.
- Then press OK or wait 5 seconds. If you have not pressed the OK button within 5 seconds, the setting will be automatically invalidated.
- To exit this mode, press the function selection button and select the "Fast Freezer" mode. The corresponding icon will flash. Then press the OK button to successfully exit the function.
4. Alarm indicator
If the door is left open for more then 3 minutes, a warning alarm will sound.
- To stop the alarm, press any button. However, if the door remains open after 3 minutes, the alarm will sound again.
• The alarm will only be turned off when the door is finally closed.
5. Display in degrees Celsius or Fahrenheit
6. "Fridge" indicator mode
This mode is used to preserve fresh food such as fruit, vegetables, eggs, milk, etc.
This mode allows you to turn your freezer into a conventional refrigerator when needed. Programmable temperatures range from +2 to +8°C.
7. "Fast Cool" mode indicator
This function allows you to quickly lower the temperature of the appliance to 2^ C. This rapid drop in temperature preserves the nutrients and freshness of your food.
It is impossible to change the temperature when this function is enabled.
• To enable this function, the appliance must be in "Fridge" mode.
- Press the function selection button and select the "Fast Cool" mode. The corresponding icon will flash.
- Then press OK or wait 5 seconds. If you have not pressed the OK button within 5 seconds, the setting will be automatically invalidated.
- To exit this mode, press the function selection button and select the "Fast Cool" mode. The corresponding icon will flash. Then press the OK button to successfully exit the function.
8. Child safety indicator
When the child safety setting is activated, the control panel will remain locked and no changes to the temperature or function can be applied.
When no buttons have been pressed in 3 minutes, the child safety lock will be automatically enabled.
- To manually enable/disable this child safety feature, hold the OK button for 3 seconds.
9. Increase temperature button
- When you press on this button for the first time, the temperature indicator will start to flash.
- Press the button again to increase the temperature in increments of one degree until you reach the desired temperature.
- Then press the OK button to confirm or wait 5 seconds to confirm the setting. We recommend you set the freezer temperature to -18°C for normal and everyday use.
10. Decrease temperature button (short press)/change mode from "Fridge" to "Freezer" mode (long press)
Setting the temperature
- When you press on this button for the first time, the temperature indicator will start to flash.
- Press the button again to decrease the temperature in increments of one degree until you reach the desired temperature.
- Then press the OK button to confirm or wait 5 seconds to confirm the setting. Change mode from "Fridge" to "Freezer" mode
- Press and hold the button for 3 seconds to switch between "Fridge" and "Freezer" mode, or vice versa.
11. Function selection key
12. OK button (short press)/Lock button (long press)
• A short press allows you to confirm your selection.
• A long press enables or disables the child safety lock.
Making ice
- Fill the ice tray provided with cold water up to three-quarters of the way up the tray and place in the freezer. Your ice cubes will be ready in around 2 hours.
- You can easily remove the ice cubes by slightly twisting the tray or pouring tap water over it.
helpful tips for use
Food storage
Your appliance bears the standard "4 stars" * * * * logo, this means that you can use it to preserve frozen food, freeze fresh produce and make ice cubes. Your appliance also offers a refrigeration function.
Always store food in the appliance as soon as possible, making sure to:
• not store too many items in the storage drawers;
- allow air to circulate around each element;
• not store unpackaged food.
Before placing your pre-frozen food in the appliance:
• make sure that it has been properly stored at the purchase point;
- make sure that the product was in good condition when frozen, and that the packaging is intact;
- be sure to place them in the appliance as soon as possible after purchase and transport them in an appropriate container.
Energy saving tips
- Limit the times you open the door to a minimum and don't leave it open too long in order to avoid an increase in temperature.
- Ensure the appliance is kept away from any heat sources (direct sun, electric heating, hot plates, etc.).
- Do not set the temperature to a colder temperature than necessary.
- Make sure that the door is always closed properly and that there are no obstructions preventing it from closing.
Improved food hygiene
- Allow hot dishes to cool before placing in the appliance as not to do so could cause the food to rot.
- Shelf-life depends on the type of food; always refer back to the manufacturer's instructions as indicated on the packet.
- Never consume any food that has exceeded its maximum shelf life, as this presents a risk of food poisoning.
- Do not mix pre-frozen products with fresh produce.
- Do not refreeze foods that have already been thawed. This poses health risks, including food poisoning.
- Prior to freezing, label the outside of any fresh food preparations or packaging of fresh produce with their contents and date of freezing to make identifying them easier.
- The maximum amount of food that can be frozen in 24 hours is specified on the appliance rating plate. Important notice.Please refer to it.
- Do not freeze overly large quantities of food in one go. Smaller portions are preferable. The quicker the food is frozen, the longer it will retain its properties. Also, be sure to package your food well in an airtight container before freezing to ensure that it retains all its flavour and does not cause other products to spoil. Never store unpackaged food.
cleaning and care
Cleaning
You should always disconnect the appliance, or remove the fuses/switch off the circuit breaker when cleaning the appliance.
We advise you to regularly clean and disinfect your appliance (at least once a year) for better food hygiene and preservation.
- Remove all food from the appliance. Carefully remove the glass trays and storage draws from their racks.
- You can clean the glass trays and ice tray using a soft sponge and warm water mixed with a mild detergent, such as washing-up liquid. Rinse with clean water and dry carefully with a soft cloth. Caution: do not clean the glass trays with hot water whilst they are still cold. The glass may break due to the sudden change in temperature and cause personal injury or property damage.
- Clean the inner and outer surfaces of your appliance using white spirit vinegar mixed with water.
Do not use alcohol, abrasive powders or detergents as this could damage the surfaces of your appliance.
- Rinse with clean water and dry carefully with a soft cloth.
- Inspect the door seals regularly to check that they are clean and that there are no food particles. Door seals must be kept clean at all times. Clean them using warm water and dry well.
- Dust off the compressor at the bottom of the rear side of the appliance at least once a year. Layers of dust increase electricity consumption.
- IMPORTANT: Do not place oils or oily dishes in the appliance in an open container, as the grease can damage the plastic surfaces in your appliance. In the event of spilling or splashing oil on any plastic surfaces, immediately clean and wash the soiled area using hot water.
Defrosting
- Your cold ventilated appliance will automatically defrost. The defrosting water is collected in an evaporation tray located at the bottom rear end of the appliance. Water will automatically evaporate from this tray.
troubleshooting guide
Noises when in use
The following noises are typical of freezer appliances:
• Rattling:
When the compressor turns on or off, it will make a rattling sound.
- Whirring:
Once the compressor is running, you will hear a whirring sound.
• Gurgling/squelching:
A gurgling or squelching sound can be heard when the refrigerant flows into narrow tubes. Even after the compressor has been turned off, these noises will continue for a short time.
In the event of a power outage
- If the power outage is short, there is no risk of food spoilage. However, refrain from opening the door. The self-sufficiency running time of your appliance is indicated in the "PRODUCT DESCRIPTI" section. This time may be significantly shorter depending on the load of your appliance.
- The appliance will restore the same settings that were applied prior to the power outage once power has been restored.
- If the power cut continues, transfer all products to another appliance.
- As soon as you notice thawing occurring, consume this food as quickly as possible.
- Caution: Thawed food should not be refrozen.
- In the event of a brief power outage (less than 5 minutes), your appliance will not restart immediately after power is restored in order to protect the compressor.
Resolving malfunctions
A malfunction may be due to a minor problem that you could solve yourself using the instructions below. Before calling your retailer's after-sales service, carry out the following checks:
1) Your appliance is not working:
Check:
• That it is plugged in correctly,
- That the circuit breaker has not been deactivated.
2) The appliance is cooling too much:
- The temperature is set too high.
3) The appliance is not cooling enough:
- You may have stored hot food or too much food in the appliance.
- The door may not be closed properly.
- The door seals may be damaged.
- The temperature may not be set properly.
4) The door is difficult to open:
- You may have difficulties opening the door if you have just closed it. When the door is open, cold air that escapes from the tank is replaced by room temperature air. During the process of cooling this hot air, a vacuum is created and the door becomes difficult to open. After a few minutes, normal pressure should return and you should be able to open the door easily again.
If the above tips have not helped to resolve the problem, do not attempt to repair the appliance yourself. Instead, contact your retailer's after-sales service.
IMPORTANT: Only maintenance technicians are able to perform repairs on this appliance. Improperly executed repairs may be hazardous to the user and are not covered by the warranty.
LED interior light
- Your appliance is equipped with LED lighting. This type of lighting is designed to last longer than a conventional bulb. Contact your retailer's after-sales service in the event of defective lighting.
natural_image
Diagram showing directional arrows and curved arrows around a rectangular structure (no text or symbols)
natural_image
3D rendered green mechanical component with mounting holes and a handle (no text or symbols visible)natural_image
3D mechanical assembly diagram showing green component with mounting holes and bolts (no text or symbols)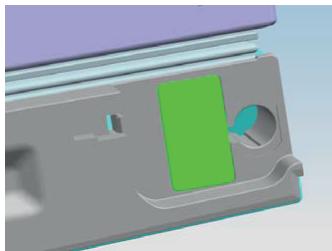
natural_image
3D rendered mechanical component with green internal slot and gray housing (no text or symbols)
natural_image
3D rendering of a mobile phone module with green and teal components, no visible text or symbols
natural_image
3D rendering of a server cabinet with open door and shelves (no text or symbols visible)natural_image
3D CAD model of a mechanical assembly with mounting bracket and mounting base (no text or symbols visible)natural_image
3D mechanical assembly diagram showing a bracket with bolts and mounting features (no text or symbols)natural_image
Close-up of a mechanical component with a yellow handle and circular button (no text or symbols visible)natural_image
3D rendering of a two-tone refrigerator with front and back panels (no text or symbols)natural_image
3D mechanical assembly diagram showing a yellow bracket with mounting holes and a blue frame (no text or symbols)
natural_image
3D rendering of a mechanical bracket or bracket with two mounting holes, no visible text or symbolsnatural_image
3D rendering of a pipe joint with a bracket and support structure (no text or symbols visible)natural_image
3D rendering of a door handle assembly with two metal brackets and a vertical guide rail (no text or symbols visible)natural_image
Diagram showing a structural change between two panels, one with internal components and the other with a rectangular frame (no text or symbols)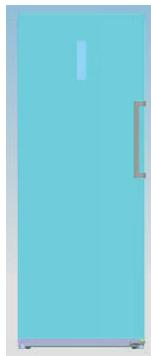
natural_image
Simple illustration of a rectangular door with a handle and a vertical line on the top (no text or symbols)Puesta en marcha
natural_image
Diagram showing directional arrows and curved arrows around a rectangular structure (no text or symbols)
natural_image
3D rendered mechanical component with green and gray parts, no visible text or symbolsnatural_image
3D mechanical assembly diagram showing a green bracket with mounting holes and a tool, no visible text or symbols
natural_image
3D rendered mechanical component with green and blue internal sections (no text or symbols)
natural_image
3D rendering of a mobile phone module with green and teal components, no visible text or symbols
natural_image
3D rendering of a server cabinet with open door and shelves (no text or symbols visible)natural_image
3D mechanical assembly diagram showing a bracket with mounting holes and a central component (no text or symbols visible)natural_image
3D mechanical assembly diagram showing a bracket with bolts and mounting features (no text or symbols)natural_image
Close-up of a mechanical component with a yellow handle and circular button (no text or symbols visible)natural_image
3D rendering of a two-tone refrigerator with front and back panels (no text or symbols)natural_image
3D mechanical assembly diagram showing a yellow bracket with mounting holes and a blue frame (no text or symbols)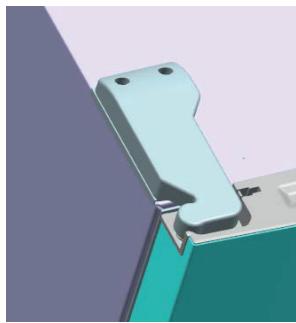
natural_image
3D rendering of a mechanical bracket or bracket component with no visible text or symbolsnatural_image
3D rendering of a pipe joint with support structure (no text or symbols visible)natural_image
3D rendering of a mechanical bracket with two side brackets and a vertical guide (no text or symbols)natural_image
Diagram showing a structural change between two panels, one with internal components and the other with a rectangular frame (no text or symbols)
natural_image
Simple illustration of a rectangular door with a handle and a vertical line on the top (no text or symbols)Erste Schritte
Installatie
natural_image
Diagram showing directional arrows and curved arrows around a rectangular structure (no text or symbols)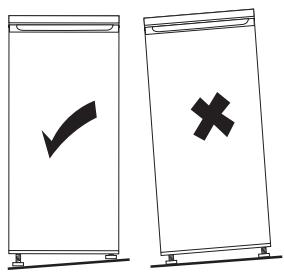
natural_image
3D rendered green mechanical component with mounting holes and a handle (no text or symbols visible)natural_image
3D mechanical assembly diagram showing green component with mounting holes and bolts (no text or symbols)
natural_image
3D rendered mechanical component with green and blue internal sections (no text or symbols)
natural_image
3D rendering of a mobile phone module with green and teal components, no visible text or symbols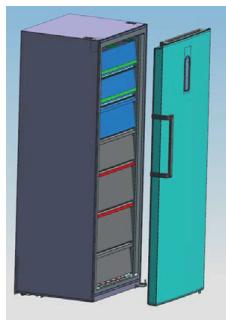
natural_image
3D rendering of a server cabinet with open door and shelves (no text or symbols visible)natural_image
3D mechanical assembly diagram showing a bracket with mounting holes and a central component (no text or symbols visible)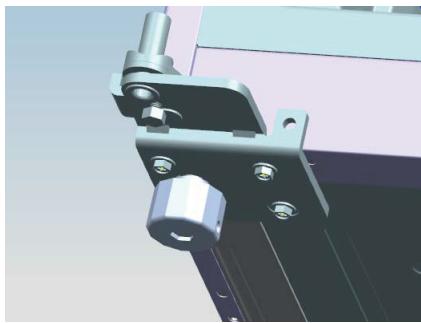
natural_image
3D mechanical assembly diagram showing a bracket with bolts and mounting features (no text or symbols)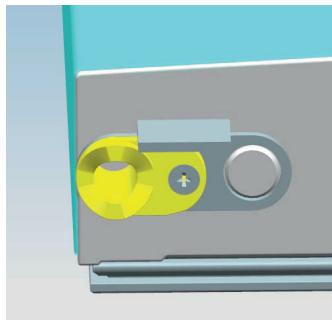
natural_image
Close-up of a mechanical component with a yellow handle and circular button (no text or symbols visible)
natural_image
3D rendering of a two-tone refrigerator with front and back panels (no text or symbols)natural_image
3D mechanical assembly diagram showing a yellow bracket with mounting holes and a blue frame (no text or symbols)
natural_image
3D rendering of a mechanical bracket or bracket with two mounting holes, no visible text or symbolsnatural_image
3D rendering of a pipe joint with a bracket and support structure (no text or symbols visible)natural_image
3D rendering of a door handle assembly with two metal brackets and a vertical guide rail (no text or symbols visible)natural_image
Diagram showing a structural change between two panels, one with internal components and the other with a rectangular frame (no text or symbols)natural_image
Simple illustration of a rectangular door with a handle and a vertical line on the top (no text or symbols)Opstarten
All information, designs, drawings and pictures in this document are the property of SOURCING & CREATION. SOURCING & CREATION reserves all rights to its brands, designs and information. Any copy and reproduction through any means shall be deemed and considered as counterfeiting.
Protection of the environment
This symbol attached to the product means that it is an appliance whose disposal is subject to the directive on waste from electrical and electronic equipment (WEEE). This appliance may not in any way be treated as household waste and must be subject to a specific type of removal for this type of waste. Recycling and recovery systems are available in your area (waste removal) and by distributors. By taking your appliance at its end of life to a recycling facility, you will contribute to environmental conservation and prevent any harm to your health.
Protection of the environment
Help protect the environment!
Follow local regulations: dispose of your electrical equipment at an appropriate waste disposal facility. Packaging materials are recyclable. Dispose of packaging in an environmentally friendly manner and dispose of it using recyclable material collections.
Customer Relations Department /
Tested in our laboratories
Warranty valid from the date of purchase (receipt as proof of purchase). This warranty does not cover defects or damage caused by improper set up, incorrect use, or normal wear and tear of this product.
Please behave responsibly
towards the environment.
Recycle this product at the end of its life.