
ERAVDE180-90B1 - ERAVDE180-90V1 - ERAVDE180-90V2 - Fridge ESSENTIELB - Free user manual and instructions
Find the device manual for free ERAVDE180-90B1 - ERAVDE180-90V1 - ERAVDE180-90V2 ESSENTIELB in PDF.
| Product type | Freestanding American fridge-freezer |
| Models | ERAVDE180-90B1, ERAVDE180-90V1, ERAVDE180-90V2 |
| Brand | Essentiel b |
| Dimensions (W x H x D) | 912 x 1770 x 704 mm |
| Weight | 91 kg |
| Energy efficiency class | A++ |
| Annual energy consumption | 362 kWh/year |
| Total net useful volume | 559 L |
| Useful refrigerator volume | 356 L |
| Useful freezer volume | 200 L |
| Freezer star rating | 4 stars (frost free) |
| Freezing capacity | 10 kg/24 h |
| Storage time in case of power failure | 4 hours |
| Climate classes | SN / N / ST / T (from +10°C to +43°C) |
| Power supply | 220-240 V~ 50 Hz |
| Rated current | 1.65 A |
| Refrigerant | R600a / 84 g |
| Defrost type | Automatic (refrigerator and freezer) |
| Interior lighting | LED |
| Water dispenser | Yes, 5.5 L tank |
| Special functions | Smart mode, Fast Freeze |
| Control panel | Touch screen with child lock |
| Cleaning and maintenance | Clean with warm water and bicarbonate; automatic defrost; monthly water tank cleaning |
| Safety | Door closing, control panel lock, open door alarm, delayed shutdown after short power cut |
| Spare parts and repairability | Contact the retailer's after-sales service; do not repair yourself |
| Warranty | Valid from the purchase date (receipt); does not cover damages due to improper installation or normal wear |
Frequently Asked Questions - ERAVDE180-90B1 - ERAVDE180-90V1 - ERAVDE180-90V2 ESSENTIELB
User questions about ERAVDE180-90B1 - ERAVDE180-90V1 - ERAVDE180-90V2 ESSENTIELB
0 question about this device. Answer the ones you know or ask your own.
Ask a new question about this device
Download the instructions for your Fridge in PDF format for free! Find your manual ERAVDE180-90B1 - ERAVDE180-90V1 - ERAVDE180-90V2 - ESSENTIELB and take your electronic device back in hand. On this page are published all the documents necessary for the use of your device. ERAVDE180-90B1 - ERAVDE180-90V1 - ERAVDE180-90V2 by ESSENTIELB.
USER MANUAL ERAVDE180-90B1 - ERAVDE180-90V1 - ERAVDE180-90V2 ESSENTIELB
To help you get the best out of your purchase
We thank you For purchasing an Essentiel b brand product. We pay special attention to the RELIABILITY, EASE OF USE and DESIGN of our products.
We hope that you will be fully satisFied with this American-style Pridge-Freezen.
summary
| saFety instructions (see additional sheet provided) | |
| datasheet | 28 |
| apppliance description | 30 |
| unpacking the appliance | 31 |
| Before initial use | 31 |
| installation | 31 |
| using the appliance | 34 |
| Switching on | 34 |
| Description of the control panel | 34 |
| Setting temperature and selecting modes | 36 |
| Water dispenser | 37 |
| Coldest part of the refrigerator compartment | 39 |
| Temperature indicator | 39 |
| Food storage tips | 40 |
| Storing frozen food in the freezer compartment | 41 |
| Making ice cubes | 43 |
| cleaning and maintenance | 44 |
| Cleaning | 44 |
| Defrosting | 45 |
| Cleaning the water tank and dispenser | 45 |
| troubleshooting guide | 46 |
| Fixing malfunctions | 46 |
| Noises in operation | 47 |
| If you are going to be away or the appliance is not going to be used for a long period | 48 |
| If there is a power cut | 48 |
| Inside light | 49 |
datasheet
Measurements in accordance with EU regulation 1060/2010 of the European Commission and the EN 62552:2013 standard.
| Description | Value | Unit |
| Brand | Essentiel b | |
| Model identification | ERAVDE180-90v1 & ERAVDE180-90b1 | |
| Product codes | 8008144 & 8008145 | |
| Electrical protection class | I | |
| Voltage | 220-240 V~ 50 Hz | |
| Rated current | 1.65 | A |
| Defrosting power | 240 | W |
| Bulb type/power | 7 W max. | |
| Refrigerant fluid/Mass | R600a / 84 g | |
| Domestic refrigeration appliance category | 7 (refrigerator-freezer) | |
| Energy efficiency class | A++ | |
| Annual energy consumption of 362 kWh, calculated on the basis of 24 hours of runtime under standardised test conditions. Actual energy consumption depends on how the appliance is used and where it is located. | ||
| Total gross volume | 591 | L |
| Total (net) usable volume | 559 | L |
| Usable volume (net) of the fresh food compartment | 356 | L |
| Usable volume (net) of the ice-making compartment | 3 | L |
| Refrigerator compartment defrosting method | Automatic | |
| Freezer compartment (net) usable volume | 200 | L |
| Freezer compartment defrosting method | Automatic | |
| Number of stars*The number of stars denotes the food storage temperature: 0 (no stars) = 0°C / 1 = -6°C / 2 = -12°C / 3 = -18°C / 4 = -18°C minimum (capable of freezing foods) | 4 (frost-free) | |
| Autonomy (temperature rise time) | 4 | hours |
| Freezing capacity | 10 | kg/24 hrs |
| Description | Value | Unit |
| Climate classes:SN / N / ST / TThis appliance is designed for use at an ambient temperature between +10°C and +43°C.SN = +10°C to +32°C / N = +16°C to 32°C / ST = +16°C to +38°C / T = +16°C to 43°C. Internal temperatures can be affected by several factors such as appliance location, ambient temperature and how often the door is opened.The thermostat can be adjusted to compensate for these factors. | ||
| Coldest storage temperature* * Preset or user-adjustable temperature that can be maintained continuously. | -18 | °C |
| Airborne acoustic emissions | 40 | dB(A) |
| Refrigerator type | Free standing | |
| Overall dimensions (W x H x D)* | 912 x 1770 x 704 | mm |
| Weight | 91 | kg |
- W = Width / H = Height / D = Depth
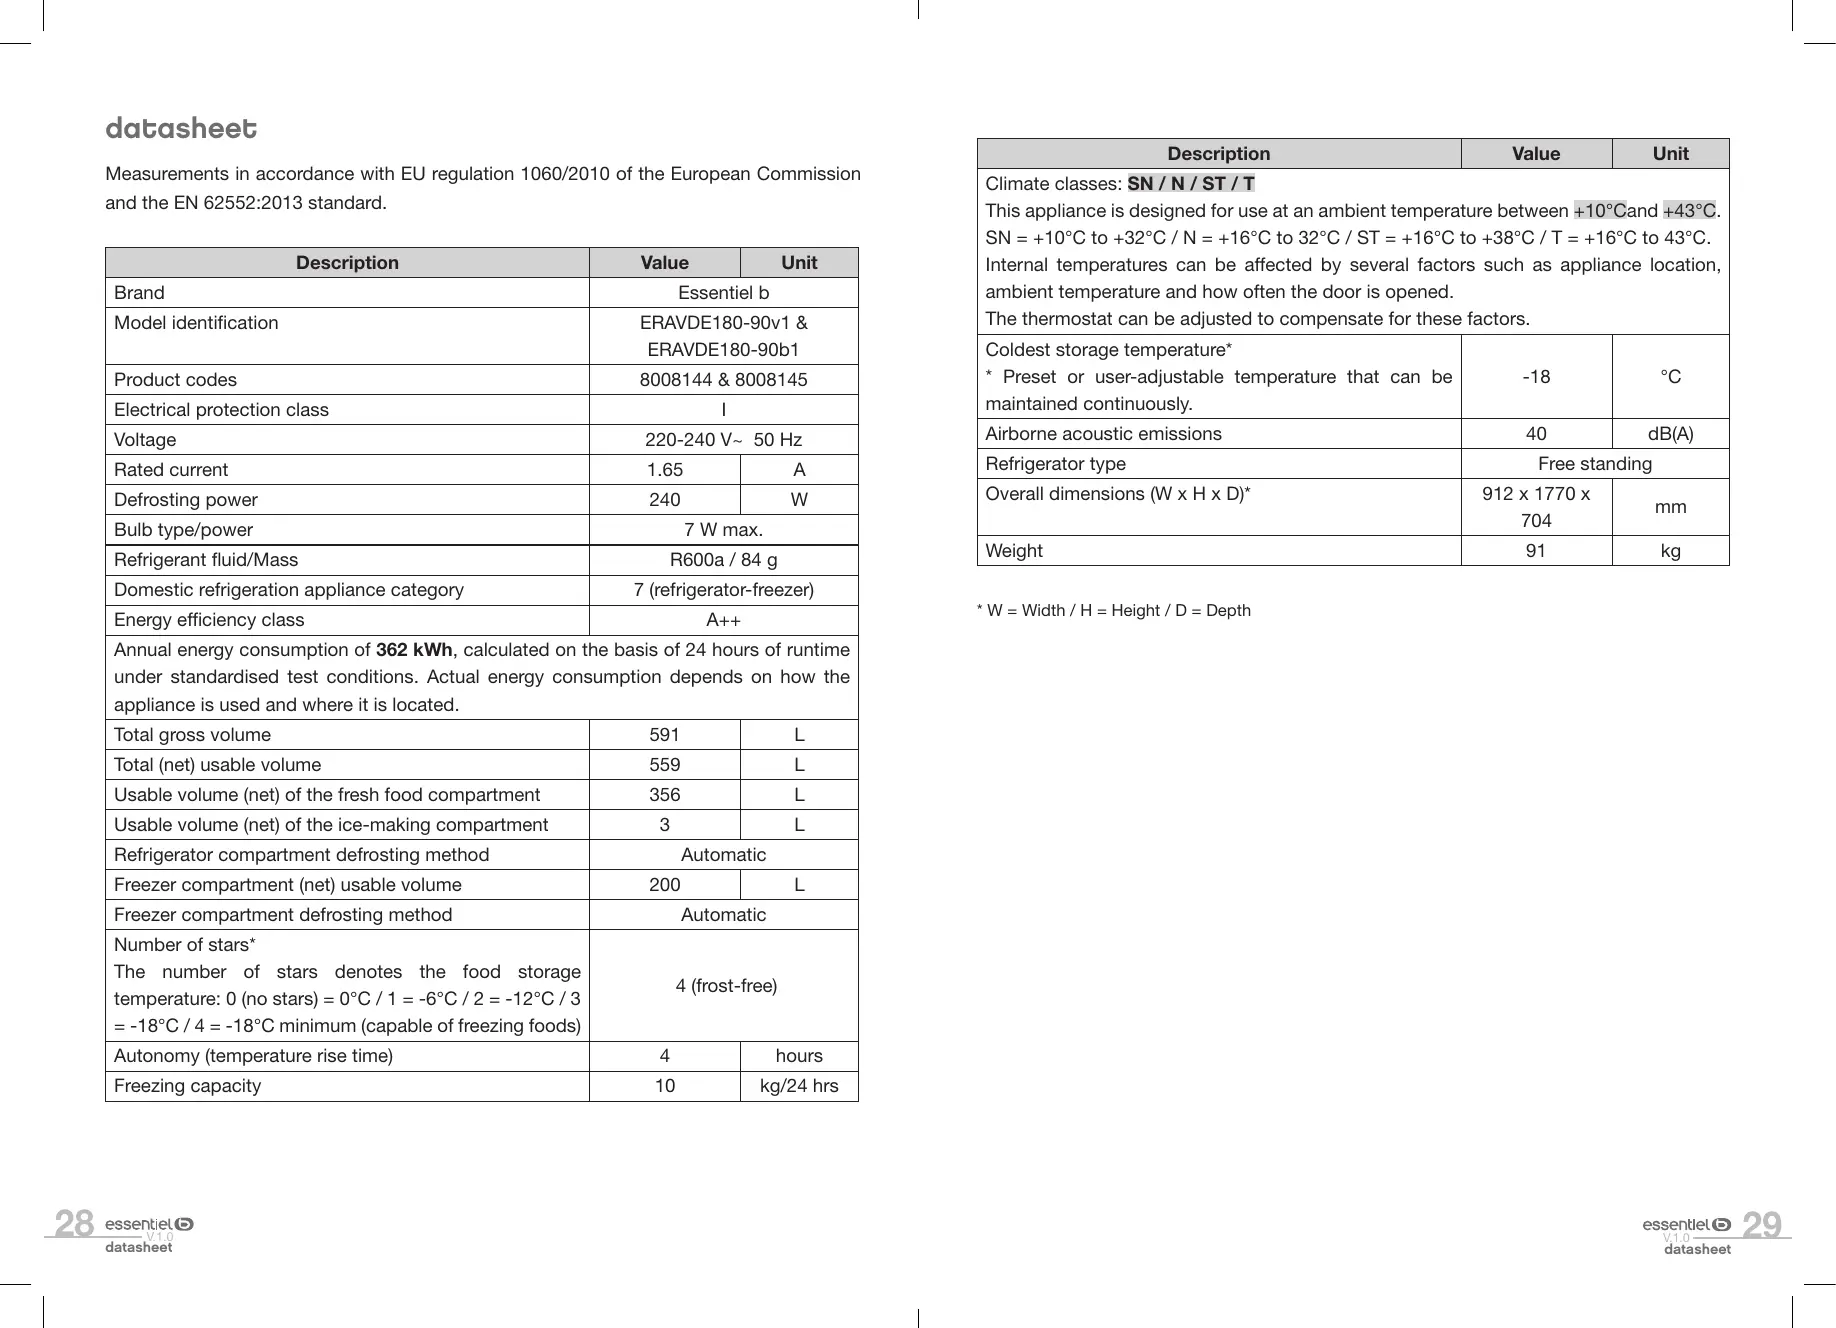
apppliance description
-
Inside light
-
Door shelves
-
Bottle-holder door shelves
-
Freezer drawer
-
Fruit and vegetable drawer
-
1 egg holder
-
1 ice tray
-
Water tank
-
Height-adjustable feet at the front
-
Glass shelves (4 in refrigerator and 4 in freezer)
-
Fruit and vegetable drawer lid
-
Freezer drawer lid
unpacking the appliance
- Remove the transport packaging.
- Make sure that the appliance has not been damaged during transport. Do not plug the appliance into the mains if damaged! Contact your retailer instead.
- Remove all the adhesive tape and packaging materials from the inside and outside of the appliance.
Before initial use
- Clean the inside of the appliance with warm water and a little white vinegar. Do not use soap or detergents as the odour can linger. When you have finished cleaning the appliance, dry it completely.
- White spirit can be used to remove adhesive residue from the exterior.
- Always unplug the appliance, remove the fuse or switch off the circuit breaker before cleaning.
installation
Installation location
- Always stand the fridge-freezer on a flat, stable surface. As your appliance will be heavy when filled with food, it must be stood on a strong, solid floor.
- The appliance must be installed in a dry, well-ventilated room at ambient temperature. Please refer to the table in the "Climate classes" section.
- Never put appliances that generate heat such as microwave ovens, toasters and the like on top of the refrigerator.
- Do not expose the appliance to direct sunlight.
- Do not expose the appliance to rain.
- Do not install the appliance next to radiators, cookers or other heat sources.
- The ambient temperature affects energy consumption and appliance efficiency.
- The mains outlet must remain accessible when the appliance is installed.
- The appliance can be installed alone, next to a piece of furniture or in front of a wall. Make sure there is enough space around the appliance to comfortably open the doors and drawers.
- After installation, make sure that the appliance does not rest on its power supply cable.
Climate classes
The appliance must be installed in a location with an ambient temperature that is compatible with the climate class for which it was designed (see table below).
The table below sets out which ambient temperatures are compatible with which climatic classes:
| Climate classes | Ambient temperature |
| SN | +10 to +32°C |
| N | +16 to +32°C |
| ST | +16 to +38°C |
| T | +16 to +43°C |
Please refer to the data plate or product datasheet to find your appliance's climate class.
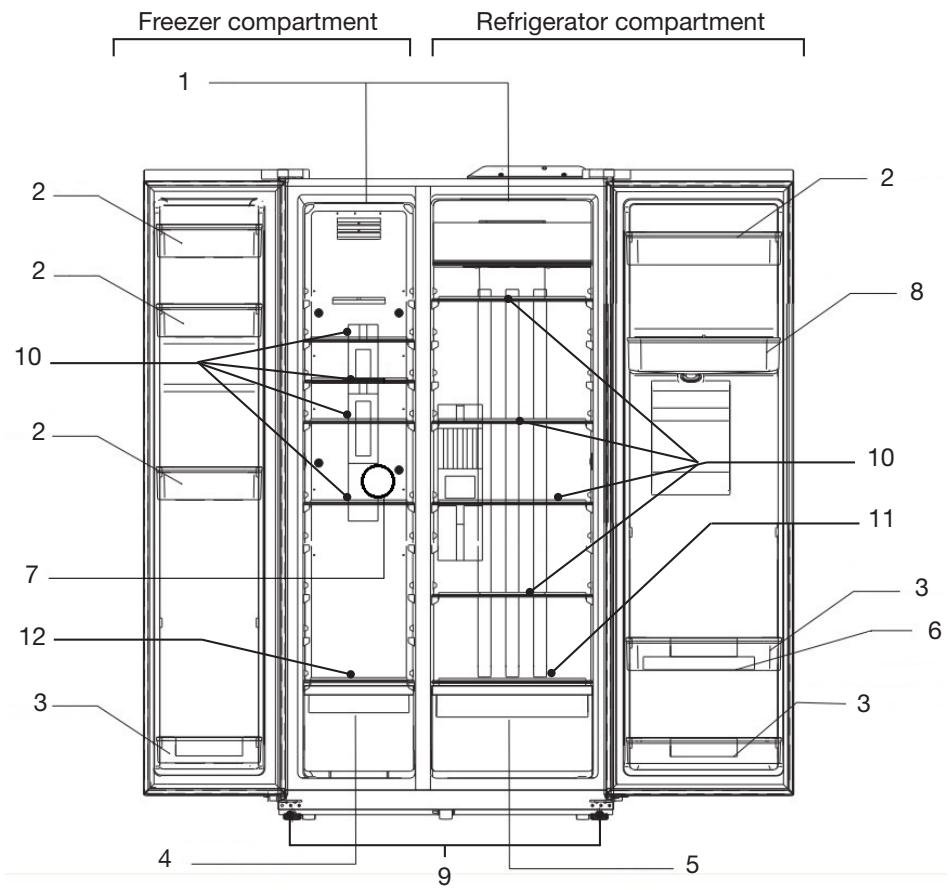
Adequate ventilation
- Make sure that air can circulate freely around the appliance.
- To ensure that your appliance works properly, do not obstruct the air vents and leave a gap of at least 100mm above the appliance, 50mm between the back and the wall and 100mm on either side. Please observe the installation dimensions indicated in the diagram below.
- If you are going to install your appliance next to another refrigerator or freezer, make sure they are not stuck together as this could cause condensation on the outside.
| A | 1524 mm |
| B | 1062 mm |
| C | 160° |
| E | 50 mm |
| F | 100 mm |
Removing the doors
If the refrigerator does not pass easily through a doorway, you can remove the doors of the appliance.
FREEZER DOOR
- Close the freezer compartment door and remove the top hinge A, then carefully disconnect the electrical wires.
- Remove the hinge B screw by turning it anticlockwise then remove the hinge. Be careful not to drop the door.
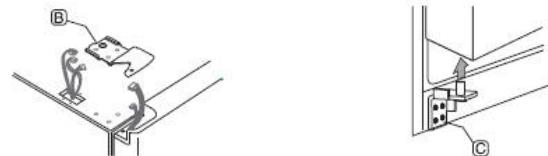
- Lift the door vertically and remove it from the lower hinge C.
- REFRIGERATOR DOOR
- Remove the refrigerator compartment door in the same manner as for the freezer door (steps 1 to 3 above).
When removing the doors, please make sure to lift them vertically to avoid damaging the hinges. Be careful not to crush the electrical wires in the doors. Place the doors on a padded surface to avoid scratching them.
- You can then reinstall the refrigerator and freezer compartment doors by following the disassembly instructions above in reverse order.
Levelling the feet
The appliance must be made level to prevent vibration in use. To level the appliance, adjust the front feet.

using the appliance
Before plugging the appliance into the mains socket for the first time, leave it to stand for two hours if it has been transported in the upright position, or 24 hours if it has been transported horizontally; this allows the refrigerant gas to flow back into the compressor. Failure to do so could damage the compressor.
Switching on
- Plug the appliance into an easily accessible, earthed mains outlet. The control panel lights up for a few seconds and a beep sounds.
- When you open the refrigerator and/or freezer door, the interior lighting of the refrigerator and/or freezer comes on.
Description of the control panel
The control panel is located on the front of the refrigerator door.
- Display screen
- Freezer compartment control
- Refrigerator compartment control
- Setpoint temperature display
- "Smart" function
- (Appliance equipped with an inverter compressor)
- "Fast freeze" function
-
Select temperature setting zone (refrigerator or freezer)
-
Select temperature
- Select mode ("Smart" or "Fast freeze")
- Confirm temperature or mode selection
-
Lock/unlock the control panel
-
SCREEN STANDBY MODE
The display screen goes into standby mode (it is turned off) after 3 minutes if no key is pressed. To exit standby mode, press any button (the screen lights up) and then press the "3 sec to unlock" button for 3 seconds. You can then make the setting adjustment(s). The screen also exits standby mode when you open the door of the appliance.
Setting temperature and selecting modes
- SETTING THE REFRIGERATOR TEMPERATURE
Press the “Temp Zone” button until the refrigerator compartment flashes in the display (point 3 in the diagram on the previous page). Then press the “Temp” button once or several times to select a temperature as shown below:
$$ 2 ^ {\circ} \mathrm {C} \rightarrow 3 ^ {\circ} \mathrm {C} \rightarrow 4 ^ {\circ} \mathrm {C} \rightarrow 5 ^ {\circ} \mathrm {C} \rightarrow 6 ^ {\circ} \mathrm {C} \rightarrow 7 ^ {\circ} \mathrm {C} \rightarrow 8 ^ {\circ} \mathrm {C} \rightarrow O F \rightarrow 2 ^ {\circ} \mathrm {C} \dots $$
Each press of the "Temp Zone" button increases the temperature by one degree.
- SETTING THE FREEZER TEMPERATURE
Press the "Temp Zone" button until the freezer compartment flashes in the display (point 2 in the diagram on the previous page). Then press the "Temp" button once or several times to select a temperature as shown below:
$$ - 2 4 ^ {\circ} \mathrm {C} - > - 2 3 ^ {\circ} \mathrm {C} - > - 2 2 ^ {\circ} \mathrm {C} - > - 2 1 ^ {\circ} \mathrm {C} - > - 2 0 ^ {\circ} \mathrm {C} - > - 1 9 ^ {\circ} \mathrm {C} - > - 1 8 ^ {\circ} \mathrm {C} - > - 1 7 ^ {\circ} \mathrm {C} - > - 1 6 ^ {\circ} \mathrm {C} - > - 2 4 ^ {\circ} \mathrm {C} \dots $$
Each press of the "Temp Zone" button decreases the temperature by one degree.
- "SMART" MODE (INTELLIGENCE)
In "Smart" mode, the refrigerator temperature is automatically set to 5^ and the freezer temperature is set to -18^ .
To activate this mode, press the “Function” button until the “Smart” mode symbol flashes. then press the “OK” button to confirm the selection. The indicator light comes on.
To deactivate "Smart" mode, press the "Function" button until the "Smart" mode symbol flashes. Then press the "OK" button to exit. The indicator light goes off.
If you select the "Fast freeze" mode, the "Smart" mode is deactivated.
-
We recommend setting your refrigerator to "Smart" mode for normal and daily use.
-
FAST FREEZE MODE
Select this mode if you intend to freeze a large amount of food. The temperature of the appliance will drop rapidly to -32^ . The appliance remains at this temperature for 26 hours.
To activate the "Fast freeze" mode, press the "Function" button until the "Fast freeze" mode symbol flashes. Then press the "OK" button to confirm the selection. The indicator light comes on.
To deactivate "Fast freeze" mode, press the "Function" button until the "Fast freeze" mode symbol flashes. Then press the "OK" button to exit. The indicator light turns off.
After 26 hours of operation, the "Fast freeze" mode stops automatically.
If you select the "Smart" mode, the "Fast freeze" mode is deactivated.
- TEMPERATURE FAULT AUDIBLE SIGNAL
- A beep sounds when one of the doors remains open for more than 3 minutes. To stop the beep, close the door.
- An error code ("E0", "E1", "E2") indicating a temperature fault may appear on the display (see "Troubleshooting Guide" for error codes). A beep will sound until the problem is resolved.
- When power is restored, if the temperature in the freezer is above -10^ , the temperature of the freezer compartment flashes on the display. Press any button to stop flashing or wait 5 seconds for the screen to return to normal display.
Water dispenser
This refrigerator is equipped with a water dispenser that you can easily fill up so that you always have cool water available. The water dispenser is equipped with a 5.5 litre water tank.
- USING THE APPLIANCE
To fill the tank, please follow the instructions below:
- Open the refrigerator door to access the water tank.
- Unscrew the cap and carefully fill the water tank through its opening to avoid splashing (maximum tank capacity: 5.5 litres). Then screw the cap back on.
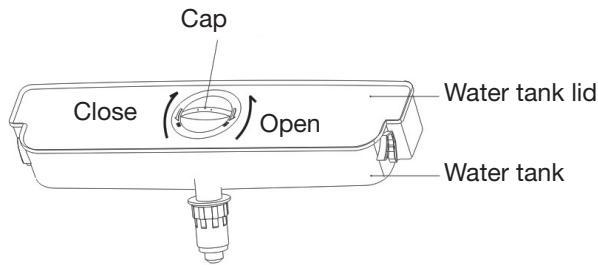
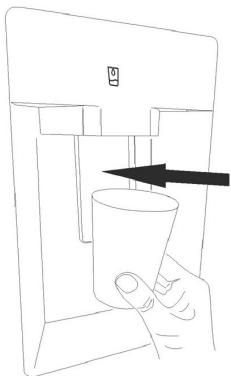
- When filling for the first time, set the temperature of the refrigerator compartment to the coldest setting (2^) and wait at least 30 minutes. You can then help yourself to a glass of cool water from the dispenser. To do this, press the glass (or another container) against the lever as shown in the figure opposite.
GENERAL RECOMMENDATIONS
- Water may run off and collect under the dispenser. If this happens, wipe off the water with a clean cloth.
- When filling the water tank, do not exceed the corresponding maximum level below the tank cover.
- Do not remove the glass from the bottom of the dispenser until the water has finished draining.
- Do not open the refrigerator door for the time required to cool the water, as this may extend the cooling time. During water cooling, noises characteristic of refrigeration equipment can be heard. This is normal.
- Replace the water and clean the tank regularly (once a month) to avoid unpleasant odours and taste.
- If you are not going to use the water dispenser for an extended period of time, empty the tank.
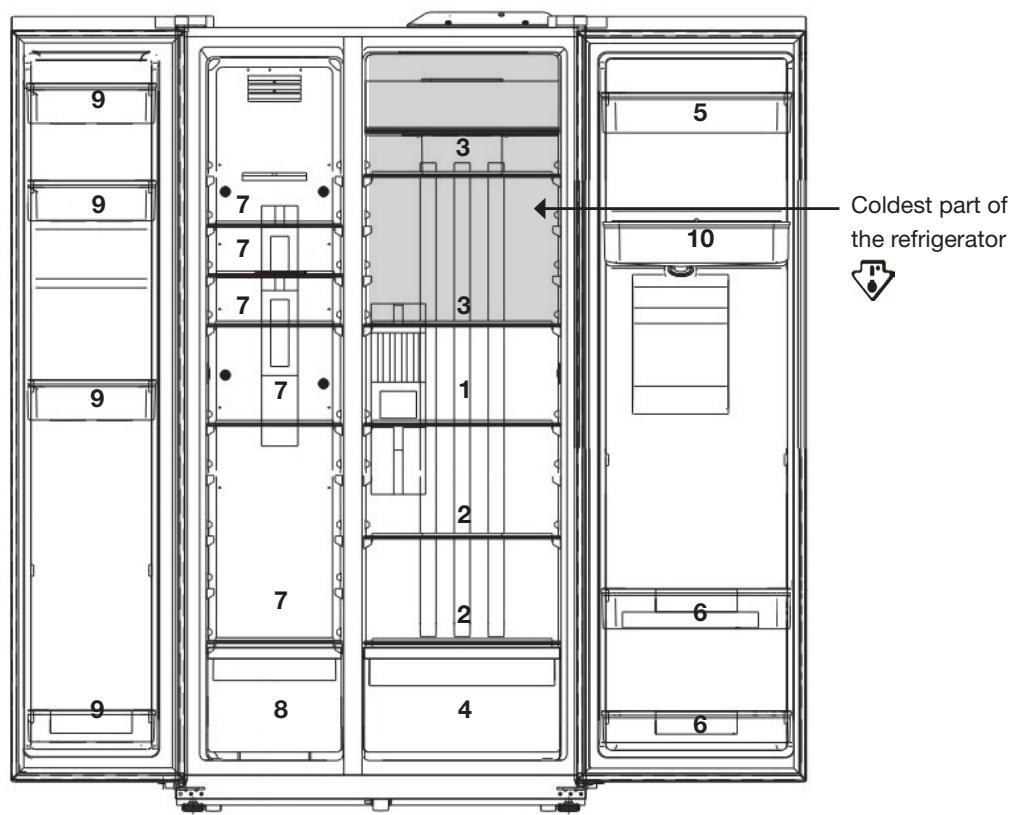
Coldest part of the refrigerator compartment
- The symbol indicates the location of the coldest part of the refrigerator where the temperature is 4^ or below.
- To ensure that it stays at the correct temperature, make sure the removable shelves surrounding it are installed next to the stickers.
Temperature indicator
- To keep food fresh in your refrigerator, especially if it is in the coldest part, make sure that the temperature indicator reads "OK". If OK is not displayed, it means that the average temperature is too high, in which case the refrigerator thermostat should be set to a higher temperature.

Correct setting

Incorrect setting
- Whenever you alter the temperature setpoint, you should leave the internal temperature time to stabilise before making any other changes. The temperature should only be changed progressively and you should wait at least 12 hours before rechecking the temperature and making further changes.
- It is normal for OK not to show on the temperature indicator after loading the appliance with fresh food or repeatedly opening the door (or leaving it open for a long time); please therefore wait at least 12 hours before adjusting the temperature.
Food storage tips
- Your food will be better preserved if kept in the cold zone designed for its type.
- Stored food must always be spaced apart and not touch the walls so that cold air can circulate freely.
- Dairy products, cheese
- Other foods
- Coldest part: raw and cooked meats, fish
- Fruit and vegetables
- Butter, eggs, condiments
-
Bottles and other beverages
-
Frozen food storage, freezing on shelves
- Frozen food storage, freezing in drawers
- Frozen food storage, freezing on door shelves
- Water tank
Storing food in the refrigerator compartment
- Only put fresh food that has been washed and wrapped or put in appropriate containers in the refrigerator. Washed meat and fish should be wrapped in plastic or clingfilm and preferably consumed within two days.
- Fruits and vegetables can be stored directly in the vegetable drawer. It is not necessary to package them separately.
- Never cover the shelves with paper or plastic sheets as this will disrupt the airflow.
| Foodstuff | Storage periods |
| Eggs, marinades, smoked meat | Up to 10 days |
| Cheese | Up to 10 days |
| Root vegetables | Up to 8 days |
| Fresh butter | Up to 7 days |
| Desserts, fruits, cooked meals, fresh minced meat | Up to 2 days |
| Fish, seafood | 1 day |
Recommendations for saving energy
We recommend that you follow the following tips to save energy:
- To prevent the refrigerator temperature from rising, do not open the door more often than necessary and never leave it open for long periods.
- Make sure that the appliance is located away from any heat source (direct sunlight, electric heating, baking trays, etc.).
- Never set the temperature lower than necessary.
- Do not store hot food or liquids that evaporate in the appliance. Hot food and drinks should be allowed to cool to room temperature before placing them in the appliance.
- Do not open the door if there is a power outage.
- Place the appliance in a well-ventilated room without humidity. Please refer to the chapter on installing the appliance.
- Follow the recommendations in the diagram on page 18 showing the correct positioning of the shelves and other compartments of the appliance. This is the ideal position to save energy.
- Make sure that the refrigerator and freezer doors are always closed properly.
Tips for freezing food
- Allow cooked food to cool completely. Refrigerate food in the refrigerator before freezing if possible.
- Think about how you want to cook food before you freeze it.
- Do not freeze food in metal containers if you plan to microwave it right out of the freezer.
- Use freezer bags, polyethylene bags, plastic food storage boxes and aluminium foil for acidic foods (such as citrus fruits).
- Do not use thin transparent film or glass. Do not use used food containers (unless they have been properly cleaned beforehand).
- Remember to exclude as much air as possible from the container. You can buy a special vacuum pump that sucks excess air out of the packaging.
- Leave a small amount of air when freezing liquids to allow for expansion.
- You can use freezer space more efficiently if you freeze liquids (or solids with liquids, such as stew) in rectangular or square blocks.
Storing frozen food in the freezer compartment
- Your refrigerator bears the 4-Star logo , signifying that it is capable of storing frozen food, freezing fresh food and making ice cubes.
- We recommend waiting for 2 hours after the appliance is switched on before putting fresh food in the freezer compartment. There is no need to wait if the appliance is already running.
- Never put hot food in the freezer as this could cause food that is already in the freezer to go off. Allow it to cool first.
- When you freeze food such as meat, mince, fish, etc., it is a good idea to divide it into separate portions that can be consumed in one go.
- Do not let fresh foods that need to be frozen come into contact with foods that are already frozen.
- Never refreeze food that has been defrosted. This is a serious health risk which can cause food poisoning.
- When you buy frozen food, make sure it has been frozen properly and that the packaging is not torn.
-
You must follow the storage instructions on the packaging when putting away frozen food. If there are no instructions, the food should be consumed as soon as possible.
-
Frozen food must be transported in appropriate packaging to preserve its quality and put in the freezer as soon as possible. When shopping, always buy frozen products last, just before you check out. You can get isothermal bags in the freezer department. These keep frozen foods cold for longer.
- If the frozen food packaging is damp or smells bad, the food inside may not have been stored properly. Throw it out!
- The length of time frozen food will keep depends on the ambient temperature, how many times the freezer door is opened and shut, the temperature setting, the type of food and the time between buying the food and putting it in the freezer. Always follow the instructions on the packaging and never exceed the use by date.
| Foodstuff | Storage periods |
| Fruit, beef | 10 to 12 months |
| Vegetables, veal, poultry | 8 to 10 months |
| Game | 6 to 8 months |
| Pork | 4 to 6 months |
| Ground or chopped meat | 4 months |
| Bread, cakes, cooked meals, lean fish | 3 months |
| Smoked sausages, oily fish | 1 months |
Making ice cubes
- Remove the ice cube tray from its clear plastic housing.
- Pour cold water into the ice cube tray and return it to its housing.
- Place the set in the freezer compartment for more than 2 hours.
- To remove the ice cubes, turn the knob to make them drop.
cleaning and maintenance
Cleaning
Unplug the appliance before you clean it.
We recommend that you regularly clean and disinfect your appliance.
-
Remove the fresh and frozen food from the appliance. Wrap the frozen food in several layers of newspaper, cover and store in a cool place.
-
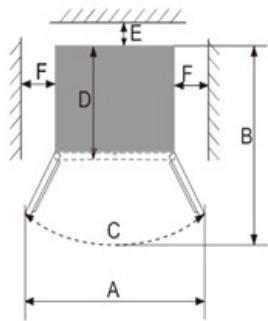
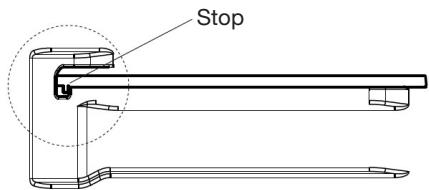
Lift the door shelves upwards as shown in the figure opposite to remove them from the appliance before cleaning them.
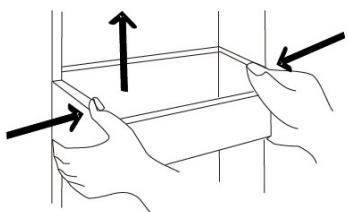
- As the shelves are equipped with a stop at the back to stabilize them on the appliance, lift them up slightly and then pull them forward as shown in the figure below to remove them before cleaning.
- Clean the fridge and freezer compartments with a soft sponge dipped in a solution of bicarbonate of soda and warm water.
- Clean the accessories with a soft sponge and warm soapy water.
- Rinse with fresh water and dry carefully after cleaning.
- Remove the accumulated dust from the rear of the appliance at least once a year. Use a soft brush, electrostatic cloth or vacuum cleaner to do so.
- The appliance can be turned back on once everything is clean and dry.
Never use abrasive or caustic cleaning products or scrub sponges to clean the interior or exterior of your appliance.
- Make sure that no water gets into the light housing or other electrical parts.
- Regularly inspect the door seals to check that they are clean and not harbouring any food particles. It is important to keep the door seals clean at all times. Clean them with hot water and dry thoroughly.
- Do not use hot water to clean the glass shelves if they are cold. There is a risk that the glass will shatter because of the sudden change in temperature which could cause injury and serious damage.
- IMPORTANT: Never put oil or oily dishes in the refrigerator in open containers as the fatty substances can damage the plastic surfaces of the refrigerator. If you spill or splash oil on the plastic surfaces, clean it up and immediately wash the affected parts with hot water.
Defrosting
- The refrigerator and freezer compartments are ventilated and defrost automatically.
Cleaning the water tank and dispenser
The water tank should be cleaned regularly (once a month) to prevent unpleasant odours or an unpleasant taste in the water. Do not leave water in the tank for too long.
- Remove the water tank by grasping it on both sides and lifting it gently.
- Remove the cover of the water tank to be able to clean it effectively.
- Wash the different parts with clear water and without detergent. If necessary, you can wipe the tank with a cloth soaked in white vinegar. Rinse with clean water and dry carefully. None of the parts are dishwasher safe.
- Wipe the water outlet of the dispenser frequently with a clean, lint-free cloth, as it could get dirty easily.
- Wipe the area underneath the water dispenser with a clean cloth if water is present.
troubleshooting guide
Fixing malfunctions
If the appliance malfunctions, it may be due to a minor problem that you can rectify by following the instructions below. Before you call in a technician, you should carry out the following checks:
1) Your refrigerator is not working:
Check:
- That it is plugged in,
- That the socket it is plugged into is suitable and working properly. To check, plug a different appliance into the socket in question.
- That the fuse has not blown or is faulty.
2) Your refrigerator is not working effectively:
Check:
- That you have not overfilled it,
- That the temperatures are set appropriately,
- That the doors have been shut properly, and have not been left open for too long,
- That you have not put hot food inside,
- That the appliance is not next to a heat source,
- That the gap at the back and around the sides is large enough.
3) Your appliance is noisy:
The cooling gas that circulates in the refrigeration system can sometimes make small noises, even when the compressor is not operating. Do not be concerned, this is completely normal.
If you hear a different noise, check:
that the appliance is level,
- That nothing is touching the rear of the appliance,
- That the accessories (door shelves, shelves) are installed correctly.
- That the contents of the appliance are not vibrating.
4) There is a strange smell:
- Check for expired food. In this case, discard the food concerned.
- Your appliance may need cleaning.
- You may have stored food with a strong odour (e.g. cheese) without having wrapped it separately. Wrap foods with a strong odour or place them in a storage container.
If this does not solve your specific problem, please contact your retail store service desk and do not attempt to make repairs yourself.
Your refrigerator should only be repaired by qualified maintenance technicians. Poorly-done repairs can be dangerous for the user and are not covered by the warranty.
Error codes
| Error codes | Description |
| E0 | Temperature sensor fault in the freezer compartment |
| E1 | Evaporator sensor fault in the freezer compartment |
| E2 | Cumulation of errors E1 and E2 |
| EH | Temperature sensor failure |
| EC | Connection failure between the control panel and the display screen |
If an error code appears on the display screen, please contact the customer service department of your dealer store.
Noises in operation
The appliance may make the following noises when operating normally:
- Crackling (ice cracking):
This noise is produced during automatic defrosting.
It may also be produced when the refrigerator is in a cooling or warming phase and is due to expansion of the appliance materials.
- Clicking:
This noise is produced when the compressor starts and stops.
- Compressor noise:
Normal motor noise. This noise indicates that the compressor is working normally. When the compressor cuts in, the noise can rise slightly for a brief moment.
- Bubbling or gurgling:
Noise produced when the refrigerant fluid flows through the coils inside the system.
You can also hear the noise when you activate the water dispenser.
Running water:
Normal noise produced when the water flows out of the evaporation container during defrosting. This noise may also be audible inside the appliance during defrosting.
Sound of ice cracking or scraping:
This is the normal sound of ice forming in the tank or spilling out after activating the dispenser.
If you are going to be away or the appliance is not going to be used for a long period
If you are not going to be using the appliance for a long period, empty it, unplug it, clean it, empty and dry the water tank and leave the doors open to prevent mould and unpleasant odours from forming.
If there is a power cut
- If the power outage only lasts a short time, the food inside the fridge will not be affected. You should not, however, open either of the doors. The length of time the fridge freezer will stay cold is set out in the "PRODUCT DATASHEET" section of this manual. The length of time varies according to how full the appliance is.
- When the appliance is switched on again, the refrigerator and freezer compartments operate with the settings defined before the power failure.
- If the outage is going to last longer, you should transfer the frozen and deep-frozen food to another freezer.
-
As soon as you notice food products start to thaw, they should be consumed as soon as possible.
-
Warning! Any thawed food must not be refrozen.
- To avoid damage to the appliance in the event of sudden power cuts and restarts, the appliance does not start immediately if the power outage time is less than 5 minutes.
Inside light
Your appliance has LED lighting. This type of lighting is designed to last much longer than conventional light bulbs. Contact your retail store service desk if your refrigerator lighting develops a fault.
All information, designs, drawings and pictures in this document are the property of SOURCING & CREATION. SOURCING & CREATION reserves all rights to its brands, designs and information. Any copy and reproduction through any means shall be deemed and considered as counterfeiting.
Protection of the environment
This symbol attached to the product means that it is an appliance whose disposal is subject to the directive on waste from electrical and electronic equipment (WEEE). This appliance may not in any way be treated as household waste and must be subject to a specific type of removal for this type of waste. Recycling and recovery systems are available in your area (waste removal) and by distributors. By taking your appliance at its end of life to a recycling facility, you will contribute to environmental conservation and prevent any harm to your health.
Tested in our laboratories
Warranty valid from the date of purchase (receipt as proof of purchase). This warranty does not cover defects or damage caused by improper set up, incorrect use, or normal wear and tear of this product.
Getest in once laboratoria
Customer Relations Department /
Please behave responsibly towards the environment. Recycle this product
at the end of its life.
- summary
- datasheet
- apppliance description
- unpacking the appliance
- Before initial use
- installation
- Installation location
- Climate classes
- Adequate ventilation
- Removing the doors
- FREEZER DOOR
- - REFRIGERATOR DOOR
- Levelling the feet
- using the appliance
- Switching on
- Description of the control panel
- Setting temperature and selecting modes
- Water dispenser
- - USING THE APPLIANCE
- Coldest part of the refrigerator compartment
- Temperature indicator
- Food storage tips
- Storing food in the refrigerator compartment
- Recommendations for saving energy
- Tips for freezing food
- Storing frozen food in the freezer compartment
- Making ice cubes
- cleaning and maintenance
- Cleaning
- Unplug the appliance before you clean it.
- Defrosting
- Cleaning the water tank and dispenser
- troubleshooting guide
- Fixing malfunctions
- Error codes
- Noises in operation
- If you are going to be away or the appliance is not going to be used for a long period
- If there is a power cut
- Inside light
- Protection of the environment
- Tested in our laboratories
- Getest in once laboratoria
Brand : ESSENTIELB
Model : ERAVDE180-90B1 - ERAVDE180-90V1 - ERAVDE180-90V2
Category : Fridge