
MADRID - Digital photo frame HAMA - Free user manual and instructions
Find the device manual for free MADRID HAMA in PDF.
| Product type | Digital photo frame |
| Brand | HAMA |
| Model | MADRID |
| Supported image formats | JPEG |
| Supported video formats | Motion JPEG (AVI), MPEG-1, MPEG-2 (CF card only) |
| Supported audio formats | MP3 |
| Supported memory card types | SD, MultiMediaCard, SmartMedia, CompactFlash, Microdrive, Memory Stick, Memory Stick PRO |
| Display resolution | 800 x 600 pixels (estimated) |
| Screen | LCD 7 inches (estimated) |
| Main functions | Slideshow, video/audio playback, brightness/contrast adjustment, image rotation, zoom |
| Power supply | Power adapter (included) |
| Remote control | Yes, with CR2025 lithium battery |
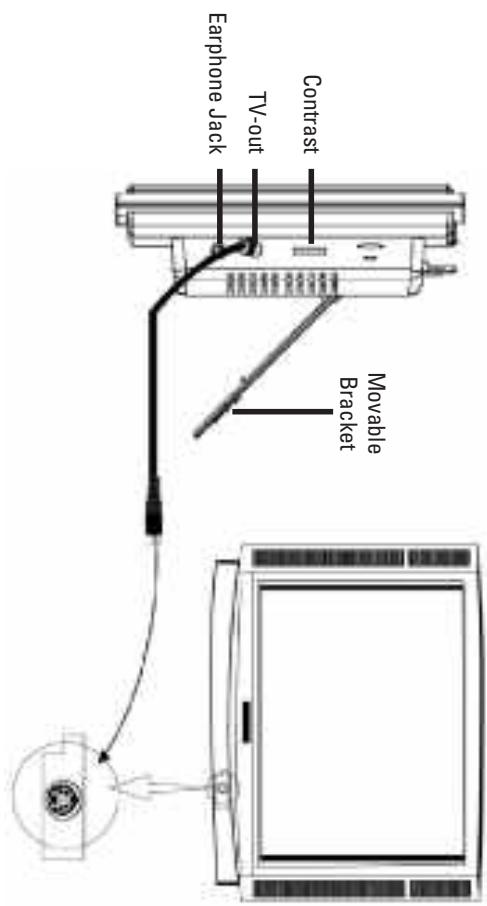
| TV output | Yes, via S-video cable |
| Audio output | Headphone jack for external speakers |
| Wall mounting | Possible with 6 mm screws |
| Dimensions (estimated) | 25 x 18 x 3 cm |
| Weight (estimated) | 500 g |
| Care and cleaning | Use a soft, dry cloth. Do not use abrasive products. |
| Safety | Do not expose to moisture. Disconnect before cleaning. Use the included adapter. |
| Spare parts and repairability | No user-serviceable parts. Contact HAMA customer service. |
Frequently Asked Questions - MADRID HAMA
User questions about MADRID HAMA
0 question about this device. Answer the ones you know or ask your own.
Ask a new question about this device
Download the instructions for your Digital photo frame in PDF format for free! Find your manual MADRID - HAMA and take your electronic device back in hand. On this page are published all the documents necessary for the use of your device. MADRID by HAMA.
USER MANUAL MADRID HAMA
86651 Monheim/Germany
Postfach 80
Hama GmbH & Co KG
hame®
www.chama.de
Digitale Fotolijst
natural_image
Black-and-white photo of a digital display frame with a beach scene, alongside a small electronic device (no visible text or symbols)natural_image
Diagram showing a device with an attached cable or connector and a power outlet, no text or symbols present.natural_image
Technical line drawing of a mechanical component with internal structure and mounting holes (no text or symbols)*Video files may not play properly if stored on a low speed card.
- Automatic slide show with multiple transition effects and display times.
- Plays slide show with MP3 music on the background.
- User-friendly on-screen display lets you access all controls easily.
- Includes a credit card style remote control - Bright 5.6" TFT active matrix LCD screen.
- Compatible with most digital cameras' stored JPEG images and motion JPEG files.
- Instantly plays MPEG-I files stored on supported memory cards ^* .
- Instantly plays MPEG-II files stored on Compact Flash Card (CF) ^* .
- Supports up to 12 Mega Pixels image files (JPEG format).
-
Instantly plays MP3 music with the integrated speakers.
-
Simply insert a compatible memory card into the digital frame to show photos, play MP3 music or supported video files (memory card not included).
- Compatible memory cards include Secure Digital Card (SD), MultiMedia Card (MMC), SmartMedia, Memory Stick, Memory Stick Pro, Microdrive, & Compact Flash (CF).
- Displays digital pictures (JPEG) without a computer.
Main Features
Chapter 1


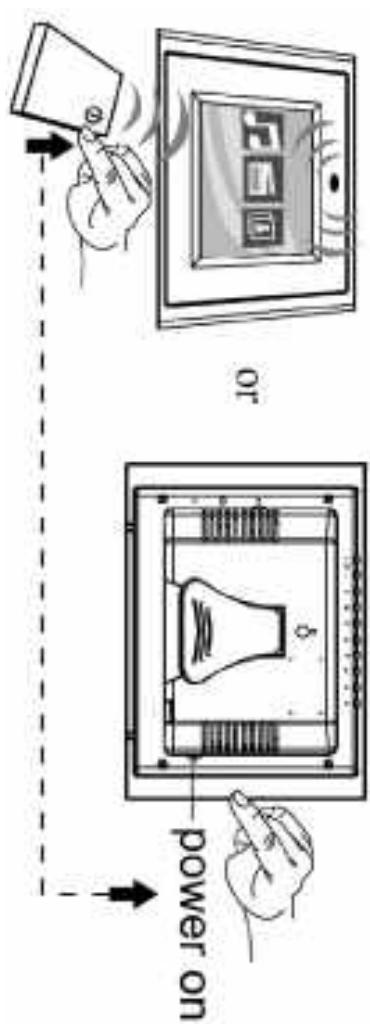
- Power on the Digital Picture Frame by pressing the power button on the remote control or on the left side of the digital frame.
There are three stages for the Digital Picture Frame bracket, please adjust it to at least the first stage for product stability before initial use.
Note:
Do not use the Digital Picture frame if conditions could allow condensation to occur, or damage may result.
Do not open the case of the Digital Picture frame. There is a risk of electric shock, and there are no user serviceable parts inside. Opening the case will void your warranty.
Always use the effect buttons on the memory storage cards slots to remove the memory storage cards.
Do not block the ventilation holes on the back of the Digital Picture frame at any time. Keep your digital picture frame out of sunlight. Direct sunlight may cause damage.
• To reduce the risk of fire or electric shock do not expose this appliance to rain or moisture.
• The digital picture frame is for indoor use only.
Preculations & Maintenance
Chapter 2
Chapter 3


natural_image
Diagram showing a device with an attached cable or connector and a power outlet, no text or symbols present.- Adjust the Digital Picture Frame bracket on the back to the widest degree for dropping stability then Plug the power adapter into an electrical outlet.
Getting Started

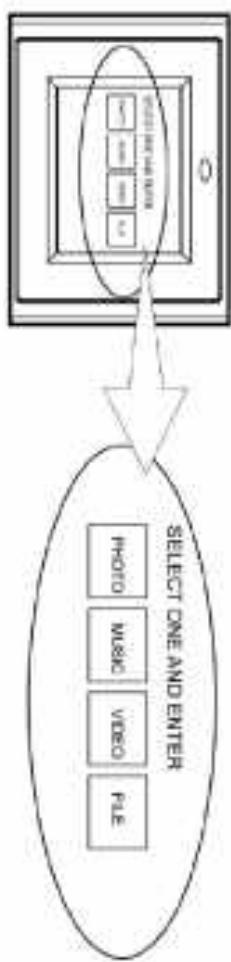
flowchart
graph TD
    A["File"] --> B["Select one and enter"]
    C["Video"] --> B
    D["Photo"] --> B
    E["Micro"] --> B
    F["Video"] --> B
    G["Photo"] --> B
    H["Micro"] --> B
    I["Video"] --> B
    J["Photo"] --> B
    K["Micro"] --> B
    L["Video"] --> M["Device Interface"]
You will see the following screen if you insert the memory card correctly. Make sure you have at least one picture stored on the memory card. The frame will not function properly without a stored picture.
Digital pictures stored in other formats will be ignored by the device. Note: The digital picture frame will ONLY rec Guineaised digital pictures stored in JPEG format.
flowchart
graph TD
    A["Device 1"] --> B["Processing Unit"]
    C["Device 2"] --> B
    D["Device 3"] --> B
    B --> E["Monitor"]
    B --> F["Server"]
    G["Computer"] --> H["Data Bus"]
    H --> I["Server"]
    style A fill:#f9f,stroke:#333
    style C fill:#f9f,stroke:#333
    style D fill:#f9f,stroke:#333
    style G fill:#f9f,stroke:#333
    style H fill:#ccf,stroke:#333
    style I fill:#ccf,stroke:#333
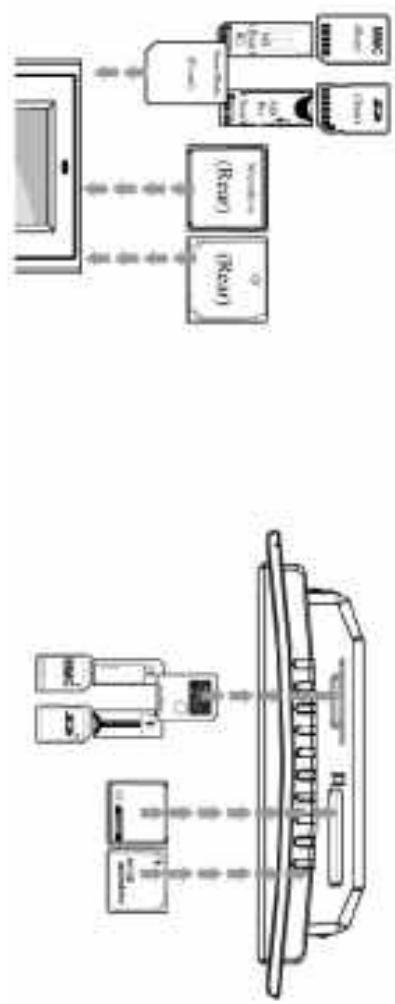
Have inserted it the wrong way. Insert the memory card with the front label facing AWAY from you. Do not force the memory card into the memory slot. If you are not able to easily insert the memory card completely, you may
- Microdrive® - CompactFlashTM (CF) Card - Memory StickTM & Memory Stick ProtM
- SmartMedia Card - Multimedia Card TM (MMC) - Secure DigitalTM Card (SD) the digital picture frame is compatible with the following memory cards:
Inserting Memory Cards
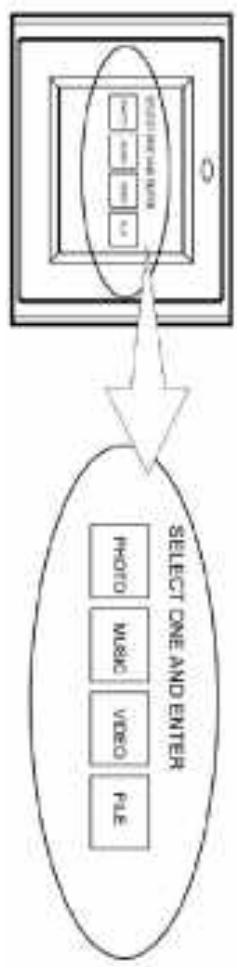
Viewing Pictures
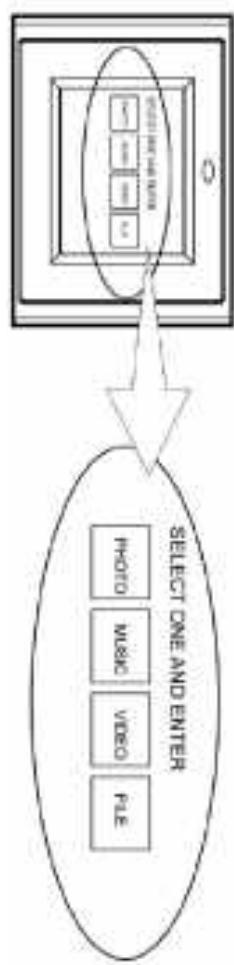
flowchart
graph TD
    A["SELECT ONE AND ENTER"] --> B["File"]
    A --> C["Video"]
    A --> D["Photo"]
    A --> E["Music"]
- You can use either the remote control or the on-board buttons to control the Picture Frame.
- Remove the plastic battery insulator (if any) on the bottom of the remote control and make sure the remote control has a battery installed. See "Installing and replicating battery" section if you need a new battery.
- Use the remote control to highlight and select the Photo folder (Use the direction keys Right, left on the remote control to navigate and press Enter to select).
See "Advance Settings" section for more control settings.
-
To disable the slideshow function, select Setup, Slideshow Setup, Slideshow Mode and Manual. You will be able to change the displayed picture by pressing Next (15) or Previous (16) key.
-
Use the Down key to select the Interval Time. Use the Right direction key to enter the time sections. Move up and down to select the desired transition time of a picture and press Enter to select. Press Setup button to exit the Setup menu. Note: The Interval Time functions only when the Slide Show Mode is set to Auto.
-
Adjust the contrast of the screen using the Contrast Dial on the right side of the frame.
- Press the Brightness key (13) to adjust the brightness setting.
- Press Setup button on the remote control to enter the Setup Menu.
-
Move to Slideshow Setup by pressing the Down button. Presses Enter to continue.
-
Highlight a picture and press Enter to view the picture.
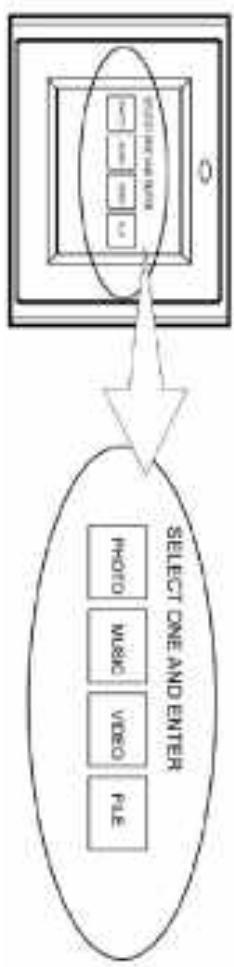
flowchart
graph TD
    A["SELECT ONE AND ENTER"] --> B["File"]
    A --> C["Video"]
    A --> D["Photo"]
    A --> E["Music"]
- MPEG-II (stored on CF Card only. Other memory cards may not play properly) Before you are able to watch video, you must first store video files on the memory card.
- MPEG-1 - Motion JPEG (avi): video format used by most digital cameras
The Digital Picture Frame supports the following video formats:
Watching video
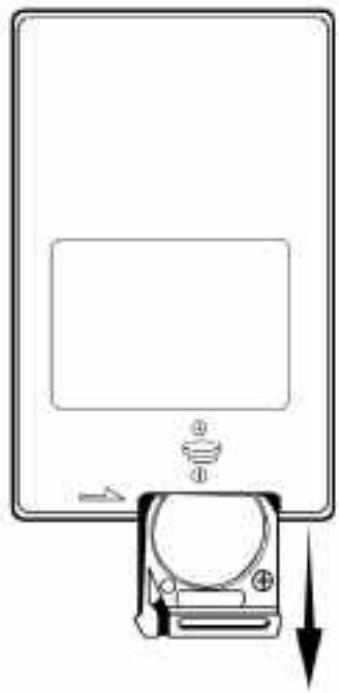
- Place the Remote Control with the control buttons facing downward.
- While pressing down on the ridged area of the battery cover pull the tray out.
- Place a "CR2025" lithium battery on the tray with the positive "+" end facing toward you.
-
Close the tray.
-
Adjust the volume by using volume up/down key (10).
- Fast forward or rewind by pressing the Ff (17) or FR (18) key.
- Press Next (15) or Previous (16) key to select a different music file. See "Advance Settings" section for more control settings.
flowchart
graph TD
    A["File"] --> B["Video"]
    B --> C["Photo"]
    C --> D["Micro"]
    D --> E["Select One and Enter"]
    F["Data"] --> G["Output"]
    H["Input"] --> I["Output"]
- Use the Remote Control's Right and Left Key Highlight and Select the Music folder.
- Highlight and Select the music file you want to play by pressing the direction keys and the Enter button.
Before you are able to listen to the MP3 music, you must first store MP3 music files on the memory card (see Q8A section for more information).
Listening to MP3 music
| (1) | Power on/off | (9) | Setup | (17) | FF(Fast Forward) |
| (2) | Right | (10) | Volume up/down | (18) | FR(Fast Rewind) |
| (3) | Left | (11) | Info | (19) | NTSC/PAI |
| (4) | Enter | (12) | Repeat | (20) | Picture Rotate |
| (5) | Down | (13) | Brightness | (21) | Zoom in/out |
| (6) | Up | (14) | Mute | (22) | Stop |
| (7) | Menu | (15) | Next | (23) | Play/pause |
| (8) | PIC+MP3 | (16) | Previous |

Locations of Controls
Use the supplied S-video out cable to connect the digital picture frame to a TV. Turn off both the frame and the TV before you make the connection.
TV Connection
You can browse all the picture, music and video files under the File Structure. You can also select and play any supported file by pressing the Enter button.
flowchart
graph TD
    A["Select one and center"] --> B["Video"]
    A --> C["Music"]
    A --> D["Photo"]
    B --> E["Device 1"]
    C --> F["Device 2"]
    D --> G["Device 3"]
    E --> H["Output Module"]
    F --> H
    G --> H
Highlight and select the Fine folder.
Viewing File Structure
See „Advance Settings“ section for more control settings.
-
Press Next (15) or Previous (16) key to select a different video clip.
-
Fast forward or rewind by pressing the FF (17) or FR (18) key.
-
Adjust the volume by using volume up/down key (10).
-
Highlight and select the video you want to watch by pressing the direction keys and the Enter button.

flowchart
graph TD
    A["Photo"] --> B["Audio"]
    B --> C["Video"]
    C --> D["File"]
    E["Select One and Enter"] --> F["Device with 12+ units"]
- Highlight and select the video folder.
Note: For the appropriate screw size #6 is advised.

natural_image
Technical line drawing of a device casing with internal components and mounting brackets (no text or symbols)The 7mm mounting hole on the back of the Digital Picture Frame as below is used to mount your Digital Picture Frame. When wall mounted, make sure the mounting hole aims at the #6 screw then mount the picture frame directly and slightly.
Mounting Digital Picture Frame
Connect speakers to the earphone jack located on the right side of the picture frame.
Speaker Connection
| Chapter 5TroubleshootingSymptom | Cause and/or Correction Actions | The POWER conncetor to the unit is not securely inserted.> Make sure you connect the AC adapter to the frame |
| Digital Frame doesn't power on. | ||
| No Start-up screen. | ||
| • Memory card is not inserted correctly. | • Incompatible file format. | |
| • No photo, music, or video file on the memory card. | • Acceptable Photo format: JPEG | |
| • Verify if the way you inserted the card is correct. Make sure there is at least one supported photo, music. | • Acceptable Video format: Motion JPEG (avi), MPEG-1. | |
| or video file on the memory card. | • Acceptable Video format: Motion JPEG (avi), MPEG-1. | |
| • Compatible Photo format: JPEG | • Compatible Video format: MP3 | |
| < Compatible Photo format: JPEG | < Compatible Video format: Motion JPEG (avi), MPEG-1. | |
| > Compatible Photo format: JPEG | > Compatible Video format: Motion JPEG (avi), MPEG-1. | |
| • Comparable Photo format: JPEG | • Comparable Video format: Motion JPEG (avi), MPEG-1. | |
| • Make sure there is at least one supported picture file | • Make sure there is at least one supported picture file | |
| > Make sure there is at least one supported picture file | > Make sure there is at least one supported picture file | |
| > Select PHOTO folder first. | > Select PHOTO folder first. | |
| > Presses PIC + MPS button after entering the PHOTO folder. | > Presses PIC + MPS button after entering the Photo folder. | |
| > Make sure you store at least one MPS music file on the memory card. | > Make sure you store at least one MPS music file on the memory card. | |
| • Check if the NTSC/PAI setting is correct. | • Presses PAL/NTSC button to set the correct setting | |
| • Presses PAL/NTSC button to set the correct setting | • Check if the NTSC/PAI setting is correct. | |
| TV-OUT does not work. | • Incorrect operation | |
| PIC + MPS button does not work. | • Incorrect operation |
| 0 & A | Answer | What photo, music, and video formats are supported by the digital frame? |
| What photo, music, and video formats are supported by the digital frame? | ||
| What digital frame? | ||
| What memory cards are compatible with the digital frame? | ||
| Secure Digital Card (SD) | ||
| Multimedia Card (MMC) | ||
| Music: MP3 | ||
| Video: Motion JPEG (avi), MPEG-1, MPEG-11. | ||
| < Use a photo editing software to resample the picture's resolution to 640x480. | ||
| > Use a photo editing software to resample the picture's resolution to 640x480. | ||
| This is normal since different digital cameras take pictures in variations of resolutions (or pixels). | ||
| < Use a photo editing software to resample the picture's resolution to 640x480. | ||
| > Most digital cameras take video in 320x240 or lower resolution. The best supported resolution of a photo or video is 640x480. Use the Zoom button on the remote control to enlarge it. | ||
| Control to enlarge it. | ||
| Small video size on the screen. | ||
| Low video resolution | ||
| > Low video resolution | ||
| > Slow memory card. | ||
| > Make sure you use a high-speed memory card to play video files. | ||
| > If you want to play a MPEG-11 video make sure you store the file on a CompacFlash Card. |
| Does the digital frame have built-in memory?Can I insert multiple memory cards?What is the maximum picture size the digital frame can display?Does it play every type of AVI video file?What is the best picture resolution when the compactFlash card?You can play MPEG-1 and MPEG-11 files stored on memory cards other memory card. You may be able to play MPEG-11 files properly using a high speed SD card. Buy a S-video to composite video adapter and use it to connect the frame to your TW. Note: The rotated picture will return to its original orientation after you power down the digital frame.Can I adjust the colours of the picture?No. All colour settings are present at the factory. You can only adjust the brightnesses and contrast of the screen. |
| Specifications5.6" Active Matrix LCD. |
| Display: |
| Memory: |
| I/O: |
| Remote Control: |
| AC Adapter, Input 100-240V, Output 12V, 1.5A |
| Remote Controller: |
| Speakers (stereo)S-video (NTSC/PAL) |
| 8MB SDRAM |
Product and brand names mentioned in this manual are trademarks or registered trademarks of their respective holders. Specifications subject to change without notice.
MENU DE REGLAGE....47
LECTURE D'IMAGE AVEC MUSIDUE MP3....47
PARA M E T R E S A V A N C E S 47
MUR 46
FIXATION DU CADRE PHOTO NUMERIOUE AU
BRANCHEMENT DE HAUT-PARLEURS....46
[Non-Text]
[Non-Text]
AFFICHER LA STRUCTURE DES FICHERS....45
LECTURE DE VIDEOS....44
[Non-Text]
LECTURE DE FICHERS MUSIOUE MP3....44
[Non-Text]
INSEPTION ET REMPLACEMENT DES PILERS. 43
POSITIONS DES TOUCHES DE FUNCTION....43
AFFICHER DES IMAGES. 42
MISE EN PLACE DE CARTES MEMOIRE....41
MISE EN ROUTE 40
CONSIGNES DE SECURITE ET ENTRETIEN....39
FUNCTIONS 38
Sommare
DIMENSIONS ET POINTS.....52
CERTIFICATIONS....52
CARACTERISTIQUES TECHNOUES. 52
QUESTIONS ET REPOSES......50
Repeat Mode (Mode de repetition) 48
Movie Setup (Configuration de la lecture video)... 48
Transition (Effect de transition) 48
- I often repeat (repetition and assessment)
Sideshow Setup (Mode diagrama) 47
Sildenafil Setup (Confiruation du diaporima)....47
Repeat Mode (Mode de repetition) 47
Music Setup (Configuration de la lecture de
Transition Mode (Mode de transition) 47
Thunmbail Digest 47
Photo Setup (Confiliation for la Logitario di'impreso)42
natural_image
Diagram showing a device with an attached cable or connector and a power outlet, no text or symbols present.natural_image
Diagram showing a camera module interacting with a screen and a control panel (no text or symbols)natural_image
Technical line drawing of a device casing with internal components and mounting brackets (no text or symbols)Repeat Mode (Mode de repetition)
OMGEVINGSV00RWAWARDEN 69
Transition (overgang) 65
Folder Repeat (herhaling map)....65
Slidershow Setup (dishow inricthen) 64
Repeat Mode (herhaalmodus) 64
[Non-Text]
Photo Setup (totowegrave incithen)......64 Thumbail Diagest (wimachion)......64
hame ^8
hama®
natural_image
Diagram showing a device with an attached cable or connector and a power outlet, no text or symbols present.natural_image
Diagram showing a camera with directional arrows and a blank rectangular area, no text or symbols present.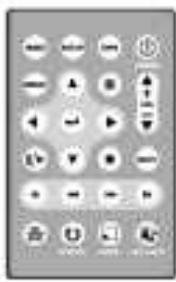
natural_image
Technical line drawing of a device casing with internal components and mounting brackets (no text or symbols)TV-aansuiting
Transition (overgang)
Repeat Mode (herhaalmodus)
Referenties
Video Output
OSD LANG
Brand : HAMA
Model : MADRID
Category : Digital photo frame