
VIAGGIO DUO-FIX K - Car seat PEG PEREGO - Free user manual and instructions
Find the device manual for free VIAGGIO DUO-FIX K PEG PEREGO in PDF.

| Product type | Car seat |
| Brand | PEG PEREGO |
| Model | VIAGGIO DUO-FIX K |
| Weight groups | Group 0+ (0-13 kg) and Group 1 (9-18 kg) |
| Approval standard | UN/ECE R44/04 |
| Category | Universal with seat belts |
| Installation Group 0+ | Rear-facing, 3-point belt, with inclined support |
| Installation Group 1 | Forward-facing, 3-point belt, with steady fix |
| Headrest adjustment | 7 positions |
| Backrest recline | 5 positions (only in Group 1) |
| Safety harness | 5-point, height adjustable |
| Reducing cushion | Included for Group 0+, remove for Group 1 |
| Anti-rotation device | Steady fix for diagonal belt |
| Cover washing | Machine wash at 30°C, delicate cycle, do not bleach, do not tumble dry |
| Shell material | Shock-absorbing plastic |
| Spare parts | Original Peg-Pérego available |
| Recommended lifespan | 7 years from production date |
| Serial number | Located under the seat |
Frequently Asked Questions - VIAGGIO DUO-FIX K PEG PEREGO
User questions about VIAGGIO DUO-FIX K PEG PEREGO
0 question about this device. Answer the ones you know or ask your own.
Ask a new question about this device
Download the instructions for your Car seat in PDF format for free! Find your manual VIAGGIO DUO-FIX K - PEG PEREGO and take your electronic device back in hand. On this page are published all the documents necessary for the use of your device. VIAGGIO DUO-FIX K by PEG PEREGO.
USER MANUAL VIAGGIO DUO-FIX K PEG PEREGO
Instructions for use
Notice d'emploi
Gebrauchsanleitung


UNIVERSAL CATEGORY 0-13 Kg
Group 0+
BELTED
EN• "Viaggio 0+1 Switchable" is fastened to the vehicle in a rear-facing position using the vehicle's seatbelt when used as a Group 0+ car seat (from 0 to 13 Kg).
natural_image
Line drawing of a car seat assembly with shaded seating area (no text or symbols)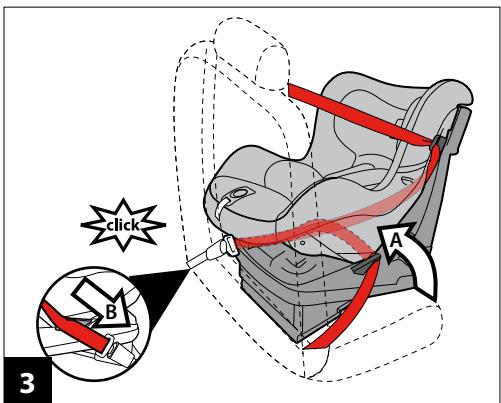
gr. 1
natural_image
Line drawing of a car seat assembly (no text or symbols)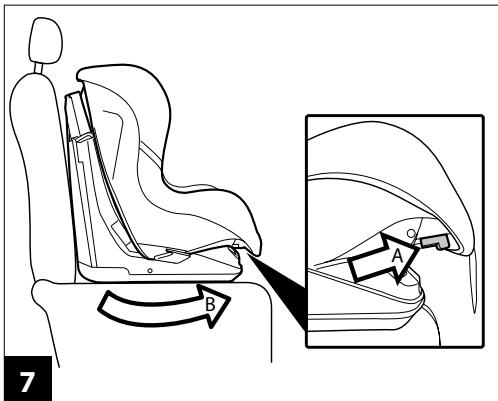
natural_image
Diagram of a car seat with red belt and arrows indicating seatbelting (no text or symbols)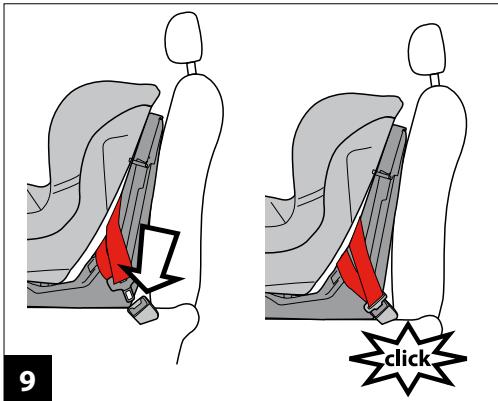
natural_image
Line drawing of a car seat assembly with a close-up inset showing the detail of the component (no text or symbols present)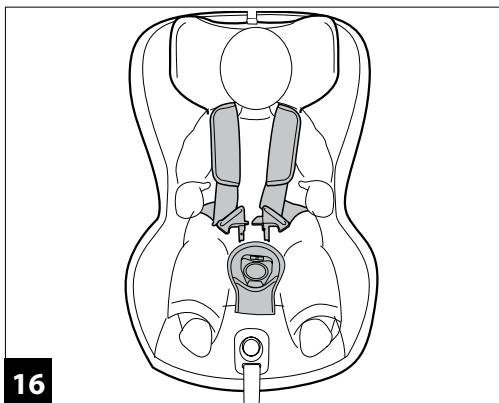
natural_image
Line drawing of a car seat assembly with no text or symbols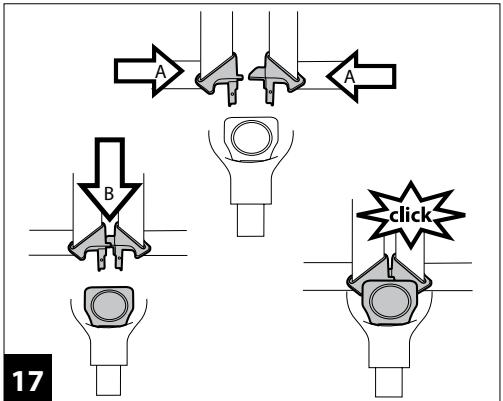
natural_image
Line drawing of a car seat assembly with no text or symbols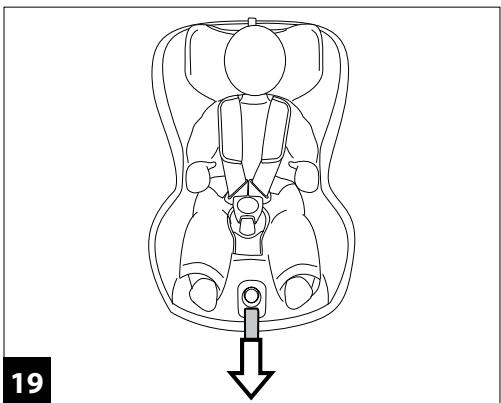
natural_image
Line drawing of a car seat with a downward arrow indicating motion or pressure (no text or symbols)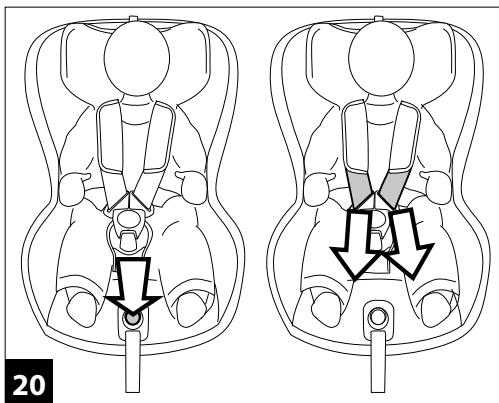
gr. 0+
natural_image
Line drawing of a car seat assembly (no text or symbols)
natural_image
Abstract diagram showing curved arrows forming a loop, no text or symbols present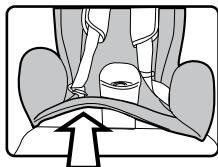
natural_image
Diagram of a mechanical or anatomical structure with no visible text, numbers, or symbols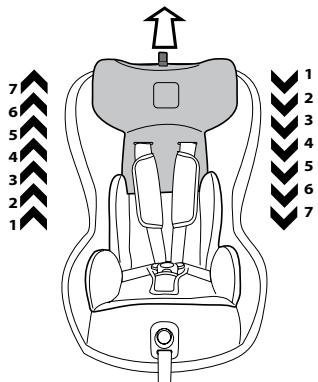
22
gr. 0+
23
gr. 0+
24
gr. 0+
25
gr. 1
26
gr. 1
27
gr. 1
28
natural_image
Technical diagram of a mechanical component with an inset showing a close-up of a fastener or fastener assembly (no text or symbols present)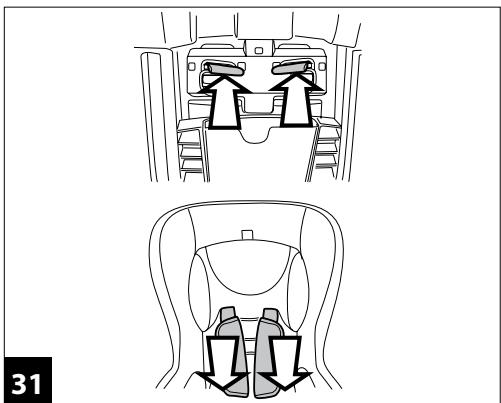
natural_image
Diagram showing two views of a car seatbelt with arrows indicating movement or force (no text or symbols present)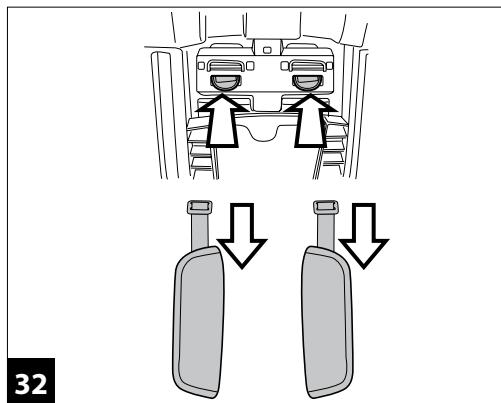
natural_image
Line drawing of a car seat assembly with an arrow indicating a specific seat (no text or symbols present)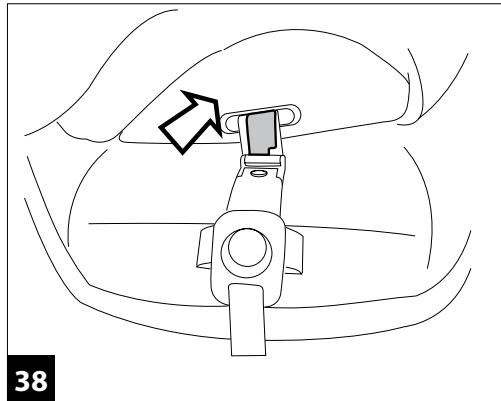
natural_image
Line drawing of a car seatbelt mechanism with a black arrow indicating the joint (no text or symbols present)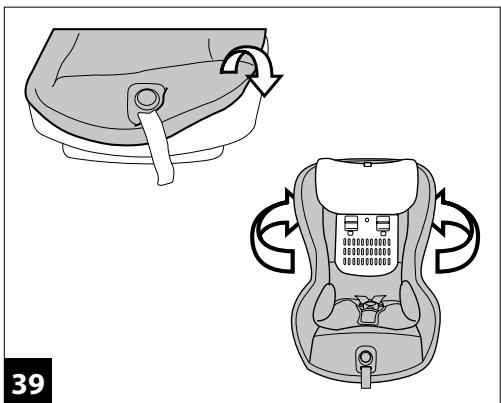
natural_image
Illustration of a car seat with two side-view diagrams showing seat positioning and rotation (no text or symbols)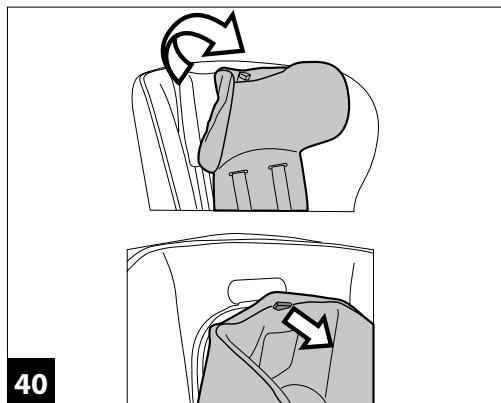
natural_image
Line drawing showing two views of a mechanical component with clamps, no text or symbols present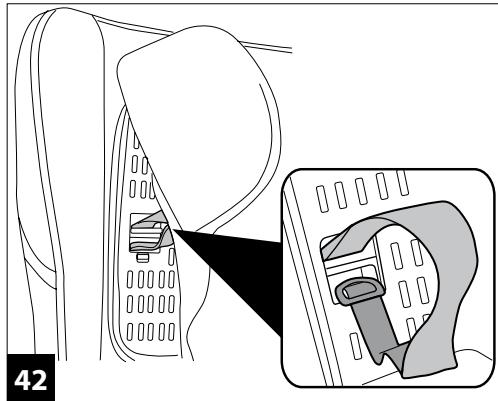
natural_image
Diagram showing a device being inserted into a socket, with an inset close-up of the socket (no text or symbols present)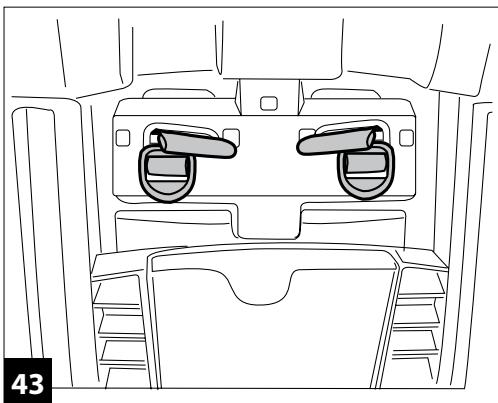
natural_image
Line drawing of a car interior showing front and rear seats with two side lockers (no text or symbols)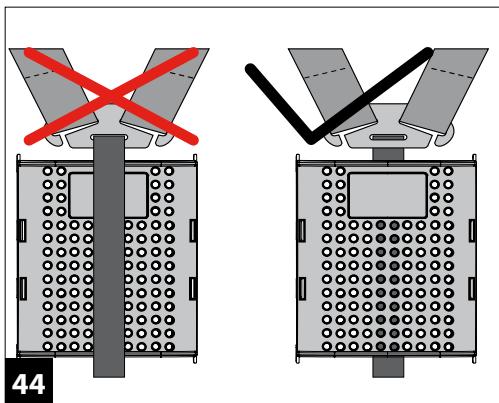


natural_image
Line drawing of a car interior showing the dashboard and seat area with an arrow pointing to a component (no text or symbols)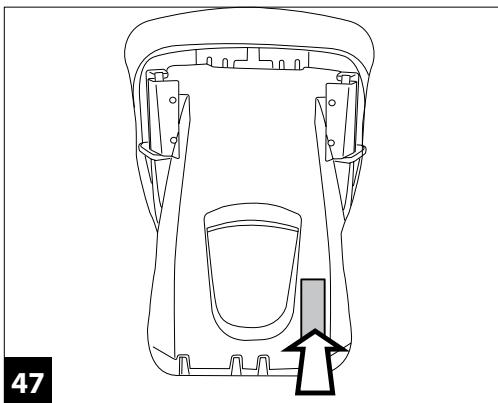
natural_image
Technical line drawing of a mechanical component with no visible text or symbols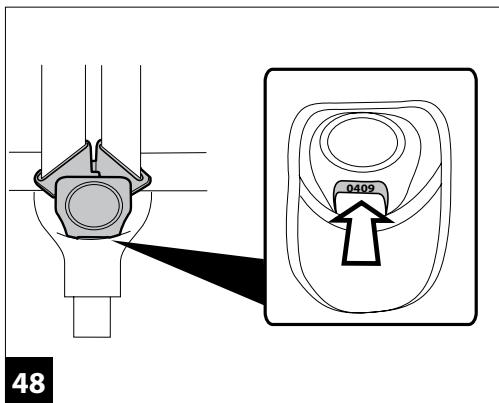
natural_image
Line drawing of a baby car seat with a cup and seatbelt (no text or symbols)
natural_image
Line drawing of a car seat with no text or symbols
natural_image
Technical line drawing of a mechanical component with no visible text or symbols
natural_image
Simple line drawing of two bottles with no text or symbolsEN• Spare parts available in different colours to be specified when ordering.
Thank you for choosing a Peg-Perego product.
Product characteristics
Features of the product Car seat, Group 0+, "Universal" category with vehicle seatbelt
- Type-approved under European standard ECE R44/04, for children of weight up to 13 kg (from birth to approximately 1 year).
- Suitable for installation on most, but not all vehicle seats.
- The car seat can be correctly installed if the vehicle's use and maintenance manual indicates compatibility with "Universal" Groups 0+ restraint systems.
- This car seat is classed as "Universal" in compliance with stricter type approval criteria than previous models that do not have type approval labels.
- The car seat can only be used in type approved vehicles, fitted with static or inertia-reel three-point seatbelts, approved under regulation UN/ECE no. 16 or equivalent standards.
- It must not be used with two-point or lap seatbelts.
Car seat, Group 1, "Universal" category with vehicle seatbelt
- Type approved under European standard ECE R44/04, for children of weight from 9 to 18 kg (9 months to 4 years approx).
- Suitable for installation on most, but not all vehicle seats.
- The car seat can be correctly installed if the vehicle's use and maintenance manual indicates compatibility with "Universal" Group 1 restraint systems.
- This car seat is classed as "Universal" in compliance with
stricter type approval criteria than previous models that do not have type approval labels.

IMPORTANT
- "Viaggio 0+1 Switchable" must be installed in a rear-facing position when used as a Group 0+ car seat and in a forward-facing position when used as a Group 1 car seat.
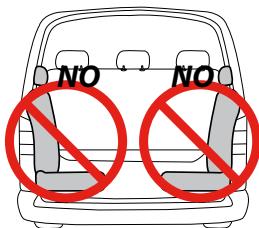
- Do not install "Viaggio 0+1 Switchable" on rear- or sideways-facing vehicle seats.
- When used as a Group 0+ car seat on the vehicle's front seat, the front airbag must be disabled.
- When used as a Group 1 car seat on the vehicle's front seat, the car seat should be positioned as far as possible from the dashboard.
- This item has a progressive serial number.
- If you experience any difficulty fitting "Viaggio 0+1 Switchable", lift up or remove the vehicle's headrests.

WARNING
- Read the instructions carefully before use and keep them in the folder provided for future reference. Failure to closely follow the car seat installation instructions will put your child at risk.
- "Viaggio 0+1 Switchable" must be assembled and installed by adults.
- The car seat must be assembled and installed when the child is not seated in it.
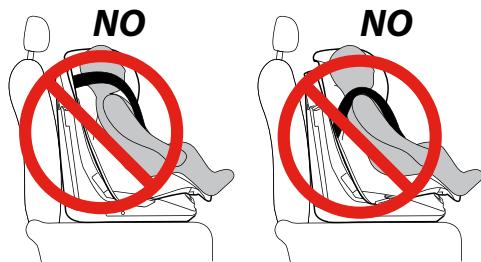
- When travelling in the vehicle, never hold your child in your arms or allow him/her to sit on the vehicle seats. In the event of sudden braking, even at low speeds, the child might easily be flung forward.
- Do not insert fingers into the mechanisms.
- When travelling take special care to make sure that luggage or other objects do not injure the child sitting in the car seat in the case of an accident.
- Do not use installation methods other than those indicated; this would result in the risk of detachment
from the seat in the case of an accident.
- Ensure that the vehicle's three-point seatbelt fixing the car seat is always taut and not twisted. It should be replaced in the case of heavy stress as a result of an accident.
- Never leave your child unattended in the car seat: watch him/her even when s/he is sleeping.
- Never remove the child from the car seat when the vehicle is in motion.
- Make sure that the car seat is not blocked by a mobile part of the vehicle seat or by a door.
- Adjust the height and tension of the shoulder straps, ensuring that they are as snug to the child's body as possible without constricting him/her too much. Check that the harness is not twisted and that the child does not release it.
- This car seat is not intended for prolonged periods of sleeping.
- Do not leave the car seat in the vehicle when exposed to the sun. Some parts might heat up and be harmful to the delicate skin of your child. Check the seat is not too hot before seating your child.
- Do not use the car seat without its fabric cover; this must not be replaced with one not approved by the manufacturer since it is an integral part of the car seat and the safety system.
- If in doubt, contact the manufacturer or retailer of the car seat.
- Do not remove the adhesive and stitched labels since this might make the product not compliant with legal requirements.
- Do not use the car seat if it has signs of breakage or missing parts, if it is second-hand or if it has been subjected to heavy impacts in an accident, because it might have suffered extremely dangerous structural damage.
- Do not alter the product.
- For any repairs, replacement parts and information about the product, contact the after-sales assistance
service. Contact information is provided on the last page of this manual.
- The car seat must always be secured in the vehicle, even when the child is not sitting in it; in the event of sudden braking, it could injure the passengers.
- Do not use this car seat if more than seven years have elapsed from the date of production indicated on the structure; the natural aging of the materials may mean the car seat is no longer compliant with safety standards.
- Do not use accessories that have not been approved by the manufacturer or by the competent authorities.
Instructions for use UNIVERSAL CATEGORY - Belted Group 0+ Fastening with seatbelts
-
IMPORTANT: For the correct use of the "Viaggio 0+1 Switchable" car seat in Group 0+ mode, it is necessary to:
-
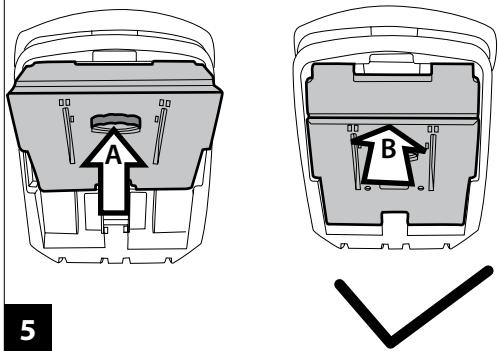
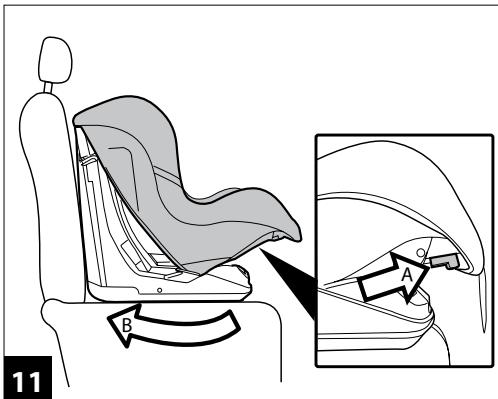
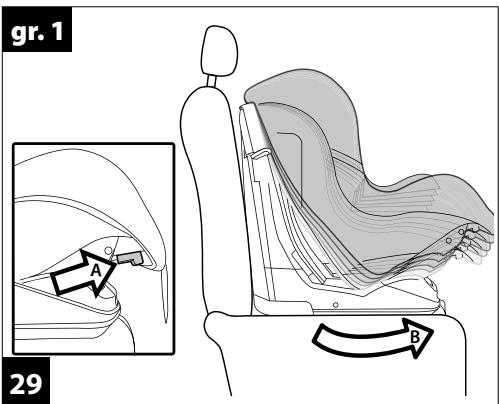
Extract from under the seat the casing that enables the car seat to be reclined.
To extract it, press the handle and pull it towards you, extracting the base (arrows A and B). - Use the lever (arrow C) to recline the seat to its highest position.
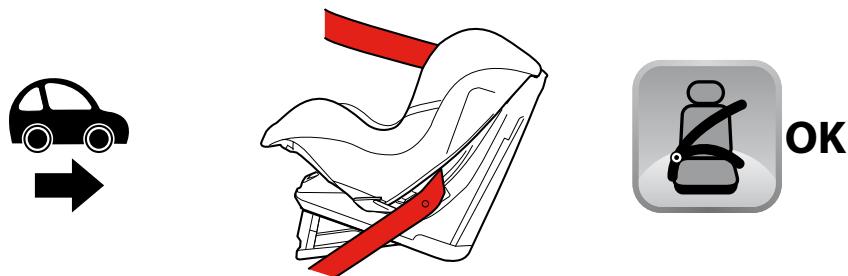
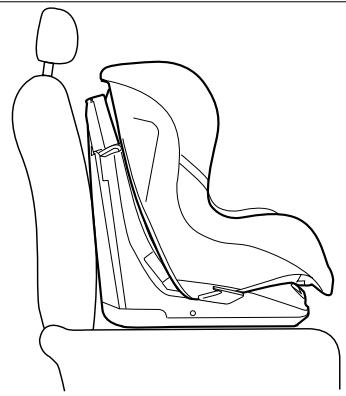
2• "Viaggio 0+1 Switchable" car seat correctly installed to be used as a Group 0+ car seat.
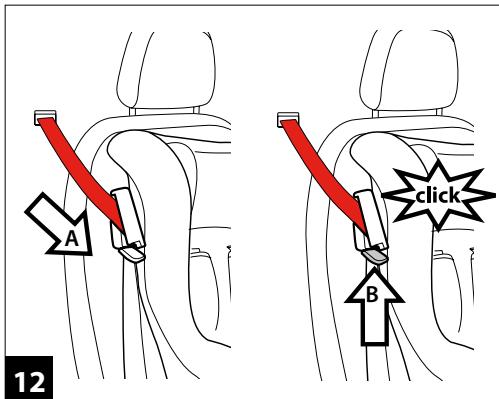
3• Install the "Viaggio 0+1 Switchable" car seat on the vehicle's seat so that it is rear-facing, as shown in the figure. Pass the vehicle seatbelt between the frame and body of the car seat following these steps:
- slip the belt into the light blue belt guides first (arrow A); - fasten the belt, ensuring that it clicks into place (arrow B);
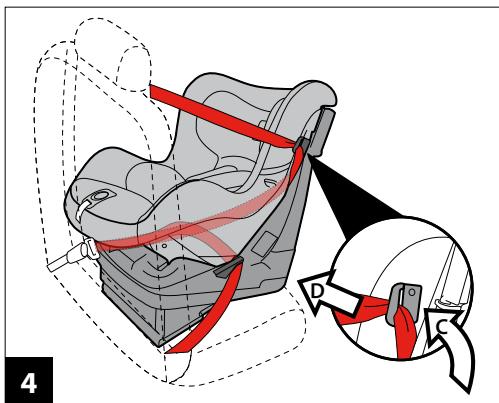
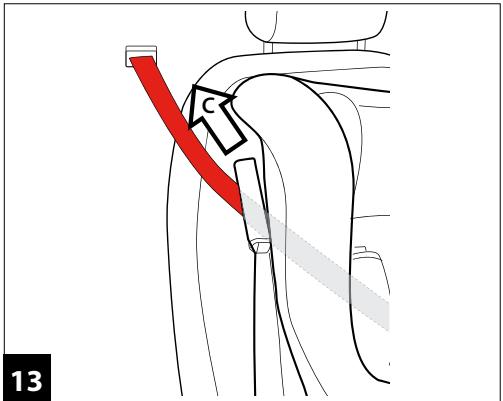
4• Pass the seatbelt through the upper light blue belt slot (arrow C).
IMPORTANT: Take hold of the seatbelt and pull it firmly, so as to ensure that the "Viaggio 0+1 Switchable" fits as close as possible to the vehicle seat (arrow D).
Instructions for use UNIVERSAL CATEGORY - Belted Group 1 Fastening with seatbelts
- IMPORTANT: For the correct use of the "Viaggio 0+1 Switchable" car seat in Group 1 mode, it is necessary to:
- Reposition the casing within the base of the car seat. Press the lever and push inwards, as indicated in the figure.
6• Install the "Viaggio 0+1 Switchable" car seat on the vehicle's seat so that it is front-facing, as shown in the figure.
7• To make it easier to pass the vehicle's seatbelts through the back of the car seat, it is necessary to recline the car seat to its lowest position by operating the lever, as shown in the figure.
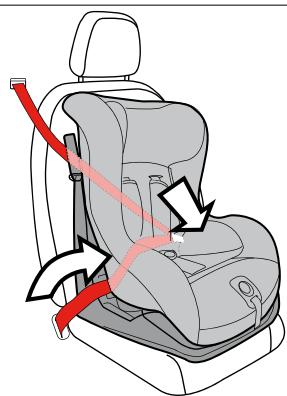
8• Pass the vehicle seatbelt between the frame and body of the car seat.
- The waist strap must pass through the lower guides, marked in red; fasten the belt, ensuring that it clicks into place.
10• Tighten the waist strap, ensuring it has passed through the lower guides, marked in red.
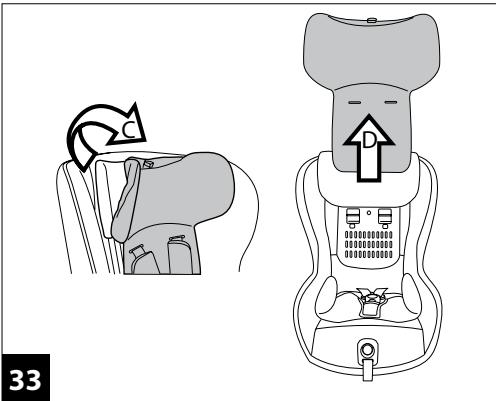
11• Bring the car seat back into the upright position by pulling the handle below the seat (Fig. A) and pushing the car seat as shown in the figure (Fig. B).
12• To complete the installation process, use the Steady Fix device: open the clip and pass the diagonal strap through it, ensuring that it is taut and not twisted (Fig. A). Close the safety tab (Fig. B).
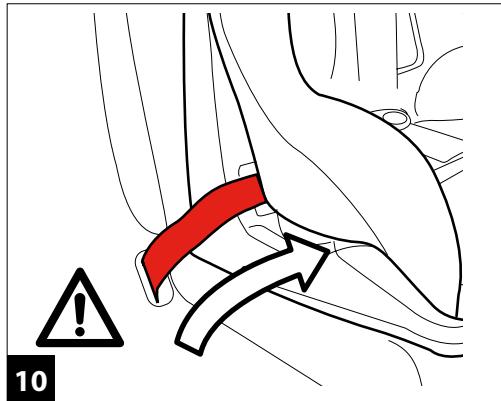
- IMPORTANT: Take hold of the seatbelt and pull it firmly upwards, so as to ensure that the "Viaggio 0+1 Switchable" fits as close as possible to the vehicle seat (Fig. C).
Once installed, the car seat may be reclined to the desired position (See Point 6).
How to secure your child in the "Viaggio 0+1 Switchable" car seat
14• Before placing the child in the car seat, release the
harness by pushing the red button on the crotch strap buckle.
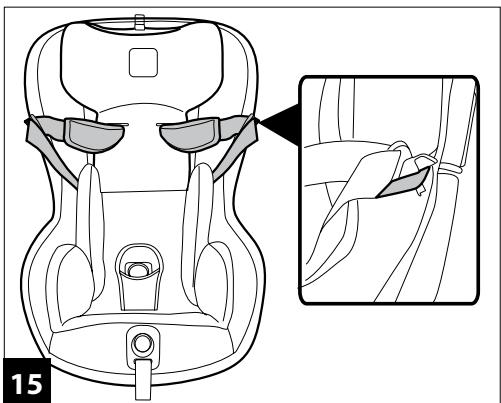
15• Lift the harness and attach the buckles to the elastic bands on the sides.
16• Place the child in the car seat and arrange the harness over the child's shoulders and waist, as shown in the figure.
17• Lock the harness by overlapping the tongues and inserting them into the buckle of the crotch strap until they click into place.
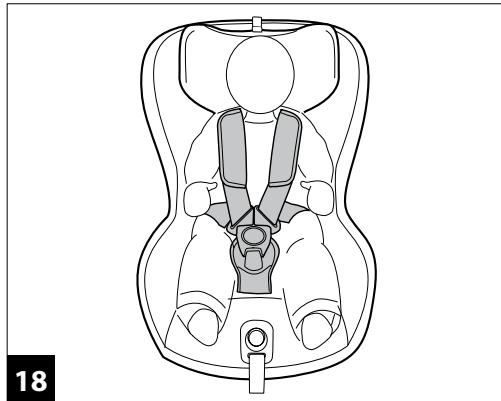
18• The child is now sitting correctly with the harness fastened properly.
19• Finally, tighten the shoulder straps until they are snug to the child's body by pulling the central adjustment strap towards you, as shown in the figure, taking care not to over-tighten the straps.
IMPORTANT: Leave minimal slack (the space of a finger) between the strap and the child's chest.
20• To slacken the straps, press the button at the centre of the car seat and at the same time pull the straps towards you.
⚠️ IMPORTANT: Take hold of the straps under the shoulder pads and pull, as shown in the figure.
21• The car seat has a booster cushion which is only suitable for small babies. When the child is older, remove the booster cushion.
- To remove the booster cushion, unfasten the seatbelts, slide them off the booster cushion and slide the crotch strap out through the slot in the booster cushion.
IMPORTANT: The booster cushion must be removed when the "Viaggio 0+1 Switchable" is used as a Group 1 car seat.
How to adjust the height of the headrest
The headrest must be adjusted to match the child's height. There are 7 positions.
22• To change from a lower position to a higher one: pull the tongue in the upper central part of the headrest upwards. The headrest will move at the same time. To change from a higher position to a lower one: pull the tongue in the upper central part of the headrest upwards and, at the same time, push the headrest down to the desired position.
When you have finished, try moving the headrest to check it is properly locked into place.
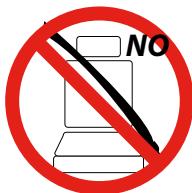
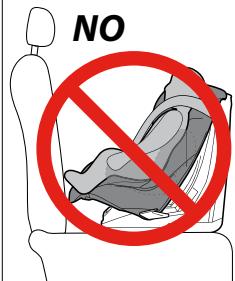
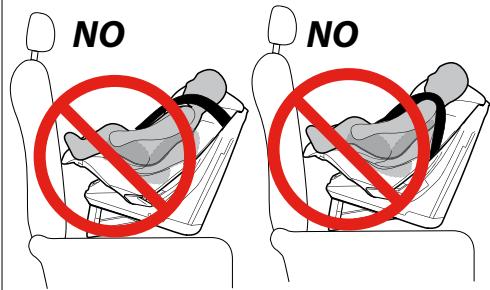
23• WARNING: Do not use the car seat in Group 0+ mode without first extracting the casing, as shown in point 1 A-B (Fig.A).
WARNING: Do not use the car seat in Group 0+ mode without first reclining the backrest, as shown in point 1C (Fig.B).
-
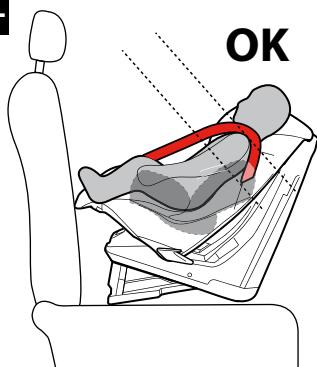
Use in Group 0+ mode: To determine the best shoulder strap position, bear in mind that the child's shoulders must be just above the shoulder strap guides.
-
⚠ IMPORTANT: The straps must not be too high or too low with respect to the child’s shoulders.
-
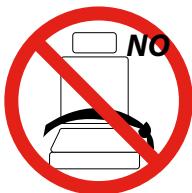
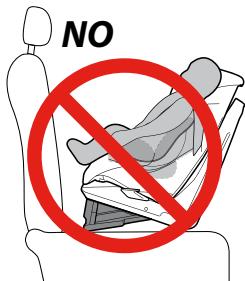
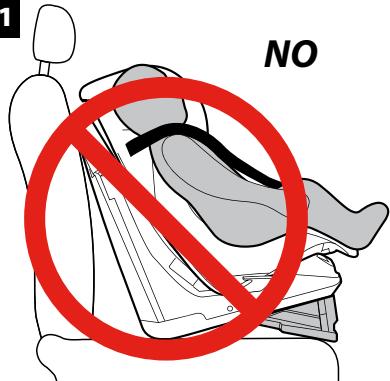
WARNING: Do not use the car seat in Group 1 mode with the casing extracted.
-
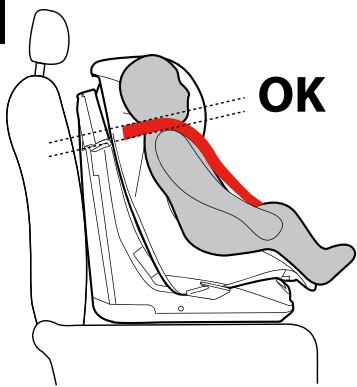
Use in Group 1 mode: To determine the best shoulder strap position, bear in mind that the child's shoulders must be just below the shoulder strap guides.
-
⚠ IMPORTANT: The straps must not be too high or too low with respect to the child’s shoulders.
-
IMPORTANT: The "Viaggio 0+1 Switchable" car seat can be reclined into 5 different positions only when it is used in Group 1 mode.
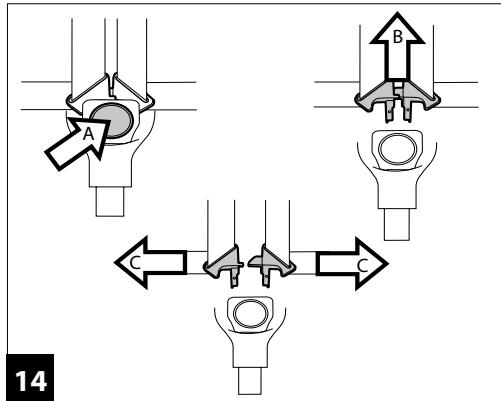
To recline the car seat, press the lever under the seat (Fig.A) and pull to adjust the seat to the desired position (Fig.B).
How to remove the soft cover
To remove the soft cover of the "Viaggio 0+1 Switchable" car seat:
- Remove the booster cushion, where present (point 20).
- Unfasten the harness (point 13).
- Open the rear panel.
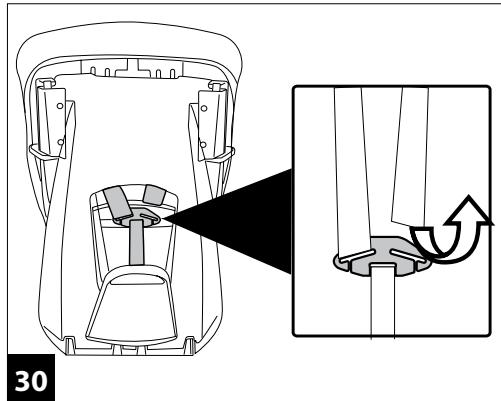
30• Unfasten the straps from the rear latch plate.
31• Unfasten the straps on the rear and slip them out from the front.
32• Unfasten the shoulder pads from the rear and slip them off the straps from the front.
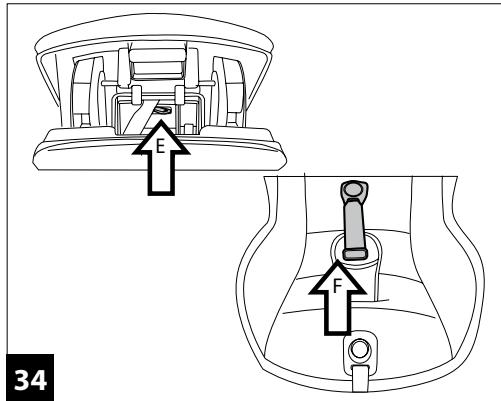
33• Slip off the adjuster strap (Fig. C) and then remove the headrest cover from above (Fig. D).
34• Release the crotch strap from below the body (Fig. E) and slide the strap out through the crotch strap cover (Fig. F).
35• Slip the strap out through the opening in the soft cover and remove the soft cover, as shown in the figure.
Soft cover maintenance
Brush the fabric parts to remove dust.
- Before placing the soft cover in the washing machine, slide the foam rubber cushion out of the booster seat from the rear.
- Machine wash at a maximum of 30^ with a delicate wash setting and short spin cycle.
- Do not use chlorine bleach.
- Do not iron.
- Do not dry clean.
- Do not remove stains with solvents.
- Do not tumble dry.


How to replace the soft cover of the "Viaggio 0+1 Switchable" car seat
To replace the soft cover of the "Viaggio 0+1 Switchable" car seat:
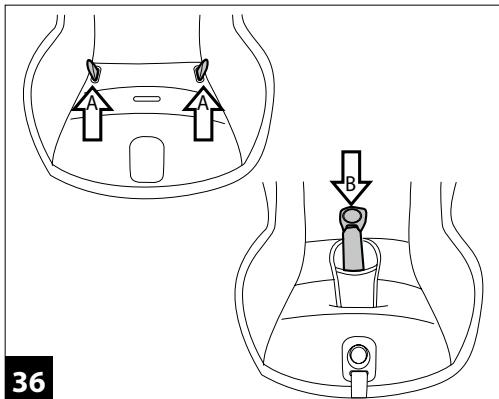
36• From below, slip the straps back in through the opening in the fabric (Fig. A).
- Reinsert the crotch strap into the soft cover (Fig. B).
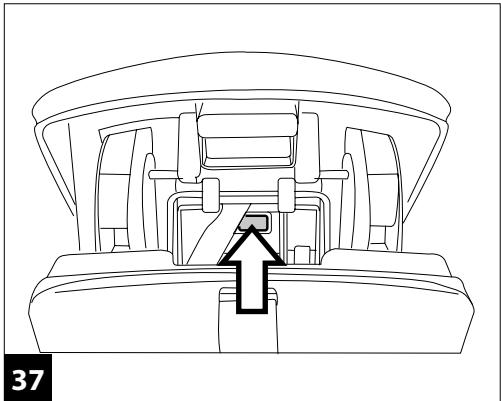
37• Fasten the crotch strap back onto the body.
38• Fasten the tongue to the crotch strap opening.
39• Put the soft cover in place, starting at the seat and moving upwards, paying attention to the sides of the backrest.
40• Slip the soft cover over the headrest, ensuring the red tongue passes through the opening in the fabric.
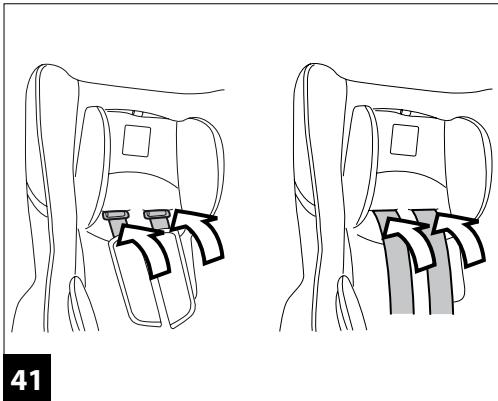
41• Insert the straps through the soft cover, starting with the buckles.
42• Lengthen the straps and insert them through the body of the car seat (the straps in the upper hole and the buckles in the lower one).
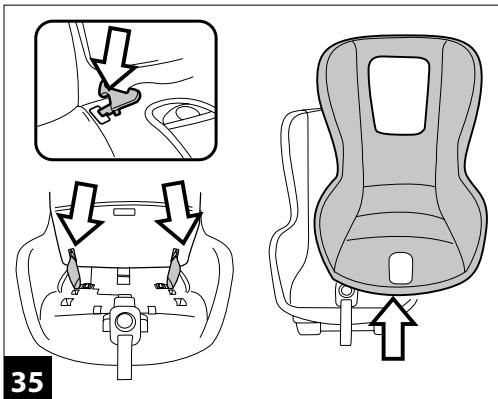
43• Fasten them correctly on the rear, as shown in the figure.
- Fasten the harness at the front (point 17).
44• ATTENTION: The central adjustment strap must pass between the body and the plastic shield, as shown.
45• Open the rear panel and fasten the straps onto the rear
IMPORTANT: The straps must not be twisted.
latch plate.
- Fasten the straps from the front (point 16).
- For infants and for use in Group 0+ mode, reposition the booster cushion.
Serial numbers
46• The following information can be found under the seat of the "Viaggio 0+1 Switchable": product name, production date and serial number.
47• The type approval label can be found behind the backrest of the "Viaggio 0+1 Switchable".
48• Harness production date.
In the event of problems with the product, these details will be of use to customers.
Product cleaning
- This product requires minimal maintenance. Cleaning and maintenance must only be carried out by adults.
- It is advisable to keep all the moving parts clean.
- Clean the plastic parts periodically with a damp cloth. Do not use solvents or similar substances.
- Brush the fabric parts to remove dust.
- Do not clean the polystyrene shock absorbing device with solvents or other similar products.
- Protect the product from atmospheric agents: humidity, rain or snow. Extended exposure to sunshine can cause colour changes in many materials.
- Store the product in a dry environment.
How to read the type approval label
- This paragraph explains how to interpret the type approval label (orange label).
- This car seat is type approved for one type of installation in vehicles: attachment system with static or inertia-reel three-point seatbelts (the term UNIVERSAL indicates compatibility of the car seat with vehicles fitted with this type of seatbelt).
- The top of the label displays the trademark of the manufacturing company and the name of the product.
• The letter E in a circle indicates the European type approval mark and the number indicates the country that issued the type approval (1: Germany, 2: France, 3:
Italy, 4: Netherlands, 11: Great Britain, 24: Ireland).
- Type approval number: if it starts with 04, this indicates the fourth amendment (the one currently in force) of Regulation R44.
• Reference standard: UN/ECE R44/04. - Production serial number: on issue of type approval, each car seat is personalised with its own number.
PEG-PEREGO S.p.A.

Peg-Perego S.p.A. is an ISO 9001 certified company. This certification is a guarantee for customers and consumers of the transparency and trustworthiness of the company's procedures and working methods. Peg Perego can make changes at any time to the models described in this publication for technical or commercial reasons. Peg Perego is at the disposal of its customers and consumers to ensure that all their demands and queries are fully satisfied. It is a key part of our policy to ensure we are always aware of our customers' views and requirements. We would therefore be very grateful if, after using a Peg Perego product, you take the time to fill in our CUSTOMER SATISFACTION QUESTIONNAIRE, making a note of any comments or suggestions you might have. You can find the questionnaire on the Peg Perego website: www.pegperego.com
Peg-Perego after-sales service
If any parts of the item get lost or damaged, only use genuine Peg Perego spare parts. For any repairs, replacements, information on the products and sales of genuine spare parts and accessories, contact the Peg Perego Assistance Service and state the serial number of the product, if present.
tel. 0039/039/60.88.213 fax 0039/039/33.09.992
All intellectual property rights on the contents of this manual are property of PEG PEREGO S.p.A. and are protected by the laws in force.
FR\_Français
respeitar as leis vigentes.
natural_image
Empty white rectangle with black border (no text or symbols)
natural_image
Empty white rectangle with black border (no text or symbols)PRIMO VIAGGIO SIP CONVERTIBLE
5.70
PRIMO VIAGGIO SIP CONVERTIBLE
5.65
Declaration of conformity
Product name
VIAGGIO 0+1 SWITCHABLE
PRIMO VIAGGIO SIP CONVERTIBLE
5.70
PRIMO VIAGGIO SIP CONVERTIBLE
5.65
Product reference number
IMVG ^ - IMCO ^
Reference Standards (origin)
UNI ECE R44/04 (EU)
FMVSS 571-213 (USA)
CMVSS 571-213 (CA)
Declaration of conformity
PegPerego S.p.A. declares, under its own responsibility, that the item in question has undergone a series of internal tests and has been certified by external independent laboratories, in compliance with current legislation.
Date and place of issue
Arcore, September 2012
PegPerego S.p.A.
via De Gasperi, 50
20862 Arcore (MB), ITALY
FR\_Français
PRIMO VIAGGIO SIP CONVERTIBLE
5.70
PRIMO VIAGGIO SIP CONVERTIBLE
5.65
PRIMO VIAGGIO SIP CONVERTIBLE
5.70
PRIMO VIAGGIO SIP CONVERTIBLE
5.65
Arcore, September 2012
PegPerego S.p.A.
Via De Gasperi, 50
20862 Arcore (MB), ITALIEN
ES\_Español
PRIMO VIAGGIO SIP CONVERTIBLE
5.70
PRIMO VIAGGIO SIP CONVERTIBLE
5.65


- UNIVERSAL CATEGORY 0-13 Kg
- Group 0+
- BELTED
- Thank you for choosing a Peg-Perego product.
- Product characteristics
- Features of the product Car seat, Group 0+, "Universal" category with vehicle seatbelt
- Car seat, Group 1, "Universal" category with vehicle seatbelt
- IMPORTANT
- WARNING
- Instructions for use UNIVERSAL CATEGORY - Belted Group 0+ Fastening with seatbelts
- Instructions for use UNIVERSAL CATEGORY - Belted Group 1 Fastening with seatbelts
- How to secure your child in the "Viaggio 0+1 Switchable" car seat
- How to adjust the height of the headrest
- How to remove the soft cover
- Soft cover maintenance
- How to replace the soft cover of the "Viaggio 0+1 Switchable" car seat
- IMPORTANT: The straps must not be twisted.
- Serial numbers
- Product cleaning
- How to read the type approval label
- PEG-PEREGO S.p.A.
- Peg-Perego after-sales service
- FR\_Français
- Declaration of conformity
- Product reference number
- Reference Standards (origin)
- Date and place of issue
- ES\_Español
Brand : PEG PEREGO
Model : VIAGGIO DUO-FIX K
Category : Car seat