
C920 REFRESH - Webcam LOGITECH - Free user manual and instructions
Find the device manual for free C920 REFRESH LOGITECH in PDF.
Download the instructions for your Webcam in PDF format for free! Find your manual C920 REFRESH - LOGITECH and take your electronic device back in hand. On this page are published all the documents necessary for the use of your device. C920 REFRESH by LOGITECH.
USER MANUAL C920 REFRESH LOGITECH
1. Carl Zeiss® autofocus HD 1080p lens
2. Microphone
3. Activity light
4. Flexible clip/base
5. Tripod attachment
6. Product documentation
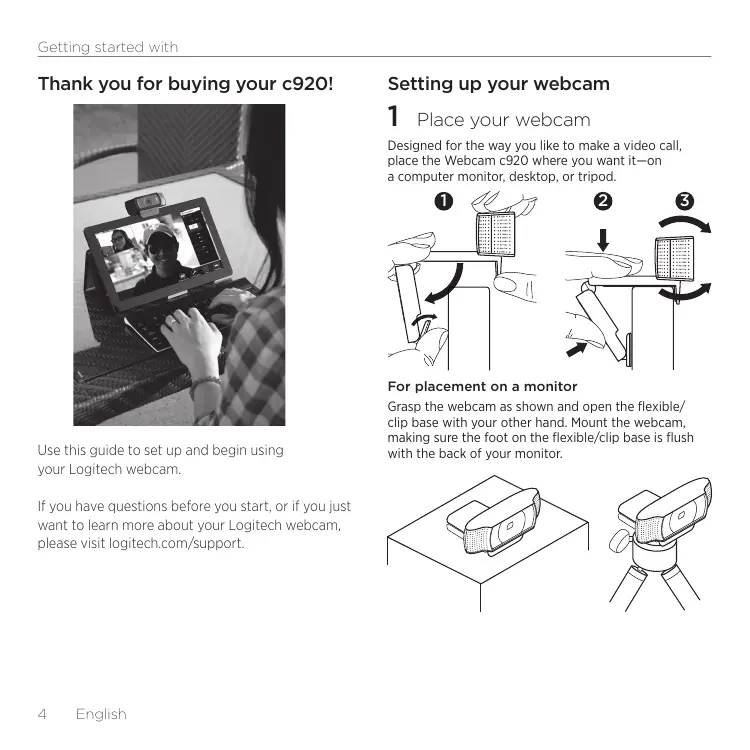
Getting started with Thank you for buying your c920! Setting up your webcam
Place your webcam Designed for the way you like to make a video call, place the Webcam c920 where you want it—on a computer monitor, desktop, or tripod.
Use this guide to set up and begin using your Logitech webcam. If you have questions before you start, or if you just want to learn more about your Logitech webcam, please visit logitech.com/support.
For placement on a monitor Grasp the webcam as shown and open the flexible/ clip base with your other hand. Mount the webcam, making sure the foot on the flexible/clip base is flush with the back of your monitor. Connect your webcam USB
Install the software If you’re using your webcam with Windows® 8, the software required is downloaded automatically when you connect your webcam for the first time, and installed silently in the background. Important: Make sure you’re connected to the Internet, so the software can be downloaded. If you’re using your webcam with Windows® 7 or Windows Vista®, you must install the Logitech® Webcam Software, available from: logitech.com/downloads Getting started with video calling Your Logitech HD Pro Webcam c920 provides full HD 1080p video calling. To take advantage of video calling both you and the person you call must install Skype™, or use a different video-calling application such as Yahoo!® Messenger, Windows Live® Messenger or Gmail. Learn more: skype.com As well as a webcam and video calling application, both callers need:
- A computer with speakers (or a headset) and a microphone; your Logitech HD Pro Webcam c920 has two built-in microphones.
- A broadband Internet connection (e.g., DSL, T1, or cable) English
Getting started with Using your webcam with Windows 8 Use the Camera app, available from the Windows 8 Start screen, to operate and control your webcam. Understanding the Camera app
1. Preview window. Click or tap to capture photos
or videos (depending on whether Video Mode is selected).
2. Change webcams (when you have more than one).
The face of your Logitech webcam illuminates when selected.
3. Adjust your camera settings.
5. Turn Video Mode on (to record videos) or off
6. Click or tap on the arrows to scroll through
the photos and videos you have captured. Videos are denoted by a timer and play button in the bottom right-hand corner:
4. Activate or deactivate the Timer feature.
When activated, there is a three second countdown to capturing a photo or video. Tip: The Camera app lets you use your webcam’s most popular features quickly and easily. If you want to take advantage of the enhanced features your webcam offers, such as motion detection, use the Logitech Webcam Software available from logitech.com/downloads.
English Adjusting your Camera settings The Logitech software optimizes the settings for your environment automatically. To adjust any of your settings choose Camera options. This is available from the Camera app (see the previous page) and from within Metro apps that support webcams. Choose your required resolution for photo capture, or video capture when in Video Mode.
1. Choose the microphone you want to use to record sound in your videos, if you have
more than one available.
2. Access More Options, to benefit from enhanced features such as digital Zoom
3. If the More Options pane doesn’t show the Logitech logo and offer enhanced
options, it is likely that the Logitech software didn’t install correctly when you first connected your camera. To reinstall it, go to the Windows Store and look for Logitech Camera Controller.
4. Zoom in or out to include/exclude your surroundings.
5. Having zoomed in, drag the white box to pan (adjust the focus area of
6. Use Follow my face so you’re always in the picture.
7. Enjoy clear conversations without annoying background noise.
Depending on the features available with your camera, you can access further advanced settings by scrolling. Sharing your photos and videos You can share your photos and videos via e-mail, Twitter, Facebook®, YouTube®, or Microsoft SkyDrive®. Follow these steps:
1. In the Camera app, scroll to the photo or video you want to share.
2. Select Share in the Charms bar (or press
3. Choose the media through which you want to share the photo or video.
Getting started with Using your webcam with Windows 7 and Windows Vista The Logitech Webcam Software provides everything you need to use and control your webcam. Launch the software from the Windows Start® menu, or by right-clicking on the camera icon in the Windows taskbar. Understanding the Logitech Webcam Software
5. Change webcams (when you have more than one).
2. View captured images and share via e-mail,
Facebook, or YouTube.
6. Open Logitech Webcam Software settings.
3. Capture videos triggered by detected motion.
4. Control your webcam while on a video call.
7. Open help dashboard.
Capturing video and snapping pictures Viewing and sharing using the Gallery Quick Capture allows you to take photos and record videos easily. You have easy access to webcam controls and settings:
1. Preview window
Clicking on an image thumbnail in the gallery (1) opens the video or photo in the review window (2). You can then:
- Attach the video or picture file to an e-mail (3)
2. Capture mode: photo/video
- Edit the photo or splice together video (4)
- Upload the picture or video to Facebook (5)
4. Webcam controls
- Upload a video to Twitter or YouTube (6) You may also drag and drop a gallery image onto one of the function tiles (items 3–6) to launch an editing application or to attach or upload.
6. Video thumbnails
7. Click a thumbnail to enter the gallery
Getting started with Using motion detection Fine tuning your webcam during a video call
- Set up your webcam to record video when it detects movement.
- Adjust captured video duration and detection sensitivity.
- Captured video is automatically saved to your computer.
- View content in the Gallery or upload it using the One-touch Upload window.
1. Launch the webcam controller when on a video call.
2. Use pan and tilt to find the best angle.
3. Zoom in or out to include/exclude
4. Use Follow my face so you’re always in the picture.
5. Enjoy clear conversations without annoying
6. Correct for poor lighting environments
7. Choose between auto- or manual focus.
8. Adjust advanced webcam settings.
6. Åpne innstillingene for Logitech Webcam Software.
Dutch: +32-(0)2 200 64 44; French: +32-(0)2 200 64 40 South Africa
Suomi +358-(0)9 725 191 08 Sverige +46-(0)8-501 632 83 Türkiye
8000 441-4294 Česká Republika +420 239 000 335 Danmark +45-38 32 31 20 Deutschland +49-(0)69-51 709 427 España +34-91-275 45 88 United Arab Emirates France +33-(0)1-57 32 32 71 United Kingdom +44-(0)203-024-81 59 Ireland +353-(0)1 524 50 80 Italia +39-02-91 48 30 31 English: +41-(0)22 761 40 25 Fax: +41-(0)21 863 54 02 Magyarország +36 (1) 777-4853 Nederland +31-(0)-20-200 84 33 European, Mid. East., & African Hq. Morges, Switzerland Norge +47-(0)24 159 579 Eastern Europe English: 41-(0)22 761 40 25 Österreich +43-(0)1 206 091 026 United States +1 646-454-3200 Polska
Argentina +0800 555 3284 Portugal +351-21-415 90 16
+7(495) 641 34 60 Schweiz/Suisse Svizzera
© 2012 Logitech. All rights reserved. Logitech, the Logitech logo, and other Logitech marks are owned by Logitech and may be registered. Microsoft, Windows, and the Windows logo are trademarks of the Microsoft group of companies. All other trademarks are the property of their respective owners. Logitech assumes no responsibility for any errors that may appear in this manual. Information contained herein is subject to change without notice. 620-003269.005