
CM3PVRD - Media Recorder CONCEPTRONIC - Free user manual and instructions
Find the device manual for free CM3PVRD CONCEPTRONIC in PDF.
| Product Type | Multimedia Recorder / Media Player & Recorder |
| Brand | Conceptronic |
| Model | CM3PVRD |
| Power Supply | 12V, 2.5A AC adapter |
| TV Tuner | Analog (PAL/SECAM) and digital DVB-T hybrid |
| Recording Media | Internal hard drive, memory card (SD/MMC/MS), USB device |
| Video Playback Formats | MPEG1, MPEG2, MPEG4 (AVI), DVD (unprotected) |
| Audio Playback Formats | MP3, WMA |
| Image Playback Formats | JPEG |
| Card Reader | SD (HC), MMC, MS |
| Video Outputs | Composite, S-Video, Component (Y Pb Pr) |
| Audio Outputs | Stereo analog (RCA), digital coaxial SPDIF |
| Inputs | TV antenna (RF), composite AV |
| PC Connectivity | USB 2.0 (mini-USB) |
| Time-Shifting | Yes, up to 55 minutes of buffering |
| Recording Scheduling | Up to 8 schedules (once, daily, weekly) |
| Recording Modes | HQ (high quality), SP (standard quality), LP (long play) |
| File Systems | FAT32 only (NTFS not supported) |
| Remote Control | Yes, with AAA batteries included |
| Security | Copy protection detection (MacroVision) |
| Maintenance | Clean with a dry cloth; avoid moisture |
| Spare Parts | Not available separately, contact Conceptronic after-sales service |
| Warranty | 2 years (estimated) |
Frequently Asked Questions - CM3PVRD CONCEPTRONIC
User questions about CM3PVRD CONCEPTRONIC
0 question about this device. Answer the ones you know or ask your own.
Ask a new question about this device
Download the instructions for your Media Recorder in PDF format for free! Find your manual CM3PVRD - CONCEPTRONIC and take your electronic device back in hand. On this page are published all the documents necessary for the use of your device. CM3PVRD by CONCEPTRONIC.
USER MANUAL CM3PVRD CONCEPTRONIC
Conceptronic CM3PVRD
natural_image
Diagram showing a cable connector connected to a TV screen, with no visible text or symbols.natural_image
Diagram showing a cable being inserted into a microphone, with a group of speakers below (no text or symbols present)natural_image
Diagram showing connections between a CD and a connector with three colored cables (no text or symbols present)natural_image
Diagram of a cable connector with a switch and power plug, no text or symbols presenttext_image
Auto Tuning Channel Frequency 47.25Mhz Found Channels 0 18%text_image
Channels Numbers 1 Active Yes Fine Tune 0 Audio Format PAL-I Swap Channel 1 Channel Name Manual Tune Start“MMDDhhmm.AVI” (MM = Maand, DD = Dag, hh = Uur, mm = Minuten)
NEDERLANDS
text_image
Rec schedule Mode Once 2005 / MM 11 / DD 22 Status Source Date Start End Quality Done TV-012 Enter Select Return Exit Clear Deletetext_image
My Computer File Edit View Favorites Tools Help Back Search Folders Address My Computer System Tasks View system information Add or remove programs Change a setting Other Places My Network Places My Documents Shared Documents Control Panel Details My Computer System Folder Files Stored on This Computer Shared Documents Hard Disk Drives Windows XP (C:) CM3PVR_HDD (D:) Devices with Removable Storage 3½ Floppy (A:) DVD-RAM Drive (F:)text_image
Setup 10/09/2008 - 10:45:38 AM System A/V set Analog TV Digital TV Tools Adv A/V TV system Screen saver Sys language Time format Set date Set time Reset setting OK OK RETURN exit Select setup optionSystem:
Conceptronic CM3PVRD
User Manual
Congratulations on the purchase of your
Conceptronic Media Recorder & Player.
This User Manual gives you a step-by-step explanation how to install and use the Conceptronic Media Recorder & Player.
When problems occur, we advise you to go to our support-site (go to www.conceptronic.net and click 'Support'. Here you will find the Frequently Asked Questions Database.
When you have other questions about your product and you cannot find it at our website, contact us by e-mail: support@conceptronic.net
For more information about Conceptronic products, please visit the Conceptronic Web Site: www.conceptronic.net
Tip : The Conceptronic CM3PVRD is firmware upgradable. To upgrade your unit with the latest firmware version, you can visit the Conceptronic Web Site.
Tip : Please check www.conceptronic.net for the latest codec list of supported files.
1. Package Contents
The following items should be present in the package of the Conceptronic Media Recorder & Player:
• Product Stand for CM3PVRD.
• Power Supply (12v, 2.5A) with power cord.
- Remote Control.
• 2 AAA batteries for remote control.
- RF Antenna Cable.
- Composite Video Cable (Red, White, Yellow RCA Jacks).
- S-Video Cable.
- Component Video Cable (Red, Green, Blue RCA Jacks).
• Coaxial Digital Audio Cable (Black RCA Jacks).
• SCART Adapter for Composite Video Cable / S-Video Cable.
- USB Cable.
- This User Manual.
- Conceptronic CM3PVRD Media Recorder & Player (described as ‘unit’ in the manual).
2. Product Features
■ Built-in hybrid TV Tuner with TV channel auto-search.
o Supports analog TV
o Supports Digital TV (DVB-T)
■ TV signal recording.
- AV signal recording from e.g. a VCR, DVD or Video Camera.
- Internal Cardreader with SD (HC), MMC and MS support.
- Record to internal HDD, Memory Card or USB Device.
■ DVD quality of recorded files in MPEG4 (AVI) format (can be played on PC or other media player).
- Record Options: One-key instant record, Timer record, Time-shift.
■ Playback of MPEG1/2/4, MP3, WMA, JPG files stored in internal HDD, Memory Card or USB Device.
- Files copy from Memory Card or USB Device to internal HDD.
■ Auto switch between PC and Player Mode:
- When connected to the PC, the unit acts as an USB Storage Device or Cardreader.
- When not connected to the PC, the unit acts as a Media Recorder & Player.
3. Notes & Cautions
- Do not attempt to disassemble the included power adapter. This may cause high-voltage injuries. If the adapter needs to be fixed, please contact your dealer or the helpdesk of Conceptronic.
- Keep the unit away from excessive moisture.
- Do not immerse or expose the unit to liquids.
- Disconnect the power adapter if you do not intend to use the unit for an extended period of time.
- Avoid using the unit in a location near combustibles.
- Change the battery of the remote control with the same kind when it is weak or dead. Recycle old batteries where possible. To avoid corrosion, remove the battery when the remote will not be used for a long time.
- Keep the remote away from excessive moisture; do not drop it.
- Do not operate the remote under intense sunlight.
- NEVER drop, shake or bump the unit.
- To prevent overheating, do not cover the unit.
- The unit only supports the FAT / FAT32 File system (NTFS is not supported).
IMPORTANT:
When you format the Hard disk to NTFS, it only functions as removable Harddisk for your computer. Reformat the Harddisk to FAT32 through the menu of the unit to re-activate the Media Recorder & Player functionalities.
Note:
The data on the internal Harddisk and/or the connected device(s) can be fragmented. This can affect the playback of movies. It is recommended that you defragment the Harddisk and/or the connected device(s) on your computer once in a while.
Note:
The hybrid tuner of the CM3PVRD can be used for Analog TV or DVB-T Digital TV.
The analog part of the hybrid tuner can be to warch channels received through an analog cable signal, or an analog antenna signal.
The digital part of the hybrid tuner can only be used to watch & listen to channels received through a free-to-air DVB-T signal.
4. Product Overview
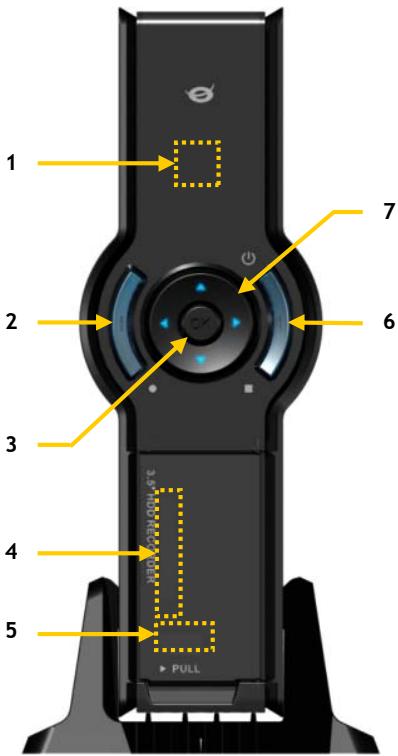
Front View
text_image
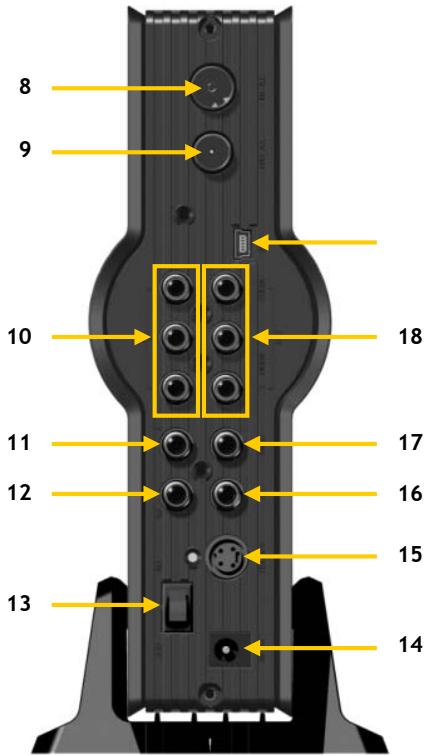
1 2 3 4 5 7 6 PULLRear view
text_image
8 9 10 11 12 13 14 15 16 17 18Description of the numbers:
- Infrared Receiver
- Record Button
- OK / Enter Button
- MMC/MS/SD Card Slot
- USB Host Port
- Power (3sec) / Stop Button
- Navigation Buttons
- Hybrid TV-Tuner Input
- Hybrid TV-Tuner Output
-
A/V Input (Composite Video/Audio)
-
Component (Y) Output
- Component (Pb) Output
- Main Power Switch
- DC Input (12V, 2.5A)
- S-Video Output
- Component (Pr) Output
- Digital Coaxial Output
- A/V Output (Composite Video/Audio)
- Mini-USB Jack (To PC)
Note: The buttons have the same functions as the basic remote control functions.
5. Remote Control Explanation
The remote control is used to control the unit. On the inside cover of this manual you will find a picture of the remote control. The numbers of the buttons correspond with the table below, to explain each function of the remote control.
| Nr | Button | Description |
| 1. | POWER ( ⏻ ) | Turn the unit on or to standby mode |
| 2. | INFO | Display Channel information / File information |
| 3. | SOURCE | Switch between Tuner, AV & Playback |
| 4. | AUDIO | Change the DVD Audio track |
| 5. | TITLE | Return to the DVD Title screen |
| 6. | 0-9 | Menu Navigation / Direct channel entry |
| 7. | +10 | + 10 Channels |
| 8. | EPG | Show the EPG Guide |
| 9. | FAVORITE | Show the favorite channels list |
| 10. | COPY | Display the Copy Menu |
| 11. | REPEAT | Change the Playback Repeat Mode |
| 12. | VOLUME ▲ | Volume Up |
| 13. | VOLUME ▼ | Volume Down |
| 14. | RETURN | Return to the previous screen / channel |
| 15. | ◀, ▶, ▲, ▼ | Navigation Keys: Navigate through the Menu’s |
| 16. | REC | Start Recording / Increase Record Time (+30 Minutes) |
| 17. | PLAY / PAUSE | Start Playback / Pause Playback / Pause Recording / Initiate Timeshift |
| 18. | REWIND ( ◀ ) | Rewind Playback |
| 19. | PREVIOUS ( ◀◀ ) | Previous File / Track / Chapter / Picture |
| 20. | OUTPUT | Change the Output signal (Composite, Component, S-Video) |
| 21. | SETUP | Show the Setup Menu on your screen |
| 22. | NEXT ( ▶◀ ) | Next File / Track / Chapter / Picture |
| 23. | FAST FORWARD ( ▶◀ ) | Fast Forward Playback |
| 24. | STOP | Stop Playback / Stop Recording / Disable Timeshift |
| 25. | TIMER | Enter the Record Scheduler |
| 26. | ENTER | Confirm selection |
| 27. | STORAGE | Change the Active Storage Device (HDD, USB, Card) |
| 28. | CHANNEL ▼ | Channel Down |
| 29. | CHANNEL ▲ | Channel Up |
| 30. | MUTE | Mute the sound |
| 31. | QUALITY | Set the record quality |
| 32. | CLEAR | Clear the input / Delete the selection |
| 33. | SELECT | Show the Digital TV Quick Channel Select menu |
| 34. | EDIT | File Edit Menu |
| 35. | 100 | + 100 Channels |
| 36. | ANGLE | Change the DVD Playback angle |
| 37. | SUB-T | Change the DVD Subtitle |
| 38. | DTV - INFO | Show information on your Digital TV channel |
| 39. | DTV - T / R | Switch between Digital TV and Digital Radio |
| 40. | MENU | Display the Main Menu |
| 41. | LED | Indicates the operation of the remote control |
6. Connecting your CM3PVRD
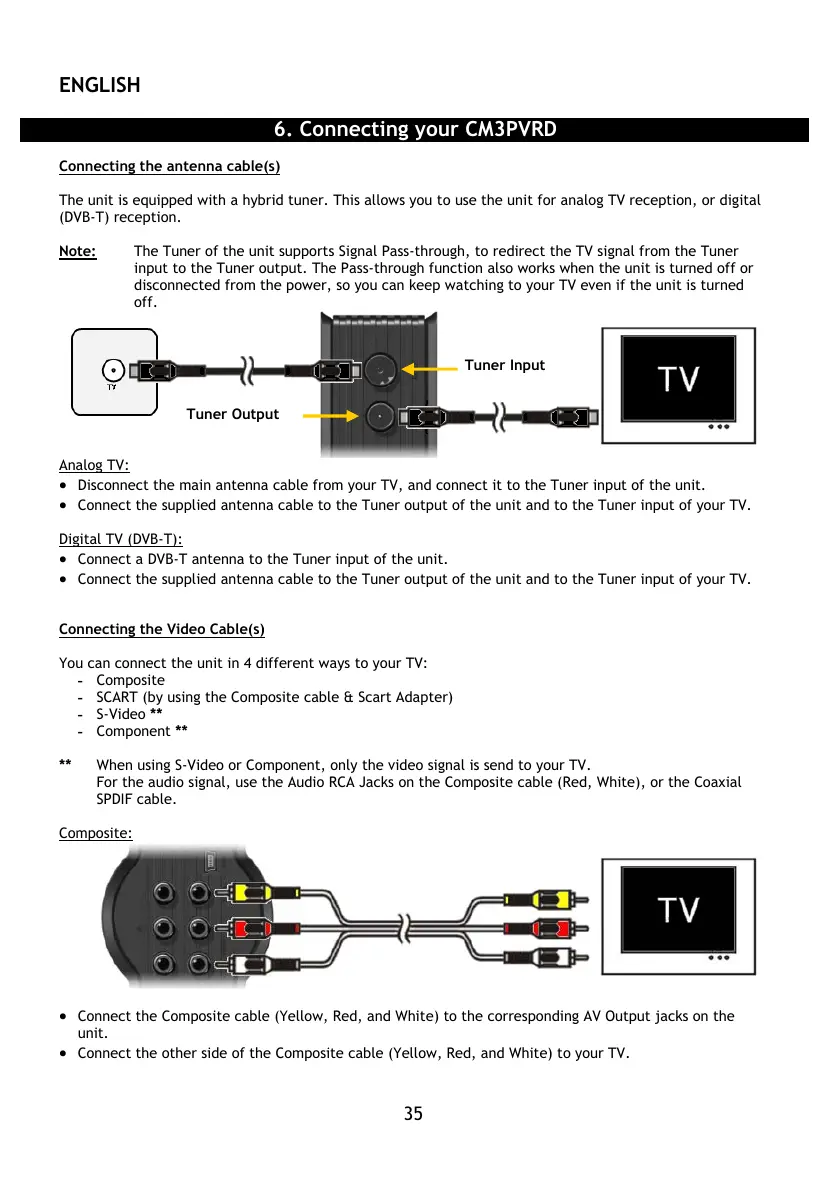
Connecting the antenna cable(s)
The unit is equipped with a hybrid tuner. This allows you to use the unit for analog TV reception, or digital (DVB-T) reception.
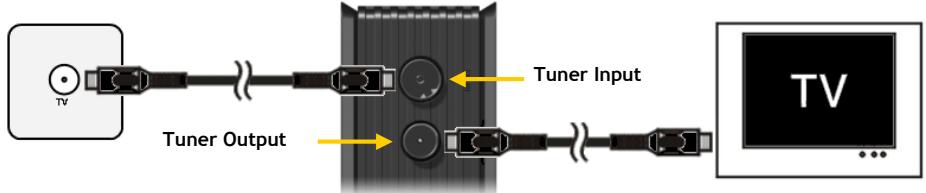
Note:
The Tuner of the unit supports Signal Pass-through, to redirect the TV signal from the Tuner input to the Tuner output. The Pass-through function also works when the unit is turned off or disconnected from the power, so you can keep watching to your TV even if the unit is turned off.
text_image
TV Tuner Output Tuner Input TVAnalog TV:
- Disconnect the main antenna cable from your TV, and connect it to the Tuner input of the unit.
- Connect the supplied antenna cable to the Tuner output of the unit and to the Tuner input of your TV.
Digital TV (DVB-T):
- Connect a DVB-T antenna to the Tuner input of the unit.
- Connect the supplied antenna cable to the Tuner output of the unit and to the Tuner input of your TV.
Connecting the Video Cable(s)
You can connect the unit in 4 different ways to your TV:
- Composite
- SCART (by using the Composite cable & Scart Adapter)
- S-Video **
- Component **
** When using S-Video or Component, only the video signal is send to your TV. For the audio signal, use the Audio RCA Jacks on the Composite cable (Red, White), or the Coaxial SPDIF cable.
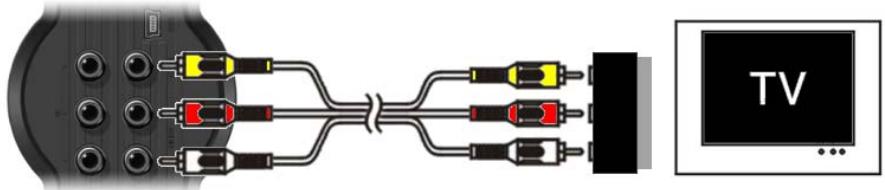
Composite:

text_image
TV ...- Connect the Composite cable (Yellow, Red, and White) to the corresponding AV Output jacks on the unit.
- Connect the other side of the Composite cable (Yellow, Red, and White) to your TV.
ENGLISH
SCART:
text_image
TV- Connect the Composite cable (Yellow, Red, and White) to the corresponding AV output jacks on the unit.
- Connect the other side of the Composite cable (Yellow, Red, and White) to the jacks on the SCART Adapter.
- Set the switch of the SCART Adapter to "Input".
- Connect the SCART Adapter to the SCART Input of your TV.
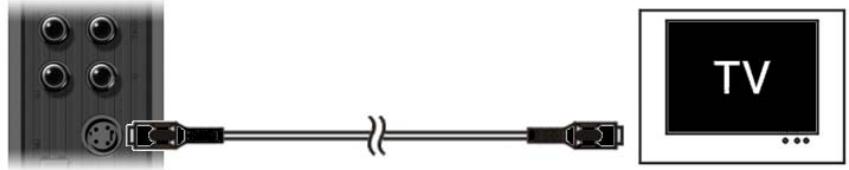
S-Video:
natural_image
Diagram showing a cable connector connected to a TV screen, with no visible text or symbols.- Connect the S-Video cable to the S-Video jack of the unit.
- Connect the other end of the S-Video cable to the S-Video Input on your TV.
Component:

text_image
TV- Connect the Component Cable (Red, Green, and Blue) to the Component Jacks on the unit.
- Connect the other end of the Component cable to the Component Jacks on your TV.
ENGLISH
Connecting the Audio Cable(s)
You can connect the unit to your TV and/or your home cinema system in 2 different ways:
- Analog, through the RCA Audio Jacks of the A/V Output
- Digital, Through the Coaxial Digital SPDIF Output
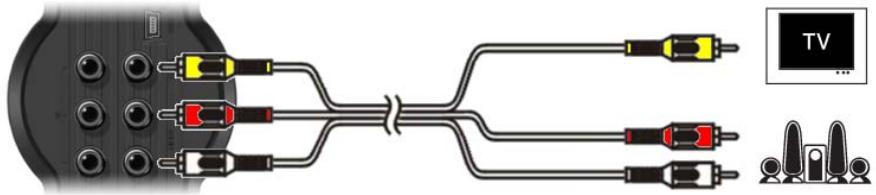
Analog:
text_image
Diagram showing connections between audio/video cables with labeled components and TV screen icon- Connect the Audio Jacks (Red, White) of the Composite cable to the RCA Audio Jacks of the A/V Output.
- Connect the other end of the Composite cable to the RCA Audio Jacks of your TV or Receiver.
Digital:

natural_image
Diagram showing a connector with cable and speaker icons, no text or symbols present- Connect the Digital Coaxial cable to the Digital Coaxial Output of the unit.
- Connect the other end of the Digital Coaxial cable to the Digital Coaxial Input of your Receiver.
Connecting other Audio/Video Equipment
You can connect an Audio/Video source, like a VCR, DVD Player or Set-Top Box to the unit so you can record from the Audio/Video source.
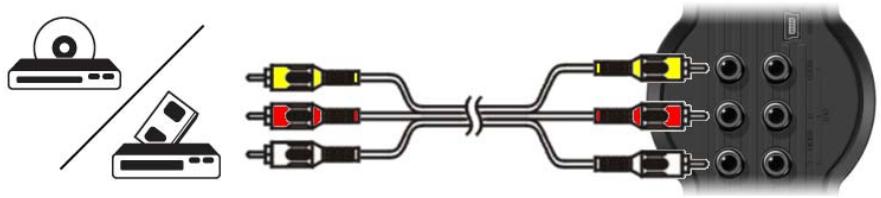
natural_image
Diagram showing connections between a CD and a camera module with three connected cables (no text or symbols present)- Connect the Audio/Video cable delivered with your Audio/Video device to the corresponding AV Output jacks on the Audio/Video device.
- Connect the other side of the Composite cable (Yellow, Red, and White) to the AV Input jacks of the unit.
ENGLISH
Connecting the Power Cable
When the unit is connected to your Audio/Video equipment, you can connect the power supply to the unit.

natural_image
Diagram showing a cable connector connected to an electrical outlet, with no visible text or symbols.- Connect the included power supply to the unit and to a free wall socket.
- Set the main power switch on the back of the unit to 'I' to power the unit.
The unit will now turn on.
When the unit is powered and operational, the Navigation Buttons (7), The Record Button (2) and the Power Button (6) will burn Blue.
When the unit is powered and in standby, the Navigation Buttons (7) will burn Red. The Record Button (2) and Power Button (6) will not burn.
Preparing the Remote Control
- Remove the battery cap from the back of the remote control
- Insert the included AAA batteries in the remote control.
- Replace the battery cap on the back of the remote control.
Notes:
- The best operational range of the remote control is about 5 meters.
- Point the remote control to the IR receiver which is embedded in the front panel of the unit.
- The receiving angle of the IR receiver is ±30 degrees.
- Change the batteries when they are weak or empty.
7. First-Time Configuration
The unit needs to be configured when you turn it on the first time.
- Select the correct input channel on your TV where the unit is connected to. (Composite, SCART, S-Video or Component).
Note: From this point, the manual is based on the fact that your TV is set to the input channel of the unit. All steps described are related to the operation of the unit.
- Check if the main power switch on the back of the unit is set to 'I'.
- Turn on the unit with the power button on the front of the unit, or with the 'Power' button (1) on the remote control.
The unit will turn on and display the menu on your screen.
Note: The unit needs to initialize the Harddisk when it is turned on. This can take a little while. During initializing, the message “Please Wait...” is shown on your screen.
Note: The default output signal is Composite. If you are using another output for the unit, it is possible that your screen does not show the menu. Press the 'Output' button (20) on the remote control to switch the output signal of the unit.
Note: When using the unit for the first time, the internal Harddisk must be formatted. Select 'Yes' to format the internal Harddisk. After the format is complete, the unit can be configured and used. When formatting the internal Harddisk, all data on the Harddisk will be erased!
text_image
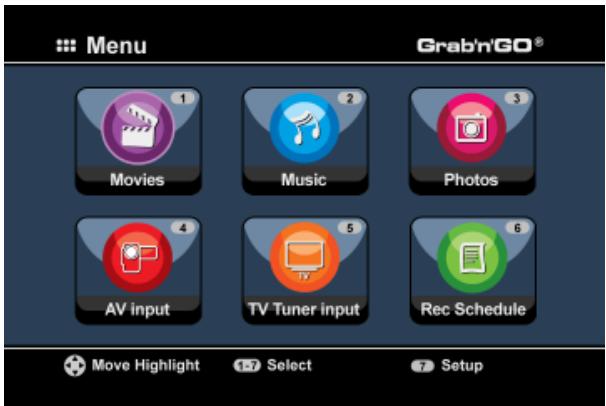
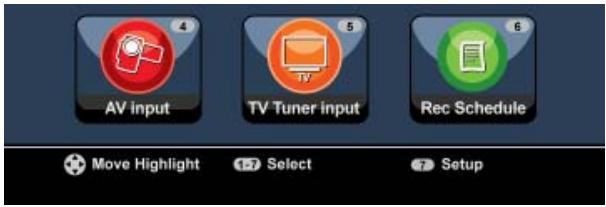
Menu 1 Movies 2 Music 3 Photos 4 AV input 5 TV Tuner input 6 Rec Schedule Move Highlight Select SetupThe following options are available in the Main Menu:
[1] - Movies
[2] - Music
[3] - Photos
[4] - AV Input
[5] - TV Tuner Input
[6] - Rec Schedule
[7] - Setup
Playback of stored records and movies.
Playback of stored music.
Playback of stored photos.
View the Audio/Video Channel.
View Live TV.
Configure scheduled records.
Configure the unit.
ENGLISH
Select the ‘Setup’ [7] option in the main menu, or press the ‘Setup’ button (21) to begin the configuration of the unit. When the Setup menu appears on your screen, you can select the following options:
- System * (Basic Configuration)
- A/V Set * (Basic Configuration)
- Analog TV * (Analog TV Tuner Configuration)
- Digital TV * (Digital TV Tuner Configuration)
- Tools
- Adv. A/V
Note: The Setup items marked with a * must be configured before the unit can be used properly.
Basic Configuration
These steps help you to configure the basic settings which are needed for a correct working unit.
- Select the option ‘System’ in the Setup Menu.
- Set the ‘TV System’ to the TV System used by your TV.
You can choose between PAL and NTSC. - Set the ‘Sys Language’ to the language of your choice.
You can choose between ENGLISH, DUTCH, SPANISH, ITALIAN, FRENCH, PORTUGUES and GERMAN. - Set the ‘Time Format’ to the time format of your choice.
You can choose between D_M_Y_12 (12hour notation with AM/PM) and D_M_Y_24 (24hour notation). - Set the Date to the current date.
- Set the Time to the current time.
- Select the option 'A/V Set' in the Setup Menu.
- Set the ‘Video Output’ to the output which is used to connect the unit to the TV.
- Set the 'TV Type' to the correct aspect ratio of your TV. You can choose between '4:3 PS' (Pan & Scan), '4:3 LB' (Letterbox) or '16:9' (Widescreen).
- Set the ‘TV input type’ to the correct tuner you want to use. You can choose between ‘Digital TV’ and ‘Analog TV’.
TV Tuner Configuration
The unit is equipped with a hybrid tuner which can handle Analog or Digital (DVB-T) TV signals. The following section is splitted in Analog and Digital TV tuner configuration:
Analog TV Tuner configuration
Search and store Analog TV Channels:
- Select the option ‘Analog TV’ in the Setup Menu.
- Set the ‘TV Signal’ to ‘Cable’ if you have connected the unit to your cable signal. Otherwise, select ‘Antenna’ if you have connected the unit to an aerial antenna.
- Select the option ‘Auto Tuning’ to search for TV channels.
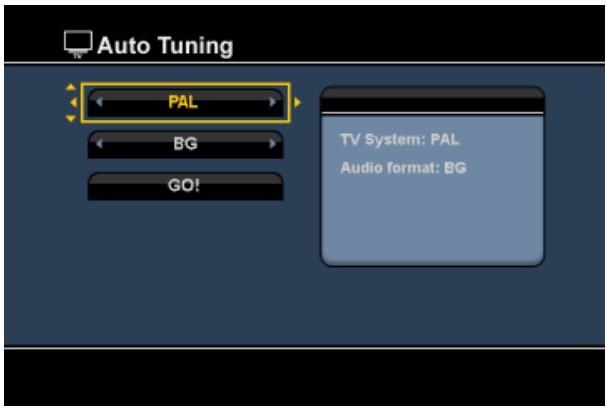
text_image
Auto Tuning PAL BG GO! TV System: PAL Audio format: BG- In the ‘Auto Tuning’ Menu, select the correct ‘TV System’ and ‘Audio Format’ for your country. The default setting is ‘PAL-BG’, which is used in most European countries, except France, which uses ‘SECAM L’.
- Select ‘Go!’ to start searching for channels.
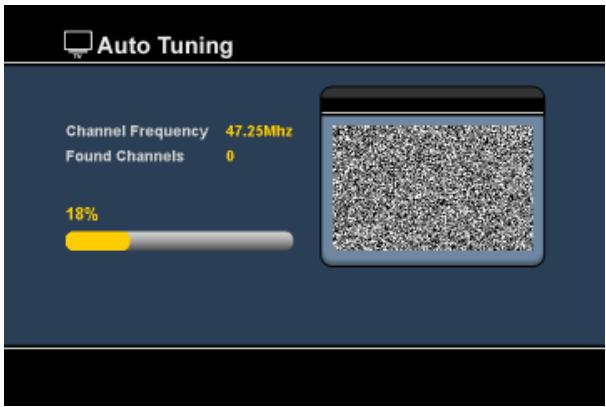
bar
| Channel Frequency | Value | | ----------------- | --------- | | Found Channels | 0 | | Channel Frequency | 47.25Mhz | | Found Channels | 18% |During the channel search, all found channels will automatically be stored in the memory of the unit. This can take some time.
When the channel search is complete, the unit will return to the Setup Menu.
ENGLISH
Customize Analog TV Channels:
When the unit is finished with the search of TV Channels, you can customize the found channels.
- Select the option ‘TV Tuner’ in the Setup Menu.
- Select the option ‘Channel Set’ in the TV Tuner Menu.
The Channel Set Menu will be shown on your TV.
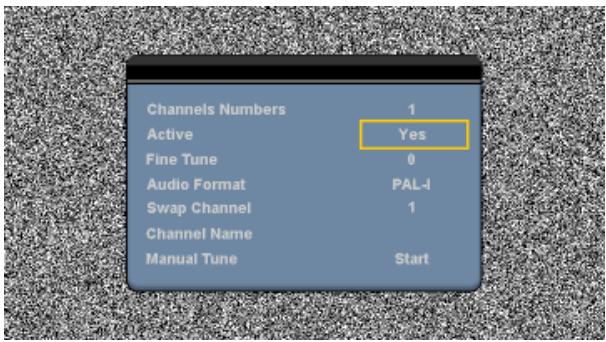
text_image
Channels Numbers 1 Active Yes Fine Tune 0 Audio Format PAL-I Swap Channel 1 Channel Name Manual Tune StartAll settings in the Channel Set Menu can be changed with the 'Navigation' buttons (15) on the remote control.
You can change the following items:
- Channel Number Change the channel which you want to change.
- Active Show or hide the selected channel in the channel list.
- Fine-Tune Fine-tune the channel.
- Audio Format Change the Audio Format for the current channel.
- Swap Channel Use the ‘Swap Channel’ option to swap 2 channels.
For example:
Select the new location for the current channel and press the 'Enter' button (26) on the remote control to swap the channels.
If you want to set channel 15 on position 2, set the ‘Channel Number’ to 15 and ‘Swap Channel’ to 2 and press the ‘Enter’ button (26) on the remote control. - Channel Name Add a name to the current channel. (Max. 4 characters)
- Manual Tune Search for another channel.
Press the ‘Enter’ button (26) on the remote control to start the ‘Manual Tune’ option.
To close the Channel Set Menu, press the 'Return' button (14) on your remote control.
ENGLISH
Digital TV Tuner configuration
Search and store Digital TV Channels:
- Select the option ‘Digital TV’ in the Setup Menu.
- Select ‘Area Setting’ and select your country from the list.
Note : If your country is not listed, choose the country which is closest to your country.
- Select the option ‘Area Scan’ to search for DVB-T TV channels.
The unit will search for DVB-T channels in your area and shows the found channels on the screen.
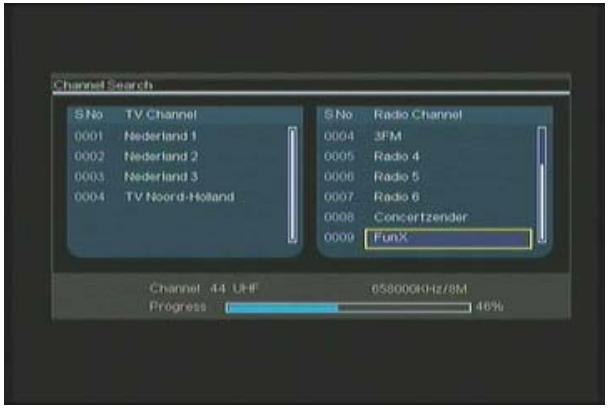
text_image
Channel Search S No TV Channel 0001 Nederland 1 0002 Nederland 2 0003 Nederland 3 0004 TV Noord-Holland S No Radio Channel 0004 3FM 0005 Radio 4 0006 Radio 5 0007 Radio 6 0008 Concertzender 0009 FunX Channel 44 UHF 658000KHz/8M Progress 46%When the search for DVB-T channels is finished, the found channels are stored in the memory of the unit. The message ‘Save Flash successful’ will be shown when the channels are stored and the unit will show the first found TV channel on your screen.
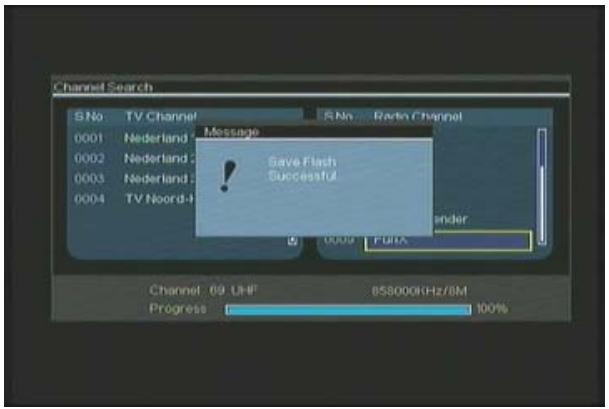
text_image
Channel Search S No TV Channel S No Radio Channel 0001 Nederland Message 0002 Nederland Save Flash 0003 Nederland Successful 0004 TV Noord-4 Channel 09 UHF 858000KHz/8M Progress 100%ENGLISH
Important : When the channel scan is completed, it is advised to synchronize the time send through the Digital TV signal with the internal clock of the unit to prevent time setting errors. You can do this in the Setup Menu, with the option ‘Date/Time Sync’ in the ‘Digital TV’ section.
Customize Digital TV Channels:
Digital TV channels cannot be changed in order. Instead of changing the order, you can make a favorite list, or lock channels which you do not want to show in your channel list.
- Select the option ‘Digital TV’ in the Setup Menu
- Select the option ‘DTV Channel’ in the Digital TV Menu.
- Select the option ‘TV Editing’ in the DVT Channel Menu.
Tip: Instead of above 3 steps, you can also go to the 'TV Tuner Input' and press the 'Edit' button (34) on the remote control.
The Channel Organizer will be shown on your TV:
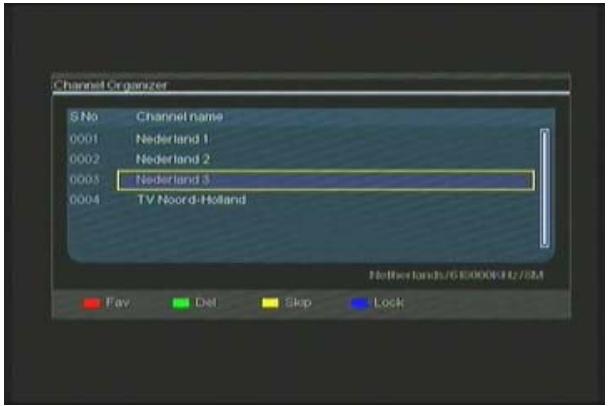
text_image
Channel Organizer S No Channel name 0001 Nederland 1 0002 Nederland 2 0003 Nederland 3 0004 TV Noord-Holland Netherlands/6500006342/SM Fav Del Skip LockYou can navigate through the Channel Organizer with the 'Navigation' buttons (15) on the remote control.
You can use the following actions on the channels in the Channel Organizer:
| Option | Button | Description |
| Fav. | ('Red' Button) (5) | Add the channel to the favorite list |
| Del. | ('Green' Button) (4) | Delete the channel from the channel list |
| Skip | ('Yellow' Button) (37) | Skip this channel in the channel list |
| Lock | ('Blue' Button) (36) | Lock this channel in the channel list |
To close the Channel Organizer, press the 'Return' button (14) on your remote control.
8. Watching Live-TV & Live-A/V
The unit has 2 input sources to watch and record programs:
• TV-Tuner Input (Analog or Digital TV)
• AV Input (Audio/Video Input)
text_image
AV input TV Tuner input Rec Schedule Move Highlight Select SetupTV-Tuner Input
You can watch live TV through the unit by selecting the option ‘TV Tuner Input’ in the Main Menu. While watching live TV, you can change the channels by pressing the ‘Channel +’ (29) or ‘Channel -’ (28) button on the remote control.
Note : When the TV Tuner Input is selected from the Main Menu, the unit will go to the Analog TV tuner or Digital TV tuner, depending on the 'TV Input Type' setting in the Setup Menu.
AV Input (Audio/Video Input)
The unit has a Composite Audio/Video-Input on the backside. This Composite Audio/Video Input can be used to connect your VCR, Set-Top Box, Video Camera or other video equipment to the unit.
You can see the Live Audio/Video Input signal by selecting the option 'A/V Input' in the Main Menu.
Timeshifting
The unit supports Timeshifting. The Timeshift feature ‘pauses’ Live TV or Live Audio/Video by recording the current channel/input when Timeshift is activated.
When the Timeshift feature is initialized, the unit will create a buffer of maximum 55 minutes for the Timeshift feature.
Note: You need at least 2,5GB of free space on the HDD to use the Timeshift feature.
Press the 'Play/Pause' button (17) on the remote control to initialize the Timeshift feature.
When the Timeshift feature is initialized, the Live TV or Live A/V will be ‘paused’ and the unit will record the channel on the background.
ENGLISH
During Timeshift, the screen will display the Timeshift information bar on your screen. You can hide this bar by pressing the 'Info' button (2) on the remote control.

text_image
13:05:45 13:05:45 14:01:59Press the 'Play/Pause' button (17) on the remote control again to resume playback from the point where Timeshift was activated.
Press the ‘Fast Forward’ (23) or ‘Rewind’ (18) buttons on the remote control to play through the Timeshift buffer in higher speeds.
Note: During pause, fast forward or rewind, the Timeshift feature is still active and continues to record.
Press the ‘Stop’ button (24) on the remote control to deactivate the Timeshift feature and resume normal Live Playback. The Timeshift record will be stopped and the Timeshift buffer will be cleared.
Note: It is not possible to save the Timeshift buffer for later usage.
Digital Radio
When you are using the Digital tuner function, you can also listen to digital radio channels.
- Select the 'TV Tuner Input' in the Main Menu.
The Digital TV channels will be shown on your screen.
- Press the ‘DTV - T/R’ button (39) on the remote control to switch to Digital Radio mode.
- You can use the ‘Channel +’ (29) or ‘Channel -’ (28) buttons to select a digital radio station.
- To return to Digital TV mode, press the the 'DTV - T/R' button (39) on the remote control again.
9. Recording
Before Recording
Before you start recording with your unit, you can set the record quality. The unit has 3 preset quality settings, which can be selected with the 'Quality' button (31) on the remote control.
Note: The unit detects copy protection on the connected source, for example MacroVision protection on DVD discs. When a connected source is copy-protected, the unit will prevent recording and shows a warning message when the record button is pressed.
One-Touch-Recording
While watching Live TV or Live A/V through the unit, you can start a record of the current channel by pressing the 'Rec' button (16) on the remote control. The unit starts recording, until you press the 'Stop' button (24) on the remote control, or until the maximum record time of 6 hours is reached.

text_image
OTRWhen you press the 'Rec' button (16) during a record, the record time will be set to 30 minutes, starting at the time you pressed the 'Rec' Button.
The message ‘OTR+30’ will be shown on your screen.

text_image
OTR+30Press the 'Rec' button (16) again to increase the time with another 30 minutes, up to a maximum of 360 minutes.
The unit keeps recording until the record time is elapsed, or until you press the 'Stop' button (24) on the remote control.
Note: During recording, you cannot change the current channel.
The recording is stored with a name based upon the record date and time, with the following name:
"MMDDhhmm.AVI" (MM = Month, DD = Day, hh = Hour, mm = Minutes)
ENGLISH
Recording through the EPG guide (Digital TV only)
When you are using the Digital TV tuner of the unit, you can use the EPG guide to schedule a recording.
- Press the ‘EPG’ button (8) on the remote control while watching TV. The EPG guide will be shown on your TV:
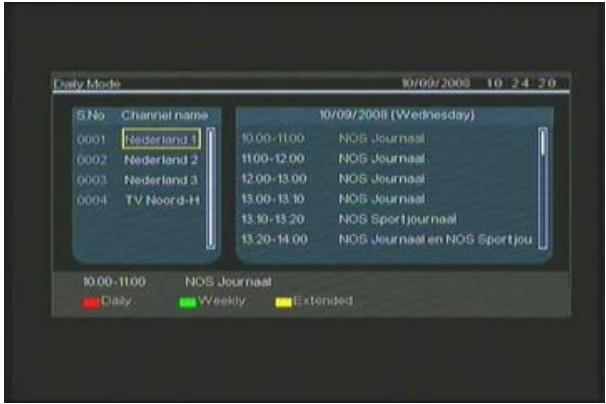
text_image
Daily Mode 10/09/2008 10 24 20 S No Channel name 10/09/2008 (Wednesday) 0001 Nederland 1 10.00-11.00 NOS Journaal 0002 Nederland 2 11.00-12.00 NOS Journaal 0003 Nederland 3 12.00-13.00 NOS Journaal 0004 TV Noord-H 13.00-13.30 NOS Journaal 13.10-13.20 NOS Sportjournaal 13.20-14.00 NOS Journaal en NOS Sportjou 10.00-11.00 NOS Journaal Daily Weekly ExtendedYou can navigate through the EPG Guide with the 'Navigation' buttons (15) on the remote control.
- Select the channel in the left row.
- Select the program you want to record in the right row.
- Press the ‘Enter’ button (26) on the remote control to add the program to your EPG scheduled recording.
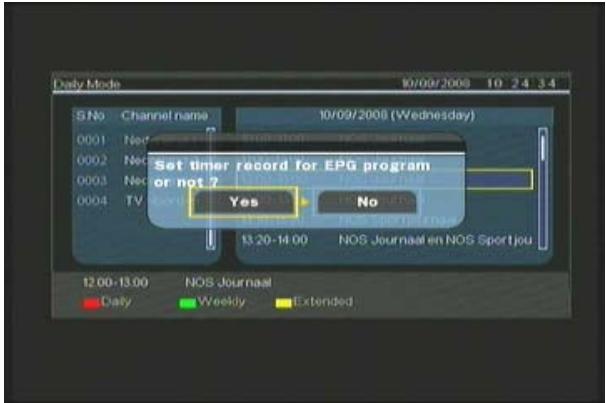
text_image
Daily Mode 10/09/2008 10 24 3.4 S.No Channel name 10/09/2008 (Wednesday) 0001 Ned 19:30-19:35 0002 Ned 19:30-19:35 0003 Ned 19:30-19:35 0004 TV Yes No Set timer record for EPG program or not ? 13:20-14:00 NOS Journaal en NOS Sport jou 12:00-13:00 NOS Journaal Daily Weekly Extended- Confirm the recording by selecting 'Yes' and press the 'Enter' button (26) on the remote control to confirm.
The recording will be stored in the scheduler of the unit.
ENGLISH
Manual Scheduled Recording (Analog TV and Digital TV)
You can program the unit to record channels on specific times. You can program up to 8 scheduled recordings in the unit.
- Select the option ‘Rec Schedule’ in the Main Menu, or press the ‘Timer’ button (25) on the remote control while watching Live TV through the unit.
The Scheduled Recording screen will be shown on your TV.

text_image
Rec schedule Mode Once 2005 / MM 11 / DD 22 Status Source Date Start End Quality Done TV-012 Enter Select Return Exit Clear DeleteBy default, the first schedule is selected, and the 'Source' is highlighted.
- Select the schedule number you want to program and press the 'Enter' button (26) on the remote control to start programming the selected schedule.
- Select the Source of your scheduled recording. This can be the Analog TV Tuner, Digital TV Tuner or the AV Input.
If you have selected the 'TV' option, press the 'Right' Navigation button (15) and select the channel which you would like to record. Press the 'Enter' button (26) on the remote control to continue. - Select the record mode: Once, Daily or Weekly. If you have selected ‘Once’, press the ‘Right’ Navigation Button (15) to select the Month and Day for the record.
If you have selected ‘Weekly’, press the ‘Right’ Navigation button (15) to select the Day for the record. Press the ‘Enter’ button (26) on the remote control to continue. - Set the start time for the recording. Press the 'Enter' button (26) on the remote control to continue.
- Set the end time for the recording.
- Set the Target for the recording: 'HDD', 'USB' or 'Card'. Press the 'Enter' button (26) on the remote control to continue.
ENGLISH
Note: When recording to USB or Memory Card, make sure you have a High-speed device attached. (An USB2.0 Device or High-Speed Memory Card)
- Set the quality for the recording: 'HQ', 'SP' or 'LP'. Press the 'Enter' button (26) on the remote control to continue.
Note: Recording in ‘HQ’, ‘SP’ or ‘LP’ influences the quality of your record and the amount of space needed for the record.
For example, if you unit is equipped with a 500GB HDD, the record time will be:
HQ: 228 hours and 35 minutes. (app. 2190MB for 1 hour)
SP: 437 hours and 46 minutes. (app. 1140MB for 1 hour)
LP: 656 hours and 45 minutes. (app. 760MB for 1 hour)
The recording is now programmed as a scheduled recording and the unit will start recording on the programmed time and channel.
When the unit is programmed with scheduled recordings, you can put the unit into Standby. The internal clock will turn on the unit 3 minutes before the scheduled recording starts and selects the correct channel 1 minute before the recording starts.
Note: During recording, you cannot change the current channel.
The recording is stored with a name based upon the record date and time, with the following name:
“MMDDhhmm.AVI” (MM = Month, DD = Day, hh = Hour, mm = Minutes)
When the recording is completed, the unit will if standby must be activated. When there is no action taken, the unit will automatically return to standby mode after 15 seconds.
10. Playback
Select your preferred playback mode from the Main Menu.
You can select the following options:
[1] - Movies
Play your records and other movies stored on the unit or USB Drive / Media Card.
[2] - Music
Play music files stored on the unit or USB Drive / Media Card.
[3] - Photos
Display photos stored on the unit or USB Drive / Media Card.
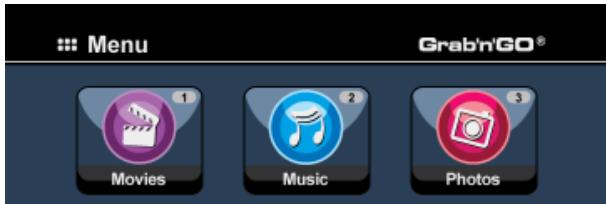
text_image
Menu 1 Movies Music 2 3 Photos Grab'n'GO®When one of the above options is selected, the file browser will be shown on your screen. The file browser will only show the files corresponding with the selected option on your screen.
For example: If you select ‘Movies’ [1], only movie files will be shown on your screen.
Tip : When you are in ‘Movies’ [1], ‘Music’ [2] or ‘Photos’ [3] mode, you can easily switch between these options through the upper bar in the media browser.
Use the navigation keys (15) to go to the upper bar and change the mode.

text_image
Movies Music PhotosIn the file browser menu, you can use the following browser options on the remote control:
- Storage (27) Change between HDD Mode, USB Mode and Card Mode.
- Navigation keys (15) Navigate through the files and folders.
- Enter (26) Play the selected file or open the selected folder.
- Edit (34) Edit files. (Play Mode, Rename, Delete, Copy).
- Copy (10) Copy the selected file to another location.
- Play/Pause (17) Play the selected file.
- Next (22) Go to the next page with files.
- Previous (19) Go to the previous page with files.
You can return from the file browser menu to the Main Menu by pressing the 'Menu' button (40) on the remote control.
ENGLISH
Playback of your recordings & other movies
You can play the recorded programs and other movies, stored on the HDD of the unit, on your TV through the ‘Movies’ option of the unit.
- Press the 'Menu' button (40) on the remote control to return to the Main Menu.
- Select the ‘Movies’ [1] icon in the Main Menu with the ‘Navigation’ buttons (15) on the remote control, and press the ‘Enter’ button (26) on the remote control to open the ‘Movies’ Mode.
The file browser of the unit will be shown on your screen, with the ‘Records’ folder on the HDD selected by default.
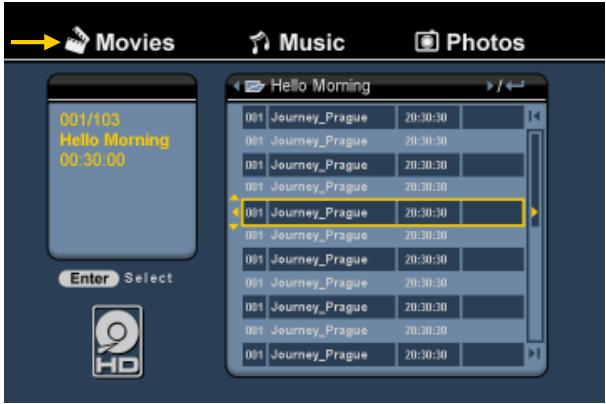
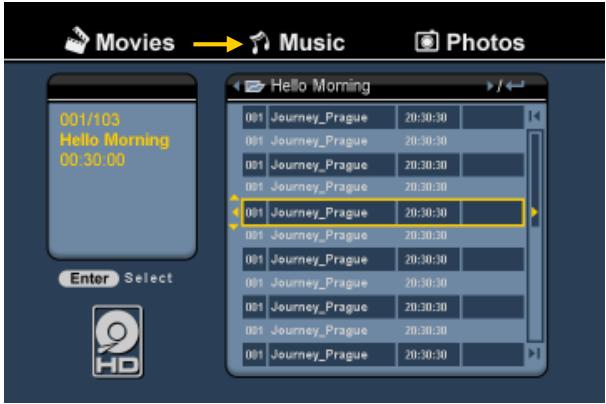
text_image
Movies Music Photos 001/103 Hello Morning 00:30:00 Enter Select Hello Morning 001 Journey_Prague 20:30:30 001 Journey_Prague 20:30:30 001 Journey_Prague 20:30:30 001 Journey_Prague 20:30:30 001 Journey_Prague 20:30:30 001 Journey_Prague 20:30:30 001 Journey_Prague 20:30.30 001 Journey_Prague 20:30:30The unit will only show the movie files which are available on your unit. Other files will not be shown.
Tip : When you are in ‘Movies’ [1], ‘Music’ [2] or ‘Photos’ [3] mode, you can easily switch between these options through the upper bar in the media browser.
Use the navigation keys (15) to go to the upper bar and change the mode.
- Select the file you would like to play with the navigation buttons on the remote control.
- Press the 'Enter' button (26) or the 'Play/Pause' button (17) on the remote control to start the playback of the selected file.
During playback, you can use the following playback options on the remote control:
- Play/Pause (17) Play the selected file or pause the playback.
- Stop (24) Stop the playback.
- Rewind (18) Rewind the playback.
- Fast Forward (23) Fast Forward the playback.
- Previous (19) Play the previous file in the current folder.
- Next (22) Play the next file in the current folder.
- Repeat (11) Change the Repeat option of the current file/folder.
- Info (2) Display the playback details.
You can return from the file browser menu to the Main Menu by pressing the 'Menu' button (40) on the remote control.
ENGLISH
Playback of subtitles
The CM3PVRD can play subtitle files when playing AVI videofiles.
To play AVI files with subtitles, you need to assign the same name to the subtitle file as the AVI file, for example:
Movie name: My_Movie_With_Sub.AVI
Subtitle name: My_Movie_With_Sub.SRT
- Press the ‘Menu’ button (40) on the remote control to return to the Main Menu.
- Select the ‘Movies’ [1] icon in the Main Menu with the ‘Navigation’ buttons (15) on the remote control, and press the ‘Enter’ button (26) on the remote control to open the ‘Movies’ Mode.
- Select the file you would like to play with the navigation buttons on the remote control.
- Press the 'Enter' button (26) or the 'Play/Pause' button (17) on the remote control to start the playback of the selected file.
The AVI file will start playing with the corresponding subtitle file loaded.
To disable/enable subtitles during playback, press the 'Sub-t' button (37) on the remote control.
Tip: The subtitle files are also listed in the browser menu when 'Movies' is selected from the main menu, so you can also copy subtitles to other locations.
DVD Playback functionality
The CM3PVRD plays DVD's from the hard disk as if they are a normal DVD. You can navigate through the DVD Menu, choose subtitles or change audio languages.
Note: The CM3PVRD only supports the playback of unprotected DVD copies. CSS protection is not supported by the CM3PVRD.
Note: The CM3PVRD only supports Region 2 or Regionfree DVD copies.
- Connect the CM3PVRD to your computer. See the chapter “Computer connectivity”.
- Create a folder on the CM3PVRD hard disk in the 'VIDEO' folder with the name of your DVD movie (for example: 'Movie1').
- Copy the 'AUDIO_TS' and 'VIDEO_TS' (including content) from your DVD to the created folder (for example: 'Movie1') on the CM3PVRD.
After copying, the structure should be:
| -VIDEO | |
| |->Movie1 | |
| |->AUDIO_TS | (optional, not available for every DVD) |
| |->VIDEO_TS | (with all the DVD files inside) |
ENGLISH
- Disconnect the CM3PVRD from your computer and connect it to your TV. Turn on the CM3PVRD.
- Select the ‘Movies’ [1] icon in the Main Menu with the ‘Navigation’ buttons (15) on the remote control, and press the ‘Enter’ button (26) on the remote control to open the ‘Movies’ Mode.
- Use the 'Navigation' buttons (15) and the 'Enter' button (26) on the remote control to navigate to the 'VIDEO' folder on the internal hard disk.
The DVD folder(in the example: 'Movie1') will be shown in the file browser, indicated with a DVD Disc icon.
- Select the DVD you want to play with the ‘Navigation’ buttons (15) on the remote control.
- Press the ‘Play/Pause’ button (17) on the remote control to start the playback of the selected DVD.
Note: Do not use the 'Enter' button (26) to start. is will only show the files/subfolders and does not start DVD Playback.
During DVD playback, you can use the following playback options on the remote control:
- Play/Pause (17) Play the selected DVD folder or pause the playback.
- Stop (24) Stop the playback of the DVD and return to the Movie browser.
- Navigation keys (15) Navigate through the DVD Menu.
- Enter (26) Confirm DVD Menu selection(s).
- Rewind (18) Fast Rewind.
- Fast Forward (23) Fast Forward.
- Previous (19) Previous Chapter.
- Next (22) Next Chapter.
- Sub-t (37) Change or turn off the subtitle of the DVD.
- Audio (4) Change the audio track of the DVD (when the DVD contains multiple audio tracks).
- Menu (40) Return to the DVD Menu.
- Title (5) Return to the DVD Menu.
ENGLISH
Playback of your Music
You can play music files, which can be stored on the HDD of the unit, on your TV through the ‘Music’ option of the unit.
- Press the 'Menu' button (40) on the remote control to return to the Main Menu.
- Select the ‘Music’ [2] icon in the Main Menu with the ‘Navigation’ buttons (15) on the remote control, and press the ‘Enter’ button (26) on the remote control to open the ‘Music’ Mode.
The file browser of the unit will be shown on your screen, with the ‘Music’ folder on the HDD selected by default.
text_image
Movies → Music Photos 001/103 Hello Morning 00:30:00 Enter Select Hello Morning 001 Journey_Prague 20:30:30 001 Journey_Prague 20:30:30 001 Journey_Prague 20:30:30 001 Journey_Prague 20:30:30 001 Journey_Prague 20:30:30 001 Journey_Prague 20:30:30 001 Journey_Prague 20:30.30 001 Journey_Prague 20:30:30The unit will only show the music files which are available on your unit. Other files will not be shown.
Tip : When you are in ‘Movies’ [1], ‘Music’ [2] or ‘Photos’ [3] mode, you can easily switch between these options through the upper bar in the media browser.
Use the navigation keys (15) to go to the upper bar and change the mode.
- Select the file you would like to play with the navigation buttons on the remote control.
- Press the 'Enter' button (26) or the 'Play/Pause' button (17) on the remote control to start the playback of the selected file.
During playback, you can use the following playback options on the remote control:
- Play/Pause (17) Play the selected file or pause the playback.
- Stop (24) Stop the playback.
- Rewind (18) Rewind the playback.
- Fast Forward (23) Fast Forward the playback.
- Previous (19) Play the previous file in the current folder.
- Next (22) Play the next file in the current folder.
- Repeat (11) Change the Repeat option of the current file/folder.
You can return from the file browser menu to the Main Menu by pressing the 'Menu' button (40) on the remote control.
ENGLISH
Playback of your Photos & Pictures
You can view your photos and pictures, which can be stored on the HDD of the unit, on your TV through the 'Photos' option of the unit.
- Press the 'Menu' button (40) on the remote control to return to the Main Menu.
- Select the ‘Photos’ [3] icon in the Main Menu with the ‘Navigation’ buttons (15) on the remote control, and press the ‘Enter’ button (26) on the remote control to open the ‘Photos’ Mode.
The file browser of the unit will be shown on your screen, with the ‘Pictures’ folder on the HDD selected by default.
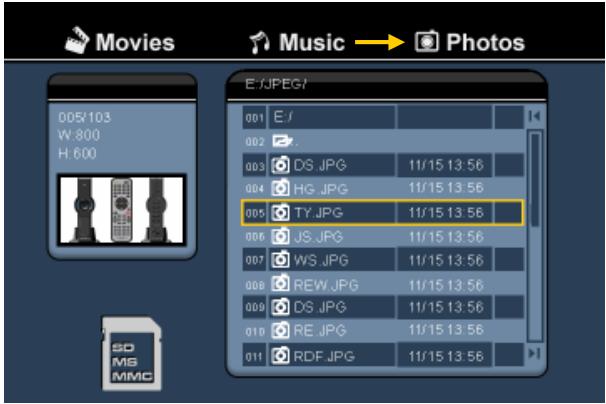
text_image
Movies Music → Photos 005/103 W: 800 H: 600 E:\JPEG\ 001 E:\ 002 003 DS JPG 11/15 13:56 004 HG JPG 11/15 13:56 005 TY.JPG 11/15 13:56 006 JS.JPG 11/15 13:56 007 WS.JPG 11/15 13:56 008 REW.JPG 11/15 13:56 009 DS.JPG 11/15 13:56 010 RE.JPG 11/15 13:56 011 RDF.JPG 11/15 13:56The unit will only show the photo and picture files which are available on your unit. Other files will not be shown.
Tip: When you are in ‘Movies’ [1], ‘Music’ [2] or ‘Photos’ [3] mode, you can easily switch between these options through the upper bar in the media browser. Use the navigation keys (15) to go to the upper bar and change the mode.
- Select the file you would like to play with the navigation buttons on the remote control.
- Press the 'Enter' button (26) or the 'Play/Pause' button (17) on the remote control to start the playback of the selected file.
During playback, you can use the following playback options on the remote control:
| - Play/Pause | (17) | Start a slideshow starting with the selected file, or pause the slideshow. |
| - Stop | (24) | Stop the slideshow. |
| - Navigation keys | (15) | Rotate the shown photo. |
| - Previous | (19) | Play the previous file in the current folder. |
| - Next | (22) | Play the next file in the current folder. |
| - Repeat | (11) | Change the Repeat option of the current file/folder. |
| - Info | (2) | Display the slideshow details. |
You can return from the file browser menu to the Main Menu by pressing the 'Menu' button (40) on the remote control.
11. Computer Connectivity
The unit can be connected to your computer to copy data (movies, music, pictures, records, etc.) from and to the internal HDD.
Note: In our example below, we are using a computer running Windows XP, but the unit can be used on all computers with USB support and the capability of reading & writing FAT32 file systems.
Connect the unit to your computer
- Connect the delivered USB to Mini-USB cable to the backside of the unit and to a free USB port on your computer.
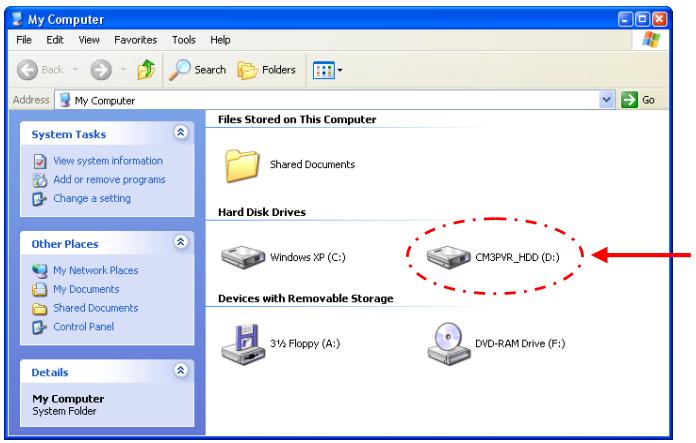
- Turn the unit on with the main power switch on the backside of the unit. The unit will be recognized and installed automatically and will be shown as an extra drive on your computer.
By default, the internal HDD of the unit will be initialized as an USB storage device.
text_image
My Computer File Edit View Favorites Tools Help Back Search Folders Address My Computer System Tasks View system information Add or remove programs Change a setting Other Places My Network Places My Documents Shared Documents Control Panel Details My Computer System Folder Files Stored on This Computer Shared Documents Hard Disk Drives Windows XP (C:) CM3PVR_HDD (D:) Devices with Removable Storage 3½ Floppy (A:) DVD-RAM Drive (F:)Switch between HDD Mode and Cardreader Mode
You can use the Cardreader of the unit as a Cardreader on your computer. When you enable the Cardreader mode, the HDD is not accessible on your computer.
- Press and hold the ‘Arrow Down’ button on the front of the unit for 2 seconds while it is connected to the computer.
The HDD will disappear from the ‘My Computer’ window, and a removable drive will be shown. The Cardreader is now active.
- To switch back to the HDD Mode, press and hold the 'Arrow Down' button on the front of the unit for 2 seconds.
ENGLISH
Playback on your computer
You can play the recorded programs on your computer, when the unit is connected to the computer. Before you can play the recorded programs, you need to install a XviD codec on your computer.
The XviD codec is added to the FFDShow MPEG4 Codec Pack, which you can download on the following website:
http://www.free-codecs.com/download/FFDShow.htm
After the installation of the FFDShow MPEG4 Codec Pack and a reboot of your computer, you can play the recorded programs on your computer.
Disconnect the unit from your computer
- Single-click the "Safe Removal" icon on the system tray.
- Select "Stop USB Mass Storage Device" when prompted.
- Wait for the message "Safe to remove Hardware".
- Disconnect the USB cable.
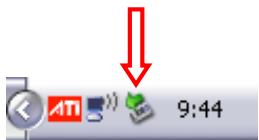
text_image
ATI 9:4412. System Configuration
When you select the ‘Setup’ [7] option in the Main Menu, or press the ‘Setup’ button (21) on the remote control, the Setup Menu will be shown on your screen. The explanation below shows all available settings with the including description.

text_image
Setup 10/09/2008 - 10:46:38 AM System A/V set Analog TV Digital TV Tools Adv A/V TV system Screen saver Sys language Time format Set date Set time Reset setting OK OK RETURN exit Select setup optionSystem:
| TV System | Select the TV System which corresponds with your TV. You can select between PAL and NTSC. (Default = PAL) |
| Screensaver | Set the screensaver of the unit on or off. (Default = On) |
| Sys Language | Select the system language for the unit. (Default = English) |
| Time Format | Set the time format of your choice. (Default = D_M_Y_24) |
| Set Date | Set the current date. |
| Set Time | Set the current Time. |
| Reset Setting | Reset the unit to the factory default settings.(Only the configuration will be restored. The data on your Harddisk will not be erased). |
A/V Set:
| Video Output | Select the Video Output signal which corresponds with the used output ports on the unit. |
| TV Type | Set the ‘TV Type’ to the correct aspect ratio of your TV.(‘4:3 PS’ (Pan & Scan), ‘4:3 LB’ (Letterbox) or ’16:9’ (Widescreen)). |
| TV Input Type | Set the ‘TV input type’ to the correct tuner you want to use.(‘Digital TV’ or ‘Analog TV’). |
ENGLISH
Analog TV:
| TV Signal | Select the TV Signal which is provided by your TV Provider. You can select between ‘Antenna’ and ‘Cable’. (Default = Cable). |
| Auto Tuning | Use the ‘Auto Tuning’ option to search and store all found channels automatically to the memory of the unit. |
| Channel Set | Use the ‘Channel Set’ option to customize the found channels, like fine-tuning, channel order and channel name. |
| Manual Tuning | Use the ‘Manual Tuning’ option to search and store channels manually. |
Digital TV:
| DTV Channel | |
| TV Editing | Edit the TV Channel List. |
| Radio Editing | Edit the Radio Channel List. |
| Program Guide | Show the TV EPG Guide. |
| Radio EPG | Show the Radio EPG Guide. |
| Channel Mode | Assign channel groups to your TV channels. |
| Area Setting | Set the area where you are using this unit, so the correct channels can be found. |
| Area Scan | Start an area scan for digital TV channels in your area. |
| Manual Scan | Start a manual scan for digital TV channels. |
| Date/Time Sync | Synchronize the time send through the Digital TV signal with the internal clock of the unit. |
Tools:
| Format | Use the ‘Format’ option to format your Internal HDD, your USB Device or your Memory Card for optimal use with the unit. |
| File Sorted By Slideshow Time | Change the way the files are sorted when you are browsing your media files. Change the time a photo is shown on your screen when you are using the slideshow feature. |
Adv. A/V:
| Contrast | Change the Contrast of the A/V Input Signal. |
| Hue | Change the Hue of the A/V Input Signal. |
| Saturation | Change the Saturation of the A/V Input Signal. |
| Brightness | Change the Brightness of the A/V Input Signal. |
Conceptronic CM3PVRD
Manual de usuario
natural_image
Diagram showing a cable connector connected to a TV screen, with no visible text or symbols.natural_image
Diagram showing a cable being inserted into a connector with multiple connectors and a group of speakers below (no text or symbols present)natural_image
Diagram showing connections between a CD and a connector with three connected ports (no text or symbols present)natural_image
Diagram of a cable connector with a switch and power plug, no text or symbols presentbar
Auto Tuning | Channel Frequency | Value | | :--- | :--- | | Channel Frequency | 47.25Mhz | | Found Channels | 0 | | Percentage | 18% |text_image
Channels Numbers 1 Active Yes Fine Tune 0 Audio Format PAL-I Swap Channel 1 Channel Name Manual Tune Starttext_image
Rec schedule Mode Once 2005 / MM 11 / DD 22 Status Source Date Start End Quality Done TV-012 Enter Select Return Exit Clear Deletetext_image
My Computer File Edit View Favorites Tools Help Back Search Folders Address My Computer System Tasks View system information Add or remove programs Change a setting Other Places My Network Places My Documents Shared Documents Control Panel Details My Computer System Folder Files Stored on This Computer Shared Documents Hard Disk Drives Windows XP (C:) CM3PVR_HDD (D:) Devices with Removable Storage 3½ Floppy (A:) DVD-RAM Drive (F:)text_image
Setup 10/09/2008 - 10:45:38 AM System A/V set Analog TV Digital TV Tools Adv A/V TV system Screen saver Sys language Time format Set date Set time Reset setting OK OK RETURN exit Select setup optionSistema:
Sistema de TV
Salvapantallas
Idioma del sist.
Formato horario
Introd. fecha
Fecha y hora
Conceptronic CM3PVRD
Benutzerhandbuch
natural_image
Diagram showing a cable connector connected to a TV screen, with no visible text or symbols.natural_image
Diagram showing connections between a black audio component and four connected audio sensors, with TV screen inset (no text or symbols)natural_image
Diagram showing a cable being inserted into a connector with two connectors and a group of stylized human figures below (no text or symbols)natural_image
Diagram showing connections between a CD and a camera module with three connected cables (no text or symbols present)natural_image
Diagram of a cable connector with a switch and power plug, no text or symbols presenttext_image
Auto Tuning Channel Frequency 47.25Mhz Found Channels 0 18%text_image
Channels Numbers 1 Active Yes Fine Tune 0 Audio Format PAL-I Swap Channel 1 Channel Name Manual Tune Starttext_image
Rec schedule Mode Once 2005 / MM 11 / DD 22 Status Source Date Start End Quality Done TV-012 Enter Select Return Exit Clear Deletetext_image
My Computer File Edit View Favorites Tools Help Back Search Folders Address My Computer System Tasks View system information Add or remove programs Change a setting Other Places My Network Places My Documents Shared Documents Control Panel Details My Computer System Folder Files Stored on This Computer Shared Documents Hard Disk Drives Windows XP (C:) CM3PVR_HDD (D:) Devices with Removable Storage 3½ Floppy (A:) DVD-RAM Drive (F:)text_image
Setup 10/09/2008 - 10:45:38 AM System A/V set Analog TV Digital TV Tools Adv A/V TV system Screen saver Sys language Time format Set date Set time Reset setting OK OK RETURN exit Select setup optionSystem:
natural_image
Diagram showing a cable connector connected to a TV screen (no text or symbols on the diagram itself)Connector le(s) Câble(s) Audio
natural_image
Diagram showing a connector with cable and connector pin, alongside a group of stylized human figures (no text or symbols)natural_image
Diagram showing connections between a CD and a multi-pin connector (no text or symbols present)natural_image
Diagram of a cable connector with a switch and power plug, no text or symbols presenttext_image
Auto Tuning Channel Frequency 47.25Mhz Found Channels 0 18%text_image
Channels Numbers 1 Active Yes Fine Tune 0 Audio Format PAL-I Swap Channel 1 Channel Name Manual Tune Start"MMDDhhmm.AVI" (MM = Mois, DD = Jour, hh = Heure, mm = Minutes)
FRANÇAIS
text_image
Rec schedule Mode Once 2005 / MM 11 / DD 22 Status Source Date Start End Quality Done TV-012 Enter Select Return Exit Clear Delete“MMDDhhmm.AVI” (MM = Mois, DD = Jour, hh = Heure, mm = Minutes)
My_Movie_With_Sub.AVI
My_Movie_With_Sub.SRT
text_image
My Computer File Edit View Favorites Tools Help Back Search Folders Address My Computer System Tasks View system information Add or remove programs Change a setting Other Places My Network Places My Documents Shared Documents Control Panel Details My Computer System Folder Files Stored on This Computer Shared Documents Hard Disk Drives Windows XP (C:) CM3PVR_HDD (D:) Devices with Removable Storage 3½ Floppy (A:) DVD-RAM Drive (F:)text_image
Setup 10/09/2008 - 10:45:38 AM System A/V set Analog TV Digital TV Tools Adv A/V TV system Screen saver Sys language Time format Set date Set time Reset setting OK OK RETURN exit Select setup optionSystème :
Conceptronic CM3PVRD
Manuale d'uso
natural_image
Diagram showing a cable connector connected to a TV screen, with no visible text or symbols.natural_image
Diagram showing a cable being inserted into a device with three speakers below (no text or symbols present)natural_image
Diagram showing connections between a CD and a multi-pin connector (no text or symbols present)natural_image
Pure electrical circuit lines without any symbolstext_image
Auto Tuning Channel Frequency 47.25Mhz Found Channels 0 18%text_image
Channels Numbers 1 Active Yes Fine Tune 0 Audio Format PAL-I Swap Channel 1 Channel Name Manual Tune Starttext_image
Rec schedule Mode Once 2005 / MM 11 / DD 22 Status Source Date Start End Quality Done TV-012 Enter Select Return Exit Clear Deletetext_image
My Computer File Edit View Favorites Tools Help Back Search Folders Address My Computer System Tasks View system information Add or remove programs Change a setting Other Places My Network Places My Documents Shared Documents Control Panel Details My Computer System Folder Files Stored on This Computer Shared Documents Hard Disk Drives Windows XP (C:) CM3PVR_HDD (D:) Devices with Removable Storage 3½ Floppy (A:) DVD-RAM Drive (F:)text_image
Setup 10/09/2008 - 10:45:38 AM System A/V set Analog TV Digital TV Tools Adv A/V TV system Screen saver Sys language Time format Set date Set time Reset setting OK OK RETURN exit Select setup optionSystem (Sistema):
Conceptronic CM3PVRD
Manual do utilizador
natural_image
Diagram showing a cable connector connected to a TV screen, with no visible text or symbols.natural_image
Diagram showing connections between audio/video cables and a TV (no text or symbols present)natural_image
Diagram showing a cable connector connected to three stylized human figures (no text or symbols present)natural_image
Diagram showing connections between a CD and a camera module with three connected cables (no text or symbols present)natural_image
Diagram showing a cable connector connected to an electrical outlet, with no visible text or symbols.bar
| Channel Frequency | Value | | ----------------- | --------- | | Found Channels | 0 | | Channel Frequency | 47.25Mhz | | Found Channels | 18% |text_image
Channels Numbers 1 Active Yes Fine Tune 0 Audio Format PAL-I Swap Channel 1 Channel Name Manual Tune Starttext_image
Rec schedule Mode Once 2005 / MM 11 / DD 22 Status Source Date Start End Quality Done TV-012 Enter Select Return Exit Clear Deletetext_image
My Computer File Edit View Favorites Tools Help Back Search Folders Address My Computer System Tasks View system information Add or remove programs Change a setting Other Places My Network Places My Documents Shared Documents Control Panel Details My Computer System Folder Files Stored on This Computer Shared Documents Hard Disk Drives Windows XP (C:) CM3PVR_HDD (D:) Devices with Removable Storage 3½ Floppy (A:) DVD-RAM Drive (F:)text_image
Setup 10/09/2008 - 10:45:38 AM System A/V set Analog TV Digital TV Tools Adv A/V TV system Screen saver Sys language Time format Set date Set time Reset setting OK OK RETURN exit Select setup optionSistema:
Conceptronic CM3PVRD
Használati utasítás
natural_image
Diagram showing a cable connector connected to a TV screen, with no visible text or symbols.text_image
Diagram showing cable routing from a device to TV, with labeled connectors and connection pointsnatural_image
Diagram showing a connector with cable and connector pin, connected to a group of stylized human figures (no text or symbols)natural_image
Diagram showing connections between a CD and a connector with three connected ports (no text or symbols present)natural_image
Diagram showing a cable connector connected to an electrical outlet, with no visible text or symbols.bar
| Channel Status | Frequency (Mhz) | | -------------- | --------------- | | Found Channels | 0 | | Channel Frequency | 47.25 | | Percentage | 18% |text_image
Channels Numbers 1 Active Yes Fine Tune 0 Audio Format PAL-I Swap Channel 1 Channel Name Manual Tune Starttext_image
Rec schedule Mode Once 2005 / MM 11 / DD 22 Status Source Date Start End Quality Done TV-012 Enter Select Return Exit Clear DeleteMy_Movie_With_Sub.AVI
My_Movie_With_Sub.SRT
text_image
My Computer File Edit View Favorites Tools Help Back Search Folders Address My Computer System Tasks View system information Add or remove programs Change a setting Other Places My Network Places My Documents Shared Documents Control Panel Details My Computer System Folder Files Stored on This Computer Shared Documents Hard Disk Drives Windows XP (C:) CM3PVR_HDD (D:) Devices with Removable Storage 3½ Floppy (A:) DVD-RAM Drive (F:)text_image
Setup 10/09/2008 - 10:45:38 AM System A/V set Analog TV Digital TV Tools Adv A/V TV system Screen saver Sys language Time format Set date Set time Reset setting OK OK RETURN exit Select setup optionRendszer:
TV System
Conceptronic CM3PVRD
Kullanıcı Kılavuzu
Conceptronic Media Recorder ve Player'1
natural_image
Diagram showing a cable connector connected to a TV screen, with no visible text or symbols.text_image
Diagram showing connections between audio/video cables with labeled components and TV screen iconnatural_image
Diagram showing a cable connector connected to three stylized human figures (no text or symbols present)natural_image
Diagram showing connections between a CD and a connector with three connected cables (no text or symbols present)natural_image
Diagram showing a cable connector connected to an electrical outlet, with no visible text or symbols.bar
Auto Tuning | Channel Frequency | Value | | :--- | :--- | | Channel Frequency | 47.25Mhz | | Found Channels | 0 | | Percentage | 18% |text_image
Channels Numbers 1 Active Yes Fine Tune 0 Audio Format PAL-I Swap Channel 1 Channel Name Manual Tune Starttext_image
Rec schedule Mode Once 2005 / MM 11 / DD 22 Status Source Date Start End Quality Done TV-012 Enter Select Return Exit Clear DeleteMy_Movie_With_Sub.AVI
My_Movie_With_Sub.SRT
text_image
My Computer File Edit View Favorites Tools Help Back Search Folders Address My Computer System Tasks View system information Add or remove programs Change a setting Other Places My Network Places My Documents Shared Documents Control Panel Details My Computer System Folder Files Stored on This Computer Shared Documents Hard Disk Drives Windows XP (C:) CM3PVR_HDD (D:) Devices with Removable Storage 3½ Floppy (A:) DVD-RAM Drive (F:)text_image
Setup 10/09/2008 - 10:45:38 AM System A/V set Analog TV Digital TV Tools Adv A/V TV system Screen saver Sys language Time format Set date Set time Reset setting OK OK RETURN exit Select setup optionSystem:
TV System
Product Specifications
Specifications
- Dimensions: H = 19.3cm, B = 6.9cm, L = 21.8cm
- Power: 100-240VAC, 50/60HZ
- Power Consumption: Standby: ± 0,8W Normal Operation: ± 17,5W (with HDD) During Recording: ± 18,5W (with HDD)
- Operation Temperature: 5°C to 40°C
- Video System: PAL/NTSC
- Video Output: 1.0 ± 0.2 Vp-p , 75
- Frequency Response: ±3dB(20HZ\~20KHZ)
- Signal to Noise Ratio: ≥70dB
- Crosstalk: ≥70dB
Hardware
- Video Input: Composite Video (CVBS), TV Tuner RF
- Audio Input: Analog Stereo signal
- Video Output: TV Tuner RF, Composite Video (CVBS), S-video, Component Video (YPbPr)
- Audio Output: Analog Stereo signal, Digital Coaxial (SPDIF)
- USB Port: USB Device, USB Host
Storage Device
- Internal 3.5 " SATA HDD, FAT32 single partition
- SD/MMC/MS card
- External USB Device
Video Record Format
- MPEG4 (*.AVI) codec: XviD
- 720×480@30fps(NTSC), 720×576@25fps(PAL)
- Quality adjustable in 3 levels (HQ/SP/LP)
Video Record Size (example with 500GB HDD)
| - | HQ: | 228 hours and 35 minutes. (app. 2190MB for 1 hour) |
| - | SP: | 437 hours and 46 minutes. (app. 1140MB for 1 hour) |
| - | LP: | 656 hours and 45 minutes. (app. 760MB for 1 hour) |
PRODUCT SPECIFICATIONS
Audio Record Format
- MPEG1 Layer 2 Mp2
Video Playback Format
- MPEG1/2 (*.MPG or *.VOB) up to 720×480@30fps, 720×576@25fps
- DivX/Xvid, up to 720×480@30fps, ADPCM or MPEG1/2 Layer II/III
- MPEG4 (*.AVI) MPEG4 Simple Profile 720×480@30fps, 2-channels MPEG1/2 Layer3 (*.MP3)
- Subtitle files: SRT, SUB, SSA, SMI.
Audio Playback Format
- MP3 (*.MP3)
Bit rate: 24-320Kbps, CBR & VBR, Stereo - MPEG1/2 Layer I/II
Bit rate: 24-320Kbps, CBR & VBR, Stereo - WMA (*.WMA)
Bit rate: 16-384Kbps, CBR, stereo
Photo Playback Format
- JPEG
- BMP
Language
- English
- Dutch
- German
- Spanish
- French
- Italian
Firmware
Firmware is upgradable through HDD, USB or Card.
To check the Firmware Version:
Press ‘RECORD’ - ‘0’ - ‘0’ - ‘0’ (zero) on the remote control when the CM3PVRD is in the Main Menu.