MEDISTAR S - Blood pressure monitor BOSO - Free user manual and instructions
Find the device manual for free MEDISTAR S BOSO in PDF.
User questions about MEDISTAR S BOSO
0 question about this device. Answer the ones you know or ask your own.
Ask a new question about this device
Download the instructions for your Blood pressure monitor in PDF format for free! Find your manual MEDISTAR S - BOSO and take your electronic device back in hand. On this page are published all the documents necessary for the use of your device. MEDISTAR S by BOSO.
USER MANUAL MEDISTAR S BOSO
1 Blood Pressure Unit boso-medistar S
2 Batteries 'micro' LR 03
1 Case
1 Blood pressure record card
1 Guarantee Certificate
1 User Instructions
For details on the conditions of guarantee, please refer to the guarantee card supplied.
A claim for guarantee can only be allowed if the Certificate of Warranty, completed and stamped by the dealer, is enclosed with the instrument.
For both guarantee and repair work, please send the instrument carefully packed and postage paid either to your authorized dealer or directly to:
- Do not expose the unit to extreme temperatures and avoid exposure to prolonged direct sunlight. Guard against mechanical shocks (do not let the unit fall or be struck) and do not allow the unit to become soiled or wet.
- To prevent possible damage to the unit from leaking batteries, remove the batteries if the unit is not going to be used for a longer period.
Medical Electrical Equipment needs special precautions regarding EMC. You will get appropriate information from the supplier on demand. - The cuff of the sphygmomanometer is suitable for a wrist circumference between 13.5 and 19.5 cm .
Take care to ensure that the cuff is not damaged by sharp or pointed objects (needles, scissors, etc.)
Description of unit
This sphygmomanometer complies with the European directives underlying the guidelines for medical products (CE symbol), as well as the European Standard EN 1060 Part 1: Noninvasive Sphygmomanometers - General Requirements' and Part 3: 'Supplementary Requirements governing electronic blood pressure measurement systems'. Regular calibration testing is to be carried out in accordance with the regulations existing in individual countries.
The technical testing procedures are detailed on page 23.
Information about blood pressure
Blood Pressure (BP) Values
Blood pressure does not remain constant but is continually changing. In the morning the blood pressure is lower than in the evening and it is at its lowest during sleep. It is also influenced by eating, smoking, stress and bodily exertion.
High blood pressure is not normally noticeable immediately by the occurrence of particular complaints. If, though, it goes unnoticed or untreated, it can lead to serious health problems. For this reason, regular blood pressure measurements as well as diagnosis and treatment by a doctor are so important.
A reliable assessment of blood pressure is only possible if you measure blood pressure regularly under comparable conditions and record the readings in your blood pressure log book.
Measuring your own blood pressure is not, however, a therapy. Never alter of your own accord any medication dosage that your doctor has prescribed.
The World Health Organization (WHO) has set the following guideline for the assessing of blood pressure values:
| Systolic | Diastolic | |
| Too high | over 140 mmHg | over 90 mmHg |
| Normal–borderline | 130 to 139 mmHg | 85 to 89 mmHg |
| Normal | 120 to 129 mmHg | 80 to 84 mmHg |
| Optimum | up to 119 mmHg | up to 79 mmHg |
Whether medical treatment is necessary depends not only on the blood pressure but also on the risk profile of the individual patient. Please contact your GP if one of the values (SYS/DIA) constantly exceeds the limit (>140 / >90) .
Preliminary remarks on measuring your own blood pressure
Pregnant women, diabetics and persons suffering from liver disorders, irregular heartbeat or those with a cardiac pacemaker should consult their doctor before measuring their own blood pressure, as in such cases, variable and incorrect blood pressure readings may occur. The sphygmomanometer does not have any influence on the pacemaker.
- In cases of poor blood circulation or severe arteriosclerosis it is not appropriate to take measurements at the wrist. In these instances the blood pressure should be taken at the upper arm.
Even with persons not suffering from these conditions it can occur that there are differences between measurements at the wrist and the upper arm. Therefore it is recommended on occasions to take comparative measurements at the upper arm.
- The measurement should always be performed when relaxed and when sitting. Measurement should be carried out on the bare wrist.
- The arm must not be constricted as a result of clothing that has been pushed back or rolled up, and the arm should be kept still throughout the measurement.
- When measuring, the wrist must be held at the same height as the heart!
It is recommended that the blood pressure is measured twice a day. In the morning after getting up and in the evening when the body is relaxed. - Variations in blood pressure are perfectly normal. Even a repeat measurement can produce noticeable differences. One-off or irregular measurements are therefore of little value when trying to assess the actual blood pressure. An interval of at least two minutes should be observed, before repeating a measurement.
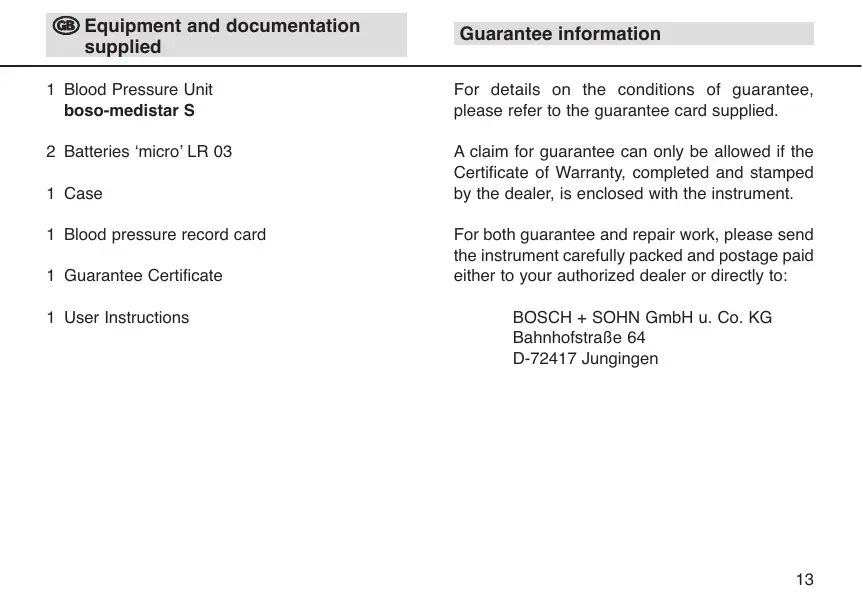
Inserting the batteries
The battery compartment is located on the left side of the housing.
To open the battery compartment slide down the cover.
Insert 2 × 1.5 Volt micro time (LR03). Only use batteries of the given specifications and follow the polarisation markings in the battery compartment. Never mix old with new batteries, or batteries of different manufacture.
Slide the lid back into its original position. Used batteries should not be disposed with normal household refuse. (See comments on protection of the environment on page 21).
The batteries require replacing when the symbol is illuminated in the display.
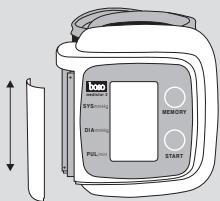
How to wear the unit
Wrap the cuff of the unit around your unclothed wrist. Please make sure, the display is positioned at your inner wrist (see picture). Most persons have a higher blood pressure on their left wrist. Therefore the measurement should be taken on the left wrist. If the blood pressure is higher on
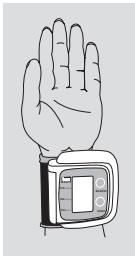
the right wrist, the measurement should be taken on the right wrist. Close the cuff with the Velcro fastener. The cuff should fit snugly around the wrist. When relaxed, place your elbow on the table with the forearm raised so that your wrist is at the same height as your heart.
Note on cuff size:
The unit must only be used in combination with the CW 42 cuff (wrist circumference 13.5 to 19.5cm ).
A step-by-step guide
Press the START button. All segments of the numerical display and all function symbols will be illuminated for a short period.
The unit inflates the cuff to a pressure of about 180mmHg . The display indicates the
pressure of the cuff as it rises. In case this pressure is not sufficient, the unit inflates the cuff by a further 50mmHg .
- Once inflated, the pump is switched off and the air in the cuff escapes automatically.
-
If not already the case, you should now keep your arm completely still and not speak.
-
As soon as the unit registers the first beats, the symbol blinks in time with the pulse rhythm and the falling pressure in the cuff is displayed.
After the measurement; the built-in solenoid valve opens automatically to rapidly release the remaining pressure in the cuff.
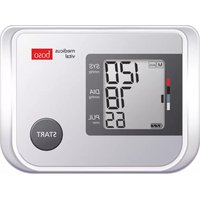
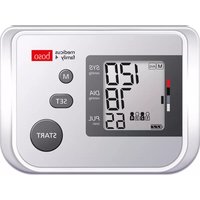
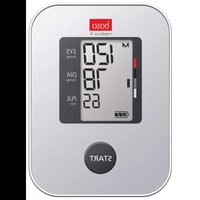
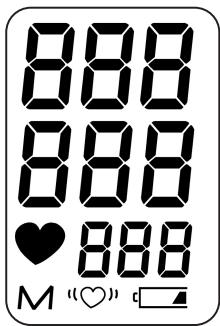
The measurement readings are shown in the display:

systole mmHg
diastole mmHg
Pulse/min
Measurements are automatically retained in the memory. When the memory store is full (30
measurements), the oldest measurement is deleted and the latest one stored.
- Invalid measurements are not stored in the memory.
- If symbol “ ” appears following a completed measurement, it is recommended that the measurement is repeated while holding the arm motionless (see also page 21).
A renewed display of symbol "♥" following the repeat measurement with the arm being held motionless, can be an indication of irregular heart beat. Discuss this matter with your GP on your next visit.
- The unit switches off automatically after approximately one minute. To repeat a measurement, press the START button again.
Aborting a measurement
-
A measurement can be aborted at any time by pressing the START button. The cuff is then automatically deflated. In case of error, you can always remove the unit at any time by simply opening the cuff.
-
Record the measured values into the record card that accompanies your unit as follows:
- Enter each individual reading.
- Recall the average value after 30 measurements and enter it in its designated column.
- By swiftly pressing the MEMORY button while the unit is not in use, stored measurements can be recalled.
The average value of all stored measurements (for systole and diastole) is showed afterwards. The mode „pulse“ shows the number of stored measurements.
- If there is no measurement stored in the memory, the display for the number of measurements taken flashes „RCC“. The
systole and dia-stole displays each show.
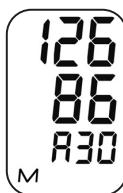
Average value Systole mmHg
Average value Diastole mmHg
Number of measurements
Call up of the stored individual measurements
- In order to bring back the last measurement stored, press the MEMORY button once more.
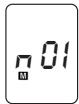
The number of the measurements appears in the display.
After three seconds the corresponding measurement value (systole, diastole and pulse) appears automatically.
- By repeated pressing of the MEMORY button, all stored measurements will be brought up in succession and appear in the display as described above.
To start a new measurement, simply press "START". - Please note: if the batteries are removed the memory store is erased.
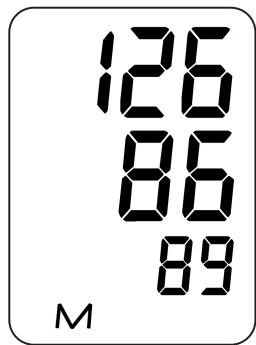
Systole mmHg
Diastole mmHg
Puls/min.
Error indicator
If a problem should arise during a measurement which prevents a usable measurement from being made, an error number is displayed in place of the usual measurement result.
Error number key:
Err 1: Inflation pressure in-adequate after three attempts to inflate.
Keep arm still.
Err 2: No pulses were detected that could be evaluated.
Check the positioning of the cuff.
Err 3: Error during inflation.
Cuff is possibly not tight enough.
: Irregular puls or incorrect taking of blood pressure (i.e. movement during measurement)
Repeat measurement holding the arm absolutely still. If the "♥" symbol is displayed again, it can be that an irregular heart beat is present. Consult your GP.
Cleaning and care of the unit
Please use only a soft, dry cloth to clean the unit.
Never use thinners, petroleum spirit or other aggressive cleaning agents.
Environmental safety notes
Used batteries and defective electronic devices do not belong into the household waste.

They can be deposited at special centres. Please contact your local authorities for information.
Technical data
Measurement principle: oscillometric
Measurement range:
40 to 240 mmHg
40 to 200 pulses/min
Memory store: 30 measurements
Display: LCD
Operating conditions:
ambient temperature: 10 - 40 ^ C relative humidity: 10 - 85 %
Transport and storage conditions:
Temperature -5 - 50°C relative humidity: max. 85%
Power supply:
DC 3V (2 x 1.5 V microcells alkali manganese, IEC LR 03)
Battery check:
indicator symbol in display
Weight: 0,15 kg
Classification:Type BF
Clinical Test (DIN 58130):
Accuracy complies with EN 1060 part 3 Maximum deviation of cuff pressure: ± 3 mmHg Maximum deviation of pulse rate: ± 5%
A) Functional testing
Functional testing of the unit can only be performed on human subjects or using a suitable simulator.
B) Leak testing of the pressure circuit and error testing of the display
Please note:
a) Prior to testing, separate the cuff from the unit (after having first removed the screws in the battery compartment). The air hose connecting plug (special plug) can now be inserted into the unit.
b) To perform leak testing of the pressure circuit, a tee connector must be used to connect the rolled-up cuff and a pump bulb to the pressure circuit.
c) If the pressure in measuring mode exceeds 320mmHg , the quick-action air release valve triggers and opens the pressure circuit. If the pressure in testing mode exceeds 320mmHg , the display blinks.
Testing
- Remove batteries.
- Hold START-button pressed down and insert batteries.
- Release START-button.
The unit is now ready for testing. The displays of SYS, DIA and PUL now show the actual pressure.
- Testing for divergence of Pressure indication and Density of Pressure circuit (setting time for cuff at least 60 seconds) can now be carried out in the usual manner.
- Switch off unit and reconnect the cuff to the unit.
C) Security
For security purposes the two parts of the housing are joined together with a security label.
Accuracy complies with EN 1060 part 3
Maximum deviation of cuff pressure: ± 3mmHg
Maximum deviation of pulse rate: ± 5%