USER MANUAL DIAMANTE FALMEC
INSTRUCTIONS BOOKLET
Dear Sir/Madam, congratulations!
You have purchased a prestigious range hood of guaranteed quality. For best results, we suggest that you carefully follow the operating and maintenance instructions provided in this booklet; in addition, to order spare charcoal filters, use the special coupon on the cover.
This instruction booklet must be kept together with the appliance for future reference. If the appliance is sold or consigned to other parties, check that the booklet is supplied with it, to ensure that the new user has the correct information on the operation of the range hood and is aware of the warnings. These warnings have been provided for the your safety and the safety of others. As a result, please read them carefully before installing and operating the appliance.
This appliance is not intended for use by young children or infirm persons unless they have been adequately supervised by a responsible person to ensure that they can use the appliance safely. Young children should be supervised to ensure they do not play with the appliance.
The appliance must be installed by qualified personnel, in accordance with the standards in force. If the supply cord is damaged, it must be replaced by the manufacturer, its service agent or similarly qualified persons in order to avoid a hazard. Any modifications that may be required to the electrical system for the installation of the range hood must only be made by qualified electricians.
It is dangerous to modify or attempt to modify the characteristics of this system. In the event of malfunctions or if repairs are required to the appliance, do not attempt to solve the problems directly.
Repairs performed by unqualified persons may cause damage. For all repair and other work on the appliance, contact an authorised service/spare parts centre.
Always check that all the electrical parts (lights, exhaust device), are off when the appliance is not being used. Read the entire instruction booklet before performing any operations on the range hood.
The range hood must only be used for the exhaust of cooking fumes in home kitchens. The manufacturer disclaims all liability for any other use of the appliance.
The maximum weight of any object placed above the hood, or hung to it (if possible) must not exceed 1,5 kilos. After installing the stainless steel hood, clean it in order to remove any residue of the protective glue, and stains of grease or oil. The manufacturer recommends its cleaning cloth available for purchase. The manufacturer accepts no liability in case of damage caused by the use of different detergent types.
SAFETYWARNINGS
C E

The electrical system features an earth connection in compliance with international safety standards; furthermore, it is compliant with the European standard for electromagnetic compatibility.
Do not connect the appliance to flues (from boilers, fireplaces, etc.). Make sure the mains voltage corresponds to the values on the rating plate located inside the range hood. The minimum safety distance between the cooktop and the range hood must be at least 65~cm .
Never cook on "open" flames under the range hood.
Check deep-fryers during use: superheated oil may be flammable.

Before performing any cleaning or maintenance operations, disconnect the appliance by unplugging it or using the main switch. The manufacturer disclaims all liability for any damage that may be directly or indirectly caused to people, things and animals due to the failure to follow all the instructions provided in this booklet and above all the warnings relating to the installation, operation and maintenance of the appliance.
- there is a fire risk if cleaning is not carried out in accordance with the instructions.
CAUTION: Accessible parts may become hot when used with cooking appliances.
- Max. length screw for fixing the chimney is 10mm (provided by the manufacturer).
WARNING: Failure to install the screws or fixing device in accordance with these instructions may result in electrical hazards.
Warning only for Australia: hood width less than 90 cm: use max. 4 hobs

TECHNICAL SPECIFICATIONS
The technical data pertaining to the electric appliance The technical specifications of the appliance are shown on the rating plates located inside the range hood.

INSTALLATION
(Section reserved for qualified installers of the range hood)
Minimum distance between the higher part of the cooker and the lower part of the hood: usually, when a hood is fitted on a gas appliance, this distance must be at least 65~cm . (25,6") see Fig. 01.
However, on the basis of EN60335-2-31 of 11-07-2002 from TC61 (sub-clause 7.12.1 meeting 15 agenda item 10.11), in the case of a Diamante/Gleam hood the distance can be reduced to 53~cm but any instructions to the contrary for the cooker must be taken into consideration. In the extractor version the whole pipe must have a diameter similar or bigger than the one linked to the hood. In the horizontal parts the pipe must be inclined slightly (about 10% ) to the top in order to better channel the fumes outside.
Avoid using angled pipes, make sure that the pipes are at least of the minimum length.
Comply with the current regulations on air discharge into the atmosphere.
If a boiler, stove, fireplace, etc. that uses gas or other fuels is being used at the same time, make sure the room where the fumes are extracted is well ventilated, in compliance with the current regulations.
Mounting instruction: see section "0" of the booklet.

ELECTRICAL CONNECTIONS
(Section reserved for qualified installers)
WARNING!
Before doing any work inside the range hood, disconnect the appliance from the mains power supply.
Check that the wires inside the range hood are not disconnected or cut; if this is the case, contact your nearest service centre. The electrical connections must be performed by qualified personnel.
The connections must be performed in compliance with the legal standards in force. Check that the relief valve and the electrical system are able to support the load of the appliance (see the technical specifications in point B).
Some types of appliance are supplied with a cable without plug; in this case, "standardised" plugs must be used, keeping in mind that:
- the yellow-green wire must be used for the earth,
- the blue wire must be used for the neutral,
- the brown wire must be used for the phase; the cable must not come into contact with hot parts (over 70^ ).
- fit a plug that is suitable for the load to the power cable, and connect it to a suitable power outlet.
For appliances that come supplied with cable and plug please ensure they are plugged into a circuit suitable for this appliance.
Please refer to a qualified person. (See technical specifications in point B).
The manufacturer declines all liability if the safety standards are not observed.

RANGE HOOD WITH OUTSIDE DISCHARGE (exhaust)
In this version, the fumes and steam from the kitchen are conveyed outside through an exhaust duct.
The exhaust conveyor that protrudes from the upper part of the range hood must be connected to a duct that carries the fumes and steam outside. In this version, the charcoal filters, if fitted, should be removed; to do this, see the instructions in point F. There must be adequate ventilation of the room when the range hood is used at the same time as appliances burning gas or other fuels, according to the standard.
Deviation for Germany:
When the range hood and appliances supplied with energy other than electricity are simultaneously in operation, the negative pressure in the room must not exceed 4 Pa (4x10 E-5 bar).

RECIRCULATING RANGE HOOD (with filter)
In this version, the air passes through charcoal filters for purification, and is then recirculated back into the kitchen.
Check that the charcoal filters are fitted to the motor, and if not, install them as described in the instructions in point H.
If the hood is of filtering type, remove the non-return valve fitted at the motor's outlet.

For maximum efficiency, the third speed should be used when there are strong odours or a lot of steam, the second speed in normal conditions, and the first speed for keeping the air clean with minimum energy consumption. The range hood should be switched on when starting to cook, and left on until the odours disappear.

OPERATION
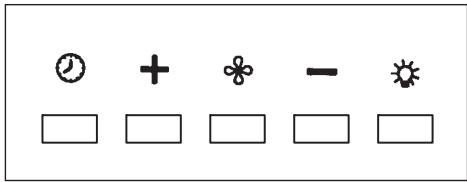
1. ELECTRONIC CONTROL PANEL

- ON: light on (the pushbutton is lit);
- OFF: light off;
Press to reduce motor speed
Speed 1, 2 and 3 are indicated by the number of LEDs that light up (excluding the light and the timer LEDs).
Press to increase motor speed
Speed 1, 2 and 3 are indicated by the number of LEDs that light up (excluding the light and the timer LEDs).
(In the 4-speed version the pushbutton + blinks. The fourth speed remains on for a set duration of time. After 15 minutes the motor returns to the third speed).
Function: it turns hood motor on and off.
The function "desired speed" enables to start the motor at the speed that was selected before the hood was last turned off.
Optional: version with remote control (some versions only).
WARNING:
Install the hood away from sources of electromagnetic waves, as these could affect the correct operation of the electronic system.
Maximum operating distance: 5 metres. The maximum operating distance could be less than 5 metres in case of electromagnetic interference by other equipment.
Light pushbutton on remote control: light on/off.
- and + pushbutton: increase/decrease speed (to start the motor press either the + or the - pushbutton).
Timer pushbutton: see instructions below.
- This function allows the automatic turning off of the hood after running for 15 minutes at the speed previously set (the pushbutton shows a flickering light).
- After about 30 hours of running the pushbutton indicates the need for washing the metal filters (the pushbutton shows a solid red light). To disable the alarm press the pushbutton for a few seconds until the red light turns off. Then turn the hood off and on again to check that the alarm has disappeared.

FILTERS REMOIVING AND REPLACING'S INSTRUCTIONS
To reach the metal filters one must remove the three frontal panels (see fig A1 and A2). To remove the metal filters use the handle.
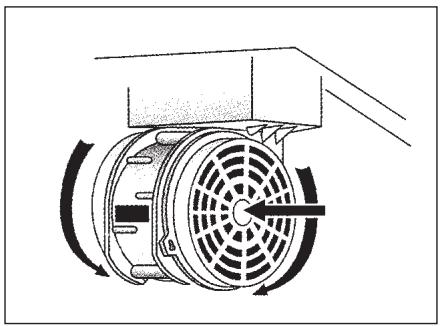
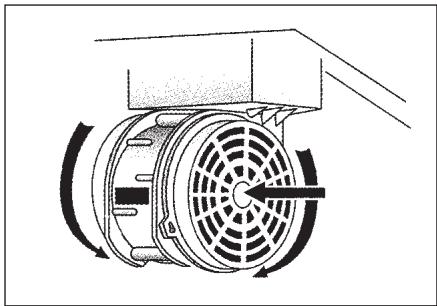
2. CHARCOAL FILTERS
To replace the charcoal filters, proceed as follows: remove the metal filters as described
above. The two filters located at the ends of the motor can now be easily accessed.
To install the new filters see picture.
In case of hood with the motor box the filter is located on the bottom part of the motor box.
To install the new filters see picture.
To order new charcoal filters contact the distributor/retailer.
VALID ONLY FOR ITALY: download the appropriate order form from: www.falmec.com (access the assistance drop-down menu).

LIGHTING ASSEMBLY AND REPLACEMENT
1. FLUORESCENT TUBE (DIAMANTE)
Fluorescent tube replacement:
a) Disconnect the appliance from the mains.
b) Remove the steel panel and the metal filters (see H 1). Undo the 2 + 2 knurled fixing studs in the steel support.
c) Remove the neon tube by rotating it by 90^ and replace it with an identical one (13W tube T5).
d) Repeat point B in reverse.
e) Reconnect the appliance to the mains
In this case the hood is equipped with high efficiency, low power LED spotlights with extremely high durability under normal use conditions. LED spotlight replacement should only be carried out by qualified technicians using only original spare parts.

MAINTENANCE AND CLEANING
Constant maintenance ensures the correct operation and efficiency of the appliance over time. Special attention should be paid to the metal grease-trapping filters and the charcoal filters. Frequent cleaning of the filters and their supports will ensure that fats and grease do not accumulate on the range hood, with the consequent risk of fire.
These trap the fat and grease particles suspended in the air, and therefore should be washed every month in hot water and detergent, without bending them. Wait until they are completely dry before repositioning them. To remove and replace these filters, see the instructions in point H1. This operation should be performed at regular intervals.
2. CHARCOAL FILTERS
These trap the odours present in the stream of air that passes through them. The air
is purified by passing a number of times through the filters and being recirculated into the kitchen. The charcoal filters cannot be cleaned, and should be replaced on average every 3-4 months (according to use). To replace the charcoal filters, see the instructions in point H2.
3. CLEANING THE OUTSIDE OF THE APPLIANCE
It is advised to clean the external hood surfaces at least every 15 days in order to avoid that oily or greasy substances affect the steel surfaces.
The aside of the range hhod should be cleaned using a damp cloth and neutral liquid detergent or denatured alcohol.
In case of fingerprint-less finish (fasteel) clean only with water and neutral soap using clean with a soft cloth, rinse and wipe dry thoroughly. Do not use products that contain abrasive substances, rough cloths or cloths specifically designed for cleaning steel. Using abrasive substances or rough cloths will inevitably damage the finish of steel. The steel surface will be irrevocably damaged if the instructions above are not complied with.
Keep these instructions together with the instructions for use of your hood.
The manufacturer accepts no liability for any damage caused by non-compliance with the instructions above.
4. CLEANING THE INSIDE OF THE APPLIANCE
The electrical parts or parts of the motor assembly inside the range hood must not be cleaned using liquids or solvents.

Do not use abrasive products.
All the above operations must be performed after having disconnected the appliance from the mains power supply.

WARRANTY
The new equipment is covered by warranty.
The warranty conditions are provided by the distributor.

The manufacturer is not liable for any inaccuracies in this booklet resulting from printing or transcription errors. The manufacturer reserves the right to modify its products as it considers necessary or in the interests of the user, without compromising their essential safety and operating characteristics.

MOUNTING INSTRUCTIONS, RANGE HOODS
Phase 1
- Lean the propping bar against the wall A (fig. 01), away from the cooking surface by a height calculated by the total sum of the numbers: X + 525 mm . (where X can vary between 530 and 650 mm ).
- Should there be a rear flue see fig. A.
- Check with a spirit level the horizontal alignment and mark two fixing points at the ends of the bar.
- Drill a hole, insert 2 × 8 ~mm wall anchors and fix the bar with the screw provided.
Phase 2
- Hook the hood to the propping bar (fig. 02).
- Check the hood's alignment using the fixing screws.(fig. 02). The upper screw (B) set the distance from the wall, the lower (C) the vertical slide.
Phase 3
To avoid any unhooking of the hood fix it to the wall with the screws and wall anchors supplied as follows:
- through the holes on the back of the hood and any strap on the cover.
- Insert in pipe union D pipe E (fig. 3)
- Should the fixing include a rear flue see fig. A.
Phase 4 (optional)
- Position chimney (G) and extension (H) as shown in fig. 04.
- Insert in G extension H, making it slip until the required height is reached.
- When happy with the location, lean bar L against the wall, check with a spirit level the horizontal alignment and mark two fixing points at the ends of the bar.
- Drill a hole, insert 2 × 4 mm. wall anchors and fix bar L with the screw provided.
- Screw extension H to bar L Using screws M.


HINWEISE
1. ELEKTRONISCHES BEDIENFELD
Lichtknopf

TEXHINUeCKNE XAPAKTEPNUCTNKN
TxHnUcKn DaHHbI npN6op a npuBdHbI Ha 3TNKTK, HaxoJaIscBHyTpN BByTJXHOYCTpOJCTBa.

YCTAHOBKA
OCHOBhbIE 3AMEUHnIa
(naparpa npdHa3NaH dny KBaHnHnnpOBaHHbIX cNuaNNCTOB, MOHTpyIOx BbITJXHO yCTPOIcTBO)
MnHnMaJIbHOe paCCToHHe: paCCToHHe MeKdy camO BbICOKo YacTbIO BapOuHNo anInpaTpybl n CamO Hn3KOJ uactbIO KxOHHOB BbITaKKn. KaK npaBnIO, KOgDa KxOHHa BbITaKKa pacnoIooJeHa Ha ra3OBoAn annapatye, Takoe paCCToHne DoJXHO 6bITb He MeHee 65 cm (25,6") (cm. pncyHok 01). Ondako, Ha oChOBaHN TpaKTobKn HopMbI EN60335-2-31 ot 11- 07-2002 co cTOpOnbl TC61 (cy6-orOBOPka 7.12.1 BCtpea 15 nyHKT COBeU.10.11) B clyuae BbITaKKn Diamante/Gleam 3TO mnHnMaJIbHOe paCCToHHe Mekdy BapOuHNo nobepxHOctBu HnXHe NcAcbIO BbITaKKn MoKeT 6bITb yMeHbSeHo Do 53 cm. EcIn B INHCTpyKunxra3OBoB BAPOuHNo NOBepxHOCTn yka3aHO 6OJIbSeE paCCToHHe, 3TO cNeDuY tYUnTBaTb.
Bo BCaCbBaIOSeB BepuBa B KOMJIeKTe C BbIXOdom DbIMOB DOJXHa IMeTb DnAmETp He MeHbIe DnAmEtpa CoedINHITeBHO Tpy6bl BbITaIKn. Ha rOpN3oHTaIbHbIX OTpE3kax Tpy6ka DoJXHa IMeTb He6OJBsoyKLOH (npn61.10%) BBepx InyLyuWero BbBOda BO3- dYxa Hapuyx.
MnHmAbHo yEmbWntb n3rN6bl; npOBepntb, qTo6bl dInHa Tpy6 6blna DoctaToOH dIra coeHNHeHn. Co6JIIOdaTb DeiCTByUOuine HopMbI O bBIOde BO3dyxa BO BHeHHIO cpeyDy. B clyae nCpONb3OBAHn Dpyrnx np6obopB (KOTNOB, neeu, kAMNHOB n.T.D.) C pNTaHnEM
ra3OM nI IN DpyrIMM BvIaMn TOpIbBa, ppeyCMOTpeB COOTBeTCTByUH BOHTNIAuIO NOMeueHn, B KOTOPM IPONCXODIT BCaCbIBaHne DbIMOB, COrJaCHO DeiCTByUOUM HOpMaM. IHCTpyKcUN No yctahOBke: CM. pa3dEe "O" hactoJero pykOBoDCTBa.

ПОДКЛЮЧЕНЕ ЗЛЕКТРОЗHEPГИN
(naparpaΦ npdHa3NaH TOJIbKO dIg KBaJIuΦnIupOBaHHbIX cIuaIINCTOB, NOdkNIOaIoUx BbITJXHO yCTpOInCTBO)
BHIMAHNE!
До Вылолння Лобов onpaць N B BытжHom yctpoiCTB OTKJIIOHT npn6op ot 3ЛКТрчскоI CTN.
Y6DNTcb, YTO BHTPN BbITJXHORO yCTPOINCTBO HOTCOINHHbI H NOBPXDHBI 3NKTPNUCKN INPOBDA; B CNYa BO3HNKHOBHNA TAKNX CNTyaCNI CBXNTCB C 6NJXKaIWM CPBNCbIM cHTpOM. JIy BblONHHN 3IKTPnUCKNX COINHHN O6paTNTCB K KBaIIINPHINPOBAHHM CNuAInCTam.
CoHHnI DoJXHb6ItB POn3BDbI B COOTBTCTBUN C NICTBYUOM 3aKOHoTaJIbCTBOM. Y6DntcB, yTO OrpaHInTJIbHbI npDOxpaHInTIN n EIKTpOo6OpyIDOBAHmOry TB bIpKaTb HarpzkyOT npi6opa (CM. 3TNKTky C TXHnCkMn XapaKtpnCTNkAmn, corlachO nyHKTy B). HkoTobpI npi6OpbI MOrY 6tBtB OCHAuHbI ShHypOM 63 BNkN; B TAKOM Cnya IcNoIb3yma BnIka DoJXHa 6bItb "CTaHaprTHoro" TnA c yTOM TORO, yTO:
- JNTO-3HnBIOPOBOD OJXH NCOJb3OBAtbcra 1a3aMJIHHIA,
- roJyboi npoBOd dOJIxH nCIONb3OBaTbcraIЯ HHTpaIbHOrO npoBOda,
-KOpuHbBn npOBoD oJONKH nCIOJIb3OBAtbcra dIЯ φa3bl, IHyp H doJXH KacaTbcra HarptbIX qactn, mIoUxN TMnpaTyP 60nl 70^
- YCTaHOBt Ha ɪŋhyp ɔJIKTpɒnɪtAɪnɪya Bɪŋkɪy, PɪŋrOdHɪyʊ ἀŋla Hɑrpy3Kɪ, N BCTaBbT B 3aʌŋTHyI0 Bɪŋkɪy.
Pn H6xOUMOCn PnMOro NODKJIOHnN K CTn H6xOIM Pa3mCTnB MxJy Pn6Opom n CTbMO HORONOPRnMaHHTOTPMUcckn PPKJHOaTJIb C MNHMaJIbHbIM OTKpbITMM Xkdy KOHTaTM 3 MM, paccHTaHHbHa HArpy3ky N OTBaIouu DiCTByIOum HopMaM. JtTO-3JIbHnPiPOBOD 3a3MJIHn H DoJIKN IIpPbIBaTcB PkJIQUaTlM.
IIOIOKJIIOUHnI np60pa K CTN 3NKTponHTAHy yOaNTcb, YTO:
- Haprajkhi CTN PINTAHNA COOTBTCTBYT YKa3aHHOMy Ha 3TNKT C TXHNUCKIMN XapaKtpnCTIKaMn.
-3a3MJIHN 3ΦΦKTINBHO IN BbIIOJIHHO IpaBUNbHO.
- LINHIA 3NKTPONTAHNA OCHAaHa 3ΦΦKTHBbIM 3a3MJIHIM NO IINCTBYIOUIM HOpMaM.
- IcnoJIb3yMbI pO3TKa IJIN MHOrONoJIocHbI NpKJIIOuATJIb JfKO DoCTyNHBI PnY UCTaHOBJIHHOM np6Op.
ПюзвориньН HCT Некаоч OTBTCTBHHOCTN B CNYa, Сли Нормь 63onaCHOCTN H co6liuDAIOTc.

B3TOn moDn n Dm n nap OT roTOBKn Bbl6paCbIAOTc HapyKu 43 Tpy6y.
Tpy6a DnBbIbPOca, KOTOPa BbICTyNaT n3 BpXH Nactn BbITJxKn DoJXHa 6bITb COINHnC Tpy6o, KOTOPa BBIONT dIM n Nap BH NOMUHn, PNC.
B daHHoM moIIN cHIMaIOTc qnIbTpbl Ha aKTbNbIpOBaHOM yI, cIIN OH N yCTaHOJIbI; KaK OH N CHIMaIOCTc, CM. nyHKT F. EcIn KycXOHNA BByTJCKA NCNoJIb3yTCs OJHObPMHNO I dJI ApyrIX npi6Opob, pa6OtaIOxN Ha ra3y nnn dpYrom TOnPbN, POMuHN DoJNXHO IMtB BO3MOXHOCTb DOCTaTOHOro pOBtpBaHn.
B 3toi moJIn BO3dY npoxoJnt yp3 pfJIbTpbl c aKTHBnPoBaHhbIM yrIm, rOuHuaTcN BO3BpaaTaC B POMUHN KxHN.
Y6dntcb, yTO yrOJIbHbI qIJIbTpbl yCTaHOBnHbI Ha MOTop, pnc. 6, B I pOToNBOM cIyua yCTaHOBNT nX, kAc yka3aHO B nyHKT F INCHtpkyuIN.
ДлучняхаразкгпсгдгпКOMнDТСИСПОь3OBaTbTpTBIOCKOPOCTbпи
HJIHnCINbHbIX 3anaxOB nIN 60JbWOrO KOJIynchBa npa, BTOpyO CKOpOCTb
B HopMaIbHbIX yCNOBnX, nPByIO CKOpOCTb ДЯ OCHCTKN BO3dYxa пи Hn3KOM
pacxODOBAHm 3IKTPO3HPrnn.
PKOMHdyTCBKNIOaTb BbITXKKY, KOrda Bbl HaHHaT rOToBnTB N OCTaBnTb pa6oTaIOUd O nC3HOBnCnIbHbIX 3anaxOB.

PABOTA
1. KHONKIC3JEKTPOHHBIM YNPABJIEHNIEM
KJabuwa ocbeenua

- ON: OCBeueHne BJIuOHeNo (KHONKa CBETNTc);
- OFF: ocBeuIeHne BbIKJIIOUeHO;
KnaBnsa -
Пин Нжатиз TOI KJIaBIIu ChNJaTaCЯСКОРOCТМOTopa.
CkopocTn 1,2 n 3 yka3bIbaIOTcKoJIHcEeTBOM 3aXKeHHbIX IINOOB,He ChITaI dIOOBOCBeueHnI TaIMepa.
KnaBnua+
Пи Нжати 3ToI KJIaBIMu yBeINuHBaetc CKOpOCTb MOTopa.
Ckopoctn 1, 2 n 3 yka3bIbaIOCTKoJIHcEeTbOM 3aXKeHHbIX dIOOB, He cHTaI dIOOBOCBeueHnI taiMepa. (B 4-ckopoCTHOB Bepcm KlaBnua + MnaeT. Ha 4-IO ckopoCTbycTaHOBHeO rpaHneHHe Bpem pa60tbl, n Upe3 15 MNHyT MOTOp aBTOMaTHeCKInpepeoxdnt Ha 3-IO ckopoCTb).
Klabnupa pexima
Функця: BKLOUeHHe N BbIKLIOUeHHe MOTOpa BbITJXKN.
KnaBnHa OcBeueHnHa npIbTe:CBET BKn./BbIKn. (on/off).
KlaBnHa - e + yMeHbSeHHe/yeBJIuHcHHe cKOpOCTn (ДЯ 3aIyCKa MoTopa MoXHO HaKaTb KaK KlaBnHy +, TAK I KlaBnHy -).
KlaBnIa TaMepa: CM. HNKe INCTpyKUmIO.
KlaBnHa TaMepa n HacbIeHnaФHbTpOB

-
3TaФункциюЗВОЛЯТЕВАТOMATUHECKNOTKПОЧаТБВITХКУпOCNe15MHHTpa6OыHa paHee3aДанHонСКОРОCTN(KЛавишaC MMRaIOUIM CBETOM).
-
Iocne npimepno 30 yacob pa6oTbI KJIaBnIa «PpeIraeT » NCTky MeTaIIInecknx
Фильтоб(KJIaBnIa CBETTCr KpaChbIM).ДЯ OTKJIIOUeHn INdIkaCm IN HaxMITE n
ydepKINBaIte KJIaBnIy TaImepa HeCKOJIbKO CekyHД Do BbIKJIIOHEnr KpaCHO rCBETA.
3aTeM BbIKJIIOUHTe BbITJxKу n CHOBA BKNIOUHTe, YTObI y6eIITbcR B TOM, YTO INdIkaCn
ncye3na.


ФИЛБТРБI ИНСТPyкци ПО ИЗВLEЧЕнЮ И 3AMEHE
YTo6bI pOnyUHT bOcTyn K MeTaJIInueCKnM ΦInbTpam, CneJyET ChrTb Tpr ΦpoH-TaJIbHbIe naHEn (cm. pnc. A1 - A2). YTo6bI cHrTb MeTaJIInueCKnE npOTnBOxNipOBbIe ΦInbTpbl BO3dEiCTBOBaTb Ha pyKoTky.
2.ФИЛБТРБICAKТВИРОBAHHbIM YГЛEM
3aMeHa qnIbTPOB Ha aKTINBnPoBaHHom yrIe DOnJXHa IpOIN3BOIDITbcra B CJIeDyIOUeM npRdke.
ChaTb MeTaNIIueckne fNJIbTpbl, KaK yKa3aHO BblIe, NocLe Yero OTKpbBaetcra DoCTyn K DByM fNJIbTpam, npuTePnHbIM K npaBOI n JbeO BCTopoHE MOTopa.
ДяуCTaHOBKn/3aMeHbI CM.
B BbITaKkax C MToPbHbIM OTcEOM qnJIbTp paCnoJIOXeH B HnXHeY cActN 3TOrO OTcEka. JyCTaHOBKn/3aMeHbI CM.
ДязakazahOBbIx yroIbHbIX ΦиIbTpoB O6paTeCb KДиCTpN6bHToPу/NpoIaBly.
TOIbKO IJNITAJIN: 3aRpy3nTe CneuNaIbHbI φOpMynIep 3aKa3a ΦIbTpA CcaTa: www.falmec.com (i3 BbIpaIauoero MeHIO cepBnCHOrO o6CnyKBaHn).

OCBELSEHNE yCTAHOBKA 3AMEHA
1.ФлуоPECULETHHAJAMNA(DIAMANTE)
3aMeHa lyopecueHTHO Tpy6Kn:
a) OTKIIOUHTb pnp6Op OT cETn;
b) ChЯт b CTaJIbHbIe nHaJIe n MeTaJIInuYeCKne ΦnJIbTpbl (cM. TOnky H1). OTHNTb 2+2 pNΦJIeHbIX KpeJexHbIX CtePjxH, JecTb CTaJIbHbIX HeOHOBbIX CynpoTob.
c) ChTb ΦIyopeceHTHyU Tpy6ky, NOBOPaunBaJ Ha 90° I3aMeHnTb ee Ha Tpy6ky c aHaJIOnuHbIMxapaKTePncTnKaMn (Tpy6ka T5 Ha 13Bt);
d) Повторив В образном поядке onepaши рунктб.
e) Choba noДклЮчNTb npибор K ceTи ЗЕКТрОПТАнЯ.
IapaHTnHbI yCIOBnI NOJIHOCTbI npIBDbI Ha NocIdN CTpaHnU 3TOrO IN3dHnI.

Pon3BODnTlb H OTBuat 3a BO3MOXHbI HTOUHOCTn OoHN6Kn B daHHOM n3daHHN, BO3NKu npn PuATn NnnpuATbIBAHnn. PpON3BODnTlb OCTabJrT 3a cO60 npBO Ha T MoDnΦnKaun Co6CTBHHo NPOdyKun, KOTOpbl COHT HOxOIMbIMn Nn INo13HbIMn, a TaKk B INTPcax NOnb3OBaTla, H BInraUoNn Ha rNaBbI ΦyHKuHOHaJIbHbI XapaktpncnKn n 630NaChOCTb.

1. LAMPA FLUORESCENCYJNA (DIAMANTE)