XR 1390 - Electric razor REMINGTON - Free user manual and instructions
Find the device manual for free XR 1390 REMINGTON in PDF.
| Product Type | Electric Shaver |
| Brand | REMINGTON |
| Model | XR 1390 |
| Power Supply | Rechargeable via 5.0 V DC, 1.0 A adapter (model PA-0510E(K)), mains voltage 100-240 V |
| Charging Time | 90 minutes for full charge |
| Runtime | 60 minutes of cordless shaving |
| Shaving Heads | 3 flexible and pivoting rotary heads |
| Trimmer | Retractable, with adjustable cutting guide (2 to 6 mm in 1 mm increments) |
| Usage | Cordless, usable in the shower or bath |
| Display | LED screen showing charge level and remaining minutes of runtime |
| Cleaning | Rinseable under warm water, cleaning brush included |
| Maintenance | Lubricate trimmer teeth every 6 months with a drop of oil |
| Spare Parts | Shaving heads and trimmer available separately |
| Dimensions (approx.) | 15 x 5 x 4 cm |
| Weight (approx.) | 200 g |
| Storage Temperature | 15 °C to 35 °C |
| Safety | Do not use if damaged or dropped in water; automatic shut-off when heads are removed |
| Included Accessories | Charging stand, adapter, protective cap, cleaning brush |
Frequently Asked Questions - XR 1390 REMINGTON
User questions about XR 1390 REMINGTON
0 question about this device. Answer the ones you know or ask your own.
Ask a new question about this device
Download the instructions for your Electric razor in PDF format for free! Find your manual XR 1390 - REMINGTON and take your electronic device back in hand. On this page are published all the documents necessary for the use of your device. XR 1390 by REMINGTON.
USER MANUAL XR 1390 REMINGTON
Thank you for buying your new Remington® product. Please read these instructions carefully and keep them safe. Remove all packaging before use.

IMPORTANT SAFETY INSTRUCTIONS
WARNING - TO REDUCE THE RISK OF BURNS, ELECTROCUTION, FIRE, OR INJURY TO PERSONS:
1 This appliance can be used by children aged from 8 years and above and persons with reduced physical, sensory or mental capabilities or lack of experience and knowledge if they have been supervised/instructed and understand the hazards involved. Children shall not play with the appliance. Cleaning and user maintenance shall not be done by children unless they are older than 8 and supervised. Keep the appliance and cable out of reach of children under 8 years.
2 Do not use this product if it is not working correctly, if it has been dropped or damaged, or dropped in water.
3 An appliance should never be left unattended when plugged into a power outlet, except when charging.
4 Keep the power plug and cord away from heated surfaces.
5 Make sure the power plug and cord do not get wet.
6 Do not plug or unplug the appliance with wet hands.
7 Do not use the product with a damaged cord. A replacement can be obtained via our International Service Centres.
8 Do not twist or kink the cable, or wrap it round the appliance.
9 Store the product at a temperature between 15^ and 35^
10 This appliance is not intended for commercial or salon use.
11 Suitable for use in a bath or shower.

KEY FEATURES
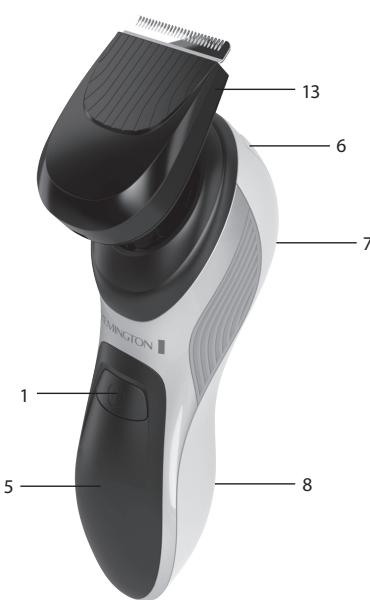
1 On/off switch
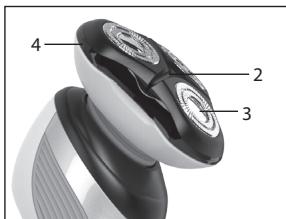
2 Head and Cutter assembly
3 Individual flexing heads
4 Hairpocket
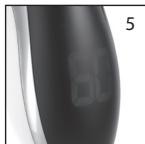
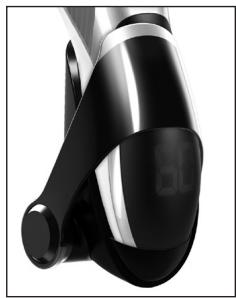
5 LED display
6 Detail trimmer
7 Trimmer release button
8 Charging pins
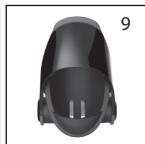
9 Charging stand
10 Adaptor (not shown)
11 Head guard (not shown)
12 Cleaning brush (not shown)
13 Grooming styler head
14 Adjustable comb for grooming styler head (not shown)
GETTING STARTED
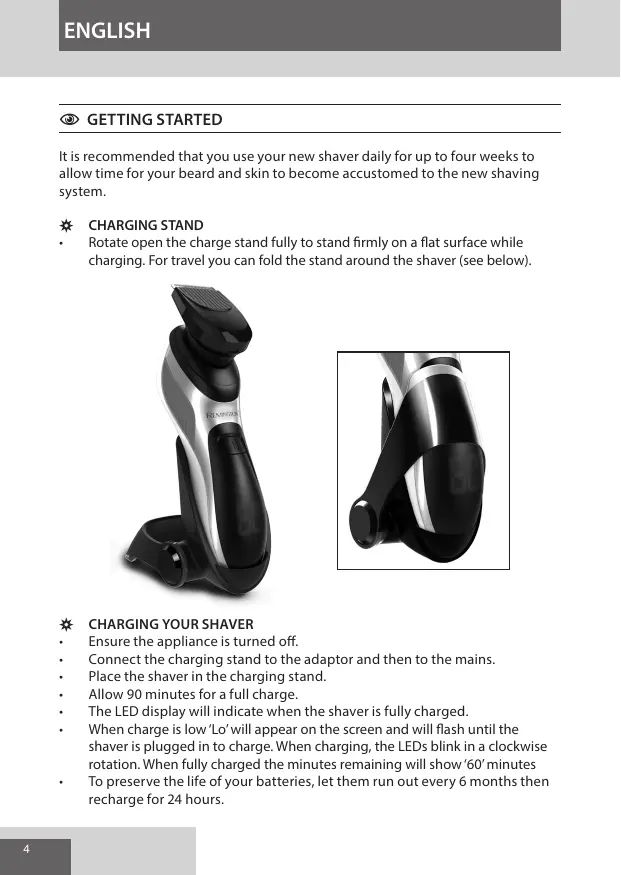
It is recommended that you use your new shaver daily for up to four weeks to allow time for your beard and skin to become accustomed to the new shaving system.
CHARGING STAND
- Rotate open the charge stand fully to stand firmly on a flat surface while charging. For travel you can fold the stand around the shaver (see below).

CHARGING YOUR SHAVER
Ensure the appliance is turned off.
- Connect the charging stand to the adaptor and then to the mains.
- Place the shaver in the charging stand.
- Allow 90 minutes for a full charge.
The LED display will indicate when the shaver is fully charged.
- When charge is low 'Lo' will appear on the screen and will flash until the shaver is plugged in to charge. When charging, the LEDs blink in a clockwise rotation. When fully charged the minutes remaining will show '60' minutes
- To preserve the life of your batteries, let them run out every 6 months then recharge for 24 hours.
- The adaptor automatically adjusts to a mains voltage between 100V and 240V.
This appliance should be charged by approved safety isolating adaptors PA-0510E(K) with the output capacity of 5.0 dc; 1.0A.

INSTRUCTIONS FOR USE
SHAVING
Note: This shaver is for cordless use only.
Make sure your shaver is properly charged.
- Switch the shaver on.
Stretch the skin with your free hand so the hairs stand upright.
- Only apply light pressure on the shaving head while shaving (pressing too hard can damage the heads and make them vulnerable to breakage).
Use short, circular strokes.
SHAVING WITH SHAVING GEL
- Follow the same instructions as dry shaving if using shaving gel.
CAUTION
After use with shaving gel, please rinse the head and cutters under warm water to clean away any excess gel and debris.
TRIMMING
- Push the trimmer button to release the detail trimmer.
Hold the trimmer at a right angle to your skin. - Place the trimmer at desired trim line for a quick, easy, professional trim.
To retract the trimmer, push down until it locks into position.
Tips for best results
- Use moderate to slow stroking movements. The use of short circular motions in stubborn areas may obtain a closer shave, especially along the neck and chin line.
DO NOT press hard against the skin in order to avoid damage to the rotary heads.
CHANGING SHAVE / GROOMING HEADS
The shaver should be switched off when changing heads.
- Grasp the shave head at the blue collar and pull up to unsnap the head from the handle.
- Attach the interchangeable heads to the handle by aligning the hexagon shapes of the head to the handle, then pressing together to snap in place.
GROOMING
- Use the grooming head without the adjustable comb for trimming hair close to the skin. This will trim hair to 1mm , holding the blades perpendicular to the skin will trim hair to 0.4mm .
- Use the snap on adjustable comb to trim hair at desired length between 2mm long and 6mm long. Adjust the comb setting by pressing in the button on the rear and rotating it to the desired length where it will lock into place. The setting length will be shown on the comb dial. Please see comb dial positions below and the respective cutting lengths.
| Comb Position | Cutting Length |
| 1 | 2mm |
| 2 | 3mm |
| 3 | 4mm |
| 4 | 5mm |
| 5 | 6mm |
- Place the groomer head against the skin and slide the clipper blade against the growth direction of the hair. The comb will lift the hair and trim it to a consistent length.
- Care for your appliance to ensure a long lasting performance.
We recommend you clean your product after each use.
Unplug the product before cleaning. - The easiest and most hygienic way to clean the appliance is by rinsing the appliance head after use with warm water.
CLEANING CAUTIONS
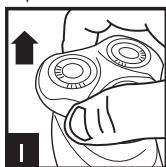
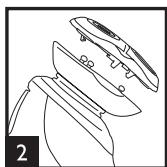
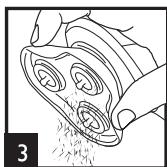
Pull the rotary shave face off the hair pocket (Fig. 1 and 2).
- Tap out excess hair shavings from the hair pocket (Fig.3). Hair clippings can also be washed out of the hair pocket and or shave face by rinsing these under the tap.
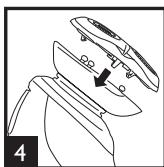
Once dry, snap the shave face back onto the hair pocket (Fig. 4).
CLEANING TRIMMER
- Lubricate the teeth of the trimmer every six months with a drop of sewing machine oil.
- Replacement parts and accessories are available to buy at http://www.remington.co.uk/ parts-accessories
CLEANING GROOMING HEAD
- The easiest and most hygienic way to clean the grooming head is by rinsing the head after use with warm water. A cleaning brush can also be used to remove cut hair from the blades.

BATTERY REMOVAL
The battery must be removed from the appliance before it is scrapped.
- The appliance must be disconnected from the supply mains when removing the battery.
Run shaver until the motor stops.
- Remove the head from the shaver (pull the head up and off).
Using a small screwdriver, pry the 'collar' off of the top of the handle.
Using a small screwdriver, pry the front cover from the body.
- Remove three screws located on front of shaver.
Using a small screw driver, pry up the newly unsecured inner housing to expose the battery.
- Pry battery free from circuit board.
- Dispose of battery properly.

ENVIRONMENTAL PROTECTION
To avoid environmental and health problems due to hazardous substances in electrical and electronic goods, appliances marked with this symbol must not be disposed of with unsorted municipal waste, but recovered, reused or recycled.

UW APPARAAT VERZORGEN
ZHMANTIKA METPA IPIOQYAAEHS
\POIEI ONIOIH H - ΓIA NA EPIOIP TEI O KIN YNO EKAYMAT N, H EKTOPI HEIA , IYPKAIIA H OMATIKH B ABH :
1 Autn n ouakeun mnoepi va xpnaiouoiothei ano naia iakac avw twv 8 ettwv kai ano atota me ieomegavec owatikec, aiothnpiakec n diavontikekavotntecne i nee eaiywn peipac kai yywoewv eoovu npaoei KATOIOVA ta e intnpie/kaiKOthnyei k epooov exouv katavoonou touc oxetikooc kivduvouc. Ta naiaia dev eniptpenei tai va naicov u Te nuakeun. O kaabapiaoc kai n ouvtnpn ano tov xpnoT dea npentei va yivovtai ano naiaia ektoec evivalawtwv 8 ettwv kai unapxei kantoioC va ta eniIbien. Kpatntote tn ouakeun kai to kalwdio paia o naiai kATW TW 8 ETWv.
2 Mny xpnojmoieite auto to pioov exoovd e aeitoupyei ootá, exi πeoi katah xéei unootei βaβn, nexi πeoi μeσo stvopeo.
3 Ouioukeuec,ev npénei note va apinyovtai avenitnpntec otav eiva atny npica,ekto c ano otav optiouv.
4ΦovTiOTeToβuαKaItoKaIδioTouρεμatocva npaμévouv Jakpiä ano Θερμaivóvec επiφaveiε.
5 i va uny a to a ka to kawio tou pueaatoC.
6 Otav baZeTe n ByaZeTe to BuOma unv to mAvete uE pEymu xepia.
7 Mny xpnoiopoieite To npoiov otav To kaawdo exei unootei aBn. Avataaktiko diatietai Oa Ieov Kevtpa SePbc tnc eTaipieiacac
8 Na unv επιρεπετη Σοιστροφή ἡν τοάκιον του καλωδίου, kai va unv to tuiyετe yμω αποτη συοκεύη.
9 To npoiov va qulaaooetai oe 0epuokpia 15^ kai 35^
10 Autn n ouokevun dEv npoopiEeai yia eumopikxphon n xphon oKoumuwntpio.
11 KaTaalnAn yia xphoan oAoutp nVtoucipea.
BAZIKA XAPAKTHPISTIKA
1 iak c v e p y o o i o i n o n c / a n e v e p y o o i o n o n c
2 Ⅱaεηκεφαλnçkai εαρτηματος κοπnε
3 MeovwEvc EukaunTec KepaLec
4 Θηκητριχών
3MiHa roIobOK 6pntBn/rgymepa
- Ppi 3miHi roJIOBOK 6pntBa MaE 6yTu BnKIOUeHa.
Bizmbitb roOBky 6pnTb 3a 6bnkTNHn «KOMipeu» i notarHt b Bropy, o6 3HATn rOJbky 3 pyKoTKn.
BctahOBiB 3mHnHy roIobky Ha pykoTci, POeHabuN WcTeKUthy BvCTyNn Ha rOJIbUci 3pykoTkoIO, NotIM HATNCHITb, Oo6 Detanb BCTana Ha MiCue.
Dorna3aBOLOCCM
Длг niцстрогань BONOCSEбиькdo шкири ВИКОпICTOBуTe roNOLBky Длг догл Any 3a BOONCCM 6e3 peryIbBOHoi rpeiHaCTOI habacdkn. TakIM YOM DO BoKINHA CTprnKKn Cknaje 1 MM, a KApI O TrpMaTIn ne3a nepriehnukynarpho Do shkpri, DO BoKHNa CTprnKKn Cknaje 0,4MM.
- Пистпжци ВОLOССД Дд ДОСгнень 6бжано IOBЖИН (ВID 2do 6 MM) ВИКОПСТОВУITE 3ATNCKAч HApERYNBОВАHIN rpe6IHuaCTIй Hacadц. BiDperyJIOte HalaHTyBaHnH rpe6IHaCTOI HacADKn, HATNCHYBShn Ha KHOKNy 33ady, i NOBEPHyBUnI II Do 6BJAAHOI DOBXHN, De BOHA 3aФICKYtCBsC. 3NaHENH HalaHTyBaHnB 6Ye BIDOBpaXeHo H zuΦep6nati HacADKn. HmKHe HABOJaTBcB 3HaENH I BIDNOBiHa DOBxHnA C TpRxKn, 100 BIDOBpaXaIObTcH A zuΦep6nati HacADKn.
| Положения на садун | Довкуна |
| 1 | 2mm |
| 2 | 3mm |
| 3 | 4mm |
| 4 | 5mm |
| 5 | 6mm |
- Ппкладьтголовуrtумета doшikiri nepecybaite le3o npotin hapnarmky pocty boNocci. TebeiHuaCTa hacaKa 6ye de niD himatu BONOCci i 3pi3AtiXHa BCTAHOBJIeHIOBKNHI.
DOrIa3A BpNTBOIO
- PeTembno DORIJaIe 3a BaWIM npICrpoE M,IO6 rapaHTyBaTu NOrO CTany npOdyKTHBnICTb Ta TpRbAII N TepMIn CnyKbN.
- PekomeHdyetbcra uctntu 6pntBy nicna Koxhoro BUKOpuctaHHa.
- Ppeed npoBeHnHm QmUeHnpeepKaHteC, zo KnuBHeHn npicStpoB BmKHeO, a cam npicTpiB iDkLIOueHo BID mepekej KnuBHeHn.
HaijeruTu Ta Hai6bIbui ririeiHn nnCIOUI nniueHH npICTPOU noJIaAe B cnOliKcYbAHnI roJIbIKn pncTPOU y tenii BOJ icOpa3y niCIA BVKOPINCTAHN.
3ANOBIXHI 3AXOIN PNP OUYIeHHI
3HIMITb 6eptaIbHy hacaIky dIy rOiHH 3 BiCiKy dIy 3bpaHH BOLocc (pnc.1 i 2).
Crtpictb hanaioo 30neHoro BONoc 3BicKi yn 36paHnB Bonoc (pnc. 3).Piipzane HOBocT aKoM KnoHa YcHyTu 3 BicKi yn 36paHnB BONoc Ta/a6o 3 HacaknI dNra TOnIHn, pOmIMBAOWI X BOIO.
- PicnBvCnXaHHaNOMiCTb HacaydYra rOliHHaHa3aHa Bicik dIy 36upaHHaBOoCCa (Pnc.4).
CHIUEHHA TPMMEPA
3MauyIte 3y6uNKn TpIMepa KOKHi WICTb MICAJIB OndHcIO KpaJIeIO MaTINJa Dnla MaunH Dnla WITTTA.
3aapanchi nactnhi Ta donomixhe npinaadjo npnstpoo MOXHa 3aMOBNTi Ha caai http://www.remington.co.uk/ parts-accessories
OuHHeHHrTOJOBKNrPymepA
HaInnpocTsiHn i Hain6BbIiRiriEhiHnn CnOci6 OChuSeHHra TOnOBKn rPymepa —OnoIckyBaHHa II TeNIOU BOIOIO NcIe BNOPNCHTAHN.ДЯ BVIDaJIeHHa 3pI3aHINX BOLOCKIB I3Je3 MOKHa TAKOX CKOpNCtAITcC qITKIO DnA YIuSeHHa.
BUNJUyEHHBAIATAE
Ipeed ytni3aueio npictpoio iHboro cnid icTaTu 6ataeio.
Ipeq TmJk Dictabatn 6atapeo i3 npncTropo, noro Tpe6a BiE'Ednatn BiD
MepeksiKuBHeHHa.
Eknpnyatynte 6pntby do no NobHOi 3ynHKn DnBnHyha.
3HIMtB rONiBky 3 6pntBu (BiTARHTB rONIBKy yropy Ta 3HIMtB ii).
3a donomorOIO maneHbKOI BnKpyTKn niiuHniTb bepxHIO acTHHy pUKN 3a «KOMipeCb».
3a donomoro moIeHbKoi BnKpyTk niDuieniTa BiD'ednaTe nepedNIO KpiuKy Bd KopnyCy.
Bukpyitb tpr rnuHTn, 0o po3TaawObytbc cpepey 6pntbn.
3a donomoroto maneheboi Bnkytpkn iudenitb ta nidiimtb po36nokoabaHy BnytpiHIO uactnHy Kopnycu, 06o8pntmaTn doctyndo6atapei.
-Пичenить та роз'еднаite 6atapeio i3pykoBaHOIO nlaTOIO.
- Ytui3ynte 6aTaepu HalexHnM uHOM.

3AXNCT HABKOLNIHbOTo CEPEIOBNUA
ДяункеннаиесндахинHaKoДиHaBKOЛшьOMу cepeOBNUy Ta 3dopOB'IO IOJei, lo NOB'ЯЗаH3 BKNOPcTahnHm He6e3neuHx peOBOH IN B eIeKTPnUHx IN Ta eIeKTPoHHx TObApX, nO3HaueHi BKA3aHIM CmMBONOM npICTOPI He cnIg yTuNl3yBaTHn pa3OM i3 HebIDcOPTOBaHm NO6yTOBUM cMTTAM. Taki npICTOPI NIDJIraIaOT bI dHOBJIeHHO, NOBTOPHOMY BKNOPcTahHHO a60 nepepo6ci.

(2,1K) jJ (3K)
glue ay
(4)
Abjus Aizsla Czyj Bzj Bzj Czj Dzj Ezj Fzj Gf jg jg jg jg jg jg jg jg jg jg jg jg jg jg jg jg jg jg jg jg jg jg jg jg jg jg jg jg jg jg jg jg jg jg jg jg jg jg jg jg jg jg jg jg jg jg jg jg jg jg j
j jill w
Jewi jyj yj yj yj yj yj yj yj yj yj yj yj yj yj yj yj yj yj yj yj
1
a aaa a a a a a a a a a a a
jSas yadall biall) aill al 1g lde lae iieis iliai idll
(1) a : a^2 + 1 = 0
Aii 0i
a
Aa 1
4
aaii iia aie ai jlll 1
. 001 j 1
i
jai jie jie jie jie jie jie jie
gssssssssssssssssssssssssssssssssssssssssssssssssssssssssssssssssssss
AilSa a jaiy u all aal l jao
iilll ldi jgl uall ciai
a 1 1 1 1 1 1 1 1 1 1 1 1 1 1 1 1 1 1 1 1 1 1 1 1 1 1 1
.1Jgssyjy 1
jill / 2d/ll
.
a a a a a a a a a a a a a a a a a a a a a a a a a a a a a
LgLo gLoJoo
7
jai jbi 8
jai li 9
Jzall (1) 10
ωd() 11
() 12
13
jw jlll lla (n) 14
J 0
aaii i 1
jaiil 2
cui jiu chai ge ciuyi cai liu lai gai jiaall xie jiyu gai (olui jbi) iayal aieslu juxiaoxell gishuyjwll
aaiiaaa
jlll
aJySbU JzUuUauuuaaue la Uusu
a a
JalSly ayjIyJIyJ 90 Jaipe Us
Jolly a dall a sla no jai loie jwali
aik jbi jn jnll jilaiie L0' jI y jnnj g w ailllge 1
g jn jn jnll jn n jnll i g . jn nnll a kla Jy s y
aialll gialll jbi jn jnll lglu uu uu uu uu
Kw 60.
Clllill lcllrrrrrrrrrrrrrrrrrrrrrrrrrrrrrrrrrrrrrrrrr rrrrrrrrrrrrrrrrrrrrrrrrrrrrrrrrrrrrrrrrrrrrrrrrrrrrr
a
i 1
:Jolil
8 0a jai jai jai jai jai jai jai
gaiiaiaial aiaai gaiiaai gaiiaiai iaiiaai gaiiaiaai gaiiaiaai
Remington® is a Registered Trade Mark of Spectrum Brands, Inc., or one of its subsidiaries
VARTA Consumer Batteries GmbH & Co. KGaA, Alfred-Krupp-Str. 9, 73479 Ellwangen, Germany
www.remington-europe.com
© 2014 SBI