
DOORGUARD 300 - Video Intercom MARMITEK - Free user manual and instructions
Find the device manual for free DOORGUARD 300 MARMITEK in PDF.

| Product Type | Video intercom with doorbell |
| Brand | MARMITEK |
| Model | DOORGUARD 300 |
| Monitor dimensions | 190 x 236 x 52 mm |
| Screen | CRT 4 inch (10 cm) flat tube |
| Resolution | 380 lines |
| Monitor power supply | 230V AC, DC 15V mains adapter |
| Power consumption | Max 10 Watts |
| Camera | Black and white CMOS |
| Viewing angle | 52.5° |
| Light sensitivity | 0.1 LUX |
| Night vision | 4 infrared LEDs |
| Supplied cable length | 10 meters (4-wire cable) |
| Max number of monitors | 4 (1 included + 3 additional) |
| Functions | Intercom, electric door opening, adjustable doorbell volume |
| Door opening control | Potential-free contact, max DC24V/1A or AC24V/1A |
| Doorbell sound | Ding-dong |
| Installation | Wall-mounted for monitor, camera on door frame |
| Safety | Indoor use except outdoor camera; do not expose to moisture |
| Maintenance | Clean with a soft, dry cloth |
| Available spare parts | Additional monitor (compatible models), angle bracket |
| Package contents | Monitor, wall mount, camera with rain shield, mains adapter, 10m cable, fixings, manual |
Frequently Asked Questions - DOORGUARD 300 MARMITEK
User questions about DOORGUARD 300 MARMITEK
0 question about this device. Answer the ones you know or ask your own.
Ask a new question about this device
Download the instructions for your Video Intercom in PDF format for free! Find your manual DOORGUARD 300 - MARMITEK and take your electronic device back in hand. On this page are published all the documents necessary for the use of your device. DOORGUARD 300 by MARMITEK.
USER MANUAL DOORGUARD 300 MARMITEK
- To prevent short circuits, this product (except the outdoor camera) should only be used inside and only in dry spaces. Do not expose the components to rain or moisture. Do not use the product close to a bath, swimming pool etc.
- Do not expose the components of your systems to extremely high temperatures or bright light sources.
- In case of improper usage or if you have altered and repaired the product yourself, all guarantees expire. Marmitek does not accept responsibility in the case of improper usage of the product or when the product is used for purposes other than specified. Marmitek does not accept responsibility for additional damage other than covered by the legal product responsibility.
This product is not a toy. Keep out of reach of children. - Do not open the product: the device may contain live parts. The product should only be repaired or serviced by a qualified repairman.
- Only connect the power cord after checking whether the mains voltage is the same as the values on the identification tags. Never connect an adapter or power cord when it is damaged. In that case, contact your supplier.
1. INTRODUCTION
Congratulations on your purchase of the Marmitek DoorGuard 300^TM . Using this video-door phone you can hear and see the visitor at the door (without the visitor being aware of it) before you decide to open it. The camera is concealed in the small doorbell and delivers high quality pictures, even in the dark. This camera is small enough to mount onto the door frame, without the need to drill holes in the (hollow) wall.
2. SET CONTENTS
a. set
- Monitor with screen
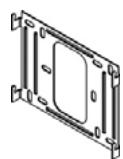
- Wall plate for the monitor
- Doorbell with camera and rain cover
- Power adapter
- 10 meters 4 core cable to connect the camera
- Mounting hardware
- Special tool
- User manual
b. extra monitor (available separately)
- Monitor with screen
- Wall plate for the monitor
- Power adapter
- 10 meters 4 core cable to connect the camera
- Mounting hardware
- Special tool
- User manual
1
2
3
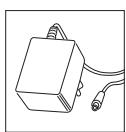
Figure 1.
4
5
6
7
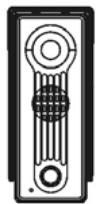
Figure 2. Doorbell camera front
8
3. INSTALLATION
Description of the parts
- Screw hole
- Loudspeaker
- Camera
- LEDs, for visibility in the dark
- Bell button
- Microphone
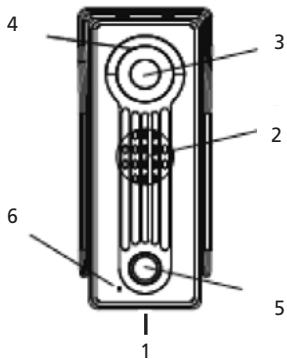
Figure 2. Doorbell camera front
Figure 3. Doorbell camera back

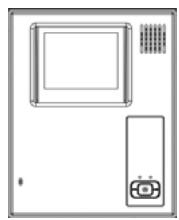
Figure 4. Monitor front
Figure 4. Monitor front
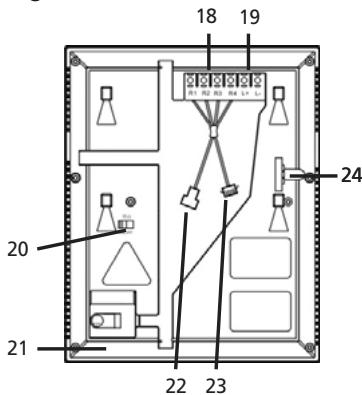
Figure 3. Doorbell camera back
- Lugs for the attachment of rain cover
-
4-wire earthed power cable with connector for transfer of image and sound to monitor
-
Microphone
- Loudspeaker
- CRT screen
- Power 'On' LED
- Monitor button
- Intercom button (for communication between multiple monitors, if applicable)
- Door-open button
- Power LED, lit when system is On
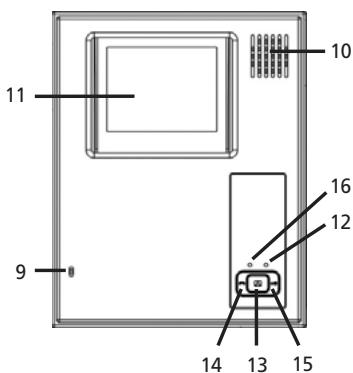
Figure 5. Monitor back
Figure 5. Monitor back
- Connection contacts for camera cable (R1 thru R4)
- Connection contacts for optional door opener (L + ,L - )
- On/Off switch 75 Ohm (for use with multiple monitors)
- DC adapter connection
- Connector for camera
- Connector for extra monitor
- Slot to block wall plate
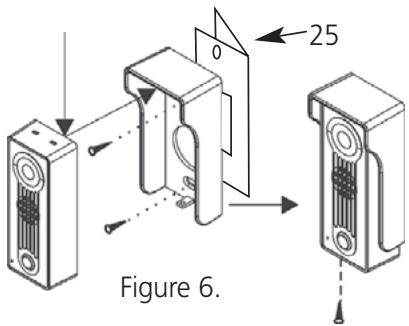
Step 1. Mounting the doorbell camera onto the door frame (figure 6).
- Drill a hole (15mm) in the door frame at the height that you want to mount the doorbell camera.
-
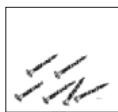
Mount the rain cover onto the door frame using the supplied screws.
-
In case you are using the optional corner bracket (25) then you need to mount that first onto the door frame and then mount the rain cover using the supplied screws.
-
Pass the power cable through the hole in the rain cover and through the door frame, and then mount the camera onto the rain cover by placing the top end of the camera into the lugs of the rain cover (see figure 6).
- Now fix the bottom of the camera into the rain cover by turning the screw with the supplied tool.
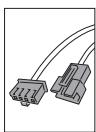
Step 2. Connecting the cable for the camera.
- The additionally supplied cable for the connection of the camera, has a black male connector at the camera end and a black female connector at the monitor end. Click the black connector of the doorbell camera onto the black male connector of the additionally supplied cable. Guide the cable to the spot where the monitor is to be mounted (Beware: there should be a power socket in the area).
- Mount the wall plate onto the wall using the four supplied screws.
Step 3. Mounting the monitor onto the wall (figure 7).
- Take the monitor and attach the connector(s) of the cable(s) in the right connectors (see figure 5).
- Connect the power adapter with the backside of the monitor (Figure 5).
- Now place the monitor against the wall plate and move it up and down against the plate such that it snap-locks onto the plate.
- Fasten it onto the side, using the additionally supplied screw (M3). (Figure 5-7).
- Your DoorGuard300™ has now been installed successfully and is ready to use.
- You can always slide off the monitor by sliding it upwards, after you have removed the fastening screw.
4. FUNCTION
As soon as a visitor rings the doorbell by pressing on the doorbell button, the image will appear instantly on the monitor in the house. This way you can see who is at the door before you decide to open it (or pretend you're not at home). To speak to the visitor, you simply press the monitor button (13). If you have also installed an electric door opener, you can open the door by pressing on the door-open button (15). In case you have installed multiple monitors in the house (maximum 3 extra), then you can talk among each other using the intercom button (14).
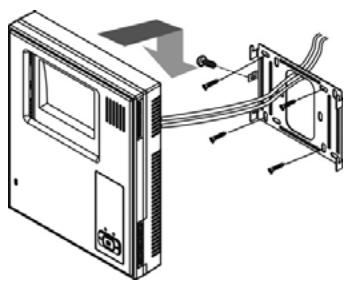
Figure 7.
5. EXTRA POSSIBILITIES WITH YOUR DOORGUARD300
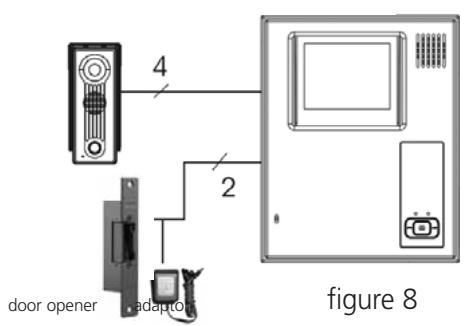
a. Connecting an electric door opener
- To open the door from the monitor (figure 8).
- You need an electric door opener with its own power supply. The door-open-contact of the monitor is a potential-free normally-open (NO) contact.
- The maximum load for this contact is: DC24V/1A or AC24V/1A.
- You need to connect the door opener onto the L+ en L- connectors of the monitor.
outdoor station
indoormonitor
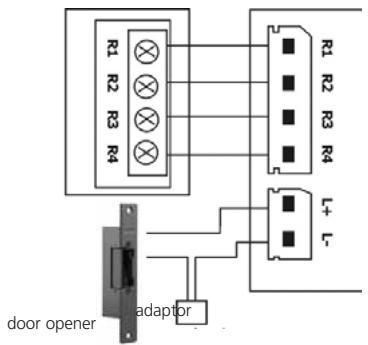
Terminals function:
Brown (R1) :VIDEO
Black (R2) : GNO
White (R3) : AUDIO
Red (R4) : VCC
L+ : dooropener
L- : dooropener
b. Connecting multiple monitors
- To be able to see who is at the door from several places (max. 4). Upon that, you now have an intercom system (figure 9). Available separately:
DoorGuard300
Black/white Hands Free monitor:
art.no: 09786 (E version) 09787 (UK version).
DoorGuard100
Black/white monitor:
art.no: 09692 (E version) 09693 (UK version).
- Beware: Only the last monitor that you connect should be switched on 75 Ohm.
- The remaining monitors are to be connected parallel. The DoorGuard300 monitor is provided with an extra connector for the connection of an extra monitor.
- If you want to bridge a greater distance, then check out the following table for the required cable type.
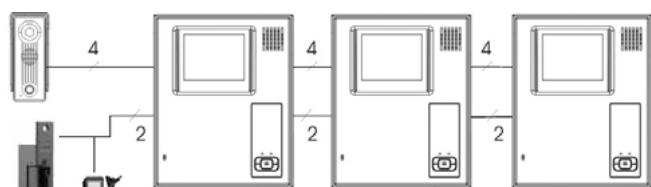
Figure 9.
Cable length Required cable type
| 1-25m | 4 core cable of minimum 4x 0,55mm² |
| 25-50m | coax cable, 75 ohm of minimum 0,5mm² + 2 wire audio 0,35mm² |
| 50-100m | coax cable, 75 ohm of minimum 1.0mm² + 2 wire audio 0,35mm² |
| 100-300m | coax cable, 75 ohm of minimum 1.5mm² + 2 wire audio 0,5mm² |
c. Marmitek Camera corner bracket
To be able to mount your DoorGuard300 camera in the corner of the door frame. Art.no: 09746
7. FREQUENTLY ASKED QUESTIONS
There is no image
Check if the power cable is properly connected to the power socket.
Check the position of the button for minimum and maximum contrast, and turn the wheel on the side to select the best image.
Check if the connectors are properly fixed
There is no sound
Check if the connectors are properly fixed
The image is hazy (clouds)
Check if there are interferences in the surrounding area. For example a high voltage cable, electric appliances etc.
Check if the 75 Ohm switch is in the right position; 'Off' in case only one monitor is used, and only in case multiple monitors are used, the switch of the last monitor should be on 'On'.
Do you still have questions?
Please check out www.marmitek.com for more information.
8. TECHNICAL DATA
Monitor
Resolution: 380 picture lines
Power supply: 230V AC DC 15V
Screen: CRT: 4" / 10cm Flat Tube
Bell sound: Ding-dong (adjustable volume)
Power consumption: Max 10 Watt
Door open switch: Max DC24V/1A or AC24V/1A.
Dimensions: 190x236x52mm
Camera
Resolution: 352x288 Pixels
Camera: CMOS Black&White
Lens and angle: f3.6 - 52,5°
Min.illumination: 0,1 LUX
Night vision: 4 Infrared LEDs
Sound: Built-in microphone en loudspeaker
Material: Impact-resistant casing
Dimensions: 58,5x134,5x40mm

Environmental Information for Customers in the European Union
European Directive 2002/96/EC requires that the equipment bearing this symbol on the product and/or its packaging must not be disposed of with unsorted municipal waste. The symbol indicates that this product should be disposed of separately from regular household waste streams. It is your responsibility to dispose of this and other electric and electronic equipment via designated collection facilities appointed by the government or local authorities. Correct disposal and recycling will help prevent potential negative
consequences to the environment and human health. For more detailed information about the disposal of your old equipment, please contact your local authorities, waste disposal service, or the shop where you purchased the product.
SICHERHEITSHINWEISE
Resolution: 352x288 Pixels
Dimensions: 58,5x134,5x40mm
CRT: 4" / 10cm Flat Tube
Sonido de quando:
Ding-dong (volumen regulable)
Consumo:
10 Watt a lo máximo
VEILIGHEIDSWAARSCHUWINGEN
DECLARATION OF CONFORMITY
Hereby, Marmitek BV, declares that this DoorGuard300 is in compliance with the essential requirements and other relevant provisions of the following Directives:
Council Directive 89/336/EEC of 3 May 1989 on the approximation of the laws of the Member States relating to electromagnetic compatibility
Council Directive 73/23/EEC of 19 February 1973 on the harmonization of the laws of Member States relating to electrical equipment designed for use within certain voltage limits
Marmitek is a trademark of Marmidenko B.V. / DoorGuard300 is a trademark of Marmitek B.V. All rights reserved.
Copyright and all other proprietary rights in the content (including but not limited to model numbers, software, audio, video, text and photographs) rests with Marmitek B.V. Any use of the Content, but without limitation, distribution, reproduction, modification, display or transmission without the prior written consent of Marmitek is strictly prohibited. All copyright and other proprietary notices shall be retained on all reproductions.