XF5600 - Washing machine NEW POL - Free user manual and instructions
Find the device manual for free XF5600 NEW POL in PDF.
User questions about XF5600 NEW POL
0 question about this device. Answer the ones you know or ask your own.
Ask a new question about this device
Download the instructions for your Washing machine in PDF format for free! Find your manual XF5600 - NEW POL and take your electronic device back in hand. On this page are published all the documents necessary for the use of your device. XF5600 by NEW POL.
USER MANUAL XF5600 NEW POL
COME ELIMINARE ALCUNE MACCHIE
Thank you for choosing our product.
Please read these instructions carefully before connecting and using the machine. An awareness of how the machine operates will help guarantee its correct and safe use. The instructions also contain some useful information on the machine's functions that will help you get the most out of its use.
If you decide to sell or give the washing machine to someone else, remember to give the instruction book to the new owner.
INDEX
NOTES AND ADVICE FOR THE USER 16-17
DESCRIPTION OF THE MACHINE 17
INSTALLING THE MACHINE 18-20
Unpacking and unblocking the machine 18
- Positioning and levelling the machine 19
- Connecting to the water supply system 19
- Connecting to the power supply 20
USING THE WASHING MACHINE 20-22
Using the machine 20
Use of detergents 21
How to eliminate stains 22
International clothing care symbols 22
MAINTENANCE 23-24
- Cleaning the machine 23
- Cleaning the filter 23
- Troubleshooting 24
MODEL:
PRODUCTION CODE:
DATE OF PURCHASE:
NOTES AND USEFUL ADVICE FOR THE USER
The washing machine has been designed for domestic use only, and as such any other use is regarded as improper and therefore potentially dangerous.
Any modifications or attempts to alter the equipment in any way may be dangerous for the user and cause damage to the washing machine.
Due to the weight of the machine, special safety standards must be observed during handling.
The machine must not be used by unsupervised children.
Any modifications to the water or electrical system must be carried out by authorised specialists.
When positioning the appliance, make sure that the power supply cable is not bent or squashed and that it is accessible.
Before operating the machine, remove all packing materials and the locking device used for protection during transport (protection screws). Failure to do this may result in serious damage to the machine and to your home.
The washing machine must never be overloaded.
When the machine is in operation, avoid any contact with the water coming out of the drain hose, as this may be hot. Do not touch the door glass as this may also heat up during the wash
Only wash clothes that are machine washable. In case of doubt, check the manufacturer's instructions found on the label attached to the clothes (see "Clothing cares symbols").
Before loading clothes into the washing machine, check that all the pockets are empty. Hard or pointed objects such as coins, pins, nails, screws or even stones can cause se
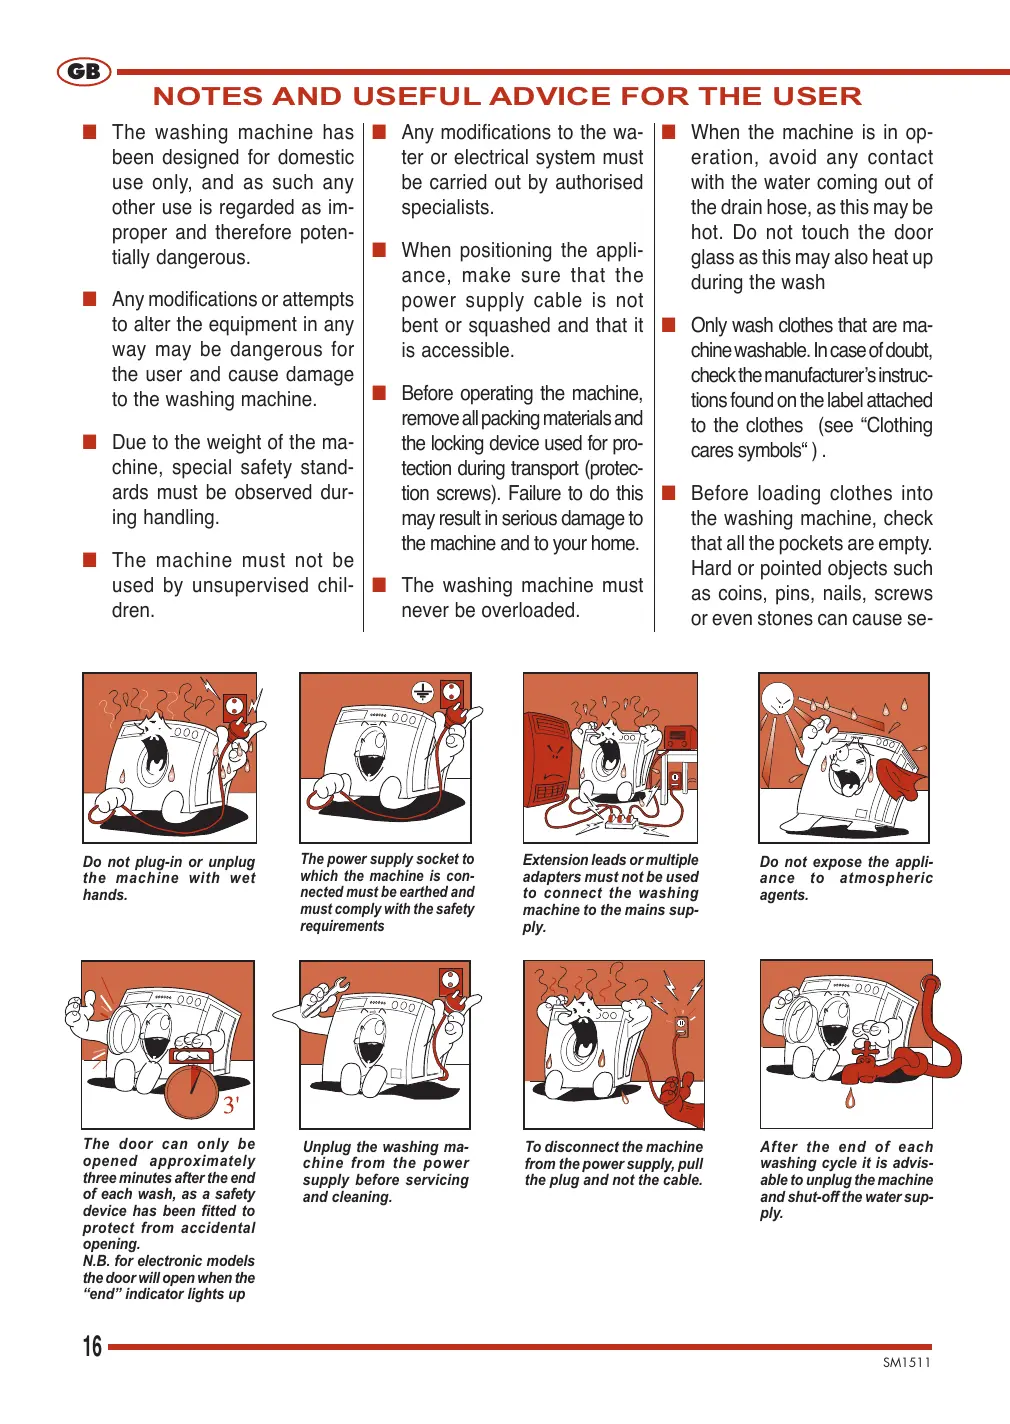
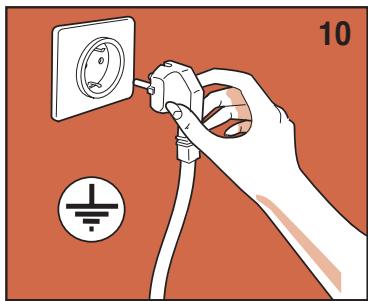
Do not plug-in or unplug the machine with wet hands.

The power supply socket to which the machine is connected must be earthed and must comply with the safety requirements
Extension leads or multiple adapters must not be used to connect the washing machine to the mains supply.

Do not expose the appliance to atmospheric agents.

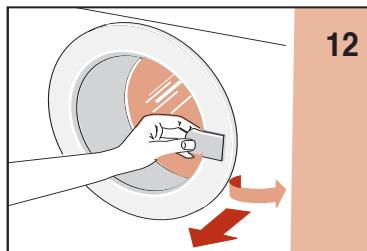
The door can only be opened approximately three minutes after the end of each wash, as a safety device has been fitted to protect from accidental opening. N.B. for electronic models the door will open when the "end" indicator lights up
Unplug the washing machine from the power supply before servicing and cleaning.
To disconnect the machine from the power supply, pull the plug and not the cable.

After the end of each washing cycle it is advisable to unplug the machine and shut-off the water supply.
NOTES AND USEFUL ADVICE FOR THE USER
rious damage.
Clothes that have been dirtied with substances containing petroleum cannot be washed in the machine. If stains have been removed using vaporising products, before loading the clothes in the washing machine, wait until the substances have completely evaporated from the material.
Do not use detergents formulated for hand washing, in that the excessive lather produced could damage the internal components.
After washing rugs, blankets
or any other long fibre fabrics, remember to check the filter and, if necessary, clean it.
It is advisable to leave the door open at the end of the wash cycle.
Under no circumstances should any repairs to the machine be attempted by unqualified persons as this could result in serious damage and will invalidate the guarantee.
Repairs to the washing machine must only be carried out by persons authorised to do so by the service centres.
Only original spare parts may be used for repairs.
THE MANUFACTURER WILL NOT BE HELD RESPONSIBLE FOR ANY ACCIDENTS THAT MAY RESULT FROM NON-COMPLIANCE WITH THE REQUIREMENTS OF SAFETY STANDARDS OR THIS INSTRUCTION MANUAL
DESCRIPTION OF THE MACHINE
The washing machine is a household appliance that can wash any type of fabric whenever you want.
The structure of the machine is fabricated in steel sheet, which has been worked using a special process and then enamelled in order to maintain its external appearance and protect it against corrosion.
The motor and all the other moving parts are built to ensure noiseless machine operation.
The large stainless steel drum is well placed to guarantee a
good wash quality and prolong the life of the washing.
The easy to use control panel makes the selection of any wash or dry programme quick and simple (see control panel and table of programmes).
The ample glass door makes loading and unloading easier.
The perfect machine balance is the result of many years of research aimed at finding the correct balance between the various moving parts.
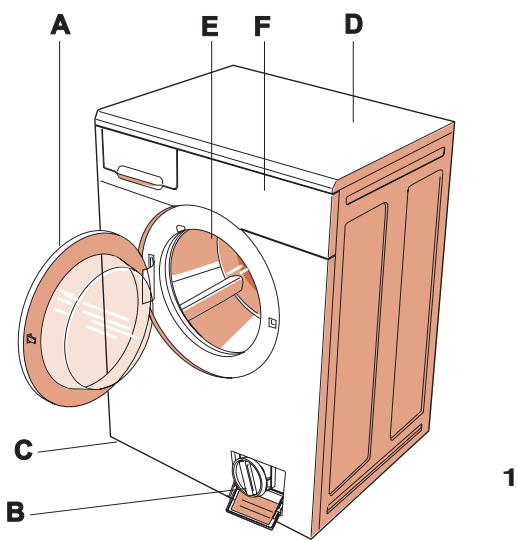
A - Glass door
B - Filter
C - Adjustable feet
D - Top cover
E - Drum
F - Control panel
INSTALLING THE MACHINE
(ACCORDING TO MODEL)
The machine must be installed by professionally qualified technicians, according to the manufacturer's indications. Incorrect installation may result in damage to persons and property.
The machine can be installed anywhere, provided the temperature in the place of installation is not below 3^ and the cables and hoses at the rear of the machine are not crushed in any way.
For transport purposes the swinging unit in the machine is blocked using 4 spacers with screws. Before starting the machine these spacers and lock screws must be removed, and stored for use in the event of a possible change of location.
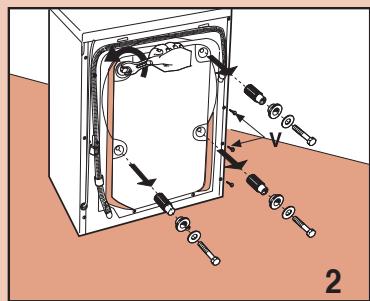
Block off the holes with the plugs provided, which can be found in the bag containing the documents.
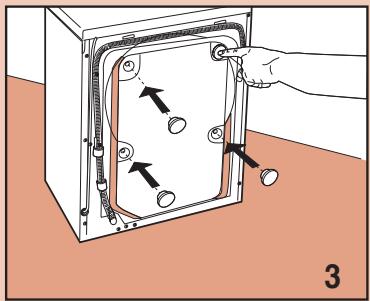
N.B. If the spacers fall into the inside of the machine, open the rear panel, recover them and then replace the panel.
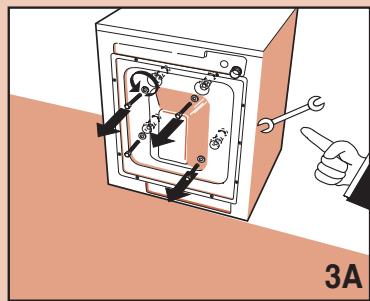
For transport purposes the swinging unit in the machine is blocked using 4 spacers with screws. Before starting the machine these screws must be removed using a screwdriver.

Insert a screwdriver in the holes and proceed as shown in the figure to recover the 4 plastic spacers.
N.B. If the spacers fall into the inside of the machine, open the rear panel, recover them and then replace the panel.
INSTALLING THE MACHINE
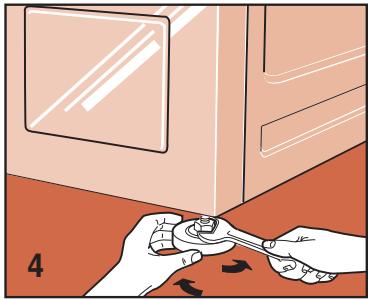
After selecting a suitable position, level the machine carefully using the adjustable feet (Fig. 4). Particular care must be taken when selecting the position, levelling the washing machine and ensuring the safety of lock nuts.
If levelling is not carried out correctly, the washing machine will be unstable and noisy during operation, which may result in damage.
If the machine stands on a carpet floor, make sure that air can circulate freely between the washing machine and the floor itself.
It is not recommended that the machine be installed in locations where the temperature is liable to drop below freezing.
CONNECTION TO THE WATER SUPPLY SYSTEM
The mains water pressure must be between 0.05 and 1.00MPa (0.5 - 10 bar.)
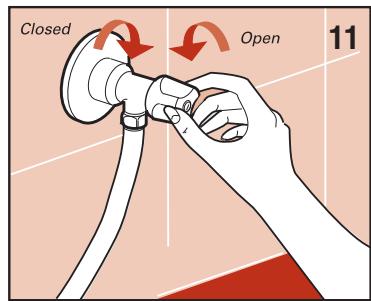
Before connecting the water fill hose, open the valve and allow a quantity of water to flow. This will censure that the supply pipes are free from impurities, such as sand or rust (this operation is very important when the washing machine is being connected to a new supply system or if the system has not been used for a long period of time).
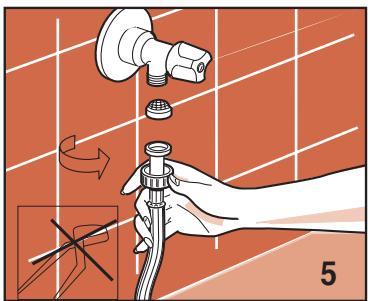
Connect the water fill hose to a 3/4 threaded cold water outlet.
Place the filter washer supplied between the hose and the valve and hand tighten the connection as much as possible (fig. 5).
Connect water feed hose (fig. 6).
The water supply tap must be fully open when washing.
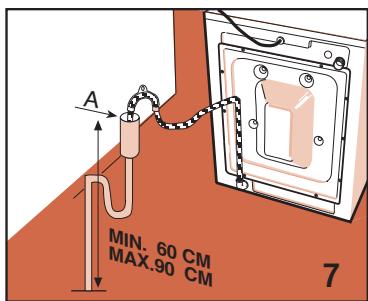
The water drain hose must be placed at least 60~cm and not more than 90~cm from the floor (fig. 7).
If the drain hose is connected to a fixed drainage system, the free end must be inserted in a pipe of minimum internal diameter 40~mm .

The drain hose water connection to the drainage system must not be hermetically sealed, as this would cause air to accumulate and the water to siphon out.
If the waste water is to be discharged into a sink or wash-basin, insert the hose in the

special bracket supplied and hook it over the edge of the sink or washbasin. Then tie the hose and bracket to a tap or similar (fig. 8). To avoid overflowing, the sink drain must be clear of obstructions and must be able to empty quickly.
INSTALLING THE MACHINE
CONNECTING TO THE POWER SUPPLY
Check that the voltage indicated on the technical data plate on the back of the washing machine is the same as that of the mains power supply (fig. 9).
The fuses, electric cables and wall socket must be rated to withstand the maximum power load indicated on the data plate.
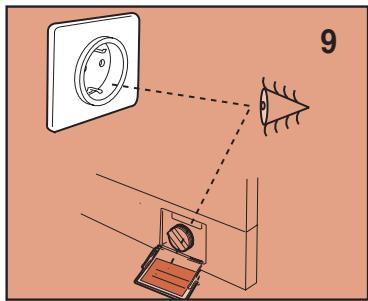
The power supply socket into which the washing machine will be plugged must be earthed. Otherwise, the manufacturer will not be held responsible for any accidents (fig. 10).
If the socket to which the machine will be connected is faulty or does not comply with the requirements, it must be
replaced by a qualified electrician.
The washing machine must not be connected to the electricity supply using extension leads or multi-plug adapters.
During maintenance the washing machine must be unplugged from the power supply socket.
- Do not plug-in or unplug the machine with wet hands.
If the power cable is damaged in any way, contact the specialised technical service centre.
Position the appliance so that the power supply cable can be accessed with ease, enabling it to be disconnected when required.
USING THE MACHINE
ADVICE BEFORE USING
Attention: Before running the machine loaded for the first time, we re-commend that you run a short washing cycle with the machine empty.
This makes it possible to check operation of the machine and clean the drum.
Each time you use the machine:
check that all water connections are tight, the drain hose is positioned correctly (see
connection to the water supply) and the supply tap is open.
make sure that your hands are dry, then insert the plug into the power socket.
- divide the washing according to fabric type (check the labels on the clothes).
check that the clothes to be washed have nothing in their pockets that might damage
the washing, the washing machine or the filter
USING THE MACHINE
USE OF DETERGENTS
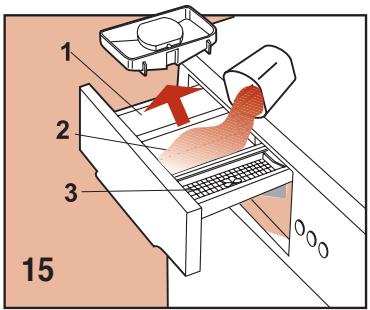
The washing machine has a three-compartment detergent drawer.
compartment for pre-wash or soak powder detergent (1)
compartment for normal wash powder detergent (2)

compartment for fabric softener (3)
use a low-foam detergent and softener (if necessary), of the type indicated for automatic washing machines. Use the doses recommended on the package.
N.B. Excessive amounts of detergent may result in too much foam, and give a poor quality wash.
Insufficient amounts of detergent may mean that the washing does not come properly clean.
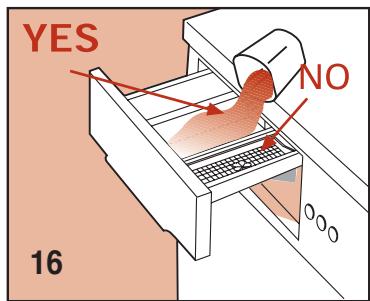
N.B. When filling the detergent compartment it is important that the detergent does not overflow into the compartment used for fabric softener, as this would result in a rinse cycle containing soap, which might leave the washing with white stains. Equally, do not allow the fabric softener to overflow into the detergent compartment, as this would reduce the cleaning capacity.
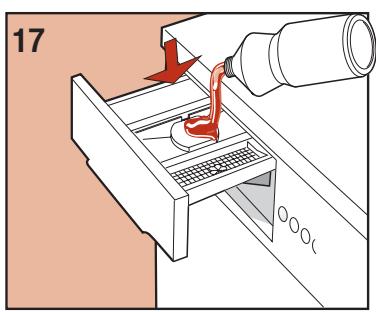
IF THE MODEL HAS A LIQUID DETERGENT COMPARTMENT
N.B. When using liquid detergent (recommended for programs that do not use the pre-wash cycle), insert the special container (if there is one) in centre compartment "2" (as shown opposite), then pour in liquid detergent up to the maximum level indicated.
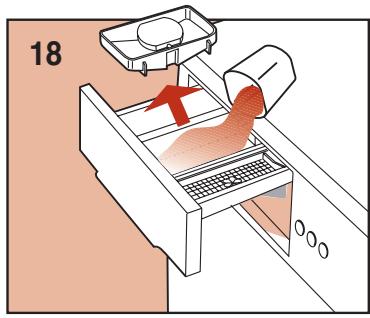
Remember to remove the liquid detergent compartment when using powder detergent.
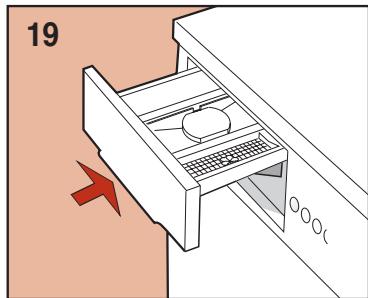
close the detergent drawer before starting the wash.
Attention! Never remove the detergent drawer when the machine is running, as water may come out of it.
USING THE MACHINE
HOW TO REMOVE STAINS
Some stains cannot be removed by just washing in a washing machine. Before trying to remove any type of stain by hand, first try the removal procedure on a small area of hidden fabric starting from the edge of the stain and working inwards, this will prevent a dark ring from forming around the site of the stain. A few methods for removing stains are reported below.
- W_AX : scrape the wax using a blunt point in order not to damage the fabric. Then, with the fabric placed between two pieces of absorbent paper, run a hot iron over the stain.
BALL-POINT PENS AND FELT-TIP PENS: clean using a soft cloth soaked in ethyl alcohol. Take care not to spread the mark. -
DAMP AND MOULD: if the fabric supports the use of bleach, perform a wash cycle adding bleach. Other-wise, soak the soiled part in hydrogen peroxide (10 volumes) and leave for 10 to 15 minutes.
LIGHT SCORCH MARKS CAUSED BY IRONING: follow the instructions for mould and damp. -
Rust: use products specially designed for rust stains, following the manufacturer's instructions written on the packet.
- CHEWING GUM: rub ice over the mark, scrape away as much as possible and then rub with a cotton cloth soaked in acetone (alternatively, use nail varnish remover).
- PAINT: do not allow the paint to dry. Rub the area with the solvent recommended by the paint manufacturer (e.g. water, turps, trichloroethylene), apply soap and then rinse.
-
LIPSTICK: stains on cotton or wool can be eliminated using a cloth soaked in ether. Stains on silk require the use of trichloroethylene.
-
NAIL VARNISH: place a sheet of absorbent paper on the stained material, then dampen the back of the fabric with acetone, frequently changing the paper placed over the stain. Continue like this until the stain has disappeared.
- TAR OR DIRT: Spread some fresh butter over the stain, allow to stand and then wash with oil of turpentine.
GRASS: delicately soap the stain, use diluted bleach. Good results can be obtained on woollen fabrics using 90% alcohol. - BLOOD : put into soak in cold water with added salt, then wash with washing soap.
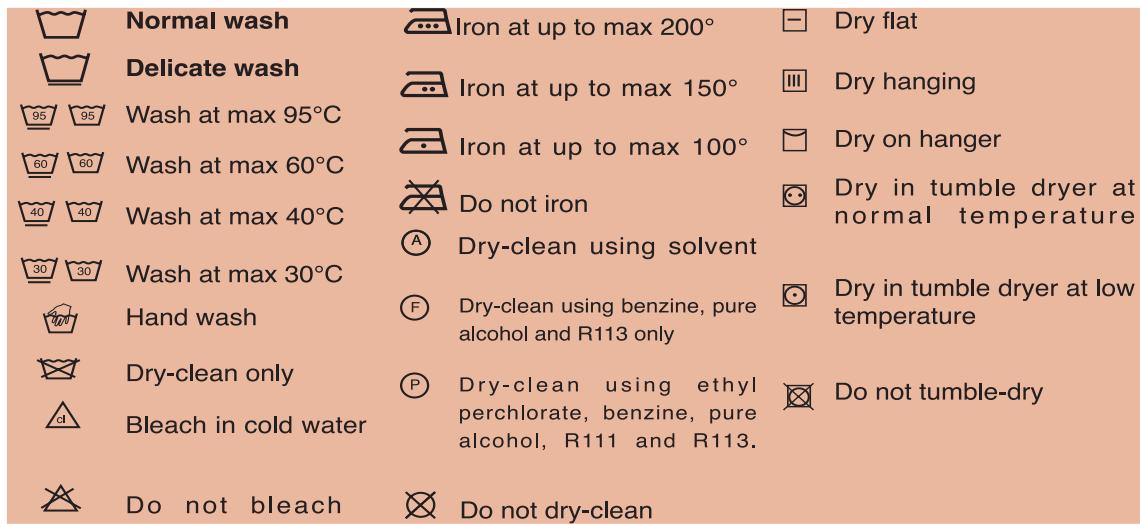
INTERNATIONAL CLOTHING CARE SYMBOLS
Before placing the clothes in the washing machine and selecting the wash programme, examine the symbols on the manufacturer's label. The table reported below will provide a useful guide to reading the symbols.
MAINTENANCE
The washing machine has been designed to reduce maintenance to a minimum. However, it is important that you remember to clean it regularly. Before cleaning, make sure that the appliance has been disconnected from the power supply and that the water supply tap has been turned off.
CLEANING THE WASHING MACHINE
The external structure and the parts of the washing machine in plastic must be cleaned with a soft damp cloth only.
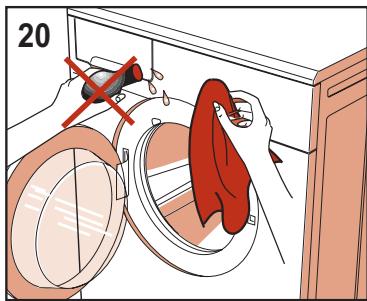
WARNING!! N e v e r use chemicals, abrasive products, alcohol, soap, petrol or other solvents to clean the appliance as these may cause damage. (fig.20)
After washing, leave the door open for a little while to allow rubber parts to dry.
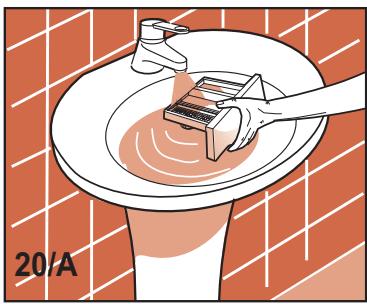
Wash out the detergent compartments from time to time. To do this, extract the detergent compartment and rinse it under running water, (fig. 20/A) then replace it.
REMOVING THE DETERGENT DRAWER
(fig. A or B, according to the model)
- If the softener compartment "3" has the word "PUSH" written on it:
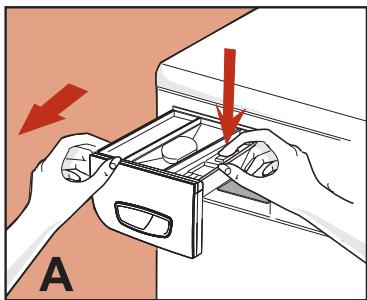
open the detergent drawer;
- press on the word "PUSH" with the right hand and pull out the drawer with the left hand (fig. A)
- If the softener compartment "3" does not have the word "PUSH" written on it:
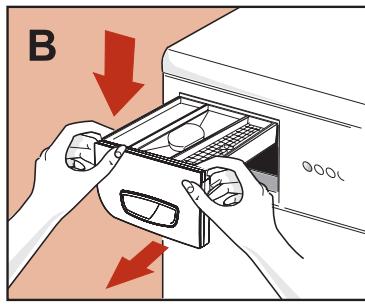
open the detergent drawer;
- grasp it with both hands, push down slightly and pull the drawer outwards (fig. B).
CLEANING THE FILTER
ATTENTION!!
Before starting the operations described below, make sure that the washing ma
chine is empty. Do not remove the filter while the machine is running, or when full of water.
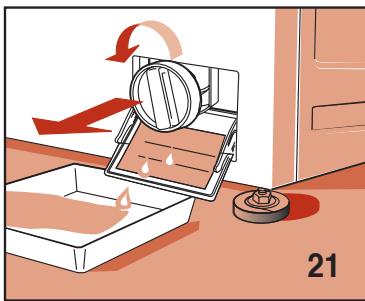
Place a cloth or flat plate under the filter to collect any water that may still be inside it. Open the filter door, unscrew the filter and remove it, turning in an anticlockwise direction (fig.21).
The filter must be cleaned periodically.
Rinse the filter under running wa
ter to eliminate all waste. Replace the filter, screwing in a clockwise direction and making sure it is hermetically sealed.
MAINTENANCE
TROUBLESHOOTING
If the appliance is not working properly, check through the following troubleshooting list before calling for technical assistance.
The washing machine does not work (warning lights are off)
- check that:
1) The mains power supply is working
2) The plug is inserted correctly in the socket
3) The On/Off button is pressed or, if there is no On/Off button, the programmer knob is pulled outwards.
The washing machine does not work (warning lights are off)
- check that:
1) The programmer knob is set to the selected program
2) The glass door is properly closed
3) The "Start" button has been pressed (electronic models only)
4) check the indications provided under "The washing machine does not fill with water"
The washing machine does not fill with water
check that:
1) There is water in the water supply system
2) The water supply hose is connected to the washing machine
3) The water supply tap is open
4) The filter is not blocked. If it is, clean the filter after unplugging the appliance from the power supply
The washing machine continuously fills and drains the water:
- check that:
1) The drain hose has been in-
stalled at the proper height (60-90 cm)
2) The end of the drain hose is not under water
The washing machine does not drain or spin
- check that:
1) The drain hose is properly connected
2) The drain hose is not bent
3) The drainage filter is not blocked
4) The no-spin function has not been selected
The washing machine vibrates and is noisy
- check that:
1) All the blocking elements used for transportation have been removed.
2) the washing machine is level
3) Bulky items such as sheets, tablecloths etc. are not all in one part of the drum
The glass door does not open
1) Wait for 3 minutes after the end of the cycle or, in the case of electronic machines, until the "End" indicator lights up
The washing has not been properly spun
- check that:
1) The washing is evenly distributed in the drum
2) The correct spin speed has been selected
The washing machine stops during the wash
- check that:
1) The mains power supply is working
There is still a lot of detergent in the compartment
check that:
1) The water supply tap is open
2) The filter between the tap and the supply hose is clean
The washing is not clean at the end of the wash cycle
- check that:
1) The drum is not overloaded
2) The correct amount of detergent has been used
3) The correct programme has been selected
The washing has shrunk or faded
- check that:
1) The correct washing programme has been selected
2) The correct washing temperature has been selected
The washing machine does not dry (washer-dryer models only)
Make sure that:
1) The water supply tap is open
2) The drainage filter is clean
3) The washing machine is turned on (control light on)
4) The program dial is positioned on one of the stop points with the dryer symbol.
5) The drying time regulator dial is not set to "0"
6) The "Half Load" button is pressed.
7) The "No Spin" button is not pressed
If, after trying the above remedies, the machine still does not work, refer the fault to the nearest authorised service centre.
When calling the service centre, inform them of the machine model, the serial number and the type of fault. The data relating the appliance can be found on the rating plate affixed to the filter door.
This information will allow the technical service staff to select the appropriate spare parts, thus making the repair service quicker and more efficient.