BIOLINE 2400 - Garden shredder ATIKA - Free user manual and instructions
Find the device manual for free BIOLINE 2400 ATIKA in PDF.
User questions about BIOLINE 2400 ATIKA
0 question about this device. Answer the ones you know or ask your own.
Ask a new question about this device
Download the instructions for your Garden shredder in PDF format for free! Find your manual BIOLINE 2400 - ATIKA and take your electronic device back in hand. On this page are published all the documents necessary for the use of your device. BIOLINE 2400 by ATIKA.
USER MANUAL BIOLINE 2400 ATIKA
Operating Manual and Spare parts for Garden Shredder BioLine
F
Attention! Read Operating Manual before use!
Cutting head rotat briefly after motor has been switched off!
Remove spark plug cap before touching blade!
Warning! Rotating blades!
Protect against moisture!
Gartenhacksler Typen: AH 200, AH 201, AH 202, AH 203, AH 207, AH 208, AH 209, AH 210,
AH 211, AH 212, AH 213, AH 214, AH 215, AH 216, AH 222, AH 223,
AH 224, AH 225, AH 226, AH 227, AH 228, AH 229, AH 235, AH 236,
AH 238, AH 239, AH 240, AH 241, AH 242, AH 250, AH 251
Your garden shredder is a high-quality, efficient machine.
Please read the following instructions carefully to ensure a long life of your garden shredder.

Do not operate machine before having read the operating instructions, understood all the notes and assembly the machine as described here.
Proper use
The garden shredders are suitable for private use in gardens and allotments.
Regarded as garden shredders for private gardens and allotments are those units which are not employed in public grounds, parks, sports grounds, and in agriculture and forestry.
Contents
- Assembly model.. p. 8
- Safety Instructions.. p. 20
3.Start-up. p.20 - Chopping. p. 21
- Maintenance and Care. p. 21
- Turning of the knives.. p. 21
- Operational faults.. p. 22
8.Warranty. p.22 - Specification. p. 23
- Spare parts. p. 36

EC Declaration of Conformity
according to Directive 98/37/EC
declare under our sole responsibility, that the products
garden shredder typ: AH 200, AH 201, AH 202, AH 203, AH 207, AH 208, AH 209, AH 210,
AH 211, AH 212, AH 213, AH 214, AH 215, AH 216, AH 222, AH 223,
AH 224, AH 225, AH 226, AH 227, AH 228, AH 229, AH 235, AH 236,
AH 238, AH 239, AH 240, AH 241, AH 242, AH 250, AH 251
to which this declaration relates corresponds to the relevant basic safety and health requirements of the Directive 98/37/EC, and to the requirements of the other relevant Directives:
89/336/EEC; 73/23/EEC and 2000/14/EC.
Measured level of the acoustic output L_WA 105 dB (A) and guaranteed level of the acoustic output L_WA 106 dB (A).
Ahlen, 14.01.2003

Pollmeier, management
AH 211, AH 212, AH 213, AH 214, AH 215, AH 216, AH 222, AH 223,
AH 224, AH 225, AH 226, AH 227, AH 228, AH 229, AH 235, AH 236,
AH 238, AH 239, AH 240, AH 241, AH 242, AH 250, AH 251
Pollmeier, direction
tuinhakelaar type: AH 200, AH 201, AH 202, AH 203, AH 207, AH 208, AH 209, AH 210, AH 211, AH 212, AH 213, AH 214, AH 215, AH 216, AH 222, AH 223, AH 224, AH 225, AH 226, AH 227, AH 228, AH 229, AH 235, AH 236, AH 238, AH 239, AH 240, AH 241, AH 242, AH 250, AH 251
aho: AH 200, AH 201, AH 202, AH 203, AH 207, AH 208, AH 209, AH 210, AH 211, AH 212, AH 213, AH 214, AH 215, AH 216, AH 222, AH 223, AH 224, AH 225, AH 226, AH 227, AH 228, AH 229, AH 235, AH 236, AH 238, AH 239, AH 240, AH 241, AH 242, AH 250, AH 251
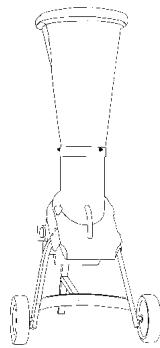
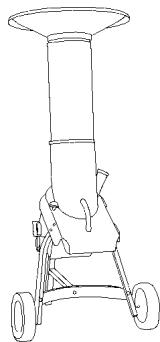
GB To connect the funnel (a) to the enclosure top (b) turn funnel until all hole positions are aligned and bolt in place with the three enclosed one-way bolts (390130 - M 5 x 12). Otherwise no liability!!
2. Safety Instructions
Machine including safety cut-out
The safety cut-out, including an automatic motor brake, which is attached to the shredder is used for the safety of the machine, preventing the motor being started when the machine is open and the rotating knives could be reached by the operator's hand.
Repairs on electrical parts of the machine and on the safety cut-out must be done by the producer or by a company designated by the producer.

Please read the following safety instructions carefully.
- Within his area of work the operator is responsible for third parties.
- The machine must not be used by operators under the age of 16.
- Keep children away from machine.
- Wear protective goggles, gloves and noise protection while working with the machine.
- The connecting lead to IEC 60245 (H 07 RN-F) should be equipped with a rubber plug. The lead section should be a minimum of 3 × 1,5 ~mm^2 .
- Never use faulty connecting leads.
- Connect the machine using a residual current detector.
- Always switch off motor before maintenance and cleaning of shredder. Remove mains plug from socket (also during transport and when leaving machine unattended).
- Do not operate without the funnel.
- Close machine properly before enabling motor.
- Faulty or damaged parts in the device must be replaced immediately.
- Never reach into the filling or ejection opening when the machine is running.
- Do not spray machine with water (this is hazardous due to live components).
- Wear safety gloves during assembly and cleaning work.
- Never modify the machine or parts thereof.
- Only use the machine for the purposes listed under Section 4 "Shredding".
-
Do not leave the machine standing in the rain or use when raining. Store the machine in a dry place.
-
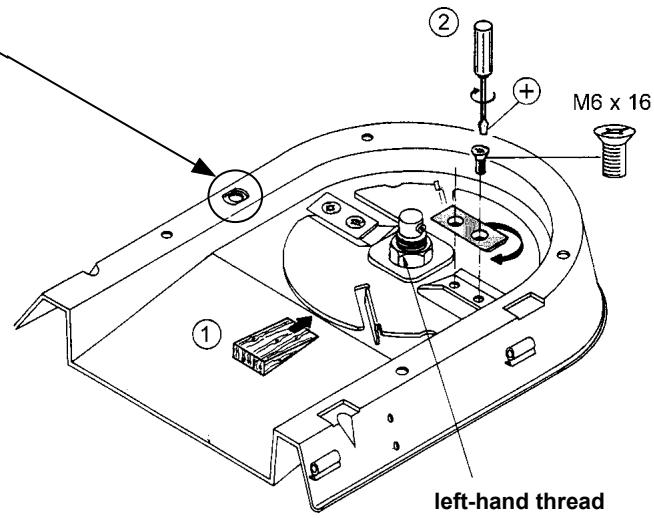
To prevent danger of injury to fingers during assembly or cleaning operations hold the cutting mechanism (for example by means of a wooden wedge, see. pic. p. 21) and wear protecting gloves.
3. Start-up
- Check that the machine is completely and correctly assembled.
- To avoid toppling, place the chopper on a firm horizontal surface.
- Connect the machine to an appropriate and correctly wired electric socket.
-
Only use extension leads with sufficient diameters:
-
cable up to 25 metres: diameter at least 1.5mm^2
-
cable over 25 metres: diameter at least 2,5mm^2
-
Fuse protection:
-
1100 W, 1200 W: 10 A
- 1300 W, 1400 W, 1500 W, 1600 W, 1700 W: 10 A inert
- 1800 W, 1900 W, 2000 W: 16 A
- 2100 W, 2200 W, 2300 W 2400 W: 16 A inert
-
for UK use 13 A fuse (all models)
-
Before using the shredder, make sure each time that
-
there are no faulty connections (tears, cuts, etc.)
- all screws are tight.
Important:
Before using the shredder for the first time, close top of case and screw tight.
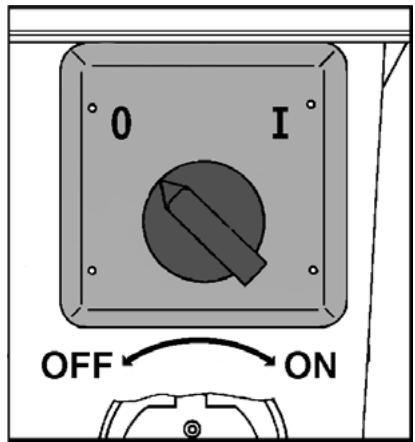
Switch on and off
4. Chopping
What can I chop?
Yes:
organic household and garden waste
e. g. hedge and tree cuttings, dead flowers and vegetable kitchen waste.
No:
- glass, metal, plastic, plastic bags, stones, cloth, roots with soil, food left-overs, fish or meat.
Special informations on the chopping procedure:
- Branches, twigs and wood should be broken down immediately after they have been cut - material of this kinds gets very hard when it is dry, and it therefore makers sense to reduce the maximum branch diameters, so that it is ready for chopping.
- Remove any side shoots from branches with a large number of twigs.
-
How to chop garden and kitchen waste with hight water content and a tendency to clog
-
to prevent the machine from clogging, alternate waste with woodcontaining material.
-
Please do not exceed the maximum branch diameter specified for your appliance ( see p. 23).
- The blades largely pull the material into the machine by themselves.
- Strong branches may cause overloading. This can be avoided by pulling them back from time to time.
-
If the machine is overloaded, a protective motor switch ensures that the machine turns itself off automatically
-
turn the shredder on again after about 5 minutes
-
during those five minutes you cannot turn the machine, see point 7 „Operational faults".
5. Maintenance and Care
Generally garden shredders require little maintenance. To maintain their efficiency and a long life, observe the following:
- After shredding, the machine must be cleaned inside and outside
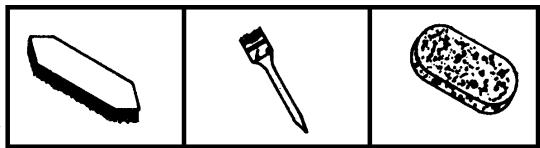
- Slightly grease polished metal components immediately after use (to prevent rusting).
Please make sure,
- that before closing the device, all impurities have been removed from the thread in the housing trough; impurities can block the thread so that the enclosure top of the housing does not close properly motor does not start
- that the screw is screwed straight into the housing trough during closing
6. Turning of the knives
Reduced output:
- one edge of the knife has become blunt turn knife so that you can use the other edge
-
both edge of the knives have become blunt
replace with new set of knives (order-no. 384547) -
Operational faults
| Problem | Possible cause | Elimination |
| Motor does not start | - no mains voltage - defective connection cable - enclosure top improperly closed (safety shut-off is activated) | - check fuse - have it inspected (electrician) - close and bolt down enclosure top correctly, remove any dirt present |
| Motor turns over, but does not start | - cutters blocked - defective capacitor | - switch machine off, disconnect mains plug, and clean interior of machine - have machine repaired by manufacturer or approved company |
| Motor starts, but becomes blocked on encountering even slight pressure, and is switched off via motor safety switch. | Extension cable too long, or cross-section too small. Socket too far away from main connection, and cross-section of connection lead too small. | Extension cable at least 1,5 mm², maximum 25 m long. Cross-section of at least 2,5 mm² in longer cables. |
8. Warranty
- The manufacturer will supply a two years warranty after supply of the machine from the dealer's store for faults in material and/or workmanship.
- Warranty claims, even during the warranty period, will not be accepted for damages due to incorrect handling or inadequate packaging during return of the devices or to a non-observance of the operating instructions.
- Faulty components should be returned to the factory, postage and freight paid. Discretion for the supply of replacements free of charge will remain with the manufacturer.
- All warranty work will be carried out by the manufacturer. The handling of repairs by third parties shall require prior written consent of the manufacturer.
- The warranty will only apply of original spare parts are used.
- Subject to alterations due to further development.
Electrical mains supply impedance
When conditions in the electrical mains supply are unfavourable, voltage reductions for short periods can occur during the process of turning on the equipment, which can adversely affect other equipment (e.g., the flickering of a lamp).
No breakdowns are to be expected if the maximum, electrical mains supply impedances given in the table are met.
| Power consumption P1 (watts) | Electrical mains supply impedance Zmax(Ω) |
| 1300 – 1400 | 0,36 |
| 1600 – 1700 | 0,35 |
| 1800 – 2000 | 0,25 |
| 2200 – 2400 | 0,24 |
- Specification
| Model | 1100 | 1200 | 1300 | 1400 | 1500 | 1600 | 1700 | 1800 | |
| Name | AH 207 AH 208 | AH 215 AH 216 | AH 200 AH 209 | AH 213 AH 214 | AH 238 AH 235 | AH 201 AH 210 | AH 225 AH 226 | AH 202 AH 211 | |
| Motor | AC-Motor 230 V, 50 Hz, S 6 = 40% start up time, including automatic motor brake | ||||||||
| Motorating P1 | 1100 W | 1200 W | 1300 W | 1400 W | 1500 W | 1600 W | 1700 W | 1800 W | |
| Motorating P2 | see nameplate | ||||||||
| Input voltage I | 5,3 A | 5,8 A | 6,3 A | 6,6 A | 7,0 A | 7,5 A | 7,9 A | 8,6 A | |
| Rotational speed N ca. | 2800 min-1 | 2800 min-1 | 2800 min-1 | 2800 min-1 | 2800 min-1 | 2800 min-1 | 2800 min-1 | 2800 min-1 | |
| On/off switch | including integrated motor protection switch and electrical safety cut-out | ||||||||
| Weight | see nameplate | ||||||||
| Ecoustic pressure level at work | 87 dB (A) | 87 dB (A) | 87 dB (A) | 87 dB (A) | 88 dB (A) | 88 dB (A) | 88 dB (A) | 89 dB (A) | |
| Ecoustic capacity level measured /guaranteed | 105/ 106 dB (A) | 105/ 106 dB (A) | 105/ 106 dB (A) | 105/ 106 dB (A) | 105/ 106 dB (A) | 105/ 106 dB (A) | 105/ 106 dB (A) | 105/ 106 dB (A) | |
| max. branch diameter * | ∅ 2,0 cm | ∅ 2,0 cm | ∅ 2,5 cm | ∅ 2,5 cm | ∅ 3,0 cm | ∅ 3,0 cm | ∅ 3,0 cm | ∅ 3,5 cm | |
| Model | 1900 | 2000 | 2000 | 2100 | 2200 | 2300 | 2300 | 2400 | |
| Name | AH 239 AH 236 | AH 222 AH 227 | AH 224 AH 240 | AH 241 AH 242 | AH 203 AH 212 | - AH 229 | AH 223 AH 228 | AH 250 AH 251 | |
| Motor | AC-Motor 230 V, 50 Hz, S 6 = 40% start up time, including automatic motor brake | ||||||||
| Motorating P1 | 1900 W | 2000 W | 2000 W | 2100 W | 2200 W | 2300 W | 2300 W | 2400 W | |
| Motorating P2 | see nameplate | ||||||||
| Input voltage I | 9 A | 9,3 A | 9,3 A | 9,5 A | 10,1 A | 10,5 A | 10,5 A | 10,5 A | |
| Rotational speed N ca. | 2800 min-1 | 2800 min-1 | 2800 min-1 | 2800 min-1 | 2800 min-1 | 2800 min-1 | 2800 min-1 | 2800 min-1 | |
| On/off switch | including integrated motor protection switch and electrical safety cut-out | ||||||||
| Weight | see nameplate | ||||||||
| Ecoustic pressure level at work | 89 dB (A) | 89 dB (A) | 89 dB (A) | 88 dB (A) | 88 dB (A) | 88 dB (A) | 88 dB (A) | 88 dB (A) | |
| Ecoustic capacity level measured /guaranteed | 105/ 106 dB (A) | 105/ 106 dB (A) | 105/ 106 dB (A) | 105/ 106 dB (A) | 105/ 106 dB (A) | 105/ 106 dB(A) | 105/ 106 dB (A) | 105/ 106 dB (A) | |
| max. branch diameter * | ∅ 3,5 cm | ∅ 3,5 cm | ∅ 3,5 cm | ∅ 4,0 cm | ∅ 4,0 cm | ∅ 4,0 cm | ∅ 4,0 cm | ∅ 4,0 cm | |
- only for freshly cut wood
A
B
C
D
E
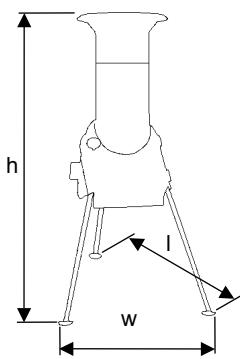
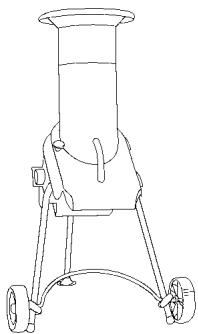
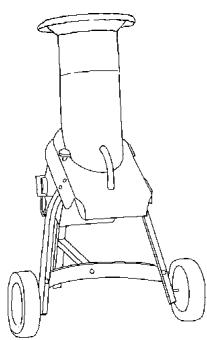
Dimensions:
| lenght | width | height | |
| A | 67 cm | 57 cm | 102 cm |
| B | 70 cm | 59 cm | 102 cm |
| C | 72 cm | 60 cm | 95 cm |
| D | 72 cm | 60 cm | 160 cm |
| E | 72 cm | 60 cm | 135 cm |
Please refer to the drawing and list for spare parts.
Ordering spare parts:
- available from the manufacturer
-
orders must quote the following information:
-
colour of appliance (for housing parts)
- spare parts no.
- quantity required
- shredder model
- name of the garden shredder
Example: deep green, 384761,1, model 1100, BioLine