HIGH Q10 - Turntable JBSYSTEMS LIGHT - Free user manual and instructions
Find the device manual for free HIGH Q10 JBSYSTEMS LIGHT in PDF.

| Product type | Turntable |
| Brand | JBSYSTEMS LIGHT |
| Model | HIGH Q10 |
| Power supply | 230 V AC, 50 Hz |
| Speeds | 33⅓ and 45 RPM |
| Speed adjustment | Slider ±10% with stroboscopic dots |
| Recommended tracking force | 2 grams (for original cartridge) |
| Anti-skating | Adjustable, set to the same value as the counterweight |
| Drive | Belt-driven (except direct drive model) |
| Tonearm | Straight tonearm with counterweight and lift lever |
| Cartridge included | Head shell with cartridge and stylus (color-coded wires: white/blue/red/green) |
| Stylus light | Yes, dedicated button |
| Audio outputs | RCA (Cinch) connector + ground wire |
| Remote control | 6.3 mm mono jack for external start/stop |
| Included accessories | Platter, felt mat, counterweight, 45 RPM adapter, plexiglass cover, user manual |
| Maintenance | Clean the stylus with a soft brush; replace the stylus if sound is distorted; replace the belt if speed is unstable |
| Safety instructions | Disconnect before maintenance; do not expose to moisture; use the supplied power cable |
| Country of origin | Not specified, designed according to European standards |
Frequently Asked Questions - HIGH Q10 JBSYSTEMS LIGHT
User questions about HIGH Q10 JBSYSTEMS LIGHT
0 question about this device. Answer the ones you know or ask your own.
Ask a new question about this device
Download the instructions for your Turntable in PDF format for free! Find your manual HIGH Q10 - JBSYSTEMS LIGHT and take your electronic device back in hand. On this page are published all the documents necessary for the use of your device. HIGH Q10 by JBSYSTEMS LIGHT.
USER MANUAL HIGH Q10 JBSYSTEMS LIGHT
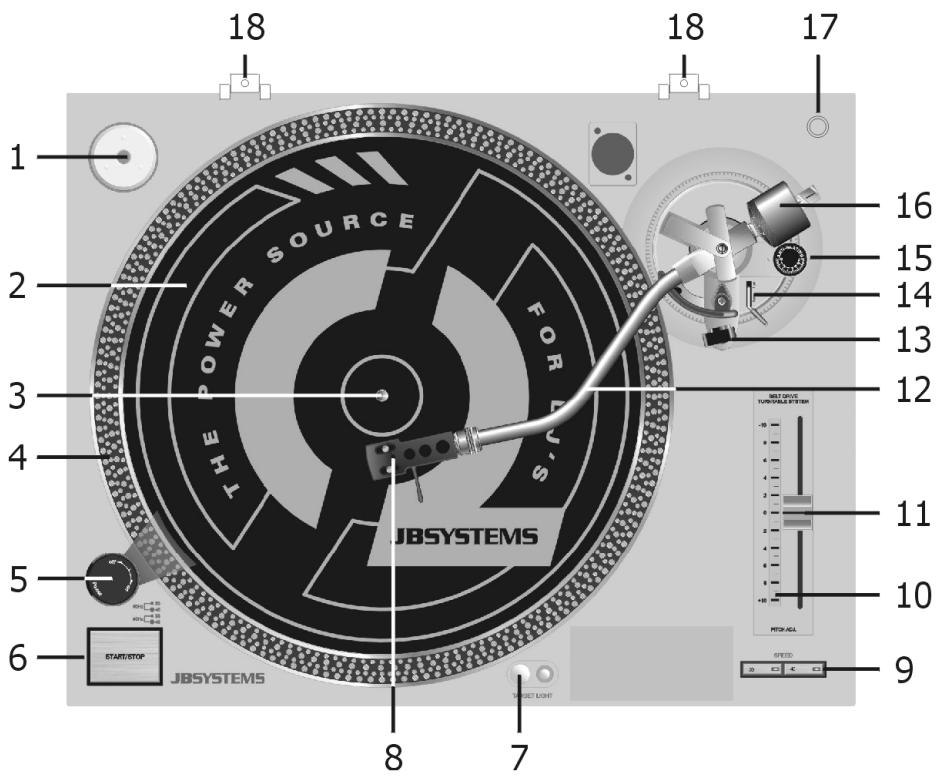
- 45-rpm Adaptor
- Slipmat
- Center Spindle
- Strobe Dots
- Power Button
- Start/Stop Button
- Target Light
- Headshell
- Speed Select Button
- Trim Control for changing the range of the Pitch Control
- Pitch Control Slider
- Tone arm
- Arm Rest
- Cueing Lever
- Anti-skating Knob
- Counterweight
- Position for preparing Cartridge
- Hinge for Dust Cover
- Remote Control This jack can be connected with an external switch to perform the Start/Stop operation.
BEFORE USE
Check if the following parts are included in the package of the main unit:
- Turntable platter
- Slipmat
Counterweight
45-rpm adaptor
Headshell
Dust cover - Operating instructions
ASSEMBLY
Take the main unit out of the box and remove the packing.
- Set the 45-rpm adaptor on the main unit.
Put the turntable on the central shaft.
Put the driving belt around the shaft.
Put the slipmat on the turntable.
- Connect the headshell.
- Connect the lead wires to the cartridge terminals. Connect each lead wire to the terminal of the same color:
White (L + ) = Left channel
Blue (L-) = Left channel
Red (R + ) = Right channel
Green (R-) = Right channel
- Install the cartridge to the headshell and tighten it with the screws provided with the cartridge.
- Insert the headshell into the front of the tone arm, turn the locking nut clockwise with the headshell firmly held horizontally.
- Slide the counterweight onto the tone arm.
- Set the anti-skating control knob to the same value as the stylus pressure for replay purpose and set it between 0 and 1 for scratch and back-cue application.
Install the dust cover on the main unit.
CONNECTIONS
- Connect the power cord to a wall AC outlet.
- Connect the unit's output terminals to the PHONO jack of your mixer our amplifier (do not use a line input as this leads to insufficient signal level and non-linear frequency response).
- Connect the GND lead firmly to the GND screw on the mixer or amplifier. When this connection is not made, unnecessary hum or noise will occur.
OPERATION
- Select the speed required for the record that you want to play.
- Put the record on the turntable. Use the puck if needed (e.g. for 45" ).
- Remove the stylus cover and release the tone arm.
- Set the tone arm lift to the up position and move the tone arm to the desired starting position. When there is not enough light, use the target light for spotting the exact starting position.
- Set the tone arm lift to the down position; the tone arm slowly lowers to the record.
- When the record has finished playing, move the tone arm lift to the up position and put the tone arm in rest position (down).
ADJUSTMENT
Pitch Control
The pitch control is variable in a range of ± 10% .
- During play, observe the strobe dots. When the strobe dots appear to flow to the right, the speed is slower than the rated speed. When they appear to flow to the left, the speed is faster than the rated speed. When they appear stationary, it means the turntable is in normal speed.
- Move the pitch control slider up or down to adjust the speed.
MAINTENANCE
- Clean the stylus periodically with a soft brush to prevent the accumulation of dust.
- When the sound becomes distorted or noisy, check the stylus. If worn out, replace it with a new one.
- From time to time, the dust cover and turntable cabinet should be wiped with a soft, dry cloth. Do not use any volatile materials as alcohol, thinner, benzine, etc... they may remove the paint or damage the lustre.