FX 1000 - Smoke machine JBSYSTEMS LIGHT - Free user manual and instructions
Find the device manual for free FX 1000 JBSYSTEMS LIGHT in PDF.

| Product Type | Smoke Machine |
| Brand | JBSYSTEMS LIGHT |
| Model | FX 1000 |
| Power Supply | AC 230 V, 50 Hz |
| Power Consumption | 1000 W |
| Fuse | T7A / 250 V (slow-blow, 6x30 mm) |
| Smoke Output | 7000 ft³/min |
| Heat-up Time | Approximately 8 minutes |
| Tank Capacity | 2.5 L |
| Dimensions (L × D × H) | 300 × 220 × 160 mm |
| Weight | 5.4 kg |
| DMX Channels | 2 (jet duration + interval) |
| Interval Range (timer) | 9 to 275 seconds |
| Jet Duration Range (timer) | 0.5 to 13 seconds |
| Manual Activation | Yes, via button on remote control |
| Remote Control Included | Yes, with cable and integrated timer |
| Optional Wireless Remote Control | RC-1 (max. distance 25 m) |
| Heating Element | 1000 W, die-cast |
| High-pressure pump | Yes |
| Maximum Ambient Temperature | 40 °C |
| Operating Surface Temperature | Up to 85 °C |
| Minimum Safety Distance | 1 meter (smoke outlet) |
| Recommended Maintenance | Every 100 hours of operation: clean with distilled water (80%) and white vinegar (20%) |
| Usage | Indoor use only |
| Warranty | Warranty void if used incorrectly |
Frequently Asked Questions - FX 1000 JBSYSTEMS LIGHT
User questions about FX 1000 JBSYSTEMS LIGHT
0 question about this device. Answer the ones you know or ask your own.
Ask a new question about this device
Download the instructions for your Smoke machine in PDF format for free! Find your manual FX 1000 - JBSYSTEMS LIGHT and take your electronic device back in hand. On this page are published all the documents necessary for the use of your device. FX 1000 by JBSYSTEMS LIGHT.
USER MANUAL FX 1000 JBSYSTEMS LIGHT
Copyright © 2008 by BEGLEC cva.
Reproduction or publication of the content in any manner, without express permission of the publisher, is prohibited.
C
Version: 1.1


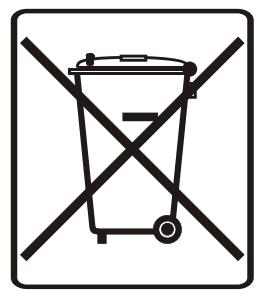
EN - DISPOSAL OF THE DEVICE
Dispose of the unit and used batteries in an environment friendly manner according to your country regulations.
FR-DECLASSES L'APPAREIL
Thank you for buying this JB Systems® product. To take full advantage of all possibilities and for your own safety, please read these operating instructions very carefully before you start using this unit.
FEATURES
This unit is radio-interference suppressed. This product meets the requirements of the current European and national guidelines. Conformity has been established and the relevant statements and documents have been deposited by the manufacturer.
-
This device has been designed to produce decorative effect lighting and is used in light show systems.
-
Powerful all-round fogger.
- High pressure pump for strong fog output
- Equipped with a die cast 1000W heater
- Equipped with DMX 2 channels (interval + duration)
-
Timer remote control included:
-
Adjustable interval time: 9 to 275 seconds
- Adjustable duration time: 0,5 to 13 seconds
-
Manual operation
-
Optional RC-1 wireless remote controller available
- Extremely reliable
BEFORE USE
- Before you start using this unit, please check if there's no transportation damage. Should there be any, do not use the device and consult your dealer first.
- Important: This device left our factory in perfect condition and well packaged. It is absolutely necessary for the user to strictly follow the safety instructions and warnings in this user manual. Any damage caused by mishandling is not subject to warranty. The dealer will not accept responsibility for any resulting defects or problems caused by disregarding this user manual.
- Keep this booklet in a safe place for future consultation. If you sell the fixture, be sure to add this user manual.
Check the contents:
Check that the carton contains the following items:
- Operating instructions
FX1000FOGGER - Timer remote control
SAFETY INSTRUCTIONS:

CAUTION
RISK OF ELECTRIC SHOCK DO NOT OPEN


ION: To reduce the risk of electric shock, do not remove the top cover. User-serviceable parts inside. Refer servicing to qualified service channel only.

The lightning flash with arrowhead symbol within the equilateral triangle is intended to alert the use or the presence of un-insulated "dangerous voltage" within the product's enclosure that may be of sufficient magnitude to constitute a risk of electric shock.

The exclamation point within the equilateral triangle is intended to alert the user to the presence of important operation and maintenance (servicing) instructions in the literature accompanying this appliance.

This symbol means: indoor use only.
This symbol means: Read instructions.

This symbol determines: the minimum distance from objects. The minimum distance between fogger output and objects must be more than 1 meter. NEVER hold your hands close to the fogger output, the fog is very hot and can cause serious burnings !!!
-
To protect the environment, please try to recycle the packing material as much as possible.
-
To prevent fire or shock hazard, do not expose this appliance to rain or moisture.
- To avoid condensation to be formed inside, allow the unit to adapt to the surrounding temperatures when bringing it into a warm room after transport. Condense sometimes prevents the unit from working at full performance or may even cause damages.
- This unit is for indoor use only.
- Don't place metal objects or spill liquid inside the unit. Electric shock or malfunction may result. If a foreign object enters the unit, immediately disconnect the mains power.
- Locate the unit in a well ventilated spot, away from any flammable materials and/or liquids.
- Don't cover any ventilation openings as this may result in overheating.
- Prevent use in dusty environments and clean the unit regularly.
- Keep the unit away from children.
- Inexperienced persons should not operate this device.
Maximum save ambient temperature is 40^ . Don't use this unit at higher ambient temperatures. - The units' surface temperature may reach up to 85^ . Don't touch the housing with bare hands during its operation.
- Make sure to always place the unit on a stable surface, never install the fogger above the audience, a little liquid can always drip from the fog output.
- Allow the device about 10 minutes to cool down before you start servicing.
- Always unplug the unit when it is not used for a longer time or before you start servicing.
- Check that the available voltage is not higher than the one stated on the rear panel of the unit.
- The power cord should always be in perfect condition. Switch the unit immediately off when the power cord is squashed or damaged. It must be replaced by the manufacturer, its service agent or similarly qualified persons in order to avoid a hazard.
- Never let the power-cord come into contact with other cables!
- This unit must be earthed in order comply with safety regulations.
- In order to prevent electric shock, do not open the cover.
- Never repair a fuse or bypass the fuse holder. Always replace a damaged fuse with a fuse of the same type and electrical specifications!
- In the event of serious operating problems, stop using the fixture and contact your dealer immediately.
- The housing must be replaced if they are visibly damaged.
- Please use the original packing when the device is to be transported
- Due to safety reasons it is prohibited to make unauthorized modifications to the unit.
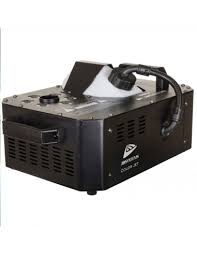
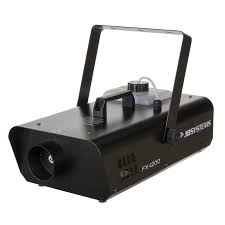
DESCRIPTION:
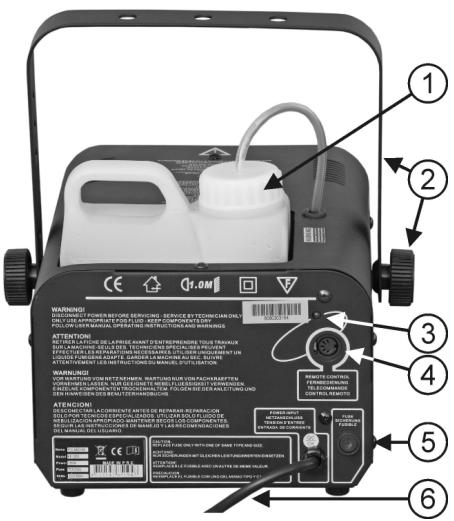
- FOG FLUID CONTAINER: to be filled with CE-certified smoke fluid. Make sure that the fog fluid container is never empty during operation, this will damage the pump of the fogger.
- HANGING BRACKET: hanging bracket with two knobs on both sides to fasten the unit + mounting holes to fix a mounting hook.
- POWER LED: indicates that the unit is connected to the mains.
- REMOTE CONTROL INPUT: Used to connect the supplied remote controller or the optional wireless remote controller.
- INPUT FUSE: When the fuse is blown, first locate and solve the problem that caused the fuse to blow. When the problem is solved, replace a damaged fuse with a fuse of the same type and electrical specifications.
- MAINS CABLE: to be plugged in a mains wall socket with earth connection.
OPERATING INSTRUCTIONS
- Put the fogger on a flat and very stable surface. Make sure that nobody can put their hands just in front of the output. The fog is very hot and can cause serious burnings!!!
- Make sure the fog liquid tank is not empty. Always use good quality fog liquid to fill up the tank. Close the tank immediately to prevent dirt to enter the reservoir!
- Plug the supplied remote in the "remote control" input (2) on the back of the unit. Don't insert or remove the remote while the fogger is connected to the mains!
- Make sure to plug the fogger in a mains wall socket with earth connection
- Switch the fogger on and wait for about 8 minutes. (warm up time)
IMPORTANT: Please note that the fogger is ready when the green LED on top of the "manual fogging" button (n°3 on the remote) is on.
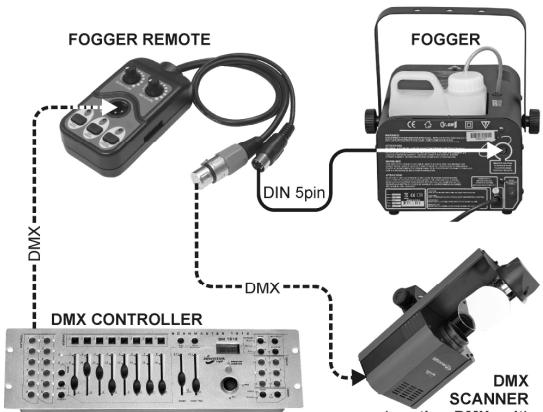
Used with the supplied timer/dmx remote controller:
- REMOTE CABLE: connect the special 5pin connector (1) to the remote input on the back of the fogger.
- DMX OUTPUT: 3-pin female connector, used to connect the fogger with the next unit in the DMX chain.
- DMX INPUT: 3-pin male connector, used to connect the fogger directly to a DMX-controller or another unit in the DMX chain.
- DMX DIP-SWITCHES: used to set the DMX start address.
- INTERVAL KNOB: while the fogger is in timer mode, this knob is used to set the time it takes (interval) between 2 bursts of fog (range = 9s ~ 27s).
- DURATION KNOB: while the fogger is in timer mode, this knob is used to set how long the fogger will produce fog (range = 0,5s ~ 10s)
- MANUAL FOGGING BUTTON: for as long as the green LED is on, you can press this button at any time to produce fog. (regardless of the operation mode selected with the timer on/off button [8])
-
TIMER ON/OFF BUTTON: used to switch the timer function on/off:
-
LED is green: timer function is activated, use the interval + duration knobs.
-
LED is off: timer is switched off, the fogger can be used in DMX or manual mode.
-
ON/OFF BUTTON: used to switch the controller on/off:
-
LED is on: the controller can be used.
- LED is off: the fog machine will continuously produce smoke. (until it needs to warm up again)
Some extra information:
- Manual operation: switch the timer off (button "8")
- Timer operation: switch the timer function on (button "8")
- DMX operation: switch the timer off (button "8"), see the next chapter to learn how to install and setup the fogger for DMX operation.
Hint: you can press the "manual fogging" button (7) at any time to produce some extra fog if needed.
Used with the optional wireless RC-1 controller:
- Connect the special 5pin connector (1) to the remote input on the back of the fogger: the red LED (3) turns on.
Fix the remote receiver (2) with its magnetic surface to the back of the fogger. - When the fogger is ready for operation, the green LED (4) turns on.
- The fogger produces fog as long as you press one of the 2 buttons (5) on the wireless remote. (after some time the green LED on the receiver will turn off to indicate that the fogger is warming up again, during this time you can't produce any fog)
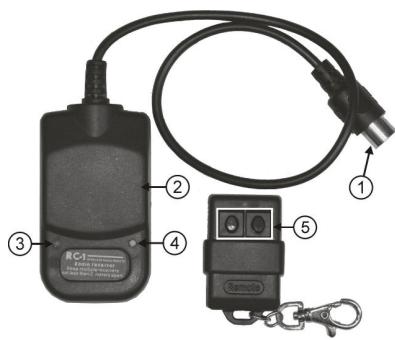
Remark: the maximum distance between the wireless remote and the fogger is about 25m .
DMX-OPERATION:
Important: The electrical installation should be carried out by qualified personal only, according to the regulations for electrical and mechanical safety in your country.
Electrical installation:
- The DMX-protocol is a widely used high speed signal to control intelligent light equipment. You need to "daisy chain" your DMX controller and all the connected units with a good quality balanced cable.
- Both XLR-3pin and XLR-5pin connectors are used, however XLR-3pin is more popular because these cables are compatible with balanced audio cables.
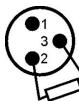
Pin layout XLR-3pin: Pin1 = GND ~ Pin2 = Negative signal (-) ~ Pin3 = Positive signal (+)
Pin layout XLR-5pin: Pin1 = GND ~ Pin2 = Negative signal (-) ~ Pin3 = Positive signal (+) ~ Pins4+5 not used.
- To prevent strange behavior of the light effects, due to interferences, you must use a 90 to 120 terminator at the end of the chain. Never use Y-splitter cables, this simply won't work!
- Make sure that all units are connected to the mains.
Each light effect in the chain needs to have its proper starting address so it knows
90~120 ohm resistor
which commands from the controller it has to decode. In the next section you will learn how to set the DMX addresses.
(or other DMX unit)
How to set the DIP-switches to obtain the right starting address:
Each of the first 9 DIP-switches correspond to a certain DMX-value:
| DIP | #1 | #2 | #3 | #4 | #5 | #6 | #7 | #8 | #9 | #10 |
| Value | 1 | 2 | 4 | 8 | 16 | 32 | 64 | 128 | 256 | Terminator for last unit |
You can combine the values of these switches to become any starting address between 1 and 512:
Begin address = 01 switch 1 = ON values:1
Begin address = 04 switch 3 = ON values:4
Begin address = 07 switch 1 + 2 + 3 = ON values: 1 + 2 + 4 = 7
Begin address = 10 switch 2 + 4 = ON values: 2 + 8 = 10
... Begin address = 62 switch 2 + 3 + 4 + 5 + 6 = ON values: 2 + 4 + 8 + 16 + 32 = 62
IMPORTANT NOTE: DIP-switch #10 is a built-in 100 ohm DMX terminator. You can set it to ON-position when the fogger is the LAST unit in the DMX-chain. Otherwise it should ALWAYS be set to OFF-position!
DMX CHART:
CHANNEL 1 = DURATION
| DMX VALUE | FOGGING TIME |
| 0-15 | No fogging |
| 16-31 | Constant fogging |
| 32 | 0.5 sec |
| 35 | 0.7 sec |
| 40 | 1.0 sec |
| 45 | 1.5 sec |
| 50 | 1.6 sec |
| 55 | 1.8 sec |
| 60 | 2.0 sec |
| 65 | 2.3 sec |
| 70 | 2.5 sec |
| 75 | 2.8 sec |
| 80 | 3.0 sec |
| 85 | 3.3 sec |
| 90 | 3.7 sec |
| 95 | 4.0 sec |
| 100 | 4.2 sec |
| 105 | 4.4 sec |
| 110 | 4.8 sec |
| 115 | 5.0 sec |
| 120 | 5.2 sec |
| 125 | 5.5 sec |
| 130 | 5.7 sec |
| 135 | 6.0 sec |
| 140 | 6.2 sec |
| 145 | 6.5 sec |
| 150 | 7.0 sec |
| 155 | 7.2 sec |
| 160 | 7.6 sec |
| 165 | 7.8 sec |
| 170 | 8.0 sec |
| 175 | 8.4 sec |
| 180 | 8.6 sec |
| 185 | 8.8 sec |
| 190 | 9.0 sec |
| 195 | 9.5 sec |
| 200 | 9.8 sec |
| 205 | 10.0 sec |
| 210 | 10.2 sec |
| 215 | 10.5 sec |
| 220 | 10.8 sec |
| 225 | 11.0 sec |
| 230 | 11.3 sec |
| 235 | 11.5 sec |
| 240 | 11.8 sec |
| 245 | 12.0 sec |
| 250 | 12.5 sec |
| 255 | 12.7 sec |
CHANNEL 2 = INTERVAL
| DMX VALUE | INTERVAL TIME |
| 0-15 | 9 sec |
| 16-31 | 10 sec |
| 32-47 | 20-23 sec |
| 48-63 | 33-36 sec |
| 64-79 | 46-49 sec |
| 80-95 | 60-63 sec |
| 96-111 | 75-78 sec |
| 112-127 | 92-96 sec |
| 128-143 | 110-114 sec |
| 144-159 | 130-133 sec |
| 160-175 | 150-154 sec |
| 176-191 | 170-176 sec |
| 192-207 | 193-200 sec |
| 208-223 | 213-220 sec |
| 224-239 | 233-248 sec |
| 240-255 | 268-278 sec |
MAINTENANCE
- Switch off the unit, unplug the mains cable and wait until the unit has been cooled down. During inspection the following points should be checked:
- All screws used for installing the device and any of its parts should be tightly fastened and may not be corroded.
- Housings, fixations and installations spots (ceiling, truss, suspensions) should be totally free from any deformation.
- The mains cables must be in impeccable condition and should be replaced immediately when even a small problem is detected.
Cleaning the fogger:
To prevent obstructions in the heater, pump and tubes, the fogger should be cleaned on a regular basis: every 100h of continuous operation is a good reference.
- Switch the fogger off
- Remove the nozzle (metal part where the fog leaves the foggger)
- Remove the fog liquid from the tank
- Fill the tank with about 1 liter of a solution containing 80% distilled water and 20% white vinegar.
- Switch the fogger on and wait for about 8minutes (warm up time)
- Put the fogger in continuous operation mode until the tank is empty
- Put the nozzle back in place
- Remove the eventual residues of the cleaning solution and refill the tank with fog liquid.
Remark: cleaning should be done outside; an awful smell is produced by the vinegar solution!
Attention: We strongly recommend internal cleaning to be carried out by qualified personnel!
SPECIFICATIONS
Mains Input: AC 230V, 50Hz
Power consumption: 1000 Watt
DMX Channels: 2 (fog time + interval time)
Fuse: T7A/250V (slow blow 6x30mm)
Output: 7000 cubic ft/min
Warm up time: 8 min
Tank size: 2,5L
Size: 300 × 220 × 160 ~mm
Weight: 5,4 kg
Every information is subject to change without prior notice
You can download the latest version of this user manual on our website: www.beglec.com
MODE D'EMPLOI
KANAAL 1 = WERKINGSTIJD
| DMX WAARDE | WERKINGSTIJD |
| 0-15 | Geen rook |
| 16-31 | Continu werking |
| 32 | 0.5 sec |
| 35 | 0.7 sec |
| 40 | 1.0 sec |
| 45 | 1.5 sec |
| 50 | 1.6 sec |
| 55 | 1.8 sec |
| 60 | 2.0 sec |
| 65 | 2.3 sec |
| 70 | 2.5 sec |
| 75 | 2.8 sec |
| 80 | 3.0 sec |
| 85 | 3.3 sec |
| 90 | 3.7 sec |
| 95 | 4.0 sec |
| 100 | 4.2 sec |
KANAAL 2 = INTERVAL
| DMX WAARDE | INTERVALTIJD |
| 0-15 | 9 sec |
| 16-31 | 10 sec |
| 32-47 | 20-23 sec |
| 48-63 | 33-36 sec |
| 64-79 | 46-49 sec |
| 80-95 | 60-63 sec |
| 96-111 | 75-78 sec |
| 112-127 | 92-96 sec |
| 128-143 | 110-114 sec |
| 144-159 | 130-133 sec |
| 160-175 | 150-154 sec |
| 176-191 | 170-176 sec |
| 192-207 | 193-200 sec |
| 208-223 | 213-220 sec |
| 224-239 | 233-248 sec |
| 240-255 | 268-278 sec |
| 105 | 4.4 sec |
| 110 | 4.8 sec |
| 115 | 5.0 sec |
| 120 | 5.2 sec |
| 125 | 5.5 sec |
| 130 | 5.7 sec |
| 135 | 6.0 sec |
| 140 | 6.2 sec |
| 145 | 6.5 sec |
| 150 | 7.0 sec |
| 155 | 7.2 sec |
| 160 | 7.6 sec |
| 165 | 7.8 sec |
| 170 | 8.0 sec |
| 175 | 8.4 sec |
| 180 | 8.6 sec |
| 185 | 8.8 sec |
| 190 | 9.0 sec |
| 195 | 9.5 sec |
| 200 | 9.8 sec |
| 205 | 10.0 sec |
| 210 | 10.2 sec |
| 215 | 10.5 sec |
| 220 | 10.8 sec |
| 225 | 11.0 sec |
| 230 | 11.3 sec |
| 235 | 11.5 sec |
| 240 | 11.8 sec |
| 245 | 12.0 sec |
| 250 | 12.5 sec |
| 255 | 12.7 sec |
ONDERHOUD
CHANNEL 2 = INTERVAL
| DMX WERT | INTERVALL ZEIT |
| 0-15 | 9 sec |
| 16-31 | 10 sec |
| 32-47 | 20-23 sec |
| 48-63 | 33-36 sec |
| 64-79 | 46-49 sec |
| 80-95 | 60-63 sec |
| 96-111 | 75-78 sec |
| 112-127 | 92-96 sec |
| 128-143 | 110-114 sec |
| 144-159 | 130-133 sec |
| 160-175 | 150-154 sec |
| 176-191 | 170-176 sec |
| 192-207 | 193-200 sec |
| 208-223 | 213-220 sec |
| 224-239 | 233-248 sec |
| 240-255 | 268-278 sec |
| 200 | 9.8 sec |
| 205 | 10.0 sec |
| 210 | 10.2 sec |
| 215 | 10.5 sec |
| 220 | 10.8 sec |
| 225 | 11.0 sec |
| 230 | 11.3 sec |
| 235 | 11.5 sec |
| 240 | 11.8 sec |
| 245 | 12.0 sec |
| 250 | 12.5 sec |
| 255 | 12.7 sec |
| VALOR DMX | DURAÇÃO |
| 0-15 | Sem fumo |
| 16-31 | Fumo continuo |
| 32 | 0.5 sec |
| 35 | 0.7 sec |
| 40 | 1.0 sec |
| 45 | 1.5 sec |
| 50 | 1.6 sec |
| 55 | 1.8 sec |
| 60 | 2.0 sec |
| 65 | 2.3 sec |
| 70 | 2.5 sec |
| 75 | 2.8 sec |
| 80 | 3.0 sec |
| 85 | 3.3 sec |
| 90 | 3.7 sec |
| 95 | 4.0 sec |
| 100 | 4.2 sec |
| 105 | 4.4 sec |
| 110 | 4.8 sec |
| 115 | 5.0 sec |
| 120 | 5.2 sec |
| 125 | 5.5 sec |
| 130 | 5.7 sec |
| 135 | 6.0 sec |
| 140 | 6.2 sec |
| 145 | 6.5 sec |
| 150 | 7.0 sec |
| 155 | 7.2 sec |
| 160 | 7.6 sec |
| 165 | 7.8 sec |
| 170 | 8.0 sec |
| 175 | 8.4 sec |
| 180 | 8.6 sec |
| 185 | 8.8 sec |
| 190 | 9.0 sec |
| 195 | 9.5 sec |
| 200 | 9.8 sec |
| 205 | 10.0 sec |
| 210 | 10.2 sec |
| 215 | 10.5 sec |
| 220 | 10.8 sec |
| 225 | 11.0 sec |
| 230 | 11.3 sec |
| 235 | 11.5 sec |
| 240 | 11.8 sec |
| 245 | 12.0 sec |
| 250 | 12.5 sec |
| 255 | 12.7 sec |
CANAL 2 = INTERVALO
| VALOR DMX | INTERVAL TIME |
| 0-15 | 9 sec |
| 16-31 | 10 sec |
| 32-47 | 20-23 sec |
| 48-63 | 33-36 sec |
| 64-79 | 46-49 sec |
| 80-95 | 60-63 sec |
| 96-111 | 75-78 sec |
| 112-127 | 92-96 sec |
| 128-143 | 110-114 sec |
| 144-159 | 130-133 sec |
| 160-175 | 150-154 sec |
| 176-191 | 170-176 sec |
| 192-207 | 193-200 sec |
| 208-223 | 213-220 sec |
| 224-239 | 233-248 sec |
| 240-255 | 268-278 sec |