The CMX-24 is a DMX light controller designed for stage and theater. It allows the control of 12 to 24 DMX lighting devices via 24 faders and 48 programmable scenes. It is suitable for concerts, parties, and fixed installations.
How many DMX channels can the CMX-24 control?
The CMX-24 manages 12 to 24 DMX channels. The 24 faders allow direct manual adjustment of each channel, ideal for real-time intensity or color adjustments of connected spotlights.
How many programs can be stored on the CMX-24?
The CMX-24 can store 48 programs distributed across 4 pages (12 scenes per page). Each program can be recalled manually or automatically sequenced using the chase function.
How does the music synchronization work on the CMX-24?
The CMX-24 features an internal microphone that detects music beats and automatically synchronizes the program scrolling with the rhythm. The Tap Sync function also allows manual tempo setting by tapping a button.
How to connect the CMX-24 to DMX spotlights?
Connect the DMX output (3-pin XLR) of the CMX-24 to the DMX input of the first spotlight in the chain. Then daisy-chain the devices (output to input). Place a 120 Ohm termination resistor on the last free socket at the end of the chain to avoid interference.
Is the CMX-24 MIDI compatible?
Yes, the CMX-24 has a MIDI connection (5-pin DIN). This interface allows synchronization or control of the controller from an external MIDI sequencer or console.
What to do if the CMX-24 does not control the spotlights?
Check that the DMX address of each spotlight matches the channels of the CMX-24.
Check the connection of the 3-pin XLR cable to the DMX output.
Ensure a 120 Ohm DMX termination is installed at the end of the line.
Check that the internal fuse (250V / 0.5A fast 20 mm) is not blown.
How to use the Blackout function?
The Blackout button instantly cuts all the light outputs of the CMX-24. It is useful during stage transitions or in case of emergency shutdown. Press the button again to restore the lighting.
How does the chase function of the CMX-24 work?
The chase mode automatically sequences the 48 stored programs according to the tempo set via the speed potentiometer or Tap Sync. It can also be advanced manually step by step using the Step button.
What power supply does the CMX-24 use?
The CMX-24 comes with an AC 230V / 50 Hz power adapter providing DC 12V, 500 mA. It also accepts a DC 9-12V, 300 mA minimum power supply with center positive polarity. Use only a replacement adapter with the same specifications.
What are the dimensions and weight of the CMX-24?
The CMX-24 measures 48.3 x 8.5 x 26.4 cm and weighs 4.8 kg. Its 19-inch format makes it compatible with standard sound and stage lighting racks.
How to replace the fuse of the CMX-24?
If the CMX-24 no longer turns on, check the internal 250V / 0.5A fast (20 mm) fuse. Unplug the device before any intervention, remove the defective fuse, and replace it with a fuse of the same rating. Contact a technician if the issue persists.
User questions about CMX-24 JBSYSTEMS LIGHT
1 question about this device. Answer the ones you know or ask your own.
Ask a new question about this device
What does the '5 min' indicator mean on the JBSYSTEMS LIGHT CMX-24 light controller?
Frequently Asked Questions -20/04/2026
Response Notice-Facile
The [5 min] indicator above the SPEED fader on the JBSYSTEMS LIGHT CMX-24 controller indicates that the speed fader is set to operate within a range of 0 to 5 minutes. This light indicator allows you to quickly know which time range you will use to control the speed of the effects (chases, transitions between scenes).
The CMX-24 offers two possible speed ranges:
5 minute range: by pressing RECORD/SHIFT + 5 + 5 + 5, the [5 min] indicator lights up. The SPEED fader will allow you to vary the speed from 0 to 5 minutes.
10 minute range: by pressing RECORD/SHIFT + 10 + 10 + 10, the [5 min] indicator turns off and the SPEED fader will allow you to vary the speed up to 10 minutes.
Once the 5 minute range is set and the indicator is on, simply move the SPEED fader up or down to adjust the speed of your light effects according to this range. For example, in chase mode, the speed of the transition between scenes will be controlled according to this 5 minute range.
You can switch between the two ranges at any time as needed: choose the 5 minute range for quick movements and short variations, or the 10 minute range for slower transitions and more gradual effects.
Respond (be the first)
Download the instructions for your Light Controller in PDF format for free! Find your manual CMX-24 -
JBSYSTEMS LIGHT and take your electronic device back in hand. On this page are published all the documents necessary for the use of your device. CMX-24 by JBSYSTEMS LIGHT.
Reproduction or publication of the content in any manner, without express permission of the publisher, is prohibited.
Version: 1.1
Operation Manual EN
Mode d'emploi FR
Dispose of the unit and used batteries in an environment friendly manner according to your country regulations.
FR-DECLASSES L'APPAREIL
Thank you for buying this JB Systems® product. To take full advantage of all possibilities, please read these operating instructions very carefully.
FEATURES
This unit is radio-interference suppressed. This product meets the requirements of the current European and national guidelines. Conformity has been established and the relevant statements and documents have been deposited by the manufacturer.
Scene-setter with 12 up to 24 DMX channels
48 programs spread over 4 pages
Chase of the programs (automatic or manual)
Manual control by 24 faders (speed control, dimming,...)
Other functions: black-out, tap sync, step change, dimming curve
Perfect for use on stages and in theaters
BEFORE USE
Check the contents:
Check that the carton contains the following items:
CMX24
User manual
DMX cable
AC/DC adapter
Some important instructions:
Before you start using this unit, please check if there's no transportation damage. Should there be any, do not use the device and consult your dealer first.
Important: This device left our factory in perfect condition and well packaged. It is absolutely necessary for the user to strictly follow the safety instructions and warnings in this user manual. Any damage caused by mishandling is not subject to warranty. The dealer will not accept responsibility for any resulting defects or problems caused by disregarding this user manual.
Keep this booklet in a safe place for future consultation. If you sell the fixture, be sure to add this user manual.
To protect the environment, please try to recycle the packing material as much as possible.
SAFETY INSTRUCTIONS:
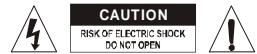
CAUTION: To reduce the risk of electric shock, do not remove the top cover. No user-serviceable parts inside. Refer servicing to qualified service personnel only.
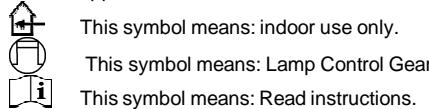
The lightning flash with arrowhead symbol within the equilateral triangle is intended to alert the use or the presence of un-insulated "dangerous voltage" within the product's enclosure that may be of sufficient magnitude to constitute a risk of electric shock.
The exclamation point within the equilateral triangle is intended to alert the user to the presence of important operation and maintenance (servicing) instructions in the literature accompanying this appliance.
To prevent fire or shock hazard, do not expose this appliance to rain or moisture.
To avoid condensation to be formed inside, allow the unit to adapt to the surrounding temperatures when bringing it into a warm room after transport. Condense sometimes prevents the unit from working at full performance or may even cause damages.
This unit is for indoor use only.
Don't place metal objects or spill liquid inside the unit. No objects filled with liquids, such as vases, shall be placed on this appliance. Electric shock or malfunction may result. If a foreign object enters the unit, immediately disconnect the mains power.
No naked flame sources, such as lighted candles, should be placed on the appliance.
Don't cover any ventilation openings as this may result in overheating.
Prevent use in dusty environments and clean the unit regularly.
Keep the unit away from children.
Inexperienced persons should not operate this device.
Maximum save ambient temperature is 40^ . Don't use this unit at higher ambient temperatures.
Always unplug the unit when it is not used for a longer time or before you start servicing.
The electrical installation should be carried out by qualified personal only, according to the regulations for electrical and mechanical safety in your country.
Check that the available voltage is not higher than the one stated on the rear panel of the unit.
The socket inlet shall remain operable for disconnection from the mains.
The power cord should always be in perfect condition: switch the unit immediately off when the power cord is squashed or damaged. It must be replaced by the manufacturer, its service agent or similarly qualified persons in order to avoid a hazard
Never let the power-cord come into contact with other cables!
In order to avoid a hazard, the unit shall only be used with the AC-adaptor delivered with it. If the AC-adaptor is damaged, a same model adaptor shall be used only.
In order to prevent electric shock, do not open the cover. Apart from the mains fuse there are no user serviceable parts inside.
Never repair a fuse or bypass the fuse holder. Always replace a damaged fuse with a fuse of the same type and electrical specifications!
In the event of serious operating problems, stop using the appliance and contact your dealer immediately.
Please use the original packing when the device is to be transported.
Due to safety reasons it is prohibited to make unauthorized modifications to the unit.
CONNECTIONS
The termination of the signal reduces signal errors and avoids problems with transmission and interruptions. It's always recommended to connect a DMX signal terminator (a resistor of 120 Ohm 1/4W) between pin2 (DMX-) and pin3 (DMX+) on the last fixture in the chain
MAINTENANCE
Clean by wiping with a polished cloth slightly dipped with water. Avoid getting water inside the unit. Do not use volatile liquids such as benzene or thinner which will damage the unit.
CONVENTIONS
In this manual, a button is presented as
-Press and release a button:
-Press and hold a button: +
For example: +
Press and hold SHIFT button, then press the CHASE REV button and release the SHIFT button.
The rank is important !!
When a button has several meanings then they will be separated by a / sign. The text above the button will be mentioned first, then the / sign and then the text below the button.
For example:
All indicators (lamps, display) are presented as [XXX] For example [LAMPJE FADER 1]
All faders are presented as {FADER}
FUNCTIONS (FRONT)
BLACK OUT button: Used to switch between black out (every DMX value at 0) and normal. The led beside the button blinks when the BLACK OUT function is activated. The DMX values will nevertheless be shown trough the green leds. (see number30/31)
FULL-ON button: As long as this button is pushed in, all channels will have the same maximal intensity, regardless the working mode and the black out function. The dark button (number 15) has priority above the full-on button
TAP SYNC button: By pressing this button twice you will adjust the chase speed. By moving the {SPEED} fader, this stored speed will be erased. This doesn't apply for the preset B faders (number 29) of which the speed is stored.
HOME button: Only useful in Chase/Scenes mode (check the chapter "How to use" for more information). Using this button you can switch a channel that is set in BLIND mode (see button) back in normal mode. So you have to press + to switch a preset B fader back in normal mode.
BLIND button: Only useful in Chase/Scenes mode (check the chapter "How to use" for more information). With this button you can switch a channel in BLIND mode. In this mode, the intensity of the channel will only be determined by the preset fader (A for the channels 1 to 12, B for the channels 13 to 24) and the master A fader. Chases or scenes that are stored in a preset B fader don't have an influence. So, you have to press + to switch a channel in blind mode.
AUDIO button: Using this button you can (de)activate the audio function (LED above the Audio button is ON/OFF). When the audio function is active, the speed of the passing of scenes of chases will be determined by an audio signal, acquired by the internal microphone or supplied by the LINE IN connector (number 5 on the rear side of the CMX24). The {SPEED} fader, and buttons don't have an influence. You cannot use the audio function for chases of which the speed is stored in a preset B fader.
STEP button: Using this button, you can view the scenes of chases manually. The {SPEED} fader has to be set in the lowest position (SHOW MODE) or you have to work in the EDIT mode. This button doesn't have and influence on chases of which the speed is stored in a preset B fader.
HOLD button: As long as you press this button, the current scene will be maintained. When you release this button, the new scene will fade in with a time that is set with the FADE fader. With the DARK, FULL-ON, BLACK OUT, PRESET buttons you can still change the scene.
9. PARK button:
Single Preset mode: no function
Double Preset mode: flash button for MASTER B fader ( take the {FADE} fader into account)
Chase/Scene mode: button to choose between Single chase or Mix chase
1-24 Button: Flash button for the MASTER A fader ( take the {FADE} fader into account)
RECORD/SHIFT button: Used to program steps or to switch to the program mode. This button has, when pressed together with the shift button, different functions depending on the combination of buttons:
Examples:
: Store a scene in the working memory.
+ : For programming or leaving the Edit mode. + : Erasing the working memory
+ <1>, <5>, <6>, <8>: Activate the program mode
+ <1>, <3>, <2>, <3>: Erasing the whole memory can only be done from the program mode.
+ <% or 0-255>: Choosing the display mode (% or DMX-value) + <5>, <5>, <5>: Choosing the 5 min range for the {SPEED} fader.
+ <10>, <10>, <10>: Choosing the 10 min range for the {SPEED} fader.
12. ADD KILL/REC EXIT button:
ADD mode: ([ADD KILL] led OFF) When you press a preset flash button, it will have the maximal intensity, without taking the {FADE} fader into account.
KILL mode: ([ADD KILL] LED ON)
Single/Double preset mode: Pressing one or more preset A or B buttons will put these channels on 100% intensity. The other channels will be put out.
o Chase/Scenes mode: Pressing one or more preset A buttons will put these channels on 100% intensity. The other channels will be put out. Pressing a preset B button will put this channels on 100% intensity, without taking the {FADE} fader into account. This last is in fact the ADD mode.
+ : With this combination of buttons you can leave the program or edit mode.
13. PAGE/REC CLEAR button:
: With this button you can flip trough the 4 pages. The 4 LEDs above this button show which page is currently active.
+ : Used to clear the working memory.
14. MODE SELECT/REC SPEED button:
MODE SELECT: With this button you can choose between Chase/Scenes, Single preset and Double preset mode.
REc SPEED: (in MIX mode!) In combination with a preset B fader, this button also allows you to store the speed of a chase in a preset B fader in Chase/Scenes mode.
Set the chase on the wanted speed with the {SPEED} fader or the button. Place the {SPEED} fader in the lowest position (SHOW MODE) to erase the speed.
Press + to store the speed.
DARK button: As long as this button is pressed all the channels will be set at zero, regardless the mode, the black out, and the full-on function.
16. EDIT/ALL REV button:
Edit: used to switch to the edit mode: +
ALL REV: Used to change the direction of all chases
17. INSERT/% or 0-255 button:
INSERT: Used to add a scene to a chase (for more info, see "editing a Chase")
% or 0-255: Changing the display mode (switching between % and DMX-values)
18. DELETE/REV ONE button:
DELETE: used to delete a scene in a chase for more info, see "editing a Chase" and "deleting scenes")
REV ONE: Changing the direction of one chase: +
19. UP/ CHASE REV button:
UP: Increasing the level of a channel in edit mode: +
- CHASE REV: used to change the direction of all the chases of which the speed isn't stored in a preset B fader.
20. DOWN/BEAT REV button:
DOWN: Decreasing the level of a channel in edit mode: +
- CHASE REV: used to change the direction of all the chases of which the speed is stored in a preset BFAster.
AUDIO LEVEL fader: This fader allows you to set the audio level. When the audio mode is active (see number 6), scenes and chases will be played on the rhythm of the music.
SPEED fader: Used to set the chase speed. Look at the schedule below to easily set your speed (x means a digit between 0 and 9):
Display
Time
0.xx
Millseconds: For example 0.10 means 100 milliseconds
x.xx
Seconds: For example 1.20 means 1 second and 200 milliseconds
xx.0
Seconds: For example 10.1 means 10 second and 100 milliseconds
x.xx.
Minutes: For example 1.05 means 1 minute and 5 seconds
xx.x.
Minutes For example 10.0. means 10 minutes
Sho
Show mode
There are 2 possibilities of range for the speed fader:
o +<5>,<5>,<5> for the 5 min range
o +<10>,<10>,<10> for the 10 min range
- You can store the speed in a preset B fader with
o +
oPut the SPEED fader in the lowest position (SHOW MODUS) to erase the stored time
FADE fader: Used to store the fade time. Look at the schedule below to easily set your speed (x means a digit between 0 and 9):
Display
Time
0.xx
Millisecond: For example 0.10 means 100 milliseconds
x.xx
Seconds: For example 1.20 means 1 second and 200 milliseconds
xx.0
Seconds: For example 10.1 means 10 seconds and 100 milliseconds
x.xx.
Minutes: For example 1.05 means 1 minute and 5 seconds
xx.x.
Minutes: For example 10.0. means 10 minutes
24. MASTER B fader:
Single preset mode: no influence
Double preset and Chase/Scene mode: Master of the preset B faders, the lowest position means 100% , the upper position is 0%
25. MASTER A fader:
Single preset mode: Master of Preset A and B faders, the lowest position is 0% , the upper position is 100%
Double preset and Chase/Scene mode: Master of Preset A faders, the lowest position is 0% , the upper position is 100%
PRESET A faders: Use these faders to set the values of channels 1 to 12
FLASH A buttons: When you press a flash button you will set the intensity of this channel to 100%
Single preset mode: use these faders to set the values of channels 12 to 24.
Double preset mode: using this mode, you will work with a 12 channels A/B control, by which every channel A/B fader will lead up to the same.
Chase/scene mode: This mode of the control allows you to store a whole (24 channels) scene/chase on a preset B fader. You have 4 pages and 12 preset B faders, so you can store 48 scenes/chases.
29. FLASH B buttons:
Single preset mode: use these buttons to maximize the intensity of the channels 12 to 24 temporary (See flash A buttons for more information)
Double preset mode: The flash B buttons control the flash A buttons
Chase/scenes mode: Used, together with the RECORD/SHIFT button, to store chase in preset B faders. When you press and hold these flash buttons, the chase that is stored in the channels will start to play.
STATE LEDs channel 1-12: Show the intensity of the channel in question.
STATE LEDs channel 13-24: Show the intensity of the channel in question.
STATE LEDs chases: when you move a preset B fader and the orange led above this channel is lit, a chase is stored in this channel. The intensity of the leds corresponds with the intensity of the chase.
SPEED/FADER/DIMMER/REC STEP ACTIVITY LEDs: The speed time led will be for example lit when you move the speed fader.
DISPLAY: shows the current action or the state of programming of the scenes/chases.
FUNCTIONS (REAR)
DC INPUT: connect the supplied AC/DC adapter to this input. If you should use another adapter, please make sure that it has 9 12Vdc and minimum 300mA with + in the center.
MIDI TRU(left)/OUT(middle)/IN(right): You can attach an external MIDI-controller to these connections (for more information, see chapter "how to use")
DMX OUTPUT: Sends DMX-signals to the connected fixtures
DMX POLARITY SWITCH: A DMX-signal normally has the following connections:
1=ground * 2=Data- * 3=Data+
In some cases it happens that a cable is inversed, as a result of this the DMX-connection doesn't work. This can be solved by using this switch. If your DMX connection doesn't work and all your DMX-receivers are properly addressed, you can check this switch. In normal conditions always put this switch in the left position.
AUDIO input: Here, you connect an audio line signal, so the connected light effects/lamps will react to the music.
REMOTE connector: Using a stereo JACK you can switch the output in BLACK OUT or FULL ON:
The Ring of the JACK to the mass: BLACK OUT can be switched ON/OFF.
The Tip of the JACK to the mass: FULL ON is active as long as the tip is connected to the mass.
HOW TO USE...
This chapter will explain step by step how the CMX24 works. We advise to read this text step by step.
- Switching on:
The CMX24 hasn't got an ON/OFF switch. You have to connect the adapter that is delivered together with the CMX24 to the DC INPUT connector and the mains. As soon as this happens, the CMX24 will be switch on.
- Connecting with dimmers:
The CMX24 is equipped with an 3 contact female XLR connector DMX OUT. Besides the connector there is a slide switch that selects the polarity of the DMX-signal. Normally, this slide switch is switched towards the side of the XLR-connection.
When the connected DMX-devices don't function correctly, switch this slide switch in the other position.
!!! Important: do not forget to set the start addresses of the dimmers correctly !!!
Basis
The CMX24 can be placed in different modes and some buttons can behave different depending of the current mode. To know for certain that the control is working in the right mode to understand this tutorial you have to do the next steps
Turn the CMX24 off and then back on
Move the next faders to the lowest position
All the {PRESET A} faders (12 faders)
All the {PRESET B} faders (12 faders)
O {MASTERB}fader
O {AUDIO LEVEL} fader
SPEED fader
Move the next faders to the highest position
{MASTERA}fader
O {FADE}fader
Select the single preset mode
Press and release the button until the [SINGLE PRESET] lamp is lit (above the master A and B fader)
Select page 1
Press and release the button until [PAGINA 1] lamp is lit. This is placed above the PAGE button
Press and hold the button
Press and release the button
Press and release the button
Press and release the button
o Release button
The [5 min] led above the SPEEDD fader should now be lit.
Leave the program and edit mode, go to the safe mode
Press and hold the button.
Press and release the button.
o Release the button.
- When red led above the RECORD/SHIFT is lit, you repeat this procedure again, until the let isn't lit anymore.
When the audio mode is active (the [AUDIO] led is lit), shut off the mode
Press and release the
Put out the black out lamp
Normally, the [BLACK OUT] led will blink, besides the BLACK OUT button
Press and release the button to put out the led
As long as this led blinks, there is no output.
Display Mode
While moving a fader, the intensity is shown on the display. The [DIMMER] LED will be lit besides the display to indicate that the display shows the intensity of the dimmer. When you have connected dimmers and light effects, you will see that the connected light effects will be lit on the same intensity.
You can choose if the display shows values from 0 (%) to 100 (%) , or values from 0 to 255 (DMX-values).
You can change the display (between % and DMX) this way:
Press and hold the button
Press and release the button
Release button
By repeating this process you will return to the original display.
Attention: The display always shows the value of the fader and not the real intensity of the lamp.
- Single Preset mode:
Using this mode, you can set the intensity of all 24 channels of the CMX24. You can set a scene by moving all the PRESET A and PRESET B faders to the preferred position.
Look at the green LEDs above each PRESET A and PRESET B fader. These LEDs show the intensity of the channels. If you have connected dimmers and light effects, then the light effects should also be lit.
Move {MASTER A} fader slowly down. You will see that all leds (and your light effects) will be put out slowly. In the single preset mode, MASTER B has no function.
Keep the <1-24> button above the MASTER A fader pushed in. You will see that the green LEDs (and your light effects) will be lit again. As long as this button is pushed, master A will have 100% intensity, even when the fader is not placed at 100% .
Press and hold the button beneath the PRESET A 2 fader. The green led will start to lit at full intensity (as well as the connected light effect). With the buttons below the faders you can place the channels temporally at full intensity, regardless of the position of MASTER A.
Press and hold the button beneath the SPEED fader. All green leds will be lit now. Every channel is set now at full intensity.
Press and hold the button (above the master A fader). There's no output now. As long as this button is pressed, all lamps will be put out. This is a blackout function but without the latch function of the blackout button.
Press and release the button (beneath the AUDIO LEVEL fader). The led beside this button will start to blink and all the lamps will be put out
Keep the button pressed while your CMX24 is still in Black out. The connected light effects will be lit at full intensity. The full-on button has priority above the black out function.
Press and hold the button while your CMX24 is still in Black out and you're pressing the button. All connected light effects will be put out. The dark button has priority above the full-on button.
Release the dark and the full-on button. All connected light effects will be put out because of the black out function. Now press a PRESET A or PRESET B button (below the faders). The connected lamp will be lit at full intensity, regardless of the black out function. The preset button has priority above the black out.
Press a PRESET A or PRESET B button and then press the button. The lamp will be put out now. The dark button has priority above the preset button.
The table below shows the priority of the buttons.
DARK
FULL-ON
PRESET
BLACK OUT
1-24
PARK
- Fade time:
With the FADE fader, you can set the transition time between 0 (INSTANT) seconds and 10 minutes. Every change of the lights will happen with the set time. This function is very handy to make flexible transitions between different scenes. You can set the fade time as long as the transition is in progress (you accelerate or delay the transition)
Move the {MASTER A} fader to the lowest position. Move {PRESET A 1} fader to the lowest position
Move the {FADE} fader until the display shows [1.00]. This means a fade time of 1 second.
Press the button beneath the fader. The green led (and your connected light effect) will be lit immediately. So, the fade time isn't used on the preset buttons. This also applies for the DARK, FULL-ON, BLACK-OUT, 1-24 and PARK button. The fade time only influences faders.
Depending of the decimal points, another time is showed. The table below gives you all the information to set your fade time (x is a digit between 0 and 9)
Display
Time
0.xx
milliseconds
For example: 0.10 is 100 milliseconds
x.xx
second
For example: 1.20 is 1 second and 200 milliseconds
xx.0
second
For example: 10.1 is 10 second en 100 milliseconds
x.xx.
minutes
For example: 1.05 is 1 minut en 5 seconds
xx.x.
minutes
For example: 10.0. is 10 minutes
HOLD
The {FADE} fader has to be placed in the highest position.
The {MASTER A} fader has to be placed in the highest position.
All the preset faders (A and B) have to be placed in the lowest position.
Place {PRESET A 1} at 75% .
Place {PRESET A 2} at 50% .
Press and hold the button above the FADE fader. The led above this button is lit.
Place {PRESET A1} at 0% .
Place {PRESET A 2} at 100% .
Place {PRESET A 3} at 75% .
Place {PRESET A 4} at 100% .
The light effects keep the actual intensity.
Release the button.
The light effects will adapt directly to the new intensities.
Using the HOLD button you can maintain the current scene while setting the next scene.
Move the {FADE} fader until the display shows [10.0] (a fade time of 10 seconds)
Press and hold the button.
Place {PRESET A 1} at 100% .
Place {PRESET A 2} at 10% .
Place {PRESET A 3} at 75% .
Place {PRESET A 4} at 0% .
Release the button.
The scene will change slowly (within 10 seconds) from the previous to the next. You'll get a perfect fade. The HOLD button always works despite of the current mode.
DOUBLE PRESET MODE:
In this mode you can use the control as an 12 channel A-B control. Change the mode to double preset:
Press and release until the [DOUBLE PRESET] lamp will be lit above the master A and master B faders.
Set the following faders:
Place {PRESET A 1} fader at 100%
Place {PRESET A 2} fader at 50%
Place {PRESET A 3} fader at 25%
Place {PRESET A 4 - 12} faders at 0%
Place {PRESET B 1} fader at 0%
Place {PRESET B 2} fader at 50%
Place {PRESET B 3} fader at 75%
Place {PRESET B 4} fader at 100%
Place {PRESET B 5} fader at 50%
Place {PRESET B 6 - 12} faders at 0%
Place {MASTER A} fader at 0% (lowest position!!!)
Place {MASTER B} fader at 0% (highest position!!!)
No lamps will be lit.
Move the {MASTER A} fader slowly to 100% (highest position). Channels 1 to 3 will be lit immediately to 100% , 50% and 25%
Move {MASTER A} fader and {MASTER B} fader simultaneously to the lowest position. Master A will change to 0% and Master B will change to 100% . Channels 1 to 5 will be lit at 0% , 50% , 75% , 100% and 50% . You have made a fade from the first to the second scene.
You can change this scene by moving the PRESET B faders. Moving the PRESET A faders doesn't change anything.
Now, you can set the PRESET A faders to a new scene.
Move {MASTER A} fader and {MASTER B} fader simultaneously to the highest position. Master A changes to 100% and Master B changes to 0% . You will a slow fade from the first scene to the second scene. You are working in the A-B preset mode.
IMPORTANT: Move the {MASTER A} fader to 100% (highest position) and the {MASTER B} fader to 100% (lowest position). The CMX24 will choose for the highest values.
Channel 1 at 100% .
Channel 2 at 50% (A: 50% is higher then B: 25% )
Channel 3 at 75% (B: 75% is higher then A: 25% )
This only works when BOTH masters are set at 100% . The highest intensity has priority
PARK
Set {MASTER A} fader and {MASTER B} fader at 50% , middle position. The scene is a combination of both presets.
Press and hold the button above the Master B fader. Master B will be set at 100% (this is visible on the green leds). When a fade time is set, this will happen slowly.
Press and hold the <1-24> button above the Master A sleeper. Master A will be set at 100% (this is visible on the green leds). When a fade time is set, this will happen slowly.
CHASE/SCENES mode
This control mode allows you to store a scene or a chase of 24 channels in every Preset B fader. The CMX24 has 4 pages, so you can store altogether 48 scenes/chases.
You can activate this mode like this:
Press and release the button until the [CHASE SCENES] lamp is lit above the master A/B faders.
Concepts:
Scene/Chase:
A scene is 1 setting of the intensity of the 24 channels. This is in fact a chase with 1 scene. Only this setting will be showed constantly.
A chase contains multiple scenes and each scene contains the intensity for 24 channels. The scenes will be showed one by one (and you can set the speed/fade time).
You have 4 pages with each 12 PRESET B faders which each can contain a scene or a chase. So you can store 48 chases/scenes.
Record mode:
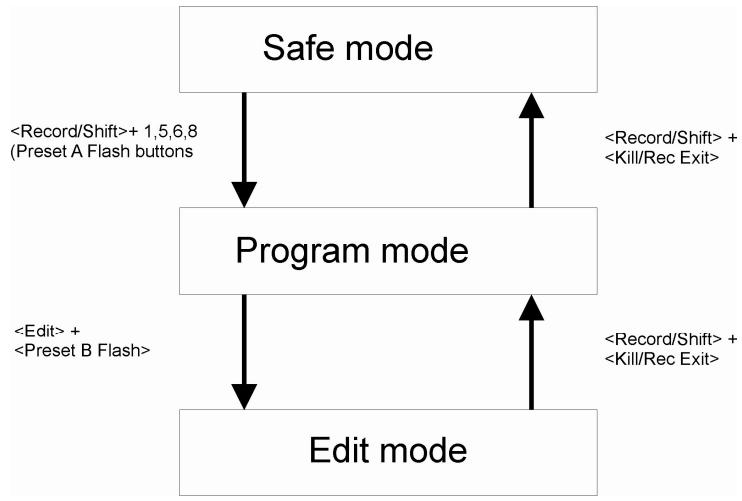
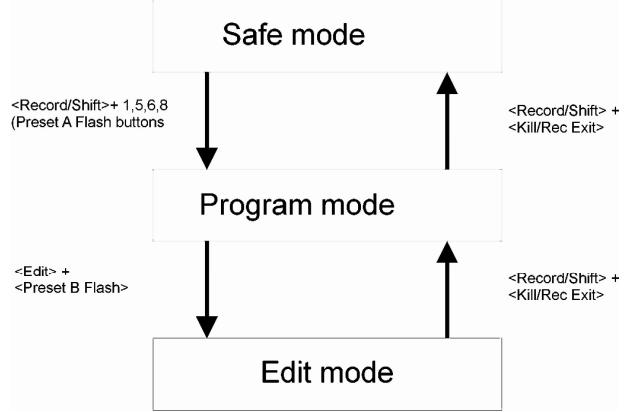
The CMX24 can work in 3 modes
Safe mode, in this mode you can't change the programs
Program mode, in this mode you can save/erase programs
Edit mode, in this mode you can change programs
Safe mode and program mode are always available, whether you are working in Single Preset, Double Preset or Chase/Scenes mode. The Edit mode is only available in the Chase/Scenes mode. Next drawing shows you how you can change from one modus to another.
How to recognize the mode:
- Safe mode: red lamp above the button isn't lit.
- Program mode: red lamp above the button is lit.
- Edit mode: yellow lamp above Preset B fader is lit, despite of the position of the fader.
Working memory
During the programming (program mode) you will use the working memory. You will store the setting of light effects/lamps in this memory and afterwards to you will assign this setting to a Preset B fader. The working memory will maintain his content until you assign or erase ( + ) the settings.
This memory isn't used in Edit mode, there you change the setting of light effects/lamps that are already stored in a Preset B finder.
In the next paragraphs, the methods to program and change chases/scenes are explained.
Activate program mode
Activate Program mode
Press and hold the button.
Press and release the button
Press and release the button
Press and release the button
Press and release the button
o Release the button
The red lamp above the RECORD/SHIFT button is lit.
!! This mode will stay activated, even if the CMX24 is turned off, until you leave the mode. It's advised to leave this mode as soon as the scenes are programmed/changed. Doing this, you can avoid that other people, who are not used to work with the controller, will change your program.
- Leave program mode, go to secured mode
To leave the program mode:
Press and hold the button
- Press and release the button.
- Release the button
The red lamp above the RECORD/SHIFT button goes out.
If the lamp doesn't go out, it means that you are in Edit mode, repeat the complete procedure.
Delete all
You can delete the complete memory by doing this:
Activate the program mode
Press and hold the button
- Press and release the button
Press and release the button
- Press and release the button
Press and release the button
- Release the button
The lamp above the RECORD/SHIFT button is lit.
!! The next procedure will delete the complete memory. Remember there is no way back!!
Delete the complete memory:
Press and hold the button
Press and release the button
- Press and release the button
- Press and release the button
- Press and release the button
- Release the button
- Record a Scene
(ONLY possible in program mode.)
Be sure that the work memory is empty:
Press and hold the button
Press and release the button
Release the button
Make your settings:
If you want to set only 12 channels, u can use the Preset A faders.
- If you want to set 24 channels, you first have to select the Single Preset mode by using the button. Set your channels by using the Preset A and Preset B faders.
Example:
Channel 1 = 100%
Channel 2 = 27%
Channel 3 = 60%
Channel 4 to channel 8 = 0%
Channel 9 = 72%
Channel 10 = 30%
Channel 11 = 0%
Channel 12 = 95%
Record this preset in the work memory:
Press and release the button
The display shows [001]
001 on the display indicates that you have recorded 1 scene in the working memory.
Store the content of the working memory in the Preset B 1 fader of page 1:
Select page 1 by pressing several times the button till the lamp "1" is lit.
Press and hold the button
Press and release the button
Release the button
You have now stored a scene in the PRESET B 1 fader of page 1. The working memory has been deleted.
Show Scene
You can recall a scene in the Chase/Scenes mode. Be sure that:
The Chase/Scenes mode is activated (by using the button)
The{Master B}fader is at its lowest position
MIX Chase is activated; select this by using the button, just on top of the MASTER B fader in Chase/Scenes mode. The [MIX CHASE] led is situated above the FADE fader and must be lit.
The Black-out function is not activated.
All the PRESET faders (A & B) are set at their lowest position.
Move the {PRESET B 1} fader to its highest position. The stored scene will appear on the green LEDs (and on your projectors).
By setting several Preset B faders at the same time on a position that is higher than 0, you can create a combined scene. You can modify the intensity of the scene by using the Master B fader.
You can quickly set the scenes at 100% by using the Preset B flash buttons. Repeat the procedure to store scenes in page 2. Be sure that the Preset B faders 1 to 3 of page 2 contain also scenes (make them different from the other scenes). Check also these scenes.
Page to page
Now you have scenes for the preset B faders 1 to 6 from page 1 and the preset B faders 1 to 3 from page 2.
The preset faders 1 to 3 can now show 2 different scenes, depending of the selected page.
Execute the next position:
Move all the Preset~B faders to the lowest position.
Activate page 1 by using the button
Move {Preset B 1} fader 1 to the highest position. The stored scene is shown.
Activate Page 2 by using the button
The same scene is still shown.
Move the Preset B 1 fader to the lowest position.
Move the {Preset B 1} fader to the highest position. The scene stored in preset B 1 of page 2 is shown.
The content of the Preset B fader has changed. This happened when the fader was in its lowest position.
Modify a Scene
If you need to have another scene, you can:
Compose a completely new scene and store it
Adapt a scene by modifying the intensity of certain channels
Follow the normal procedure to store a scene. when you have stored the working memory in the Preset B fader by pressing <RECORD/SHIFT> + <PRESENT B x> , the old scene will be replaced by the new scene.
If only a few channels of a scene need to be adapted, it is easier to recall the scene and to adapt it than to create a complete new scene. The CMX24 has a special edit mode that allows you to modify the channels of a scene.
First of all, you need to place the Preset B fader with the stored scene in edit mode:
Be sure that program mode is activated.
Be sure that Chase/Scenes mode is activated.
Bring all the Preset A faders to their lowest position
Select a page by using the button
Place the Preset B fader in edit mode:
Press and hold the button
Press and release the button. X has to be replaced by 1, 2, 3, 4, 5, 6, 7, 8, 9, 10, 11 or 12 depending on the preset B fader that you want to edit
Release the button
The yellow led on top of the Preset B fader will Lit and the actual scene is shown.
Increase the intensity of channels:
Press and hold the button
- Press and hold the button of the channel where you want to have the intensity increased
Use the button for the channels 13 to 24.
The intensity will slowly increase on you fixtures and on your display
Release the buttons, as soon as you have reached the desired intensity.
Reduce the intensity of channels:
Press and hold the button
Press and hold the button of the channel where you want to have the intensity reduced
Use the button for the channels 13 to 24.
The intensity will slowly decrease on your fixtures an on your display.
Release the buttons as soon as you have reached the desired intensity.
!! The intensity that you have set will be directly stored, it is not possible to undo the modifications.
To Exit the Edit mode:
Press and hold the button
Press and release the button
- Release the button
The normal output is shown.
Store a Chase
A chase is a succession of scenes that are shown on a certain rhythm.
The controller makes no difference between scenes and chases. A scene is in fact a chase with only 1step. So you will notice that the method of storing a chase is almost identical to the method of storing a scene.
(At this time, program mode has to be active, if it is not; you will have to do that first)
Be sure that the working memory is emtpy:
Press and hold the button
Press and release the button
Release the the
We are going to make a chase, composed out of 4 scenes. Be sure that you work in program mode and that your master is not set to 0.
Scene 1
Set the first scene:
Channel 1 = 100%
All the other channels = 0%
Now store this scene in the working memory:
Press and release the button
[001] appears on the display = first scene
Scene 2
Set the second scene:
Channel 2 = 100%
All the other channels = 0%
Now store this scene in the working memory:
Press and release the button
[002] appears on the display = second scene
Scene 3
Set the third scene:
Channel 3 = 100%
All the other channels = 0%
Now store this scene in the working memory:
Press and release the button
[003] appears on the display = third scene
Scene 4
Set the fourth scene:
Channel 4 = 100%
All the other channels = 0%
Now store this scene in the working memory:
Press and release the button
[004] appears on the display = fourth scene
The four scenes are now stored in the working memory. Now we will store the working memory in the Preset B7 fader of page 1:
Select page 1 by pressing several times on the till the Led 1 will lit.
Press and hold the button
Press and release the button
Release the button
Now you just have stored a chase in the Preset B 7 fader. The working memory has been cleared.
Play a Chase
You can recall the stored chase in Chase/Scenes mode. Be sure that:
Chase/Scenes mode is activated (by using the button)
{MASTER B} fader is at its lowest position
SPEED fader is at its highest position
{FADER} fader is at its highest position
MIX Chase is activated; make this selection with the button above the MASTER B fader, in Chase/Scenes mode. The [MIX CHASE] Led is situated at the top of the FADE fader, this must be Lit.
Blackout is not activated
Audio is not activated: press/release the
All the preset faders (A & B) are set at their lowest position.
Move the {PRESET B 7} fader upwards. The chase will appear on the green LEDs (and on your fixtures).
U can also work with the:
{SPEED} fader, the chase speed will be modified
{FADE} fader: the scene will fade into the next scene. If the fade time is set too high, it can be possible that the lamps will not lit at full level, or maybe the chase will not move anymore.
Manual activation of a Chase
Sometimes it is usefulness to activate manually every step in a chase.
This can be done in a very easy way:
{SPEED} fader at its lowest position: SHOW MODE
Press and release the button, situated at the top of the speed fader.
Each time that you press the STEP button, the next step of the chase will be activated.
Synchronize a Chase
Very often, when you play music, you want to synchronize the speed of the chase with the beat of the music. The CMX24 offers you the possibility to press twice on a button, so that the interval time between the two moments will be used as speed setting for the chase. you can do it like this:
Press twice the button on the beat of the music.
The interval time will be used to set automatically the chase speed. The position of the {SPEED} is not important.
! As soon as you move the {SPEED} fader, the chase time will be controlled again by this speed fader!
- Memorize the speed
When several chases are running, the {SPEED} fader, the button and the button will influence all the chases. Sometimes it is useful to program a fix speed, so that the chase can not be influenced by the speed fader, the step and tap sync buttons while running.
This can be done in a very easy way:
Set the chase time by using the {SPEED} fader or the button.
Be sure that the {SPEED} fader is not set at its lowest position (SHOW MODUS).
Press and hold the
Press and release the button of the PRESET B fader where the chase is stored
Release the button
The chase speed is now stored in the PRESET B fader, together with the chase.
To delete:
To delete the stored speed:
Be sure that the {SPEED} fader is at its lowest position: SHOW MODE.
Press and hold the button
Press and release the button of the PRESET B fader where the chase is stored
Release the button
The time (speed) is erased from the PRESET B fader. Now you can modify again the speed of the chase by using the {SPEED} fader or the button.
Audio
The CMX24 has a built-in microphone
If you dispose of an audio source (CD player, audio mixer, etc) you can synchronise the speed of the chase with the sound. Connect the audio source with the LINE IN Cinch connector of the CMX24. Press the
To switch off the audio function:
Press and release the
- Chase reverse
You can reverse the working direction of a chase. There are 4 possibilities:
ALL REV
All the chases will be reversed.
Press and release the button, the chase direction will be reversed.
Repeat this to reverse again the chase direction.
REV ONE
Only one particular chase will be reversed
Press and hold the button
Press a button that is containing a chase.
Release the button
CHASE REV
All the chases that have no speed stored in the preset B fader will be reversed.
Press and release the button: the case will be reversed.
Repeat this to reverse again the chase direction.
BEAT REV
All the chases that have a speed stored in the preset B fader will be reversed.
Press and release the button: the chase will be reversed.
Repeat this to reverse again the chase direction.
To modify a Chase
There are 3 ways to modify a chase. You can:
A. Modify the output levels
B.Add scenes
C. Delete scenes
A. Modify the output levels:
Be sure that the program mode is activated.
Be sure that Chase/Scenes is activated.
Bring all the preset A faders to their lowest position
Choose the page by using the button
Set the Preset B x fader in edit mode
Press and hold the button
Press and release the button
Release the button
The yellow Led on the top of the Preset B fader will Lit while the actual value is shown,
ect the scene that you would like to modify by pressing the <STEP> button.
To increase the intensity of the channels:
Press and hold the button
Press and hold the button for channels 1 to 12. Use the button for channels 13 to 24.
You will see that the intensity will slowly increase on your display (and your fixtures)
o Release the buttons as soon as you have reached the desired intensity.
To decrease the intensity of the channels:
Press and hold the button
Press and hold the button for channels 1 to 12. Use the button for channels 13 to 24.
You will see that the intensity will slowly decrease on your display (and your fixtures)
o Release the buttons as soon as you have reached the desired intensity.
- Repeat these steps till you have the desired settings
To exit the edit mode:
Press and hold the button
Press and release the button
o Release the button
The normal output of the controller is shown again
!! The modifications will be stored directly; there is no possibility to undo the modifications.
B. Add scenes:
This method gives you the possibility to add a new scene to the chase. Repeat this method to add several scenes.
Be sure that the program mode is activated.
Be sure that Chase/Scenes is activated.
Bring all the Preset B faders to their lowest position
Clear the working memory:
Press and hold the button
Press and release the button
o Release the button
Set the new scene, so that it appears on the green leds (and fixtures), eventually in Single Preset mode to be able to use 24 channels
Press and hold the button. The scene is now recorded in the working memory
If you have activated the Single Preset mode to compose scenes, you have now to activate again the Chase/Scenes mode.
Bring all the Preset A and B faders to their lowest position
Choose the desired page by using the button
Place the Preset B x fader in edit mode
Press and hold the button
Press and release the button
o Release the button
The yellow Led above the Preset B fader will lit and the actual scene is shown.
Press the till you have reached the scene that should come NEXT to the scene that you want to insert.
Press and release the button.
To exit the edit mode:
Press and hold the button
Press and release the button
o Release the button
The normal output of the controller is shown again
C. Delete scenes:
!! It is impossible to recover deleted scenes.
Be sure that the program mode is activated.
Be sure that Chase/Scenes is activated.
Move all the Preset A faders to their lowest position
Choose the desired page by using the button
Place the Preset B x fader in edit mode:
Press and hold the button
Press and release the button
Release the button
The yellow Led on top of the de Preset B will Lit and the actual scene is shown.
Select the scene that you want to delete by using the button.
Press and release the button
If needed, choose another scene by using the button en delete it by using the button
To exit the edit mode:
Press and hold the button
Press and release the button
o Release the button
The normal output of the controller is shown again
Empty a preset B fader
!! it will not be possible to undo this action !!
Be sure that the program mode is activated.
Press and hold the button
Press and release the button of the desired preset B fader
Press and release the button of the desired preset BFA
(So the preset B x button has to be pressed 2 times).
Release the button
- Copy Preset Bfader
!! Only possible with scenes!!
If you want to copy a scene to another preset BFAder to use again the same scene or to use it as a base for a new scene.
Be sure that the Chase/Scene mode is activated
Bring all the preset A faders (or the master A fader) to their lowest position
Bring all the preset B faders to their lowest position
Bring the Master B fader to its lowest position (100%)
Modify the page if necessary
Move the preset B fader of the scene that you want to copy to 100%
+ to delete the working memory
to store the scene
Modify the page if necessary
+ to store the scene in another preset B fader, the scene is now copied
- Delete a CHASE
To delete a chase or a scene from a preset B fader in Chase/Scenes mode:
Use the button to select the page
Press and hold the button
Press and release the button
Press and release the button again
Release the button
- Blind/Home
In Chase/Scenes mode u can use the and the buttons. These buttons are not used in Single Preset and Double Preset mode.
- Preset A
To disconnect the channels 1 to 12 from the preset B scenes/chases:
Press and hold the button
Press and release the button
Release the button
The level will only be determinated by using the preset A fader, master A fader and the flash buttons.
The easiest way to test this is to activate a chase (by using a preset B fader), then place one of the cannels in BLIND. Now you can adapt the intensity by using the preset A fader. This channel will not follow the chase anymore. However, the FULL-ON button will still activate the channel.
To place the channel back in normal mode:
Press and hold the button
Press and release the button
Release the button
- Preset B
To disconnect the channels 13 to 24 from the preset B scenes/chases:
Press and hold the button
Press and release the button
Release the button
The level will only be determined by using the preset B fader, master A fader and the flash buttons.
You can set the intensity of the channel by using the preset B fader. The preset B fader will not be linked anymore to its stored scene/chases.
To place the channel back in normal mode:
Press and hold the button
Press and release the button
Laat de toets los
You will notice that the Preset B fader is directly used to activate the programmed scene/chase. That's why it is better to place the de Preset B fader in the lowest position, before to activate the normal mode
SINGLE CHASE
De single chase mode is useful to create quickly different chases.
When Single chase (indicate with the PARK button) is activated, the CMX24 will create chase, based on all the preset B faders that are not set to zero. Each preset B fader will be activated till all the fader positions are shown. Then, the next preset B fader will be shown.
In this text, we consider that all the preset B faders in output 1 have a scene (1 to 6) or a chase (7 to 12) stored.
Place the controller in Single Chase mode:
Bring all the Preset A and B faders to the lowest position
Be sure that the Chase/Scenes mode is activated
Press and release the button on top of the Master B fader
The [SINGLE CHASE] Led on top of the {FADE} fader must be lit, if it is not, you will have to press again the button
To have a clear view of the effect you should first place the {FADE} fader in highest position and move the {SPEED} fader till the display shows [1.05] (1,05 second).
Bring the preset B faders 1 to 4 to their highest position. Now you see a chase, composed of 4 scenes that are stored in the faders. You can set the speed by using the {SPEED} fader, the button and the button. By moving the preset B faders you can modify the chase. Try also to activate the preset B 7 to 12 faders.
Like this you can quickly create several chases by combining scenes/chases that are stored in the preset B faders.
Notice:
If the preset B fader includes a speed setting (stored with REC SPEED), it will not be used.
- You can reverse the chase direction of the preset B faders with the REV ALL, REV ONE, CHASE REV and BEAT REV buttons, but you can not reverse the global chase, this one always goes from preset B 1 to preset B 12
- Sometimes it looks like if the chase includes extra steps. You have to be sure that the preset B faders are set to zero. Control this with the display.
- Pressing the flash buttons of the preset B faders will add presets to the chase, sop you will have to wait till the chase activates the preset
MIDI function:
Set the MIDI IN channel: Press and hold the Record button and press 3x Flash button 1. The display will show "CHI". Press one of the Flash buttons (1-16) to assign the MIDI in channel (1-16). If the relevant channel LED is lit, the MIDI IN channel is correctly set.. Press and hold the Record button and press the Exit button to exit MIDI setup.
Set the MIDI OUT channel: Press and hold the Record button and press 3x Flash button 2. The display will show "CHO". Press one of the Flash buttons (1-16) to assign the MIDI out channel (1-16). If the relevant channel LED is lit, the MIDI OUT channel is correctly set. Press and hold the Record button and press the Exit button to exit MIDI setup.
Receive MIDI file dump: Press and hold the Record button and press 3x Flash button 3. The display will show "IN", indicating the controller is ready to receive the file dump.
Send MIDI file dump: Press and hold the Record button and press 3x Flash button 4. The display will show "OUT", indicating the controller is ready to send the file dump.
IMPORTANT:
During a file dump, the other functions of the CMX24 will not work. You will be able to use them again as soon as the file dump is completed
WORKMODES (SEE PREVIOUS PART)
Activate the secured mode
+ till the Led on top of the record button goes out. In this mode it is not possible to modify chases/scenes programs.
Activate the program mode
Press and hold the button
Press and release the button
Press and release the button
Press and release the button
Press and release the button
Release the button
Activateeditmode
+
!! This is only possible if the program mode is activated.
Delete all
!! This will erase the complete memory !!
The program mode must be activated !!
Press and hold the button
Press and release the button
Press and release the button
Press and release the button
Press and release the button
Release the button
Clear the working memory
+
Store a Scene
Program mode = activated
+
+
Modify a scene
Program mode = activated
+
+
+
+
Store a chase
Program mode = activated
+
+
Modify Chase / Scene
Program mode = activated:
+
+
+
+
Add Chase / Scene
Program mode = activated
+
+
+
Delete Chase / Scene
Program mode = activated
+
+
Working memory is empty
Store scene in working memory
Select page
Working memory in preset B
Select page
Activate Edit mode
Increase intensity
Decrease intensity
Exit edit mode
Working memory is empty
Store scene in working memory
Repeat this for every scene
Select page
Working memory in preset B
Select page
Activate Edit mode
Select scene
Increase intensity
Decrease intensity
Exiteditmode
Working memory is empty
Store scene in working memory
Select page
Activate edit mode
Select the scene that will be next to the one
you are going to add
Add scene
Exiteditmode
Select page
Activate edit mode
Select scene
Delete scene
Exiteditmode
SPECIFICATIONS
Power Input:
DC 12V-18V 500mA.
AC/DC Power adapter:
AC 230V, 50Hz → 12Vdc / 500mA
DMX outputs:
3pin XLR
MIDI Signal:
5pin standard DIN plug
Audio input:
100 mV~1 Vpp & internal microphone
Size:
482 × 264 × 85 mm
Weight:
4,3kg
Every information is subject to change without prior notice
You can download the latest version of this user manual on our website: www.beglec.com
MODE D'EMPLOI
CONVENTIONS D'ECRITURE
FONCTIONS (FACE AVANT)
Alimentation: DC 12V-18V 500mA.
Selecteer single preset modus
Other manuals JBSYSTEMS LIGHT
Discover other manuals and user guides for the brand JBSYSTEMS LIGHT
💬 Hi! I'm your manual assistant.I know your JBSYSTEMS LIGHT CMX-24.
How can I help you? (use, settings, error codes, maintenance, explaining a step from the manual, etc.)💡 Examples :
• How do I use it ?
• Error code E3 ?
• How do I clean it ?