
AS 1150 - Scanner AGFAPHOTO - Free user manual and instructions
Find the device manual for free AS 1150 AGFAPHOTO in PDF.
| Product type | Photo and film scanner |
| Brand | AGFAPHOTO |
| Model | AS 1150 |
| Weight | 0.23 kg |
| Power supply | Input 100-240V ~ / 50-60 Hz, output 5V / 1A (adapter included) |
| Power consumption | < 9 W |
| Maximum resolution (photo) | 300 x 300 dpi |
| Maximum resolution (film/slide) | 1200 x 1200 dpi |
| Color depth (input/output) | 48 bits / 24 bits |
| Compatible paper formats | Min 42 x 20 mm, max 105 x 304.8 mm, max thickness 1 mm, weight 50-105 g/m² |
| Compatible film formats | Color 35mm negative strips (6 frames), uncut 35mm slides |
| Memory card types | SD, xD, MMC, MS, MS Pro |
| Connection | Mini USB 2.0 (compatible with computer and digital photo frame) |
| Main features | Standalone scan to memory card, automatic edge cropping, automatic negative rotation, memory card reader |
| Sleep mode | Automatic after approximately 15 minutes |
| Package contents | Scanner, calibration sheet, cleaning sheet, cleaning rod, film adapter, power adapter, USB cable, protective cover, warranty card, user guide |
| Glass cleaning | Use the cleaning rod from left to right in the document output slot |
| Cleaning the input rollers | Special cleaning sheet (cleaning mode) – do not use liquids |
| Safety | Do not open, do not expose to moisture, use only the supplied adapter, unplug if unused for a long time |
| Repairs | Do not repair yourself – contact a specialist or customer service |
| Recommended ambient temperature | 15-35 °C |
| Recommended relative humidity | 20-70 % without condensation |
Frequently Asked Questions - AS 1150 AGFAPHOTO
User questions about AS 1150 AGFAPHOTO
0 question about this device. Answer the ones you know or ask your own.
Ask a new question about this device
Download the instructions for your Scanner in PDF format for free! Find your manual AS 1150 - AGFAPHOTO and take your electronic device back in hand. On this page are published all the documents necessary for the use of your device. AS 1150 by AGFAPHOTO.
USER MANUAL AS 1150 AGFAPHOTO
Type .........Color Contact Image Sensor (CIS)
Dimensions [L × H × P] 158×45×55mm
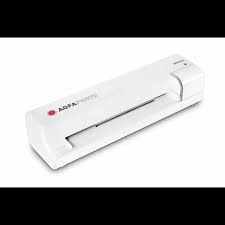
With the purchase of this device, you have chosen a quality AgfaPhoto product brand. Their device fulfils the most varied requirements for private use or in your office and business everyday.
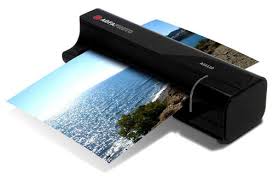
Scan photos or business cards and transfer the data automatically on to memory cards or onto compatible digital picture frames.
The adapter for the negative film / slides [film guide] allows you to scan black/white negative film, colour negative film and unframed slides automatically.
In addition, you also use the scanner as a memory card reader in combination with a computer.
We hope you enjoy your device and its many functions!
About this User Manual
With the installation guide on the following pages, you can start using your device quickly and easily. Detailed descriptions can be found in the following sections of this user manual.
Read the entire user manual carefully. Follow all safety instructions in order to ensure proper operation of your device. The manufacturer accepts no liability if these instructions are not followed.
Symbols Used
Notice

Troubleshooting
This symbol designates tips that will help you to use your device more effectively and easily.
DANGER!

DANGER!
Warns about dangers for people, damage to the device or other objects as well as possible loss of data. Injuries or damage can result from improper handling.
EN
1 Introduction
Dear Customer 1
About this User Manual 1
General Safety Information
Setting Up the Device 3
Power Supply 3
Repairs 3
3 Overview
External View 4
Connections on the Rear Side 4
Packing Contents 4
Connecting power supply 4
Inserting a Memory Card 5
Using the digital photo frame 5
4 Scanning
Loading Photos 6
Insert film / slides 7
Cleaning the Scanner Glass 8
Computer Connection 8
Service
Cleaning 9
Calibrating the Scanner 9
Power Cycling 10
6 Appendix
Technical Data 12
General Safety Information
Read the following information before using the device in order to avoid or minimise any risk of injury or damage.
Setting Up the Device
Protect the device against direct sunlight, heat, large temperature fluctuations and moisture. Do not place the device in the vicinity of heaters or air conditioners. Observe the information on temperature and humidity in the technical data.
In the event that the device becomes too hot, or if you see smoke coming from the device, you must immediately pull the power cable out of the power socket. Have your device examined by trained professionals at a technical service location. To prevent the spread of fire, open flames should be kept away from the device.
The device must have sufficient ventilation. Do not cover the ventilation slots on the underside. Do not place your device on soft surfaces such as cloth covers or carpets. Otherwise, the device can overheat and catch on fire.
Do not plug in the device in moist rooms. Never touch the mains cable or the mains connection with wet hands.
Under the following conditions, a layer of moisture can appear inside the device which can lead to malfunctions:
- if the device is moved from a cold to a warm area;
- after a cold room is heated;
- when this device is placed in a damp room.
Proceed as follows to avoid any moisture build-up:
1 Seal this device in a plastic bag before moving it to another room, in order for it to adapt to room conditions.
2 Wait one to two hours before you take the device out of the plastic bag.
The device should not be used in a very dusty environment. Dust particles and other foreign objects may damage the unit.
Be sure not to bump or knock the scanner glass as it is fragile and could break. Do not expose the device to extreme vibrations. It may damage the internal components.
Do not allow children to handle the device without supervision. The packing materials should be kept out of the hands of children.
Power Supply
Do use the AC adapter and USB cable provided with the scanner. When using other power supply units and cables, the device may not work.
Turn the device off using the on/off switch before you remove the plug from the socket.
Never touch the power cable if the insulation is damaged. Replace damaged wires immediately. Use suitable cables only; if necessary please contact our technical customer service or your retailer.
Set up your device so that the power socket is easily accessible. In an emergency, disconnect your device from the power supply by pulling the power plug.
Before cleaning the surface of your device, disconnect it from the power network. Use a soft, lint-free cloth. Never use liquid, gaseous or easily flammable cleansers (sprays, abrasives, polishes, alcohol). Do not allow any moisture to reach the interior of the device.
Remove the mains cable if you are not using the device for a long time to avoid the risk of fire.
Do not attempt to take the device apart. There is danger of an electrical shock. Opening the device voids the warranty.
Repairs
Do not make any repairs to the device yourself. Improper maintenance can result in injuries or damage to the device. Only have your device repaired by an authorised service centre.
Do not remove the type label from your device; this would void the warranty.
Overview
External View
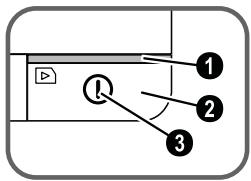
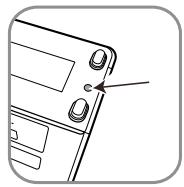
1 - STATUS - status indicator - displays the device status
2 - ①—On/Off switch—switch the device on/off
3 - ①—Operating status light - Shows the operating mode and device faults

4 Document guide - inserting the document/ remove the tape before using it for the first time
Document feed slot
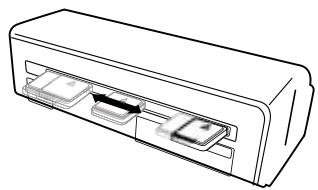
Grooves for installing the film guide
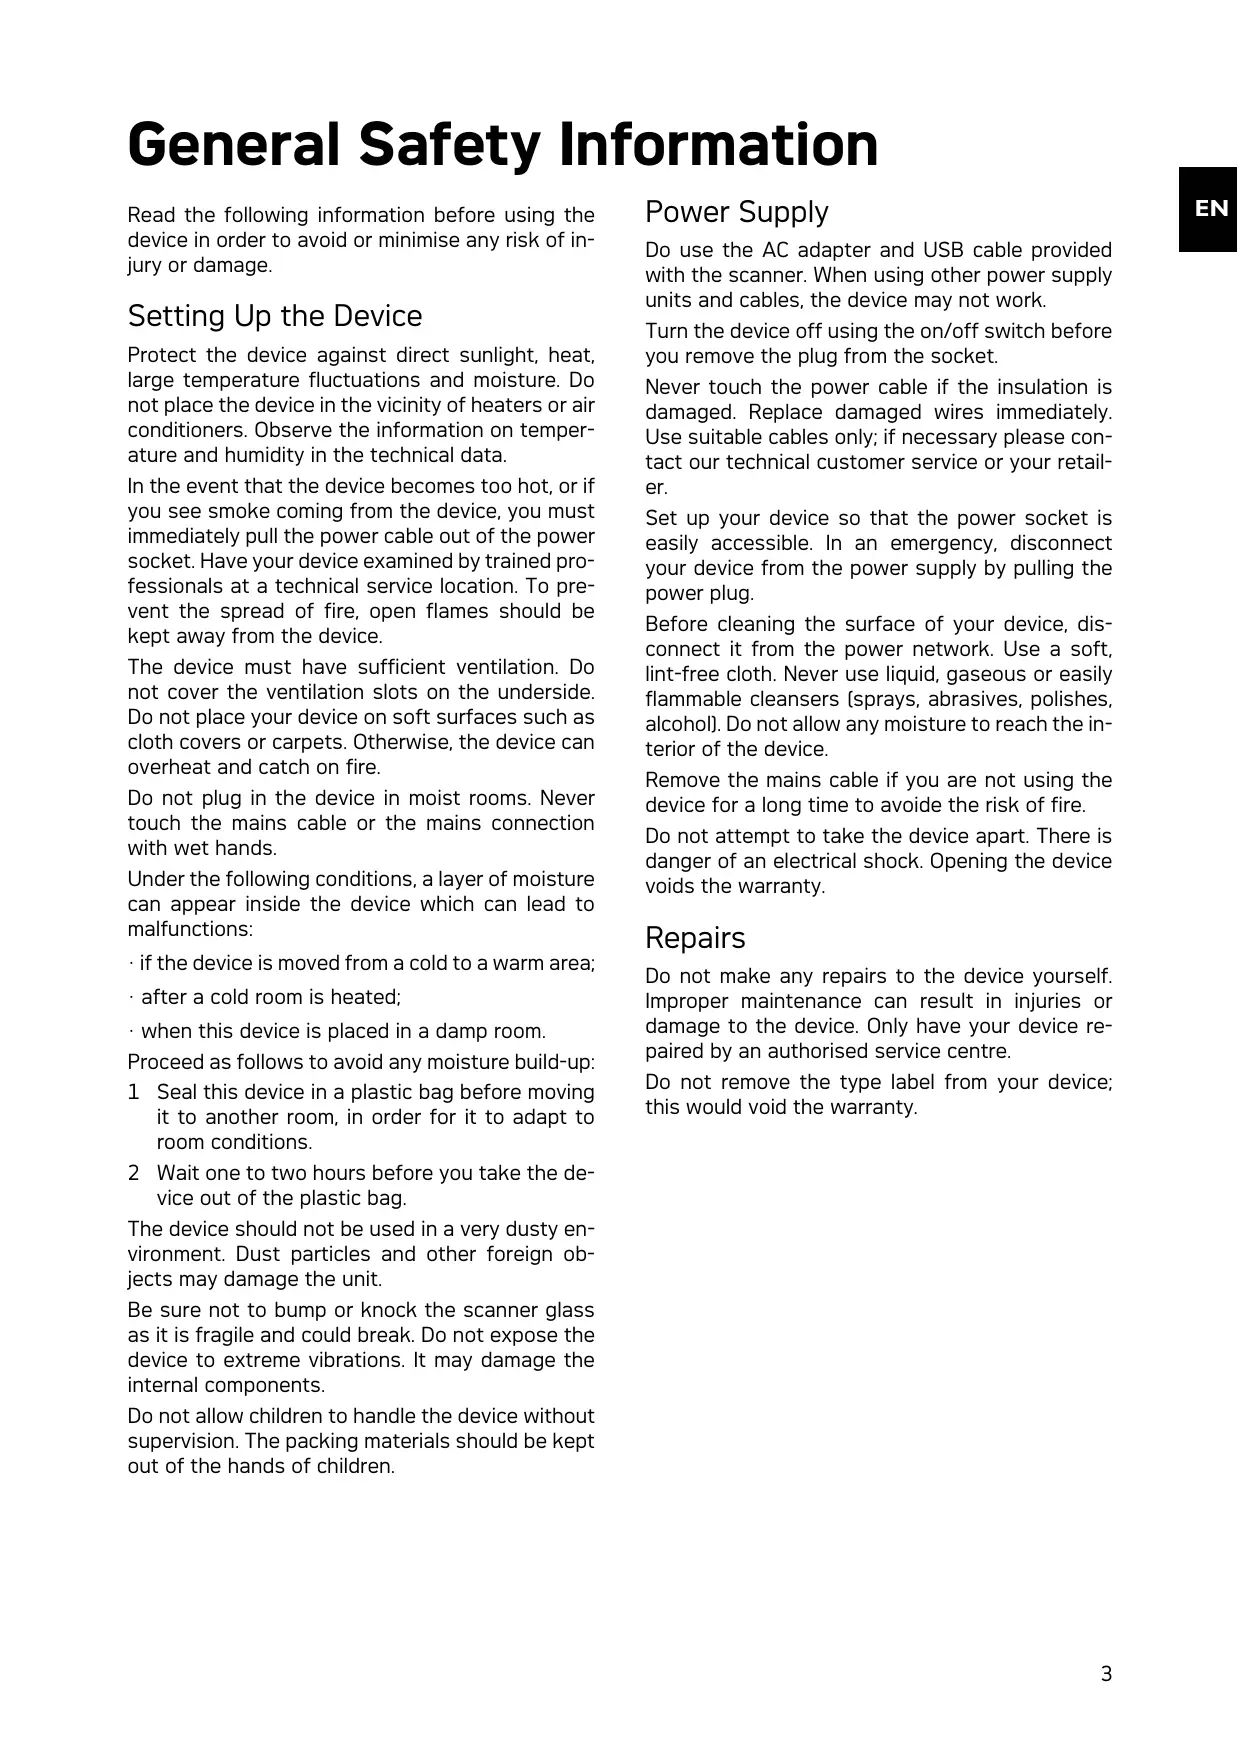
Symbol for direction of feed - insert the document into the document feeder with the printed side facing up and one edge as close as possible to the side with this symbol.

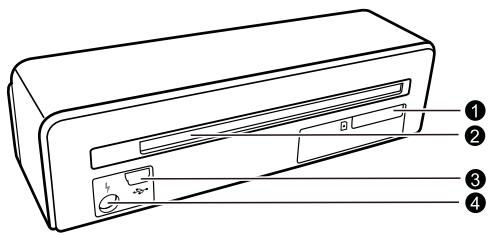
Connections on the Rear Side
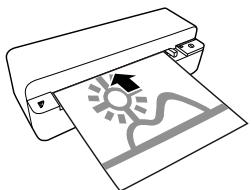
Slot for Memory card [SD, xD, MMC, MS, MS Pro]
2 Document outlet
3 Mini USB connection – for connecting a computer (only as a memory card reader) or a digital photo frame
4 - Socket - Port for power supply

Packing Contents
Photo scanner
Calibration sheet
Cleaning sheet for the feed rollers
Cleaning pen for scanner
Adapter for negative film / slides [film guide]
Power supply with exchangeable plugs
USB Cable
Protective cover
Warranty Card
User Manual
Notice

Missing Package Contents
If one of the parts is missing or damaged, please contact your retailer or our customer service.
Connecting power supply
CAUTION!

Mains Voltage at the Site of Installation!
Check whether the mains voltage of your device [indicated on the type label] matches the mains voltage available at the setup location.
1 Insert the small plug of the power supply into the socket on the rear side of your device.

2 Insert the power supply unit into the socket.
Inserting a Memory Card
1 Insert a memory card which is not read-only into the appropriate card slot at the rear of the device. Your photo frame supports the following memory cards: SD, xD, MMC, MS, MS Pro.
DANGER!

Inserting a Memory Card!
Only use storage media that are compatible with the device. In order to prevent damage to the card or the unit, please turn off the power before removing or inserting the card.
Never pull out the memory card while the device is accessing it. This could cause data to be damaged or lost.

2 Press the button ①.
3 Wait until the indicator light for the device status is constantly on.

Notice

Control Lamp
If this control lamp flashes, this could stem from one of the following causes.
- no memory card inserted
- insufficient memory capacity available on the memory card (less than 1MB)
- The read-only option of the memory card is active
- memory card defective
Please note that the initialisation process of a memory card with a capacity of 2GB or more takes longer.
The control lamp can blink for up to 20 seconds
Using the digital photo frame
If the device is connected to a compatible digital photo frame, the scanned photos can be transferred directly to the memory of the digital photo frame.
1 Press and hold the ① key to switch off the device.
2 Connect the digital photo frame to the Mini-USB socket of the device using a USB cable.
3 Switch the device on using the ① button.
Scanning
Loading Photos
You can insert different types of document into your device. Follow the specifications in the technical data.
You can scan documents using the protective cover to avoid the photo or document being damaged by scratches or creases.
Notice

Scanning documents with the protective cover
If smaller documents are scanned using the protective cover, in certain cases, the automatic cutting off function does not function properly. Either important parts of the image are cut off or too much edge remains around the document. In this case, scan the documents without using the protective cover.
CAUTION!

Unsuitable Documents!
No paper clips, staples, fixing pins or similar may be retained on the documents.
1 Insert a document into the document feeder text side up and the top of the page facing the ① key.
2 Align the document to the left hand edge.
3 Fix the document in place using the document guide on the right hand side. The document guide should lightly touch the documents.
4 Push the document horizontally as far into the document feeder until it is automatically fed into the scanner and the scanning process is started. Ensure you do not bend the document. The control lamp ① flashes during the scanning process.
DANGER!

Document Jam!
Do not insert documents into the feeder whilst the device is scanning. This can lead to a paper jam.
5 Wait until the control lamp ① and STATUS are no longer flashing and STATUS is continually on. This means that the scanning process is completed and the data was saved onto the memory card.
DANGER!

Document Jam!
Wait until both control lamps are no longer flashing before you insert the next document in order to prevent a document jam.
6 The file name is assigned according to the DCF [Design Rule for Camera File System] standard.
Notice

Stand-by Mode
If the scanner has not been used for approx. 15 minutes, it automatically switches off.
Using the protective cover
1 Open the protective cover and insert the document with the printed side facing up.

2 Lay the protective cover into the document feeder with the printed side facing upwards, the closed side of the page [black lines] forward and the page header in the direction of the ① button.
3 Slide the protective cover horizontally as far into the document feeder until it is automatically fed into the scanner and the scanning process is started. Ensure you do not bend the document. The control lamp ① flashes during the scanning process.

4 Wait until the control lamp ① and STATUS are no longer flashing and STATUS is continually on. This means that the scanning process is completed and the data was saved onto the memory card.
Notice

Removing documents from protective cover
Remove the document from the protective cover after the scanning process in order to avoid the document sticking to the protective cover.
Insert film / slides
Notice

Suitable documents
- 35mm colour negative film
Unframed slides - 35mm black/white negative film
- Automatic rotating and mirroring of the photo:
The scanner automatically recognises the orientation of the negativ film when the printed numbers on the edge are in the same orientation as the photo. If the numbering cannot be identified, this function is deactivated.
CAUTION!

Unsuitable Documents!
No glue residue or stickers should be present on the edge of the negative. Only unframed slides can be inserted.
CAUTION!

Damaged negative film ends
If the negative film ends are damaged (not cut evenly, folded), cut the film evenly and removed the folded corners.
- Verify that there are not any documents in the document feed. Push the document guide rightmost.
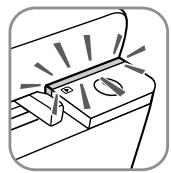
2 Place the film guide on the designated grooves in the document feed.

3 Carefully slide the film guide all the way into the document feed. Be careful not to damage the metal rails in the film guide.
4 When the film guide is inserted correctly, it snaps into place and the device starts the calibration process.
5 Wait until the control lamps are no longer flashing.
6 Remove the negative film/slides from the protective case/bag.
7 Verify that they are in the correct position for insertion.
8 Hold the negative film such that the labelling [number] of the negative is legible [not reversed] and the upper side of the image is facing in the direction of the activation key.
9 Insert the negative film / slide into the film guide.

Notice

Handle the negative carefully
Handle the negative with care. If possible, wear cotton gloves.
10 Insert the negative film / slide into the film guide far enough so that it is automatically fed in and the scanning process starts. Be careful not to bend the negative film / slide. The control lamp ① flashes during the scanning process.
Notice

Scanning speed
Due to the higher resolution when scanning negatives / slides, the scanning speed is slower than when scanning photos.
11 Wait until the control lamp ① and STATUS are no longer flashing and STATUS is continually on. This means that the scanning process is completed and the data was saved onto the memory card.
12 Return the scanned negative film / slides to the protective case / bag in order to avoid damage or contamination.
13 The file name is assigned according to the DCF [Design Rule for Camera File System] standard.
14 Remove the film guide after all negativ film / slides are scanned. To do so, pull it out gently and evenly from the document feed.

Notice

Stand-by Mode
If the scanner has not been used for approx. 15 minutes, it automatically switches off.
Cleaning the Scanner Glass
If lines appear on the scanned image or the image is not sharp, you need to clean the scanner glass.
1 Switch the device off.
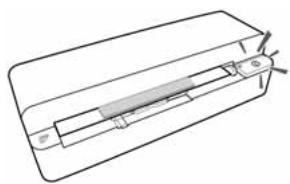
2 Insert the cleaning pen into the left hand end of the document ejector.
Notice

Instructions for Cleaning
The cleaning pen must be free of any dust.

3 Move the cleaning pen carefully two or three times to the other end of the document ejector.
4 Move the cleaning pen to the left hand side of the document ejector again and then remove the cleaning pen.

Computer Connection
You also use the scanner as a memory card reader in combination with a computer.
Your computer must meet the following minimum requirements:
Operating System
Windows: Windows 2000 · XP · Vista · or later versions · 32 bit or 64 bit
Macintosh: Mass Storage Class Mac OS10.5 or later versions
Connecting to the Computer
The device is Hot-Plug-and-Play capable which means you can link your computer to the device, whilst its running. You do not need to close down your computer to link the device to it.
1 Connect the device to your computer by means of the USB cable.
2 If the USB is working correctly, the device is recognised automatically. A drive letter is assigned to each memory card slot.
Notice

Connecting to an USB hub
If you would like to connect the device to a USB hub = [USB distributor], ensure that the USB hub is connected to the computer before you connect the device to the USB hub.
3 You can access the memory card [drive] and edit the saved files.
Service
Cleaning
DANGER!

Switching off the device!
Switch the device off using the ① before you disconnect the USB cable or the connection to the power supply.
DANGER!

Instructions for Cleaning!
Use a soft, lint-free cloth. Never use liquid or easily flammable cleansers (sprays, abrasives, polishes, alcohol, etc.). Do not allow any moisture to reach the interior of the device. Do not spray the device with any cleaning fluids.
Wipe over the surfaces gently. Be careful that you do not scratch the surfaces.
Cleaning the feed rollers
1 Switch the device off.
2 Press and hold the ① key until the control lamp ① light up.
3 The scanner is now in cleaning mode.
4 Push the cleaning sheet into the document feeder.

Notice

Instructions for Cleaning
Observe the direction of feed. The white sponge must be on the upper side.
Do not use any cleaning agents or cleaning fluids. Doing so can permanently damage the feed rollers.
5 The sheet is automatically fed and the cleaning process started. During cleaning, the control lamps ① and STATUS flash.
6 After cleaning is complete, the sheet is ejected and the control lamp ① goes out.
Notice

Cleaning sheet for the feed rollers
Store the cleaning sheet in a dust-free location.
Calibrating the Scanner
A calibration of the scanner is necessary if the scanned image looks blurred or has lines that are not on the original. This allows you to adjust and compensate for variations that can occur in the optical component over time by its nature.
1 Clean the scanner glass first before calibrating the scanner.
2 Insert a memory card which is not read-only into the appropriate card slot at the rear of the device.
3 Press the button ①. Wait until the indicator light STATUS is continually on.
4 Place the calibrating sheet in the document feeder with the arrows facing the feed rollers.

5 The sheet is automatically fed and the calibration process started.
Notice

Calibrating the Scanner
Observe the direction of feed. If the calibration sheet is inserted incorrectly, the calibration process cannot be started.
6 After successful calibration, the sheet is ejected.
Power Cycling
If a problem occurs that cannot be corrected with the instructions in this user manual (see also the help below), follow the steps given here.
1 Press the reset button on the underside of the device with a straightened paper clip.

2 If the problems repeats, please contact our technical customer service or your retailer.
| Problems | Solutions |
| The device cannot be switched on | Check that power supply or the USB cable is con- nected to the device properly. |
| The device feels warm | After a certain period of operation, the surface reaches approx. 30°C to 45 °C. This is normal. If an unusual smell comes from the device or the surface becomes too hot, disconnect the scanner immediately from the power supply and/or the computer / digital photo frame. |
| Lines are present on the scanned picture or the im- age is not sharp | Check whether the document is dirty or scratched. Check whether the protective cover used is dirty or scratched. Clean and calibrate the scanner if it has not been used for a longer period. |
| With scanned images, parts of the image are cut off. | The scanner is equipped with a function for au- tomatic cutting off of black edges. With small images, the image is only saved without the edge. When using this function, cutting off of im- portant picture information can occur with images with a black background (e.g. night shot). In this case, rotate the image and scan it again. |
| The document is stuck in the feeder | Press the button ①. The document is automatically ejected. |
| The control lamp STATUS flashes quickly, scanning not possible / memory card is not recognised | ·Check whether you have used a compatible memory card and whether you have inserted the memory card correctly. ·Remove the memory card and insert it into the slot again ·Switch any active read-only options on the memory card off. ·Make sure the memory card is not damaged. ·Check the available memory space on the memory card. If the available space is less than 1MB, the scanning process cannot take place ·Check the file format of the memory card Only memory cards in the FAT16 or FAT32 file format can be used. ·Check whether the next document was inserted too quickly. When scanning several documents, wait until the data transfer of the first scan has ended (status lamp continuously on) ·Check the document length (see technical data) |
| Transfer to a digital photo frame is not working | ·This function is only available with certain photo-to frames. |
Appendix
Technical Data
Type ............Color Contact Image Sensor (CIS)
Dimensions [L × H × W] 158×45×55mm
Weight 0,23kg
Mains Connection
......Input: 100 - 240V (± 10%) / 50 - 60Hz ......Output: 5V = / 1A
Power Consumption
Operation.<9W
Recommended Ambient. 15-35°C
Relative Humidity 20-70% (non-condensing)
Scanner
Input format 48 bit colour
Output format. 24-Bit
Maximum hardware resolution, photos. 300× 300 dpi
Maximum hardware resolution film/slides. 1200× 1200 dpi
Document Feed Slot
Maximum thickness of cheque cards/plastic cards 1mm
Paper formats supported Minimum (B× L) 42x20mm
Maximum (× ) 105×304,8mm
Paper Weight 50-105g/m2
Supported film formats 35mm colour negative film.....6 photos, unframed
35mm transparency slides............unframed
Film type detection [colour, B/W, slide]..automatic
Computer Connection
Connection Type.......Compatible with USB 2.0 High Speed
Power supply
Model No. ADS-5N-06 05005G
Manufacturer. SHENZHEN HONOR ELECTRONIC CO.,LTD.
Technical specifications subject to change without notice.
AgfaPhoto is used under license of Agfa-Gevaert NV & Co. KG or Agfa-Gevaert NV. Neither Agfa-Gevaert NV & Co KG nor Agfa-Gevaert NV manufacture this product or provide any product warranty or support.
For service, support and warranty information, contact the distributor or manufacturer.
Contact:AgfaPhoto Holding GmbH, www.agfaphoto.com
Manufacturer: Sagemcom, www.sagemcom.com

The CE symbol confirms conformity with the EU directives that apply to the device.
Preservation of the environment as part of a sustainable development logic is an essential concern of AgfaPhoto. The desire of AgfaPhoto is to operate systems observing the environment. The desire of AgfaPhoto is to operate systems observing the environment and consequently it has decided to integrate environmental performances in the life cycle of this products, from manufacturing to commissioning use and elimination.

Packaging: The presence of the logo [green dot] means that a contribution is paid to an approved national organisation to improve package recovery and recycling infrastructures to facilitate. Please respect the sorting rules set up locally for this kind of waste.
Batteries: If your product contains batteries, they must be disposed of at appropriate collection points.

Product: The crossed-out waste bin stuck on the product means that the product belongs to the family of electrical and electronic equipment. In
this respect, the European regulations ask you to dispose of it selectively;
- At sales points in the event of the purchase of similar equipment.
- At the collection points made available to you locally[drop-off centre, selective collection, etc.].
In this way you can participate in the re-use and upgrading of Electrical and Electronic Equipment Waste, which can have an effect on the environment and human health.
The paper and cardboard packaging used can be disposed of as recyclable paper. Have the plastic wrapping and Styrofoam packaging recycled or dispose of it in the non-recyclable waste, depending on the requirements in your country.
Trademarks: The references mentioned in this manual are trademarks of the respective companies. The lack of the trademarks and TM does not justify the assumption that these dedicated terminologies are free trademarks. Other product names used herein are for identification purposes only and may be trademarks of their respective owners. AgfaPhoto disclaims any and all rights in those marks.
The reproduction of certain documents [e.g. by scanning, printing, copying] is prohibited in many countries. The list of such documents below is not intended to be complete, it only offers a general overview. In case of doubt, consult your legal advisor.
Passports (personal identification)
- Entrance and exit visa papers (immigration papers)
· Military service documents
· Bank notes, travel checks, payment orders
- Postage stamps, tax stamps [stamped or unstamped]
- Loan papers, certificates of deposit, bonds
Documents protected by copyright
Follow the statutory regulations of your country with regard to the legal validity of fax transmissions—particularly in connection with the validity of signatures, meeting delivery deadlines or disadvantages resulting from the loss of quality in the transmission, etc.
Take care to maintain the statutory regulations of your country regarding telecommunications secrecy and data privacy.
Neither AgfaPhoto nor its affiliates shall be liable to the purchaser of this product or third parties for damages, losses, costs, or expenses incurred by the purchaser or third parties as a result of accident, misuse, or abuse of this product or unauthorized modifications, repairs, or alterations to
this product, or failure to strictly comply with AgfaPhoto operating and maintenance instructions.
AgfaPhoto shall not be liable for any damages or problems arising from the use of any options or any consumable materials other than those designated as original AgfaPhoto products or AgfaPhoto approved products.
AgfaPhoto shall not be held liable for any damage resulting from electromagnetic interference that occurs from the use of any interface cables other than those designated as AgfaPhoto products.
All rights reserved. No part of this publication may be reproduced, stored in a retrieval system or transmitted in any form or by any means, electronic, mechanical, photocopying, recording, or otherwise, without the prior written permission of AgfaPhoto. The information contained herein is designed only for use with this product. AgfaPhoto is not responsible, if this information is applied to other devices.
This user manual is a document that does not represent a contract.
Errors, printing errors and changes are reserved. Copyright © 2010
Introduzione
Stimato cliente,
Macintosh: Mass Storage Class Mac OS10.5 o versioni successive
TipColor Contact Image Sensor [CIS]
Dimensioni (× × ) 158×45×55mm
Peso 0.23kg
credito/schedule in plastica 1mm
Formatidicarta supportati
Macintosh: Mass Storage Class Mac OS10.5 of niecewere versies
Type ............Color Contact Image Sensor (CIS)
TipColor Contact Image Sensor (CIS)
Dimensiones [A × A × P] 158×45×55mm
Peso 0.23kg
TipColor Contact Image Sensor (CIS)
Dimensoes [L× A× P] 158×45×55mm
Gramagem 0,23kg
Ligaçao à rede.......Entrada: 100 - 240V [± 10% ] / 50 - 60Hz . Saida: 5V = /1A
Consumo de energia
Operacao <9W
Kpome TOrO, cKaHep MoXHo NcNoJIb30BaTb N KaK CHTbIbaUoUee yCTpoiCTBO dJa KapT NaMRTN, NOdKNIOuCHB eRO K KOMNbIoTepy.
Mbl haedeemc, yTo Bbl noJyHte ydoBOJIbCTBne OT pa60tbl c annapatom n erO MHOROHCJIeHHbIX fynkui!
O6 3TOM pyKOBODCTBe
ПОЛьваТелЯ
C nOMObI npBHeHHO daaee pyKOBoDCTBa no yctaHOBe Bbl CMOKeTe 6bICTpo npNCTyNtB K 3KcPnPyatau nn BaJero annapata. NpOp6Hoe OINsAHne FyHKU npBHeDHO B NOcJeDuOuNX pa3dEJaX pyKOBoDCTBa NOlb3OBaTeJI.
BHHMaTeIbHo 03HaKombTecb c pyKOBoIDCTBOM nOJIb3OBaTeIe. IJRA ObecneueHnE 6e3OnacHO pa6oTBI annapata co5IIOdaIte BCE yka3AHnTExHnKn 6e3OnaChocTn. N3rOTobTeb He Hecet OTBeTCTBeHHOCtN B CInyae HecO6JIIODeHnR npABnI TExHnKn 6e3OnaChocTn.
IcnoJIb3yeMbIe 6o3HaueHnIa
3aMeuHua

Cobetbipekomehdauin
3TOT CnMBOJ 06O3Haayet COBeTbI, KOTOpBIE NOMORAHT HAn6OJIe IpoCTo N 3ΦΦEKTUBHO NcONlb3OBaTb yCTPOICTBO.
ONACHOCTb!

ONACHOCTb!
IpeDynpexJaet o6 onaChocTx IJnJIIOJei, BO3MOXHOCTN IOBpeKdEHN annapata nn Dpyrnx yctpoCTB, a TaKKe O BO3MOXHOI NOTepe DaHHbIX. HenpaBnIbHa 3KcPnyatauM MoKET npVBecTn K TpaBMam nn NOBpeXDeHIO annapata.
1 BVeDeneHne
Ybaxaembl nokynateIb, 1
O6 3tOM pykoBODCTBE noJIb3OBaTeJRA 1
OsshajnHOpMaucna oTexHnke
6e30naCHOCTN
IpoceDypa hactpOkn annapata 3
3
PemOHr 3
3 Osshne cBeDeHnna
Bud chapykin 4
UHyp ceTeBOrO 3JIeKTpOnITAHnI 4
KOMJIeKT NOCTaBKn 4
IopKnHoue Hne cTeBOro aanTepa 4
UctahOBka KapTbI namrtn 5
IcnoB3OBAHne uΦpOBoΦOTopAMKn 5
1 CkaHnpoBaHne
3arpyzka foToIpaФn 6
Bnoxnte HeRaTHBHyIO PnEKny/DnaNo3NTNB 7
OuicKa cTeKna cKaHepa 8
IopKnHoue H K KomnBIOTepy 9
5 TexHHueckoe obcnyxmbaHne
OuicKa 10
KajnibpoBka ckahepa 10
BbIKIOueHne IN BkIOUeHne nITaHnI 11
6 PnIIOxKeHne
TexHHueckne daHHbIe 13
Ов Ocяинформаць O Тхниke 6e3opacnoctn
Ipeed nCNoJb3OBaHHeM yCTpoiCTBa O3HaKOMbTeCb CO CNeDyUoSei BaXHOI INΦOpMaцeI, YTO6bl NCKJIIOHTb IIN CHN3NTb PnCKI TpaBMIpOBaHnI INI IOBpeJDeHnI O6OpyIDOBaHnI.
Прочадура настrodu каappapata
3aunuatae annapat OT nonadnna npramoro COJHeHOro CBeta, BO3dEiCTBnA TeNla, pe3Knx nepenadoB Tempepatpyi n Bnarn. He pa3MeuaTe aannapat B6n3n HarpBeBaTeJeI KOHNIOHEPOB BO3dyxa.CMOTPe INHΦopMaUHO O DOnyCTmOJ TEMpepatye BnaxHoCTN BO3dyxa B TEXHuecknx XapaKTepnCTNKax.
EcnBaaannapa CnIHKOM CNIbHO HArpeETcNIN BByBUNITE BixOJaUH N3 Hero DbIM,TO HeMeJLeHNOOTJIIOHTe UHyp CeTeBOrO 3JeKTPoNTAHN N3 pO3eTKN.OTdAaTe Baaw annapaT dIy OCMOTpaKBaJIINPHuPOBaHHbIM CneuaJIncTAm NIN B CEHTpceBPVCHOO6CnyXNBAHN. JnPpeDToBpaUeHNoBO3RopAHN 3aPpeUaETcN POnHOCITb K aNNapATNUCTOHNK OTKpbITOrO PJIaMeHNI.
MecTo yCTaHOBKn yCTpoiCTBa DoJXHo XOPOIo npOBeTpNBaTbCn. He 3aKpbIbAIte BeHTnJIaUIOHbIe npopeuHa HIXHe CTOpeHc. He CTabTe yCTpoiCTBO Ha TAKne MfKNe IOkPaAdKn, KaK cKaTePTr NII KOBpKn. B npOTuBHom Cnyae annapat MoKeT nepeRpeTBcN BO3HnKAeT ONaCHOCTb BO3rOpAHn.
HnkOrda He NpoknOuaaTe annapat K cetn K TelefoHHo JInHbBcIpbIX PomeueHnX. HnkOrda He KacaaiTecb CeTeBOB BUNKn I p03eTKN I TelefoHHoro pa3bema Bnaxhblm pykam.
PnCneIyUOxuYcNOBnX BHyTpN yCTpOJCTBa MoKET npOnCxOndTb 3aNoTeBaHHe, YTO npINBOoNT K c6oam B pa6ote:
- ecπu yctpɔiCTBO npehocntcŋ 3X OJOODHOro B TeJIPOe NOMeIeHne;
-Пи HarpeBaHIMXOJODHORIO NOMEUeHINIA;
- Пин Нхождени B リOMeшени C BBICOKОBЛЯЖHOCTьЮ.
Ipy npedotBpaueHn 3anoteBaHn co6JIOdaTe cneDyUoUne yka3aHn:
1 Ynakynte annapaT B nIactNKbMy MeoK nepeJ erO nepeCTaHOBkoB DpyrOe NOMEueHne, yTO6bl oBeCneHTb erO aKKNIMaTH3aUH O K dpyrIMyCNOBnM.
2 Поюждп Te Два ча, пөждүчem дocтавы устрочТВО n3 пл actIKOBOrO naKeTa.
He nCNoJIb3yIte yCTpoiCTBO B CnJIbHO 3aNbJIeHHOM
PomeuHm. YactnUbl nbIIN npDpyrne NocToPOHHme
IpeMeTbMOrY T NOBpeDiNb yCTpoiCTBO.
He ydapnTe n He cTyuTe no NOBepxHocTNCKaHnpOBaHn; OHa OueHb YvBCTBnTeIbHa N MOXePa3bTc. He dOnyckaiTe BO3deNCTBnHa Ha ycTpoNCTBOCINbHO Bn6paun. 3TO MOXeT PnIBecT KIOBpeXDeHnO BVtpeHHnx KOMnOHeTOB.
He IIO3BOJnTe DeTAM NOIb3OBAtbcr annapaTom 6e3 npncmToTa. He dOnyckaIte DeTeR K yNaKOBoHbIM MaTePnaJam.
3JIeKtpnueckoe nITaHne
IcnoJb3yIe TOnbKO opuHnHaJIbHbI cTeBOI aJaNTep I USB-Ka6eJIb, BxOJaIe N B KOMJIeKTI nocTAbKn. PpN IcNoJIb3OBAHN dpyrNX cTeBbIX aJaNTepOB I Ka6eJIeY cTpoIcTB OMOKeT He pa6oTaTb.
BkIIOuHTe yCTpOInCTBO npn NOMOUn BbIKIOUaTeJIa, npexJe cEm n3BLeKaTb ceTeByIO BuJky n3 p03eTKn.
He kacaTeCb shHpya 3JeKtpOnTahnC NOBpeJDeHHoN I3OJIaUeH. HeMeIeHHO 3aMeHIne TNOBpeJDeHHbIKabeJIb. IVcNoJIb3yIne ToJIbKO COOTBETCTByIOUne KaBeJIi; npH Heo6XoDmOcTn O6paUaHTecb B Cnyk6y TeXhUeCKo IooepKKn INI K BaWemy NoCTabUuKy.
YctaHOBtBe BaI annapat TaK, YTO6bI y Bac 6bl ydo6hI DoCTyn K po3eTke 3neKTpOnHnA B 3KCTpeHHo CHTyaun OTcoEduHnte annapat OT hCToHnka 3NeKTpOnHnA NyTeM OTKJIuOHeHn A Hhpy aCeTEBOrO nITAHn.
Ipeed OCHKTKoN NOBepxHOCt annapaTa 6b3aTeNbHO OTKIOUHTe erO ot cTeu 3NeKTPoNTAHn. DnA OChCTKn IcNoJIb3yInTe Mrgkyo cyxyo 6e3BOPCBOYu TkaHb. He npIMHeHrTe dIra OCHCTKN KndkX, r3006pa3HbIX n ropUOnx OChCTnteJe [a3po30Ji, a6pa3NBhle n I pONpyUOnne cpeDCTBa, cnpt]. He donyckaTte InonaHaHn Blanr BHyTp bannapata.
I3BNeKInTe cTeBoi Ka6JIb, ecJN yCTpoJcTBO He IcIOJIb3yETcR B TeueHne IINTEJIbHO BpeMeHn, YTO6bl NCKJIouHTb BEPOrTHOCTb BO3rOpAHn.
He nbItaItecb pa3o6paTb yCTpoiCTBO. CyIeCTByet OnaCHOCTb nopaxeHn 3JIeKTPOTOKOM. OTKpbBaHne yCTpoiCTBa BeTeKnotepe rapaHTMn.
PemOH
He nbItaIteCb camOCToTeJIbHO peMOHTnpOBaTb annapat. HenpaBnIbHbI peMOHT MOKeT npVBcTeK TpaBMam n NobpeJdeHIO annapata. BaI annapat MOxHO peMOHTnpOBaTb TOJIbKO B yNOLHOMOeHHOM cepBnCHOM ueHTpe.
He cHIMaIte 3aBOIDCKO uINJIbDnK C aannapata, npN 3TOM OTMeHЯIOTc rapaHTnHbIe 06ra3aTeJbCTBa.
ОвICIе CBeDEHЯ
Budchapykn
1 STATUS - INДиКaTOp COCTOЯня - OTOбрахаet COCTOЯнe yctpoiCTBa
2 - ① - BbIKJIoyaTeIb - BKIIoyeHne/ BbIKJIoyeHne annapapaTa
3 - ① - ИнданkaTop pa6oчero peximа - OTO6paXaet pa6ochn pexim n O7n6kn yCTpoiCTBa
Ha npablaioa JOKmEHTOB - KnKcaun JOKMeHToB/peep NepBbIM NCNoJb3ObaHneM ydaJIte KneKyU JeHTy
⑤ ABOIOnaTUnK DOKyMeHToB
6 Pana3blndnoaunnneHkn
7 CnMBoJ HnPaBHeHn BTrnBaHn - yIOXHTe DOKyMeHT JInCeBOJ CTOpOHn BBepx IN Kpaem KaK MoXHO 6JInxKe K CTOpOHe C 3TmCnMBoJOM.

UHyp cTeBOrO 3JIeKTpOnnTaHnIa
1 CnotДля KapTnamrtn [SD, xD, MMC, MS, MS Pro]
2 BbIXoHNoILOTOKДЛДOKyMeHTOB
Pa3bem MmH- USB -ДЯ NOДКПЮЧЕНЯ KOMпьЮТepa [TOЛБКВ KaueCTBe yCtpoiCTBa ДЯ UTeHENI KapT NaMrtn]Ии UNФрOBОΦOTOPAMKIN
Pa3bem - noDCoeDInHeHne cTeBOro aDanTepa
KOMJIeKT NOCTABKN
ΦOTOCKaHep
KanibpoBouhnyIINCT
OuHuaIOHnIINCT DnB TByrBaIOUxPONIKOB
UcTЯшКapaHdaIДЯсkaHepa
AanTep nIe HeraTnBbIX IneHOK/InaNo3nTnBOB [noDaay nJeHKn]
CeteBoi aanTep CO CMeHHbIMn CeteBBIMN BnKamn
USB-ka6eJb
3aunTHbIy CheXoN
Гаразная Kapta
PykoBoDCTBO NOJb3OBaTeJa
3aMeuHua

HenoJIhBk KOMnJIeK TIOCTaBKn
EcnOdH 3 3TNX PpeMeTOB OTCyTCTByET INN IOBpeKDeH, 6paNTecb K BaIeMy NocTaBUnKy INN B cnJx6by noDepkKn.
PoiKJIouHne cTeBOro aIaItepa
OCTOPOXHOCTb!

HanpaxKeHne cetn B MeCTe yctaHOBkn! IpoBepbTe, COOTBeTcTByET JI TIN 3JIeKTPoNTaHnBaJSeRo aIInpaTa [yka3aHa 1uNbDnke] TINy 3JIeKTPoNTaHnBaMeCTe yCTaHOBKn aIInpaTa.
1 BctaBbTe MaIeHbkyu BnIky Ka6eJy ceTeBoro aanTepa B pa3bem Ha 3aIHei CTopoHe yCTpoiCTBa.

2 BcTaBbTe ceTeBOaanTep BCeTeByo po3eTKy.
YctaHOBKa KapTbI namrTu
1 BCTaBbTe KapTu pAmrTu, He 3aUuIeHHyO OTo 3aIINc, B COOTBeTCTByUoIee rHe3Do Ha 3aIHeN CTOpOHe yCtpoiCTBa. OHO IIOJdEprKInBaIoT KapTbI pAmrTu cJeDuIoux φopMaTob: SD, xD, MMC, MS, MS Pro.
ONACHOCTb!

YctahOBte KapTy namrtn!
Ncnoj3yIte TOLbKO COBMeCTMble c yctpoiCTBOM HOCHTeIN INHΦOpMaCn. Bcerda OTKIOUaIte 3NEKTPoNTaHne ycTPOiCTBa IpeJde, Yem N3BLeYb N3 Hero KapTy NaMBy BO N36ExKaHN NOBpeXdEHN KaPTbI NaMBy Nl6o ycTPOiCTBa.
HnkOrda He BbITacknBaIte KapTy
PamrTn, KOtOpA NcNoJIb3yETcB
TEkyuSNI MOMENT. 3TO MOxKET
PnPBecTI K NOBpeJDeHIO IIN K
YTpate DaHhbIX.

2 HaKmTe KhoNky ①.
3 Подождnte, noka KOHTpoJIbHbI INdNKaTOp cTaTyca yCTpoIcTba He 6ydet ropeTb NOCTOJHHO.
3aMeuHua

KoHTpOJIbHbI INHdɪnKaTOp
Ecn3TOT KOHTPOJIbHbI INHdNKaTOP MnraeT, PnUHHbI MOrYT 6bITb CJeNyUOuIMN:
- He BCTabJIeHa KapTa nAmrTn
HeIOCTaTOUHO MeCTa IncoXpaHEnHaDaHHbIX Ha KapTe namrTIN [MeHee 1 M6] - BKJIIOUeHa 3aIuTa OT 3aIINcN KapTbI NaMRTN
- NOBpeJdeHa KapTa naMaTn UyHTbIbAaTe To, UTo IaJa KapT naMaTn EMKoCTbIO 6OJIe 2 Γ6 npOcecc HnUaJIaN3aIa 3aHImaET 6OJIbIe BpeMeH. KoHTpOJIbHbI INdIkaTop MOKeT MmRaT b Do 20 cekyHd.
IcnoJb3OBaHne cnpoBoi oTOpaMkn
Pn NOdkJIOUeHnn yCTpOJcTBA K COBMeCTHMoI ΣΦpOBoN ΦOTopaMKe OTCKaHIpOBAHHbIe ΦOTorpaΦn IpeHocrTcR HeNOCpeIcTBeHNO Ha 3aONIMHaIOuCeE yCTpOJcTBO ΣΦpOBoN ΦOTopaMKn.
1 YdepxnBaIe KHOkky ① B HaxaTOM NOJIOKeHm IJa BbIKHouEHHy yCTpoiCTBa.
2 Порклочи TeцфpoByo ФOTopamky npn nomoи USB-ka6eЯ K pa3bemy MnHn-USB yctpoiCTba.
3 BkIIOHTe ycTPOIcTBo npn NOMOuN KHOJKN ①.
Сkaн投降军建设
3arpy3ka foToIpaФn
B yctpoiCTBO MOxHNO NOMEuTa b pa3NnHbIe TnBi IOKyMeHTOB. DOnoJIHnTeJbHa HΦOpMaunr npUBeHeHa B pa3dJe O TexHNuecknx XapaKTEpNCtIKaX aannapata.
3aunTHa 6JIOKKa HcNOJIb3yeTcra JIg 3aunTbI φOTOrpaΦn IN NOKyMeHTOB OT capaHn IN 6bpa3OBaHncklaDOK BO BpemcKaHnpOBaHn.
3aMeuHua

СkaHnroBaHne DOKyMeHToB B 3aunTHoI O6NoXke
Ecni BbIOnHЯETc cKaHIpOBaHne DOKymeHTOB B 3aUHTHOJ O6LOXKe,TO B ONpeJeHHbIX Clyuayx FyHKnA aBTOMaTNUeCKOro 6pe3aHnma MoKet pa6oTaB HnpaBnIbHo. POnCxoDnT o6pe3aHnue qactey n3O6paxKeHn, JIoBO BOKpyr DOKymeHTa OCTaOTcra CnUShkOM 6oJIbUne IOnr. B TAKOM cLyuae BblONHnTe cKaHIpOBaHne DOKymeHTOB 6e3 3aUHTHOJ O6ONoKn.
OCTOPOXHOCTb!

HenoxxoJnne DokymeHTbI
Ha DOKyMeHTax He DoJxHo 6bItb KaHcJIepcknX cKpeNok, cKo6 dIa CShBaHnI 6ymar, 6yIaBOK nT.I.
1 3aRpy3nTe DOKyMeHT NnueBOI CTOPOHOB BBePx n CTOPOHO 3aROJOBKa B HApRaBJIeHN KHOJKN ① B NOJaTCHK DOKyMeHToB.
2 BbipOBHnTe DoKymeHT No JIeBOMy KpaIO.
3 3aФИКСИРУTe DOKUMEHT npn NOMOuHnnpabJIIOUeI C npaBOI CTOPOBHl.HanpaBJIIOUaJ DOJIXHa CJERKa KacaTbCraDOKUMEHTa.

4 BCTaBbTe DOKyMeH T B TOPn3oHTaJIbHOM NOJIOXeHN B NODaTcNk, YTO6bl IpnO3oUNo ero aBTOMaTNUeCKOE BTaRbAHne N 3aNyCTuINcra IpOuCeCC cKaHIpOBaHN. He dOnyckaIte Cm6aHN JOKyMeHToB. KOHTpONbHbI INHdIKaTOP ① Mmraet Bo BpeMЯ IpOuCeCCA cKaHIpOBaHN.
ONACHOCTb!

3aCTpeBaHne DOKyMeNTa!
3arpy3ka DOKyMeHTOB B NOdaTcNK pOncxOaNT BO BpeMcKaHnPoBaHnIg. 3TO MOKeT npBecTu K 3actpeBaHnIO 6ymaru.
5 IopoJxIte, noka KOHTpOJIbHbI INHdNkAToP ① n STATUS He npekpaTAY MIRaTb, a STATUS He 6ydet ropeYb NOCToRnHO. 3TO O3HaayeT, YTO npouceC cKaHnpOBaHnY 3aBepSeH N daHHbIe COXpaHebl Ha KapTy pAmrTn.
ONACHOCTb!

3aCTpeBaHne DOKyMeNTa!
O6ra3aTeIbHo DoJDNTEcB, Noka He nepeCTaHyT MiraTb Oba KOHTpOJIbHbIX INdNkAtOpA, npExZe Yem 3aRpyKaTb CJeDyUoUn DOKyMeHr, TTo6bl NCKJIIOuHTb BepoARHOCTb er0 3aCTpeBaHn.
6 ImЯ phaɪna ha3hauaetcra corlaacHO cTaHapTy DCF [IpaBnla phaɪnoBoi cnCTeMbI dЯ φotoannapaTob].
3aMeyaHua

Pexim OxuaHna
Ecni ckaHep He nCNoIb3yETcB TeueHne npImePho 15 MNHyT, IpOncxOaNT erO aBTOMaTHueckoe BblKlIOUeHne.
IcnoJIb3yIte 3aIHTHyO o6IoJkU
1 OTKpoIte 3aUHTHyO oBIOKky I BNOKInTe B Hee DOKymENT NlueBOI CTOpHOH BBepX.

2 YIIOXHTe 3aUHTHyU O6OJouKy IINcEBOI CTOPHOI BVEpX, 3aKpbIToI CTOPHOI (YePhAra NoIoca) BpePeI, a CTOPHOI 3aROrOBKa B HAnpaBLeHn KHOJIKN ① B NODaTtIK.
3 BCTaBbTe 3aunTHyO o6IOxky C DOKymeHTOM B TROP3oHTaJIbHOM NIOJoxKeHn B NOJaTcNk, YTO6bl npOn3oJIo ee aBTOMaTnueCKoe BTaINBaHne n 3aynctuJncrpocecc cKaHnpOBaHn. He dOnyckaIte crn6aHn JOKymeHTOB. KoHTpOJIbHbI INHdNKaTOP Mmraet BO BpeM npOcecca cKaHnpOBaHn.

35-MM LBeTHbIe HeRaTUBHbIe IJIeHKI
- Be3paMoUHbIe DnaNo3nTnBbl
35-MM YepHo-6eIbIe HeraTnBHbIe nJIeHKn
- ABTomatnueckoe BpauneHne 3epkaInpobAHne FOToRpaФn: cKaHeP paCno3Haet HAnpabJeHne JeHTbl HeaTbA abTomatnueckn, ecn Hymepaun No KpaO NMeet To Xe HaprabLeHne, yTo nN3o6paXeHne. Ecnn Hymepaun HeBO3MOxHa, 3Ta FyHKcua OTKJIUOuaTcra.
OCTOPOXHOCTb!

HenoDxoOaIe DOKyMeHTbI
Ha heratNBbIX nIeHKax He doJIxHO 6bITb OCTaTkoB KJIe IIN HaKneek Ha KpaX. DnaNo3NTBBi pa3peWaeTcra YKJaDbIBaTb ToJbKO 6e3 pamok.
OCTOPOXHOCTb!

IobpeJdeHHOe HauaNo HeRaTMBHOIJIeHKn
Ecni Naayano HeratubHOI PJIeHKINOBpeJdeH [HePOBHO 06pe3aH,coHyT],POBHO 06peXbTe Naayo PJIeHKINCOHyTbIyIbl.
1 PpOBepbTe, He HaxoJATcR Jn B NOaTUnKe 6ymarN DOkUMeHbI. CDbHbTe HaPpaBJIIOuYIO DOkUMeHToB Do ynpa BnpaBO.
2 BLOXHTe HnpaBnaIooUo PJIeHKn B COOTBeTCTByIOuNe Na3bI POJaTuNka DOKyMeHTOB.

3 Octopoxho BCTaBbTe HnpaBnaIooyUo nnEHN Do ynpa B NOdaTnK DOKymeHTOB. He DonyckaTe NOBpeXdEHnMaTaNlNuCeCKNX DOpOKeHnPaBIAIOSe nnEHN.
4 Ecnn HnnpabJnoa JneHKn yCTaHOBJeHa npabNbHo, OHa QnkCnpyeTc, N yCTpoiCTBO 3anyckaT npoueDpy KaJIb6pOBKn.
5 POnOJxNITe, NOKa KOHTpOJIbHbIe INdIKaTOpbl He nepeCTaHyt MmraTb.
6 N3BneKeTe HeRaTHBHyO pHeHky/ДиAno3HTNB n3 3aUHTHOrO yExHa/CymKn.
7 Co6JIoudaIte nOLOXKeHne npu yKlaIke.
8ДержITE HeaTbBHyO Плeнky TaKIM O6pa3OM, YTO6bl NaIINcB [Homep] HeraTbBa 6bla ChTaema [He B 3epKaJbHom OTo6paXeHn], a BepxHn KpaN3O6paXeHn6bl HappaBneH B CTOPOHY KHOPIK N BKNIOUChEHN.
9 POnaIte HeRaTbBHyIO pJIeHky/ДиANO3nTbB HAnpaBnaIouyIO pJIeHKn.

3aMeuHua

Co6JIHOdaIte OCTOPOXHOCTB npn o6paueHn c pJeHkoI
CobIIOdaIte OCTOPOXHOCtB npn o6paueHn C HeaTINBaMn. PpN BO3MOXHOCTn HadeBaITe XIoONaTO6bymaxKHbIe NepuATKn.
10 BcTaBbTe HeaTnBHyU pIeHky/DnaNo3ntuB B HnPaBnIooSyU pIeHKn, YTo6bl npOn3oJIo ee/ erO aBTOMaTnueckoe BtIgNBaHne N 3aNyCTnJcra npoeecc cKaHnpOBaHn. He DoynyckaJIte CrtnbHn HaTaNBOH nIpeHKn/DnaNo3ntuBa. KoHTpOlbHbI INDnKaTop ① Mmraet BO BpeMa npocecca cKaHnpOBaHn.
3aMeuHua

CkopoocTb cKaHnpoBaHn
Ha YnCTaIe KapaHdaIe He DoJIxHo 6bITb IIIN.

3 AkkypaTHo nepemecTHe YnctrauN KapaHdaUdBa-TpN pa3a K dpyromy kpaIO OTBepCTNu Bblrpy3Kn DOKymeHTOB.

4 B 3aBepseHne cHOba nepemecnte YnCTaUnc KapaHdaI K JEBOMy KpaO OTBepCTNbY3KN DOKyMeHTOB N 3BJIeKNTe erO.

IoiKJIIOUeHne K USB-KoHcEHTpaTOpy
При подклioчени устpoиства черes КонцentpaTop USB Heo6xodnmo Сачала подклioчпь концentpaTop USB K komlbIoTepy, a 3aTem - устpoиств К konцentpaTopy USB.
3 Moxhno OTKpbIbAtb KapTy namrTn [nck] npedakTnpoBaTb COxpaHeHHbIe daHHbIe.
TexHnueckoe o6cIyJxBaHne
OuInCTka
ONACHOCTb!

OTkIouyTe annapaT!
OTKlnHouHTe yCTpOiCtBO npn NOMOuN KHOJKN ①, npexJe Yem OTcoeINHrTb OT Hero USB-ka6eIb nIpa3bEm ceTeBOrO ka6eJIa.
ONACHOCTb!

PekomeHdaaun no qncTke!
Дя OунstКи Испь3уИte МЯгкУIO cyxUO 6e3BOPcOBYIO TkaHb. He npIMeHЯTe Дя OунstKи КИдКиX, ra3OO6pa3HBIX I ropUOuNX OунstTneJIeN [a3po3OJIn, a6pa3INBHyIe I NOIIpyUOJIne cpeDCTBa, cNtP I T.n.). He DoNYscAITE NOJaDAHnI BlaRn BHyTpB annapata. He IncpONb3yIte DЯ YUcSTKn UcTPOJcTBA YUcTIAJIe Cnpen. AkkypaTHo IprOtpaIte NOBepXHOCTN C NaIDINSCAMN. Co6JIIOJaIte OCTOpOKHOCtB, yTObI He noцapanatb NOBepXHOCTN.
YnCTKa BTAHBAHOx BaJIINKOB
1 BbIKHouHTe yCTpoiCTBO.
2 YdepxuBaIte KHOKy ① B HaxaTOM NOJoxKeHn Do Tex Nop, Noka He 3arOpTcA OHtpoJIbHbI INHdNkATOp ①.
3 CkaHep HaxoNTcBpeXmE YnCTKn.
4 BcTaBbTe Ounuauuui JnCT B NOaTnK DOKyMeHToB.

3aMeuHua

PekomeHdaunnoNCHTke
YuHTbIbAaTe HnPaBHeHne Nodaun. BeNa r6ka DoJxHa HaxOuNTbcra Ha BepXHe CTOpOHe.
He nCNoJb3yIte JIJI YNCTKn pactBOpNTeI INI YNCTAJIne KJNDKOCTN. 3TO MOKeT PnVBecT N K Heo6paTmbl M NOBpeXdEHnA M BTAINBAUOUX BAJIKNOB.
5 JIInCT aBTOMaTnueckn BTBaETcR, n 3aynyckaetc npoceDypa uNCTkn. Bo Bpemr
ЧИСТКИ MИГАЮТ KOHTРОЛьнBLE ИНДИКАТОРБI ① I STATUS.
6 Nocne 3aBepseHn npOeDpybI YNCTKn JNCT Bbl6paCbIBaETcR, IN KOHTPOJbHbI INHdNkATOp ① rachET.
3aMeuHua

OuHauoJnCTdJIa BtRnBaOuXPOJIKOB
XpaHInTe OunuauoUnn JnCT B MeCte, rHe HET nblnn.
KanibpoBka cKahepa
Heo6xOdmo OTkaIb6pObaT b cKaHep, ecnOTcKaHnpOBaHHoe n3O6paXeHne BblrJNT Hepe3KmUHa HEM IMeIoTc JInHn, KOTOpbIX Het HaOpunHaJe. Ppi NOMoUs KaJIb6pOBKn MoXHO KOMNeHCnPOBaT OTKIOHeHn I NOrPeuHOCtN u3MepHn, KOToPbIE BO3HnKAOT BO BCEX ONTNUeCKNX np6bopax no nCTeueHn HEKOTOPORo BpemeH.
1 Ppei npoBeHnem KaIbpoBKn BblOnHnte ouNcTkY cTeKna cKahepa.
2 BCTaBbTe KapTu PAmrTu, He 3aUuIeHHyU O T 3aIINc, B COOTBeTCTByUOuEe rHe3Do Ha 3aDHeN CTOpOHe yCTpOJCTBa.
3 Haxmnte KhoNky ①. NdoJNTe, Noka KOHTPOJIbHbI INdIKaTOp STATUS He 6ydet Ropetb NOCTOARHO.
4 BLOXHTe KaIN6pOBOUHbI JnCT CTpeJIkAmN B HAnpaBHeHn BTAInBaHOuIX BaJInKOB INoTaTcIK DoKymEHTOB.

5 IInCT B7raHbAeTc, n 3aynyckaetc npoceDypa kaIIN6pOBKn.
3aMeuHua

KaJIn6poBka cKaHepa
YuNbIbAaIe HnPaBHeHne NOpaH.
Ecnn KaNbPoBOUHbI JnCT BNoXeH
HenpaBnIbHo, PpoUeDpya
KaNbPoBKn He 6yDet 3anyuSeHa.
6 Посл e BbInOpHeHnKaJIbIbPoBKn IpoIcXoIIT BByIpy3ka JInCTa.
BbIKIIOUeHne N BkIIOUeHne IITaHnI
Ecni Bo3HnKJI npo6JIeMa, KOtOpyI He ydaetcay YCTpaHnTb C NOMOuI OINcaHHbIX 3Decb yka3aHNI [CMOTPnTE TAKKe CNpABOuHbI TEkCT HNKe], TO BblINOJHnTe CJIeDyUOuNe DeIcTBnI.
1 HaxmTe KhoNky C6poc [Reset] Ha HxKHei cTOpOHe yCTpoIcTba pa3oRHyToi KaHZeJIaPcKOI cKpeIkoI.
2 Ecnn Oun6ka He ycTpaHeHa, To oBpaaauTeScb B cnJyK6y TexHnuecko NOpDepKKn IJI K BaUeMy nOCTaBUnKy.
| Henschpabnoctn | Ustpanenne |
| Ustproietbo He bcdet BklnouaTbcs. | Y6eintecb V TOM, chTo cTeBoi aadantep nIi USB-Ka6ebI pOdknueH K yctpoiCTbV naIexkaunm obpa3om. |
| Ustproietbo OuHTIMo HargBaetcra | После onpeJeHnHO BvEmHi NcKcIIpyatauNIOBepXHoCTb HargBaETcR npImepHDo 30-45 °C. 3To HopMaJIbHoe JaBHeHne.PriN pOaBLeHn HEnPbIByHOrO 3aIaxa n3yctpoiCTBa nIi Pn i CInIeKOM CInIbHOM HargBaHn IOBepXHoCTn He MeDJIeHNOOTKlIooHtE cKaHep OT cEtN 3JIeKTPoNTaHnry n/NiIOn OT KomlbTOpeA/ZnΦpOBov ΦOTopamKn. |
| Ha otckaHrpOBaHHOM n3O6paJHn NMeIOTcR IINHn IJI N3O6paJHnO He XbATAe Tpe3KoCTn | ПрOBeIbTe, HeT nI Na DOKumte 3aRpa3HnN IINI zCapaHn.IPobEBt, HeT nI 3aRpa3HnN IINI zCapaHn Ha 3aIeHTHO oBoLOUKe.OChCTnte n OTkaJIb6pyIte cKaHep nOcIe DInIteJIbHO rPoSTOr. |
| Uactn OTsKaHrpOBaHHOrO n3O6paJHn OBe3aHbI | СkaHep IMeETФyHKzHIO ABTomatUcheckoOBpe3Ku YerHbIX KpaEB. Ppi cKaHrpOBaHHN He6OJIbIeX n3O6paJHn HlaIarOdApRA 3ToIФyHKzHn COxPaHReTcR TOJIbKO camO n3O6paJHnEbe3 nOJIeN.3TaФyHKzHn MochET cTaTb prUnHOnOBpe3aHn BaxHbIX 3JIeMehTOB n3O6paJHnNHaФOTorpaФHnx C TemHbIMФOHm [HaIprIMep,HouHЯ CSbEMKa].B TAKOM cLyuae NOBepHnTe n3O6paJHnE n OTsKaHrpUyIte erO eIe pa3. |
| Дokument 3aCtPraI B IODaTChke | HaxMIte KNoKBy ①.Dokument 6yIeT BvIgPyJeuH nAVTomatUcheckn. |
| HéncnPapBnOCTn | UcTpaHEnHe |
| БыICTPO MИгаET KOHTPONьнй INДиКаТОР STATUS,СКАнровВане He 3aIpySkaeTcR/КapТa пamЯтNi He PACNo3HaEТСя | П探测ыTe, COBmecTIma Ли 3Ta KapTa пamЯтNi сappapatOM и правильно Ли Вы установлNi eB в ГеЗДо. ИЗВLEКITE KapTu пamЯтNi сНObA BcTаВпeе eB в ГеЗДо ОТКПЮчITE 3aIyNTu OT 3aIpIcNп KapТb ПамяТи (eСпи установлЕнa). П探测ыTe, He KapTa пamЯтNi He NOВpeждЕнa. П探测ыTe KapTu пamЯтNi на NaIчис cбОюного MeCTa ДдЯхЕня DAннБiX.ЕсNi дОctуПньий обьем пamЯтNi coSTabЯт MeHee 1 М6, сKaнровВанe He BO3MоЖно П探测ыTe ФормAT ДaHнБiX Ha KapTe пamЯтNi. ПODерЖИВaEТСЯ 3aIpIcь ДaHнБiX Ha KapТb пamЯтNi TOblko B ФорMate FAT16 ИП FAT32 П探测ыTe, He 6blПи сLПшКOM bIcTpo 3aRpyжEN cIeДуЮшй ДOKуМeNT. При сKaнровВанNi HeCKOLьКИX DOKуМeNTOBdoJdnteСь, ПОКе He 6bYdET 3aВepSheHa п electада ДaHнБiX пeДыДуШeTo GcAнровВанNi (INДиKaTOp сOCTОУнЯ ropNT поТЯнHO) П探测ыTe ДПИну DOKуМeNTa (CM. Т电商чесnéхараКтеристник) |
| He удаЕТСЯ пereДаТь ИЗобразжЕпп HeцФрВУЮфOTOPAMКу | ЗТа ФункциДоCTуПна TOblKO cОп徳ЕнEHьIMN ФOTOPAMКamи. |
RU
Приложкени
TexHnueckne daHHbIe
Tun.CIS-cehcop
T6apntbIe pa3mepbl (LxBxΓ).....158×45×55MM
Bec. 0,23kr
Cetb 3JIeKtpoNTaHnB BxOJ; nepem. .. Tok 100-240B\~ (± 10%) /50-60Tc .BbIXoJ: noCT. Tok 5B\~/1T
Iotppe6JЯem MOUHocTb
Bpa6ooyempexime. <9BT
PekomeHdyembyeucIOBna 3KcIpyatau.. 15-35°C
OTHOCHTeJIbHaB BλακHOCTb BO3dUxα ...20-70% [6e3 KoHndeHcaun]
CkaHep
ΦopMaT BVOda 486nt, CbETHOJ
BbIXoHNoΦopMaT 246nT
MaKcImaJIbHoe aInpaTHOe
pa3peSeHne foToIraΦn 300x300 ToueK Ha IIOm (dpi)
MaKcImaJIbHoe aInpaTHOJ
pa3peUeHne IJIeHKN/DmAnO3nTnBa 1200x1200 ToueK Na DIOm [dpi]


- About this User Manual
- Symbols Used
- Notice
- Troubleshooting
- DANGER!
- Introduction
- General Safety Information
- Overview
- Scanning
- Service
- Appendix
- Setting Up the Device
- Power Supply
- Repairs
- Overview
- External View
- Connections on the Rear Side
- Packing Contents
- Missing Package Contents
- Connecting power supply
- CAUTION!
- Mains Voltage at the Site of Installation!
- Inserting a Memory Card
- Inserting a Memory Card!
- Control Lamp
- Using the digital photo frame
- Scanning
- Loading Photos
- Scanning documents with the protective cover
- Unsuitable Documents!
- Document Jam!
- Stand-by Mode
- Using the protective cover
- Removing documents from protective cover
- Insert film / slides
- Suitable documents
- Damaged negative film ends
- Handle the negative carefully
- Scanning speed
- Cleaning the Scanner Glass
- Instructions for Cleaning
- Computer Connection
- Operating System
- Connecting to the Computer
- Connecting to an USB hub
- Cleaning
- Switching off the device!
- Instructions for Cleaning!
- Cleaning the feed rollers
- Cleaning sheet for the feed rollers
- Calibrating the Scanner
- Power Cycling
- Appendix
- Technical Data
- Scanner
- Document Feed Slot
- Introduzione
- Stimato cliente,
- O6 3TOM pyKOBODCTBe
- ПОЛьваТелЯ
- IcnoJIb3yeMbIe 6o3HaueHnIa
- 3aMeuHua
- Cobetbipekomehdauin
- ONACHOCTb!
- BVeDeneHne
- OsshajnHOpMaucna oTexHnke
- 6e30naCHOCTN
- Osshne cBeDeHnna
- CkaHnpoBaHne
- TexHHueckoe obcnyxmbaHne
- PnIIOxKeHne
- Ов Ocяинформаць O Тхниke 6e3opacnoctn
- Прочадура настrodu каappapata
- 3JIeKtpnueckoe nITaHne
- PemOH
- ОвICIе CBeDEHЯ
- Budchapykn
- UHyp cTeBOrO 3JIeKTpOnnTaHnIa
- KOMJIeKT NOCTABKN
- HenoJIhBk KOMnJIeK TIOCTaBKn
- PoiKJIouHne cTeBOro aIaItepa
- OCTOPOXHOCTb!
- YctaHOBKa KapTbI namrTu
- YctahOBte KapTy namrtn!
- KoHTpOJIbHbI INHdɪnKaTOp
- IcnoJb3OBaHne cnpoBoi oTOpaMkn
- Сkaн投降军建设
- 3arpy3ka foToIpaФn
- СkaHnroBaHne DOKyMeHToB B 3aunTHoI O6NoXke
- HenoxxoJnne DokymeHTbI
- 3aCTpeBaHne DOKyMeNTa!
- 3aMeyaHua
- Pexim OxuaHna
- IcnoJIb3yIte 3aIHTHyO o6IoJkU
- HenoDxoOaIe DOKyMeHTbI
- IobpeJdeHHOe HauaNo HeRaTMBHOIJIeHKn
- Co6JIHOdaIte OCTOPOXHOCTB npn o6paueHn c pJeHkoI
- CkopoocTb cKaHnpoBaHn
- IoiKJIIOUeHne K USB-KoHcEHTpaTOpy
- TexHnueckoe o6cIyJxBaHne
- OuInCTka
- OTkIouyTe annapaT!
- PekomeHdaaun no qncTke!
- YnCTKa BTAHBAHOx BaJIINKOB
- PekomeHdaunnoNCHTke
- OuHauoJnCTdJIa BtRnBaOuXPOJIKOB
- KanibpoBka cKahepa
- KaJIn6poBka cKaHepa
- BbIKIIOUeHne N BkIIOUeHne IITaHnI
- Приложкени
- TexHnueckne daHHbIe
- CkaHep
Brand : AGFAPHOTO
Model : AS 1150
Category : Scanner